1
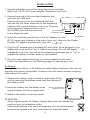
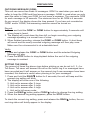
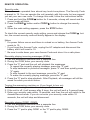
Users Manual
TAM-60X
2
SAFETY INFORMATION
Read the safety instructions before first use of this answering machine.
· Do not use any mains adapter other than the one provided otherwise you may
permanently damage your answering machine.
· Do not dispose of used batteries with household waste or by burning.
· Do not use the answering machine in an explosive hazard area.
· To prevent electric shock, never try to open the answering machine.
· There is a slight chance that your answering machine could be damaged by
an electrical storm. It is recommended that you unplug your device from the
mains supply and telephone socket during a storm.
DECLARATION OF NETWORKCOMPATIBILITY
The Profoon TAM-60X is designed for use on the ‘public switched telephone
networks (analogue single-line)’ of telephone- and cable-companies inside the
European Union.
Each country and/or provider might require a different telephoneplug.
The Profoon TAM-60X complies with the essential requirements and provisions
as described in the European Directive 1999/5/EC.
DECLARATION OF CONFORMITY
The declaration of conformity is available on the
website WWW.PROFOON.COM
3
FUNCTIONS AND CONTROLS
1
2
14
3
13
4
12
5
11
6
7
15
1.
2.
3.
4.
5.
6.
7.
8.
8
loudspeaker
OGM1 (Outgoing Message 1) Button
OGM2 (Outgoing Message 2) Button
SPK/MONI Button
MEMO Button
ON/OFF Button
2 WAY (Two way recording) Button
LED display
9
10
9.
10.
11.
12.
13.
14.
15.
4
RING/ Button
STOP/SET Button
CODE/ Button
DELETE Button
Sliding Volume Knob
PLAY/Pause Button
microphone
TABLE OF CONTENTS
INSTALLATION . . . . . . . . . . . . . . . . . . . . . . . . . . . . . . . . . . . . . . . . . . . . . 6
PREPARATION:
Outgoing message (OGM) . . . . . . . . . . . . . . . . . . . . . . . . . . . . . . . . . . 7
Setting the rings . . . . . . . . . . . . . . . . . . . . . . . . . . . . . . . . . . . . . . . . . . . 7
OPERATION:
Setting the answering modes . . . . . . . . . . . . . . . . . . . . . . . . . . . . . . . . 8
Call screening . . . . . . . . . . . . . . . . . . . . . . . . . . . . . . . . . . . . . . . . . . . . 8
Personal memo . . . . . . . . . . . . . . . . . . . . . . . . . . . . . . . . . . . . . . . . . . . 9
Two-way recording . . . . . . . . . . . . . . . . . . . . . . . . . . . . . . . . . . . . . . . . 9
Play back . . . . . . . . . . . . . . . . . . . . . . . . . . . . . . . . . . . . . . . . . . . . . . . . 9
Delete . . . . . . . . . . . . . . . . . . . . . . . . . . . . . . . . . . . . . . . . . . . . . . . . . . 9
Remote operation:
Security code . . . . . . . . . . . . . . . . . . . . . . . . . . . . . . . . . . . . . . . . . . . 10
Remotely playing incoming messages (ICM’s) . . . . . . . . . . . . . . . . . 10
Turning the answering machine on (if you forget to turn on) . . . . . . 10
Remotely playing OGM1, OGM2 . . . . . . . . . . . . . . . . . . . . . . . . . . . 10
Remotely recording a new OGM . . . . . . . . . . . . . . . . . . . . . . . . . . . . 11
Erasing all messages . . . . . . . . . . . . . . . . . . . . . . . . . . . . . . . . . . . . 11
Recording a memo . . . . . . . . . . . . . . . . . . . . . . . . . . . . . . . . . . . . . . 11
Remote room monitoring . . . . . . . . . . . . . . . . . . . . . . . . . . . . . . . . . . 11
Remotely setting the unit to answer-only or answer/record mode . . 11
MAINTENANCE . . . . . . . . . . . . . . . . . . . . . . . . . . . . . . . . . . . . . . . . . . . . . 12
TROUBLESHOOTING GUIDE . . . . . . . . . . . . . . . . . . . . . . . . . . . . . . . . . 13
GUARANTEE CARD . . . . . . . . . . . . . . . . . . . . . . . . . . . . . . . . . . . . . . . . . 14
5
INSTALLATION
1. Unpack and make sure all the items have been included:
Base Unit, DC 9V AC Power Adapter, Telephone Line Cord.
2. Connect one end of the provided telephone line
cord into the LINE jack.
Plug the other end into the telephone wall jack.
You can link the other telephone to this answering
machine with a short telephone line cord. Plug one
end of the short telephone line cord to
the PHONE jack and the other end
to power adapter
to telephone outlet
to the telephone jack.
to telephone
3. Insert the small plug on the end of the AC adapter into the
DC 9V power jack located on the rear of your unit. Use only the Center
Positive AC adapter provided with your unit. (
)
4. Plug the AC adapter into a standard AC wall outlet. Once plugged in, the
display will count up from 0 to 5. After a long beep, the unit will display " -- "to
indicate the unit is on, but not set for answering messages yet, or "Lo" to
indicate the battery is dead, weak, or not Installed.
5. This unit uses digital technology, so a microcassette is not used.
Follow the instructions on the following pages to operate your unit.
9V Battery:
During AC power failure, a 9V battery provides battery backup so the unit can
maintain the memory information. However, the unit cannot answer incoming
calls without AC power.
1. Remove the battery cover located on the bottom of the
unit by removing the phillips screw and then taking off
the battery cover.
2. Insert the battery into the battery snap
and put battery into the compartment.
Battery Compartment
(Bottom of Unit)
3. Replace the battery cover and screw.
ATTENTION:
* When (re)placing the 9V battery, always disconnect the answering
machine from the telephone outlet.
* Exhausted batteries may never be disposed of in household waste
but must be handed in at your local depot for chemical waste.
6
PREPARATION
OUTGOING MESSAGE (OGM):
This unit can record two kinds of messages: OGM1 is used when you want the
caller to hear the OGM and then leave a message, OGM2 is used when you only
want the caller to hear your OGM, but not leave a message. The maximum OGM
for each message is 30 seconds. The minimum time for an OGM is 4 seconds.
As you record, the display shows the time passed. If you have not recorded an
OGM1 and/or OGM2, the answering machine cannot be turned on.
Record:
1. Press and hold the OGM1 or OGM2 button for approximately 2 seconds until
a long beep is heard.
2. The display will count down the time left, so begin recording your outgoing
message speaking in a normal tone of voice.
3. When finished recording, release the OGM1 or OGM2 button. A short beep
will sound and the newly recorded outgoing message will then play once.
Make sure the volumecontrol is at a desirable level.
Verify:
1. Press and release the OGM1 or OGM2 button and the selected Outgoing
Message will play.
2. Press the STOP button to stop playback before the end of the outgoing
message is reached.
SETTING THE RINGS:
The amount of times the phone rings before picking up can be set to 2, 3, 4 or
Toll-Saver. Toll saver will answer the call on the fourth ring if no messages have
been recorded and it will answer on the second ring if new messages have been
recorded; this feature is useful when phoning in for your messages.
button for 2 seconds; the unit will beep and the
1. Press and hold the RING/
present ring setting will blink.
2. The display will show one of the following:
2: Unit set to answer after 2 rings
3: Unit set to answer after 3 rings
4: Unit set to answer after 4 rings
t : Unit set to toll-saver mode.
button and/or CODE/
button to change the ring setting.
3. Press the RING/
4. When the desired ring setting appears, press the STOP button.
button; the curTo check the current ring setting, press and release the RING/
rent ring status will briefly appear in the display.
7
OPERATION
SETTING THE ANSWERING MODES:
Answer/Record mode:
When a call is received, the unit will play the OGM1 and then record a message.
1. Make sure the OGM1 is recorded.
2. Press the ON/OFF button once
3. The unit will emit 2 short beeps and then play OGM1
4. The message counter will appear in the display indicating the unit is in
answer/Record mode.
NOTES:
* If the unit detects a dial tone, silence or a busy signal, the unit will hang up
and not register the message.
* The unit will shut off if a parallel phone is picked up.
* when the memory is full, "FU" will appear in the display and the TAM-60X will
switch to Answer-only mode
Answer-only mode:
When a call is received, the unit will play the OGM2 and then disconnect.
1. Make sure the OGM2 is recorded.
2. Press the ON/OFF button once
3. OGM1 will play and 2 short beeps will be heard.
4. Press the ON/OFF button again and the unit will emit 3 short beeps and then
play OGM2.
5. The message counter and "Ao" will then alternate in the display indicating the
unit is in Answer-Only mode.
Answer-OFF mode:
1. Press ON/OFF button unitl "--" appears in the display to set the unit to
the Answer off mode.
CALL SCREENING:
When a call is received, you may listen to the caller leaving an incoming message. If you wish to speak with the caller, just pick up the handset to talk (the
machine will turn off automatically).
1. Press the SPK/MONI button until "on" appears in the display.
2. Adjust the volumecontrol on the side of your unit to hear the caller.
Press the SPK/MONI button again until "OF" appears in the display to turn the
call screen screening off.
8
PERSONAL MEMO:
1. Press and hold the MEMO button for approximately 2 seconds.
2. A beep will sound and the countdown timer will appear in the display.
The recording time of the memo must be less than 30 seconds and more than
3 seconds.
3. Record your memo into the microphone.
4. Release the MEMO button to stop the recording.
TWO-WAY RECORDING:
1. During telephone talking, press and hold 2WAY button for 2 seconds until a
long beep is heard.
2. Two-way recording is started.
3. Press the STOP-button to end the recording.
PLAY BACK:
The display's message counter will blink when the unit has recorded new messages, including memo’s and 2-way recordings. If the message counter is not blinking, then that is the number of messages that have been recorded previously,
but not deleted.
1. Make sure the volumecontrol is adjusted as desired.
2. If new messages have been recorded, press the PLAY button to hear
only the new messages. If no new messages have been recorded, press the
PLAY button to hear the previously heard messages that were not
deleted.
- To repeat a message while you are listening to it, simply press the RING/
button.
- Repeatedly press this button to skip back to previous messages.
button
- To skip a message while you are listening to it, press the CODE/
and the next recorded message will play.
- To pause the ICMS, press and release the PLAY button, the unit will
pause playback and "PA" will blink in the display. To continue playback,
press and release the PLAY button again.
4. To stop playback, press the STOP button and the unit will save the previous
messages.
After playing the messages, the display's message counter will show the total
messages received.
DELETE:
To erase a single message while playing it back, press the DEL button and the
unit will delete the current message and play the next message.
To delete all the messages, press and hold the DEL button while in the idle
mode (messages not playing). The unit will beep and the message counter will
revert back to "00"
9
REMOTE OPERATION:
Security code:
This unit can be operated from almost any touch-tone phone. The Security Code
is preset to 19. You can operate the unit remotely with this code, but we suggest
you set your own new code. To change this code, follow the instructions below.
button for 2 seconds; a beep will sound and the
1. Press and hold the CODE/
current code will blink.
button and/or CODE/
button to change the security
2. Press the RING/
code.
3. When the code setting appears, press the STOP button.
butTo check the current security code setting, press and release the CODE/
ton; the current security code will briefly appear in the display.
Notes:
* If a power failure occurs and there is a dead or no battery, the Access Code
resets to 19.
* If you forget the Access Code, unplug the AC adapter and disconnect the
battery and it will reset to 19.
* Be sure to write down your new Access Code and store it in a safe place.
Remotely playing incoming messages (ICM's):
1. Call the answering machine from a separate line.
2. During the OGM, enter your security code.
3. Press the "5" pad and the unit will playback the messages.
- To repeat the currently playing message, press the "4" pad.
- To skip backward to previous messages, press "4" and then quickly press
"4" again.
- To skip forward to the next message, press the "6" pad.
- To erase the currently playing message, press the "0" pad.
4. Press the "9" pad to stop playback. After Playback, all messages will still be
saved for when you return home.
Turning the answering machine on (if you forget to turn on)
1. Call the answering machine from a separate line.
2. If the unit is off, it will answer after 8 rings, the unit will emit a 3 second beep.
3. Enter your security code within 10 seconds, and then the unit will switch to the
Answer/Record mode. If you do not enter your security code within 10
seconds, the unit will stop and disconnect.
Remotely playing OGM1, OGM2:
1. Call the answering machine from a separate line.
2. During the OGM, enter your security code.
3. Press the "1" pad to play OGM1 or the "2" pad to play OGM2.
10
Remotely recording a new OGM:
1. Call the answering machine from a separate line.
2. During the OGM, enter your security code.
3. Press the "#" and then the "1" pad (for OGM-1) or the "2" pad (for OGM-2)
4. After the long beep, record your new OGM.
5. When finished, press the "9" pad and then the new OGM will play back.
If satisfied, press the "∗" pad to end the call or repeat this step to record a new
OGM again.
Erasing all messages:
1. Call the answering machine from a separate line.
2. During the OGM, enter your security code.
3. Press the "5" pad to play messages.
4. To remotely erase all messages, press the "#" and then the "0" pad.
Recording a memo:
1. Call the answering machine from a separate line.
2. During the OGM, enter your security code.
3. Press the "#" and then the "3" pad.
4. After the long beep, record your memo.
5. Press the "9" pad when finished.
Remote room monitoring:
This feature will allow you to call in and monitor the room in which the answering
machine is located.
1. Call the answering machine from a separate line.
2. During the OGM, enter your security code.
3. Press the "7" pad and the unit will monitor the situation for 90 seconds, beep
and then stop.
4. If you want to continue monitoring, press the "7" pad again.
5. To stop monitoring, press the "9" pad.
Remotely setting the unit to answer-only or anser/record mode:
1. Call the answering machine from a separate line.
2. During the OGM, enter your security code.
3. Press the "8" pad to cycle through the modes (Answer/Record, Answer-Only
and Answer-off).
4. After pressing the "8" pad, you will hear the respective OGM. If you only hear
a long beep, then the unit is set to the Answer-Off mode.
5. Press the "9" pad when finished.
Note:
Pressing the "∗" pad will stop all operations and release the line.
11
For your convenience, you may copy this card and keep it in your wallet as a
reference guide when remotely calling your answering machine.
REMOTE CONTROL
Code
5
6
4
44
0
9
∗
Functions
play back
next message
repeat message
previous message
erase message
stop
clear the line
PIN-code:
Code
1
2
7
#+0
#+1
#+2
#+3
∗
8
9
Functions
play back OGM1
play back OGM2
room monitor
erase all
record OGM1
record OGM2
record MEMO
clear the line
set answering modes
stop
TAM-60X
MAINTENANCE
* Do not clean any part of your answering machine with benzene, thinner or
other solvent chemicals - this may cause permanent damage that is not
covered by the guarantee. When necessary, clean it with a damp cloth.
* Keep your answering machine away from hot, humid conditions or strong
sunlight.
* Every effort has been made to ensure the highest standards of reliability for
your TAM-60X. However, if something does go wrong, please do not try to
repair it yourself but consult your supplier.
12
TROUBLESHOOTING GUIDE
Before requesting service, please refer to the following chart ancd check for
symptom your are experencing.
SYMPTOM
No Power.
POSSIBLE CAUSE
AC adaptor not connected.
AC outlet not working.
Volume is too low.
Message recorded too low.
Line cord(s) are not
connected properly.
Unit is not on.
Phone line problems.
POSSIBLE SOLUTION
Conncect AC adaptor
Move to another outlet.
No OGM.
Increase volume.
Record message again.
Unit not answering
Connect line cord(s)
securely
Turn unit on.
Call local phone compay
for service.
No ICM(s) recorded. Unit is not on.
Turn unit on.
Memory is full.
Delete old ICMs.
Unit is set to the
Set unit to the
Anser-Only mode.
Answer/Record mode.
ICM is incomplete. Memory is full.
Delete old ICMs
ICM was more than
Make sure ICMs are
90 seconds.
less than 90 seconds.
The caller recorded silence, Calls that fit these
busy signal or dial tone.
categories will be cut off.
ICM is low.
Volume is too low.
Increase volume.
No sound.
Volume is too low.
Increase volume.
"Lo" blinks on the
The battery is weak or
Install new battery.
display
not installed.
No remote acess
The phone is not a
Use a touch-tone phone.
touch-tone phone.
Incorrect Access Code.
Enter the correct Access
Code.
Can't leave
Memory is full.
When memory is full, this unit
messages (ICMs).
will automatically switch to the
Answer-Only mode.
13
GUARANTEE CARD
CUSTOMER:
Name:
Address:
Zip-code:
City:
Telephone:
Serialnumber:
attach here your
purchase ticket
You have a guarantee of 24 MONTHS after the date of purchase of this
TAM-60X. We guarantee during this period the free repair of defects caused by
material- and construction faults. This at the importers discretion. It is only possible to claim to the guarantee when you enclose your purchase ticket with the
telephone.
HOW TO ACT:
If you notice a defect, consult the manual first. If this manual gives you no definite answer, consult your dealer with a clear description of your complaint. He will
collect the device together with this guarantee card and the dated purchase ticket and he will take care of a prompt repair, respectively free sending to the
importer.
THE GUARANTEE EXPIRES:
When used inexpert, faulty connections, leaking and faulty placed batteries, use
of unoriginal parts or accessories, negligence and defects caused by fire, flood,
stroke of lightning and natural disasters. With unqualified modifications or repairs
by third persons. With incorrect transport without a suitable packing. If the device
is not handed in with the correct filled in guarantee card and the purchase ticket.
NOT UNDER THIS GUARANTEE: cords, plugs and batteries.
All further responsibilities, in particular subsequent damages, are excluded.
14
15
Ver1.1 Nov.2003