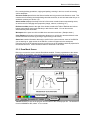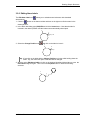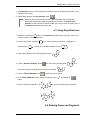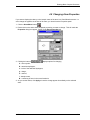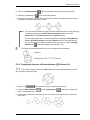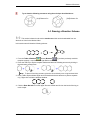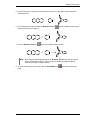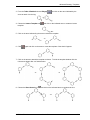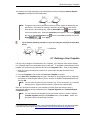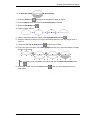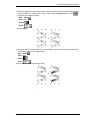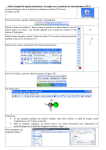
1
ACD/ChemSketch
Version 4.5 for Microsoft Windows
User’s Guide
Drawing Chemical Structures
and Graphical Images
Advanced Chemistry Development Inc.
Copyright © 1994-2000 Advanced Chemistry Development Inc. All rights reserved.
ACD/Labs is a trademark of Advanced Chemistry Development Inc.
Microsoft is a registered trademark and Windows is a trademark of Microsoft Corporation.
IBM is a registered trademark of International Business Machines Corporation.
All the other trademarks mentioned within this Manual are the property of their respective owners.
All trademarks are acknowledged.
Information in this document is subject to change without notice and is provided "as is" with no
warranty. Advanced Chemistry Development Inc. makes no warranty of any kind with regard to
this material, including, but not limited to, the implied warranties of merchantability and fitness for
a particular purpose. Advanced Chemistry Development Inc. shall not be liable for errors
contained herein or for any direct, indirect, special, incidental or consequential damages in
connection with the use of this material.
Table of Contents
1. Introduction..................................................................................................... 1
1.1 What is ACD/ChemSketch .................................................................................... 1
1.2 Additional Modules ................................................................................................ 1
1.3 What’s New in 4.5 ................................................................................................. 2
1.4 About this Guide .................................................................................................... 3
1.5 Useful Definitions................................................................................................... 3
1.6 Demo Versions ...................................................................................................... 4
1.7 Freeware Version .................................................................................................. 4
1.8 For More Information… ......................................................................................... 4
1.8.1 How to Get Hold of Us......................................................................................................5
2. Basics of ACD/ChemSketch .......................................................................... 6
2.1 Objectives.............................................................................................................. 6
2.2 Starting ACD/ChemSketch .................................................................................... 6
2.3 Structure and Draw Mode...................................................................................... 7
2.3.1 Structure Mode Screen ....................................................................................................7
2.3.2 Draw Mode Screen...........................................................................................................8
3. Drawing Simple Structures.......................................................................... 10
3.1 Objectives............................................................................................................ 10
3.2 Drawing Atoms, Bonds and Labels...................................................................... 10
3.2.1 Using the Draw Normal Tool ..........................................................................................10
3.2.2 Using the Draw Continuous Tool....................................................................................11
3.2.3 Using Mouse Drag..........................................................................................................12
3.2.4 “Cleaning” the Structure .................................................................................................12
3.2.5 Using the Stereo, Coordinating and Undefined Bond Tools...........................................12
3.2.6 Editing Atom Labels........................................................................................................13
3.2.7 Using the Draw Chains Tool...........................................................................................14
3.3 Flipping Structures............................................................................................... 15
3.4 Selecting, Rotating, and 3D Rotating................................................................... 15
3.5 Clearing the Screen............................................................................................. 16
4. Drawing More Complex Structures ............................................................. 17
4.1 Objectives............................................................................................................ 17
4.2 Using the Table of Radicals................................................................................. 17
4.3 Using Ring Structures.......................................................................................... 18
4.4 Deleting Atoms and Fragments ........................................................................... 18
4.4.1 Deleting Atoms Individually ............................................................................................19
4.4.2 Deleting All Atoms Simultaneously.................................................................................19
4.5 Replacing Atoms ................................................................................................. 19
4.6 Setting Double and Triple Bonds ......................................................................... 20
4.7 Setting Charges and Defining Anions and Cations .............................................. 21
4.8 Changing Atom Properties................................................................................... 23
ACD/ChemSketch
User’s Guide
i
Table of Contents
5. Advanced Structures and Reaction Schemes............................................ 24
5.1 Objectives............................................................................................................ 24
5.2 2D Optimization ................................................................................................... 24
5.2.1 Creating the Structure of Cyclic Alkanes........................................................................24
5.2.2 Creating the Structure of a Cyclic Peptide .....................................................................25
5.3 3D Optimization ................................................................................................... 26
5.3.1 Creating Structure of Bicyclo[2.2.2]octane .....................................................................27
5.3.2 Creating the Structure of Triptycene ..............................................................................28
5.3.3 Creating the Structure of Cubane...................................................................................29
5.3.4 Creating the Structure of Dodecahedrane ([5]Fullerene-C20).........................................30
5.4 Drawing a Reaction Scheme ............................................................................... 32
6. Advanced Drawing: Templates.................................................................... 34
6.1 Objectives............................................................................................................ 34
6.2 Overview ............................................................................................................. 34
6.3 Instant Template Tool.......................................................................................... 35
6.3.1 Creating the Structure of a Cyclic Oligomer ...................................................................35
6.4 Table of Radicals in Structure Drawing................................................................ 37
6.4.1 Creating the Structure of Fluorescamine........................................................................37
6.5 Templates from the Template Window ................................................................ 38
6.5.1 Creating the Fragment of a DNA Molecule ....................................................................38
6.5.1.1 Drawing the chain of deoxyriboso-5-phosphate fragments .....................................39
6.5.1.2 Adding the bases .....................................................................................................40
6.6 Drawing Complex Biomolecules .......................................................................... 40
6.6.1 Creating the Structure of β-Maltose ...............................................................................40
6.7 Defining a User Template .................................................................................... 42
6.7.1 The Template.cfg File.....................................................................................................43
6.7.2 Available Templates .......................................................................................................43
7. Creating Special Graphical Objects ............................................................ 44
7.1 Objectives............................................................................................................ 44
7.2 Drawing the Energy of Reaction Diagram............................................................ 44
7.2.1 Drawing a Curve.............................................................................................................44
7.2.2 Drawing the X and Y axes..............................................................................................45
7.3 Drawing Different Kinds of Orbitals...................................................................... 46
7.4 Drawing Vacuum Distillation Apparatus ............................................................... 49
7.5 Drawing a Two-chain DNA Strand ....................................................................... 51
7.6 Drawing Lipids and Micelles ................................................................................ 55
7.6.1 Drawing the lipid .............................................................................................................55
7.7 Creating a Poster................................................................................................. 57
8. Calculating Macroscopic Properties........................................................... 59
8.1 Overview ............................................................................................................. 59
8.2 Calculating Macroscopic Properties..................................................................... 59
8.2.1 Menu Command .............................................................................................................59
8.2.2 Automatic Display on Status Line...................................................................................60
8.3 Algorithms for Calculating Macroscopic Properties.............................................. 61
8.3.1 Molar Volume, MV ..........................................................................................................61
8.3.2 Molar Refractivity, MR ....................................................................................................62
8.3.3 Parachor, Pr ....................................................................................................................62
8.3.4 Density, d .......................................................................................................................62
8.3.5 Refractive Index, n .........................................................................................................62
ACD/ChemSketch
User’s Guide
ii
Table of Contents
8.3.6 Surface Tension,=γ ..........................................................................................................62
8.3.7 Dielectric Constant, ε (Permittivity).................................................................................63
8.3.8 Polarizability ...................................................................................................................63
8.4 Correlation Statistics with Experimental Data ...................................................... 63
8.4.1 Distribution of Molar Refractivity Prediction Error...........................................................63
8.4.2 Distribution of Molar Volume Prediction Error ................................................................64
8.4.3 Distribution of the Parachor Prediction Error..................................................................64
8.4.4 Distribution of the Refractive Index Prediction Error ......................................................65
8.4.5 Distribution of the Density Prediction Error ....................................................................65
8.4.6 Distribution of the Surface Tension Prediction Error ......................................................66
8.4.7 Distribution of the Dielectric Constant (Permittivity) Estimation Error ............................66
9. Special Function Keys.................................................................................. 67
9.1 Tautomers ........................................................................................................... 67
9.2 Dictionary ............................................................................................................ 68
10. Goodies ....................................................................................................... 69
10.1 What are “Goodies”? ......................................................................................... 69
10.2 Where can I get them? ...................................................................................... 69
10.3 Goodies ............................................................................................................. 69
ACD/ChemSketch
User’s Guide
iii
1. Introduction
1.1 What is ACD/ChemSketch
ACD/ChemSketch is a chemical drawing software package from Advanced Chemistry
Development, Inc. designed to be used alone or integrated with other applications. ChemSketch
is used to draw chemical structures, reactions and schematic diagrams. It can also be used to
design chemistry-related reports and presentations.
ACD/ChemSketch has the following major capabilities:
• Structure Mode for drawing chemical structures and calculating their properties.
• Draw Mode for text and graphics processing.
• Molecular Properties calculations for automatic estimation of:
∗
∗
∗
∗
∗
∗
∗
∗
∗
∗
molecular weight;
percentage composition;
molar refractivity;
molar volume;
parachor;
index of refraction;
surface tension;
density;
dielectric constant; and
polarizability.
ACD/ChemSketch can stand alone as a drawing package or act as the “front end” to other ACD
software such as the NMR Predictor engines.
1.2 Additional Modules
There are additional ACD software items which are accessible through the ChemSketch interface,
as single-click buttons. These items, which are increasing in number with each upgrade, are
available as additional options and should be considered as separate items. All of them have
separate guides. Please contact us or consult our Web site for more details on pricing and
availability.
• ChemBasic - the special programming language that enables the user to customize ACD
software (can be downloaded from http://www.acdlabs.com). As of Spring 2000,
ChemBasic version 1.3 freeware is available from our web site. Please see Chapter 10,
“Goodies”, for some examples of how ChemBasic can be used with ChemSketch.
• ACD/I-Lab - the Internet-based service that allows you to get instant access to chemical
databases and property predictions programs. An account on the Interactive Lab can be
set up from http://www.acdlabs.com/ilab . As of Spring 2000, a 2-week demo period can be
arranged for the I-Lab. ChemSketch 4.0 and upwards can access the I-Lab automatically,
if run on a PC with Internet connection.
ACD/ChemSketch
User's Guide
1
Introduction
• ACD/Tautomers - checks and generates the most reasonable tautomeric forms of organic
structures (included in both freeware and commercial versions of ChemSketch);
• ACD/Dictionary – looks up the molecular structure for common drug names.
ACD/Dictionary contains over 48,000 systematic and non-systematic names of the most
frequently used chemicals and biologicals. The entries cover more than 200 therapeutic
areas, and the inhibitors of more than 500 different enzymes are also available (included in
commercial version only).
The following buttons represent functionality that must be purchased in addition to
ACD/ChemSketch:
• ACD/pKa Calculator - calculates accurate acid-base ionization constants at 25 degrees
Celsius and zero ionic strength for a structure as drawn in the ChemSketch window;
• ACD/LogP Calculator - calculates octanol-water partition coefficients (log P values) for
neutral molecule as drawn in the ChemSketch window;
• ACD/Boiling Point and Vaporization - calculates accurate boiling points at any pressure
from 0.001 mm Hg to 10 atm, in most cases to ±10 degrees or better, for a structure as
drawn in the ChemSketch window;
• ACD/Solubility - calculates the solubility of the sketched-in structure as a function of pH;
• ACD/Sigma - displays the Hammett-type or related parameters for different substituent
groups as drawn in the ChemSketch window;
• ACD/Name to Structure – generates a molecular structure for almost any chemical name
typed in. ACD/Name to Structure treats most names of general organic compounds and
many natural products derivatives according to IUPAC recommendations on Organic,
Biochemical and Inorganic Nomenclature.
1.3 What’s New in 4.5
If you are new to this software, we recommend that you work through the examples described in
the following chapters. If, however, you have purchased (or are thinking of purchasing) this
software as an upgrade, you are likely already familiar with the basic features of ChemSketch. In
this section we list only the newest features.
and Reaction Arrows
tools are now
• Reaction Plus
available directly in the Structure mode. You do not have to switch to the Draw mode for
drawing these objects.
• The new Reaction tab in the Preferences dialog box (Options menu) allows you to
choose among various options for Reaction Plus and Reaction Arrows.
• Graphical objects (those created in the Draw mode) can now be selected and moved in the
Structure mode as well. This facilitates the drawing of complex reports. To enable this
feature, make sure that the Select Graphics check box is selected in the Structure tab of
the Preferences dialog box (Options menu).
• Stereo configuration can be controlled when the Clean and Flip tools are applied. See the
bottom part of the Structure tab in the Preferences dialog box (Options menu).
• New structure file formats can be imported: ChemDraw CDX (*.cdx) files and REACCS
RXN (*.rxn) files. The RXN format is also a newly-supported Export format.
• A new additional module can be purchased to be integrated into the ChemSketch Window ACD/Name to Structure (refer to section 1.2 for more details).
ACD/ChemSketch
User’s Guide
2
Introduction
• The ACD/I-Lab add-on allows you to access our prediction modules and various chemical
databases via Internet. Just sign up for an account on the Interactive Lab at
http://www.acdlabs.com/ilab . (As of Spring 2000, a 2-week demo period can be arranged
for the I-Lab.) The I-Lab can be accessed automatically, if run on a PC with Internet
connection.
1.4 About this Guide
To start using ACD/ChemSketch in its full power you don’t have to read a manual, it is so intuitive
and simple to use. That’s why this guide doesn’t provide comprehensive descriptions of all the
options available in the program; rather, it just gets you started. After reviewing these exercises,
you will be able to use ACD/ChemSketch yourself, without any further assistance and with
maximum speed and efficiency.
You will be able to view nearly every section of this manual in animated form in the LotusCam®based movies, downloadable from our Web site (www.acdlabs.com). (These movies are also
present on our demo CD as well as the installation CD.)
This User’s Guide is provided in electronic form, readable with a commonly-available word
processing program. If you cannot locate an index topic you need, please do a text stringsearch in the word processing program for the relevant word or phrase, or related words.
The screen-shots shown throughout this tutorial have been taken with a relatively small
window size. The default display is a window which fills the screen. Click once on the
(upper right-hand corner of window display) to get a smaller working
Minimize button
to return to full-screen display.
area; click on the Maximize button
The screen-shots have been taken with the next-to-last version of the software. We have
made every effort to match what you will see in ACD/ChemSketch with what the tutorial
shows, but there may be slight discrepancies.
This Guide assumes you have basic familiarity with mouse and file manipulation in
Microsoft Windows.
1.5 Useful Definitions
In this tutorial the following terms are used to describe various actions:
Point means move the mouse pointer
to an item.
Click or left-click means move the mouse pointer to an item, and press the left mouse
button.
Right-click means move the mouse pointer to an item, and press the right mouse button.
Double-click means move the mouse pointer to an item, and quickly press the left mouse
button twice.
Drag means press and hold down the left mouse button while you move the mouse.
Note
In Windows the default mouse button side is on the left. You can change the
default side to the right by summoning the Mouse dialog box from the Windows
Control Panel. (This also permits you to change the speed and motion attributes
of the mouse.)
ACD/ChemSketch
User’s Guide
3
Introduction
1.6 Demo Versions
When the demo version is first loaded to run, you will see a message displayed that informs you
this is ACD Demonstration software. You may also see this message displayed from time to time
throughout the normal course of using the demo software.
Demo versions of ACD/Labs programs have some command restrictions such as Save, Copy,
Cut, Paste and Print features. If you try to carry out a restricted operation from a demo version, a
dialog box will appear which informs you that it is not permitted.
If you would like to know more about a specific restriction in the full version of the program, please
contact us. Nevertheless, most of the exercises and examples in this guide are designed so that
you can execute them with the demo version of this ACD/Labs program as well.
1.7 Freeware Version
From April 1999 onward, Advanced Chemistry Development has been making ChemSketch 4.0
available as freeware, through the “Free Stuff” link at our web site. Please be advised that the
freeware version:
(a) does not come with ACD/Dictionary;
(b) does not have the latest enhancements for version 4.5 (see section 1.4, “What’s
New”);
(c) does not include ACD Add-ins for ISIS/Base or ISIS/Draw; and
(d) does not entitle you to technical support. (However, there is a newsgroup at
news://news.acdlabs.com/acd.public.chemsketch where users can post their
questions or share tips.)
The freeware ChemSketch:
(a) does come with ACD/Tautomers and ACD/3D Viewer;
(b) does include a 15-second sequence listing our other products when it is first started
up. Once the Cancel button becomes active, click it to remove this screen; and
(c) should be installed to its own separate folder. This folder can contain other ACD
freeware concurrently available, such as ACD/SpecViewer, ACD/CNMRView,
ACD/HNMRView, etc. but should not contain any purchased ACD software.
1.8 For More Information…
To see the latest in ACD software and services, please visit our web-site at
http://www.acdlabs.com
Our web-site is being accessed at the rate of tens of thousands of “hits” per day. There’s a
reason for this: much is offered through our web-site. As of Spring 2000, we offer free
ChemSketch 4.0, a free ISIS 3D Add-in, free ChemDraw extensions and a free 2-week demo key
for “Interactive Lab” sessions where you can run test calculations using Java applets without
purchasing software. There are Lotus Cam-based movies which show the operation of many of
our software packages available for download.
We are constantly updating the information on our web-site. The web-site will tell you at which
scientific conferences you can visit the ACD booth. You can browse the Frequently Asked
Questions page or drop in and “chat” on our newsgroup, which can also be reached via our web
page.
ACD/ChemSketch
User’s Guide
4
Introduction
If you would like to stay informed of the latest developments in chemical naming software
products at ACD, please be sure to sign up for e-mail broadcasts at our web site page:
http://www.acdlabs.com/feedback/mailing.html
If you would like to partake of the ChemSketch newsgroup, please access:
news://news.acdlabs.com/acd.public.chemsketch
1.8.1 How to Get Hold of Us
We are accessible through our web-site, phone, fax and regular mail, but by far the most popular
way to contact us is via electronic mail. Questions on pricing, sales, availability and general
issues should be directed to
[email protected].
Technical and scientific support issues should be addressed to
[email protected].
Please tell us the name of the software owner, the version number and release date of the
product you are contacting us about. (This information is available by selecting Help/About.) If
applicable, please tell us the name of the distributor from whom you purchased the software.
ACD/ChemSketch
User’s Guide
5
2. Basics of ACD/ChemSketch
2.1 Objectives
This Chapter will familiarize you with
• how to start the program;
• basics of the ChemSketch interface, namely, the Structure and Draw modes.
2.2 Starting ACD/ChemSketch
Once ACD/ChemSketch has been installed on your computer, follow these basic steps to start it:
1. Start Windows.
2. Double click on the ACD/ChemSketch icon to start ACD/ChemSketch.
OR choose the ACD/ChemSketch icon from the Start/Run menu in the Windows 95 or NT
Taskbar
OR double click on the program file “chemsk.exe” in the ACD folder.
3. You will see the splash screen appear, followed by the ChemSketch window:
4. If this is the freeware version, you will see a 15-second list of ACD products scroll by. Be
patient and click Cancel when it becomes active.
5. Then you will see a Tip of the Day box, which you can close after reading.
ACD/ChemSketch
User's Guide
6
Basics of ACD/ChemSketch
2.3 Structure and Draw Mode
When ACD/ChemSketch starts up, you will find many menu commands and toolbar buttons
dimmed (inactive). They will be enabled as soon as you draw a structure.
In the ChemSketch Window, there are two modes, Structure and Draw. You switch between
them using the buttons in the upper left-hand corner:
In the Structure Mode you draw structures and reaction schemes while the Draw Mode presents
you with the tools for entering text and drawing various graphical objects.
2.3.1 Structure Mode Screen
Below you can see the screen with the Structure Mode enabled. Please pay attention to the
names and position of the toolbars, since we are going to use these terms throughout the whole
Guide.
Title Bar
Menu Bar
General Toolbar
Structure Toolbar
Atoms
Toolbar
Workspace
Reference
Toolbar
Color Palette
Status Bar
Title bar shows the name of the program and the name of the currently open file. The default file
name is NONAMExx.SK2, where ‘xx’ is a counter.
Menu bar contains a series of words. Each word links to a list (‘menu’) of related commands for
working in the ChemSketch window in Structure mode.
General toolbar located right below the menu bar includes tools that are present in both Structure
and Draw modes and will help you with tasks relevant to both modes such as: saving, opening
ACD/ChemSketch
User’s Guide
7
Basics of ACD/ChemSketch
files, undoing/redoing operations, copying and pasting, zooming in and out, as well as inserting
various templates.
Structure toolbar placed below the General toolbar and only present in the Structure mode. This
contains tools for drawing and manipulating chemical structures, as well as buttons that link you to
additional modules (see section 1.2).
Atoms toolbar displayed vertically to the left of the screen contains buttons representing atoms,
as well as tools for changing atom properties (charge, valence, numbering, etc.).
Reference toolbar placed to the right of the window contains the Table of Radicals and various
buttons representing ready-made radicals you take from the table. You can also access
ACD/Dictionary from this toolbar.
Workspace is the open area in the middle where structures are drawn. (Sample shown.)
Color Palette at the bottom of the workspace allows you to quickly color atoms and bonds in the
selected chemical structures (by clicking or right-clicking on the colors).
Status bar contains information that may be useful for the current moment: name of the SK2 file
you are working on, page number in the SK2 file, number of fragments in the workspace,
molecular formula of the selected structure, as well as one of the available chemical properties for
the selected structure. It also contains a button for automatic I-Lab access.
2.3.2 Draw Mode Screen
Below you can see the screen with the Draw Mode enabled. Please, pay attention to the names
and position of the toolbars, since we are going to use these terms throughout the whole guide.
Title Bar
Menu Bar
General Toolbar
Editing Toolbar
Drawing
Toolbar
Workspace
Color Palette
Status Bar
Title bar shows the name of the program and the name of the currently open file. The default file
name is NONAMExx.SK2, where ‘xx’ is a counter.
ACD/ChemSketch
User’s Guide
8
Basics of ACD/ChemSketch
Menu bar contains a series of words. Each word links to a list (‘menu’) of related commands for
working in the ChemSketch window in Draw mode.
General toolbar located right below the menu bar includes tools that are present in both Structure
and Draw modes and will help you with tasks general for both modes such as, saving, opening
files, undoing/redoing operations, copying and pasting, zooming in and out, as well as inserting
various templates.
Editing toolbar placed below the General toolbar and only present in the Draw mode
incorporates tools for editing and manipulating drawn graphical objects.
Drawing toolbar displayed vertically to the left of the screen contains buttons for drawing various
graphical objects and text.
Workspace is the open area in the middle where graphical objects are drawn and text is typed.
(Sample shown.)
Color Palette at the bottom of the workspace allows you to quickly color selected objects (by
clicking or right-clicking on the colors).
Status bar contains information that may be useful for the current moment: name of the file you
are working on, status of the document and page number.
ACD/ChemSketch
User’s Guide
9
3. Drawing Simple Structures
3.1 Objectives
This chapter considers the basics of structure drawing, which occurs only in Structure Mode.
Here you will learn how to:
• draw atoms, bonds and labels;
• flip a drawn molecular structure;
• select, rotate and resize drawn structures; and
• clear the screen.
3.2 Drawing Atoms, Bonds and Labels
Drawing bonds and atoms is the basic activity in the ChemSketch. Make sure that you are in
Structure Mode for all following actions.
3.2.1 Using the Draw Normal Tool
The Draw Normal tool is the default tool when the program is started. In this mode you can easily
draw normal or branched chains and replace the drawn atoms with other atoms from the Periodic
Table of Elements.
is enabled on the Structure toolbar and that the
1. Make sure that the Draw Normal tool
Carbon atom
is selected on the Atoms toolbar.
2. Click in an empty space to draw CH4
3. Click on CH4 to add a -CH3 group, creating CH3-CH3 with a standard bond length. Click twice
more on the same Carbon to draw
H3C
CH3
H3C
4. Click the Set Bond Vertically button
on the Structure toolbar and click on any bond of the
structure to rotate it to this orientation:
H3C
CH3
CH3
5. Click the Draw Normal button
on the Structure toolbar.
6. Click on the right-most Carbon atom to draw
H3C
CH3
CH 3
7. Repeat the above step to draw the following structures:
H3C
CH3
CH3
ACD/ChemSketch
H3C
,
H3C
CH3
CH3
,
H3C
CH3
C H3
User's Guide
and
CH3
CH3
10
Drawing Simple Structures
8. Click the Periodic Table button
Elements:
on the Atoms toolbar to open the Periodic Table of
9. Click the Fluorine button in the Periodic Table of Elements. Note that the Fluorine button
is added to the Atoms toolbar.
F
10. Click on the left-most Carbon to replace it with a Fluorine atom:
Note
CH3
CH3
When you select new elements from the Periodic Table of Elements,
corresponding buttons are automatically added to the Atoms toolbar. To remove
these buttons from the Atoms toolbar, double click on any of them or double click
on the Atoms toolbar and choose Yes.
3.2.2 Using the Draw Continuous Tool
When the Draw Continuous tool is active, bonds can only be drawn from the highlighted atom. To
highlight an atom, click on it. This mode is very convenient for “sprouting” new atoms from a
selected atom.
on the Structure toolbar. Alternatively, you can press
1. Click the Draw Continuous button
the right mouse button to switch to this drawing mode.
2. Make sure that the Fluorine button
ACD/ChemSketch
is selected on the Atoms toolbar.
User’s Guide
11
Drawing Simple Structures
3. Click on the right-most carbon in the drawn structure to select it. Click the second time to
sprout fluorine from the selected carbon. Click twice on the same carbon again to sprout the
second fluorine atom:
F
F
F
CH3
3.2.3 Using Mouse Drag
With either drawing tool, Draw Normal
, dragging the mouse from
or Draw Continuous
one atom to another draws a single bond between them. If you drag to or from an empty space, a
new atom is inserted at the start or at the end of the drawn bond.
With either the Draw Normal or Draw Continuous tool active, point the mouse arrow to one of
the terminal carbons and drag to another terminal carbon to draw the following structure:
F
F
F
3.2.4 “Cleaning” the Structure
1. Click the Clean button
on the Structure toolbar to standardize all the bond lengths and
F
F
F
angles in the drawn structure to obtain the following:
Note
The Clean command not only standardizes all bond lengths and angles to make the
structure look nice — it makes the drawn structures closer to being chemically
2
correct. For acyclic fragments, for example, it places the bonds near the sp
o
o
carbons at 120 angles and the bonds near the sp carbon at 180 (linear). If you
draw geometrical and stereo isomers, the "Clean" command standardizes their
bond lengths and angles while retaining all of their structural significance.
3.2.5 Using the Stereo, Coordinating and Undefined Bond Tools
You can draw a wide variety of bonds, besides the “ordinary” connection:
;
• stereo bonds directed away from you
• stereo bonds directed towards you
• coordinating bonds
• and undefined bonds
;
;
.
Select any of these tools and click on any bond in the drawn structure. Click repeatedly on a
stereo or coordinating bond to change its direction.
ACD/ChemSketch
User’s Guide
12
Drawing Simple Structures
3.2.6 Editing Atom Labels
The Edit Atom Label tool
abbreviations.
1. Click the
allows you to substitute terminal atoms with shorthand
button on the Atoms toolbar and then on the right-most fluorine atom in the
drawn structure.
2. In the Edit Label dialog type (CH2)3Ph and click the Insert button. Note that the label is
inserted in the desired position and the indexes are automatically subscripted:
F
F
(CH2)3Ph
3. Select the Change Position tool
and click on the label to invert it:
F
F
Ph(H 2C)3
Tip If you click on the label with the Change Position tool active while holding down the
SHIFT key, the connection point of the label will be changed.
4. With the active Edit Atom Label tool click on the obtained shorthand abbreviation to open the
Edit Label dialog box again. Then click on the Expand button to obtain the following
structure:
F
F
ACD/ChemSketch
User’s Guide
13
Drawing Simple Structures
3.2.7 Using the Draw Chains Tool
Using the Draw Chains tool, you can easily draw short or long chains with a single click and
mouse drag.
1. Click the Draw Chains button
on the Structure toolbar and point the mouse arrow to the
atom indicated by the arrow:
F
F
2. Press mouse button and drag to the left side. As you move the mouse away from the
structure, a carbon chain is created. Note the carbon counter (C #) located beside the mouse
arrow changes with each carbon added or removed. Continue until the counter reaches C 8,
then release the mouse button to finish the chain:
F
F
H3C
3. With the active Draw Chains tool select the Fluorine button
on the Atoms toolbar and
click on the left-most carbon to sprout three fluorine atoms. Then click on the Clean button
on the Structure toolbar to obtain the following structure:
F
F
F
F
ACD/ChemSketch
F
User’s Guide
14
Drawing Simple Structures
3.3 Flipping Structures
You can rotate or flip the structure(s) by using the following buttons:
Button
Function
Select this button and then click on the bond to set it horizontally, rotating the
rest of the structure correspondingly.
Select this button and then click on the bond to set it vertically, rotating the rest
of the structure correspondingly.
Flips the structure around the clicked bond.
Flips selected structure or fragment (or if nothing is selected, all drawn
structures) from top to bottom.
Flips selected structure or fragment (or if nothing is selected, all drawn
structures) from left to right.
3.4 Selecting, Rotating, and 3D Rotating
You can select atoms, bonds and fragments in two different ways, by using the button which
toggles between
or
• the Lasso Selector
• the Rectangle Selector
.
Once the fragment(s) has been selected, there are three ways you can move it:
• Move
,
• Rotate/Re-size
• 3D Rotate
,
,
or you can perform one or more other operations on it:
• Delete
,
• 3D Optimization
. or
• 2D Optimization (or Clean)
ACD/ChemSketch
User’s Guide
.
15
Drawing Simple Structures
3.5 Clearing the Screen
To clear the screen, you can do one of the following:
Choose the New command from the File menu to open a new document.
Choose the New Page button
from the upper left set of buttons to go to a new page.
Choose the Select All command from the Edit menu and then choose the Delete
command.
Click the Delete button
on the General toolbar. Click on an empty space away from
the drawn structure to select all of the structures, then click on any structure to delete the
entire screen.
ACD/ChemSketch
User’s Guide
16
4. Drawing More Complex Structures
4.1 Objectives
Now that you have studied the basics of structure drawing described in the previous chapter you
may continue with drawing more complex structures using advanced tools of ChemSketch.
In this chapter you will learn how to:
• use the Table of Radicals for drawing typical radicals;
• quickly draw ring structures;
• delete and replace atoms;
• set double and triple bonds;
• set an atom’s charge, draw cations and anions; and
• change various atomic properties.
4.2 Using the Table of Radicals
The Table of Radicals includes pre-drawn structures of amino acids, their protecting groups, as
well as nucleotides and other frequently used radicals.
1. Clear the screen using the directions given in previous section.
2. Click on the Table of Radicals button
on the References toolbar to display the radicals:
3. Click the Cyclohexane button
in the Table of Radicals.
ACD/ChemSketch
User's Guide
17
Drawing More Complex Structures
4. A Cyclohexane button is now located and currently selected on the References toolbar on the
right side of the screen.
5. Repeat these steps for the Cyclopentane button
Note
.
When you select new radicals from the Table of Radicals, the corresponding
buttons are automatically added to the References toolbar. To remove these
buttons from the References toolbar, double click on any of them or double click on
the References toolbar and choose Yes.
4.3 Using Ring Structures
1. Select the cyclopentane
button on the References toolbar on the right side. Click on the
screen to create a five-membered ring.
2. On the same toolbar, select the
indicated bond,
icon. Now point the mouse arrow to highlight the
and click to create the following structure:
3. Repeat these steps to create the following structure;
4. Click the Set Bond Vertically button
then click on the indicated bond
to
rotate the structure around this bond to obtain the following:
5. Click the Table of Radicals button
on the References toolbar.
6. In the Table of Radicals window, select the carboxyl group O
OH
by clicking the
button.
7. Click on the atoms indicated in
to sprout carboxyl groups from them:
O
OH
O
HO
OH
O
HO
O
HO
O
HO
O
4.4 Deleting Atoms and Fragments
ACD/ChemSketch
User’s Guide
18
Drawing More Complex Structures
O
OH
O
HO
Delete the atoms indicated by arrows in
CH3
CH3
OH
O
HO
O
O
to draw
HO
HO
O
CH3
H3C
O
CH3
You can do this in two ways: delete each atom individually or delete all atoms simultaneously.
4.4.1 Deleting Atoms Individually
1. Click the Delete button
.
2. Click each of the atoms which you want to delete.
4.4.2 Deleting All Atoms Simultaneously
1. Click the Lasso On/Off button
mode
on the Structure toolbar to enable the Lasso selection
. Note the Select/Move tool becomes active.
2. Drag to include all of the specified atoms in the closed Lasso line:
O
OH
O
HO
3. Click on the Delete button
on the General toolbar.
OH
O
HO
O
HO
O
HO
O
4. Click on any of the highlighted atoms to delete all of them simultaneously.
Note
You can select atoms, bonds and fragments in two different ways, by using either
the Lasso selector
or the Rectangle selector
. To deselect fragment(s),
click anywhere on an empty space.
4.5 Replacing Atoms
NH2
CH3
NH
O
CH3
H3C
CH3
NH2
N
CH3
Replace the atoms indicated with arrows in
HN
to draw
N
O
HO
N
NH
OH
OH
1. Click the Nitrogen button
on the left Atoms toolbar and then click on all the carbons
denoted by an open-head arrow on the above structure.
on the Atoms toolbar and then click on three Carbons
2. Click on the Oxygen button
denoted by a solid-head arrow.
Note
You cannot replace atoms with the Draw Continuous tool (see Section 3.3).
ACD/ChemSketch
User’s Guide
19
Drawing More Complex Structures
4.6 Setting Double and Triple Bonds
1. With any one of the Draw Normal
, Draw Continuous
or Draw Chains
tool
active, click on the bonds indicated in
NH2
NH
NH2
HN
N
NH2
N
N
O
HO
N
NH
NH2
N
to set double bonds:
OH
HN
N
O
HO
OH
N
+
N
OH
OH
2. Using the Change Double Bond or Hydrogen Position button
the structure’s
appearance can be “fine-tuned”. Select this button and click on the indicated hydrogens and
double bonds. Note the movement of hydrogen around the nitrogen and oxygen, and the
double bond around the single bond:
NH2
N
HN
NH2
N
O
HO
+
N
N
OH
OH
Note
You can set a double or triple bond or reset a single bond by repetitive clicking on a
chosen bond. This will cycle through all bond orders available. When an atom has
an invalid number of bonds, a corresponding charge is placed on it and it is crossed
out with a red “X”:
If you want to disable the crossing-out function, select the structure, choose
Structure Properties from the Tools menu, clear the Cross Out Invalid Atom
check box in the Common tab and click Apply.
ACD/ChemSketch
User’s Guide
20
Drawing More Complex Structures
4.7 Setting Charges and Defining Anions and Cations
In this section we will draw the following set of structures:
H3C
H3C
H3C
-
+
NH2 CH3
N
anion
CH3
cation
H3C
+
CH3
radical cation
CH3
free radical
H3C
NH
H3C
NH
CH3
H3C
N
radical anion
1. Choose the Carbon button
tool
N
singlet biradical
N
triplet biradical
on the Atoms toolbar and make sure that the Draw Normal
is on. Click three times in one place to draw the following structure:
H3C
CH3
2. Choose the Nitrogen button
with a nitrogen:
and click on the middle carbon in the fragment to replace it
3. Click the bottom right triangle of the
button on the left Atoms toolbar to expand it to the
following group:
Increment Charge;
Decrement Charge;
Radical;
Radical Cation;
Radical Anion.
and then click on the NH group to make an anion:
4. Click on the Decrement Charge button
H3C
-
N
CH3
5. Right-click to switch to the Increment Charge tool (or choose
from the group of buttons)
and click twice to make a cation:
H3C
+
NH2 CH3
ACD/ChemSketch
User’s Guide
21
Drawing More Complex Structures
Note
When you use the Charge buttons,
or
, to change the charge of a non-
metal, the corresponding number of hydrogen atoms is automatically added to it, or
removed from it, to preserve proper chemical valency. If you change the charge of
a metal, the charge is changed in increments or decrements in accordance with the
next chemically valid charge of the corresponding ion. (You can view common
valences used in the Periodic Table of the Elements.)
6. Choose the Radical button
from the group of buttons shown in step 4 above and click on
the NH2 group to draw a free radical:
H3C
N
CH3
7. Right-click in an open part of the workspace to quickly switch to the Radical Cation tool or
choose the corresponding button
and click to draw the radical cation:
H3C
+
NH
CH3
8. Right-click in an open part of the workspace to switch to the Radical Anion tool
to draw the radical anion:
H3C
NH
9. Choose the Delete button
delete it.
and click
CH3
on the top General toolbar and click the right CH3 group to
10. From the group of buttons in step 4 choose the Radical tool
several times until the following singlet biradical is obtained:
H3C
and click on the NH group
N
11. Continue clicking with the radical tool until the triplet biradical is displayed:
H3C
N
ACD/ChemSketch
User’s Guide
22
Drawing More Complex Structures
4.8 Changing Atom Properties
If you want to display the valency or the isotopic mass of the atom in a ChemSketch structure—or
even change the typeface or the size of the atom, you should use the Properties panel.
1. Click the Select/Move button
.
2. Double-click on the atom whose displayed properties you want to change. This will make the
Properties dialog box appear. Switch to the Atom Properties tab:
3. Clicking the buttons
displays options for changing
C – atom symbol,
H – attendant hydrogens,
n – index of the attendant hydrogens,
q – charge,
V – valence,
I – isotopic mass,
N – numbering of atom in the overall molecule.
4. As you set the values, click Apply to have the change appear immediately on the selected
atom.
ACD/ChemSketch
User’s Guide
23
5. Advanced Structures and Reaction Schemes
5.1 Objectives
This chapter is the next step to drawing much more complicated structures as compared to the
one described in the previous chapters. If you are using ChemSketch for the first time, it is
recommended that you do the exercises described here only after completing the previous
chapters.
Here you will learn how to:
• draw structures of cyclic Alkanes and Peptides using the 2D optimization (Clean Structure)
tool;
• use the 3D Optimization tool for drawing “spectacular” 3D structures of
Bicyclo[2.2.2]octane, tripticene, cubane and dodecahedrane;
• draw reaction schemes.
5.2 2D Optimization
The Clean option can be considered to be a 2D-optimization of the drawn structure, i.e. redrawing and re-sizing it to standardize all the bond lengths and angles. Using this option you can
easily draw a structure perfectly. Some examples:
5.2.1 Creating the Structure of Cyclic Alkanes
This section is based on the movie cycloalk.exe which can be downloaded from our web
site or found in the Movies folder.
Using the following technique you can quickly draw cyclic alkanes perfectly. Here's how to draw
Cyclononane:
1. Switch to the
mode and delete any previously drawn structures by pressing
CTRL+A and then DELETE.
2. Choose the Draw Chains tool
and drag in the workspace to draw a 9-member chain.
Note that the informative cursor shows the number of atoms in the chain.
ACD/ChemSketch
User's Guide
24
Advanced Structures
3. Click on the right mouse button to quickly switch to the Draw Normal tool
and drag from
one end atom to another in order to connect them with a bond.
4. Click on the Clean Structure
button to obtain the following structure:
Try to draw C10- and C8-rings using the above technique.
5.2.2 Creating the Structure of a Cyclic Peptide
This section is based on the movie pept.exe which can be downloaded from our web site
or found in the Movies folder.
Let’s draw the cyclic Tyr-Ala-Trp. Again we will find the Clean Structure button is useful.
1. Switch to the
mode and delete any previously drawn structures by pressing
CTRL+A and then DELETE.
2. From the Template Window
choose the
tab.
3. From the set of amino acids, choose Tyrosine and click in the workspace to copy the
structure.
4. From the Table of Radicals
choose Alanine
and then Tryptophan
and
click on the indicated atoms to attach the corresponding radicals:
Note
You can flip the template shadow before fixing it by pressing the TAB key.
ACD/ChemSketch
User’s Guide
25
Advanced Structures
5. Click the right mouse button to quickly switch to the Select/Move tool
and drag the NH2
group to the OH group as shown:
6. Click on the Clean Structure
button to obtain the following structure:
Try to draw any other cyclic peptide, for instance Gramicidine S:
5.3 3D Optimization
This section explains how to create structures that have “realistic” angles and bond lengths.
There is no need to explain how difficult it is to draw such molecules proportionally. The 3DOptimization and 3D Rotation options will help you to quickly cope with this task. These options
make it possible to create complex structures in ACD/ChemSketch with ease.
The 3D optimization algorithm is a proprietary version of molecular mechanics with the force field
1
initially based on CHARMM parameterization . The modifications involve some simplification and
were intended to increase the stability and speed of computation. Note that 3D-optimizer is NOT
a full-scale molecular mechanics engine. Its design aims to reliably reproduce reasonable
conformations from (possibly very unreasonable) 2D drawings, rather than to precisely optimize
3D structures.
If 3D-optimizer produces the conformation different from what you have expected, do not be
surprised. It is the very essence of conformational analysis that molecules typically have many
conformations. The optimizer finds only one, and it may not be one you expect. For example, you
probably expect a cyclohexane fragment to be a chair, but the optimizer may generate twist-boat,
which is also one of its suitable conformations (indeed, in many structures this fragment exists in
1
B. R. Brooks, R. E. Bruccoleri, B. D. Olafson, D. J. States, S. Swaminathan, and M.
Karplus. CHARMM: A program for macromolecular energy, minimization, and dynamics
calculations. J. Comput. Chem. 4 187-217 (1983).
ACD/ChemSketch
User’s Guide
26
Advanced Structures
a twisted form). In such a case, you may try to correct the conformation (e.g., by manually moving
the atoms into desired direction and 3D-optimizing the structure again).
You may wish to perform actual conformational analysis of your molecule using a special
molecular mechanics or quantum chemistry geometry optimization package. The ChemSketch
3D-optimized structure will serve as input data.
Important Prior to starting any of the exercises in this section, clear the Add Hydrogens
check box in the Structure Tab in the Preferences dialog box (Options
menu).
5.3.1 Creating Structure of Bicyclo[2.2.2]octane
This section is based on the movie bicyc.exe which can be downloaded from our web
site or found in the Movies folder.
Switch to the
mode and delete any previously drawn structures.
1. From the Table of Radicals
choose Cyclohexane
. Click in the workspace to
place a cyclohexane ring.
and draw the hydrocarbon bridge by dragging as shown in the
2. Click the Draw Normal tool
following scheme:
3. Click the 3D Optimization
Note
button to obtain a 3D model of the drawn structure.
If there is more than one structure in the workspace you should select the structure
you want to 3D-optimize using any of the selection tools (Select/Move
Select/Move/Re-size
or 3D Rotation
,
tools).
4. If the Switch to 3D Rotation mode check box in the Structure tab of the Preferences dialog
box (Options menu) is selected, you will be automatically switched to 3D Rotation mode after
. Place
the 3D Optimization is completed. If you are not, switch to the 3D-Rotation tool
the mouse cursor over any atom or bond in the structure and drag the mouse over the
workspace to rotate the structure until it is placed as shown:
ACD/ChemSketch
User’s Guide
27
Advanced Structures
Note
You can choose whether the background bond should be broken or not by selecting
or clearing the Enable bonds intersections check box in the Structure tab of the
Preferences dialog box (Options menu).
You can change the position of intersecting bonds by applying the Bring Bond to
Front or Send Bond to Back commands (Options menu) to the selected bond.
You can also bring the background bond to the front by clicking on it with the
Change Position
tool active while holding down the SHIFT key.
Try to draw the following structures on your own using the above technique
Bicyclo[2.2.1]heptane
Bicyclo[4.2.1]nonane
5.3.2 Creating the Structure of Triptycene
This section is based on the movie triptyc.exe which can be downloaded from our web
site or found in the Movies folder.
Switch to the
mode and delete any previously drawn structures by pressing Ctrl + A
and Del.
1. Draw the structure of bicyclo[2.2.2]octane as described above or use the corresponding
template from the Template Window
2. From the Table of Radicals
(the
choose Benzene
tab).
.
3. Position the cursor over the bond a and click to attach the benzene ring to this bond:
4. Repeat steps 2--3 for bonds b and c to obtain the following structure:
ACD/ChemSketch
User’s Guide
28
Advanced Structures
5. If there is more than one structure in the workspace, select the structure you want to 3Doptimize using any of the selection tools (Select/Move
Rotation
, Select/Rotate/Re-size
or 3D
tools)
6. Click on the 3D Optimization
button to obtain a 3D-model of the drawn structure:
7. If the Switch to 3D Rotation mode check box in the Structure tab of the Preferences dialog
box (Options menu) is selected, the program will automatically switch to 3D Rotation mode
after the 3D Optimization is completed, if it does not, select the 3D Rotation tool
. Place
the mouse cursor over any atom or bond of the structure and drag the mouse over the
workspace to obtain the projection you want.
8. Choose the Show Aromaticity command from the Tools menu to show the aromatic rings:
5.3.3 Creating the Structure of Cubane
This section is based on the movie Pr_cub.exe which can be downloaded from our web
site or found in the Movies folder.
1. Switch to the
mode and delete any previously drawn.
choose Cyclobutane
2. From the Table of Radicals
to place two 4-membered rings one under another.
. Click twice in the workspace
3. Choose the Draw Normal tool
and connect the corners of cyclobutane molecules with
bonds by dragging from one atom to another as shown:
ACD/ChemSketch
User’s Guide
29
Advanced Structures
4. Click on the 3D Optimization
5. Select the 3D Rotation tool
button to obtain the 3D model of the drawn structure.
if it is not already selected.
6. Place the mouse cursor over any atom or bond of the structure and drag the mouse over the
workspace to obtain the projection you want:
Note
You can choose whether the background bond should be broken or not by selecting
or clearing respectively the Enable bonds intersections check box in the
Structure tab of the Preferences dialog box (Options menu).
You can change the position of intersecting bonds by applying the Bring Bond to
Front or Send Bond to Back commands (Options menu) to the selected bond.
You can also bring the background bond to front by clicking on it with the Change
Position tool
active while holding down the SHIFT key.
Try to draw the following structures on your own using the above technique
Prismane
2,5
3,9
4,8
7,10
Hexacyclo[4.2.0.0 .0 .0 .0
]decane
5.3.4 Creating the Structure of Dodecahedrane ([5]Fullerene-C20)
This section is based on the movie fuller.exe which can be downloaded from our web
site or found in the Movies folder.
1. Switch to the
mode and delete any previously drawn structures.
2. From the Table of Radicals
place a cyclopentane ring.
choose Cyclopentane
. Click in the workspace to
3. Consequently position the mouse pointer over every bond of the ring and click to attach five
other rings:
ACD/ChemSketch
User’s Guide
30
Advanced Structures
4. Click the right mouse button to quickly switch to the Select/Move tool
.
5. Move by dragging atoms a, c, e, g, i to atoms b, d, f, h, j accordingly as shown in the following
scheme to merge them:
6. Select the Carbon button
on the left Atoms toolbar and click directly on the points
indicated by arrows to add more atoms and bonds:
7. Connect the adjacent methyl groups with single bonds by dragging from one terminal atom to
another to obtain the following structure:
8. Click on the 3D Optimization
button to obtain the 3D model of the drawn structure.
9. Select the 3D Rotation tool
. Place the mouse cursor over any atom or bond in the
structure and drag the mouse over the workspace to obtain the projection you want.
Note
You can choose whether the background bond should be broken or not by selecting
or clearing respectively the Enable bonds intersections check box in the
Structure tab of the Preferences dialog box (Options menu).
You can change the position of intersecting bonds by applying the Bring Bond to
Front or Send Bond to Back commands (Options menu) to the selected bond.
You can also bring the background bond to front by clicking on it with the Change
Position tool
ACD/ChemSketch
active while holding down the SHIFT key.
User’s Guide
31
Advanced Structures
Try to draw the following structures using the technique described above
[4,6]Fullerene-C24
[5,6]Fullerene-C24
5.4 Drawing a Reaction Scheme
This section is based on the movie reaction.exe which can be downloaded from our
Web site or found in the Movies folder.
In this section we will draw the following scheme:
+
1. From the Table of Radicals
choose Benzene
(if you have previously used this
template recently, it can found in the right Reference toolbar).
2. Press the TAB key to flip the template shadow and draw the following structure by clicking in
the workspace several times:
Note
To draw a fused-ring structure, place the cursor directly over a ring bond and click.
3. Press TAB to flip the shadow again and click beside the drawn structure to place a separate
ring. Right-click to hide the template shadow.
4. Click the Draw Normal tool on the upper Structure toolbar and click on the bond of the ring to
make it triple:
ACD/ChemSketch
User’s Guide
32
Advanced Structures
5. Draw the structure of Triptycene as described in section 5.3.2 and place it beside the other
drawn structures:
6. From the Structure toolbar choose the Reaction Plus tool
the second structures to place it:
and click between the first and
+
7. Click the Reaction Arrow tool
and click or drag to place it as well:
+
Note
By clicking the bottom right triangle of the Reaction Arrow button you can choose
among various type of arrows. Some arrows are treated as graphical objects,
however, and may not export properly.
8. To move the plus sign or the arrow, click the Select/Move tool
drag.
ACD/ChemSketch
User’s Guide
, point to the object and
33
6. Advanced Drawing: Templates
6.1 Objectives
This chapter will bring you one step closer to an advanced drawing expert once you have
mastered the powerful Template feature. You will learn:
• some ways template usage can help you;
• how to apply the Instant Template tool for drawing structures containing repetitive
fragments;
• more ways of using the Table of Radicals;
• how to use the Template Window for drawing DNA molecules and complex biomolecules;
• how to create your own templates; and
• what templates are available from our Web site.
6.2 Overview
ACD/ChemSketch includes the following 3 sources of structure templates:
• Table of Radicals
;
• Template Window
;
• Instant Template tool
.
While the binding point of any template in the Table of Radicals is fixed (invariable), the
Template Window and the Instant Template tool allow you to specify any atom or bond to be the
binding point simply by clicking directly on it. However, no matter what the source of template is,
the principles of joining are the same. There are several ways of joining the template to a drawn
structure:
By fusing the bonds of the structure and template: point the mouse pointer over the bond so
that the corresponding bonds of the structure and the template shadow are fused and then
click.
By attaching the template to the structure: point the mouse pointer on the corresponding
atom on the structure so that the connecting bond appears and click
By drawing a spiro connection between the template and the structure: point the mouse
pointer on the atom you want to be the binding point and click holding down the SHIFT key.
Note
You can flip the template shadow before fixing it by pressing the TAB key
Template Window Organizer is a very convenient way for managing template files: both those
included with the software package, and those which you decide to create. It will just take you a
minute to save your document as a template and then quickly find it. Note that the only difference
between the template file and a usual file is the fact that you can find the template file in the
ACD/ChemSketch
User's Guide
34
Advanced Drawing: Templates
Template Window Organizer. Otherwise it is a usual document with the extension *.sk2. By
saving files this way there are several advantages:
• Your *.sk2 files scattered over different directories and disks will be gathered in one place
(the Template Window Organizer).
• You can assign a name to the template that is more descriptive than what the real file name
is. This will better reflect the contents of the document and allow you to quickly find the
document you need.
• You can quickly find the document by previewing its contents in the Preview Field of the
Template Window.
• You can quickly open a selected document from the list just by clicking the Open Document
button in the Template Window Organizer.
• Up to 15 templates can be accessed through the Template Window.
6.3 Instant Template Tool
A useful ACD/ChemSketch feature is the Instant Template tool
which will help you save time
by allowing you to draw fragments quickly. You can think of it as a “replicate” command.
6.3.1 Creating the Structure of a Cyclic Oligomer
This section is based on the movie oligomer.exe which can be downloaded from our
web site or found in the Movies folder.
1. Switch to the
mode and delete any previously drawn structures by pressing
CTRL+A and then DELETE.
choose Benzene
. Point the cursor to the upper
2. From the Table of Radicals
middle part of the workspace and click to place a benzene ring.
ACD/ChemSketch
User’s Guide
35
Advanced Drawing: Templates
3. From the Table of Radicals choose Ethynyl
arrow to attach it to the ring:
4. Choose the Instant Template tool
template
and click on the atom indicated by the
and click on the indicated atom to create an instant
5. Click on the atom indicated by the arrow to attach the template:
6. Click
again and click on the atom to create the template of the whole fragment:
7. Click on the atoms to attach the template as shown. To hide the template shadow click the
right mouse button after you finish drawing:
8. Choose the Draw Normal tool
ACD/ChemSketch
and click on the indicated atom to complete the ring:
User’s Guide
36
Advanced Drawing: Templates
6.4 Table of Radicals in Structure Drawing
6.4.1 Creating the Structure of Fluorescamine
This section is based on the movie fluor.exe which can be downloaded from our web
site or found in the Movies folder.
1. Switch to the
mode and delete any previously drawn structures.
2. From the Table of Radicals
copy the ring.
choose Cyclopentane
. Click in the workspace to
3. Click on the indicated atom while holding down the SHIFT key to obtain the spiro-connection
with the second cyclopentane ring:
4. From the Table of Radicals
choose Benzene
. First click on the indicated bond
to fuse the benzene ring and then click on the indicated atom to connect the phenyl radical:
5. Choose the Oxygen
button on the Atoms toolbar (note that the Draw Normal tool
automatically enabled). Click on the indicated atoms to replace them with oxygen atoms:
is
ACD/ChemSketch
37
User’s Guide
Advanced Drawing: Templates
6. Click the right mouse button to quickly switch to the Draw Continuous tool
on the indicated atoms to attach the OH groups to them:
. Double-click
7. Click on the indicated single bonds to replace them with double-bonds:
6.5 Templates from the Template Window
A brief tour of available ChemSketch Templates is given in the movie templ_st.exe
which can be downloaded from our web site or found in the Movies folder.
6.5.1 Creating the Fragment of a DNA Molecule
This section is based on the movie dna_st.exe which can be downloaded from our web
site or found in the Movies folder.
Switch to the
ACD/ChemSketch
mode and delete any previously drawn structures.
User’s Guide
38
Advanced Drawing: Templates
6.5.1.1 Drawing the chain of deoxyriboso-5-phosphate fragments
1. Open the Template Window
. From the
tab choose 2Dioxyriboso-5-phosphate (chain form) by clicking on the indicated atom:
O
HO P O
O
OH
OH
Click
OH
2-Deoxyriboso-5-phosphate
2. Click in the workspace to copy the chosen template.
3. Position the mouse pointer over the indicated atom and while holding down the SHIFT key
click to attach the next Dezoxyriboso-5-phosphate fragment:
Click + Shift
HO
O
HO P O
O
OH
O P O
O
OH
O
O P OH
OH
4. Choose the Select/Rotate/Re-size tool
O
O
OH
OH
OH
OH
.
5. Select the indicated part of structure by dragging the selection rectangle around it. Drag the
onto the oxygen atom indicated by arrow. Then holding down the SHIFT
action center
o
key drag the selected part of structure clockwise to rotate it by 90 :
O
HO P O
HO
O
HO
O
O
O P O
O
O
OH
O P OH
OH
ACD/ChemSketch
OH
O
O
O P O
O
OH
OH
O
OH
O
OH
HO P O
O
O
OH
OH
O P OH
OH
User’s Guide
OH
OH
39
Advanced Drawing: Templates
6.5.1.2 Adding the bases
1. Open the Template Window
. From the
base you need by clicking on the atom that will be the attachment point.
tab choose the
2. Position the mouse pointer over the indicated atom and click while holding down the SHIFT
key:
Tip You can flip the template shadow before fixing it by pressing the TAB key.
3. Repeat step 2 to add bases to other nucleotides:
Now try to draw your own DNA or RNA fragment of any other length.
6.6 Drawing Complex Biomolecules
Here are some examples for creating complex biomolecules using different ACD/ChemSketch
tools.
6.6.1 Creating the Structure of β -Maltose
This section is based on the movie maltose.exe which can be downloaded from our web
site or found in the Movies folder.
1. Switch to the
ACD/ChemSketch
mode and delete any previously drawn structures.
User’s Guide
40
Advanced Drawing: Templates
2. In the Template Window
select the
tab, and confirm that
you are viewing the Haworth formulae page:
the arrow to the right of the text box and choose accordingly.
. If not, click on
3. Click once on α-D-Glucopyranose to select it and click in the workspace to copy it.
4. Repeat steps 1-3, but this time select the beta-D-pyranose tab
and
choose β -D-Glucopyranose
5. Click in the ChemSketch Window to place it to the right of the first structure.
6. Choose the Carbon button
. Click on the indicated atom in the α-D-Glucopyranose
structure to replace it with a CH3 group and then drag from the CH3 group to the right while
holding down the Shift key to draw the bond at a perfect right angle:
7. Repeat step 3 for the β -D-Glucopyranose structure to obtain the following structure:
8. Choose the Oxygen button
structure:
9. Choose the Select/Move tool
and click on the indicated atom in the β -D-Glucopyranose
. Click in the workspace adjacent to, but not touching, the
β -D-Glucopyranose structure to select it. Place the mouse cursor over any atom or bond of
the selected structure and drag it to the left until the corresponding OH and CH3 groups overlap
each other:
ACD/ChemSketch
User’s Guide
41
Advanced Drawing: Templates
10. If desired, hide single hydrogens in the selected structure by choosing the Remove Explicit
Hydrogens command from the Tools menu:
Note
Though the carbon atoms which are bonded to central oxygen are hidden they are
still present. If the chemical meaning is important for your task you can remove
these atoms in the following way. With the Select/Move tool
active double
click on the hidden atom. When the Properties panel appears; click on the
tab, then on the Atom Symbol button
Empty
and from the Value drop-down list choose
. Click Apply.
Try to draw the following structure on your own using the technique as described
above:
b-Cellobiose
6.7 Defining a User Template
It is very easy to assign a ChemSketch file as a Template. As of Summer 1998, we are offering
2
free Templates that can be downloaded from our web site. To designate a ChemSketch file as a
template, we recommend you place the SK2 file in the Templates folder. Then, do the following:
1. Save your current structures as an SK2 file or open the SK2 file (with structures in it) in
ChemSketch.
2. From the Templates menu choose the Save User Template command.
3. In the Save User Template dialog box type in the name for your template, such as “Alkaloids”,
and browse to obtain the path name to your file, such as “C:\ACD45\Templates\alkaloids.sk2”
and click OK.
Note
You can enter any name for your document (e.g. for the document b_d_fur.sk2 the
following name - Sugars: beta-D-Furanose - would be more appropriate).
Once your document is saved as a user template, its name (under the entered name) is
automatically added to the list of templates in the Template Organizer and Template Window
(Templates menu).
Note
You can create a user template from any document even if it is closed. Open the
Template Organizer dialog box (Templates menu), click the New... button, find
the needed document and assign it a name.
2
Check first in the “Templates” folder of the ACD/ChemSketch freeware for the desired template.
If you don’t find it there, go to http://www.acdlabs.com/download/download_templates.html .
ACD/ChemSketch
User’s Guide
42
Advanced Drawing: Templates
You can perform the following tasks with the user template:
Quickly find the document and open it for editing. From the Template List (Template
Organizer) choose the needed template and click Open Document button.
Copy any part of your document to the workspace (Structure or Draw mode) without
opening the whole document. To do this find your template in the Template List (Template
Window) and click on the item to place it into the workspace.
6.7.1 The Template.cfg File
The key to management of the templates in ACD/ChemSketch is the file template.cfg. This file
lets ChemSketch know that a .SK2 file is a template file rather than simply a user file. It can be
opened and read with any text editor, although you will likely never need to do so. The Template
Window accesses “template.cfg” to let it know what files to display as templates. If a .SK2 file is
not shown in the Template Window, it will be added to “template.cfg” by when you open the SK2
as a regular ChemSketch file and select the command to save as a user template.
If template.cfg is moved or lost, the Template Window will not display any templates. If the
template.cfg file is found (by Windows Explorer, for example, or the system “Find File” utility) it
can be restored to the default directory or the user’s private directory. If it cannot be found, it must
be retrieved by reinstalling ChemSketch or by adding each template individually as detailed
above.
6.7.2 Available Templates
As of Summer 1999, this is the list of templates available for download from our “Free Stuff”
section of our Web site:
Monomer Template (6.22 kb)
Alkaloid Template (31.9 kb)
Steroid Template (7.35 kb)
Terpene Template (12.4 kb)
Tipped Rings Template (1.83 kb)
Solid Phase Synthesis Resins (3.81 kb)
Template for Phosphorus Compounds (2.5 kb)
Template for Carbonyls (3.1 kb)
Newman Projections (6.6 kb)
Lewis Structures (12.2 kb)
Chem Quiz (4.3 kb)
ACD/ChemSketch
User’s Guide
43
7. Creating Special Graphical Objects
7.1 Objectives
This chapter will familiarize you with the creation of graphical objects, so switch to the Draw mode
before proceeding with any exercise in this chapter.
You will learn how to use Draw mode tools for creating the following objects:
• a diagram of the energy of reaction;
• various types of orbitals;
• vacuum distillation apparatus;
• a two-chain DNA strand;
• lipids and micelles; and
• multi-page layout posters.
7.2 Drawing the Energy of Reaction Diagram
This section is based on the movie diagram.exe which can be downloaded from our web
site or found in the Movies folder.
Switch to the
mode and select the Polyline tool
7.2.1 Drawing a Curve
1. Drag horizontally to the right from the starting point of the curve to stretch the control line.
2. Release the mouse button.
3. Move the mouse up to draw the first segment of the curve.
4. Drag horizontally to the right to stretch the control lines. By changing the length of the control
lines you can modify the form of the curve segment.
5. Release the mouse button.
ACD/ChemSketch
User's Guide
44
Creating Special Graphical Objects
6. Move the mouse down to draw the next segment.
horizontally
horizontally
7. Repeat the above steps to draw the next two segments.
8. Click the right mouse button to finish drawing the curve.
7.2.2 Drawing the X and Y axes
Make sure that the Polyline tool
Select the Draw Arrow tool
is switched on.
. In the Arrow panel from the Arrow Type drop-down list
choose the two way arrow
.
1. Click at the endpoint of the Y axis.
2. Move the mouse down vertically to draw the axis.
3. Click to fix the point of the axes’ intersection.
4. Move the mouse horizontally to the right to draw the X axis
5. Click to fix the endpoint of the X axis.
6. Click the right mouse button to finish drawing the axes.
Tip You can easily draw the axes at a right angle by previously choosing the Snap on
Grid and/or Show Grid command (Options menu).
7. Add inscriptions using the Text
ACD/ChemSketch
and Rotate 90°°
User’s Guide
tools.
45
Creating Special Graphical Objects
7.3 Drawing Different Kinds of Orbitals
This section is based on the movie orbital.exe which can be downloaded from our web
site or found in the Movies folder.
Switch to the
I.
mode.
To draw this orbital
Select the Polygon tool
do the following:
.
1. Drag horizontally to the right from the starting point of the orbital to stretch the control line.
2. Release the mouse button.
3. Move the mouse down to draw the body of the orbital.
4. Click to fix the orbital.
5. Right-click twice to finish drawing the orbital and to quickly switch to the Select/Move/Re-size
tool
. Position the cursor over the selected orbital; while holding down the CTRL key drag
it down to make a copy of the drawn orbital.
6. Choose the Flip Top to Bottom button
segments by moving them.
to flip the lower segment of the orbital. Align the
7. Point to the gray color button in the Color Palette (at the bottom of the workspace) and click
with the left mouse button to change the fill color of the orbital segment.
Tip To quickly center the orbital segments, select them and click the Center Horizontally
button
.
8. Select both segments of the orbital and click the Group button
. Now you can manipulate
the segments as a single object, e.g. rotate using the Select/Move/Rotate tool
ACD/ChemSketch
User’s Guide
.
46
Creating Special Graphical Objects
II. To draw the orbital
do the following:
.
Select the Polygon tool
1. Drag horizontally to the right from the starting point of the orbital to stretch the control line.
2. Release the mouse button.
3. Move the mouse down to draw the body of the orbital.
4. Drag horizontally to the right to stretch the control lines. Note that to make the two segments
of the orbital identical, make the lengths of the control lines equal.
5. Release the mouse button.
6. Right-click to finish drawing the orbital and to switch to the Select/Move/Re-size tool
.
Tip You can draw the symmetrical orbital easier by previously choosing the Snap on Grid
command (Options menu).
7. Select the orbital and holding down the CTRL key drag to make a copy of it.
8. Choose the Rotate 90°° button
.to rotate the copy of the orbital.
9. Move the copy by dragging it.
10. Point to the gray color button in the Color Palette and click with the left mouse button to
change the color of the orbital:
Tip To quickly center the orbitals, select them and click the Center Horizontally button
.
11. Select both orbitals and click the Group button
. Now you can manipulate the orbitals as a
single object, e.g. rotate using the Select/Move/Rotate tool
ACD/ChemSketch
User’s Guide
.
47
Creating Special Graphical Objects
III. To draw this orbital
1. Select the Ellipse tool
do the following:
and drag in the workspace to draw an ellipse.
2. From the Objects menu choose the Convert to Polyline command.
3. Select the Edit Nodes tool
.
4. Drag the lowest node up.
5. Click the right mouse button to switch to the Select/Move/Re-size tool
.
6. Select the orbital by clicking on its contour and holding down the CTRL key drag to make a
copy of it.
7. Choose the Flip Top to Bottom button
to flip the lower orbital.
8. Point to the gray color button in the Color Palette and click on the left mouse button to change
the color of the orbital.
Tip To quickly center the orbitals, select them and click the Center Horizontally button
.
9. Select both orbitals and click the Group button
single object.
ACD/ChemSketch
User’s Guide
. Now you can manipulate them as a
48
Creating Special Graphical Objects
7.4 Drawing Vacuum Distillation Apparatus
This section is based on the movie apparat.exe which can be downloaded from our web
site or found in the Movies folder.
Switch to the Draw mode and set 50% zoom.
1. In the Template Window
choose the Lab Kit tab from the Template List.
2. Select the round-bottom flask by clicking on it. Click on the workspace to place the selected
template. Then right-click to hide the template shadow.
3. Open the Template Window. Select the vigreux distillation column with connecting
adapter. Connect it to flask by clicking and right-click to hide the template shadow.
4. From the Template Window choose thermometer and connect it by clicking as shown. Hide
the template shadow.
5. From the Template Window choose the distillation column and place it on the workspace
near the apparatus by clicking. Right-click to hide the template shadow and switch to the
Select/Move/Re-size tool
.
6. Click on any selection handle (black squares surrounding the distillation column) to quickly
switch to the Select/Move/Rotate tool
.
7. Rotate the selected object 60° counter-clockwise by dragging any selection handle. The
informative cursor will show you the angle of rotation (if the corresponding option has been
selected in the General tab of the Preferences dialog box (Options menu)). Note, that
holding down the SHIFT key while rotating will constrain the angle of rotation to 15° and will
help you to rotate the object exactly by 60°.
8. Move the column by dragging to attach it to the apparatus.
9. From the Template Window select the vacuum adapter and attach it to apparatus.
ACD/ChemSketch
User’s Guide
49
Creating Special Graphical Objects
10. Complete the drawing by connecting the receiving flask.
ACD/ChemSketch
User’s Guide
50
Creating Special Graphical Objects
7.5 Drawing a Two-chain DNA Strand
This section is based on the movie dna_ch.exe which can be downloaded from our web
site or found in the Movies folder.
Switch to the
mode and select the Polyline tool
.
1. Drag vertically down from the starting point of the curve to stretch the control line;
2. Release the mouse button.
3. Move the mouse to the right to draw the curve.
4. Drag vertically down to stretch the control lines. By changing the length of the control lines you
can modify the form of the curve.
5. Release the mouse button and right-click twice to finish drawing the curve and to switch to the
Select/Move/Re-size tool
.
6. Place the mouse pointer over the selected curve and holding down CTRL+SHIFT keys drag it
down (holding down the CTRL key while dragging leaves behind an instant copy of the object
and holding down the SHIFT key forces the object to move strictly vertically or horizontally).
7. Select both curves by dragging the selection rectangle around them or by clicking on each of
the curves while holding down the SHIFT key, then choose Connect Lines (in the Object
menu) to connect the right ends of the curves.
ACD/ChemSketch
User’s Guide
51
Creating Special Graphical Objects
8. Choose the Edit Nodes tool
on the Editing toolbar (at the top of the workspace). Proceed
with the following to draw a segment:
a) Click the Connect Vertices button
to connect the end nodes with a line.
b) Select the right two nodes by dragging the selection rectangle around them and click the
.
Convert to Line button
c) Click the right mouse button to leave the Edit Nodes mode and to switch to the
Select/Move/Re-size tool
.
9. Make a copy of the obtained segment by dragging it with CTRL+SHIFT as described in step 2.
Click the Flip Left to Right button
button
to flip the segment and then click the Send to Back
to send the segment to the background.
Tip It may take some time to correctly position the segments by manual moving them. To
align their position automatically, select both segments and apply the Center
Horizontally
tool to the segments.
10. Select both segments by dragging or clicking while holding down the Shift key and make a
copy of them (CTRL+drag). Correct the position using the directions in the previous step:
ACD/ChemSketch
User’s Guide
52
Creating Special Graphical Objects
11. Select the segments marked with bullets in the picture below by clicking on them while holding
down the SHIFT key. Double click on any of them to open the Objects panel. In the
tab specify the following settings:
;
Style - Shade
Color -white;
;
PatternShade and click Apply:
12. Select the other two segments (they are marked with crosses in the figure below) and specify
the following settings in the Objects panel:
;
Style - Shade
Color -white;
Pattern-
;
Shade and click Apply to obtain the following spiral:
ACD/ChemSketch
User’s Guide
53
Creating Special Graphical Objects
13. Select the whole spiral by dragging the selection rectangle so that it includes all the spiral
segments and make a copy of it by dragging+CTRL. Click the Flip Left to Right
then Flip Top to Bottom
and
buttons:
14. Select the segments marked with bullets in the picture below by clicking+SHIFT and click the
Send to Back button
ACD/ChemSketch
.
User’s Guide
54
Creating Special Graphical Objects
7.6 Drawing Lipids and Micelles
This section is based on the movie lipid.exe which can be downloaded from our web site
or found in the Movies folder.
7.6.1 Drawing the lipid
Switch to the
mode.
1. Select the Ellipse tool
. Drag in the workspace holding down the SHIFT key to draw a
circle. Click with the left mouse button on the black color from the Color Palette (above the
status bar) to color the fill of the circle.
2. Choose the Polyline tool
. Click repeatedly in the workspace near the circle to draw the
carbonic tail and click the right mouse button to finish drawing.
Tip To easily draw the symmetric zigzag line, you may previously choose the Snap on
Grid and/or Show Grid command (Options menu).
ACD/ChemSketch
User’s Guide
55
Creating Special Graphical Objects
3. Choose the Edit Nodes tool
and smooth the zigzag line in the following way:
a) Select all the nodes of the drawn polyline by dragging the selection rectangle around it.
Note that selected nodes become black.
b) Click on the Convert to Curve button
and then the Smooth button
c) Click the right mouse button to switch to the Select/Move/Re-size tool
.
.
4. Position the mouse pointer over the curve and drag it holding down the CTRL key to leave the
copy of the curve behind.
5. Arrange the tails as shown by dragging them.
Tip If you select all the elements of the phospholipid and click the Group button
, you
will be able to manipulate them as a single object, e.g. rotate it using the
Select/Move/Rotate tool
.
Try drawing the micelle picture using the copying feature (Ctrl + drag), Group, Rotate
90°, Select/Move/Rotate as well as the aligning and flipping tools :
ACD/ChemSketch
User’s Guide
56
Creating Special Graphical Objects
7.7 Creating a Poster
Using ChemSketch you can quickly draw a poster and print it on paper of any format.
ACD/ChemSketch will automatically separate the poster into pages; the only thing you have to do
(besides design them) is attach them.
This section is based on the movie poster.exe which can be downloaded from our web
site or found in the Movies folder.
1. From the File menu choose the Page Setup command.
2. Select the Poster tab in the dialog box that appears. Set the number of standard pages you
want your poster to consist of by clicking on the spin buttons. Note that you can see the
automatically calculated size of the poster in the Virtual page size field:
3. In the Size & Orient and Margins tabs set the page margins and orientation.
4. Click
.
5. Draw your poster using the tools in the Structure and Draw modes. Note that you can use the
Paste and Paste Special commands from the Edit menu to insert objects (text, pictures and
etc.) created in other Windows applications . You can also edit these objects using OLE.
6. In the Preferences dialog box (Options menu) select the View Printable area check box in
the General tab, if you want to see how your poster will be divided into individual pages while
being printed.
7. Choose the Printer Setup command from the File menu.
8. In the Select Printer dialog box choose the Set Up button
and in the Font tab
select the Print TrueType as Graphics option. Note that this step may be different for each
printer.
9. Click OK.
ACD/ChemSketch
User’s Guide
57
Creating Special Graphical Objects
10. Choose the Print command from the File menu or click the Print
toolbar to print your poster.
button on the General
11. Attach the pages.
ACD/ChemSketch
User’s Guide
58
8. Calculating Macroscopic Properties
8.1 Overview
ACD/ChemSketch is so versatile in its drawing capabilities that it is possible to overlook the
unique macroscopic properties predictions which are built right into it. These include prediction of
• molecular weight;
• percentage composition;
• molar refractivity;
• molar volume;
• parachor;
• index of refraction;
• surface tension;
• density;
• dielectric constant; and
• polarizability.
In this Chapter, the simple means to calculate these properties is described. The algorithms for
calculating these properties are briefly described, and a summary of the agreement is shown for
calculated vs. experimental values for several hundred compounds.
Please note, that in this chapter, “properties” is used to mean physico-chemical values, in contrast
to the general use of “properties” in ChemSketch documents, where the characteristics of the
graphic display are referred to. For example, the Structure Properties command in the Tools
menu permits you to set font size, bond thickness, color, etc.
8.2 Calculating Macroscopic Properties
8.2.1 Menu Command
To determine any one or all of the following molecular properties, when in Structure mode, draw a
structure, select Tools and then choose the Calculate… menu command. This permits
calculation of
• molecular weight;
• percentage composition;
• molar refractivity;
• molar volume;
• parachor;
• index of refraction;
• surface tension;
• density;
• dielectric constant;
• polarizability; or
• all properties at once.
ACD/ChemSketch
User's Guide
59
Calculating Macroscopic Properties
Once chosen, the calculated property is displayed in a Calculation Result dialog box. The text
content of this can be immediately pasted on the ChemSketch screen if desired by clicking on the
Copy to Editor button. For example, choosing Tools>Calculate…>All properties for benzoic
acid will show the following dialog:
8.2.2 Automatic Display on Status Line
It is also possible to view the macroscopic property directly on the status line as shown:
Just click on the box to the far right on the status line and choose the property desired. By default,
20
this is set to molecular weight. In the example shown, the dielectric constant, ε , has been
specified.
ACD/ChemSketch
User’s Guide
60
Calculating Macroscopic Properties
8.3 Algorithms for Calculating Macroscopic Properties
At the heart of the additive-constitutive calculation algorithm of all physico-chemical properties in
ChemSketch lies the presumption that these properties can be estimated using additive atomic or
group increments. Apart from molecular weight (MW), which is trivial to calculate, the algorithms
may be divided into three general groups:
• basic macroscopic properties: Molar Volume (MV), Molar Refractivity (MR) and Parachor
(Pr);
• derived macroscopic properties: density (d) , refractive index (n) and surface tension (γ);
and
• the dielectric constant ε (Permittivity).
Basic macroscopic properties such as Molar Volume (MV), Molar Refractivity (MR) and the
Parachor (Pr) are calculated first for the input structure. The atomic additive increments in such
an algorithm depend on the bonds (single, double, aromatic, etc.) of this atom and on neighboring
atoms. ChemSketch rapidly analyzes the input structure to determine the class of each atom, i.e.,
whether it is cyclic, aromatic, aliphatic, etc.
The prediction algorithms for density (d) , refractive index (n) and surface tension (γ) are founded
on well known physico-chemical formula which can be found in most physical chemistry
textbooks. These express d, n and γ as functions of MV, MR or Pr. Once the MV, MR or Pr, have
been predicted by additive means, it is straightforward to predict d, n and γ using these formula.
The determination of the additive-constitutive atomic increments for MV, MR and Pr were obtained
internally by ACD using large experimental data bases relating structure to density, refractive
index and surface tension. The MV, MR and Pr were recalculated from d, n and γ. These
parameters are proprietary information of Advanced Chemistry Development.
The prediction of the dielectric constant ε (permittivity) resembles very closely the prediction of
Boiling Point, which is a separate ACD product from ChemSketch. Senior scientists at ACD
discovered an additive function, which relates the dielectric constant to other macroscopic
properties which can be additively treated, such as MV. Once this relationship was discovered,
the additive-constitutive atomic increments for this function were obtained using large Data Bases
consisting of molecular structures and their observed dielectric constants. Using the function and
estimated MV for the input structure, its dielectric constant can be quickly predicted.
8.3.1 Molar Volume, MV
By definition,
MV =
MW
.
d
ChemSketch calculates molar volume from additive increments. The additive atomic increments
were obtained using a Data Base of density and calculated MW.
ACD/ChemSketch
User’s Guide
61
Calculating Macroscopic Properties
8.3.2 Molar Refractivity, MR
The Lorentz-Lorenz equation relates refractive index, density, and refractive index:
MR =
n 2 − 1 MW
⋅
n2 + 2 d
ChemSketch calculates molar refractivity from additive increments. The additive atomic
increments were obtained using a Data Base of density, refractive index and calculated MW.
8.3.3 Parachor, Pr
By definition,
Pr = ç
MW
÷γ
d
1
4
ChemSketch calculates the parachor from additive increments. The additive atomic increments
were obtained using a Data Base of density, surface tension, and calculated MW.
8.3.4 Density, d
By definition,
d=
MW
MV
ChemSketch calculates the density from MW and the calculated molar volume (see above).
8.3.5 Refractive Index, n
By the Lorentz-Lorenz equation,
n=
2 ⋅ MR + MV
MV − MR
ChemSketch calculates the refractive index from the molar volume and molar refractivity, both of
which are calculated as above.
8.3.6 Surface Tension,==γ
By definition,
P
γ =ç r ÷
MV
4
ChemSketch calculates the surface tension from calculated MV (see above) and calculated Pr
(see above).
ACD/ChemSketch
User’s Guide
62
Calculating Macroscopic Properties
8.3.7 Dielectric Constant, ε (Permittivity)
f ( ε ) = f ( MV , AdditiveFunction)
ChemSketch calculates the dielectric constant from calculated MV (see above) and a proprietary
empirical additive function.
8.3.8 Polarizability
This property is calculated from the Molar Refractivity (MR) (see Section 8.3.2) as follows:
Polarizability = 0.3964308 ⋅ MR
8.4 Correlation Statistics with Experimental Data
8.4.1 Distribution of Molar Refractivity Prediction Error
120
100
80
60
40
20
0
-1.3
Vertical scale:
Horizontal scale:
Number of tested structures:
-0.9
-0.5
-0.1
0.3
Number of Tested Structures
ACD Molar Refractivity Estimation Error
592
MRexp = 0.99901(±0.00067) MRcalc + 0.026(±0.025)
ACD/ChemSketch
0.7
User’s Guide
R=0.999867, StD=0.23
63
Calculating Macroscopic Properties
8.4.2 Distribution of Molar Volume Prediction Error
140
120
100
80
60
40
20
0
-12
-8
-4
Vertical scale:
Horizontal scale:
Number of tested structures:
0
4
8
12
Number of Tested Structures
ACD/Molar Volume Estimation Error
671
MVexp = 0.9989(±0.0020) MVcalc + 0.18(±0.29)
R=0.998626, StD=2.74
8.4.3 Distribution of the Parachor Prediction Error
90
80
70
60
50
40
30
20
10
0
-12
Vertical scale:
Horizontal scale:
Number of tested structures:
-8
-4
0
4
12
Number of Tested Structures
ACD/Parachor Estimation Error
377
Prexp = 0.9978(±0.0015) Prcalc + 0.68(±0.46)
ACD/ChemSketch
8
User’s Guide
R=0.99958, StD=3.11
64
Calculating Macroscopic Properties
8.4.4 Distribution of the Refractive Index Prediction Error
180
160
140
120
100
80
60
40
20
0
-0.07
-0.05
Vertical scale:
Horizontal scale:
Number of tested structures:
-0.03
-0.01
0.01
0.03
0.05
Number of Tested Structures
ACD/Refractive Index Estimation Error
665
n20exp = 0.98035(±0.0073) n20calc + 0.028(±0.011)
R=0.982, StD=0.012
8.4.5 Distribution of the Density Prediction Error
180
160
140
120
100
80
60
40
20
0
-0.16
Vertical scale:
Horizontal scale:
Number of tested structures:
-0.08
0.00
0.08
Number of Tested Structures
ACD/Density Estimation Error
671
d20exp = 0.9947(±0.0036) d20calc + 0.0052(±0.0036)
ACD/ChemSketch
0.16
User’s Guide
R=0.995683, StD=0.028
65
Calculating Macroscopic Properties
8.4.6 Distribution of the Surface Tension Prediction Error
100
90
80
70
60
50
40
30
20
10
0
-12
-8
Vertical scale:
Horizontal scale:
Number of tested structures:
-4
0
4
8
12
Number of Tested Structures
ACD/Surface Tension Estimation Error
432
st20exp = 0.998(±0.018) st20calc + 0.08(±0.53)
R=0.934720, StD=2.84
8.4.7 Distribution of the Dielectric Constant (Permittivity) Estimation Error
30
25
20
15
10
5
0
-0.25
-0.125
0
0.125
0.25
Vertical scale:
Horizontal scale:
Number of tested structures:
Number of Tested Structures
Dielectric constant (Permittivity) Estimation Error
85
*** Note *** Derived only for hydrocarbons
εexp = 1.005(0.033)εexp - 0.013(0.072)
R=0.9588, StD=0.079
ACD/ChemSketch
User’s Guide
66
9. Special Function Keys
The ChemSketch Window is an extremely versatile molecular structure input editor. For this
reason, several ACD software items are now accessible as single buttons from the ChemSketch
interface. This Chapter describes two special add-on modules which can also be accessed from
the ChemSketch interface. ACD/Tautomers is now included with both ACD/ChemSketch
commercial and freeware; and ACD/Dictionary is available only with the ACD/ChemSketch
commercial software.
9.1 Tautomers
The Tautomers button
will automatically check the structure that is drawn alone in the
ChemSketch Window or which is selected from several other molecules and will automatically
search for Tautomeric forms.
ACD/Tautomers is such a popular request item that we cover it here in some detail. For more
information on Tautomers, as well as many examples of overlooked tautomers in the chemical
literature, please refer to the ACD/Tautomer User’s Guide.
1. Using the above technique draw the following structure:
N
O
HN
N
O
2. Select the structure (use the Select/Move tool
), click the Check Tautomeric Forms
on the Top toolbar. The program starts generating and checking tautomeric forms
button
of the drawn structure and when the process is finished, the following dialog box is displayed:
3. To browse through all of the generated structures, click on the
ACD/ChemSketch
User's Guide
or
buttons.
67
Special Function Keys
4. To replace the drawn structure with the currently displayed structure, click on the Replace
button
.
5. Please refer to the ACD/Tautomers User’s Guide for more information!
9.2 Dictionary
ACD/Dictionary is an add-in “Look-up” module, now included with all commercial copies of
ACD/ChemSketch. It is extraordinarily useful at finding “chemicals” by their common names.
ACD/Dictionary finds chemical structures according to their chemical name. It contains almost
48,000 systematic and non-systematic names and their corresponding molecular structures. The
dictionary is searchable by both the full chemical name and name fragments.
Although the many features of ACD/Dictionary are covered in the ACD/Dictionary User’s Guide,
we introduce it briefly here.
On the right References toolbar, click on the Dictionary
button to view the ACD/Dictionary
screen:
Note
If you purchased ACD/ChemSketch but do not see the ACD/Dictionary button in the
ChemSketch Window when you are in Structure mode, please verify that you have
correctly entered TWO registration numbers at the time of installation – one for
ACD/ChemSketch, and one for the ACD/Dictionary add-in.
Please refer to the ACD/Dictionary User’s Guide for more information!
ACD/ChemSketch
User’s Guide
68
10. Goodies
10.1 What are “Goodies”?
What are "goodies"? They are additional tool-buttons that extend the functionality of ChemSketch.
They are, actually, implemented as ACD/ChemBasic programs associated with the 22 new
ChemSketch buttons. ACD/ChemBasic is a special programming language that enables you to
customize ACD software, and we think this is a great way to show off how useful it is—and at the
same time make your ChemSketch even more versatile!
Note that you do not need to know anything about ACD/ChemBasic (although, if you wish, you can
learn it by using the Goodies' code as example).
10.2 Where Can I Get Them?
These helpful buttons are already included in most ChemSketch 4.5 installations. To check if you
already have them, look for all *.BAS files within your ChemSketch folder. If you don’t find any,
you can download Goodies from our web site free of charge at
http://www.acdlabs.com/products/chem_dsn_lab/goodies.html
They are easy to install and to use. Just follow the installation instructions provided on the Web
page and enjoy these new ChemSketch features.
Note that you can remove these new buttons from your ChemSketch toolbar at any time.
Note
ChemBasic Goodies buttons are only available when you are in Structure Mode.
10.3 Goodies
Below is the list of Goodies buttons that are available at the moment from our Web site:
Button
Function
How to use
Insert Page
Inserts blank pages at any place
within your ChemSketch
document. Note that the usual
way - through a Pages/New menu
- adds a page to the end of
document.
Clones current page (together
with its contents) a given number
of times - it is very useful for filling
in the document with page
templates, tables, titles, etc. New
pages are added at the end of a
document.
Moves and copies pages - i.e.
∗ Go to the page before which you want to insert a blank
page and click the Insert Page button.
Clone Page
Move/ Copy
ACD/ChemSketch
∗ Make the page which you wish to clone active.
∗ Click the Clone Page button.
∗ In the dialog box that appears specify the number of
clones and click OK.
∗ Go to the page which you wish to move or copy.
User's Guide
69
Goodies
Button
Function
How to use
Page
changes page order in your
document.
∗ Click the Move/Copy Page button.
∗ In the dialog box that appears type in number of the
page after which you wish to place the current page and
click OK.
∗ Select Yes in the Message Box which appears if you
want to copy the current page. Select No if you want to
just move it. Click Cancel to stop program execution.
Delete
Pages
Deletes a range of pages at a
time.
∗ Click the Delete Pages button.
∗ in the dialog box which appears type the sequence of
pages to delete.
∗ You will be prompted about disabling Undo after
program execution. Choose OK if you wish to delete the
pages. Click Cancel to abort program execution.
Annotate
Document
Annotates your documents based
on the content of the leftmost top
textbox on each page. This is
very convenient for managing
large documents and
presentations.
Exports all the molecules in a
current page into a VRML 2.0 file,
which you may then view with
Cosmo, GLView, or any other
VRML browser.
∗ Open or create a document.
∗ Click the Annotate Document button.
∗ After program execution click on the page counter from
the bottom status line to see page names.
SDF-toSketch
Converter
Imports the data (molecules,
texts, etc.) from a file in MDL's
SDF format into ChemSketch
document. Each record in the
SDF file becomes a page.
LIMITATION: no more than 100
records may be imported
(ChemSketch document may
contain 100 pages maximum). If
the SDF file contains more than
100 records then you will be
prompted about partial SDF
conversion (and the number of
successfully imported records).
∗ Click the SDF-To-Sketch Converter button.
∗ In the dialog box type in the full path and name (or mask
- “*” and “?” are acceptable in the file-mask) of the SDF
file which you want to import and click OK. If you type in
the filename without specifying the full path, the program
will search your SDF file in ChemBasic program
directory. So, if you place the needed SDF file in the
same directory with sdf2sk.bas then simply specify the
file name without a path. If you place the SDF file in
ChemBasic’s program sub-directory then iyou need only
type in the sub-directory name.
∗ If searching the result contains more than 1 file, the
program will suggest you select one, then will ask for the
field name. Specify the field name and click OK.
Document
Browser
Looks through the directories to
find specified ChemSketch
documents as well as to search
ChemSketch documents for the
text string without opening them.
Creates tables or/and aligns
objects according to a specified
number of rows and columns
∗ Click this button and follow the instructions that appear
in the messages. This is a very useful tool for searching
and previewing ChemSketch documents
Sketch-toVRML
Converter
Table
Wizard
ACD/ChemSketch
∗ Draw structures which you wish to export in one page.
∗ Click the Sketch-To-VRML Converter button.
∗ Select OK in the Ready to export... message box which
appears (or CANCEL to abort program).
∗ Type in the file name and path and click OK. Note that if
you have typed in the filename only, the program will
place the resulting WRL file in the same directory with
sk2vrml.bas.
∗ Specify the desired structure presentation by typing the
corresponding letter in the next dialog box and click OK.
To create a table and place the drawn objects into it
∗ Click the Table Wizard button.
∗ You will be informed about the number of objects on the
page and some suggestions on how to align them.
Select YES.
∗ Specify the number of rows and columns in the table.
∗ Then choose whether to create borders in the table.
User’s Guide
70
Goodies
Button
Function
How to use
To create an empty table
∗ Run the Table Wizard with the blank page active.
∗ or
∗ Select NO in the message box that suggests that you
should align objects.
Note that program execution is possible only with a single
structure on the page.
∗ Draw or leave only one structure on the page and click
this button.
∗ In the dialog box that appears specify the element which
you want to be replaced and click OK.
∗ In the next dialog box specify an element that should
replace the one specified before and click OK.
Note that program execution is possible only with a single
structure on the page.
∗ Draw or leave one structure on the page and click this
button.
∗ Specify the required molar concentration and solution
volume in the dialog box.
∗ See the result in the Message Box that appears.
Replace
Element
Replaces all the atoms of a given
type with atoms of another type in
a chemical structure. This is very
useful for drawing, for example,
perfluorinated structures.
Solution
Calculator
Calculates the weight of a
compound required for preparing
a solution of the user-defined
volume and molar concentration.
Label
Printer
Quickly creates labels for
chemicals and print them on the
Avery Standard (45 template
sheets included) or your own
sheets
∗ Draw structures for which you want to create labels and
click this button.
∗ You can create labels for structures from the *.sdf file if
you run this program with an empty active page.
∗ For more information see lprinter.txt provided in the
Goodies directory.
Peptide
Builder
Builds a 3D peptide structure from
the amino acids sequence.
∗ Refer to the pepbuild.sk2 provided in the Goodies
directory as a guide to using this button.
Carbohydrate
Builder
Builds a structure from
carbohydrate abbreviated names.
∗ For information about how to work with this button refer
to the sugarsk.txt file that you can find in the Goodies
directory.
Reorder
Allows you to cut-and-paste or
copy-and-paste a sequence of
pages to a new position within the
same document.
∗ Open the document within which you want to reorder the
pages.
∗ Click this button and follow the instructions in the
messages.
Rename
Pages
Changes the name of pages
∗ Open the document.
∗ Click this button.
∗ Type in the number of a page you want to name and
click OK.
∗ Type the name and click OK.
∗ The names of the pages are shown when you click on
the “Page 1/1” button at the bottom of your ChemSketch
Window.
Insert Page
Numbers/
Annotations
Inserts page numbers or complex
annotations in your document.
Note that annotation will be
inserted in a left-bottom corner of
the page.
∗ Open or create a document.
∗ Click the Annotate Pages button
∗ Type in a page annotation template in dialog box that
appears and click OK.
Annotation template keys:
∗ $P - inserts page numbers
Pages
ACD/ChemSketch
User’s Guide
71
Goodies
Button
Function
How to use
∗ $N - inserts pages names (that can be inserted using
Rename Pages goody or using Pages/Rename
command)
You can also include any fixed text into your annotation
template.
For example:
Template “$P” will insert page numbers
Template “$N” will place page names in a left-bottom
corner of each page
Template “Page $P” will insert “Page 1”, “Page 2”, etc.
annotations
Template: “Page $P: $N” will insert “Page 1: Page Name”,
etc. Annotations
Template that does not contain any keys will insert fixed
text for each page - you can, for example, sign all pages
with your name.
∗ All the details may be found in FillTmpHelp.doc provided
in the Goodies directory.
Sketch-ToSDF
Converter
Exports all the selected pages of
a current document into an HTML
file, which you may then view with
your favorite web-browser. Note:
Requires ChemSketch 4.01.
Exports all the structures from the
current page or from the whole
document into an SDF file.
Explicit
Hydrogens
Explicitly shows hydrogens in the
drawn structure(s).
Remove
Spectator
Ions
(Desalt)
An SDF file that contains one or
more salt structure entries can be
changed to a “one-molecule-perentry” SDF file. This button
removes the smallest ion, either
by MW or by number of atoms.
For example, sodium acetate will
have the sodium atom removed,
and acetic acid will remain
behind. (Note: the molecule left
behind is put into neutral form.)
∗ Specify the name and the path for an *.sdf file. Note that
if you type in the filename only, the program will look for
file in the Goodies directory.
∗ Then define a criterion for smallest part: mass or atom.
∗ The resultant SDF file will be saved in the same directory
with the one you have specified under the newfile.sdf
name.
A special sample file, “salts.sdf” with 5 salts in it is placed
in the Goodies directory for testing.
Hint: use the “Import SDF” Goody to double-check
Newfile.sdf.
Nucleic
Acid Builder
Builds a 3D nucleic acid (DNA,
RNA) structure (one or two
chains) from your input sequence.
∗ Click this button and follow the instructions from the
messages.
Create
HTML
ACD/ChemSketch
∗ Open the page with the structures you want to export.
∗ Choose this button and choose what you want to import
- the current page or the whole document. Click OK.
∗ Specify the name and the path for an *.sdf file. Note that
if you type in the filename only, the program will place
the resulting sdf file in the same directory with
expsdf.bas file.
∗ * Draw structure(s) on the page and click this button.
Note: you can use standard ChemSketch command Tools/Remove Explicit Hydrogens - to revert this goody
action.
User’s Guide
72