1
R
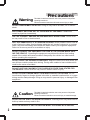
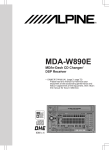
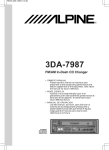
CDA-7846E
FM/AM Compact Disc Receiver
• OWNER'S MANUAL (page 2- page 55)
Please read this manual to maximize your
enjoyment of the outstanding performance and
feature capabilities of the equipment, then retain
the manual for future reference.
OPEN
DISC TITLE MEMORY
RLS
INTLZ
PWR
DISC-IN
CD RECEIVER 40Wx4
CHG
MODE
LOUD
BAND
T.S.M.
SOURCE
DN
UP
F1
DN
DN
CLK
TITLE
DEMO
TUNE
A. ME
MAX
MIN.
FUNC
FUNC
F1
F2
7
1
UP
UP
F2
8
2
F3 ALL
F4 ALL
F5
M.I.X. 9
D.A.P. 3
RPT 10
MONO 4
SCAN 11
T.RCL 5
F3
F6
MUTE 12
MUTE 6
CT
H
M
F4
F5
F6
DX SEEK
ST LOUD
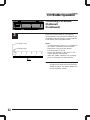
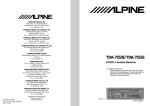
CDA-7846E
English
Precautions
Warning
This label is intended to alert the user to the presence of important
operating instructions.
Failure to heed the instructions will result severe injury or death.
DO NOT DISASSEMBLE OR ALTER. Doing so may lead to accident, fire or electric
shock.
KEEP SMALL ARTICLES OUT OF THE REACH OF CHILDREN. If swallowed,
consult a physician immediately.
USE THE CORRECT AMPERE RATING WHEN REPLACING FUSES. Failure to do
so may result in fire or electric shock.
HALT USE IMMEDIATELY IF A PROBLEM APPEARS. When problems occur such as
a lack of sound or video, foreign objects inside the unit, smoke coming out, or noxious
odors, stop use immediately and contact the dealer where you bought the equipment.
Failure to do so may result in an accident or injury.
DO NOT OPERATE THE EQUIPMENT OR LOOK AT THE SCREEN WHILE DRIVING THE VEHICLE. Operating the equipment may distract the driver from looking
ahead of the vehicle and cause accident. Always stop the vehicle in a safe location
before operating this equipment.
DO NOT RAISE THE VOLUME EXCESSIVELY. Keep the volume at a level where you
can still hear outside noises while driving. Driving while unable to hear outside noises
could be the cause of accident.
DO NOT USE THIS EQUIPMENT FOR PURPOSES OTHER THAN STATED FOR
THE VEHICLE. Failure to do so may result in electric shock or injury.
DO NOT PLACE FOREIGN OBJECTS IN INSERTION SLOTS OR GAPS. Do not
insert hands, fingers or foreign objects in the disc or cassette insertion slots, or in gaps
during monitor startup/storage. Doing so may result in personal injury or damage to the
equipment.
Caution
This label is intended to alert the user to the presence of important
operating instructions.
Failure to heed the instructions can result injury or material damage.
DO NOT BLOCK VENTS OR RADIATOR PANELS. Blocking them may cause heat to
build up inside and may result in fire.
STOP THE VEHICLE IF UNIT OPERATION MIGHT INTERFERE WITH DRIVING.
2
Contents
English
Page
4 .......................................................................................... Precautions
7 ...................................................................... Detachable Front Panel
Basic Operation
8 ........................................................................... Initial System Start-up
9 .................................................................... Turning Power On and Off
9 ...................................................................... Turning Loudness On/Off
10 ........................................................................ Subwoofer On and Off
11 ............................................ Non Fading Pre-Out (N.F.P.) On and Off
12 .................................... Adjusting Volume/Bass/Treble/Balance/Fader
13 ........................................................................... Audio Mute Function
13 ............................................................. Sound (Beep) Guide Function
14 .................................................................. Adjusting Display Contrast
15 ................................................................. Turning Mute Mode On/Off
16 ..................................................................................... Demonstration
17 ................................................................................... Displaying Time
18 ........................................................................................ Setting Time
19 ................................................................... Using the Function Button
Radio Operation
20 .................................................................................... Manual Tuning
21 ....................................................................... Automatic Seek Tuning
22 ....................................................... Manual Storing of Station Presets
23 ................................................. Automatic Memory of Station Presets
24 ................................ Storing into Direct Access Preset (D.A.P.) Band
25 .................................................................... Tuning to Preset Stations
26 ...................................................................... Displaying Station Titles
27 ..................................................................................... Titling Stations
29 ................. Displaying Station Signal Strength [T.RCL (Tuner Recall)]
29 ....................................................................... Mono/Stereo Switching
CD Operation
30 ...................................................................................... Inserting Disc
31 .................................................................................... Removing Disc
32 ...................................................................... Normal Play and Pause
33 ............................................................................ Music Sensor (Skip)
34 ............................................................... Fast Forward and Backward
34 ......................................................................................... Repeat Play
35 .......................................................................... M.I.X. (Random Play)
36 ............................................................................. Scanning Programs
37 ........................................................................... To Display CD Titles
38 ........................................................................................... Titling Disc
40 ................................................................................ Erasing Disc Title
CD Shuttle Operation
41 ........................................................ Controlling CD Shuttle (Optional)
43 ........................................ Searching Titled Discs (Title Search Menu)
44 ...................................................................... Multi-Changer Selection
46 ................................................................................. Remote Control
49 ............................................................................................ Disc Care
50 ........................................................................... In Case of Difficulty
54 .................................................................................... Specifications
3
Precautions
English
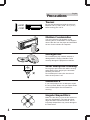
Thermal
+60°C
–10°C
Be sure the temperature inside the vehicle is
between +60°C (+140°F) and –10°C (+14°F)
before turning your unit on.
Moisture Condensation
You may notice the CD playback sound
wavering due to condensation. If this happens,
remove the disc from the player and wait about
an hour for the moisture to evaporate.
Damaged Disc
Do not attempt to play cracked, warped, or
damaged discs. Playing a bad disc could
severely damage the playback mechanism.
Never Attempt the Following
Do not grip or pull out the disc while it is being
pulled back into the player by the automatic
reloading mechanism.
Do not attempt to insert a disc into the unit
when the unit power is off.
Maintenance
If you have problems, do not attempt to repair
the unit yourself. Return it to your Alpine dealer
or the nearest Alpine Service Station for
servicing.
Irregular Shaped Discs
Make sure the discs you use in this unit do not
have any irregularities. The outer and inner
edges should be round and smooth. Use of
irregularly shaped discs may cause damage to
the mechanism.
4
Precautions
English
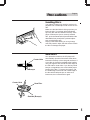
Inserting Discs
Your player accepts only one disc at a time for
playback. Do not attempt to load more than one
disc.
Make sure the label side is facing up when you
insert the disc. Your player will automatically
eject any disc that is inserted incorrectly. If the
player continues to eject a correctly inserted
disc, push the Reset switch (located behind the
detachable front panel) with a pointed object
such as a ball-point pen.
Playing a disc while driving on a very bumpy
road may result in skips, but this will not scratch
the disc or damage the player.
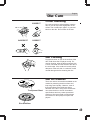
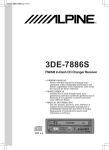
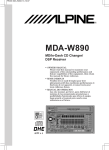
New Discs
Center Hole
Bumps
Center Hole
As a protective measure, the CD player will
automatically eject discs that have either been
inserted incorrectly or have irregular surfaces. If
a new disc is ejected immediately after loading,
use your finger to feel around the outer edge of
the CD and its center hole. If you feel any small
bumps or irregularities, this could inhibit proper
loading of the disc. To remove the bumps, rub
the inside edge of the hole and outside edge of
the disc with a ball-point pen or other such
instrument, then insert the disc again.
New Disc
Outside (Bumps)
5
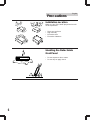
Precautions
English
Installation Location
Make sure the CDA-7846E player/receiver will
not be exposed to:
•
•
•
•
Direct sun and heat
High humidity
Excessive dust
Excessive vibrations
Handling the Detachable
Front Panel
•
•
6
Do not expose to rain or water.
Do not drop or apply shock.
Detachable Front
Panel
English
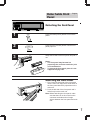
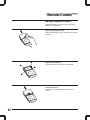
Detaching the Front Panel
1
Press the PWR (Power) button to turn off the
power.
INTLZ
PWR
2
Press the RLS (release) button until the front
panel pops out.
RLS
3
Grasp the left side of the front panel and pull it
out.
Notes:
• The front panel may become hot
(especially the connector terminals), this
is not malfunction.
• To protect the front panel, place it in the
supplied carrying case.
Attaching the Front Panel
1. First, insert the right side of the front panel
into the main unit. Align the 2 small holes on
the front panel with the 2 projections on the
main unit.
2. Push the left side of the front panel until it
locks firmly into the main unit.
1
2
Note: Before attaching the front panel, make
sure that there is no dirt or dust on the
connector terminals and no foreign
objects between the front panel and main
unit.
7
Basic Operation
English
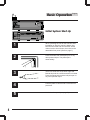
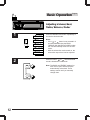
Initial System Start-Up
8
1
When operating the unit for the first time after
installation or after the vehicle's battery has
been disconnected and reconnected, set the
volume level to its minimum, then remove the
detachable front panel. (Refer to page 7.)
2
Press the button with a ball-point pen or any
other pointed object. The plate opens
automatically.
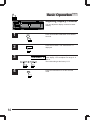
3
There is a small hole at the lower right side.
Behind this hole the red Reset switch is located.
Press the Reset switch with a ball-point pen or
any other pointed object.
4
Push the plate to close it until a click sound is
produced.
5
Attach the front panel (see page 7).
Basic Operation
English
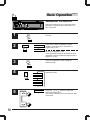
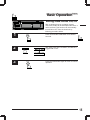
Turning Power On and Off
1
Press the PWR button to turn off the unit.
INTLZ
PWR
The volume level gradually increases to the
previous level you were listening to before the
unit was turned off. Press the PWR button
again to turn off the unit.
Turning Loudness On/Off
Loudness introduces a special low- and highfrequency emphasis at low listening levels. This
compensates for the ear's decreased sensitivity
to bass and treble sound.
1
MODE
LOUD
Press and hold the LOUD button for at least 2
seconds to activate or deactivate the loudness
mode.
LOUD
The display shows "LOUD" when the loudness
mode is activated.
Note: Depending on the device connected to
the CDA-7846E, not all functions or
display indications will operate as
described. For details, consult your
Alpine dealer.
9
Basic Operation
English
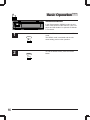
Subwoofer On and Off
Change the setting when an optional product
having the Subwoofer output terminals is AiNET connected.
1
2
Press and hold the PWR button for at least 3
seconds.
INTLZ
PWR
F1
SUBW
ON
SUBW
OFF
Press the F1 button repeatedly to select
"SUBW.". With each press, subwoofer is
toggled ON or OFF.
When the subwoofer is ON:
Press the MODE button for at least 2 seconds
repeatedly, and the subwoofer output phase is
toggled 0° or 180°.
3
4
Press the PWR button, after setting the
subwoofer ON.
INTLZ
PWR
MODE
LOUD
VOLUME
Press the MODE button repeatedly to select the
subwoofer mode.
BALANCE
FADER
Subwoofer
5
10
SW 15
Press the
or
button to adjust the
subwoofer output level.
The setting is displayed for 5 seconds and then
memorized.
Basic Operation
English
Non Fading Pre-Out
(N.F.P.) On and Off
1
2
Press and hold the PWR button for at least 2
seconds.
INTLZ
PWR
N.F.P. ON
F1
N.F.P. OFF
Press the F1 button.
With each press, N.F.P. is toggled On or Off.
N.F.P. ON: In this position, the Front PreOutput will not be affected by the
fader. This is ideal for driving a
subwoofer amplifier.
N.F.P. OFF: Returns to normal fader mode.
Note: Set the N.F.P. to OFF unless the
subwoofer is used.
3
INTLZ
PWR
Press the PWR button to set the selected
mode.
11
Basic Operation
English
Adjusting Volume/Bass/
Treble/Balance/Fader
1
VOLUME
MODE
LOUD
BASS
TREBLE
BALANCE
FADER
2
Press the MODE/LOUD button repeatedly to
choose the desired mode.
Notes:
or
button is not pressed in 5
• If the
seconds after selecting the BASS,
TREBLE, BALANCE and FADER modes,
the unit automatically returns to the VOL
mode.
• With the subwoofer mode turned on, the
subwoofer output level can be adjusted.
Press the button
or
until the desired
sound is obtained in each mode.
Note: The BASS and TREBLE settings for
each source (FM, AM and CD) are
automatically memorized. These
settings remain until you manually
change them.
12
Basic Operation
English
Audio Mute Function
Activating this function will instantly lower the
volume level by 20 dB.
1
F6
F6
(ON)
MUTE
F6
(OFF)
MUTE
Press the F6 button to activate the MUTE
mode. The volume bar graphic indicator will
flash in the display and the audio level will
decrease by about 20 dB.
Pressing the F6 button again will bring the
audio back to its previous level and the display
will return to normal.
In the CD mode, press the F6 button when the
FUNC indicator is off.
Sound (Beep) Guide Function
This function will give audible feedback with
varying tones depending upon the button
pressed.
1
2
3
Press and hold the PWR button for more than 2
seconds.
INTLZ
PWR
F2
INTLZ
PWR
BEEP
ON
BEEP
OFF
With each press of the F2 button, BEEP is
toggled ON or OFF.
Press the PWR button to set the selected
mode.
13
Basic Operation
English
Adjusting Display Contrast
You can adjust the display contrast for better
visibility.
1
2
CONTRAST 0
DN
14
Press the F3 button. The "CONTRAST" is
displayed.
F3
3
4
Press and hold the PWR button for at least 2
seconds.
INTLZ
PWR
INTLZ
PWR
UP
c f
Press the
or
button to adjust the contrast
of the display. You can adjust in a range of –6
and +6.
The initial setting at the factory is "0".
Press the PWR button to set the selected
mode.
Basic Operation
English
Turning Mute Mode On/Off
With a cellular phone or navigation system
connected, audio will be interrupted whenever a
call is received. This function can be manually
turned ON or OFF from the head unit by
following procedure below.
1
2
INTLZ
PWR
F4
Press and hold the PWR button for at least 2
seconds.
MUTE ON
With each press of the F4 button, the MUTE is
toggled ON or OFF.
MUTE OFF
3
INTLZ
PWR
Press the PWR button again to return to normal
operation.
15
Basic Operation
English
Demonstration
In the Demonstration (DEMO) mode, the unit
scans each function of the sources; Tuner, CD
player and CD shuttle if an optional CD Shuttle
is connected.
1
2
16
DEMO
DEMO
Press the DEMO button to activate the DEMO
mode.
The DEMO mode is activated and the unit
automatically performs the operation.
To end the DEMO mode, press the DEMO
button.
Basic Operation
English
Displaying Time
1
CLK
TITLE
12:00
Press the CLK (CLOCK) button to display the
time. The unit displays the time.
Note: Selecting any tuner or CD function while
in the Clock mode will interrupt the time
display momentarily. The function
selected will be displayed for about 5
seconds before the time returns to the
display.
2
CLK
TITLE
Press the CLK (CLOCK) button to turn off the
time and to show other functions.
17
Basic Operation
English
Setting Time
1
CLK
TITLE
12:00
Press the CLK (CLOCK) button to display the
time.
Note: If the power to the unit is off, turn the
power.
2
3
4
5
CLK
TITLE
F4
12:30
12:00
Press the F4 button while the time indication is
blinking to set seconds to "0".
Example: To adjust to 9:35
F5
F6
9:00
Press the F5 button to adjust the hours while
the time indication is blinking.
9:35
Press the F6 button to adjust the minutes while
the time indication is blinking. The time
indication will stop blinking 5 seconds after the
last adjustment. The time will automatically be
set.
9:35
18
Press and hold the CLK (CLOCK) button for at
least 2 seconds. The time indication will begin
to blink.
Basic Operation
English
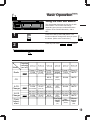
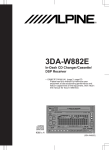
Using the Function Button
The chart below describes the function of each
preset button. The function will change
depending upon the source selected and the
condition of the FUNCTION switch, ON or
OFF.
1
Press the FUNC (FUNCTION) button. The
function mode will change each time you press
the button. (Refer to the chart below.)
FUNC
2
Press any one of the
F1
Mode
Radio
F2
F3
Function
indicator
(on/ off)
FUNC
F4
F5
F1
F1
–
F6
F6
F2
F3
F4
F5
Preset 1 Preset 2 Preset 3 Preset 4 Preset 5
P–UP
D.A.P.
MONO
T.RCL
P–DN
(Preset DOWN)
buttons.
(Preset UP)
CD
F6
Preset 6
MUTE
(Direct Access (Stereo/Monaural) (Tuner Recall)
Memory Preset)
M.I.X.
RPT
(Randam Play)
(Repeat)
SCAN
MUTE
Disc Select 1 Disc Select 2 Disc Select 3 Disc Select 4 Disc Select 5 Disc Select 6
6-CD
Changer
FUNC
D–DN
D–UP
M.I.X.
RPT
(Disc DOWN)
(Disc UP)
(Randam Play)
(Repeat)
SCAN
MUTE
Disc Select 1 Disc Select 2 Disc Select 3 Disc Select 4 Disc Select 5 Disc Select 6
12-CD
Changer
Clock
Adjustment
Disc Select 7 Disc Select 8 Disc Select 9 Disc Select 10 Disc Select 11 Disc Select 12
FUNC
D–DN
D–UP
M.I.X.
RPT
(Disc DOWN)
(Disc UP)
(Randam Play)
(Repeat)
SCAN
MUTE
Time Signal Hour
Minute
Adjust- Adjustment Adjustment
ment
(HOUR)
(CT)
(MIN)
19
English
Radio Operation
Manual Tuning
1
Press the SOURCE button to select the radio
mode.
SOURCE
Press the BAND button repeatedly until the
desired radio band is displayed.
2
BAND
T.S.M.
FM1
FM2
AM
Press the TUNE button repeatedly until
"MANUAL" appears in the display.
3
DX SEEK
TUNE
A. ME
Note: The initial mode is DX SEEK.
LOCAL SEEK
MANUAL
4
F1
c) DN or UP (f) button to move
the desired station frequency is displayed.
DN
20
Press the (
82.5 downward or upward one step respectively until
UP
Note: The "ST" indicator appears on the display
when a Stereo FM station is tuned in. If
the stereo FM signal becomes weak, the
"ST" indicator disappears and the unit
automatically switches the mode from
stereo to monaural to reduce the noise.
When the signal becomes strong
enough, the unit automatically switches
back to the stereo mode.
Réception
radio
English
Radio Operation
Automatic Seek Tuning
1
Press the SOURCE button to select the radio
mode.
SOURCE
2
FM1
BAND
T.S.M.
Press the BAND button repeatedly until the
desired radio band is displayed.
FM2
AM
3
TUNE
A. ME
DX SEEK
LOCAL SEEK
MANUAL
4
F1
DN
UP
Press the TUNE button to illuminate the DX and
SEEK indicators in the display. With the DX
mode activated, both strong and weak stations
will be tuned automatically.
Press again to return to the local mode. The DX
indicator will turn off and only the SEEK
indicator will remain illuminated. Now only
strong stations will be tuned.
Press the (
c) DN or UP (f) button to
82.5 automatically seek a station downward or
upward respectively.
The unit will stop at the next station it finds.
Press the same button again to seek next
station.
21
English
Radio Operation
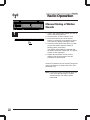
Manual Storing of Station
Presets
1
F1
F2
F3
F4
F5
F6
1. Tune in the desired radio station you wish to
store in the preset memory.
2. Check that the "FUNC" indicator is off.
3. Press and hold any one of the preset
buttons (1 through 6) for at least 2 seconds.
The frequency display will begin to blink.
4. Press the preset button into which you wish
to store the station while the display is
blinking (within 5 seconds).
The display stops blinking to indicate that
the station has been memorized. The preset
number is also displayed.
5. Repeat the procedure to store 5 other
stations onto the same band. Use this
procedure for other bands.
A total of 24 stations can be stored in the preset
memory (6 stations for each band; FM1, FM2,
AM and D.A.P.).
Note: If a preset memory has already been set
in the same preset location, it will be
cleared and the new station will be
memorized.
22
Réception
radio
English
Radio Operation
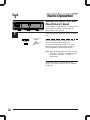
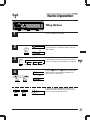
Automatic Memory of
Station Presets
1
Press the SOURCE button to select the radio
mode.
SOURCE
2
BAND
T.S.M.
FM1
Press the BAND button repeatedly until the
desired radio band is displayed.
FM2
AM
3
TUNE
A. ME
Press and hold the A. ME button for at least 2
seconds. The frequency on the display
continues to change while the automatic
memory is in progress.
The tuner will automatically seek and store 6
strong stations in the selected band in order of
signal strength.
When the automatic memory has been
completed, the tuner goes to the station stored
in the preset location F1.
Note: If no stations are stored, the tuner will
return to the original station you were
listening to before the auto memory
procedure began.
23
English
Radio Operation
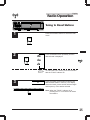
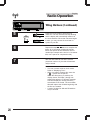
Storing into Direct Access
Preset (D.A.P.) Band
A combination of radio stations in any band, AM
and FM (up to 6 stations) can be manually
preset onto the D.A.P. band.
1
Press the F3 button when the "FUNC" indicator
is on.
F3
F3
D.A.P.
F3
D.A.P.
(OFF)
(ON)
Press the BAND button to select FM or AM.
The selected band will be displayed.
To memorize stations onto the D.A.P. band,
follow the steps for the automatic or Manual
Storing of Station Presets section above.
Note: When Automatic Memory Preset is used
with D.A.P., 4 FM and 2 AM stations will
be stored in Presets 1 – 4 and 5 – 6
respectively.
To cancel the D.A.P. mode, press the F3
button. The red line above the D.A.P. indicator
will turn off.
24
Réception
radio
English
Radio Operation
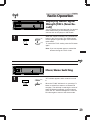
Tuning to Preset Stations
1
Press the SOURCE button to select the radio
mode.
SOURCE
2
FM1
BAND
T.S.M.
Press the BAND button repeatedly until the
desired band is displayed.
FM2
AM
F3
D.A.P.
3
F1
F1 2
F2
F3
F4
F5
82.5
F6
To select the D.A.P. band, press the F3 button
with the "FUNC" indicator on.
Press the station preset button that has your
desired radio station in memory. The display
shows the band, preset number with a triangle
and frequency of the station selected.
Note: When the "FUNC" indicator is on,
pressing the F1 or F2 button can select
the stations.
25
English
Radio Operation
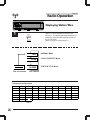
Displaying Station Titles
1
If a title has been entered for the selected
station, it can be displayed in place of the
frequency. The display will toggle between the
frequency and title display with each press of
the TITLE button.
(Refer to page 27 to title stations.)
CLK
TITLE
90.1
12:58
ALPINE
Title not entered
NORMAL Mode
CLOCK PRIORITY Mode
STATION TITLE Mode
Title entered
Characters and Symbols
A (a)
B (b)
C (c)
D (d)
E (e)
F (f)
G (g)
H (h)
I (i)
J (j)
K (k)
L (l)
M (m)
N (n)
O (o)
P (p)
Q (q)
R (r)
S (s)
T (t)
U (u)
V (v)
W (w)
X (x)
Y (y)
Z (z)
0
1
2
3
4
5
6
7
8
9
!
"
#
$
%
&
’
(
)
*
+
,
-
.
/
:
;
<
=
>
?
。
「
」
、
・
Blank
26
Réception
radio
English
Radio Operation
Titling Stations
1
Tune in a station to be titled.
2
CLK
TITLE
or
Change to the TITLE mode. Press and hold the
TITLE button for at least 2 seconds. The first
digit will blink.
BLPINE
3
FUNC
A
0
!
Press FUNC button to select the desired mode.
It will change each time you press the button.
Refer to “Character and Symbols” on page 26.
Alphabet Number Symbol
c
4
A
DN
f
Press the
DN or UP
button to select the
desired letter/numeral/symbol available for
naming ("A" for example).
or
UP
ALPINE
F1
F2
a
If entering a letter (alphabet), press the F1
button to change to lowercase. Press the F2
button to return to all caps mode.
27
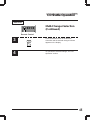
English
Radio Operation
Titling Stations (Continued)
5
CLK
TITLE
A
or
ALPINE
6
7
Press the TITLE button to store the first
character. The first character will stop blinking
and the display will automatically advance to
the next character. When that character begins
to blink, you may choose the next letter or
symbol of your title.
Repeat the steps – above to complete the
titling. All 10 character positions should be
filled. Use spaces where characters are not
needed (for example at the end of a 5 character
title, use 5 spaces to complete the title).
After the last character has been entered
(character number 10), the title will automatically be stored.
Notes:
• You can not enter a title on clock mode.
Refer to "Displaying Time".
• When you want to erase a title, enter the
"
" symbol into all spaces.
When the title memory is used up, the
display shows "Full Data." Storing new
station titles after the "Full Data" message
has been displayed, causes previously
stored titles to be erased. The new station
titles will replace the old titles beginning with
the first one created.
• A total of 24 titles for AM and FM stations
may be entered.
28
Réception
radio
English
Radio Operation
Displaying Station Signal
Strength [T.RCL (Tuner Recall)]
You can display the signal strength of a desired
radio station while you are listening to other
sources such as CD player or CD Shuttle.
1
F5
F5
(ON)
T.RCL
F5
(OFF)
T.RCL
When the "FUNC" indicator is on, press the F5
button in the Tuner mode. The display shows
the bar-graphic signal strength of the selected
radio station.
To cancel the T.RCL mode, press the F5 button
again.
Note: If you use a power antenna, extend the
antenna during the T.RCL mode.
Mono/Stereo Switching
1
F4
F4
MONO
F4
MONO
(OFF)
(ON)
"ST" indicator appears when a stereo is tuned
in.
When the "FUNC" indicator is on, press the F4
button to switch from stereo to monaural FM
reception. This will help in reducing the noise of
weak FM Stereo broadcasts. In the monaural
mode, the "ST" indicator disappears. Press the
F4 button again to return to the stereo mode.
29
CD Operation
English
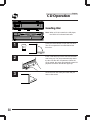
Inserting Disc
Note: When a CD is located in the CD player,
the "DISC IN" indicator illuminates.
1
30
OPEN
Press the OPEN button to open the front door.
The CD compartment is located behind the
front door.
2
Insert a CD half way into the slot with the label
side facing up. The player automatically draws
the disc into the disc compartment. When the
CD is loaded, the player automatically starts CD
playback and DISC-IN indicator lights up.
3
Close the front door with your hand until you
hear a click sound.
CD Operation
English
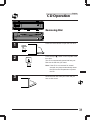
Removing Disc
1
2
Press the OPEN button to open the front door.
OPEN
Press the Eject (h) button on the top side of the
front door.
The CD is automatically ejected half way out.
Remove the CD with your hand.
Note: If the CD is not removed for several
seconds, the player automatically draws
the CD into the compartment to protect
the CD.
3
Close the front door with your hand until you
hear a click sound.
31
CD Operation
English
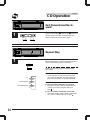
Normal Play and Pause
1
2
Insert a CD into the CD player. The CD player
begins playback from the first track on the disc.
The display shows the track number and
elasped time of the track being played. When
the last track is played back the player returns
to the first track and begins playback from that
point.
SOURCE
TUNER
CD
CHANGER*
3
32
TUNE
A. ME
If a CD is already loaded in the CD player,
press the SOURCE button to select the CD
mode.
Note:
* The source indicator varies depending on
the connected source.
k
Press the
(Play/Pause) button during the
play mode to place the player in the Pause
mode. "PAUSE" appears in the display.
To resume playback, press the
button
again.
k
CD Operation
English
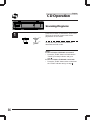
Music Sensor (Skip)
c
1
CD T04
DN
CD T04
Momentarily press the ( ) DN button once to
return to the beginning of the current track. If
you wish to access a track further back,
repeatedly press until you reach the desired
track. (The example shows the Music Sensor
operation starting from track No. 4.)
CD T03
UP
CD T04
CD T05
f
Press the UP ( ) button once to advance to
the beginning of the next track. If you wish to
access a track further ahead, press repeatedly
until the desired track is reached.
Note: The music sensor feature is functional in
the play or pause mode.
33
CD Operation
English
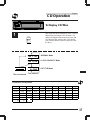
Fast Forward and Backward
1
DN
UP
c
f
Press and hold the ( ) DN or UP ( ) button to
quickly move backward or forward until you
reach the desired section of the track.
Repeat Play
Press the F4 button to play back repeatedly the
track being played. The RPT indicator appears
and the track will be played repeatedly.
1
F4
Press the F4 button again to deactivate the
repeat play.
(OFF)
F4
RPT
(1 track repeat)
F4
RPT
(*All tracks repeat)
F4 ALL
RPT
34
Note:
* If a CD Shuttle is connected and the RPT
ALL mode is selected, the unit repeatedly
plays back all tracks on the disc selected.
Notes:
In case of 6-disc CD Shuttle connected:
• Press the "FUNC" button to illuminate the
"FUNC" (Function) indicator and go to
step .
In case of 12-disc CD Shuttle connected:
• Press the "FUNC" button twice to illuminate
the "FUNC" indicator and go to step .
CD Operation
English
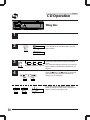
M.I.X. (Random Play)
1
F3
F3
M.I.X.
F3
M.I.X.
(OFF)
Press the F3 button in the play or pause mode.
The M.I.X. indicator will illuminate and the
tracks on the disc will be played back in a
random sequence. After all the tracks on the
disc have been played back once, the player
will begin a new random sequence play until
the M.I.X. mode is canceled.
To cancel M.I.X. play, press the F3 button
again.
Note: If a CD Changer equipped with the M.I.X.
F3 ALL
ALL function is connected, " RPT
"
will be displayed.
Notes:
In case of 6-disc CD Shuttle connected:
• Press the "FUNC" button to illuminate the
"FUNC" (Function) indicator and go to
step .
In case of 12-disc CD Shuttle connected:
• Press the "FUNC" button twice to illuminate
the "FUNC" indicator and go to step .
35
CD Operation
English
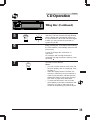
Scanning Programs
1
F5
F5
(OFF)
Press the F5 button to activate the Scan mode.
The first 10 seconds of each track will be
played back in succession.
SCAN
F5
SCAN
(ON)
To stop the Scan, press the F5 button to
deactivate the Scan mode.
2
Notes:
In case of 6-disc CD Shuttle connected:
• Press the "FUNC" button to illuminate the
"FUNC" (Function) indicator and go to
step .
In case of 12-disc CD Shuttle connected:
• Press the "FUNC" button twice to illuminate
the "FUNC" indicator and go to step .
36
CD Operation
English
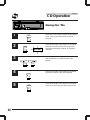
To Display CD Titles
1
After a title has been entered for a CD, it can be
displayed by pressing the TITLE button. The
display will toggle between Normal, Clock and
CD Title with each press of the TITLE button
(see example below). (Refer to page 38 to title
the disc.)
CLK
TITLE
T08 11'03
NORMAL Mode
T08 12:58
CLOCK PRIORITY Mode
ALPINE
Title not entered
CD TITLE Mode
Title entered
Characters and Symbols
A (a)
B (b)
C (c)
D (d)
E (e)
F (f)
G (g)
H (h)
I (i)
J (j)
K (k)
L (l)
M (m)
N (n)
O (o)
P (p)
Q (q)
R (r)
S (s)
T (t)
U (u)
V (v)
W (w)
X (x)
Y (y)
Z (z)
0
1
2
3
4
5
6
7
8
9
!
"
#
$
%
&
’
(
)
*
+
,
-
.
:
;
<
=
>
?
。
「
」
/
、
・
Blank
37
CD Operation
English
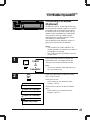
Titling Disc
1
Select a disc for which you want to enter a title.
2
Change to the TITLE mode. Press and hold the
TITLE button for at least 2 seconds. The first
digit will blink.
CLK
TITLE
or
BLPINE
3
Press the FUNC button to select the desired
mode.
Alphabet Number Symbol The mode will change each time you press the
button. Refer to “Characters and Symbols” on
page 37.
A
FUNC
DN
f
Press the
DN or UP
button to select the
desired letter/numeral/symbol available for
naming ("A" for example).
UP
F2
a
38
!
c
4
F1
0
If entering a letter (alphabet), press the F1
button to change to lower case. Press the F2
button to return to all caps mode.
CD Operation
English
Titling Disc (Continued)
5
CLK
TITLE
AL
6
Press the TITLE button to store the first
character. The first character will stop blinking
and the display will automatically advance to
the next character. When that character begins
to blink, you may choose the next letter or
symbol of your title.
Repeat the steps – above to complete the
titling. Pressing the TITLE button after entering
the 12th character, automatically stores the title
into memory.
In case of storing a title of less than 12
characters:
For example, after 3rd digit character is
completed, 4th digit character is blinking. Then,
go to step .
7
CLK
TITLE
Press and hold the TITLE button for at least 2
seconds to record the title.
Notes:
• You can not enter a title in clock mode. For
the clock display, refer to “Displaying Time”,
on page 17.
• When the display shows "Full Data", the
memory is full and no input is accepted. In
order to input new titles, old titles must be
deleted first. Refer to the section "Erasing
Disc Title" on page 40 to delete titles.
• To erase the title name in the CD mode,
select (Blank) in the table <Characters and
Symbols> on page 37 and enter as described in the operating procedures above.
39
CD Operation
English
Erasing Disc Title
1
2
Press the TITLE button to select the disc titling
mode. Then, press and hold for at least 2
seconds.
CLK
TITLE
FUNC
ALPINE
c
3
DN
40
Press and hold the FUNC button for at least 2
seconds to activate the title scanning mode.
The title in the display will blink, for example
"ALPINE".
UP
4
FUNC
5
CLK
TITLE
f
Press the ( ) DN or UP ( ) button repeatedly
until the disc title you want to erase is displayed.
Press and hold the FUNC button for at least 2
seconds to erase the disc title displayed.
Press and hold the TITLE button for at least 2
seconds to cancel the disc title erasing mode.
English
CD Shuttle Operation
Controlling CD Shuttle
(Optional)
An optional 6-disc or 12-disc CD Shuttle may
be connected to the CDA-7846E if it is Ai-NET
compatible. With a CD Shuttle connected to
the Ai-NET input of the CDA-7846E, the CD
Shuttle will be controllable from CDA-7846E.
Using the KCA-400C (the Multi-Changer
Switching device) multiple changers can be
controlled by the CDA-7846E.
See the Multi-Changer Selection section on
page 44 for selecting the CD Shuttles.
Notes:
• The controls on the CDA-7846E for CD
Shuttle operation are operative only when a
CD Shuttle is connected.
• The "CHG" indicator illuminates in the CD
Shuttle mode.
1
SOURCE
TUNER
CD
CHANGER*
2
FUNC
Press the SOURCE button to activate the
CHANGER mode. The display shows the
“Changer” disc number and track number.
Note:
* The source indicator varies depending on
the connected source.
Press the FUNC button to select the FUNC
OFF1 or OFF2 mode.
FUNC OFF1 mode:
In this mode you can select the discs
between 1 and 6.
(FUNC OFF1 mode)
FUNC OFF2 mode (for 12-disc CD Shuttle
only):
In this mode you can select the discs
between 7 and 12.
(FUNC OFF2 mode)
FUNC
(FUNC ON mode)
41
English
CD Shuttle Operation
Controlling CD Shuttle
(Optional)
(Continued)
3
Press the Function button (F1 through F6)
corresponding to one of the discs loaded in the
CD Shuttle. The selected disc number appears
in the display and CD playback starts.
For FUNC OFF1 mode
For FUNC OFF2 mode
7
1
F1
8
2
F2
9
3
F3
10
4
F4
11
5
F5
12
6
F6
Notes:
• To select the disc numbers 7 to 12 loaded in
the 12-disc CD Shuttle, press the FUNC
button twice, then press the desired
Function button (F1 to F6).
• If the FUNC indicator is ON, the F1 to F6
buttons become unfunctional.
• When the "FUNC" indicator is on, pressing
the F1 or F2 button can select the disc.
Note: After selecting the desired disc, you ban
operate in the same way as for the CDA7846E CD player. For details, please see
the CD Operation section.
42
English
CD Shuttle Operation
Searching Titled Discs
(Title Search Menu)
1
2
3
4
Press the TITLE button to activate the Title
Display mode.
CLK
TITLE
BAND
T.S.M.
ALPINE
Press and hold the T.S.M. button for at least 2
seconds while the title is displayed.
The title in memory blinks in the display.
c
Press the ( ) DN or UP (
the desired disc title.
DN
f) button to select
UP
BAND
T.S.M.
Press the T.S.M. button to play the selected
disc.
The unit will automatically search the disc and
will play that disc.
43
English
CD Shuttle Operation
Multi-Changer Selection
Alpine’s Ai-NET system will support up to 6 CD
Shuttles. When operating two or more
changers, the KCA-400C (Multi-Changer
Switching device) must be used. If you use 1
Switching device, you can connect up to 4 CD
Shuttles. If you use 2 Switching devices, you
can connect up to 6 CD Shuttles.
RUE-4185
BAND
PROG
SOURCE
A.PROC
Remote Control
1
Press the SOURCE button on the CDA-7846E
to activate the CD Changer mode.
SOURCE
Alternatively, press the SOURCE button on the
Remote Controller (RUE-4185) to activate the
CD Shuttle mode. Proceed to Step below to
select the desired CD Shuttle.
SOURCE
2
3
Press the BAND button on the CDA-7846E or
the RUE-4185 to activate the CD Shuttle
Selection mode.
BAND
T.S.M.
BAND
T.S.M.
Changer-X
The CD Shuttle Selection mode remains active
for 3 seconds after Step is performed. Press
the BAND button until the desired CD Shuttle
indicator appears on the display.
Note: If the selected CD Shuttle is not connected, the display will show "No
Changer X".
44
English
CD Shuttle Operation
RUE-4185
BAND
PROG
SOURCE
A.PROC
Multi-Changer Selection
(Continued)
Remote Control
3
4
BAND
PROG
Press the BAND button on the Remote
Controller until the desired changer indicator
appears on the display.
To operate the selected changer, see "CD
Operation" section.
45
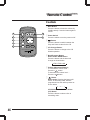
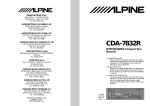
Remote Control
English
Controls
1 Mute Button
Press the button to lower the volume by
20 dB instantly. Press the button again to
cancel.
VOLUME
1
6
MUTE
2
PWR
3
ENT
4
CD-CHG
5
BAND
PROG
7
2 Power Switch
Press the switch to turn the power on/off.
3
SOURCE
REMOTE CONTROL UNIT
k
Button
Press the button to switch between the
Play and Pause modes for the CD.
A.PROC
4 CD Changer Button
Press the button to change to the CD
Shuttle operation.
5 Band/Program Button
Radio mode: BAND Button
Press the button and the band will
change as shown below.
→FM1→FM2→AM
6 Volume Adjustment Buttons
To increase the volume level.....
Press the
button
To decrease the volume level.....
Press the
button
7
Button
Radio mode: Pressing the button will
select, in ascending order, stations
programmed into the radio's presets as
shown below.
→1 →2
• • •
6
CD/CD Shuttle mode: DISC Select
(UP) Button
Press the button to select a disc in
ascending order.
46
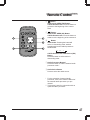
Remote Control
VOLUME
8
Button
Radio mode: SEEK (DN) Button
CD/CD Shuttle mode: Press the button to
go back to the beginning of the current
track.
9
Button
Radio mode: SEEK (UP) Button
CD/CD Shuttle mode: Press the button to
advance to the beginning of the next track.
Ä
Button
Radio mode: Pressing the button will
select, in descending order, stations
programmed into the radio's presets as
shown below.
MUTE
PWR
8
English
9
ENT
10
CD-CHG
BAND
PROG
12
SOURCE
REMOTE CONTROL UNIT
A.PROC
11
→6 →5
• • •
1
CD/CD Shuttle mode: DISC Select (DN)
Button
Press the button to select a disc in
descending order.
Å Audio Processor Button**
Press the button to call the external audio
processor mode.*
Ç Audio Select Button
Press to select the audio source.
*
For the operation of external audio
processor, refer to the Owner's Manual of
the external audio processor you purchased.
** This button is used in conjunction with an
optional Ai-NET processor.
47
Remote Control
English
Battery Replacement
Applicable battery: Use two "AAA" sized dry
batteries or equivalent.
Opening the battery cover
Slide out the battery cover while firmly pressing
outward.
d
e
d
Replacing the battery
Put the batteries in the case as illustrated.
e
Closing the cover
Push the cover as illustrated until a click is
heard.
48
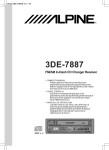
Disc Care
CORRECT
INCORRECT
English
Correct Handling
Do not drop the disc while handling. Hold the
disc so you will not leave fingerprints on the
surface. Do not affix tape, paper, or gummed
labels on the disc. Do not write on the disc.
CORRECT
Disc Cleaning
Fingerprints, dust, or soil on the surface of the
disc could cause the CD player to skip. For
routine cleaning, wipe the playing surface with
a clean, soft cloth from the centre of the disc to
the outer edge. If the surface is heavily soiled,
dampen a clean soft cloth in a solution of mild
neutral detergent before cleaning the disc.
Disc Accessories
Transparent Sheet
There are various accessories available on the
market for protecting the disc surface and
improving sound quality. However, most of
them will influence the thickness and/or
diameter of the disc. Using such accessories
can cause the disc to be out of standard
specifications and may create operational
problems. We recommend not using these
accessories on discs played in Alpine CD
players.
Disc Stabilizer
49
English
In Case of Difficulty
If you encounter a problem, please review the
items in the following check list. This guide will
help you isolate the problem if the unit is at
fault. Otherwise, make sure the rest of your
system is properly connected or consult your
authorized Alpine dealer.
Initial Turn-on After
Installation
50
Symptom
Cause and Solution
No function or display.
•
Car's ignition is off.
– If connected per instructions, the unit will
not operate with the car's ignition off.
•
Improper connection of power leads.
– Check connections of the power leads.
•
Blown fuse.
– Check the fuses on the Battery leads;
replace with the proper value if
necessary.
•
Internal micro-computer malfunctioned due
to interference noise etc.
– Press the Reset button with a ball-point
pen or other pointed article.
English
In Case of Difficulty
Radio Mode
Symptom
Cause and Solution
Unable to receive stations.
•
No antenna or open connection in cable.
– Make sure the antenna is properly
connected; replace the antenna or cable
if necessary.
Unable to tune stations in the seek mode.
•
You are in a weak signal area.
– Make sure the tuner is in the DX mode.
If the area you are in is not known to be a
weak signal area, the antenna may not be
grounded and connected properly.
– Check your antenna connections; make
sure the antenna is properly grounded at
its mounting location.
The antenna may not be the proper length.
– Make sure the antenna is fully extended;
if broken, replace the antenna with a new
one.
•
•
Broadcast is noisy.
•
•
The antenna is not the proper length.
– Extend the antenna fully; replace it if it is
broken.
The antenna is poorly grounded.
– Make sure the antenna is grounded
properly at its mounting location.
51
English
In Case of Difficulty
CD Mode
Symptom
Cause and Solution
CD insertion not possible.
•
•
Unable to Fast-Forward or Backward.
•
The CD has been damaged.
– Eject the CD and discard; using a
damaged CD in your unit can cause
damage to the transport.
Sound skips due to vibration.
•
Improper mounting.
– Securely re-mount the unit.
Disc is very dirty.
– Clean the disc.
Disc has scratches.
– Change the disc.
•
•
Sound skips without vibration.
52
There is a CD already in the transport.
– Eject the CD in transport and remove it.
The CD is being improperly inserted.
– Make sure the CD is being inserted per
instruction in the Owner's Manual.
•
Dirty or scratched disc.
– Clean the disc: damaged discs should be
replaced.
English
In Case of Difficulty
Indication for CD Shuttle
Indication
Cause and Solution
•
Protective circuit is activated due to high
temperature.
– The indicator will disappear when the
temperature returns to within operation
range.
•
Disc won't return to magazine.
– Press the eject button.
– Insert an empty magazine and once
again press the eject button to recover
the disc.
•
Mechanical error.
– Press the eject button.
– When display message disappears,
correctly re-insert disc into magazine and
try again.
– If it still won't operate correctly, consult
your Alpine dealer.
•
No magazine is loaded into the CD Shuttle.
– Insert a magazine.
•
No indicated disc.
– Choose another disc.
Hi Temp.
ERROR
NO MAGAZINE
NO DISC
53
Specifications
English
FM TUNER SECTION
Tuning Range ...................................................................................................... 87.5 – 108.0 MHz
Mono Usable Sensitivity .......................................................................... 9.3 dBf (0.8µV/75 ohms)
50 dB Quieting Sensitivity ...................................................................... 13.5 dBf (1.3µV/75 ohms)
Alternate Channel Selectivity ................................................................................................. 80 dB
Signal-to-Noise Ratio ............................................................................................................. 65 dB
Stereo Separation .................................................................................................................. 35 dB
AM TUNER SECTION
Tuning Range ........................................................................................................ 531 – 1,602 kHz
Usable Sensitivity ................................................................................................... 22.5µV/27.0 dB
CD SECTION
Frequency Response* .................................................................................. 5 – 20,000 Hz (±1 dB)
Wow & Flutter (% WRMS)* ...................................................................... Below measurable limits
Total Harmonic Distortion* ................................................................................. 0.008% (at 1 kHz)
Dynamic Range* .................................................................................................... 95 dB (at 1 kHz)
Signal-to-Noise Ratio* ............................................................................................................ 95 dB
Channel Separation* ............................................................................................. 85 dB (at 1 kHz)
REMOTE CONTROL
Battery Type ................................................................................................. "AAA" sized dry battry
Battery Quantity .............................................................................................................................. 2
Dimensions (W x H x D) .................................... 56mm (2-1/4") x 14mm (9/16") x 105mm (4-1/8")
Weight (without battery) ................................................................................................. 50 g (1 oz)
54
Specifications
English
GENERAL
Power Requirement ..................................................................... 14.4V DC (11 – 16V (allowable))
Maximum Power Output ..................................................................................................... 40W x 4
Pre-Output Voltage ........................................................................................... 2000 mV/10k ohms
Bass ....................................................................................................................... ±15 dB at 30 Hz
Treble .................................................................................................................... ±10 dB at 10 kHz
Weight ................................................................................................................ 1.5 kg (3 lbs. 5 oz)
CHASSIS SIZE
Width ............................................................................................................................. 178mm (7")
Height .............................................................................................................................. 50mm (2")
Depth ...................................................................................................................... 150mm (5-7/8")
NOSEPIECE SIZE
Width ....................................................................................................................... 170mm (6-3/4")
Height ................................................................................................................... 46mm (1-13/16")
Depth ............................................................................................................................ 22mm (7/8")
*
Measured at internal amp input stage.
Note: Due to product improvement, specifications and design are subject to change
without notice.
55