1
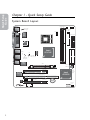
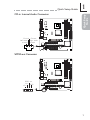
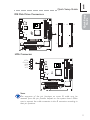
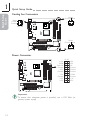
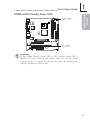
852GME-MGF Pro
System Board User’s Manual
Carte Mère Manuel Pour Utilisateur
System-Platine Benutzerhandbuch
Manual del Usuario de Placas Base
Ðóêîâîäñòâî Ïîëüçîâàòåëÿ
935-852GM2-000
85900512
Quick Setup
Guide
1
Quick Setup Guide
Copyright
This publication contains information that is protected by copyright. No part of it
may be reproduced in any form or by any means or used to make any
transformation/adaptation without the prior written permission from the copyright
holders. This publication is provided for informational purposes only. The
manufacturer makes no representations or warranties with respect to the
contents or use of this manual and specifically disclaims any express or implied
warranties of merchantability or fitness for any particular purpose. The user will
assume the entire risk of the use or the results of the use of this document.
Further, the manufacturer reserves the right to revise this publication and make
changes to its contents at any time, without obligation to notify any person or
entity of such revisions or changes. © 2005. All Rights Reserved.
Trademarks
Product names or trademarks appearing in this manual are for identification
purpose only and are the properties of the respective owners.
Caution
To avoid damage to the system, use the correct AC input voltage range..
To reduce the risk of electric shock, unplug the power cord before removing the
system chassis cover for installation or servicing. After installation or servicing,
cover the system chassis before plugging the power cord.
Battery: 1. Danger of explosion if battery incorrectly replaced. 2. Replace only
with the same or equivalent type recommend by the manufacturer. 3. Dispose of
used batteries according to the battery manufacturer’s instructions.
Notice
The system board and accessories in the package may not come similar to the
information stated in this manual. This may differ in accordance to the sales region
or models in which it was sold. For more information about the standard
package in your region, please contact your dealer or sales representative.
FCC and DOC Statement on Class B
This equipment has been tested and found to comply with the limits for a Class
B digital device, pursuant to Part 15 of the FCC rules. These limits are designed
to provide reasonable protection against harmful interference when the
equipment is operated in a residential installation. This equipment generates, uses
and can radiate radio frequency energy and, if not installed and used in accordance with the instruction manual, may cause harmful interference to radio
communications. However, there is no guarantee that interference will not occur
in a particular installation. If this equipment does cause harmful interference to
radio or television reception, which can be determined by turning the equipment
off and on, the user is encouraged to try to correct the interference by one or
more of the following measures:
• Reorient or relocate the receiving antenna.
• Increase the separation between the equipment and the receiver.
• Connect the equipment into an outlet on a circuit different from that to
which the receiver is connected.
• Consult the dealer or an experienced radio TV technician for help.
Notice:
1. The changes or modifications not expressly approved by the par ty
responsible for compliance could void the user's authority to operate the
equipment.
2. Shielded interface cables must be used in order to comply with the emission
limits.
The user’s manual in the provided CD contains detailed information about the system
board. If, in some cases, some information doesn’t match those shown in this manual, this
manual should always be regarded as the most updated version.
2
European Contact:
Diamond Flower Information (NL) B.V.
Shannonweg 11
3197 LG Rotterdam / Botlek
Port No. : 5087
The Netherlands
Y. S. Liao, General Manager
March 11, 2005, The Netherlands
EN 55022: 1998+A1: 2000 + A2: 2003
EN 61000-3-2: 2000
EN 61000-3-3: 1995 + A1:2001
EN 55024: 1998 + A1: 2001 + A2: 2003:
IEC 61000-4-2: 1995+A1: 1998+ A2: 2000
IEC 61000-4-3: 1995+A1: 1998+ A2: 2000
IEC 61000-4-4: 1995+A1: 2000, IEC 61000-4-5: 1995+A1: 2000
IEC 61000-4-6: 1996+A1: 2000, IEC 61000-4-8: 1993+A1: 2000
IEC 61000-4-11: 1994+A1: 2000
Conforms to the EMC Directive 89/336/EEC as attested by conformity with the
following harmonised standards:
Model Number: 852GME-MGF
Product Name: Mother Board
Declares that the product:
Manufacturer’s Address: 100 Huan-Ho St.
Hsi-Chih City,
Taipei Hsien, Taiwan,
R.O.C.
Manufacturer’s Name: DFI Inc.
Declaration of Conformity
Quick Setup
Guide
David Lu, President
March 11, 2005 U.S.A.
This Class B digital device complies with 47 CFR Part 15 of the FCC rules. Operation is
subject to the following two conditions: (1) This device may not cause harmful interference,
and (2) this device must accept any interference received, including interference that may
cause undesired operation.
Identification of product:
Part 15 of the FCC rules
Class B digital device
Conforms to the following specification:
Product Name: Mother Board
Model Number: 852GME-MGF
Declares that the product:
Name: Diamond Flower Electric Instrument Co., (U.S.A.) Inc.
Address: 732-C Striker Avenue, Sacramento, CA 95834, U.S.A.
Phone/Fax no: (916) 568-1234
Manufacturer/Importer:
According to 47 CFR, Part 15 of the FCC Rules
Declaration of Conformity
Quick Setup Guide
1
3
Quick Setup Guide
Chapter 1 - Quick Setup Guide
System Board Layout
DDR 1 DDR 2
KB
Mouse
1
2nd fan
DIMM standby
power LED
PS/2 power
select (JP2)
1
CPU fan
IrDA
1
ATX power
Socket
479
Winbond
COM 1
W83627THF
Quick Setup
Guide
1
Parallel
1
BIOS
1
FDD
VGA
1
IDE 2 IDE 1
1394_1
J18
J3
1
1
LAN
USB 1-2
1
1
Intel
852GME
IT8266R
1394_2
USB 3-4
CPU FSB
select (J3, J18)
USB power
select (JP3)
Mic-in
Line-in
Line-out
1
VIA
VT6307
AGP
1
SATA 2 1
SATA 1 1
PCI 1 Slot
Realtek
RTL8110S
1
Intel
6300ESB
PCI-X Slot 1
1
CD-in
Audio
codec
PCI standby
power LED
PCI 2 Slot
Clear
CMOS
(JP10)
Battery
1
1
1
Front audio S/PDIF-out
4
Chassis
fan
1
COM 2
Front panel
1
Quick Setup Guide
Quick Setup
Guide
Jumpers
1
Clear CMOS Data
JP10
X
3
3
2
2
1
1
1-2 On: Normal
2-3 On:
(default)
Clear CMOS Data
CPU FSB Select
J3 J18
J3/J18
X
J3 J18
1
1
2
2
3
J3:1-2 On
J18: 2-3 On
Auto (default)
3
2-3 On:
100MHz
Important:
Overclocking may result to the CPU’s or system’s instability and are
not guaranteed to provide better system performance. If you are
unable to boot your system due to overclocking, make sure to set
these jumpers back to their default settings.
5
Quick Setup
Guide
1
Quick Setup Guide
USB Power Select
JP3
3
3
X
2
2
1
1
1-2 On: 5V
(default)
2-3 On: 5VSB
Important:
If you are using the Wake-On-USB Keyboard/Mouse function for 2
USB ports, the 5VSB power source of your power supply must
support ≥1.5A. For 3 or more USB ports, the 5VSB power source of
your power supply must support ≥2A.
PS/2 Power Select
JP2
X
1
2 3
1-2 On: 5V
(default)
1
2 3
2-3 On: 5VSB
Important:
The 5VSB power source of your power supply must support
≥720mA.
6
Rear Panel I/O Ports
PS/2
Mouse
Parallel
1394_2
LAN
Mic-in
Line-in
1
Quick Setup
Guide
Quick Setup Guide
Line-out
PS/2 KB COM 1
VGA
USB 3-4 USB 1-2
I/O Connectors
Audio (Rear Audio and Front Audio)
Mic-in
Line-in
Rear audio
W
GND
AuD_Vcc
AuD_R_Return
Key
AuD_L_Return
Line-out
Front
audio
10
9 W
Mic
Mic Power
AuD_R_Out
N. C.
AuD_L_Out
2
1
2-channel
4-channel
6-channel
Line-in
Rear R/L
Rear R/L
Lime
Line-out
Front R/L
Front R/L
Pink
Mic-in
Mic-in
Center/Subwoofer
Light Blue
7
TPA+
Ground
TPB+
+12V (fused)
Key
TPAGround
TPB+12V (fused)
Ground
CD
TD
GND
RTS
RI
RD
DTR
DSR
CTS
Quick Setup
Guide
1
8
Quick Setup Guide
Serial Ports
W
COM 1
COM 2 21
9
1394_2
1394_1 21
W
IEEE 1394
W
10
9W
CD-in Internal Audio Connector
1
Quick Setup
Guide
Quick Setup Guide
Ground Ground
Left audio
Right audio
channel
channel
1
4W
S/PDIF-out Connector
SPDIF out
Key GND
+5V
1
4
W
9
Quick Setup
Guide
1
Quick Setup Guide
Floppy Disk Drive Connector
33
34
X
2
1
Serial ATA Connectors
1
7 SATA 2 (J14)
1
7 SATA 1 (J15)
GND
TXP
TXN
GND
RXN
RXP
GND
X
Note:
The Intel 6300ESB south bridge chip allows configuring RAID on
Serial ATA drives. It supports RAID 0 and RAID 1.
10
IDE Disk Drive Connectors
39
40
39
40
1
Quick Setup
Guide
Quick Setup Guide
X
2
1
IDE 2
2
1
IDE 1
IrDA Connector
IRTX
Ground
IRRX
N. C.
VCC
5
W
1
Note:
The sequence of the pin functions on some IR cable may be
reversed from the pin function defined on the system board. Make
sure to connect the cable connector to the IR connector according to
their pin functions.
11
Quick Setup
Guide
Quick Setup Guide
Cooling Fan Connectors
Power
Sense
Sense
Power
Ground
3
X Ground
X
1
1
1
3
2nd fan
CPU fan
Power
Ground Sense
1
3
X Chassis
fan
Power Connector
10 20
X
+12V
5VSB
PW-OK
Ground
+5V
Ground
+5V
Ground
3.3V
3.3V
+5V
+5V
-5V
Ground
Ground
Ground
PS-ON
Ground
-12V
3.3V
1 11
Important:
To ensure that adequate power is provided, use a 250 Watt (or
greater) power supply.
12
DIMM and PCI Standby Power LEDs
DIMM Standby
Power LED
1
Quick Setup
Guide
Quick Setup Guide
PCI Standby
Power LED
Important:
If the DIMM Standby Power LED or PCI Standby Power LED is
lighted, you must power-off the system then turn off the power
supply’s switch or unplug the power cord prior to installing any
memory modules or add-in cards.
13
Quick Setup
Guide
1
Quick Setup Guide
Front Panel Connectors
RESET SW
HDD-LED
11
12
1
2
PWR-LED
X PWR-BTN
N. C.
1
N. C.
PWR-LED
Pin Pin Assignment
2 LED Power
4 LED Power
6 Signal
HDD-LED
3
5
HDD Power
Signal
PWR-BTN
8 PWR-BTN Power
1 0 Signal
RESET SW
7
9
Ground
RST Signal
N. C.
11
N. C.
Key
1 2 Key
Pin
14
Pin Assignment
English
2
Chapter 2 - English
Features and Specifications
English
Processor
• Intel® Pentium® M / Celeron® M processor
- 400/533MHz system bus
- Supports 64-bit host data bus and 32-bit addressing
• Processor socket: mPGA479M
Chipset
• Intel® 852GME chipset
- Intel® 852GME Graphics Memory Controller Hub (GMCH)
- Intel® 6300ESB I/O Controller Hub
System Memory
• Two 184-pin DDR SDRAM DIMM sockets
• 2.5V unbuffered PC1600 (DDR200), PC2100 (DDR266) or
PC2700 (DDR333) DDR SDRAM DIMM with ECC/non-ECC
support
• Supports 128Mbit, 256Mbit and 512Mbit technologies providing
maximum capacity of 1GB with x16 devices and up to 2GB with
high density 512Mbit technology
BIOS
• Award BIOS
• 4Mbit flash memory
Energy Efficient Design
• Suppor ts ACPI specification and OS Directed Power
Management
• Supports ACPI STR (Suspend to RAM) function
• Wake-On-Events include:
- Wake-On-PS/2 Keyboard/Mouse
- Wake-On-USB Keyboard
- Wake-On-Ring
- RTC timer to power-on the system
• AC power failure recovery
15
2
English
English
Hardware Monitor
• Monitors CPU/system temperature and overheat alarm
• Monitors 5VSB(V)/VBAT(V)/1.5V/3.3V/VCC/12V/Vcore voltages
and failure alarm
• Monitors CPU/system fan speed and failure alarm
• Read back capability that displays temperature, voltage and fan
speed
Onboard Graphics Features
• Up to 64MB of dynamic video memory allocation
• Display core frequency at 250MHz (default)
• Render core frequency at 250MHz (default)
• Intel® Dual-Frequency Graphics Technology
• 2D graphics engine
- Optimized 128-bit BLT engine
- 32-bit Alpha Blended cursor
- 8-bit, 16-bit and 32-bit color
• 3D graphics engine
- Enhanced Hardware Binning Instruction Set
- Bi-Cubic Filtering
- Linear Gamma Blending for Video Mixer Rendering (VMR)
- Video Mixer Rendering (VMR)
- 3D setup and render engine
- DirectX and OpenGL pixelization rules
- 266-MegaTexel/s peak performance
- 16- and 24-bit Z-buffering; 16- and 24-bit W-buffering
- Optimal 3D resolution
- Double and triple render buffer
• Graphics Power Management
- Dynamic Frequency Switching
- Memory Self-Refresh During C3
- Intel® Display Power Saving Technology
Onboard Audio Features
• Realtek ALC655 6-channel audio
• 16-bit stereo full-duplex codec with independent variable
sampling rate
• DirectSound 3DTM compatible
• S/PDIF-out interface
16
English
2
Onboard LAN Features
• RTL8110S Gigabit ethernet controller
• Supports 10Mbps, 100Mbps and 1Gbps data transmission
• IEEE 802.3 (10/100Mbps) and IEEE 802.3ab (1Gbps) compliant
Serial ATA Interface with RAID
• Supports two SATA (Serial ATA) interfaces which are compliant
with SATA 1.0 specification (1.5Gbps interface)
• Supports RAID 0 and RAID 1
English
IDE Interface
• Supports up to UltraDMA 100Mbps hard drives
• PIO Mode 4 Enhanced IDE (data transfer rate up to 14MB/sec.)
IEEE 1394 Interface
• VIA VT6307
• Supports two 100/200/400 Mb/sec ports
Accelerated Graphics Port (A.G.P.)
• Supports 1.5V AGP 4x data transfers and 2x/4x fast write
protocol (3.3V AGP card is not supported)
• AGP 2.0 compliant
Rear Panel I/O Ports
• 1 mini-DIN-6 PS/2 mouse port
• 1 mini-DIN-6 PS/2 keyboard port
• 1 DB-25 parallel port
• 1 DB-9 serial port
• 1 DB-15 VGA port
• 1 IEEE 1394 port
• 1 RJ45 LAN port
• 4 USB 2.0/1.1 ports
• Mic-in, line-in and line-out
I/O Connectors
• 1 connector for an external serial port
• 1 connector for 1 external IEEE 1394 port
• 1 front audio connector for line-out and mic-in jacks
• 1 CD-in internal audio connector
• 1 S/PDIF-out connector
• 1 connector for IrDA interface
• 2 Serial ATA connectors
17
2
English
•
•
•
•
•
2
1
1
1
3
40-pin IDE connectors
floppy connector
20-pin ATX power supply connector
front panel connector
fan connectors
English
Expansion Slots
• 1 AGP 4x slot
• 1 PCI-X slot
• 2 PCI slots
Compatibility
• PCI 2.2, Intel AGP 2.0, PCI-X 2.2 and AC ’97 compliant
PCB
• 4 layers, microATX form factor
• 24.4cm (9.61") x 23cm (9.06")
RAID Configuration
The following describes the steps on configuring RAID.
1. Set the “On-Chip Serial ATA” field to “Enhanced Mode”. (Integrated Peripherals submenu - OnChip IDE Device” section of the
Award BIOS.)
2. Set the “SATA Mode” field to “RAID”. (Integrated Peripherals
submenu - OnChip IDE Device” section of the Award BIOS.)
3. Reboot the PC.
4. When the system powers-up, press the <Ctrl> and <I> keys
simultaneously to run the Intel RAID BIOS Setting Utility. The
utility is used to configure the Serial ATA drives to RAID 0 or
RAID 1.
5. Install the Intel 6300ESB RAID driver.
If you are in the process of installing Windows® XP or
Windows® 2000 on RAID configured Serial ATA drives, you will
need the provided Intel RAID floppy diskette. If you are installing
the driver on existing Windows® XP or Windows® 2000, install
the “6300ESB RAID Drivers” that is in the provided CD.
18
English
2
Installing the RAID Driver While Installing Windows® XP or
Windows® 2000
The steps below will instruct you on installing the 6300ESB RAID
driver while in the process of installing Windows® XP or Windows®
2000 on a RAID 0 or RAID 1 Volume Serial ATA drives.
1. Start Windows Setup by booting from the installation CD.
English
2. Press <F6> when prompted at the beginning of Windows
setup.
3. Press <S> to select “Specify Additional Device”.
4. At this point you should be prompted to insert a floppy disk
containing the 6300ESB RAID driver. Insert the provided floppy
diskette.
5. Select “Intel® 6300ESB SATA RAID Controller” from the list then
press <Enter>.
6. The next screen should confirm that you have selected the
Intel(r) RAID controller. Press <Enter> again to continue.
7. Finish the Windows installation. Leave the floppy disk in the
floppy drive until the system reboots itself. Windows setup will
need to copy the files from the floppy disk again after the RAID
volume is formatted, then Windows setup starts copying files.
19
2
English
Package Checklist
English
The system board package contains the following items:
;
;
;
;
;
;
;
;
;
The system board
A user’s manual
One IDE cable
One floppy cable
Two Serial ATA data cables
One Serial ATA power cable
One “Main Board Utility” CD
One Intel RAID driver diskette
One I/O shield
If any of these items are missing or damaged, please contact your
dealer or sales representative for assistance.
20
Français
3
Chapter 3 - Français
Caractéristiques et Spécifications
Processeur
• Les processeurs Intel® Pentium® M / Celeron® M
- Interface du bus système 400/533MHz
- Supporte 64-bit hôte donnée bus et adressage de 32 bits
• Socket mPGA479M
Mémoire Système
• 2 socles DIMM DDR 184-pin
• 2.5V non-tamponnés les modules PC1600 (DDR200), PC2100
(DDR266) et PC2700 (DDR333), ECC/non-ECC
• Supporte 128Mbit, 256Mbit et 512Mbit technologie pourvoir
fournir la capacité maximum 1GB avec dispositifs x16 y jusqu’à
2GB avec 512Mbit technologie
Français
Chipset
• Intel® 852GME chipset
- Intel® 852GME GMCH
- Intel® 6300ESB I/O Controleur Entrée/Sorrtie
BIOS
• Compatible avec Award BIOS
• Mémoire Flash 4Mbit
Design à Haut Rendement Énergétique
• ACPI STR (Suspend to RAM) fonction
• Réveil-Sur-PS/2 Clavier/Souris et Réveil-Sur-USB Clavier
• Eveil Sonnerie
• Minuterie RTC pour allumer le système
• Récupération après Défaillance d’Alimentation CA
System Health Monitor Fonctions
• Gère l’alarme de température et de surchauffe de CPU/système
• Gère l’alarme de voltage et d’échec de 5VSB(V)/VBAT(V)/1.5V/
3.3V/VCC/12V/Vcore
• Gère la vitesse de ventilateur du ventilateur de CPU/system
• Affichage température, voltage et éventez la vitesse
21
3
Français
Français
Fonctions de la Graphique Intégrée
• Jusqu’à 64MB Mémoire Dynamique
• Dynamische videospeicherallozierung à 250MHz
• Rendez la fréquence de noyau à 250MHz
• Intel® Dual-Frequency Graphics technologie
• Fonctions 2D moteur de graphiques
• Fonctions 3D moteur de graphiques
• Fonctions graphiques Power Management
Français
Caractéristiques Audio sur Carte
• Realtek ALC655 6-canaux audio
• Codec full-duplex 16 bits stéréo avec fréquence d’échantillonnage
variable indépendante
• DirectSound 3DTM compatible
• Interface sor tie S/PDIF
Fonctionnalités Onboard LAN
• RTL8110S Gigabit LAN
• Supporte 10Mbps, 100Mbps et 1Gbps
• IEEE 802.3 (10/100Mbps) et IEEE 802.3ab (1Gbps) compatible
Interface Serial ATA avec RAID
• Supportant 2 interface SATA (Serial ATA) compatible avec la
spécification SATA 1.0 (bande passante à 1.5Gbps)
• Supporte RAID 0 et RAID 1
Contrôleur IDE
• Supporte des disques durs jusqu’à UltraDMA 100Mbps
• IDE Améliorés Mode 4 PIO (vitesse de transfert de données
allant jusqu’à 14Mo/sec.)
Interface IEEE 1394
• VIA VT6307
• Supporte 2 ports 100/200/400 Mb/séc
AGP (Accelerated Graphics Port)
• Soutien des cartes supplémentaires 1.5V AGP 4x (1066MB par
seconde). Les cartes 3.3V AGP ne sont pas soutenues.
• Soutien des spécifications AGP 2.0
22
Français
Panneau des Ports Entrée/Sortie en Arrière
1 port souris PS/2
1 port clavier PS/2
1 port parallèle DB-25
1 port de DB-9 série
1 port de DB-15 VGA
1 port IEEE 1394
1 port RJ45 LAN
4 ports USB 2.0/1.1
Mic-in, line-in et line-out prises audio
Connecteurs Entrée/Sortie
• 1 connecteur pour 1 port série supplémentaires
• 1 connecteur pour 1 IEEE 1394
• 1 connecteur audio de l’avant pour la line-out et mic-in
• 1 connecteur CD-in audio internes
• 1 connecteur S/PDIF-out
• 1 connecteur IR
• 2 connecteurs Serial ATA
• 2 connecteurs IDE
• 1 connecteur de FDD
• 1 connecteur d’alimentation 20-pin ATX
• 1 connecteur devant panneau
• 3 connecteurs de ventilateurs
Français
Le
•
•
•
•
•
•
•
•
•
3
Logements d’Extension
• 1 slot AGP 4x
• 1 slot PCI-X
• 2 slots PCI
Compatibilité
• Compatible PCI 2.2, Intel AGP 2.0, PCI-X 2.2 et AC ’97
PCB
• microATX
• 24.4cm (9.61") x 23cm (9.06")
23
3
Français
Configuration du RAID
Les instructions suivantes décrivent les étapes essentielles de la
configuration du RAID.
Français
1. Activez le champ “On-Chip Serial ATA” en sélectionnant
“Enhanced Mode”. (Sous-menu “Integrated Peripherals” dans la
section “OnChip IDE Device” du Award BIOS.)
2. Activez le champ “SATA Mode” en sélectionnant “RAID”. (Sousmenu “Integrated Peripherals” dans la section “OnChip IDE
Device” du Award BIOS.)
3. Redémarrer PC.
Français
4. Effectuez l’utilitaire Intel RAID BIOS en appuyant sur <Ctrl> et
<I> après le démarrage. Cet utilitaire sert à configurer et gérer
le RAID sur les disques Serial ATA.
5. Installez les pilotes Intel 6300ESB RAID.
Ci-dessous, vous trouverez les étapes à suivre pour installer le pilote
RAID pendant l’installation de Windows® XP ou Windows® 2000
sur un disque Serial ATA configuré pour supporter le RAID.
Installer le pilote RAID
1. Démarrez le système à sortir du CD d’installation pour effectuer
Windows Setup.
2. Appuyez sur <F6> quand vous y serez invité au début de
Windows Setup.
3. Appuyez sur <S> pour sélectionner “Specify Additional Device”.
4. Vous serez invité à insérer une disquette contenant le pilote
RAID. Insérez la disquette 6300ESB RAID.
5. Sélectionnez “Intel® 6300ESB SATA RAID Controller”.
6. Appuyez sur <Enter>.
7. uivez les instructions sur l’écran pour achever l’installation.
24
Français
3
Liste de Vérification de l’Emballage
L’emballage de la carte système contient les éléments suivants:
;
;
;
;
;
;
;
;
;
1
1
1
1
2
1
1
1
1
carte système
manuel utilisateur
câble IDE
câble FDD
câble SATA
câble d’alimentation SATA
CD “Mainboard Utility”
disquette Intel RAID
plaque I/O
Français
Si l’un de ces éléments n’était pas dans l’emballage ou s’il était
endommagé, veuillez contacter votre revendeur ou votre
représentant.
25
4
Deutsch
Chapter 4 - Deutsch
Leistungsmerkmale und Technische Daten
Français
Prozessor
• Intel® Pentium® M / Celeron® M Prozessor
- Interface des Systemreifens 400/533MHz
- Supports 64-bit Wir t Datenübertragungsweg und 32-bit
Wenden
• Prozessor socket: mPGA479M
Chipset
• Intel® 852GME chipset
- Intel® 852GME GMCH
- Intel® 6300ESB I/O Steuerungsplattenmitte
Deutsch
Systemspeicher
• 2 Sockel 184-pin DDR DIMM
• 2.5V ungepuffert PC1600 (DDR200), PC2100 (DDR266) und
PC2700 (DDR333), ECC/non-ECC
• Unterstützung 128Mbit, 256Mbit and 512Mbit Technologie
stellen Sie die maximale Kapazität zur Verfügung 1GB mit
Vorrichtungen x16 und bis zu 2GB mit hohe Dichte 512Mbit
Technologie
26
BIOS
• Kompatibilität mit Award BIOS
• Flash-Speicher (4Mbit)
Energomisches Design
• ACPI STR (Suspend to RAM) funktion
• Wecken bei Betätigung der PS/2 Tastatur/Maus
• Wecken bei USB-Tastatur
• Wecken bei Klingeln
• RTC-Taktgeber zum Einschalten des Systems
• Wiederherstellung der Wechselstromversorgung nach einem
Ausfall
Deutsch
4
System Health Monitor Funktions
• Überwachung der Temperatur des CPU/Systems sowie
Warnsignal bei Überhitzung
• Überwachung der Spannungen des 5VSB(V)/VBAT(V)/1.5V/3.3V/
VCC/12V/Vcore
• Überwachung der Geschwindigkeit des CPU/system Ventilators
• Anzeige Temperatur, Spannung und lockern Sie Geschwindigkeit
auf
Bordgraphikmerkmäle
• Bis zu 64MB dynamische videospeicherallozierung
• Anzeige Kernfrequenz an 250MHz
• Übertragen Sie Kernfrequenz an 250MHz
• Intel® Dual-Frequency Graphics Technologie
• 2D Graphikmaschine Funktion
• 3D Graphikmaschine Funktion
• Graphiken Power Management
Audiomerkmale auf Platine
• Realtek ALC655 6-Kanal-Audioausgang
• 16-bit Stereo mit unabhängiger und variabler Abtastfrequenz
• Kompatibilität DirectSound 3DTM
• S/PDIF-Aus-Schnittstelle
Deutsch
Merkmale des LAN auf Platine
• RTL8110S Gigabit LAN
• Unterstützung 10Mbps, 100Mbps und 1Gbps
• IEEE 802.3 (10/100Mbps) und IEEE 802.3ab (1Gbps)
Kompatibilität
Serial ATA Schnittstelle mit RAID
• Unterstützt 2 SATA (Serielle ATA)-Schnittstelle, die mit SATA 1.0
Spezifikation (1.5Gigabits Schnittstelle) konform ist.
• Unterstützt RAID 0 und RAID 1
IDE-Controller
• Unterstützung der Festplatten bis zum UltraDMA 100Mbps
• Erweitertes IDE des PIO-Modus 4 (Datenübertragungsgeschwindigkeit von bis zu 14MB/Sek.)
27
4
Deutsch
IEEE 1394 Schnittstelle
• VIA VT6307
• Uunterstützt 2 Ports 100/200/400 Mbps
Français
AGP (Accelerated Graphics Port)
• Unterstützt 1.5V AGP 4x (1066MB/sek.) Erweiterungskarten.
3.3V AGP Karten werden nicht unterstützt.
• Unterstützt AGP 2.0 Spezifikationen
Deutsch
Ein-/Ausgabe-Porte an der Rückwand
• 1 Mini-DIN-6-Anschluß für eine PS/2-Maus
• 1 Mini-DIN-6-Anschluß für eine PS/2-Tastatur
• 1 DB-25-Parallelanschluß
• 1 serieller DB-9-Anschlüsse
• 1 VGA DB-15-Anschlüsse
• 1 IEEE 1394-Anschlüsse
• 1 RJ45 LAN-Anschlüsse
• 4 USB 2.0/1.1-Anschlüsse
• Mic-in, line-in und line-out Audio-Anschlußbuchsen
Ein-/Ausgabe-Steckverbinder
• 1 Anschlußfassung für 1 zusätzliche externe serieller Anschlüsse
• 1 Anschluß für eine externe IEEE 1394 Schnittstelle
• 1 Frontaudioanschluß für die externe line-out und mic-in
• 1 interne Audioanschlüsse (CD-in)
• 1 S/PDIF-out Anschluß
• 1 IR-Anschluß
• 2 Serial-ATA-Anschlüsse
• 2 IDE-Anschlüsse
• 1 Floppy-Anschlüsse
• 1 Anschlußstecker für das 20-pin ATX-Netzgerät
• 1 Frontabdeckung Stecker
• 3-ventilator-Anschlüsse
Erweiterungssteckfasssungen
• 1 AGP 4x-Einbauplätzen
• 1 PCI-X-Einbauplätzen
• 2 PCI-Einbauplätzen
Kompatibilität
• Kompatibilität mit PCI 2.2, Intel AGP 2.0, PCI-X 2.2 und AC ’97
28
Deutsch
4
Die Druckplatte
• microATX
• 24.4cm (9.61") x 23cm (9.06")
RAID-Konfiguration
Das folgende beschreibt die Schritte auf zusammenbauenüberfall.
1. Stellen Sie das Feld “On-Chip Serial ATA” auf “Enhanced Mode”.
(Submenu Integrated Peripherals - “OnChip IDE Device” Teil
Award BIOS.)
2. Stellen Sie das Feld “SATA Mode” auf “RAID”. (Submenu
Integrated Peripherals - “OnChip IDE Device” Teil Award BIOS.)
3. Laden Sie den PC neu.
4. Drücken Sie nach dem Star ten Ihres Computers die Taste
<Ctrl> und <I>, um Intel RAID BIOS Utility aufzurufen, die zur
Einstellung und Verwaltung von RAID-Disks der Serial ATAInterfaces notwendig ist.
5. Stellen Sie die Drivers Intel 6300ESB RAID.
Die Einstellung des RAID Driver während der Installation von
Windows® XP oder Windows® 2000.
Deutsch
Die Einstellung des RAID Driver
1. Starten Sie die Windows-Einstellung vom Einstell-CD.
2. Drücken Sie die Taste <F6>, um die Windows-Installation zu
beginnen.
3. Drücken Sie <S> , um “Specify Additional Device” zu wählen.
4. Sie bekommen den Hinweis, die Diskette mit dem RAID Driver
einzulegen. Legen Sie die Diskette 6300ESB RAID ein.
5. Wählen Sie “Intel® 6300ESB SATA RAID Controller”.
6. Drücken Sie <Enter>.
7. Folgen Sie den weiteren Hinweisen.
29
4
Deutsch
Verpackungsliste
;
;
;
;
;
;
;
;
;
1 Systemplatine
1 Benutzerhandbuch
1 IDE-Kabel
1 FDD-Kabel
2 SATA-Kabel
1 SATA-Energiekabel-Kabel
1 CD mit “Mainboard Utility”
1 Diskette Intel RAID driver
1 I/O-Shutzdeckel
Français
In der Verpackung der Systemplatine sind folgende Artikel enthalten:
Deutsch
Fehlt einer dieser Ar tikel oder weist einer dieser Ar tikel
Beschädigungen auf, wenden Sie sich an Ihren Händler oder Vertreter.
30
Español
5
Chapter 5 - Español
Características y Especificaciones
Procesador
• Procesador Intel® Pentium® M / Celeron® M
- Interface de la barra sistémica 400/533MHz
- Soporta ómnibus de datos 64-bit de anfitrión y dirección
32-bit
• Zócalo: mPGA479M
Chipset
• Intel® 852GME chipset
- Intel® 852GME GMCH
- Intel® 6300ESB Hub de Controlador I/O
Memoria de Sistema
• 2 184-pin DDR DIMM asientos
• 2.5V unbuffered PC1600 (DDR200), PC2100 (DDR266) o
PC2700 (DDR333) DIMMs, ECC/non-ECC
• Soporta 128Mbit, 256Mbit y 512Mbit tecnología proporcione la
capacidad máxima 1GB con dispositivos x16 y hasta 2GB con
tecnología de alta densidad 512Mbit
BIOS
• Award BIOS
• Memoria Instante (4Mbitios)
Diseño Energia Eficiente
• ACPI STR (Suspend to RAM) función
• PS/2 Teclado/Ratón und USB Teclado de Wake-On
• Wake-On-Ring
• Temporizador de RTC para encender el sistema
• Recuperación de Fracaso de Energía AC
Español
Funciones de Monitor de Salud del Sistema
• Monitores de los CPU/sistema temperaturas y alarma acalorada.
• Monitores de voltajes de 5VSB(V)/VBAT(V)/1.5V/3.3V/VCC/
12V/Vcore
• Vigila la velocidad del abanico del abanido del CPU/system
• Demostración temperaturas, voltajes y aviente la velocidad
31
5
Español
Características de Gráficos Interno
• Hasta 64MB of asignación de memoria video dinámica
• Frecuencia de la base de la exhibición en 250MHz
• Rinda la frecuencia de la base en 250MHz
• Intel® Dual-Frequency Graphics tecnología
• 2D motor de los gráficos
• 3D motor de los gráficos
• Gráficos Power Management
Características de Audio En Tablero
• Realtek ALC655 6-canal audio
• 16-bit dúplex completo estéreo de con independiente frecuencia
de muestreo variable
• DirectSound 3DTM compatible
• Interfáz de S/PDIF-out
Características de LAN Interno
• RTL8110S Gigabit LAN
• Soporta 10Mbps, 100Mbps y 1Gbps
• IEEE 802.3 (10/100Mbps) y IEEE 802.3ab (1Gbps)
compatibilidad
Interfaz Serial ATA con RAID
• Permite 2 interfaz SATA (Serie ATA) la cual es compatible con la
especificación SATA 1.0 (interfaz 1.5Gbps)
• Soporta RAID 0 y RAID 1
Controlador de IDE
• Soporta las unidades duras hasta de UltraDMA 100Mbps
• PIO Modo 4 Realzada IDE (tasa de transferencia de dato hasta
14MB/seg.)
Español
Interfaz IEEE 1394
• VIA VT6307
• Soporta 2 ports 100/200/400 Má/sec
32
AGP (Accelerated Graphics Port)
• Soporta placas 1.5V AGP 4x (1066Mb/seg.). Tarjetas AGP 3.3V
no se soportan.
• Soporta especificaciones AGP 2.0
Español
5
Panel de reverso de conectores de entrada - Salida
• 1 puerto de ratón PS/2 mini-DIN-6
• 1 puerto de teclado mini-DIN-6 PS/2
• 1 puerto paralelo de DB-25
• 1 puerto de serie DB-9
• 1 puerto de VGA DB-15
• 1 puerto de IEEE 1394
• 1 puerto de RJ45 LAN
• 4 puertos de USB 2.0/1.1
• Mic-in, line-in y line-out enchufes de audio
I/O Conectores
• 1 conector para 1 puerto de serie externo adicional
• 1 conector para un puerto de IEEE 1394
• 1 conectador audio delantero para la salida extrema de line-out
y el micro
• 1 conector de CD-in audio interno
• 1 conector S/PDIF-out
• 1 conector de IR
• 2 conectores de Serial ATA
• 2 conectores de IDE
• 1 conector de FDD
• 1 conector de fuente de alimentación de 20-pin ATX
• 1 conector de conectador del panel delantero
• 3 conectores de abanicos
Ranuras de Expansión
• 1 slot AGP 4x
• 1 slot PCI-X
• 2 slots PCI
Compatibilidad
• Sumisión de PCI 2.2, Intel AGP 2.0, PCI-X 2.2 y AC ’97
Español
La Placa Imprenta
• microATX
• 24.4cm (9.61") x 23cm (9.06")
33
5
Español
Configuración RAID
A continuación le mostramos los pasos básicos que ha de seguir
para llevar a cabo la configuración RAID.
1. Establezca el valor de la opción “On-Chip Serial ATA” como
“Enhanced Mode”. (submenú Integrated Peripherals – sección
“OnChip IDE Device” de la BIOS Award.)
2. Establezca el valor de la opción “SATA Mode” como “RAID”.
(submenú Integrated Peripherals – sección “OnChip IDE Device”
de la BIOS Award.)
3. Reanude la PC.
4. Ejecute la utilidad BIOS RAID de Intel pulsando la tecla <Ctrl>
y <I> durante el arranque del sistema. Esta utilidad se emplea
para configurar y gestionar la función RAID tanto en las unidades
Serial ATA.
5. Instale los controladores Intel 6300ESB RAID.
Los siguientes pasos le indican cómo instalar el controlador RAID
durante el proceso de instalación de Windows® XP o Windows®
2000 en unidades Serial ATA configuradas como RAID.
Instalación del Controlador RAID
1. Inicie la instalación de Windows arrancando desde el CD de
instalación.
2. Pulse <F6> durante el arranque de la instalación.
3. Pulse <S> para seleccionar otros dispositivos adicionales.
Español
4. En este punto, se le solicitará que introduzca un disco flexible
conteniendo el controlador RAID. Inserte el disco etiquetado
como 6300ESB RAID.
5. Pulse “Intel® 6300ESB SATA RAID Controller” et pulse <Enter>.
6. Pulse <Enter>.
7. Siga las instrucciones que se muestran en pantalla para
completar la instalación.
34
Español
5
Lista de Chequeo del Paquete
El paquete del tablero de sistema contiene los siguientes artículos:
;
;
;
;
;
;
;
;
;
1
1
1
1
2
1
1
1
1
tablero de sistema
manual de usuario
cable de IDE
cable de FDD
cable SATA
cable de alimentacion SATA
CD de “Mainboard Utility”
disquette flojo Intel 6300ESB RAID
tapa protectora I/O
Español
Si cualquieres de estos artículos están perdidos o dañados, favor de
ponerse en contacto con su tratante o representantes de venta
para la asistencia.
35
Ðóññêèé
6
Ðóññêèé
Ãëàâà 6 - Ðóññêèé ÿçûê
Õàðàêòåðèñòèêè è ñâîéñòâà
Ïðîöåññîð
• Ïðîöåññîð Intel® Pentium® M / Celeron® M
- Èíòåðôåéñ ñèñòåìíîé øèíû 400/533MHz
- Ïîääåðæèâàåò 64-bit “host data bus” è “32-bit
addressing”
• Socket: mPGA479M
×èïñåò
• Intel® 852GME chipset
- Intel® 852GME GMCH
- Intel® 6300ESB I/O Controller Hub
Îïåðàòèâíàÿ Ïàìÿòü
• 2 184-pin DDR DIMM ãíåçäà
• 2.5V, PC1600 (DDR200), PC2100 (DDR266) è PC2700
(DDR333), ECC/non-ECC
• Ïîääåðæèâàåò 128Mbit, 256Mbit è 512Mbit äî 1GB x16
“devices” è äî 2GB 512Mbit
BIOS
• Award BIOS
• 4Mbit Flash Ïàìÿòü
Ýíåðãîìè÷íûé Äèçàéí
• ACPI STR (Suspend to RAM)
• Àêòèâèçàöèÿ Íà Äâèæåíèå Ìûøè
• Àêòèâèçàöèÿ Íà Íàæàòèå Êíîïêè USB Êëàâèàòóðû
• Àêòèâèçàöèÿ Íà Âõîäÿùèé Çâîíîê
• RTC Òàéìåð äëÿ Âêëþ÷åíèÿ Ñèñòåìû
• Ñêà÷êè Íàïðÿæåíèÿ
Ôóíêöèè Ìîíèòîðèíãà Ñîñòîÿíèÿ Ñèñòåìû
• Mîíèòîðèíã òåìïåðàòóðû ïðîöåññîðà/ñèñòåìû
• Mîíèòîðèíã íàïðÿæåíèé 5VSB(V)/VBAT(V)/1.5V/3.3V/
VCC/12V/Vcore
• Mîíèòîðèíã ñêîðîñòè âðàùåíèÿ âåíòèëÿòîðà CPU/
system
36
Ðóññêèé
6
Ðóññêèé
Ãðàôèêà
• Äî 64ÌÁ äèíàìè÷åñêîé âèäåî ïàìÿòè
• ×àñòîòà ÿäðà 250MÃö
• ×àñòîòà ðåíäåðèíãà 250Ãö
• Intel® Dual-Frequency Graphics Technology
• 2D äâèæîê
• 3D äâèæîê
• Òåõíîëîãèÿ Graphics Power Management
Âñòðîåííûé Çâóê
• Realtek ALC655 6-channel êàíàëüíûé çâóêîâîé âûõîä
• Ïîëíîäóïëåêñíûé 16-bit êîäåê ñ íåçàâèñèìûì
èçìåíåíèåì ÷àñòîòû ñæàòèÿ
• DirectSound 3DTM compatible
• èíòåðôåéñà S/PDIF-out
Âñòðîåííûå ñåòåâûå ôóíêöèè
• RTL8110S Gigabit LAN
• Ïîëíîäóïëåêñíàÿ ïîääåðæêà íà 10 Mbps, 100 Mbps è
1Gbps
• Ïîääåðæèâàåò IEEE 802.3 (10/100Mbps) è IEEE
802.3ab (1Gbps)
Èíòåðôåéñ Serial A
TA è RAID
AT
• Ïîääåðæèâàåò 2 ïîðòà SATA (Serial ATA), ñîâìåñòèìûé
ñî ñïåöèôèêàöèåé SATA 1.0
• RAID 0 è RAID 1
Èíòåðôåéñ IDE
• Ïîääåðæèâàåò æåñòêèå äèñêè äî UltraDMA 100Mbps
• PIO Mode 4 Ðàñøèðåííûé IDE (ñêîðîñòü ïåðåäà÷è
äàííûõ äî 14ÌÁ/ñåê.)
Èíòåðôåéñ IEEE 1394
• VIA VT6307
• Ïîääåðæèâàåò 2 ïîðòà 100/200/400 Má/ñåê
AGP (Accelerated Graphics Port)
• Ïîääåðæèâàåò êàðòû 1.5V AGP 4x (1066Má/ñåê.). AGP
êàðòû 3.3V íå ïîääåðæèâàþòñÿ.
• Ïîääåðæèâàåò ñïåöèôèêàöèè AGP 2.0
37
Ðóññêèé
6
Ðóññêèé
Ïîðòû Ââîäà/Âûâîäà (I/O) çàäíåé ïàíåëè
• 1 ìèíè-DIN-6 PS/2 ïîðò äëÿ ìûøè
• 1 ìèíè-DIN-6 PS/2 ïîðò äëÿ êëàâèàòóðû
• 1 DB-25 ïàðàëëåëüíûé ïîðò
• 1 âíåøíåãî DB-9 ïîðòà è 1 VGA DB-15 ïîðòà
• 1 IEEE 1394 ïîðò è 1 RJ45 LAN ïîðò
• 4 USB 2.0/1.1 ïîðòà
• Mic-in, line-in è line-out ãíåçäà äëÿ çâóêà
Ðàçúåìû Ââîäà/Âûâîäà
• 1 ðàçúåì äëÿ 1-õ äîïîëíèòåëüíûõ âíåøíèõ serial
ïîðòîâ
• 1 ðàçúåì äëÿ âíåøíåãî IEEE 1394 ïîðòà
• 1 ïåðåäíèé àóäèî ðàçúåì äëÿ âíåøíåãî ëèíåéíîãî
âûõîäà è ìèêðîôîíà
• 1 âíóòðåííèõ çâóêîâûõ ðàçúåìà (CD-in)
• 1 S/PDIF-out ðàçúåì
• 1 ðàçúåì äëÿ èíòåðôåéñà IR
• 2 Serial ATA ðàçúåìà
• 2 IDE ðàçúåìà è 1 ðàçúåì FDD
• 1 ðàçúåìà ïèòàíèÿ 20-pin ATX
• 1 Ôðîíò ïàíåëü ðàçúåì
• 3 Ðàçúåìû äëÿ âåíòèëÿòîðà
Ñëîòû
• 1 AGP 4x ñëîòîâ, 1 PCI-X ñëîòîâ è 2 PCI ñëîòîâ
Ñîâìåñòèìîñòü
• PCI 2.2, Intel AGP 2.0, PCI-X 2.2 è AC ’97
Ïå÷àòíàÿ ïëàòà
• microATX , 24.4cm (9.61") x 23cm (9.06")
Êîíôèãóðàöèÿ RAID
Îïèñàíèå íàñòðîéêè RAID.
1. Óñòàíîâèòå ïîëå “On-Chip Serial ATA” íà “Enhanced
Mode”. (ïîäìåíþ Integrated Peripherals - “OnChip IDE
Device” ðàçäåë Award BIOS.)
38
Ðóññêèé
6
Ðóññêèé
2. Óñòàíîâèòå ïîëå “SATA Mode” íà “RAID”. (ïîäìåíþ
Integrated Peripherals - “OnChip IDE Device” ðàçäåë
Award BIOS.)
3. Ïåðåçàãðóçèòå êîìïüþòåð.
4. Çàïóñòèòå óòèëèòó Intel RAID BIOS, íàæàâ êíîïêó <Ctrl>
è <I> ïîñëå âêëþ÷åíèÿ êîìïüþòåðà. Óòèëèòà íóæíà äëÿ
íàñòðîéêè è óïðàâëåíèÿ äèñêàìè RAID èíòåðôåéñîâ
Serial ATA.
5. Óñòàíîâèòå äðàéâåðû Intel 6300ESB RAID.
Äàëåå âû óçíàåòå, êàê óñòàíîâèòü RAID äðàéâåð âî âðåìÿ
èíñòàëëÿöèè Windows® XP èëè Windows® 2000.
Óñòàíîâêà äðàéâåðà RAID
1.
2.
3.
4.
Çàïóñòèòå óñòàíîâêó Windows ñ óñòàíîâî÷íîãî CD.
Íàæìèòå <F6> äëÿ íà÷àëà óñòàíîâêè Windows.
Íàæìèòå <S> äëÿ âûáîðà “Specify Additional Device”.
Âàì ïðåäëîæàò âñòàâèòü äèñêåòó ñ RAID äðàéâåðîì.
Âñòàâüòå äèñêåòó Intel 6300ESB RAID.
5. Âûáåðèòå “Intel 6300ESB SATA RAID Controller”.
6. Íàæìèòå <Enter>.
8. Ñëåäóéòå äàëüíåéøèì èíñòðóêöèÿì.
Êîìïëåêòàöèÿ
Êîìïëåêòàöèÿ ïîñòàâêè ìàòåðèíñêîé ïëàòû:
;
;
;
;
;
;
;
;
;
1 Ñèñòåìíàÿ ïëàòà
1 Ðóêîâîäñòâî ïîëüçîâàòåëÿ
1 IDE øëåéô
1 FDD øëåéô
2 øëåéô Serial ATA
1 øëåéô øíóðîì ïèòàíèÿ Serial ATA
1 CD ñ “Mainboard Utility”
1 äèñêåòà Intel RAID
1 çàùèòíàÿ êðûøêà I/O
Åñëè â êîìïëåêòå èç ýòîãî ÷åãî-òî íå õâàòàåò èëè ÷òî-òî
èñïîð÷åíî, ïîæàëóéñòà, ñâÿæèòåñü ñî ñâîèì äèëåðîì
èëè ïðîäàâöîì.
39