1
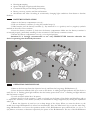
•
•
•
•
•
•
•
•
•
•
•
PACKAGE CONTENTS
Digital Monocular RANGER PRO
Carrying Case
Neck Strap
Extra Battery Container
Variable Power Switching Adapter
Output Video Cable
Lens Cleaning Cloth
Operating Manual
CD Guide
Warranty Registration Card
Car Adapter
For improvement purposes, design of this product is subject to change.
OPERATING MANUAL
The RANGER PRO 5x42 Digital Night Vision Device is designed on the basis of the Ranger 5x42
Night Vision Device. In comparison to the basic model, the RANGER PRO 5x42 features a greater range of
view (up to 600 m) due to a more sensitive CCD array and advanced program technology employed in this
model. The RANGER PRO 5x42 is equipped with a built-in, high power IR-illuminator that has gradual IR
adjustment and memory controller, which provides effective viewing in most night conditions. The unit can be
attached to a standard tripod that uses a 1/4 inch mounting thread. The RANGER PRO 5x42 has a built-in
video-out connector which can be used to pair the device with a monitor or to record video via a recording
device (such as Yukon Mobile Player/Recorder). For the best image quality, it is recommended to set up the
unit on a tripod before attaching the video cables and recording devices. The unit is equipped with a special
connector that allows the RANGER PRO 5x42 to be powered by a 12 volt car outlet. It operates for up to 10
hours using 6 AA batteries. The RANGER PRO 5x42 has an ergonomically-designed, water resistant, durable
plastic body that helps protect the unit and creates versatility.
Yukon's RANGER PRO 5x42 is ideal for the following applications::
• Surveillance
•
•
•
•
•
darkness
Hunting & camping
Sports and night navigation and observation
Commercial and personal fishing and boating
Rescue, recovery, security and law enforcement
Surveillance and video recording in continuously changing light conditions from dawn to absolute
BATTERY INSTALLATION
1. Remove the battery compartment cover (1).
2. Pull out the battery container (3) using the attached strap (2).
3. Slide batteries into the battery container (3). Pay attention to «+» (positive) and «-» (negative) symbols
marked on the walls of the container.
4. Insert the battery container (3) back into the battery compartment. Make sure the battery container is
re-inserted properly particularly watching for the orientation of the battery container contacts.
5. Return the battery compartment cover (1) to its original position.
Attention! It is strongly recommended to use only SINGLE-TYPE batteries otherwise the
device's operating time drastically decreases.
OPERATING INSTRUCTIONS
1. Remove the lens caps from the objective lens (4) and from the long-range IR-illuminator (5).
2. Press the button marked «ON» (6) to turn on the device. A stable green light indicates that the device is
ready for use. A flashing green light indicates that the battery power level is low. A flashing red light indicates
that the battery is empty.
3. Locate an object within 20 to 30 meters.
4. Rotate the lever of the eyepiece (7) until you clearly see the frame of the display and black fine grid on
it. Adjust the sensitivity of the device (visually it is determined as image brightness) by turning the adjustment
wheel (11).
5. Rotate the objective (4) until you see a sharp image of the object. When you turn the device on, the
stealth short-range IR-illuminator is turned on automatically. Press the «IR» button (8) to turn the main longrange IR-illuminator on. Choose the operation modes of the IR-illuminator: press and hold the «+» (9) or «-»
(10) buttons to increase or decrease respectively the power of the IR-illuminator. The use of the IR-illuminator
in the optimal mode prolongs operating time. If the device is focused on an object closer than 15 metres, the
emission spot of the main IR-illuminator (bright light circle) will be shifted to the right side of the display.
6. When changing the viewing distance, try to see a sharp and high-quality image by rotating the objective
(4) and the sensitivity adjustment wheel (11) and by changing the operating modes of the IR-illuminator. Do not
rotate the eyepiece's lever (7) the device is already individually adjusted.
7. Plug the output video cable into the RANGER PRO's video-output jack (12) to transmit the observed
image to an external LCD monitor. When the RANGER PRO 5x42 is coupled with video equipment, the
observed image can be recorded.
8. To connect the RANGER PRO 5x42 to a vehicle's 12V auxiliary power port, plug the car adapter into
the RANGER PRO’s power input jack (13) and connect the other end of the cable to the vehicle's auxiliary
power port.
9. To connect the RANGER PRO 5x42 to a household outlet, use a variable power switching adapter.
Be careful, observe the polarity shown on the inner side of the battery cover.
NOTE. When the batteries are in the container and the external power source is turned on, the device
operates on the external power source. If you unplug the external power source, you have to press the
«ON» button to make the device operate on the batteries.
CARE AND STORAGE
• Do not subject the digital NV device to shock or impact. Do not drop.
• Turn off the device when not in use and when moving the unit.
• The device can be used in daylight as well as nighttime conditions.
• After using the device in cold temperatures, please, wait up to 5 hours before using the device in the
warm temperatures. This helps prevent condensation on the lenses.
• Do not leave the device in direct sunlight or rain.
• Water, sand, dust, and salt can damage the device.
• Do not cover the vent grid (14) of the IR-illuminator. Please keep the grid clean to insure proper
performance of the IR illuminator.
• The device can be powered with 6 nickel cadmium batteries as well as 6 AA batteries.
• The power level of the main and auxiliary IR-illuminators when turning the device on with the «ON»
button (6) and switching the IR-illuminators with the «IR» button (8) corresponds to the value previously set
with the «+» (9) or «-» (10) buttons.
• Do not connect stray devices (headphones, for example) to the «Video» port. This may put the device
out of action.
• When focusing on the display (you can see the fine black net) 7 light or dark spots on the whole field
of view in the image plane are acceptable.
• The main IR-illuminator can not be focused.
CLEANING
• Do not scratch the external lens surfaces or touch them with your fingers.
• Clean the device's lenses with optic/camera lens tissue or a clean cloth moistened with alcohol. You
may use your breath to mist the surface of the glass prior to wiping. Clean the device's surfaces with alcohol if
necessary and dry thoroughly.
• The RANGER PRO’s plastic surfaces do not require special treatment. If necessary, clean the unit's
surfaces with a clean, soft cloth and a petroleum-based jelly and dry thoroughly.
Important Note:
• Do not pour alcohol directly on the lenses.
• Do not clean lenses and unit surfaces with any paper, such as newspaper, notebook paper, etc.: this
can damage the coating.
•
STORAGE
Remove the unit's batteries if the device will not be used for longer than 2 months.
• Always store the RANGER PRO 5x42 in its case.
• Always store the RANGER PRO 5x42 in a dry, well-ventilated area away from heating/air
conditioning vents and other heating devices. Temperature should be greater than +50oF (+10oC), and
humidity should not exceed 70%.
TROUBLESHOOTING
The Table 2 lists possible problems that you may encounter with your equipment. If the equipment
problem is not listed or the corrective actions listed do not correct the issue, notify the manufacturer.
Table 2
PROBLEM
1. Monocular fails to activate
2. IR Illuminator fails to activate
3. Poor image quality
TEST OF INSPECTION
Visual
CORRECTIVE ACTION
Turn unit OFF and then ON
Check for defective, missing or
improperly installed batteries or the
battery container.
The «-» button (10) is in its extreme
position. The sensitivity adjustment
wheel (11) is in its extreme
position.
Check the objective lens and
eyepiece, making sure they are
focused according to the
instructions listed in section:
OPERATING INSTRUCTIONS.
Check for fog or dirt on the lens.
Replace or install batteries or the
battery container correctly.
Press the «+» (9) button and hold
for 5-8 seconds. Adjust sensitivity
of the device.
Follow the instructions to adjust
the device.