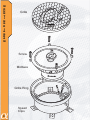
1
ALPHASONIK
R
Owner's Manual
Full Range Speaker Systems
PFZ693E / PFZ692E / PFZ680E
PFZ652E / PFZ525E / PFZ460E
PFZ410E / PFZ400E / PFZ325E
S
E
T
T
I
N
G
T
H
E
P
A
C
E
S
I
N
C
E
1
9
7
6
ALPHASONIK WAS FOUNDED IN 1976 WITH ONE MISSION, TO
BRING STATE OF THE ART PERFORMANCE TO THE CAR
AUDIO ENTHUSIAST.
In these early years we pioneered such ground-breaking
technologies as amplifier fan cooling and high voltage signal
transfer which remain a benchmark in high-end audio.
Today, the new Alphasonik is committed to pushing the envelope
with regard to technology, quality and value. Our electronics
feature audiophile parts and circuit topology designed to let the full
musical experience come through, loud and clear. Our
loudspeakers employ the latest high technology materials and
processes such as carbon reinforced woven glass and titanium
vapor deposition to deliver your music with tremendous impact,
dynamics and resolution.
We stand behind our quality with one of the best warranties in
consumer electronics. Compare Alphasonik car audio products
against anything competition has to offer. We're confident you will
come to one conclusion...
ALPHASONIK HAS NO EQUAL.
Introduction.................................................................................3
Features and Specifications........................................................4
Choosing a Location...................................................................5
Installation................................................................................6-8
T
A
B
L
E
O
F
C
O
N
T
E
N
T
S
Mounting Diagram.......................................................................9
Troubleshooting........................................................................10
Warning / Disclaimer.................................................................11
Warranty..............................................................................12-13
Notes.........................................................................................14
2
I
N
T
R
O
D
U
C
T
I
O
N
Thank you for purchasing this Alphasonik product.
Alphasonik products are specifically engineered and designed
for the mobile audio environment. This manual contains
important information about installation, set-up procedures and
integrating your new Alphasonik product into your vehicle. With
proper care and installation, your new product will provide you
with many years of high performance listening enjoyment. We
recommend having an Authorized Alphasonik Dealer install
your new product for optimal performance and to take
advantage of our warranty program. Before installing your new
product, please read through the manual to fully understand the
application.
Before making any electrical connections, make sure
that you disconnect the battery's ground cable to prevent the
possibility of short circuits or damage to your electronic
equipment. If your vehicle's stereo (head unit) comes with an
Anti-theft code, DO NOT disconnect the battery. If you have the
access code for the stereo (head unit), please refer to the
vehicle's owner's manual.
3
Standard Features
:Titanium injected polymer cone :Pure Butyl rubber surround :2-Layer hi-temp ASV voice coil
:Integrated crossover network with Solid-State tweeter protection :Oversized Poly-woven damper
:Proprietary heavy gauge coated steel frame :Chrome plated back plate :Aluminum magnet sleeve
:Titanium dome tweeter with swivel-mounted machined aluminum housing (Fixed position on PFZ693E)
4-Ohm impedance :Complete mounting hardware and grilles with templates
Specific Features
PFZ325 E
3.25î 2-WAY SYSTEM
PFZ652E
6.5î 2-WAY SYSTEM
Power Handling: 60 Watts RMS
Frequency Response: 150Hz ñ 20kHz
Sensitivity: 91 dB 1w/1m
Mounting Depth: 1 5/8î
Power Handling: 90 Watts RMS
Frequency Response: 50Hz ñ 20kHz
Sensitivity: 94 dB 1w/1m
Mounting Depth: 2 1/8î
PFZ400 E
4î 2-WAY SYSTEM
PFZ680E
5 X 7î OR 6 X 8î 2-WAY SYSTEM
Power Handling: 80 Watts RMS
Frequency Response: 90Hz ñ 20kHz
Sensitivity: 93 dB 1w/1m
Mounting Depth: 1 æî
Power Handling: 100 Watts RMS
Frequency Response: 60Hz ñ 20kHz
Sensitivity: 93dB 1w/1m
Mounting Depth: 2 3/8î
PFZ410 E
4 X 10î 2-WAY SYSTEM
PFZ692E
6 X 9î 2-WAY SYSTEM
Power Handling:100 Watts RMS
Frequency Response: 50Hz ñ 20kHz
Sensitivity: 93 dB 1w/1m
Mounting Depth: 2 5/8î
Power Handling: 180 Watts RMS
Frequency Response: 25Hz ñ 20kHz
Sensitivity: 95 dB 1w/1m
Mounting Depth: 3 1/8î
PFZ460E
4 X 6 2-WAY SYSTEM
PFZ693E
6 X 9 3-WAY SYSTEM
Power Handling: 80 Watts RMS
Frequency Response: 60Hz ñ 20kHz
Sensitivity: 93 dB 1w/1m
Mounting Depth: 1 æî
Power Handling: 200 Watts RMS
Frequency Response: 25Hz ñ 20kHz
Sensitivity: 95 dB 1w/1m
Mounting Depth: 3 1/8î
F
E
A
T
U
R
E
S
&
S
P
E
C
I
F
I
C
A
T
I
O
N
S
PFZ525E
5.25 2-WAY SYSTEM
Power Handling: 80 Watts RMS
Frequency Response: 60Hz ñ 20kHz
Sensitivity:93 dB 1w/1m
Mounting Depth: 2 1/8î
4
C
H
O
O
S
I
N
G
A
L
O
C
A
T
I
O
N
It is always best to plan the complete installation prior to
attempting to install any product. The routing of wires, power
connections and mounting locations should be planned first. As
with any car stereo installation, all work performed should be
checked thoroughly and carefully prior to the operation of the
system.
The placement of your Alphasonik speakers within your
vehicle will greatly affect the overall performance of your audio
system. Installation in every vehicle may not be possible
without modifications. Factory provided locations are generally
preferable due to ease of installation. In all cases speakers
should be placed in a location free of obstruction by body
panels, window cranks, storage compartments or anything that
may hinder the speaker's performance. Avoid areas that do not
provide a flat, sturdy mounting surface.
Alphasonik speakers are designed to fit in almost any
factory location. Again, if at all possible, it is recommended that
you use a factory location. This applies mostly to later model
vehicles. For those earlier models that do not have factory
locations or are limited to front locations, it is recommended that
you choose an area with sufficient air space.
If you allow an insufficient amount of air space, the
speaker may not reproduce low frequencies very well. It is
recommended to mount the speakers in door panels, kick
panels, rear decks, etc. Ideally, the speaker should be mounted
where it will be in an enclosed airspace, allowing for extended
bass response.
5
NOTE:
Alphasonik strongly recommends that you operate your
system at low volumes prior to the completed installation of your
Alphasonik speakers. This will allow a test of the speaker before
securing it to its permanent location.
CAUTION: Make sure that all speaker wiring is fully protected from
cuts, tears and possible wear. Any short circuit developing as a result
could severely damage the source unit or possibly the amplifier. Make
sure all speaker wires easily reach the speaker terminal with no stress
on the wires or connectors.
I
N
S
T
A
L
L
A
T
I
O
N
MOUNTING:
1: Confirm the mounting location and depth requirements by
inspecting the area where the speaker will be mounted. Most
speakers will fit into stock locations on the vehicle, in this case only
depth is important.
2:
If the location you have picked does require cutting, you
may use the supplied template to help you locate and mark the
mounting location and cuts to be made. Be careful when cutting out
the template. If you cut the template properly, the speaker will be a
perfect fit.
3.
If there is a cosmetic panel where the speaker will be
mounted, we recommend using a utility knife to carefully cut a hole in
it. Confirm the cut by placing the speaker in the hole. You may
modify the hole as necessary.
4.
If it will be necessary to cut steel, reinstall the cosmetic
panel in place and use the hole you have previously cut as a template.
This will help to insure proper cutting and a good fit. Mark the location
for the speaker mounting screws, remove the panel and drill the screw
holes. When finished you may replace the panel.
5.
After cutting and drilling all holes, inspect the mounting
areas for any metal burrs or rough edges. File any area that may
interfere with the mounting of the speaker.
6.
Clean any metal shavings from the mounting area and
check for areas in which water may enter the speaker cavity. Treat the
6
I
N
S
T
A
L
L
A
T
I
O
N
C
O
N
T
I
N
U
E
D
7
Make sure your source unit (Cassette, CD, DAT, DVD, etc)
is turned off while connecting the speaker terminals. Turn on the
various components and slowly advance the volume.
Remember to check and recheck all connections to insure
proper use.
1. Alphasonik recommends using at least 18-gauge wire
with your new speaker system. Thinner gauge wire may easily
be severed and can cause damage to your system should any
bare wire come in contact with the vehicle's chassis.
2. Make sure that your audio system is off while installing
and connecting your new Alphasonik speakers. Failure to do so
could result in damaging the speaker beyond repair.
3. Be sure to route the wires to the speakers with the
insulated terminals ending at the speakers. This will insure a
good contact with the speaker. If you need to shorten the
speaker lead, do so at the opposite end of the insulated
terminals or the bare end.
4. Be sure the polarity is correct at all times. The speaker
leads are color-coded for negative and positive. Be sure that the
leads are connected to the correct terminal of the speaker.
5. To insure long-term reliability, all bare wires and
wire-to-wire connections should be soldered and insulated with
heat shrink or electrician's tape. Under no circumstances should
you leave any bare wires uncovered, as this can and will lead to
the damage of your speakers.
6. When mounting in a door, it is imperative to have the
right amount of slack in the connecting wire so it does not get
crimped or torn when the door is opened and closed. Avoid
areas of the door jam that pinch, this will cause damage to the
speaker over long-term use.
7. Once the speaker wiring is completed you can connect
the opposite end to the source unit or amplifier. Again, be sure
to observe the correct polarity. Solder and wrap all stripped
connections.
Once you have tested your system and have confirmed that it
is operating properly, turn off your system and prepare for the
final mounting of the speakers.
1.
Position the speaker into the mounting hole and
reconfirm the correct mounting location and hole placement.
Screw clips are provided to insure a snug fit. Place screw clips
over the metal surface and line up the hole with the hole you
have previously drilled. Place the speaker into the hole, align the
mounting holes and proceed to insert the screws. Be sure to
tighten the screws evenly as to not warp the speaker frame.
2. Turn your system back on and confirm the speaker's
operation, first at low volume and then you may increase the
volume as you desire.
I
N
S
T
A
L
L
A
T
I
O
N
C
O
N
T
I
N
U
E
D
3. The next steps will aid in the proper mounting of the
speaker grilles. Follow these steps carefully and be patient.
First, locate the special bonding rubber which is located between
the waxed paper in the hardware package.
4. Carefully inspect the mounting ring where the grill
will be inserted. You will notice 4 to 6 channeled areas. This is
the area where the bonding rubber will secure the grill to the
speaker.
5. Break off pieces of the bonding rubber that correspond
to the size of the channels and insert it snugly in place. Once all
of the channels have been filled, carefully insert the grille and
press it firmly into place.
8
M
O
U
N
T
I
N
G
D
I
A
G
R
A
M
Grille
Screw
Midbass
Grille Ring
Speed
Clips
9
In the event that your Alphasonik speakers appear to
require service, we ask that you first do a little troubleshooting
to determine if the problem is actually the speaker or a problem
located in a different part of the vehicle such as the amplifier,
wiring, fusing or possibly the source unit.
If your Alphasonik speakers have been installed
professionally by an Authorized Alphasonik Dealer, we
recommend that you return to the Dealer and demonstrate the
problem to a qualified installer or repair technician. If you
installed the speakers yourself, use the following guidelines to
help find the problem:
T
R
O
U
B
L
E
S
H
O
O
T
I
N
G
1. No Sound
*Check the source unit or amplifier for power and be sure
they are operating properly.
*Check all signal connections.
*Check for any wiring that may be shorting together or
touching the metal chassis.
*Check all ground connections.
2. Distorted Sound At All Volumes
*Check for bad speaker connections.
*Check wiring for correct polarity.
3. Distorted Sound At High Volumes Only
*Check for loose mounting of the speaker.
*Inspect the speaker for debris in the cone or other
obstructions.
4. Poor Bass Response
*Check wiring for correct polarity.
*Check for unstable or loose mounting surface.
*Check Bass and Treble controls at the source unit or
amplifiers.
5. Poor High Frequency Response
*Check wiring for correct polarity.
*Check Treble controls or EQ settings.
*Check the Tweeter for possible damage.
10
W
A
R
N
I
N
G
&
D
I
S
C
L
A
I
M
E
R
Investigate the layout of your vehicle thoroughly before drilling
or cutting. Take care when you work near the gas tank, gas lines,
hydraulic lines, electrical components and electrical wiring. Do not use
the equipment unmounted. Attach this system securely to prevent
damage, particularly in the event of an accident or aggressive driving.
Do not mount the system so that wire connections are unprotected or
are subjected to pinching or damage from nearby objects. Before
connecting or disconnecting power connections at the system power
terminals, disconnect the +12V DC wire at the battery end. Confirm
that your source unit and other equipment are turned off while
connecting the input terminals. If you need to replace the power fuse,
replace it only with a fuse identical to the provided fuse. Using a fuse
of different type or rating may result in damage to the system, which is
not covered by the manufacturer's warranty. Do not install any product
where it may be subjected to excessive heat, moisture and dust or
where it may be repeatedly kicked, brushed or bumped. Make
absolutely sure that the terminals for the products are connected to the
proper inputs and outputs from the music source. Never run the wiring
on the outside of the vehicle or under it where it can be damaged by
road hazards or any moving parts of the vehicle. Use existing wire
channels, sills, panels and molding strips inside the vehicle to hide the
wiring for safety and a neat appearance.
DISCLAIMER
IMPORTANT: Never cut any metal that is an integral part of
the vehicle's safety or structural support system. If you are unsure, it is
best to have the product professionally installed by an Authorized
Alphasonik Dealer. Never sacrifice your safety for sound.
11
Alphasonik, Inc. warrants this product against all defects in material
and workmanship for a period of one (1) year from the date of
original purchase provided it was purchased from an Authorized
Alphasonik, Inc. Dealer. Alphasonik, Inc. will extend this standard oneyear warranty to a period of two (2) years from the date of original
purchase provided your products were purchased from and installed by
an Authorized Alphasonik, Inc. Dealer. (See "Installed Warranty"
below.)
W
A
R
R
A
N
T
Y
The conditions of this warranty and the extent of the responsibility of
Alphasonik, Inc. under this warranty are as follows:
1. DATED PROOF OF PURCHASE IS REQUIRED FOR
WARRANTY SERVICE OF THIS PRODUCT. Information about
Alphasonik, Inc. authorized warranty service may also be obtained at
www.alphasonik.com or by contacting or writing Alphasonik, Inc. at the
address listed on the back of this booklet.
2. This warranty will become void if service is performed by any
one other than an approved Alphasonik, Inc. Warranty Service Center.
3. This warranty does not apply to any product which has been
subjected to misuse, neglect or accident, or which has had the
warranty seal broken, serial number altered, defaced or removed, or
which has been connected, installed adjusted or repaired other than in
accordance with the instructions furnished by Alphasonik, Inc.
4. This warranty does not cover car static, electrical interference,
adjustments or labor costs for the removal or reinstallation of the unit
for repair.
5. The sole responsibility of Alphasonik, Inc. under this warranty
shall be limited to the repair or replacement thereof, at the sole
discretion of Alphasonik, Inc.
6. If it becomes necessary to send the product or any defective
part to Alphasonik, Inc. or an authorized service station, the product
must be shipped in its original or equivalent carton, fully insured, with
shipping charges prepaid. Alphasonik, Inc. will not assume any
responsibility for any loss or damage incurred in shipping.
12
W
A
R
R
A
N
T
Y
C
O
N
T
I
N
U
E
D
7. This warranty is not transferable and protects the original
purchaser provided they reside and made their purchase in the United
States. International consumers may contact their local retailer or
distributor for warranty information.
8. ALL IMPLIED WARRANTIES, EXCEPT TO THE EXTENT
PROHIBITED BY APPLICABLE LAW, SHALL HAVE NO GREATER
DURATION THAN THE WARRANTY PERIOD SET FORTH ABOVE.
UNDER NO CIRCUMSTANCES SHALL ALPHASONIK INC. BE
LIABLE FOR ANY LOSS OR DAMAGE, DIRECT OR
CONSEQUENTIAL, ARISING OUT OF THE USE OR INABILITY TO
USE THE PRODUCT. BECAUSE SOME STATES DO NOT ALLOW
LIMITATIONS ON HOW LONG AN IMPLIED WARRANTY LASTS OR
EXCLUSIONS
OR
LIMITATIONS
OF
INCIDENTAL
OR
CONSEQUENTIAL DAMAGES, THE ABOVE LIMITATIONS OR
EXCLUSIONS MAY NOT APPLY TO YOU.
9. THIS WARRANTY GIVES YOU SPECIFIC LEGAL
RIGHTS AND YOU MAY ALSO HAVE OTHER RIGHTS THAT VARY
FROM STATE TO STATE.
10. Should you have any difficulties with the performance of
this product during warranty or with any Alphasonik, Inc. authorized
service center, you may contact the Alphasonik, Inc. National Service
Manager at the address listed on the back of the booklet card or call
714.988.0370 for a listing of Authorized Warranty Service Centers in
your area.
INSTALLED WARRANTY
(When purchased from and installed by an Authorized Alphasonik, Inc. Dealer)
Speaker and Accessories:
1-year over-the-counter defective
exchange plus 1-year repair or replacement at the sole discretion of
Alphasonik, Inc.
Electronics:
1-year over-the-counter defective exchange, plus
1-year repair or replacements at the sole discretion of Alphasonik, Inc.
An Alphasonik Extended Warranty Registration Card must be
submitted to Alphasonik, Inc. within 30 days of purchase. To process
any warranty claim, Alphasonik, Inc. will require the dated proof of
purchase, which must specifically show the model and serial number
and that installation was provided for the product in question. All other
terms per Alphasonik, Inc.'s standard one-year warranty apply.
13
N
O
T
E
S
14
ALPHASONIK INC.
7050 VILLAGE DRIVE BLDG. G
BUENA PARK, CALIFORNIA. 90621
TEL: (714)670-8950 · FAX: (714)670-8959
www.alphasonikinc.com