1
MODEL: MX-2300G
MX-2300N
MX-2700G
MX-2700N
Copier Guide
MX-3500N
MX-3501N
MX-4500N
MX-4501N
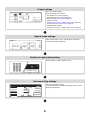
TABLE OF CONTENTS
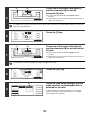
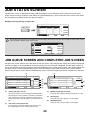
JOB STATUS SCREEN . . . . . . . . . . . . . . . . . . . . . . . 49
• JOB QUEUE SCREEN AND COMPLETED
JOB SCREEN. . . . . . . . . . . . . . . . . . . . . . . . . . . . 49
• WHEN THE DOCUMENT FILING FUNCTION
IS USED . . . . . . . . . . . . . . . . . . . . . . . . . . . . . . . . 53
ABOUT THIS MANUAL . . . . . . . . . . . . . . . . . . . . . . . . 3
• MANUALS PROVIDED WITH THE MACHINE . . . 3
1
BASIC PROCEDURE FOR MAKING
COPIES
BASE SCREEN OF COPY MODE . . . . . . . . . . . . . . . . 5
2
COPYING SEQUENCE . . . . . . . . . . . . . . . . . . . . . . . . 8
CONVENIENT COPY FUNCTIONS
SPECIAL MODES . . . . . . . . . . . . . . . . . . . . . . . . . . . 54
• [Image Edit] KEY AND [Colour Adjustments] KEY. . 57
MAKING COPIES . . . . . . . . . . . . . . . . . . . . . . . . . . . . 11
• USING THE AUTOMATIC DOCUMENT
FEEDER TO MAKE COPIES . . . . . . . . . . . . . . . . 11
• MAKING A COPY USING THE DOCUMENT
GLASS . . . . . . . . . . . . . . . . . . . . . . . . . . . . . . . . . 12
ADDING MARGINS (Margin Shift) . . . . . . . . . . . . . . 59
AUTOMATIC 2-SIDED COPYING . . . . . . . . . . . . . . . 15
• USING THE AUTOMATIC DOCUMENT
FEEDER TO MAKE 2-SIDED COPIES . . . . . . . . 15
• AUTOMATIC 2-SIDED COPYING USING THE
DOCUMENT GLASS . . . . . . . . . . . . . . . . . . . . . . 18
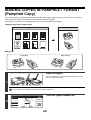
MAKING COPIES IN PAMPHLET FORMAT
(Pamphlet Copy) . . . . . . . . . . . . . . . . . . . . . . . . . . . . 65
ERASING PERIPHERAL SHADOWS (Erase) . . . . . . . . 61
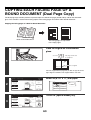
COPYING EACH FACING PAGE OF A BOUND
DOCUMENT (Dual Page Copy). . . . . . . . . . . . . . . . . 63
COPYING A LARGE NUMBER OF ORIGINALS
AT ONCE (Job Build) . . . . . . . . . . . . . . . . . . . . . . . . 69
COPY COLOUR MODES . . . . . . . . . . . . . . . . . . . . . . 21
• SELECTING THE COLOUR MODE . . . . . . . . . . . 21
USING TWO MACHINES TO COPY A LARGE
NUMBER OF ORIGINALS (Tandem Copy) . . . . . . . . . . . 71
CHANGING THE EXPOSURE AND EXPOSURE
MODE . . . . . . . . . . . . . . . . . . . . . . . . . . . . . . . . . . . . . 23
• AUTOMATIC ADJUSTMENT OF THE
EXPOSURE AND EXPOSURE MODE . . . . . . . . 23
• SELECTING THE EXPOSURE MODE AND
MANUALLY ADJUSTING THE EXPOSURE
LEVEL . . . . . . . . . . . . . . . . . . . . . . . . . . . . . . . . . 23
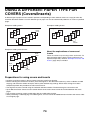
USING A DIFFERENT PAPER TYPE FOR
COVERS (Covers/Inserts). . . . . . . . . . . . . . . . . . . . . 74
• INSERTING COVERS IN COPIES (Cover
Settings) . . . . . . . . . . . . . . . . . . . . . . . . . . . . . . . . 75
• INSERTING INSERT SHEETS IN COPIES
(Insert Settings) . . . . . . . . . . . . . . . . . . . . . . . . . . 78
• CHANGING COVER/INSERT SETTINGS
(Page Layout) . . . . . . . . . . . . . . . . . . . . . . . . . . . . 81
REDUCTION/ENLARGEMENT/ZOOM . . . . . . . . . . . 26
• AUTOMATIC RATIO SELECTION (Auto
Image) . . . . . . . . . . . . . . . . . . . . . . . . . . . . . . . . . 26
• MANUALLY SELECTING THE RATIO (Preset
ratios/Zoom) . . . . . . . . . . . . . . . . . . . . . . . . . . . . . 27
• ENLARGING/REDUCING THE LENGTH AND
WIDTH SEPARATELY (XY Zoom) . . . . . . . . . . . . 30
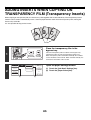
ADDING INSERTS WHEN COPYING ON
TRANSPARENCY FILM (Transparency Inserts) . . . 85
COPYING MULTIPLE PAGES ONTO ONE
SHEET OF PAPER (Multi Shot) . . . . . . . . . . . . . . . . 88
COPYING A PAMPHLET (Book Copy) . . . . . . . . . . . 91
ORIGINAL SIZES . . . . . . . . . . . . . . . . . . . . . . . . . . . . 33
• CHECKING THE ORIGINAL SIZE . . . . . . . . . . . . 33
• SPECIFYING THE ORIGINAL SIZE . . . . . . . . . . 35
• STORING FREQUENTLY USED ORIGINAL
SIZES . . . . . . . . . . . . . . . . . . . . . . . . . . . . . . . . . . 36
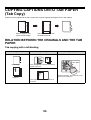
COPYING CAPTIONS ONTO TAB PAPER (Tab
Copy) . . . . . . . . . . . . . . . . . . . . . . . . . . . . . . . . . . . . . 95
• RELATION BETWEEN THE ORIGINALS AND
THE TAB PAPER . . . . . . . . . . . . . . . . . . . . . . . . . 95
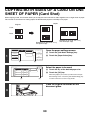
COPYING BOTH SIDES OF A CARD ON ONE
SHEET OF PAPER (Card Shot) . . . . . . . . . . . . . . . . 99
OUTPUT . . . . . . . . . . . . . . . . . . . . . . . . . . . . . . . . . . . 42
• OUTPUT MODES. . . . . . . . . . . . . . . . . . . . . . . . . 43
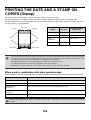
PRINTING THE DATE AND A STAMP ON
COPIES (Stamp) . . . . . . . . . . . . . . . . . . . . . . . . . . . 102
• ADDING THE DATE TO COPIES (Date) . . . . . . 103
• STAMPING COPIES (Stamp) . . . . . . . . . . . . . . 107
• PRINTING PAGE NUMBERS ON COPIES
(Page Numbering) . . . . . . . . . . . . . . . . . . . . . . . 110
• PRINTING TEXT ON COPIES (Text) . . . . . . . . . 116
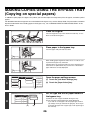
MAKING COPIES USING THE BYPASS TRAY
(Copying on special papers) . . . . . . . . . . . . . . . . . . 46
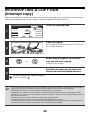
INTERRUPTING A COPY RUN (Interrupt copy) . . . 48
1
CHECKING THE STAMP LAYOUT (Layout) . . . . . 122
REPEATING PHOTOS ON A COPY (Photo
Repeat) . . . . . . . . . . . . . . . . . . . . . . . . . . . . . . . . . . . 124
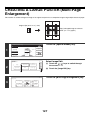
CREATING A LARGE POSTER (Multi-Page
Enlargement) . . . . . . . . . . . . . . . . . . . . . . . . . . . . . . 127
REVERSING THE IMAGE (Mirror Image) . . . . . . . . 130
COPYING A3 (11" x 17") SIZE ORIGINAL
WITHOUT CUTTING OFF THE EDGES (A3
(11x17) Full Bleed) . . . . . . . . . . . . . . . . . . . . . . . . . 132
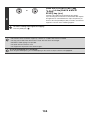
COPYING IN THE CENTRE OF THE PAPER
(Centring) . . . . . . . . . . . . . . . . . . . . . . . . . . . . . . . . . 135
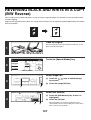
REVERSING BLACK AND WHITE IN A COPY (B/W
Reverse) . . . . . . . . . . . . . . . . . . . . . . . . . . . . . . . . . . . . . 137
ADJUSTING RED/GREEN/BLUE IN COPIES
(RGB Adjust) . . . . . . . . . . . . . . . . . . . . . . . . . . . . . . 139
ADJUSTING THE SHARPNESS OF AN IMAGE
(Sharpness) . . . . . . . . . . . . . . . . . . . . . . . . . . . . . . . . . . 141
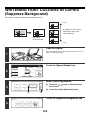
WHITENING FAINT COLOURS IN COPIES (Suppress
Background) . . . . . . . . . . . . . . . . . . . . . . . . . . . . . . . . . 143
ADJUSTING THE COLOUR (Colour Balance) . . . . 145
ADJUSTING THE BRIGHTNESS OF A COPY
(Brightness) . . . . . . . . . . . . . . . . . . . . . . . . . . . . . . . 147
ADJUSTING THE INTENSITY OF A COPY
(Intensity) . . . . . . . . . . . . . . . . . . . . . . . . . . . . . . . . . 149
CHECKING COPIES BEFORE PRINTING (Proof
Copy) . . . . . . . . . . . . . . . . . . . . . . . . . . . . . . . . . . . . 151
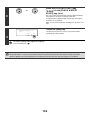
COPYING ORIGINALS OF DIFFERENT SIZES
(Mixed Size Original) . . . . . . . . . . . . . . . . . . . . . . . . 154
COPYING THIN ORIGINALS (Slow Scan Mode) . . 157
STORING COPY OPERATIONS (Job Programs) . 159
• STORING A JOB PROGRAM . . . . . . . . . . . . . . 160
• DELETING A JOB PROGRAM. . . . . . . . . . . . . . 161
APPENDIX . . . . . . . . . . . . . . . . . . . . . . . . . . . . . . . . 163
2
ABOUT THIS MANUAL
Please note
• Where this manual shows the "MX-2300/2700 series" or the "MX-3500/4500 series", the following models are indicated:
MX-2300/2700 series: MX-2300G, MX-2300N, MX-2700G, MX-2700N
MX-3500/4500 series: MX-3500N, MX-3501N, MX-4500N, MX-4501N
• This manual contains references to the fax function. However, please note that the fax function is not available in some
countries and regions.
• Considerable care has been taken in preparing this manual. If you have any comments or concerns about the manual, please
contact your dealer or nearest authorised service representative.
• This product has undergone strict quality control and inspection procedures. In the unlikely event that a defect or other problem
is discovered, please contact your dealer or nearest authorised service representative.
• Aside from instances provided for by law, SHARP is not responsible for failures occurring during the use of the product or its
options, or failures due to incorrect operation of the product and its options, or other failures, or for any damage that occurs due
to use of the product.
Warning
• Reproduction, adaptation or translation of the contents of the manual without prior written permission is prohibited, except as
allowed under copyright laws.
• All information in this manual is subject to change without notice.
Illustrations and the operation panel and touch panel shown in this manual
The peripheral devices are generally optional, however, some models include certain peripheral devices as standard equipment.
The explanations in this manual assume that a right tray and stand/2 x 500 sheet paper drawer are installed on the MX-2700N
(equipped standard with an automatic document feeder).
To further explain certain functions and uses, some explanations assume that additional peripheral devices are installed.
The display screens, messages, and key names shown in the manual may differ from those on the actual machine
due to product improvements and modifications.
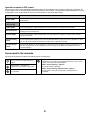
MANUALS PROVIDED WITH THE MACHINE
Printed manuals and manuals stored in PDF format on the machine's hard drive are provided with the machine. When
using the machine, read the appropriate manual for the feature you are using.
Printed manuals
Manual name
Contents
Safety Guide
This manual contains instructions for using the machine safely and lists the specifications of the machine
and its peripheral devices.
Software Setup
Guide
This manual explains how to install the software and configure settings to use the machine as a printer or
scanner.
Quick Start Guide
This manual provides easy-to-understand explanations of all the functions of the machine in a single volume.
Detailed explanations of each of the functions can be found in the manuals in PDF format.
Troubleshooting
This manual explains how to remove paper misfeeds and provides answers to frequently asked questions regarding
the operation of the machine in each mode. Refer to this manual when you have difficulty using the machine.
Facsimile Quick
Reference Guide
This manual explains the basic procedures for using the fax function of the machine, and provides an
overview of the features of the fax function, troubleshooting procedures, and specifications.
For detailed information on using the fax function and the system settings for fax, see the "Facsimile
Guide" in PDF format.
3
Operation manuals in PDF format
The manuals in PDF format provide detailed explanations of the procedures for using the machine in each mode. To
view the PDF manuals, download them from the hard drive in the machine. The procedure for downloading the manuals
is explained in "How to download the manuals in PDF format" in the Quick Start Guide.
Manual name
User's Guide
Contents
This manual provides information, such as basic operation procedures, how to load paper, and machine
maintenance.
Copier Guide
(This manual)
This manual provides detailed explanations of the procedures for using the copy function.
Printer Guide
This manual provides detailed explanations of the procedures for using the printer function.
Facsimile Guide
This manual provides detailed explanations of the procedures for using the fax function and the "System
Settings" that are related to fax.
Scanner Guide
This manual provides detailed explanations of the procedures for using the scanner function and the
Internet fax function.
Document Filing
Guide
This manual provides detailed explanations of the procedures for using the document filing function. The
document filing function allows you to save the document data of a copy or fax job, or the data of a print
job, as a file on the machine's hard drive. The file can be called up as needed.
System Settings
Guide
This manual explains the "System Settings", which are used to configure a variety of parameters to suit
the aims and the needs of your workplace. Current settings can be displayed or printed out from the
"System Settings".
Icons used in the manuals
The icons in the manuals indicate the following types of information:
This alerts you to a situation where
there is a risk of machine damage or
failure.
This indicates the name of a system setting and a provides a brief
explanation of the setting. For detailed information on each system
setting, see the System Settings Guide.
This provides a supplemental
explanation of a function or procedure.
When "System Settings:" appears:
A general setting is explained.
This explains how to cancel or correct
an operation.
When "System Settings (Administrator):" appears:
A setting that can only be configured by an administrator is
explained.
4
1
BASIC PROCEDURE FOR
MAKING COPIES
This chapter explains the basic procedures for making copies, including selection of the copy ratio and other copy settings.
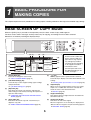
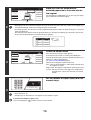
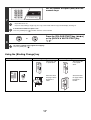
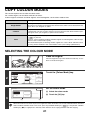
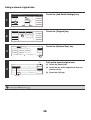
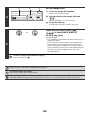
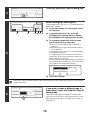
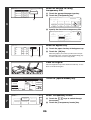
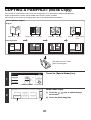
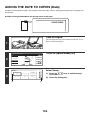
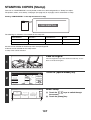
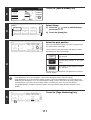
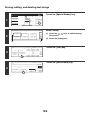
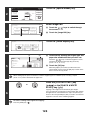
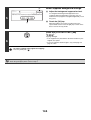
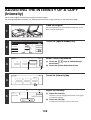
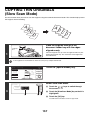
BASE SCREEN OF COPY MODE
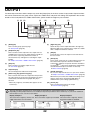
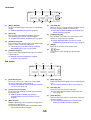
When the [COPY] key is pressed on the operation panel, the base screen of copy mode appears.
The base screen shows messages and keys necessary for copying, and settings that have been selected.
Selections are made by touching the displayed keys.
PRINT
READY
DATA
DOCUMENT
FILING
LINE
DATA
IMAGE SEND
COPY
SYSTEM
JOB STATUS SETTINGS
LOGOUT
(8)
(6) (7)
(9)
Ready to scan for copy.
(1)
0
Full Colour
Colour Mode
(2)
Job Detail
Settings
(3)
Auto
Exposure
(4)
100%
Copy Ratio
Original A4
Plain
A4
1.
2.
3.
4.
A4
A4R
B4
A3
5.
2-Sided Copy
(11)
Output
(12)
Special Modes
A4
[Colour Mode] key
Touch this to change the colour mode.
☞ COPY COLOUR MODES (page 21)
(2)
[Job Detail Settings] key
Touch this key to select original settings, paper settings,
and special modes.
☞ [Job Detail Settings] key (page 6)
(3)
(4)
(13)
File
Quick File
(5)
(1)
(10)
[Exposure] key
This shows the current copy exposure and exposure
mode settings. Touch this key to change the exposure or
exposure mode setting.
☞ CHANGING THE EXPOSURE AND EXPOSURE
MODE (page 23)
[Copy Ratio] key
This shows the current copy ratio. Touch this key to
adjust the copy ratio.
☞ REDUCTION/ENLARGEMENT/ZOOM (page 26)
5
• The screen at left shows the
machine with the saddle stitch
finisher, stand/2 x 500 sheet
paper drawer, large capacity
tray and right tray installed.
The image will vary depending
on the equipment installed.
• The indicators of the
operation panel and screen
may differ depending on the
country and region.
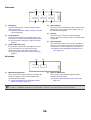
(5)
key
This key appears when a special mode is selected.
Touch this key to display a list of the selected modes and
settings.
☞ Checking which special modes are selected (page 58)
(6)
Output display
When one or more output functions such as sort, group,
staple sort, or saddle stitch have been selected, this
shows the icons of the selected functions.
☞ OUTPUT (page 42)
(7)
Original feed display
This appears when an original has been inserted in the
document feeder tray.
(8)
Original size display
This shows the size of the original.
When the original size is set manually, the display shows
"Manual". When an original is not placed, nothing appears.
☞ ORIGINAL SIZES (page 33)
(9)
(13) Customized keys
Paper select display
This shows the size of paper loaded in each tray.
In the bypass tray area, the paper type appears above
the paper size.
The selected tray is highlighted.
The approximate amount of paper in each tray is
indicated by
. To display the paper tray selection
screen for a tray, touch the tray.
These 3 keys can be changed to show any 3 settings or
functions that you like. The keys are changed in
"Customize Key Setting" in the system settings
(administrator). Normally the following keys appear:
☞ Customizing displayed keys (page 7)
• [Special Modes] key
This is the same [Special Modes] key that appears
when the [Job Detail Settings] key is touched.
☞ SPECIAL MODES (page 54)
• [File] key, [Quick File] key
Touch either key to use the Quick File or File of the
document filing functions. These are the same [File]
and [Quick File] keys that appear when the [Special
Modes] key is touched. For information on the
document filing function, see the Document Filing
Guide.
(10) Number of copies display
This shows the number of copies set.
(11) [2-Sided Copy] key
Touch this to make 2-sided copies.
☞ AUTOMATIC 2-SIDED COPYING (page 15)
(12) [Output] key
Touch this to select an output function such as sort,
group, offset, staple sort, saddle stitch, or punch.
☞ OUTPUT (page 42)
When the system settings screen is displayed, the base screen of copy mode will not appear even if the [COPY] key is
pressed.
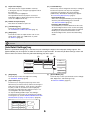
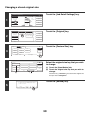
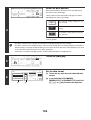
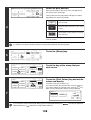
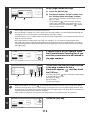
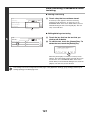
[Job Detail Settings] key
When the [Job Detail Settings] key is touched, keys for selecting the original size and paper settings appear. The
[Special Modes] key also appears to allow the selection of special modes. To close the job detail settings screen and
return to the base screen, touch the [Job Detail Settings] key once again.
Full Colour
Colour Mode
(1)
(2)
Auto
Original
Auto
A4
Paper Select
Job Detail
Settings
(3)
Touch this key to select the original size setting.
☞ ORIGINAL SIZES (page 33)
[Paper Select] key
OK
Plain
A4R
Plain
B4
Plain
A3
Plain
File
[Special Modes] key
Touch this key to select special modes such as Margin
Shift, Edge Erase, and Dual Page Copy.
☞ SPECIAL MODES (page 54)
Touch this key to change the paper (tray) that is used.
When the key is touched, each tray and the size and type of
paper in that tray will appear . Touch the key of the paper
tray that you wish to use and then touch the [OK] key.
The paper size and paper type settings for trays 1 to 5
are configured in the system settings.
☞ System Settings Guide "Paper Tray Settings"
For information on the paper size and paper type settings
for the bypass tray, see the "MAKING COPIES USING THE
BYPASS TRAY (Copying on special papers)" (page 46).
A4
Special Modes
Quick File
[Original] key
Paper Select
Output
A4
100%
Copy Ratio
(2)
2-Sided Copy
Plain
Special Modes A4
Auto
Exposure
(1)
(3)
A4
Plain
A4
Plain
6
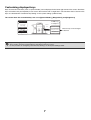
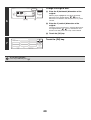
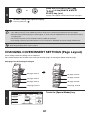
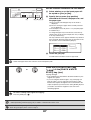
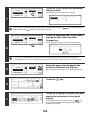
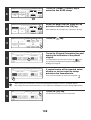
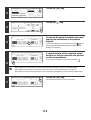
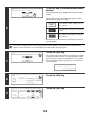
Customizing displayed keys
Keys of convenient functions (such as special modes) can be displayed in the lower right corner of the screen. Set these
keys to functions that you frequently use to access the functions with a single touch. The functions that are shown in the
keys are selected with "Customize Key Setting" in the system settings (administrator).
The screen when the customized keys are set to [Special Modes], [Margin Shift], and [Brightness]
Full Colour
Colour Mode
2-Sided Copy
Output
Job Detail
Settings
Auto
Exposure
100%
Copy Ratio
1.
2.
3.
4.
A4
A4R
B4
A3
5.
Plain
A4
B5
Special Modes
A4
Margin Shift
These 3 keys can be changed
as desired.
Brightness
System Settings (Administrator): Customize Key Setting
This is used to select the customized keys that appear in the base screen.
For the procedure for configuring "Customize Key Setting", see the System Settings Guide.
7
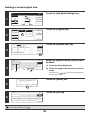
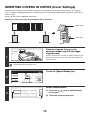
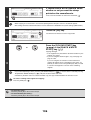
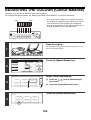
COPYING SEQUENCE
Select settings in the order shown below to ensure that the copy operation takes place smoothly. For detailed
procedures for selecting the settings, see the explanation of each setting in this guide.
Place the original.
Place the original in the document feeder tray of the automatic
document feeder, or on the document glass.
1
* Depending on the copy functions used, there are also cases
where functions are selected before the original is placed.
Basic copy settings
Full Colour
Colour Mode
Job Detail
Settings
Auto
Exposure
100%
Copy Ratio
Auto
Original
Auto
A4
Paper Select
Plain
Special Modes A4
Select the basic copy settings.
The main settings are as follows:
• Colour mode ☞COPY COLOUR MODES (page 21)
• Exposure and exposure mode
☞ CHANGING THE EXPOSURE AND EXPOSURE MODE
(page 23)
• Copy ratio
☞REDUCTION/ENLARGEMENT/ZOOM (page 26)
• Original size ☞ORIGINAL SIZES (page 33)
• Paper settings
2-Sided Copy
Output
Special Modes
File
Quick File
2-sided copy settings
2-Sided Copy
Select settings as needed for 2-sided copying and 2-sided
scanning of the original.
☞ AUTOMATIC 2-SIDED COPYING (page 15)
OK
8
Output settings
Output
Sort
Offset
Tray
Staple
Sort
Group
Select copy output settings.
The main settings are as follows:
• Sort mode ☞Sort mode (page 43)
• Group mode ☞Group mode (page 43)
• Offset mode ☞Offset function (page 43)
• Staple sort mode
☞Staple sort function / Saddle stitch function (page 44)
• Punch function ☞Punch function (page 45)
• Pamphlet staple function
☞Staple sort function / Saddle stitch function (page 44)
OK
Right Tray
Saddle
Stitch
Punch
Offset
Special mode settings
Select special modes such as "Margin Shift" and "Erase".
☞ SPECIAL MODES (page 54)
OK
Special Modes
1/4
Margin Shift
Pamphlet Copy
Dual Page
Copy
Erase
Job
Build
Tandem
Copy
Number of copies (sets) setting
Set the number of copies (number of sets).
7
2-Sided Copy
Document filing settings
Ready to scan for copy.
Full Colour
Colour Mode
Original A4
Plain
A4
1.
2.
3.
100%
Copy Ratio
2-Sided Copy
Output
Job Detail
Settings
Auto
Exposure
Select document filing settings.
For more information on the document filing function, see the
Document Filing Guide.
0
4.
A4
A4R
B4
A3
Special Modes
File
Quick File
9
Start copying.
Start scanning the original(s) and making copies.
Start colour copying.
Start black and
white copying.
When one or more special modes are selected, the
key appears in the base screen. Touch the
key to display a
list of the selected special modes. This lets you check what special modes are selected and the settings of each mode.
To cancel all settings, press the [CLEAR ALL] key (
).
When the [CLEAR ALL] key (
) is pressed, all settings selected to that point are cleared and you will return to the base
screen.
To stop scanning of the original and copying, press the [STOP] key (
).
When the [STOP] key (
) is pressed, a message will appear asking you if you want to cancel the job. Touch the [Yes] key
in the message screen.
10
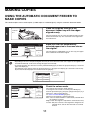
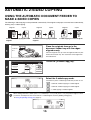
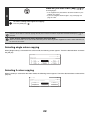
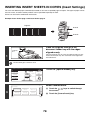
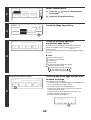
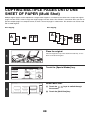
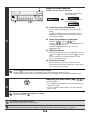
MAKING COPIES
USING THE AUTOMATIC DOCUMENT FEEDER TO
MAKE COPIES
This section explains how to make copies (1-sided copies of 1-sided originals) using the automatic document feeder.
1
1
Indicator
line
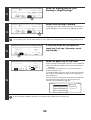
Place the originals face up in the
document feeder tray with the edges
aligned evenly.
Place the originals face up. Insert the originals all the way into
the document feeder tray. The stack must not be higher than
the indicator line.
Ready to scan for copy.
0
Full Colour
Colour Mode
Output
Job Detail
Settings
Auto
Exposure
100%
Copy Ratio
2-Sided Copy
Original A4
Plain
A4
1.
2.
3.
4.
A4
A4R
B4
A3
Special Modes
File
Make sure that the automatically
selected paper size is the same size as
the original.
The selected tray is highlighted. You can also copy onto paper
that is a different size than the original.
Quick File
(A)
2
• Depending on the size of the placed original, there may be cases where the same size of paper as the original is not
selected automatically. In this event, change the paper size manually.
• To change the paper size selection, touch the [Job Detail Settings] key and then the [Paper Select] key, or touch the
paper size display (A).
The following screen appears when the [Paper Select] key or the paper size display (A) is touched. Touch the tray
key that has the desired paper size and then touch the [OK] key.
Paper Select
Plain
A4R
Plain
B4
Plain
A3
Plain
Ready to scan for copy.
0
Full Colour
Colour Mode
Original A4
3
100%
Copy Ratio
2-Sided Copy
Output
Job Detail
Settings
Auto
Exposure
OK
A4
Plain
A4
1.
2.
3.
4.
A4
A4R
B4
A3
Special Modes
File
Quick File
A4
Plain
Check the colour mode.
The currently selected colour mode appears.
To change the colour mode, touch the [Colour Mode] key,
touch the [Full Colour] key, [Auto] key, [Single Colour] key or [2
Colour] key, and touch the [OK] key.
☞ COPY COLOUR MODES (page 21)
Full Colour: The original is copied in full colour.
Auto: Colour or black and white is automatically selected when
the original is scanned.
Single Colour: The original is copied in the selected colour only.
2 Colour: Only the red areas of the original are changed to the
selected colour; colours other than red are scanned
in black.
11
Set the number of copies (sets) with the
numeric keys.
7
2-Sided Copy
4
• Up to 999 can be set.
• A single copy can be made even if "0" appears for the number of copies.
If an incorrect number of copies is set...
Press the [CLEAR] key (
) and then enter the correct number.
Press the [COLOUR START] key (
or the [BLACK & WHITE START] key
(
).
or
5
)
Even if a colour mode is selected, copying will take place in black and white if the [BLACK & WHITE START] key
(
) is pressed.
To cancel scanning of the original and copying...
Press the [STOP] key (
).
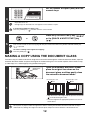
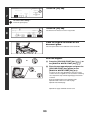
MAKING A COPY USING THE DOCUMENT GLASS
To make a copy of a book or other thick original that cannot be fed through the automatic document feeder, open the
automatic document feeder and place the original on the document glass. This section explains how to make a copy
(1-sided copy of a 1-sided original) using the document glass.
Original size
detector
Open the automatic document feeder,
place the original face down on the
document glass, and then gently close
the automatic document feeder.
Document glass scale
mark
1
A5 or
5-1/2" x 8-1/2"
B4 or
8-1/2" x 14"
B5
A4 or 8-1/2" x 11" A3 or 11" x 17"
Document glass scale
mark
B5R
A4R or 8-1/2" x 11"R
• Align the corner of the original with the tip of the arrow mark
on the document glass scale.
• Place the original in the appropriate position for its size as
shown above.
Do not place any objects under the original size detector. Closing the automatic document feeder with an object
underneath may damage the original size detector plate and prevent correct detection of the document size.
12
Ready to scan for copy.
0
Full Colour
Colour Mode
Output
Job Detail
Settings
Auto
Exposure
100%
Copy Ratio
2-Sided Copy
Original A4
Plain
A4
1.
2.
3.
4.
A4
A4R
B4
A3
Special Modes
File
Make sure that the automatically
selected paper size is the same size as
the original.
The selected tray is highlighted. You can also copy onto paper
that is a different size than the original.
Quick File
(A)
2
• Depending on the size of the placed original, there may be cases where the same size of paper as the original is not
selected automatically. In this event, change the paper size manually.
• To change the paper size selection, touch the [Job Detail Settings] key and then the [Paper Select] key, or touch the
paper size display (A).
The following screen appears when the [Paper Select] key or the paper size display (A) is touched. Touch the tray
key that has the desired paper size and then touch the [OK] key.
Paper Select
Plain
A4R
Plain
B4
Plain
A3
Plain
Ready to scan for copy.
0
Full Colour
Colour Mode
Original A4
3
100%
Copy Ratio
2-Sided Copy
Output
Job Detail
Settings
Auto
Exposure
OK
A4
Plain
A4
1.
2.
3.
4.
A4
A4R
B4
A3
Special Modes
File
Quick File
A4
Plain
Check the colour mode.
The currently selected colour mode appears.
To change the colour mode, touch the [Colour Mode] key,
touch the [Full Colour] key, [Auto] key, [Single Colour] key or [2
Colour] key, and touch the [OK] key.
☞ COPY COLOUR MODES (page 21)
Full Colour: The original is copied in full colour.
Auto: Colour or black and white is automatically selected when
the original is scanned.
Single Colour: The original is copied in the selected colour only.
2 Colour: Only the red areas of the original are changed to the
selected colour; colours other than red are scanned
in black.
Set the number of copies (sets) with the
numeric keys.
7
2-Sided Copy
4
• Up to 999 can be set.
• A single copy can be made even if "0" appears for the number of copies.
If an incorrect number of copies is set...
Press the [CLEAR] key (
) and then enter the correct number.
13
Press the [COLOUR START] key (
or the [BLACK & WHITE START] key
(
).
or
)
Scanning begins.
If group copy is selected, copying begins.
If you are using the sort function or other function that requires
all originals to be scanned before the copies are printed, you
must use the same [START] key that you used to scan the first
original to scan each of the remaining originals.
5
Even if a colour mode is selected, copying will take place in black and white if the [BLACK & WHITE START] key
(
) is pressed.
Remove the original and place the next
original, and then press the [COLOUR
START] key (
) or the [BLACK &
WHITE START] key (
).
or
6
If you are using the sort function or other function that requires
all originals to be scanned before the copies are printed, you
must use the same [START] key that you used to scan the first
original to scan each of the remaining originals.
Repeat this step until all originals have been scanned.
Touch the [Read-End] key.
Place next original. Press [Start].
When finished, press [Read-End].
Read-End
7
To cancel scanning of the original and copying...
Press the [STOP] key (
).
14
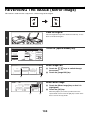
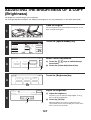
AUTOMATIC 2-SIDED COPYING
USING THE AUTOMATIC DOCUMENT FEEDER TO
MAKE 2-SIDED COPIES
The following 2-sided copying can be performed automatically. The originals and paper are turned over automatically,
allowing easy 2-sided copying.
Originals
Originals
Copies
Automatic 2-sided copying of 1-sided
originals
Automatic 2-sided copying of 2-sided
originals
1-sided copying of 2-sided originals
Place the originals face up. Insert the originals all the way into
the document feeder tray. The stack must not be higher than
the indicator line.
Ready to scan for copy.
0
Full Colour
Colour Mode
2
Copies
Place the originals face up in the
document feeder tray with the edges
aligned evenly.
1
1
Indicator
line
Originals
Copies
100%
Copy Ratio
2-Sided Copy
Original A4
Output
Job Detail
Settings
Auto
Exposure
Touch the [2-Sided Copy] key.
Plain
A4
1.
2.
3.
4.
A4
A4R
B4
A3
Special Modes
File
Quick File
OK
2-Sided Copy
Select the 2-sided copy mode.
Touch the key of the 2-sided copy mode that you wish to use.
: Automatic 2-sided copying of 1-sided originals
: Automatic 2-sided copying of 2-sided originals
: 1-sided copying of 2-sided originals
3
When making automatic 2-sided copies of a 1-sided A3 (11" x 17") or B4 (8-1/2" x 14") size portrait original, or when
you wish to vertically invert the reverse side of a 2-sided original, touch the [Binding Change] key.
☞ Using the [Binding Change] key (page 17)
OK
2-Sided Copy
Binding
Change
15
Touch the [OK] key.
OK
2-Sided Copy
Binding
Change
4
Ready to scan for copy.
0
Full Colour
Colour Mode
Auto
Exposure
Output
Plain
A4
1.
2.
3.
100%
Copy Ratio
2-Sided Copy
Original A4
Job Detail
Settings
4.
A4
A4R
B4
A3
Special Modes
File
Make sure that the automatically
selected paper size is the same size as
the original.
The selected tray is highlighted. You can also copy onto paper
that is a different size than the original.
Quick File
(A)
• The 2-sided copy setting appears at the top of the paper size display (A).
5
• Depending on the size of the placed original, there may be cases where the same size of paper as the original is not
selected automatically. In this event, change the paper size manually.
• To change the paper size selection, touch the [Job Detail Settings] key and then the [Paper Select] key, or touch the
paper size display (A).
The following screen appears when the [Paper Select] key or the paper size display (A) is touched. Touch the key of
the tray that has the desired paper size and then touch the [OK] key.
Paper Select
Plain
A4R
Plain
B4
Plain
A3
Plain
Ready to scan for copy.
0
Full Colour
Colour Mode
Original A4
Plain
A4
1.
2.
3.
6
100%
Copy Ratio
2-Sided Copy
Output
Job Detail
Settings
Auto
Exposure
OK
A4
4.
A4
A4R
B4
A3
Special Modes
File
Quick File
A4
Plain
Check the colour mode.
The currently selected colour mode appears.
To change the colour mode, touch the [Colour Mode] key,
touch the [Full Colour] key, [Auto] key, [Single Colour] key or [2
Colour] key, and touch the [OK] key.
☞ COPY COLOUR MODES (page 21)
Full Colour: The original is copied in full colour.
Auto: Colour or black and white is automatically selected when
the original is scanned.
Single Colour: The original is copied in the selected colour only.
2 Colour: Only the red areas of the original are changed to the
selected colour; colours other than red are scanned
in black.
16
Set the number of copies (sets) with the
numeric keys.
7
2-Sided Copy
7
• Up to 999 can be set.
• If you are only making a single copy, the copy can be made with the copy number display showing "0".
If an incorrect number of copies is set...
Press the [CLEAR] key (
) and then enter the correct number.
Press the [COLOUR START] key (
or the [BLACK & WHITE START] key
(
).
or
8
To cancel scanning of the original and copying...
Press the [STOP] key (
).
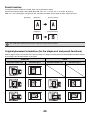
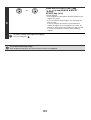
Using the [Binding Change] key
Originals
Binding Change is used
A
The reverse side
is upside down.
Binding Change is not used
A
The reverse side
is not upside
down.
A
1
2
Select this when
the pages will be
bound into a
tablet.
A
3
17
A
Select this when
the pages will be
bound into a
booklet.
)
AUTOMATIC 2-SIDED COPYING USING THE
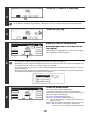
DOCUMENT GLASS
The following 2-sided copying can be performed automatically. The paper is turned over automatically, allowing easy
2-sided copying.
Originals
Copies
Automatic 2-sided copying of 1-sided
originals
Open the automatic document feeder,
place the original face down on the
document glass, and then gently close
the automatic document feeder.
Original size
detector
Document glass scale
mark
A5 or
5-1/2" x 8-1/2"
1
B4 or
8-1/2" x 14"
B5
A4 or 8-1/2" x 11" A3 or 11" x 17"
Document glass scale
mark
B5R
A4R or 8-1/2" x 11"R
• Align the corner of the original with the tip of the arrow mark
on the document glass scale.
• Place the original in the appropriate position for its size as
shown above.
Do not place any objects under the original size detector. Closing the automatic document feeder with an object
underneath may damage the original size detector plate and prevent correct detection of the document size.
Ready to scan for copy.
0
Full Colour
Colour Mode
2
Original A4
100%
Copy Ratio
2-Sided Copy
Output
Job Detail
Settings
Auto
Exposure
Touch the [2-Sided Copy] key.
Plain
A4
1.
2.
3.
4.
A4
A4R
B4
A3
Special Modes
File
Quick File
18
Touch the [1-Sided to 2-Sided] key.
OK
2-Sided Copy
3
The [2-Sided to 2-Sided] key and [2-Sided to 1-Sided] key cannot be used when copying from the document glass.
Touch the [OK] key.
OK
2-Sided Copy
Binding
Change
4
Ready to scan for copy.
0
Full Colour
Colour Mode
Output
Job Detail
Settings
Auto
Exposure
Plain
A4
1.
2.
3.
100%
Copy Ratio
2-Sided Copy
Original A4
4.
A4
A4R
B4
A3
Special Modes
File
Make sure that the automatically
selected paper size is the same size as
the original.
The selected tray is highlighted. You can also copy onto paper
that is a different size than the original.
Quick File
(A)
5
• The "1-Sided to 2-Sided" copy setting appears at the top of the paper size display (A).
• Depending on the size of the placed original, there may be cases where the same size of paper as the original is not
selected automatically. In this event, change the paper size manually.
• To change the paper size selection, touch the [Job Detail Settings] key and then the [Paper Select] key, or touch the
paper size display (A).
The following screen appears when the [Paper Select] key or the paper size display (A) is touched. Touch the tray
key that has the desired paper size and then touch the [OK] key.
Paper Select
Plain
A4R
Plain
B4
Plain
A3
Plain
Ready to scan for copy.
0
Full Colour
Colour Mode
Original A4
6
Plain
A4
1.
2.
3.
100%
Copy Ratio
2-Sided Copy
Output
Job Detail
Settings
Auto
Exposure
OK
A4
4.
A4
A4R
B4
A3
Special Modes
File
Quick File
A4
Plain
Check the colour mode.
The currently selected colour mode appears.
To change the colour mode, touch the [Colour Mode] key,
touch the [Full Colour] key, [Auto] key, [Single Colour] key or [2
Colour] key, and touch the [OK] key.
☞ COPY COLOUR MODES (page 21)
Full Colour: The original is copied in full colour.
Auto: Colour or black and white is automatically selected when the
original is scanned.
Single Colour: The original is copied in the selected colour only.
2 Colour: Only the red areas of the original are changed to the
selected colour; colours other than red are scanned in black.
19
Set the number of copies (sets) with the
numeric keys.
7
2-Sided Copy
7
• Up to 999 can be set.
• A single copy can be made even if "0" appears for the number of copies.
If an incorrect number of copies is set...
Press the [CLEAR] key (
) and then enter the correct number.
Press the [COLOUR START] key (
or the [BLACK & WHITE START] key
(
).
or
8
)
Scanning begins.
If you are using the sort function or other function that requires
all originals to be scanned before the copies are printed, you
must use the same [START] key that you used to scan the first
original to scan each of the remaining originals.
Remove the original and place the next
original, and then press the [COLOUR
START] key (
) or the [BLACK &
WHITE START] key (
).
or
9
If you are using the sort function or other function that requires
all originals to be scanned before the copies are printed, you
must use the same [START] key that you used to scan the first
original to scan each of the remaining originals.
Repeat this step until all originals have been scanned.
Touch the [Read-End] key.
Place next original. Press [Start].
When finished, press [Read-End].
Read-End
10
To cancel scanning of the original and copying...
Press the [STOP] key (
).
20
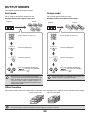
COPY COLOUR MODES
This section explains how to select the colour mode.
For a colour original, set the colour mode to Full Colour.
If colour originals and black and white originals are mixed together, set the colour mode to Auto.
Full Colour
The original is copied in full colour.
Single Colour
The original is copied in the selected colour only.
All colours in the original are changed to the selected colour, which can be selected from red,
green, blue, cyan, magenta, or yellow.
2 Colour
Only the red areas of the original are changed to the selected colour; colours other than red are
copied in black. This lets you make copies that are more expressive than black and white copies.
Red, green, blue, cyan, magenta, or yellow can be selected.
Auto
A colour original is normally copied in Full Colour mode when the [COLOUR START] key
(
) is pressed.
However, if colour originals and black and white originals are mixed together, follow the steps
below to set the colour mode to [Auto].
The discrimination point for detecting whether originals are colour or black and white can be
set using "Detect Standard in Auto Colour Mode" in the system settings (administrator).
SELECTING THE COLOUR MODE
Place the original.
Place the original face up in the document feeder tray, or face
down on the document glass.
1
1
Ready to scan for copy.
0
Full Colour
Colour Mode
2
Original A4
Touch the [Colour Mode] key.
2-Sided Copy
Output
Job Detail
Settings
Plain
A4
Auto
Exposure
1.
2.
3.
100%
Copy Ratio
4.
A4
A4R
B4
A3
Colour Mode
Special Modes
File
Quick File
OK
Full Colour
Single Colour
Auto
2 Colour
Set the colour mode.
(1) Select the colour mode.
(2) Touch the [OK] key.
3
(1)
(2)
When auto mode is used, there may be some originals for which the mode is not correctly switched between full colour
mode and black and white mode. In this event, press the [COLOUR START] key (
) or the [BLACK & WHITE
START] key (
) as appropriate to manually switch between colour copying and black and white copying.
21
Press the [COLOUR START] key (
).
Scanning begins.
• If the originals were placed in the document feeder tray, the
originals are copied.
• If you are using the document glass, copy each page one
page at a time.
4
To cancel scanning of the original and copying...
Press the [STOP] key (
).
Even if a colour mode is selected, copying will take place in black and white if the [BLACK & WHITE START] key (
pressed.
) is
System Settings (Administrator): Detect Standard in Auto Colour Mode
When the colour mode is set to auto, the discrimination point for detecting whether originals are colour or black and white can
be set to one of 5 levels.
Selecting single colour copying
When [Single Colour] is selected for the colour mode, the following screen appears. Touch the desired colour and touch
the [OK] key.
Colour Mode
OK
OK
Single Colour
R(Red)
G(Green)
B(Blue)
C(Cyan)
M(Magenta)
Y(Yellow)
Selecting 2 colour copying
When [2 Colour] is selected for the colour mode, the following screen appears. Touch the desired colours and touch the
[OK] key.
Colour Mode
OK
OK
2 Colour
Select a colour other than black.
R(Red)
G(Green)
B(Blue)
C(Cyan)
M(Magenta)
Y(Yellow)
22
CHANGING THE EXPOSURE AND
EXPOSURE MODE
The exposure level and exposure mode can be selected to obtain a clear copy.
AUTOMATIC ADJUSTMENT OF THE EXPOSURE AND
EXPOSURE MODE
Automatic exposure adjustment operates by default to automatically adjust the exposure level and mode as appropriate
for the original being copied. ("Auto" is displayed.)
When a black and white or full colour copy is made, the exposure is automatically adjusted to obtain the best image
quality.
Ready to scan for copy.
0
Full Colour
Colour Mode
Original A4
2-Sided Copy
Output
Job Detail
Settings
Plain
A4
Auto
Exposure
1.
2.
3.
100%
Copy Ratio
4.
A4
A4R
B4
A3
Special Modes
File
Quick File
SELECTING THE EXPOSURE MODE AND MANUALLY
ADJUSTING THE EXPOSURE LEVEL
To select the exposure mode, or to manually adjust the exposure level, follow the steps below.
Place the original.
1
Place the original face up in the document feeder tray, or face
down on the document glass.
1
Full Colour
Colour Mode
Original A4
Auto
Exposure
100%
Copy Ratio
Touch the [Exposure] key.
Output
Job Detail
Settings
2
2-Sided Copy
Plain
A4
1.
2.
3.
4.
A4
A4R
B4
A3
Special Modes
File
Quick File
23
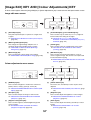
Exposure
Select the exposure mode.
OK
Text
Auto
Manual
Text/
Prtd.Photo
Text/Photo
Printed
Photo
Photo
Map
Light
Original
Exposure
1/2
Touch the appropriate original type key to select the exposure
mode.
OK
2/2
Manual
● Selecting the exposure mode
Mode
3
Description
Auto
Normally this setting is selected. When a black and white or full colour copy is made, the
exposure is automatically adjusted to obtain the best image quality.
Text
Use this mode for regular text documents.
Text/Prtd. Photo
This mode provides the best balance for copying an original which contains both text and
printed photographs, such as a magazine or catalogue.
Text/Photo
This mode provides the best balance for copying an original which contains both text and
photographs, such as a text document with a photo pasted on.
Printed photo
This mode is best for copying printed photographs, such as photos in a magazine or
catalogue.
Photo
Use this mode to copy photos.
Map
This mode is best for copying the light colour shading and fine text found on most maps.
Light Original
Use this mode for originals with light pencil writing.
If [Auto] is selected but the darkness or lightness of the image does not seem quite right...
If the image seems too light or too dark when [Auto] is selected, the exposure level can be adjusted using "Copy
Exposure Adjustment" in the system settings (administrator).
24
Exposure
Adjust the exposure level.
OK
Copy of Copy
Colour Tone
Enhancement
Manual
Auto
Text
Text/
Prtd.Photo
Text/Photo
Printed
Photo
Photo
1/2
Touch the
key to make the copy darker.
Touch the
key to make the copy lighter.
• Using a copy or printed page as an original
When using a copy or printed page from the machine as an
original, touch the [Copy of Copy] checkbox so that a
checkmark
appears.
When [Copy of Copy] is selected, only [Text], [Printed Photo],
or [Text/Prtd.Photo] can be selected for the exposure mode.
• To enhance the colour of a colour copy...
Touch the [Colour Tone Enhancement] checkbox so that a
checkmark
appears.
4
• Exposure levels when [Text] is selected:
1 to 2: Dark originals such as a newspaper
3: Normal density originals
4 to 5: Originals written in pencil or light coloured text
• Restrictions when Colour Tone Enhancement is selected
When [Colour Tone Enhancement] is selected in step 4, the following functions cannot be used:
• [Copy of Copy]
• [Auto] or [Light Original] exposure
• [Intensity] in the special modes
• [2 colour] or [Single Colour] in the colour mode
Press the [COLOUR START] key (
or the [BLACK & WHITE START] key
(
).
or
)
Scanning begins.
• If the originals were placed in the document feeder tray, the
originals are copied.
• If you placed the original on the document glass, scan each
page one page at a time. If you are using the sort function or
other function that requires all originals to be scanned before
the copies are printed, you must use the same [START] key
that you used to scan the first original to scan each of the
remaining originals.
5
To cancel scanning of the original and copying...
Press the [STOP] key (
).
System Settings (Administrator): Copy Exposure Adjustment
The exposure level used for automatic exposure adjustment can be adjusted.
25
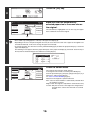
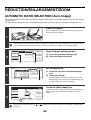
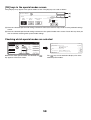
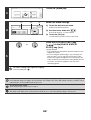
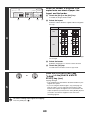
REDUCTION/ENLARGEMENT/ZOOM
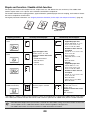
AUTOMATIC RATIO SELECTION (Auto Image)
This section explains the automatic ratio selection function (Auto Image), which automatically selects the ratio to match
the paper size.
The reduction or enlargement ratio is selected automatically based on the original size and the selected paper size.
Place the original.
1
Place the original face up in the document feeder tray, or face
down on the document glass.
1
Automatic ratio selection cannot be used if the original size or paper size is a non-standard size. If the original size is
a non-standard size, automatic ratio selection cannot be used unless the original size is entered manually.
Full Colour
Colour Mode
Auto
Original
Job Detail
Settings
2
2-Sided Copy
Auto
A4
Paper Select
Output
Plain
Special Modes A4
Auto
Exposure
(2)
Paper Select
Plain
A4R
Plain
B4
Plain
A3
Plain
A4
(1) Touch the tray that has the desired paper
size.
Plain
(2) Touch the [OK] key.
(1)
When the [OK] key is touched, you will return to the job
detail setting screen. Touch the [Job Detail Settings] key
to return to the base screen of copy mode.
(2)
Ready to scan for copy.
0
Full Colour
Colour Mode
Original A4
2-Sided Copy
Output
Job Detail
Settings
Plain
A4
Auto
Exposure
4
Set the paper size.
OK
A4
100%
Copy Ratio
(2) Touch the [Paper Select] key.
Quick File
(1)
3
(1) Touch the [Job Detail Settings] key.
Special Modes
File
100%
Copy Ratio
Open the paper settings screen.
1.
2.
Auto
Image
3.
4.
A4
A4R
B4
A3
If the message "Rotate original from
message.
Special Modes
Touch the [Auto Image] key.
A suitable ratio for the original size and the selected paper size
will be selected. (The selected ratio will appear in the ratio
display.)
File
Quick File
to
" is displayed, change the orientation of the original as indicated in the
26
Press the [COLOUR START] key (
or the [BLACK & WHITE START] key
(
).
or
)
Scanning begins.
• If the originals were placed in the document feeder tray, the
originals are copied.
• If you placed the original on the document glass, scan each
page one page at a time. If you are using the sort function or
other function that requires all originals to be scanned before
the copies are printed, you must use the same [START] key
that you used to scan the first original to scan each of the
remaining originals.
5
To cancel scanning of the original and copying...
Press the [STOP] key (
).
• To cancel automatic ratio selection...
Touch the [Auto Image] key so that it is no longer highlighted.
• To return the ratio to 100%...
To return the ratio setting to 100%, touch the [Copy Ratio] key to display the ratio menu and then touch the [100%] key.
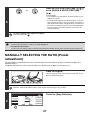
MANUALLY SELECTING THE RATIO (Preset
ratios/Zoom)
The enlargement and reduction keys can be used to select five preset ratios each (from a maximum of 400% to a
minimum of 25%).
In addition, the zoom keys can be used to select any ratio from 25% to 400% in increments of 1%.
Place the original.
1
Place the original face up in the document feeder tray, or face
down on the document glass.
1
When the automatic document feeder is used, the ratio selection range is 25% to 200%.
Ready to scan for copy.
0
Full Colour
Colour Mode
2
Original A4
100%
Copy Ratio
2-Sided Copy
Output
Job Detail
Settings
Auto
Exposure
Touch the [Copy Ratio] key.
Plain
A4
1.
2.
3.
4.
A4
A4R
B4
A3
Special Modes
File
Quick File
27
Touch the [Menu] key to select copy
ratio menu " " or " ".
● Menu
Copy Ratio
B4 B5 70%
A3 A4
B5 A5
B4 A4
A4 B5
A3 B4
B5 A4 115%
B4 A3
Zoom
A5 B5 122%
A4 B4
81%
100%
86%
Auto Image
Menu
• Enlarge keys:
115%, 122% and 141% (for the AB system).
121% and 129% (for the inch system).
• Reduction keys:
70%, 81% and 86% (for the AB system).
77% and 64% (for the inch system).
• Full size key: 100%
OK
100 %
B5 B4 141%
A4 A3
1
XY Zoom
2
3
● Menu
Copy Ratio
25%
50%
75%
150%
Auto Image
Zoom
200%
400%
100%
300%
350%
Menu
1
• Enlargement keys (2 to 4 ratios)
200%, 400%, any ratio (max. of two)
• Reduction keys (2 to 4 ratios)
25%, 50%, any ratio (max. of two)
• Full size key
100%
OK
100 %
XY Zoom
2
(A)
Keys marked (A)
The keys marked (A) can be set to show any ratio using "Add or Change Extra Preset Ratios" in the system settings
(administrator).
Copy Ratio
B4 B5 70%
A3 A4
B5 A5
B4 A4
A4 B5
A3 B4
B5 A4 115%
B4 A3
Zoom
A5 B5 122%
A4 B4
81%
100%
86%
Auto Image
4
OK
70 %
Menu
B5 B4 141%
A4 A3
1
2
XY Zoom
Touch a preset ratio key and zoom key
to select the desired ratio and touch the
[OK] key.
After touching the [OK] key, make sure that a paper size
suitable for the ratio is selected.
• To quickly select a ratio, touch a reduction or enlargement key to select a ratio close to the desired ratio and then
use the zoom keys for fine adjustment.
• The zoom keys can be used to select any ratio from 25% to 400% in increments of 1%.
• Touch the
key to increase the ratio, or the
key to decrease the ratio. (If you continue to touch the
/
key, the ratio will change automatically. After 3 seconds, the ratio will change rapidly.)
• If the message "Image is larger than the copy paper." appears when an enlargement ratio is selected, the image
may not fit on the paper.
(B)
Full Colour
Colour Mode
5
Job Detail
Settings
Auto
Exposure
70%
Copy Ratio
Auto
Original
Auto
A4
Paper Select
Plain
Special Modes A4
2-Sided Copy
Output
Special Modes
File
Quick File
Touch the [Job Detail Settings] key and
make sure that a suitable paper size is
selected for the ratio.
If "Auto" appears in the [Paper Select] key (B), auto paper
selection is enabled. If auto paper selection is not enabled,
select the paper size manually.
28
Press the [COLOUR START] key (
or the [BLACK & WHITE START] key
(
).
or
)
Scanning begins.
• If the originals were placed in the document feeder tray, the
originals are copied.
• If you placed the original on the document glass, scan each
page one page at a time. If you are using the sort function or
other function that requires all originals to be scanned before
the copies are printed, you must use the same [START] key
that you used to scan the first original to scan each of the
remaining originals.
6
To cancel scanning of the original and copying...
Press the [STOP] key (
).
To return the ratio to 100%...
To return the ratio setting to 100%, touch the [Copy Ratio] key to display the ratio menu and then touch the [100%] key.
System Settings (Administrator): Add or Change Extra Preset Ratios
Two enlargement preset ratios (101% to 400%) and two reduction preset ratios (25% to 99%) can be added. An added
preset ratio can also be changed.
29
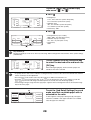
ENLARGING/REDUCING THE LENGTH AND WIDTH
SEPARATELY (XY Zoom)
The XY Zoom feature allows the horizontal and vertical copy ratios to be changed separately.
Both the horizontal and vertical ratios can be set from 25% to 400% in increments of 1%.
When 50% is selected for the horizontal ratio and 70% is selected for the vertical ratio
Copies
Originals
Place the original.
Place the original face up in the document feeder tray, or face
down on the document glass.
1
1
Ready to scan for copy.
0
Full Colour
Colour Mode
Output
Plain
A4
Auto
Exposure
2.
3.
4.
Copy Ratio
B4 B5 70%
A3 A4
3
A4 B5
A3 B4
OK
A5 B5 122%
A4 B4
100%
Menu
X
B5 B4 141%
A4 A3
1
X
Y
Y
Touch the [XY Zoom] key.
B5 A4 115%
B4 A3
Zoom
Copy Ratio
4
File
81%
86%
Special Modes
Quick File
100 %
Auto Image
70%
A4
A4R
B4
A3
1.
100%
Copy Ratio
B5 A5
B4 A4
2-Sided Copy
Original A4
Job Detail
Settings
2
Touch the [Copy Ratio] key.
2
100 %
100 %
XY Zoom
OK
141%
64%
Zoom
200%
50%
100%
400%
Cancel
XY Zoom
Touch the [X] key.
The initial state of the [X] key is selected (highlighted), so this
step is normally not necessary. Touch the [X] key only if it is not
highlighted.
30
(A)
Copy Ratio
(B)
X
70%
5
100
100
X
Y
Y
OK
%
141%
%
64%
Zoom
200%
50%
100%
400%
Cancel
XY Zoom
Touch one of the preset ratio keys (A)
and the zoom keys (B) to set the
horizontal (X) ratio.
(A) A preset ratio key will not become highlighted when
touched.
(B) The zoom keys can be touched to set the ratio from 25% to
400% in increments of 1%.
To quickly select a ratio, touch a preset ratio key (A) to select a ratio close to the desired ratio and then use the zoom
keys (B) for fine adjustment.
Copy Ratio
X
70%
6
Y
OK
%
%
Zoom
200%
50%
100%
400%
Cancel
XY Zoom
(B)
Copy Ratio
50
100
X
70%
Y
OK
%
%
Touch the [Y] key.
141%
64%
(A)
7
50
100
X
Y
141%
64%
Zoom
200%
50%
100%
400%
Cancel
XY Zoom
Touch one of the preset ratio keys (A)
and the zoom keys (B) to set the vertical
(Y) ratio.
(A) A preset ratio key will not become highlighted when
touched.
(B) The zoom keys can be touched to set the ratio from 25% to
400% in increments of 1%.
If needed, you can touch the [X] key once again to readjust the X zoom.
8
Copy Ratio
X
70%
Y
50
70
OK
%
%
64%
Zoom
200%
50%
100%
400%
Cancel
XY Zoom
(C)
Full Colour
Colour Mode
9
Job Detail
Settings
Auto
Exposure
X 50% Y 70%
Copy Ratio
Auto
Original
Auto
A4
Paper Select
Plain
Special Modes 4
Touch the [OK] key.
141%
2-Sided Copy
Output
Special Modes
File
Quick File
Touch the [Job Detail Settings] key and
make sure that a suitable paper size is
selected for the ratio.
If "Auto" appears in the [Paper Select] key (C), auto paper
selection is enabled. If auto paper selection is not enabled,
select the paper size manually.
31
Press the [COLOUR START] key (
or the [BLACK & WHITE START] key
(
).
or
)
Scanning begins.
• If the originals were placed in the document feeder tray, the
originals are copied.
• If you placed the original on the document glass, scan each
page one page at a time. If you are using the sort function or
other function that requires all originals to be scanned before
the copies are printed, you must use the same [START] key
that you used to scan the first original to scan each of the
remaining originals.
10
To cancel scanning of the original and copying...
Press the [STOP] key (
).
When the automatic document feeder is used, the vertical and horizontal ratio selection ranges are both 25% to 200%.
To cancel an XY zoom setting...
To cancel an XY Zoom setting, touch the [XY Zoom] key or the [Cancel] key.
32
ORIGINAL SIZES
CHECKING THE ORIGINAL SIZE
When the original is placed, the original size is automatically detected and displayed in the base screen. If [Auto]
appears in the [Original] key that is displayed when the [Job Detail Settings] key is touched, the size of the placed
original is automatically detected. (Automatic original detection function)
Example of base screen
Example of the [Original] key display
The original size is displayed. An icon shows the
orientation of the original.
If the original size is not a standard size, it will not be
automatically detected. In this case, specify the original size.
(B)
Full Colour
Colour Mode
Job Detail
Settings
(A)
Auto
Exposure
Ready to scan for copy.
Original A4
100%
Copy Ratio
Auto
A4
Paper Select
Plain
Special Modes A4
2-Sided Copy
Output
Special Modes
File
Quick File
2-Sided Copy
Output
Job Detail
Settings
Auto
Exposure
100%
Copy Ratio
0
Full Colour
Colour Mode
Auto
Original
Plain
A4
1.
2.
3.
4.
A4
A4R
B4
A3
Special Modes
File
Quick File
(A) The original size is displayed.
(B) "Auto" appears when the automatic original detection function is operating.
List of original size detector settings
The standard sizes are set in "Original Size Detector Setting" in the system settings (administrator). The factory default
setting is "AB-1 (Inch-1)".
Detectable original sizes
Selections
Document glass
Document feeder tray (automatic document feeder)
AB-1
A3, A4, A4R, A5, B4, B5, B5R
A3, A4, A4R, A5, B4, B5, B5R, 8-1/2" x 11",
8-1/2" x 14", 11" x 17"
AB-2
A3, A4, A4R, A5, B5, B5R, 216 mm x 330 mm
(8-1/2" x 13")
A3, A4, A4R, A5, B4, B5, B5R, 8-1/2" x 11",
11" x 17", 216 mm x 330 mm (8-1/2" x 13")
AB-3
A4, A4R, A5, B4, 8K, 16K, 16KR
A3, A4, A4R, A5, B4, 8K, 16K, 16KR, 8-1/2" x 11",
11" x 17", 216 mm x 330 mm (8-1/2" x 13")
Inch-1
11" x 17", 8-1/2" x 14", 8-1/2" x 11", 8-1/2" x 11"R,
5-1/2" x 8-1/2"
11" x 17", 8-1/2" x 14", 8-1/2" x 11", 8-1/2" x 11"R,
5-1/2" x 8-1/2", A4, A3
Inch-2
11" x 17", 8-1/2" x 13" (216 mm x 330 mm),
8-1/2" x 11", 8-1/2" x 11"R, 5-1/2" x 8-1/2"
11" x 17", 8-1/2" x 13" (216 mm x 330 mm),
8-1/2" x 11", 8-1/2" x 11"R, 5-1/2" x 8-1/2", A4, A3
• When the automatic original detection function is operating and the original is a non-standard size (an inch size or special
size), the closest standard size may be displayed or the original size may not appear. In this event, manually set the
correct original size.
☞ SPECIFYING THE ORIGINAL SIZE (page 35)
• When placing a non-standard size original on the document glass, you can make it easier for the size to be detected by
placing a blank sheet of A4, B5 (8-1/2" x 11", 5-1/2" x 8-1/2"), or other standard size of paper on top of the original.
33
Standard original placement orientations
Place originals in the document feeder tray or on the document glass so that the top and bottom of the original are
oriented as shown below. If originals are placed in the wrong orientation, staples will be incorrectly positioned and some
special features may not give the expected result. For more information on placing the original, see "3. ORIGINAL" in
the User's Guide.
[Example 1]
Document feeder tray
abc
Document glass
Place the original
with the corners
aligned here.
cba
[Example 2]
Document glass
Place the original
with the corners
aligned here.
cba
abc
Document feeder tray
Automatic copy image rotation (Rotation Copy)
If the orientation of the original and paper are different, the original image will be automatically rotated 90º to match the
paper. (When an image is rotated, a message will be displayed.)
[Example]
Orientation of placed original
Orientation of paper
The original seen
from behind
The image is rotated 90 degrees
The paper seen
from behind
This function operates in either auto paper selection mode or auto image mode. Rotation can be disabled using
"Rotation Copy Setting" in the system settings (administrator).
34
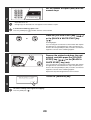
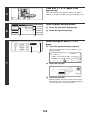
SPECIFYING THE ORIGINAL SIZE
When the original size is a non-standard size or is not detected correctly, manually specify the original size.
Ready to scan for copy.
0
Full Colour
Colour Mode
1
Original A4
2-Sided Copy
Output
Job Detail
Settings
Plain
A4
Auto
Exposure
1.
2.
3.
100%
Copy Ratio
4.
Full Colour
Colour Mode
2
Touch the [Job Detail Settings] key.
Auto
Original
Job Detail
Settings
A4
A4R
B4
A3
Special Modes
File
Quick File
Auto
A4
Paper Select
Plain
Special Modes A4
Auto
Exposure
2-Sided Copy
Touch the [Original] key.
Output
Special Modes
File
100%
Copy Ratio
Quick File
Specify the original size.
● Specifying an AB original size
(1)
Original
AB
OK
Inch
A5
B5R
B4
A5R
A4
A3
B5
A4R
3
(2)
(1) Touch the appropriate original size key.
(2) Touch the [OK] key.
Auto
Manual
Custom
Size
Standard Size
Size Input
● Specifying an inch original size
(2)
(1)
Original
AB
51/2x81/2
1/2
1/2
OK
Inch
81/2x11R
11x17
8 x13(216x330)
81/2x11
81/2x14
Standard Size
Auto
(1) Touch the [AB
Inch] key.
(2) Touch the appropriate original size key.
(3) Touch the [OK] key.
Manual
1/2
5 x8 R
(3)
Custom
Size
Size Input
35
● Specifying a non-standard original size
(1) Touch the [Size Input] tab.
(4)
Original
(2) Enter the X (horizontal) dimension of the
original.
OK
Auto
X
X
420
Y
297
Y
(64
mm
(64
mm
With the [X] key highlighted, enter the X (horizontal)
dimension of the original with the
keys. When
the document glass is used, a dimension from 64 mm to
432 mm (2-1/2" to 17") can be entered.
When an automatic document feeder is installed, a
dimension from 140 mm to 432 mm (5-1/2" to 17") can be
entered.
If the length or width of the original is less than 140 mm
(5-1/2"), use the document glass.
432)
Manual
297)
Custom
Size
Standard Size
Size Input
(2), (3)
(1)
(3) Enter the Y (vertical) dimension of the original.
Touch the [Y] key and enter the Y (vertical) dimension of
the original with the
keys. When the document
glass is used, a dimension from 64 mm to 297 mm (2-1/2"
to 11-5/8") can be entered.
When an automatic document feeder is installed, a
dimension from 131 mm to 297 mm (5-1/8" to 11-5/8") can
be entered.
If the length or width of the original is less than 131 mm
(5-1/8"), use the document glass.
(4) Touch the [OK] key.
When the [OK] key is touched, you will return to the job
detail setting screen. Touch the [Job Detail Settings] key
to return to the base screen of copy mode.
Ready to scan for copy.
0
Full Colour
Colour Mode
4
Manual
Plain
A4
1.
2.
3.
100%
Copy Ratio
Verify that the correct original size is entered.
• Make sure that the entered numbers appear in the [Original]
key. If the numbers are not correct, touch the [Original] key
again and enter the correct numbers.
• If the correct numbers appear, touch the [Job Detail Settings]
key to return to the base screen of copy mode. The original
size display in the base screen will show "Manual".
2-Sided Copy
Output
Job Detail
Settings
Auto
Exposure
X 420
Y 297
4.
A4
A4R
B4
A3
Special Modes
File
Quick File
STORING FREQUENTLY USED ORIGINAL SIZES
You can save special original sizes that you frequently use. This section explains how to store, call up, change, and
delete special original sizes.
Storing original sizes
Up to 9 special original sizes can be stored.
Ready to scan for copy.
0
Full Colour
Colour Mode
1
Original A4
100%
Copy Ratio
2-Sided Copy
Output
Job Detail
Settings
Auto
Exposure
Touch the [Job Detail Settings] key.
Plain
A4
1.
2.
3.
4.
A4
A4R
B4
A3
Special Modes
File
Quick File
36
Full Colour
Colour Mode
2
Auto
Original
Job Detail
Settings
2-Sided Copy
Auto
A4
Paper Select
Output
Plain
Special Modes A4
Special Modes
Auto
Exposure
File
100%
Copy Ratio
Quick File
Original
3
Touch the [Original] key.
AB
OK
Inch
A5
B5R
B4
A5R
A4
A3
B5
A4R
Touch the [Custom Size] key.
Auto
Manual
Custom
Size
Standard Size
Size Input
Original
OK
X254 Y210mm
Auto
Select a key for storing a custom
original size.
Manual
4
Custom
Size
Recall
Store/Delete
(2)
(1)
(1) Touch the [Store/Delete] tab.
(2) Touch a key for storing a custom original
size.
Touch a key that does not show a size (
Cancel
Original
Enter the original size.
OK
Auto
X
X
420
Y
297
Y
(64
mm
(64
mm
432)
Manual
297)
Recall
(1) Enter the X (horizontal) dimension of the
original.
Custom
Size
With the [X] key highlighted, enter the X (horizontal)
dimension of the original with the
keys. A
dimension from 64 mm to 432 mm (2-1/2" to 17") can be
entered.
Store/Delete
(1), (2)
).
(3)
5
(2) Enter the Y (vertical) dimension of the
original.
Touch the [Y] key and enter the Y (vertical) dimension of
the original with the
keys. A dimension from
64 mm to 297 mm (2-1/2" to 11-5/8") can be entered.
(3) Touch the [OK] key.
Original
OK
X254 Y210mm
X420 Y297mm
Touch the [OK] key.
Auto
6
Manual
Custom
Size
Recall
Store/Delete
The stored original size will be retained even if an interruption in the power supply occurs.
To cancel the operation...
Press the [CLEAR ALL] key (
).
37
Using a stored original size
Ready to scan for copy.
0
Full Colour
Colour Mode
1
Original A4
Plain
A4
1.
2.
3.
100%
Copy Ratio
4.
Full Colour
Colour Mode
Auto
Original
Job Detail
Settings
A4
A4R
B4
A3
File
Auto
A4
Paper Select
Plain
Special Modes A4
2-Sided Copy
Touch the [Original] key.
Output
Special Modes
File
100%
Copy Ratio
Quick File
AB
A5
3
Special Modes
Quick File
Auto
Exposure
Original
2-Sided Copy
Output
Job Detail
Settings
Auto
Exposure
2
Touch the [Job Detail Settings] key.
OK
Inch
B5R
B4
A5R
A4
A3
B5
A4R
Standard Size
Auto
Manual
Custom
Size
Size Input
(3)
Original
OK
X254 Y210mm
Auto
4
Manual
Custom
Size
Recall
Touch the [Custom Size] key.
Store/Delete
Call up the stored original size.
(1) Touch the [Recall] tab.
(2) Touch the key of the original size that you
wish to call up.
(3) Touch the [OK] key.
(2) (1)
To cancel the operation...
Press the [CLEAR ALL] key (
).
38
Changing a stored original size
Ready to scan for copy.
0
Full Colour
Colour Mode
1
Original A4
Plain
A4
1.
2.
3.
100%
Copy Ratio
4.
Full Colour
Colour Mode
Auto
Original
Job Detail
Settings
A4
A4R
B4
A3
File
2-Sided Copy
Auto
A4
Paper Select
Special Modes
File
Quick File
AB
A5
OK
Inch
B5R
B4
A5R
A4
A3
B5
A4R
Standard Size
Manual
Custom
Size
Size Input
OK
X254 Y210mm
Auto
Manual
Custom
Size
Recall
Store/Delete
(2)
(1)
Cancel
Delete
Select the original size key that you wish
to change.
(1) Touch the [Store/Delete] tab.
(2) Touch the original size key that you wish to
change.
Touch the key ( X254 Y210mm
that you wish to change.
A custom size has already been stored
in this location.
5
Touch the [Custom Size] key.
Auto
Original
4
Touch the [Original] key.
Output
Plain
Special Modes A4
100%
Copy Ratio
3
Special Modes
Quick File
Auto
Exposure
Original
2-Sided Copy
Output
Job Detail
Settings
Auto
Exposure
2
Touch the [Job Detail Settings] key.
) that shows the original size
Touch the [Amend] key.
Amend
39
Cancel
Original
Change the original size.
OK
Auto
X
X
420
Y
297
Y
(64
mm
(64
mm
432)
Manual
297)
Recall
Custom
Size
With the [X] key highlighted, enter the X (horizontal)
dimension of the original with the
keys. A
dimension from 64 mm to 432 mm (2-1/2" to 17") can be
entered.
Store/Delete
(1), (2)
6
(1) Enter the X (horizontal) dimension of the
original.
(3)
(2) Enter the Y (vertical) dimension of the
original.
Touch the [Y] key and enter the Y (vertical) dimension of
the original with the
keys. A dimension from
64 mm to 297 mm (2-1/2" to 11-5/8") can be entered.
(3) Touch the [OK] key.
Original
OK
X420 Y297mm
Touch the [OK] key.
Auto
7
Manual
Custom
Size
Recall
To cancel the operation...
Press the [CLEAR ALL] key (
Store/Delete
).
40
Deleting a stored original size
Ready to scan for copy.
0
Full Colour
Colour Mode
1
Original A4
Plain
A4
Auto
Exposure
1.
2.
3.
4.
Full Colour
Colour Mode
Auto
Original
Job Detail
Settings
A4
A4R
B4
A3
File
2-Sided Copy
Auto
A4
Paper Select
Touch the [Original] key.
Output
Plain
Special Modes A4
Special Modes
File
100%
Copy Ratio
3
Special Modes
Quick File
Auto
Exposure
Original
2-Sided Copy
Output
Job Detail
Settings
100%
Copy Ratio
2
Touch the [Job Detail Settings] key.
Quick File
AB
OK
Inch
A5
B5R
B4
A5R
A4
A3
B5
A4R
Touch the [Custom Size] key.
Auto
Manual
Custom
Size
Standard Size
Size Input
Original
OK
X254 Y210mm
Auto
Select the original size key that you wish
to delete.
Manual
Custom
Size
4
Recall
Store/Delete
(2)
(1)
Cancel
Delete
(2) Touch the original size key that you wish to
delete.
Touch the key ( X254 Y210mm
that you wish to delete.
Amend
Original
OK
Touch the [OK] key.
Auto
6
Manual
Custom
Size
Recall
To cancel the operation...
Press the [CLEAR ALL] key (
) that shows the original size
Touch the [Delete] key.
A custom size has already been stored
in this location.
5
(1) Touch the [Store/Delete] tab.
Store/Delete
).
41
OUTPUT
To select output functions and the output tray, touch the [Output] key in the base screen of copy mode. Output functions
that can be selected are sort, group, offset, staple sort, saddle stitch, and punch. All settings are explained in this section
based on the assumption that a saddle stitch finisher, punch module and right tray are installed.
(1) (2) (3)
(4)
Output
(5)
(6)
OK
Offset
Tray
Sort
(7)
Right Tray
Staple
Sort
Group
Punch
(9)
(10)
Offset
(8)
(1)
[Group] key
This is used to group copies by page.
☞ Group mode (page 43)
(2)
[Staple Sort] key
This is used to sort the output into sets, staple each set,
and deliver the sets to the tray. (Note that the sets will not
be offset in the output tray.) When this function is
selected, three keys will appear for selecting the staple
position.
☞ Staple sort function / Saddle stitch function (page 44)
(3)
[Sort] key
This is used to sort (collate) output into sets.
☞ Sort mode (page 43)
(4)
Output display
An icon will appear to indicate the output mode.
(5)
Saddle
Stitch
[Offset Tray] key ([Centre Tray] key*)
This is used to offset each set of output from the previous
set in the offset tray (centre tray). The [Offset Tray] key is
automatically selected when the [Staple Sort] key is
selected.
* When only a right tray is installed, this appears as the
"Centre tray".
(6)
[Right Tray] key
Select this key to have output delivered to the right tray.
When the right tray is selected, offset, staple sort, saddle
stitch, and punch cannot be selected.
(7)
[OK] key
Touch this key to close the output screen and return to
the base screen.
(8)
[Offset] key
This is used to offset each set of output from the previous set.
The offset function operates when the checkbox is
selected
and does not operate when the checkbox is
not selected
. (The offset checkmark is automatically
cleared when the staple sort function is selected.)
☞ Offset function (page 43)
(9)
[Saddle Stitch] key
This is used to staple and fold each set of copies at the centreline.
☞ Staple sort function / Saddle stitch function (page 44)
When this key is touched, the saddle stitch setting screen
appears. (Only when "Automatic Saddle Stitch" is
enabled in the system settings (administrator).)
(10) [Punch] key
This is used to punch holes in the output.
☞ Punch function (page 45)
The keys that appear and that can be selected will vary depending on what peripheral devices are installed.
Depending on what peripheral devices are installed, it may not be possible to select certain keys. If your screen is different
from the above screen, see the screens below.
Display example 1
Display example 2
Display example 3
The screen when a right tray, finisher, and The screen when a right tray is installed. The screen when a right tray, finisher
and punch module are installed.
saddle stitch finisher are not installed.
Output
OK
Sort
Output
Sort
Centre
Tray
Right Tray
OK
Output
Sort
Offset
Tray
Staple
Sort
Group
Offset
Group
Offset
42
Group
Right Tray
OK
Punch
Offset
OUTPUT MODES
This section explains the output functions.
Sort mode
Group mode
This is used to sort (collate) output into sets.
Example: Sorting the originals into 5 sets
This function groups copies by page.
Example: Groups of 5 copies of each page
Originals
Output
Originals
Set the number of copies (5).
Set the number of copies (5).
LOGOUT
LOGOUT
Output
Sort
Output
Touch the [Output] key.
Output
Touch the [Sort] key.
Group
Press the [COLOUR START] key
(
) or the [BLACK & WHITE
START] key (
).
Touch the [Output] key.
Touch the [Group] key.
Press the [COLOUR START] key
(
) or the [BLACK & WHITE
START] key (
).
• The sort function is automatically selected when
originals are placed in the automatic document feeder.
• When the Quick File Folder for document filing is full,
copying of a large number of originals using the sort
function will be affected. Delete unneeded files from
the Quick File Folder.
The group function is automatically selected when an
original is placed on the document glass.
Offset function
This function offsets each set of copies from the previous set in the output tray, making it easy to separate sets of copies.
Offset function "ON"
Offset function "OFF"
• The offset function cannot be used in the right tray.
• The offset function cannot be selected when the staple sort function is selected.
43
Staple sort function / Saddle stitch function
The staple sort function sorts output into sets, staples each set, and delivers the sets to the tray. The saddle stitch
function staples each set in 2 places at the centreline and folds the stapled set.
The relations between the stapling positions, paper orientation, permitted paper sizes for stapling, and number of sheets
that can be stapled are shown below.
For original placement orientations, see "Original placement orientation (for the staple sort and punch functions)" (page 45).
4
5
Saddle stitch
Stapling positions
Vertically-oriented paper
Horizontally-oriented paper
One staple at top left
corner
One staple at bottom left
corner
Applicable paper sizes
A4, B5, 8-1/2" x 11", 16K
Number of sheets that can be
stapled:
• Saddle stitch finisher
Max. 30 sheets*
Two staples at left edge
Saddle stitch (only with
saddle stitch finisher)
• Finisher
Max. 50 sheets*
Saddle stitch cannot be used
when the paper is oriented
vertically
• Saddle stitch finisher
Applicable paper sizes
A3, B4, A4R, B5R, 11" x 17",
8-1/2" x 14", 8-1/2" x 13",
8-1/2" x 11"R, 8K, 16KR
Number of sheets that can
be stapled
A3, B4, 11" x 17", 8-1/2" x 14",
8-1/2" x 13", 8K:
Max. 25 sheets*
A4R, B5R, 8-1/2" x 11"R,
16KR:
Max. 30 sheets*
• Finisher
Applicable paper sizes
A3, B4, A4R, 11" x 17",
8-1/2" x 14", 8-1/2" x 13",
8-1/2" x 11"R, 8K, 16KR
Number of sheets that can
be stapled
A3, B4, 11" x 17", 8-1/2" x 14",
8-1/2" x 13", 8K:
Max. 30 sheets*
A4R, 8-1/2" x 11"R, 16KR:
Max. 50 sheets*
Applicable paper sizes
A3, B4, A4R, 11" x 17",
8-1/2" x 11"R
Number of sheets that can be
stapled:
Max. 10 sheets*
* Two 209 g/m2 (56 lbs.) sheets can be inserted as covers and stapled (only 1 sheet when saddle stitch is used). When
this is done, the number of sheets that can be used is two less (one less for saddle stitch) than the stated maximum.
• When Mixed Size Original in the special modes is used with the "Same Width" setting, the maximum number of sheets that
can be stapled is 25 for a saddle stitch finisher or 30 for a finisher regardless of the paper size.
• The saddle stitch function can only be used when a saddle stitch finisher is installed.
44
Punch function
If an optional punch module is installed, holes can be punched in output.
Paper that can be punched is A3 to B5R (60 to 209 g/m2) (11" x 17" to 8-1/2" x 11" (16 lbs. to 56 lbs.)).
A3W (12" x 18") sized paper, transparency film, tab paper and other special types of paper cannot be used.
[Examples]
[Original 1]
[Punch positions]
[Original 2]
[Punch positions]
The saddle stitch and hole punch functions cannot be selected at the same time.
Original placement orientation (for the staple sort and punch functions)
When using the staple sort function or the punch function, the original must be placed as shown below to enable stapling
or punching in the desired position on the paper.
Staple sort
Document feeder tray
abc
abc
Punch
Document glass
Document feeder tray
Document glass
cba
cba
abc
cba
cba
cba
abc
abc
45
MAKING COPIES USING THE BYPASS TRAY
(Copying on special papers)
In addition to plain paper, the bypass tray allows you to make copies on transparency film, tab paper, and other special
papers.
For detailed information on paper that can be loaded in the bypass tray, see the Safety Guide. For precautions and other
important information when loading paper in the bypass tray, see "LOADING PAPER IN THE BYPASS TRAY" in the
User's Guide.
Place the original.
Place the original face up in the document feeder tray, or face
down on the document glass.
1
1
Place paper in the bypass tray.
Insert the paper with print side face down.
2
When loading paper larger than A4R or 8-1/2" x 11"R, be sure
to pull out the bypass tray extension.
Pull the bypass tray extension all the way out. If the bypass tray
extension is not pulled all the way out, the size of the loaded
paper will not be correctly displayed.
Full Colour
Colour Mode
Auto
Original
Job Detail
Settings
3
2-Sided Copy
Auto
A4
Paper Select
Output
Plain
Special Modes A4
Auto
Exposure
(2) Touch the [Paper Select] key.
Quick File
(2)
(1)
Paper Select
4
(1) Touch the [Job Detail Settings] key.
Special Modes
File
100%
Copy Ratio
Open the paper settings screen.
OK
A4
Plain
A4R
Plain
B4
Plain
A3
Plain
A4
Set the type and size of paper loaded in
the bypass tray.
Plain
(A)
(B)
(A) Shows the size of paper loaded in the bypass tray.
(B) The currently selected paper type will be displayed.
If you wish to use the paper size and paper type shown in
(A) and (B), touch (A) and touch the [OK] key. Go to step 8.
To change the paper size or paper type, touch (B) and go to
the next step.
46
Select the type of paper used in the
bypass tray.
Cancel
Bypass Tray Type/Size Setting
Select the paper type.
1/2
5
Plain
Letter Head
Thin Paper
Transparency
Pre-Printed
Pre-Punched
Heavy Paper
Tab Paper
Recycled
Colour
Labels
Envelope
Select the paper type used.
1/2
Type
Bypass Tray Type/Size Setting
Type
Plain
Auto-Inch
Auto-AB
Custom Size
Set the paper size.
OK
Size
12x18,11x17,81/2x14
81/2x11,81/2x11R,51/2x81/2R
71/4x101/2R,A3,A4,B4,B5
A3W,A3,A4,A4R,A5R,B4
B5,B5R,216x330(81/2x13)
11x17,81/2x11
8K
To use a paper size used in China on the MX-2300/2700
series, touch the [8K], [16K], or [16KR] key to select the paper
size.
On the MX-3500/4500 series, touch the [Manual] key, touch the
[8K], [16K], or [16KR] key in the screen that appears, and then
touch the [OK] key.
[Auto-Inch] key
Touch this key when the loaded paper is an inch size (8-1/2" x 11",
etc.). When the paper placed in the bypass tray is an inch size, the
paper size will be detected automatically and an appropriate size set.
[Auto-AB] key
Touch this key when the loaded paper is an AB size (A4, etc.).
When the paper inserted in the bypass tray is an AB size, the
paper size will be detected automatically and an appropriate
size set.
[Custom Size] key
Touch this key when you know the size of the inserted paper
but it is not one of the inch or AB sizes.
When the key is touched, the paper size entry screen appears.
To set a paper size in millimetres, touch the [AB] tab.
To set a paper size in inches, touch the [Inch] tab.
Touch the [X] key and enter the horizontal dimension of the
paper with the
keys, and then touch the [Y] key and
enter the vertical dimension. When finished, touch the [OK] key.
16K
16KR
X420 Y297
2/2
6
OK
Type
Bypass Tray Type/Size Setting
Type
Plain
OK
Auto-Inch
X
17
((148
mm
432)
11
(100
mm
297)
Auto-AB
Y
Custom Size
Inch
AB
Paper Select
7
Select the bypass tray.
OK
A4
Plain
A4R
Plain
B4
Plain
A3
Plain
A4
(1) Touch the paper size key of the bypass tray.
Tab Paper
(2) Touch the [OK] key.
(1)
When the [OK] key is touched, you will return to the job
detail setting screen. Touch the [Job Detail Settings] key
to return to the base screen of copy mode.
(2)
Press the [COLOUR START] key (
or the [BLACK & WHITE START] key (
or
)
).
Scanning begins.
• If the originals were placed in the document feeder tray, the
originals are copied.
• If you placed the original on the document glass, scan each
page one page at a time. If you are using the sort function or
other function that requires all originals to be scanned before
the copies are printed, you must use the same [START] key
that you used to scan the first original to scan each of the
remaining originals.
8
To cancel scanning of the original and copying...
Press the [STOP] key (
).
47
INTERRUPTING A COPY RUN
(Interrupt copy)
When you need to make an urgent copy and the machine is busy with a long copy run or other job, use interrupt copy.
Interrupt copy temporarily stops the job in progress and lets you perform the interrupt copy job.
Copies in progress from tray 1.
Ready to scan for next copy job.
Full Colour
Colour Mode
1
Touch the [Interrupt] key.
0
Interrupt
2-Sided Copy
Output
Job Detail
Settings
Plain
A4
Auto
Exposure
1.
2.
3.
100%
Copy Ratio
4.
A4
A4R
B4
A3
Special Modes
File
Quick File
Place the original.
3
1
2
Place the original face up in the document feeder tray, or face
down on the document glass.
Select copy settings for the interrupt
copy job and start copying.
or
The interrupt copy job begins.
After the interrupt copy job is printed,
the job that was interrupted resumes.
4
To cancel scanning of the original and copying...
Press the [STOP] key (
).
• If user authentication is enabled, the login screen will appear when the [Interrupt] key is pressed. Enter your user name
and password to log in. The number of copies made will be added to the count of the user that logged in.
• Depending on the settings of the job in progress, the [Interrupt] key may not appear.
• Depending on the settings of the job in progress, the [Reserve] key may appear instead of the [Interrupt] key. Unlike
interrupt copy, reserve copy does not temporarily stop the job in progress. Instead, the reserve copy job begins when the
job in progress is finished.
• Interrupt copy cannot be used in combination with the following special modes:
Job Build, Tandem Copy, Book Copy, Card Shot, Multi-Page Enlargement, Proof Copy
• If the document glass is used for an interrupt copy job, 2-sided copying, sort copying, and staple sort copying cannot be
selected. If any of these functions are necessary, use the automatic document feeder.
48
JOB STATUS SCREEN
The job status screen is displayed when the [JOB STATUS] key on the operation panel is pressed. The job status
screen shows the status of jobs by mode. When the [JOB STATUS] key is pressed, the job status screen of the mode
that was being used before the key was pressed appears.
Example: Pressing the key in copy mode
Job Queue
JOB STATUS
Sets / Progress
Spool
Status
Copy
020 / 001
Copying
Copy
020 / 000
Waiting
Computer01
020 / 000
Waiting
0312345678
002 / 000
Waiting
Job Queue
1/1
Complete
Detail
Print Job
Scan to
Priority
Stop/Delete
Fax Job
Internet Fax
The left edge of the job status screen appears at the left edge of the touch panel screen The left edge of the job status screen
can be touched to display the job status screen.
Ready to scan for copy.
1
2
0
Full Colour
Colour Mode
2-Sided Copy
Output
Job Detail
Settings
Plain
A4
3
4
Auto
Exposure
1.
2.
3.
100%
Copy Ratio
4.
Special Modes
A4
A4R
B4
A3
File
Quick File
JOB QUEUE SCREEN AND COMPLETED JOB SCREEN
The job status screen consists of the job queue screen that shows copy and print jobs waiting to be printed and the job
currently in progress, the completed job screen that shows jobs that have been completed, and the spool screen that
shows print jobs that have been spooled and encrypted PDF jobs that are waiting to be printed. This section explains the
job queue screen and the completed jobs screen, which are related to copy mode. The job status screen switches
between the job queue screen and the completed jobs screen each time the job status screen selector key is touched.
(1)
Job Queue
Sets / Progress
(7)
Spool
Status
Copy
020 / 001
Copying
Copy
020 / 000
Waiting
1/1
Job Queue
Complete
Detail
Computer01
020 / 000
Waiting
0312345678
002 / 000
Waiting
Print Job
(1)
Scan to
Fax Job
Priority
Stop/Delete
Internet Fax
(2)
Set Time
Computer01
14:38 12/09 010/010 OK
Sets
Copy
14:38 12/09 005/005 OK
Computer02
14:09 12/09 002/002 OK
Copy
13:27 12/09 003/003 OK
Spool
Status
1/8
Job Queue
Complete
(3)
(4)
(5)
(6)
Print Job
(3)
Job list (job queue screen)
Scan to
Fax Job
Detail
(8)
Call
(9)
Internet Fax
[Detail] key (job queue screen)
Touch this key to display detailed information on a job.
This shows the jobs that are waiting to be printed and the
job in progress as keys (job keys). The jobs are printed in
order from the job at the top of the queue. Each job key
shows information on the job and the current status of the
job.
(2)
Complete
(4)
[Priority] key
Touch this key to give priority to a selected job.
(5)
[Stop/Delete] key
Touch this key to stop or delete a selected job.
Job status screen selector key
Touch this key to switch through the job queue screen,
the completed jobs screen, and the spool screen.
49
(6)
(8)
Mode switch keys
When a job is shown as a key in the job list, the [Detail]
key can be touched to show detailed information on the
job.
Use these keys to select the mode that is shown in the
job status screen.
The status of copy jobs can be checked by touching the
[Print Job] key.
(7)
[Detail] key (completed jobs screen)
(9)
[Call] key
Job list (completed jobs screen)
Touch this key to call up and use a copy job stored using
the document filing function.
This shows up to 99 completed jobs. The result (status)
of each completed job is shown. Copy jobs that used the
document filing function are indicated as keys.
For information on the spool screen, see the Printer Guide.
Job key display
Each job key shows the position of the job in the job queue and the current status of the job.
Copy
(1) (2)
(1)
(2)
(3)
(3)
020 / 000
(4)
Shows the job status.
Message
Status
Mode icon
"Copying"
Copying is in progress.
The
"Waiting"
The job is waiting to be printed.
"Paper
Empty"
The paper used for the job has run
out. Add paper or change to a
different paper tray.
"Error"
An error occurred while the job was
being executed. Clear the error
condition.
icon appears when the job is a copy job.
Job name
Number of copies (sets) entered
This shows the number of copies (sets) specified.
(5)
Job Status
When the job currently being printed is finished, the job
moves up 1 position in the job queue.
"Copy" appears for a copy job.
When user authentication is enabled, the name of the
user that performed the job appears.
(4)
(6)
(5)
(6)
Indicates the number (position) of the job in the job
queue.
Waiting
Number of completed copies
This shows the number of copies (sets) completed.
"000" appears while the job is waiting in the job queue.
50
Cancelling a job that is waiting in the queue
To cancel a job that is waiting in the queue, touch the job key and then the [Stop/Delete] key. The following screen will
appear. Touch the [Yes] key.
The job will be deleted from the queue.
Delete the job?
Copy
No
Yes
If the job in progress is a copy job, you can also press the [STOP] key (
To cancel, touch the [Yes] key.
) to display the above screen.
Giving priority to a job in the queue
If a copy job is performed when there are already multiple jobs in the queue, the copy job will appear at the end of the
queue. However, if you have an urgent copy job, you can give priority to the job and have it executed first.
Touch the key of the urgent job and then touch the [Priority] key. The job will move to the top of the queue and copying
will begin.
Job Queue
Sets / Progress
Spool
Status
Computer01
020 / 001
Printing
Copy
020 / 000
Waiting
Copy
020 / 000
Waiting
0312345678
002 / 000
Waiting
1/1
Job Queue
Job Queue
Sets / Progress
Spool
Status
Copy
020 / 001
Copying
Computer01
020 / 000
Waiting
Copy
020 / 000
Waiting
0312345678
002 / 000
Waiting
Complete
Scan to
(1)
Fax Job
Job Queue
Complete
Detail
Print Job
1/1
Detail
Priority
Stop/Delete
Internet Fax
Print Job
Scan to
Fax Job
Priority
Stop/Delete
Internet Fax
(2)
The job that was in progress will be moved to the second position in the queue and will wait. The job will resume when
the priority job is finished.
51
Checking information on a copy job waiting in the queue
Detailed information can be displayed on a copy job waiting in the queue.
Touch the key of the job that you wish to check and then touch the [Detail] key. The job information screen will appear.
Job Queue
Sets / Progress
Detail of
Copy
Spool
Status
Computer01
020 / 001
Printing
Copy
020 / 000
Waiting
Copy
020 / 000
Waiting
1/1
Job Queue
Colour / B/W:
Complete
Detail
0312345678
002 / 000
A4
Paper: Plain
Stop/Delete
Copy Ratio:
Print Job
Scan to
Fax Job
Waiting
2-Sided
Copy:
Full Colour
1
Exposure:
Priority
Waiting
OK
020/000
3
Paper Select
X100%
5
Output
Special
Modes:
Y100%
Internet Fax
(1)
(2)
[Paper Select] key
If a copy job is stopped because the paper ran out, the [Paper Select] key can be pressed to change to a different paper
tray.
When the [Paper Select] key is pressed, the paper tray selection screen appears.
Paper Select
OK
A4
Plain
A4R
Plain
B4
Plain
A3
Plain
A4
Plain
Touch the tray that has the size of paper that you wish to use and then touch the [OK] key. The stopped copy job will
resume.
52
WHEN THE DOCUMENT FILING FUNCTION IS USED
When a copy job has been saved using the [Quick File] key or [File] key of the document filing function, the job can be
called up and reused from the job status screen.
Touch the job status screen selector key to display the completed jobs screen.
Job Queue
Sets / Progress
Spool
Status
Computer01
020 / 001
Printing
Copy
020 / 000
Waiting
Job Queue
1/1
Complete
Set Time
Computer01
14:38 12/09 010/010 OK
Sets
Copy
14:38 12/09 005/005 OK
Computer02
14:09 12/09 002/002 OK
Copy
13:27 12/09 003/003 OK
Spool
Status
1/8
Complete
Detail
Detail
Copy
020 / 000
Waiting
0312345678
002 / 000
Waiting
Priority
Scan to
Call
Stop/Delete
Print Job
Print Job
Job Queue
Complete
Fax Job
Scan to
Fax Job
Internet Fax
Internet Fax
Copy jobs saved with the document filing function will appear as keys. To call up and reuse a job, touch the job key and
then the [Call] key. The job selection screen of the document filing function will appear.
Cancel
Job Settings
Copy_08012005_134050PM
User1
F. Colour
A4
Select the job.
Print
Send
Property
Change
Move
Delete
Detail
Manipulate the job from this screen. For more information on manipulating called up jobs, see the Document Filing
Guide.
If you touch a key in the job list followed by the [Detail] key, the following screen will appear.
Detail of
Copy
File Name:
OK
Copy_01082005_134050
Size:A4
Date:01/08/2005 13:40
Resolution:600X600dpi
Call
1/2
Colour / B/W:Full Colour
The [Call] key can be touched in this screen to open the job selection screen of the document filing function.
53
2
CONVENIENT COPY FUNCTIONS
This chapter explains special-purpose functions, storing of copy settings, and other convenient functions.
SPECIAL MODES
There are 2 ways to open the special modes screen from the base screen of copy mode.
1. Touch the [Special Modes] key in the base screen of copy mode.
The explanations in this guide generally assume that this method is used.
Ready to scan for copy.
0
Full Colour
Colour Mode
Original A4
1/4
Output
Job Detail
Settings
Plain
A4
Auto
Exposure
1.
2.
3.
100%
Copy Ratio
4.
A4
A4R
B4
A3
OK
Special Modes
2-Sided Copy
Margin Shift
Erase
Dual Page
Copy
Special Modes
File
Pamphlet Copy
Quick File
Job
Build
Tandem
Copy
2. Touch the [Job Detail Settings] key in the base screen of copy mode and then touch the [Special Modes] key
in the job detail settings screen.
OK
Special Modes
Full Colour
Colour Mode
Job Detail
Settings
Auto
Original
Auto
A4
Paper Select
Plain
Special Modes A4
Auto
Exposure
1/4
Output
Margin Shift
Erase
Dual Page
Copy
Special Modes
File
100%
Copy Ratio
(1)
2-Sided Copy
Pamphlet Copy
Quick File
Job
Build
Tandem
Copy
(2)
Use either method to open the special modes screen. The same screen appears regardless of which method is used.
The special modes screen consists of four screens. Use the
keys to switch through the screens.
• The displayed menu will vary depending on the country and regions.
• The displayed menu will vary depending on the equipment installed.
54
1st screen
(1)
(2)
(3)
(7)
OK
Special Modes
1/4
Margin Shift
Dual Page
Copy
Erase
(8)
Pamphlet Copy
(4)
(1)
Job
Build
Tandem
Copy
(5)
(6)
(5)
[Margin Shift] key
(2)
[Erase] key
(6)
This is used to erase peripheral shadows that occur
when making copies of books and thick originals.
☞ ERASING PERIPHERAL SHADOWS (Erase) (page 61)
(3)
[Tandem Copy] key
Two machines connected to the same network can be
used to run a large copy job in parallel.
☞ USING TWO MACHINES TO COPY A LARGE
NUMBER OF ORIGINALS (Tandem Copy) (page 71)
[Dual Page Copy] key
This is used to make separate copies of the left and right
pages of a book or other bound document.
☞ COPYING EACH FACING PAGE OF A BOUND
DOCUMENT (Dual Page Copy) (page 63)
(4)
[Job Build] key
When you have a very large number of originals, this can
be used to scan the originals in separate sets.
☞ COPYING A LARGE NUMBER OF ORIGINALS AT
ONCE (Job Build) (page 69)
Use this to shift the image on the paper to create binding
margins.
☞ ADDING MARGINS (Margin Shift) (page 59)
(7)
[OK] key
Touch this to close the special modes screen.
(8)
[Pamphlet Copy] key
/
keys
Touch these to switch through the special modes
screens.
This is used to make pamphlet-style copies of 1-sided or
2-sided originals.
☞ MAKING COPIES IN PAMPHLET FORMAT
(Pamphlet Copy) (page 65)
2nd screen
(1)
(2)
(3)
OK
Special Modes
(1)
Transparency
Inserts
Multi Shot
Book Copy
Tab Copy
Card Shot
(4)
(5)
(6)
(4)
[Covers/Inserts] key
(5)
[Transparency Inserts] key
[Tab Copy] key
Use this to copy onto the tabs of tab paper.
☞ COPYING CAPTIONS ONTO TAB PAPER (Tab
Copy) (page 95)
Inserts can be automatically inserted between sheets of
transparency film.
☞ ADDING INSERTS WHEN COPYING ON
TRANSPARENCY FILM (Transparency Inserts)
(page 85)
(3)
[Book Copy] key
Books and other bound originals can be copied pamphlet
style.
☞ COPYING A PAMPHLET (Book Copy) (page 91)
Front covers, back covers, and inserts can be added.
The covers and inserts can be copied on.
☞ USING A DIFFERENT PAPER TYPE FOR COVERS
(Covers/Inserts) (page 74)
(2)
2/4
Covers/Inserts
(6)
[Card Shot] key
The front and reverse sides of a card can be copied onto
one sheet of paper.
☞ COPYING BOTH SIDES OF A CARD ON ONE
SHEET OF PAPER (Card Shot) (page 99)
[Multi Shot] key
Multiple original pages can be copied onto a single sheet
of paper in a uniform layout.
☞ COPYING MULTIPLE PAGES ONTO ONE SHEET
OF PAPER (Multi Shot) (page 88)
55
3rd screen
(1)
(2)
(3)
OK
Special Modes
(1)
Stamp
Image Edit
Colour
Adjustments
Quick File
File
Proof Copy
(4)
(5)
(5)
[Image Edit] key
[File] key
This saves a job in a folder of the document filing
function. For more information on File, see the Document
Filing Guide.
Touch this key to display the image edit menu screen.
This allows you to select special image editing functions.
☞ [Image Edit] KEY AND [Colour Adjustments] KEY
(page 57)
(3)
[Quick File] key
This saves a job in the Quick File folder of the document
filing function. For more information on Quick File, see
the Document Filing Guide.
Use this to print the date, a stamp, the page number
and/or text on copies.
☞ PRINTING THE DATE AND A STAMP ON COPIES
(Stamp) (page 102)
(2)
(6)
(4)
[Stamp] key
3/4
(6)
[Proof Copy] key
This feature prints only one set of copies, regardless of
how many sets have been specified. After the first set is
checked for errors, the remaining sets can be printed.
☞ CHECKING COPIES BEFORE PRINTING (Proof
Copy) (page 151)
[Colour Adjustments] key
Touch this key to display the colour adjustment menu
screen. This allows you to select special colour
adjustment functions when making colour copies.
☞ [Image Edit] KEY AND [Colour Adjustments] KEY
(page 57)
4th screen
(1)
(2)
OK
Special Modes
Mixed Size
Original
(1)
4/4
Slow Scan
Mode
(2)
[Mixed Size Original] key
This is used to make copies of mixed size originals. The
mixed size originals can be inserted together in the
automatic document feeder.
☞ COPYING ORIGINALS OF DIFFERENT SIZES
(Mixed Size Original) (page 154)
[Slow Scan Mode] key
This is used to copy thin-paper originals using the
automatic document feeder.
☞ COPYING THIN ORIGINALS (Slow Scan Mode)
(page 157)
Special modes can generally be combined with other special modes, however, there are some combinations that are not
possible. If a prohibited combination of special modes is selected, a message will appear on the touch panel.
56
[Image Edit] KEY AND [Colour Adjustments] KEY
A menu screen appears when the [Image Edit] key or [Colour Adjustments] key is touched in the 3rd special modes screen.
Image edit menu screen
(1)
(2)
(3)
OK
Image Edit
OK
Special Modes
Stamp
Image Edit
Colour
Adjustments
Quick File
File
Proof Copy
Photo Repeat
3/4
Multi-Page
Enlargement
Mirror
Image
Centring
B/W
Reverse
(5)
(6)
A3
Full Bleed
(4)
(1)
[Photo Repeat] key
(4)
[A3 Full Bleed] key ([11x17 Full Bleed] key)
This prints repeated copies of a photo on a single sheet
of paper.
☞ REPEATING PHOTOS ON A COPY (Photo Repeat)
(page 124)
(2)
(3)
This is used to copy an entire A3 (11" x 17") original at
full size without the cutting off the edges.
☞ COPYING A3 (11" x 17") SIZE ORIGINAL
WITHOUT CUTTING OFF THE EDGES (A3 (11x17)
Full Bleed) (page 132)
[Multi-Page Enlargement] key
This enlarges an original image and prints it as a
composite image using multiple sheets of paper.
☞ CREATING A LARGE POSTER (Multi-Page
Enlargement) (page 127)
(5)
[Mirror Image] key
(6)
[Centring] key
This is used to centre the copied image on the paper.
☞ COPYING IN THE CENTRE OF THE PAPER
(Centring) (page 135)
[B/W Reverse] key
This is used to print a mirror image of the original.
☞ REVERSING THE IMAGE (Mirror Image) (page 130)
This is used to reverse black and white in a copy to
create a negative image. This function can only be used
for black and white copying.
☞ REVERSING BLACK AND WHITE IN A COPY (B/W
Reverse) (page 137)
Colour adjustments menu screen
(1)
OK
Special Modes
(1)
Stamp
Image Edit
Colour
Adjustments
Quick File
File
Proof Copy
3/4
[RGB Adjust] key
(4)
OK
RGB Adjust
Sharpness
Suppress
Background
Colour Balance
Brightness
Intensity
(4)
(5)
(6)
[Colour Balance] key
The colour, tone, and density of colour copies can be
adjusted.
☞ ADJUSTING THE COLOUR (Colour Balance) (page
145)
[Sharpness] key
(5)
This is used to sharpen an image or make it softer.
☞ ADJUSTING THE SHARPNESS OF AN IMAGE
(Sharpness) (page 141)
(3)
(3)
Colour
Adjustments
This is used to strengthen or weaken one of the three
primary colours, red (R), green (G), or blue (B).
☞ ADJUSTING RED/GREEN/BLUE IN COPIES (RGB
Adjust) (page 139)
(2)
(2)
[Brightness] key
This is used to adjust the brightness of colour images.
☞ ADJUSTING THE BRIGHTNESS OF A COPY
(Brightness) (page 147)
[Suppress background] key
(6)
This is used to suppress unwanted light background
areas on copies.
☞ WHITENING FAINT COLOURS IN COPIES
(Suppress Background) (page 143)
[Intensity] key
This is used to adjust the intensity (saturation) of colour
images.
☞ ADJUSTING THE INTENSITY OF A COPY
(Intensity) (page 149)
57
[OK] keys in the special modes screen
Two [OK] keys may appear in the special modes screen. The [OK] keys are used as follows:
Special Modes
Cancel
Erase
Edge
Erase
Centre
Erase
OK
(A)
OK
(B)
Edge
Edge+Centre
Erase
10
(0
mm
20)
(A) Enter the selected special mode settings and return to the base screen of copy mode or to the job detail settings
screen.
(B) Enter the selected special mode settings and return to the special modes menu screen. Touch this key when you
wish to continue selecting other special mode settings.
Checking which special modes are selected
Ready to scan for copy.
0
Original A4
Plain
A4
1.
2.
3.
100%
Copy Ratio
2-Sided Copy
Output
Job Detail
Settings
Auto
Exposure
OK
Function Review
Full Colour
Colour Mode
4.
A4
A4R
B4
A3
Special Modes
File
Margin Shift
Shift:Right
:
Front:10mm/Back:10mm
Erase
:
Covers/Inserts :
1/3
Edge:10mm
Centre:10mm
Front:2-Sided/Back:Insert
Insertion A:10Page/B:10Page
Quick File
When one or more special modes are selected, the
key appears in the base screen.
The
key can be touched to display a list of the
selected special modes.
58
ADDING MARGINS (Margin Shift)
This function is used to shift the copy image right, left or down to adjust the margin.
This is convenient when you wish to bind the copies with a string or in a binder.
Shifting the image to the right so the copies can be bound at the left edge with a string
Not using margin shift
Using margin shift
1
1
1
1
The punch holes cut off
part of the image
The image is shifted to the
right to allow space for the
string holes so the image is
not cut off.
Margin shift positions
Top edge
Right edge
Left edge
Place the original.
Place the original face up in the document feeder tray, or face
down on the document glass.
1
1
Ready to scan for copy.
0
Full Colour
Colour Mode
2
Output
Plain
A4
1.
2.
3.
100%
Copy Ratio
2-Sided Copy
Original A4
Job Detail
Settings
Auto
Exposure
Touch the [Special Modes] key.
4.
Special Modes
A4
A4R
B4
A3
File
Quick File
OK
Special Modes
Touch the [Margin Shift] key.
1/4
3
Margin Shift
Pamphlet Copy
Erase
Job
Build
Dual Page
Copy
Tandem
Copy
59
(1)
(2)
Cancel
Margin Shift
Side 1
Right
(1) Touch the margin shift position.
OK
Special Modes
4
Set the margin shift.
(3)
Left
Select one of the three positions.
OK
Side 2
(2) Set the amount of the margin shift with
.
Down
10
(0
mm
20)
10
(0
mm
20)
0 mm to 20 mm (0" to 1") can be entered.
(3) Touch the [OK] key.
You will return to the base screen of copy mode.
Press the [COLOUR START] key
(
) or the [BLACK & WHITE
START] key (
).
or
Copying will begin.
• If the originals were placed in the document feeder tray, the
originals are copied.
• If you are using the document glass, copy each page one
page at a time. If you are using the sort function or other
function that requires all originals to be scanned before the
copies are printed, you must use the same [START] key that
you used to scan the first original to scan each of the
remaining originals.
5
To cancel scanning of the original and copying...
Press the [STOP] key (
).
Rotation copy cannot be used in combination with margin shift.
To cancel the margin shift setting...
Touch the [Cancel] key in the screen of step 4.
System Settings (Administrator): Initial Margin Shift Setting
The default margin shift setting can be set from 0 mm to 20 mm (0" to 1"). The factory default setting is 10 mm ("1/2")".
60
ERASING PERIPHERAL SHADOWS (Erase)
The erase function is used to erase shadows around the edges of copies that occur when copying thick originals or
books.
When a thick book is copied...
Not using the erase
function
Using the erase
function
Shadows appear here
Shadows appear on the
copy.
Shadows do not appear on
the copy.
Erase modes
Edge erase
Centre erase
Edge + Centre erase
Place the original.
Place the original face up in the document feeder tray, or face
down on the document glass.
1
1
Ready to scan for copy.
0
Full Colour
Colour Mode
2
Original A4
Plain
A4
1.
2.
3.
100%
Copy Ratio
2-Sided Copy
Output
Job Detail
Settings
Auto
Exposure
Touch the [Special Modes] key.
4.
A4
A4R
B4
A3
Special Modes
File
Quick File
61
Touch the [Erase] key.
OK
Special Modes
1/4
Margin Shift
3
Erase
Dual Page
Copy
Job
Build
Pamphlet Copy
(1)
Tandem
Copy
(2)
Cancel
Erase
4
(1) Touch the desired erase mode.
OK
Special Modes
Edge
Erase
Select the erase settings.
(3)
Centre
Erase
Edge+Centre
Erase
Select one of the three positions.
OK
Edge
10
(0
mm
(2) Set the erasure width with
20)
.
0 mm to 20 mm (0" to 1") can be entered.
(3) Touch the [OK] key.
You will return to the base screen of copy mode.
Press the [COLOUR START] key
(
) or the [BLACK & WHITE
START] key (
).
or
Copying will begin.
• If the originals were placed in the document feeder tray, the
originals are copied.
• If you are using the document glass, copy each page one
page at a time. If you are using the sort function or other
function that requires all originals to be scanned before the
copies are printed, you must use the same [START] key that
you used to scan the first original to scan each of the
remaining originals.
5
To cancel scanning of the original and copying...
Press the [STOP] key (
).
When the erase function is used, erase takes place at the edges of the original image. If you also use a ratio setting, the
erase width will change according to the selected ratio. For example, if the erase width setting is 20 mm (1") and the copy is
reduced to 50%, the erase width will be 10 mm (1/2").
To cancel the erase setting...
Touch the [Cancel] key in the screen of step 4.
System Settings (Administrator): Erase Width Adjustment
The default erase width can be set from 0 mm to 20 mm (0" to 1"). The factory default setting is "10 mm (1/2")".
62
COPYING EACH FACING PAGE OF A
BOUND DOCUMENT (Dual Page Copy)
The dual page copy function produces separate copies of 2 document pages placed side by side on the document
glass. This function is useful when making copies of the facing pages of a book or other bound document.
Copying the facing pages of a book or bound document
5
6
5
Book or bound document
6
The facing pages are separated
into 2 copy pages.
Place the original on the document
glass.
Size mark
A4 81/2
The page on this side
is copied first.
1
Centreline of original
A4 (8-1/2" x 11") A3 (11" x 17")
Place the original with the page that you wish to copy first on the
right. Align the centreline of the original with the size mark.
Ready to scan for copy.
0
Full Colour
Colour Mode
2
Original
A3
2-Sided Copy
Plain
A4
Auto
Exposure
1.
2.
3.
4.
A4
A4R
B4
A3
Special Modes
File
Quick File
Ready to scan for copy.
0
Full Colour
Colour Mode
Original
A3
Plain
A4
Auto
Exposure
1.
2.
Auto
Image
3.
4.
A4
A4R
B4
A3
OK
A4
Plain
A4R
Plain
B4
Plain
A3
Plain
A4
Plain
Touch the [Special Modes] key.
2-Sided Copy
Output
Job Detail
Settings
100%
Copy Ratio
Paper Select
Output
Job Detail
Settings
100%
Copy Ratio
3
Select A4 (8-1/2" x 11") size paper.
Special Modes
File
Quick File
63
Select Dual Page Copy.
OK
Special Modes
1/4
Margin Shift
4
Pamphlet Copy
Erase
Job
Build
(1) Touch the [Dual Page Copy] key so that it is
highlighted.
Dual Page
Copy
Tandem
Copy
(2) Touch the [OK] key.
You will return to the base screen of copy mode.
(1) (2)
Press the [COLOUR START] key
(
) or the [BLACK & WHITE
START] key (
).
or
Copying will begin.
If you are using the document glass, copy each page one page
at a time. If you are using the sort function or other function that
requires all originals to be scanned before the copies are
printed, you must use the same [START] key that you used to
scan the first original to scan each of the remaining originals.
5
To cancel scanning of the original and copying...
Press the [STOP] key (
).
• When using dual page copy, the original must be placed on the document glass.
• Only A4 (8-1/2" x 11") paper can be used.
• To erase shadows caused by the binding of a book or other bound document, use the erase function.
Note that the centre erase and edge + centre erase modes of the erase function cannot be used with dual page copy.
To cancel dual page copy...
Touch the [Dual Page Copy] key in the screen of step 4 so that it is not highlighted.
64
MAKING COPIES IN PAMPHLET FORMAT
(Pamphlet Copy)
This function copies 2 original pages onto the front side and 2 original pages onto the reverse side of each sheet of
paper so that the copies can be folded at the centreline to form a pamphlet.
This function is convenient for arranging copies into an attractive booklet or pamphlet.
Pamphlet copy using 8 original pages
In pamphlet form
Originals
5
4
2
3
4
1st page
2nd page
3rd page
4th page
5
6
7
5th page
6th page
7th page
7
3
2
5
7
8th page
Binding side
Left binding
4
Right binding
5
5
7
7
3
2
5
5
4
3
2
7
7
Place the original.
1
Place the original face up in the document feeder tray, or face
down on the document glass.
1
If the originals are 2-sided, place them in the document feeder tray.
Ready to scan for copy.
0
Full Colour
Colour Mode
2
Original A4
Plain
A4
1.
2.
3.
100%
Copy Ratio
2-Sided Copy
Output
Job Detail
Settings
Auto
Exposure
Touch the [Special Modes] key.
4.
A4
A4R
B4
A3
Special Modes
File
Quick File
65
OK
Special Modes
Touch the [Pamphlet Copy] key.
1/4
Margin Shift
Dual Page
Copy
Erase
3
Job
Build
Pamphlet Copy
Tandem
Copy
OK
Special Modes
Cancel
Pamphlet Copy
Original
1-Sided
2-Sided
4
Left
Binding
OK
Right
Binding
Cover
Setting
OK
Special Modes
Cancel
Pamphlet Copy
Original
1-Sided
2-Sided
5
Left
Binding
OK
Select the binding edge ([Left Binding]
or [Right Binding]).
Right
Binding
Cover
Setting
OK
Special Modes
Cancel
Pamphlet Copy
Original
1-Sided
2-Sided
6
Left
Binding
OK
Right
Binding
Cover
Setting
Cancel
Cover Setting
Print on Cover
7
Specify whether the original is a 1-sided
or 2-sided original.
Yes
No
Paper Tray
Bypass
Tray
OK
Specify whether or not a cover will be
added.
If a different type of paper will be used for the cover, touch the
[Cover Setting] key.
If a cover will not be added, go to step 10.
If the cover sheet will be copied on,
touch the [Yes] key. Otherwise, touch
the [No] key.
A4
Plain
66
Cancel
Cover Setting
No
2-Sided
(A)
Bypass
Tray
A4
Plain
(B)
Select the paper tray for the cover.
(A) The currently selected paper tray for the cover is displayed.
(B) The size and type of paper in the currently selected tray is
displayed.
In the example screen, A4 (8-1/2" x 11") size plain paper is
loaded in the bypass tray.
To change the paper tray for the cover, touch the tray selection
key. (In the screen example, the "Bypass Tray" display is the
tray selection key.)
The tray selection screen appears when the tray selection key
is touched. Select the paper tray for the cover in the tray
selection screen and touch the [OK] key.
Paper Tray
Print on Cover
Yes
OK
8
OK
Cover Setting
A4
Plain
A4R
Plain
B4
Plain
A3
Plain
A4
Plain
If the cover will be copied on, label sheets, transparency film, and tab paper cannot be used.
Cancel
Cover Setting
No
Touch the [OK] key.
OK
Touch the [OK] key.
OK
You will return to the base screen of copy mode.
Paper Tray
Print on Cover
Yes
OK
2-Sided
Bypass
Tray
A4
Plain
9
To cancel cover settings...
Touch the [Cancel] key.
Special Modes
Cancel
Pamphlet Copy
10
Original
1-Sided
2-Sided
Left
Binding
Right
Binding
Cover
Setting
67
Press the [COLOUR START] key
(
) or the [BLACK & WHITE
START] key (
).
or
Copying will begin.
• If the originals were placed in the document feeder tray, the
originals are copied.
• If you are using the document glass, copy each page one
page at a time. If you are using the sort function or other
function that requires all originals to be scanned before the
copies are printed, you must use the same [START] key that
you used to scan the first original to scan each of the
remaining originals.
11
To cancel scanning of the original and copying...
Press the [STOP] key (
).
• To make pamphlet copies of a book or other bound original, use the book copy function.
• When the pamphlet copy function is selected, 2-sided copying mode is automatically selected. When settings are selected
that prevent 2-sided copying, the pamphlet copy function cannot be used.
• Scan the originals in order from the first page to the last page. The order of copying will be automatically adjusted by the
machine. Four original pages will be copied onto each sheet of paper. Blank pages may be automatically produced at the
end depending on the number of original pages.
• When a saddle stitch finisher is installed, saddle stitch can be used. When pamphlet copy is used in combination with the
saddle stitch function and the number of originals is greater than the number of sheets that can be stapled, a message will
appear showing the [Cancel] key, the [Continue] key, and the [Divide] key. To cancel the job, touch the [Cancel] key. To
make pamphlet copies without stapling, touch the [Continue] key. To divide the pages into sets that can be stapled, touch
the [Divide] key.
If you selected settings for adding a cover, it will not be possible to select "Divide". You can either continue pamphlet
copying without stapling, or cancel the job.
To cancel pamphlet copy...
Touch the [Cancel] key in the screen of step 4.
System Settings (Administrator): Automatic Saddle Stitch
When a saddle stitch finisher is installed, this setting can be enabled to have saddle stitch take place automatically when the
pamphlet copy function is selected.
68
COPYING A LARGE NUMBER OF
ORIGINALS AT ONCE (Job Build)
When copying a very large number of originals, this function allows you to divide the originals into sets and feed each
set through the automatic document feeder one set at a time.
Use this function when you wish to copy all of the originals as a single job but the number of originals exceeds the
maximum number that can be inserted.
This function is convenient when you wish to sort copies of a large number of originals into multiple sets because all
originals are copied as a single job, which saves you the trouble of sorting the copies that would be required if the
originals were divided into separate copy jobs.
When scanning the original in sets, divide the sheets so that no set has more than the number of paper that can be
loaded and then scan from the set with the first page. The settings that you select for the first set can be used for all
remaining sets.
Sorting the copies of a large number of originals into 2 sets
Originals are
scanned in
separate sets
Originals
1
1
1
1
101
1
1
Indicator
line
Place the originals face up in the
document feeder tray with the edges
aligned evenly.
Place the originals face up. Insert the originals all the way into
the document feeder tray. The stack must not be higher than
the indicator line.
Ready to scan for copy.
0
Full Colour
Colour Mode
2
Output
Plain
A4
1.
2.
3.
100%
Copy Ratio
2-Sided Copy
Original A4
Job Detail
Settings
Auto
Exposure
4.
Special Modes
A4
A4R
B4
A3
File
Quick File
OK
Special Modes
1/4
Margin Shift
3
Pamphlet Copy
Touch the [Special Modes] key.
Erase
Job
Build
(1)
Dual Page
Copy
Tandem
Copy
Select Job Build.
(1) Touch the [Job Build] key so that it is
highlighted.
(2) Touch the [OK] key.
You will return to the base screen of copy mode.
(2)
69
Press the [COLOUR START] key
(
) or the [BLACK & WHITE
START] key (
) to scan the first set of
originals.
or
4
Scanning begins.
).
or
10
1
To cancel scanning...
Press the [STOP] key (
Insert the next set of originals and press
the [COLOUR START] key (
) or
the [BLACK & WHITE START] key (
).
You must use the same [START] key that you used to scan the
first set of originals to scan each of the remaining sets.
Repeat this step until all originals have been scanned.
5
To cancel scanning...
Press the [STOP] key (
).
Place next original. Press [Start].
When finished, press [Read-End].
Touch the [Read-End] key.
Read-End
6
To cancel copying...
Press the [STOP] key (
).
If the Quick File Folder of the document filing function is full, copying in job build mode will be affected. Delete unneeded files
from the Quick File Folder.
To cancel the job build setting....
Touch the [Job Build] key in the screen of step 3 so that it is not highlighted.
70
USING TWO MACHINES TO COPY A LARGE
NUMBER OF ORIGINALS (Tandem Copy)
Two machines connected to the same network can be used to run a large copy job in parallel.
Each machine prints half of the copies, reducing the time required to complete the job.
Master machine and slave machine
In the following explanation, the master machine is the machine that is used to scan the originals. The slave machine is
another machine specified in the master machine that only helps print the copies; it is not used to scan the originals.
Master
machine
2 sets of copies
4 sets of copies are made
2 sets of copies
Slave
machine
Network environment
Before using tandem copy
• To use this function, two machines must be connected to your network. Even if more machines are connected to the
network, this function can only be used to have one other machine share a job.
• To use the tandem copy function, "Tandem Connection Setting" must be configured in the system settings (administrator).
• When configuring the system settings in the master machine, the IP address of the slave machine is required. For the
port number, it is best to use the initial setting (50001). Unless you experience difficulty with this setting, do not
change the port number. The tandem settings should be configured by your network administrator. If the master
machine and slave machine will change roles, configure the IP address information of the master machine in the slave
machine. Both machines can use the same port number.
Place the original.
Place the original face up in the document feeder tray, or face
down on the document glass.
1
1
Ready to scan for copy.
0
Full Colour
Colour Mode
2
Original A4
Plain
A4
1.
2.
3.
100%
Copy Ratio
2-Sided Copy
Output
Job Detail
Settings
Auto
Exposure
Touch the [Special Modes] key.
4.
A4
A4R
B4
A3
Special Modes
File
Quick File
71
OK
Special Modes
1/4
Margin Shift
3
Pamphlet Copy
Dual Page
Copy
Erase
Job
Build
Tandem
Copy
(1)
Select tandem copy.
(1) Touch the [Tandem Copy] key so that it is
highlighted.
(2) Touch the [OK] key.
You will return to the base screen of copy mode.
(2)
Set the number of copies with the
numeric keys.
Up to 999 can be set. When the [COLOUR START] key
(
) or the [BLACK & WHITE START] key (
) is
pressed, the copies will automatically be divided between the
master and slave machines.
If an odd number of copies is set, the master machine will print
the extra set.
4
If an incorrect number of copies is set...
Press the [CLEAR] key (
) and then enter the correct number.
Press the [COLOUR START] key
(
) or the [BLACK & WHITE
START] key (
).
or
Copying will begin.
• If the originals were placed in the document feeder tray, the
originals are copied.
• If you are using the document glass, copy each page one
page at a time. If you are using the sort function or other
function that requires all originals to be scanned before the
copies are printed, you must use the same [START] key that
you used to scan the first original to scan each of the
remaining originals.
The following screen appears when the [START] key is pressed.
Starting tandem operation.
Please wait.
5
After the message appears, tandem copying begins.
If tandem copying is not possible, the following screen appears.
Tandem output is not allowed.
Output all sets using master machine?
(Cancel will delete the job.)
OK
Cancel
To have the master machine make all copies, touch the [OK]
key. To cancel the job, touch the [Cancel] key.
• To cancel scanning...
Press the [STOP] key (
).
• To cancel tandem copying...
Touch the [STOP] keys (
) on both the master machine and the slave machine.
72
In this situation...
A saddle stitch finisher is installed on the master machine but not on the slave machine.
• Copying without stapling: tandem copy is possible.
• Copying with stapling: tandem copy is not possible.
In this way, if tandem copying is executed using a function that the slave machine does not have, a message will appear. To
have the master machine make all copies, touch the [OK] key. To cancel the job, touch the [Cancel] key.
If a machine runs out of paper
If either the master machine or the slave machine run out of paper, the machine that ran out of paper will hold the job while
the machine that still has paper continues the job. When paper is added to the machine that ran out, the job resumes.
When user authentication is enabled
User authentication is enabled in the master machine: tandem copying is possible.
User authentication is enabled in the slave machine but not in the master machine: tandem copying is not possible.
To cancel tandem copy...
Touch the [Tandem Copy] key in the screen of step 3 so that it is not highlighted.
System Settings (Administrator): Tandem Connection Setting
This must be configured to use the tandem function. This can also be used to disable the tandem function.
73
USING A DIFFERENT PAPER TYPE FOR
COVERS (Covers/Inserts)
A different type of paper can be inserted in positions corresponding to front and back covers of a copy job when the
automatic document feeder is used. A different type of paper can also be automatically added as an insert at specified
pages.
Example of adding covers
Example of adding inserts
Originals
Originals
Back
cover
Front cover
Inserts
Example of adding covers/inserts
About the explanations of covers and
inserts
Originals
Back
cover
There are various ways of using covers and inserts. To
keep the explanations simple, covers and inserts are
explained separately. Refer to "Examples of covers and
inserts" (page 163) as needed.
Front
cover
Inserts
Preparations for using covers and inserts
• Load the cover/insert paper in the tray before using the cover/insert function.
• Before selecting the cover/insert function, place the originals in the document feeder tray, select 1-sided or 2-sided
copying, and select the number of copies and any other desired copy settings. When these settings have been
completed, perform the procedure to select covers/inserts.
• The originals must be scanned using the automatic document feeder. The document glass cannot be used.
• Up to 100 cover/insert sheets can be inserted. Note that two insert sheets cannot be inserted between the same
pages.
• This function cannot be used in combination with the saddle stitch function.
• When performing 2-sided copying of 2-sided originals, an insert cannot be added between the front and reverse sides
of an original page.
74
INSERTING COVERS IN COPIES (Cover Settings)
A different type of paper can be inserted at the positions corresponding to the front and back covers of a copy job.
This is useful for arranging documents in an attractive format and for using a different type of paper as a cover on an
estimate sheet.
Covers can be used in combination with inserts.
Copying on a front cover and inserting together with a back cover
AAA
1
AAA
2
3
4
5
Front cover
1
Originals
2
3
4
Back cover
5
Front cover paper
Back cover paper
Place the originals face up in the
document feeder tray with the edges
aligned evenly.
1
Indicator
line
Copies
Place the originals face up. Insert the originals all the way into
the document feeder tray. The stack must not be higher than
the indicator line.
1
The document glass cannot be used.
Ready to scan for copy.
0
Full Colour
Colour Mode
2
Original A4
Plain
A4
1.
2.
3.
100%
Copy Ratio
4.
A4
A4R
B4
A3
(2)
Special Modes
File
Quick File
OK
Special Modes
3
2-Sided Copy
Output
Job Detail
Settings
Auto
Exposure
Touch the [Special Modes] key.
2/4
Covers/Inserts
Transparency
Inserts
Multi Shot
Book Copy
Tab Copy
Card Shot
Select Covers/Inserts.
(1) Touch the
the screens.
keys to switch through
(2) Touch the [Covers/Inserts] key.
(1)
75
OK
Special Modes
Cancel
Covers/Inserts
4
Front Cover
Insertion
Type A Setting
Back Cover
Insertion
Type B Setting
Page Layout
Cancel
OK
Paper Tray
Print on Front Cover
No
OK
Paper Tray
Settings
Insertion
Settings
Front Cover Setting
Yes
1-Sided
Bypass
Tray
2-Sided
(A) (B) (3) (4)
(2)
Select front cover settings.
In the example screen, A4 (8-1/2" x 11") size plain paper in the
bypass tray is selected.
(1) If you wish to copy on the front cover, touch
the [Yes] key.
A4
Plain
(1)
Touch the [Front Cover] key.
(2) If you touched [Yes] in (1), touch the
[1-Sided] key if copying will be 1-sided or
the [2-Sided] key if copying will be 2-sided.
(3) To change the paper tray used for the front
cover, touch the tray select key.
(A) The currently selected paper tray for the cover is
displayed.
(B) The size and type of paper in the currently selected
tray is displayed.
In the example screen, A4 (8-1/2" x 11") size plain paper
is loaded in the bypass tray.
To change the paper tray for the cover, touch the tray
selection key. (In the screen example, the "Bypass Tray"
display is the tray selection key.)
The tray selection screen appears when the tray selection
key is touched. Select the paper tray for the cover in the
tray selection screen and touch the [OK] key.
5
OK
Front Cover
A4
Plain
A4R
Plain
B4
Plain
A3
Plain
A4
Plain
(4) Touch the [OK] key.
If both sides of the cover will be copied on, label sheets, transparency film, and tab paper cannot be used. Tab paper
can only be inserted.
OK
Special Modes
Cancel
Covers/Inserts
6
Front Cover
Back Cover
Insertion
Type A Setting
Insertion
Type B Setting
Insertion
Settings
OK
Paper Tray
Settings
Page Layout
If you wish to insert a back cover, touch
the [Back Cover] key.
The screen of step 5 appears. The procedures are the same as
for the front cover. Follow the procedures in step 5.
When following the procedures, substitute "Back Cover" for
"Front Cover".
76
Cancel
Covers/Inserts
7
Touch the [OK] key.
OK
Special Modes
Front Cover
Insertion
Type A Setting
Back Cover
Insertion
Type B Setting
Insertion
Settings
You will return to the base screen of copy mode.
To check your settings, touch the [Page Layout] key.
☞ CHANGING COVER/INSERT SETTINGS (Page Layout)
(page 81)
OK
Paper Tray
Settings
Page Layout
Press the [COLOUR START] key
(
) or the [BLACK & WHITE
START] key (
).
or
8
Copying of the originals in the document feeder tray begins.
To cancel scanning of the original and copying...
Press the [STOP] key (
).
• This function cannot be used in combination with the saddle stitch function.
• The document glass cannot be used.
• Cover settings cannot be selected if insertion of covers and inserts is disabled in the System Settings (Administrator).
To cancel cover sheet insertion...
Touch the [Cancel] key in the screen of step 4.
77
INSERTING INSERT SHEETS IN COPIES (Insert Settings)
You can have different paper automatically inserted as an insert at specified pages of copies. Two types of paper can be
used as inserts, and the insertion positions can be specified separately for each.
Covers can be used in combination with inserts.
Example: Insert A after page 3 and insert B after page 5.
Originals
1
Insert A
2
3
1
2
3
4
5
4
6
Insert B
5
6
Copies
1
Indicator
line
Place the originals face up in the
document feeder tray with the edges
aligned evenly.
Place the originals face up. Insert the originals all the way into
the document feeder tray. The stack must not be higher than
the indicator line.
1
The document glass cannot be used.
Ready to scan for copy.
0
Full Colour
Colour Mode
2
Original A4
Plain
A4
1.
2.
3.
100%
Copy Ratio
4.
A4
A4R
B4
A3
(2)
Special Modes
File
Quick File
OK
Special Modes
3
2-Sided Copy
Output
Job Detail
Settings
Auto
Exposure
Touch the [Special Modes] key.
2/4
Covers/Inserts
Transparency
Inserts
Multi Shot
Book Copy
Tab Copy
Card Shot
Select Covers/Inserts.
(1) Touch the
the screens.
keys to switch through
(2) Touch the [Covers/Inserts] key.
(1)
78
OK
Special Modes
Cancel
Covers/Inserts
4
Front Cover
Insertion
Type A Setting
Back Cover
Insertion
Type B Setting
Insertion
Settings
Page Layout
OK
Paper Tray
Print on Insert Sheets
No
OK
Paper Tray
Settings
Insertion Type A Setting
Yes
1-Sided
Bypass
Tray
2-Sided
(A) (B) (3) (4)
(2)
Select settings for insert type A.
In the example screen, A4 (8-1/2" x 11") size plain paper in the
bypass tray is selected.
(1) If you wish to copy on insert type A, touch
the [Yes] key.
A4
Plain
(1)
Touch the [Insertion Type A Setting] key.
(2) If you selected [Yes] in (1), touch the
[1-Sided] key if copying will be 1-sided or
the [2-Sided] key if copying will be 2-sided.
(3) To change the paper tray used for insert
type A, touch the tray select key.
(A) The currently selected paper tray for the insert is
displayed.
(B) The size and type of paper in the currently selected
tray is displayed.
In the example screen, A4 (8-1/2" x 11") size plain paper
is loaded in the bypass tray.
To change the paper tray for the inserts, touch the tray
selection key. (In the screen example, the "Bypass Tray"
display is the tray selection key.)
The tray selection screen appears when the tray selection
key is touched. Select the paper tray for the inserts in the
tray selection screen and touch the [OK] key.
5
OK
Insertion Type A
A4
Plain
A4R
Plain
B4
Plain
A3
Plain
A4
Plain
(4) Touch the [OK] key.
If both sides of the insert will be copied on, label sheets, transparency film, and tab paper cannot be used. Tab paper
can only be inserted.
OK
Special Modes
Cancel
Covers/Inserts
Front Cover
6
Back Cover
Insertion
Type A Setting
Insertion
Type B Setting
Insertion
Settings
OK
Paper Tray
Settings
Page Layout
If you wish to insert a different type of
insert sheet, touch the [Insertion Type B
Setting] key.
The screen of step 5 appears. Settings are selected in the
same way as for insert type A. Follow the procedures in step 5.
When following the procedures, substitute "Insert Type B" for
"Insert Type A".
79
OK
Special Modes
Cancel
Covers/Inserts
7
Front Cover
Insertion
Type A Setting
Back Cover
Insertion
Type B Setting
OK
Paper Tray
Settings
Insertion
Settings
Page Layout
(5)
OK
Insertion Settings
Insertion Page
Insertion
Total:2
4
Enter
(2)
Touch the [Insertion Settings] key.
Insertion
Type A
Insertion
Type B
Bypass
Tray
A4
Plain
Bypass
Tray
A4
Plain
(3)
Specify the pages where inserts A and B
will be inserted.
(1) Touch the [Insertion Type A] key or the
[Insertion Type B] key.
Specify the page where the highlighted insert will be
inserted.
(2) Enter the page number where the insert
sheet will be inserted with the numeric
keys.
(1)
(3) Touch the [Enter] key.
(4) To insert another insert sheet, repeat steps
(1) to (3).
(5) Touch the [OK] key.
8
● Insertion settings screen
OK
Insertion Settings
Insertion Page
Insertion
Total:2
4
Enter
(A)
Insertion
Type A
Insertion
Type B
Bypass
Tray
A4
Plain
Bypass
Tray
A4
Plain
(B)
(C)
(A) This shows the total number of inserts. Up to 100 insert
sheets can be inserted. To insert multiple inserts, touch the
[Enter] key after entering each insertion page number
(insertion position) with the numeric keys.
(B) This shows the tray selected for insert type A and the paper
size and type.
(C) This shows the tray selected for insert type B and the paper
size and type.
When the [Insertion Type A] key is highlighted, the insert
settings are applied to [Insertion Type A Setting]. When the
[Insertion Type B] key is highlighted, the insert settings are
applied to [Insertion Type B Setting].
If both sides of the insert will be copied on, label sheets, transparency film, and tab paper cannot be used. Tab paper
can only be inserted.
OK
Special Modes
Cancel
Covers/Inserts
9
Front Cover
Insertion
Type A Setting
Back Cover
Insertion
Type B Setting
Insertion
Settings
OK
Paper Tray
Settings
Page Layout
Touch the [OK] key.
You will return to the base screen of copy mode.
To check your settings, touch the [Page Layout] key.
☞ CHANGING COVER/INSERT SETTINGS (Page Layout)
(page 81)
80
Press the [COLOUR START] key
(
) or the [BLACK & WHITE
START] key (
).
or
10
Copying of the originals in the document feeder tray begins.
To cancel scanning of the original and copying...
Press the [STOP] key (
).
• Use the same size of paper for the inserts as for the copies.
• Up to 100 insert sheets can be added. Note that two insert sheets cannot be inserted between the same pages.
• When performing 2-sided copying of 2-sided originals, an insert cannot be added between the front and reverse sides of
an original page.
• This function cannot be used in combination with the saddle stitch function.
• Insert settings cannot be selected if insertion of covers and inserts is disabled in the system settings (administrator).
To cancel insert sheet insertion...
Touch the [Cancel] key in the screen of step 4.
CHANGING COVER/INSERT SETTINGS (Page Layout)
Cover settings and insert settings can be combined.
This section explains how to check cover and insert insertion pages, and change or delete insertion pages.
Changing insert A from page 4 to page 5
1
1
2
2
3
3
4th page, insert A
4
4
5
5
6
7th page, insert B
7
7
8
9th page, insert B
9
9
11
12th page, insert A
12
Ready to scan for copy.
12
0
Full Colour
Colour Mode
Original A4
Plain
A4
1.
2.
3.
4.
A4
A4R
B4
A3
12th page, insert A
Touch the [Special Modes] key.
2-Sided Copy
Output
Job Detail
Settings
100%
Copy Ratio
9th page, insert B
10
11
Auto
Exposure
7th page, insert B
8
10
1
5th page, insert A
6
Special Modes
File
Quick File
81
OK
Special Modes
2/4
2
Covers/Inserts
Transparency
Inserts
Multi Shot
Book Copy
Tab Copy
Card Shot
keys to switch through
(1)
OK
Special Modes
Cancel
Covers/Inserts
Front Cover
Insertion
Type A Setting
Back Cover
Insertion
Type B Setting
Insertion
Settings
OK
Page Layout
OK
1/1
Insertion
Type A
4/-
Insertion
Type B
7/-
Touch the [Page Layout] key.
Paper Tray
Settings
Page Layout
Insertion
Type B
9/-
Insertion
Type A
12/-
Check the currently specified
cover/insert page layout.
Each key shows a print image icon and the insertion page.
If there are multiple screens, touch the
keys to
change screens.
If you are only checking the layout, touch the [OK] key and go
to step 8.
● Icons
4
: Copy on front side only
: Copy on reverse side only
: 2-sided copy
: Do not copy
For inserts, the insertion page also appears.
represents a page number.
/-: Copy only on front side at page
/ : Two-sided copy at page /
< : Insert without copying at page
Example: Touch insert A at page 4
OK
Page Layout
1/1
Insertion
Type A
4/-
5
(1) Touch the
the screens.
(2) Touch the [Covers/Inserts] key.
(2)
3
Select Covers/Inserts.
Insertion
Type B
7/-
Insertion
Type B
9/-
Insertion
Type A
12/-
Touch the key of the page that you wish
to delete or change.
The following screen will appear.
• To delete the page, touch the [Delete] key. After deleting the
key, touch the [OK] key and go to step 8.
• To change the page, touch the [Amend] key.
To edit a cover, touch the [Front Cover] key or the [Back
Cover] key and go to step 6.
To edit an insert, touch the [Insertion Type A] key or the
[Insertion Type B] key and go to step 7.
• To cancel, touch the [Cancel] key.
Amend the insertion?
Cancel
82
Delete
Amend
Cancel
Front Cover Setting
The procedure for changing a front cover is explained below.
A back cover is changed in the same way.
Paper Tray
Print on Front Cover
Yes
Change the cover settings.
OK
No
1-Sided
Bypass
Tray
2-Sided
(1) If you wish to copy on the front cover, touch
the [Yes] key.
A4
Plain
(1)
(2)
(A) (B) (3) (4)
(2) If you touched [Yes] in (1), touch the
[1-Sided] key if copying will be 1-sided or
the [2-Sided] key if copying will be 2-sided.
(3) To change the paper tray used for the front
cover, touch the tray select key.
(A) The currently selected paper tray for the cover is
displayed.
(B) The size and type of paper in the currently selected
tray is displayed.
In the example screen, A4 (8-1/2" x 11") size plain paper
is loaded in the bypass tray.
To change the paper tray for the cover, touch the tray
selection key. (In the screen example, the "Bypass Tray"
display is the tray selection key.)
The tray selection screen appears when the tray selection
key is touched. Select the paper tray for the cover in the
tray selection screen and touch the [OK] key.
6
OK
Front Cover
A4
Plain
A4R
Plain
B4
Plain
A3
Plain
A4
Plain
(4) Touch the [OK] key.
You will return to the screen of step 5.
If both sides of the cover will be copied on, label sheets, transparency film, and tab paper cannot be used. Tab paper
can only be inserted.
Example: Changing the insertion page from page 4 to
page 5
(2)
(1)
OK
Insertion Amend
Insertion Page
7
Insertion
Total:4
(3)
4
Enter
Insertion
Type A
Insertion
Type B
Bypass
Tray
A4
Plain
Bypass
Tray
A4
Plain
Change the insert settings
(1) If you wish to change to the other insert
type, touch the [Insertion Type A] key or the
[Insertion Type B] key.
The paper setting for insert A and insert B cannot be
changed.
(2) If you wish to change the insertion page of
the insert, enter the desired page number
with the numeric keys and touch the [Enter]
key.
(3) Touch the [OK] key.
You will return to the screen of step 5.
83
Special Modes
Cancel
Covers/Inserts
8
Front Cover
Insertion
Type A Setting
Back Cover
Insertion
Type B Setting
Insertion
Settings
OK
Touch the [OK] key.
OK
You will return to the base screen of copy mode.
Paper Tray
Settings
Page Layout
84
ADDING INSERTS WHEN COPYING ON
TRANSPARENCY FILM (Transparency Inserts)
When copying on transparency film, the sheets may stick together due to static electricity. The transparency inserts
function can be used to automatically insert a sheet of paper between each sheet of transparency film, making the
sheets easy to handle.
It is also possible to copy on the inserts.
B
C
A
Inserts
Place the transparency film in the
bypass tray.
1
Oriented
Oriented
horizontally vertically
Full Colour
Colour Mode
Auto
Original
Job Detail
Settings
2
2-Sided Copy
Auto
A4
Paper Select
Output
Plain
Special Modes A4
Auto
Exposure
Open the paper settings screen.
(1) Touch the [Job Detail Settings] key.
Special Modes
File
100%
Copy Ratio
Place the transparency film face down on the bypass tray.
Transparency film can only be placed in the bypass tray.
When transparency film is oriented horizontally, the rounded
corner should be at the front left. When oriented vertically, the
round corner should be at the rear left.
(2) Touch the [Paper Select] key.
Quick File
(1)
(2)
85
Paper Select
Select the settings for using
transparency film.
OK
A4
plain
A4R
plain
B4
plain
A3
plain
A4
Plain
(1) Touch the appropriate paper type key.
(2) Touch the [Transparency] key.
Cancel
Bypass Tray Type/Size Setting
Select the paper type.
(1)
1/2
3
Plain
Letter Head
Thin Paper
Transparency
Pre-Printed
Pre-Punched
Heavy Paper
Tab Paper
Recycled
Colour
Labels
Envelope
1/2
(3) Specify the size of the transparency film.
Type
Bypass Tray Type/Size Setting
Type
Transparency
OK
Size
Auto-Inch
Auto-AB
Custom Size
81/2x11,81/2x11R
A4,A4R
X420 Y297
2/2
Paper Select
4
Select the bypass tray.
OK
A4
plain
A4R
plain
B4
plain
A3
plain
A4
(1) Touch the paper size key of the bypass tray.
Transparency
(2) Touch the [OK] key.
(1)
When the [OK] key is touched, you will return to the job
detail setting screen. Touch the [Job Detail Settings] key
to return to the base screen of copy mode.
(2)
Place the original.
Place the original face up in the document feeder tray, or face
down on the document glass.
1
5
Ready to scan for copy.
0
Full Colour
Colour Mode
6
Original A4
2-Sided Copy
Output
Job Detail
Settings
OHP
A4
Auto
Exposure
100%
Copy Ratio
1.
2.
Auto
Image
3.
4.
A4
A4R
B4
A3
Special Modes
File
Quick File
OK
Special Modes
2/4
7
Touch the [Special Modes] key.
Covers/Inserts
Transparency
Inserts
Multi Shot
Book Copy
Tab Copy
Card Shot
(2)
Select Transparency Inserts.
(1) Touch the
the screens.
keys to switch through
(2) Touch the [Transparency Inserts] key.
(1)
86
Set the insertion conditions for the inserts.
OK
Special Modes
Cancel
Transparency Inserts
Print on Insert Sheets
Yes
No
OK
(1) Select whether or not the insert paper will
be copied on ([Yes] or [No]).
Insertion Sheet
Tray 1
A4
Plain
(1)
(2) Specify the tray name (tray position)
selected for the inserts, the paper size, and
the paper type.
(A) (B) (2) (3)
(A) The currently selected paper tray for the insert is
displayed.
(B) The size and type of paper in the currently selected
tray is displayed.
In the example screen, A4 (8-1/2" x 11") size plain paper
is loaded in tray 1.
To change the paper tray for the inserts, touch the tray
selection key. (In the screen example, the "Tray 1" display
is the tray selection key.)
The tray selection screen appears when the tray selection
key is touched. Select the paper tray for the inserts in the
tray selection screen and touch the [OK] key.
8
OK
Insertion Sheet
A4
Plain
A4
A4R
Plain
Transparency
B4
Plain
A3
Plain
(3) Touch the [OK] key.
You will return to the base screen of copy mode.
Select insert paper that is the same size as the transparency film.
Press the [COLOUR START] key
(
) or the [BLACK & WHITE
START] key (
).
or
Copying will begin.
• If the originals were placed in the document feeder tray, the
originals are copied.
• If you are using the document glass, copy each page one
page at a time. If you are using the sort function or other
function that requires all originals to be scanned before the
copies are printed, you must use the same [START] key that
you used to scan the first original to scan each of the
remaining originals.
9
To cancel scanning of the original and copying...
Press the [STOP] key (
).
• The number of copies cannot be selected in this mode.
• When performing 2-sided copying, only "2-sided to 1-sided" mode can be used.
To cancel the transparency inserts setting...
Touch the [Cancel] key in the screen of step 8.
87
COPYING MULTIPLE PAGES ONTO ONE
SHEET OF PAPER (Multi Shot)
Multiple original pages can be copied onto a single sheet of paper in a uniform layout. Select 2in1 to copy two original
pages onto one sheet, or 4in1 to copy four original pages onto one sheet. This function is convenient when you wish to
present multiple pages in a compact format, or show a view of all pages in a document. This function can also be used
with 2-sided originals.
2in1 copying
A
4in1 copying
AB
A B
B
CD
AB
CD
Place the original.
Place the original face up in the document feeder tray, or face
down on the document glass.
1
1
Ready to scan for copy.
0
Full Colour
Colour Mode
2
Original A4
Plain
A4
1.
2.
3.
100%
Copy Ratio
2-Sided Copy
Output
Job Detail
Settings
Auto
Exposure
4.
A4
A4R
B4
A3
Special Modes
File
Quick File
OK
Special Modes
2/4
3
Touch the [Special Modes] key.
Covers/Inserts
Transparency
Inserts
Multi Shot
Book Copy
Tab Copy
Card Shot
(2)
Select Multi Shot.
(1) Touch the
the screens.
keys to switch through
(2) Touch the [Multi Shot] key.
(1)
88
Select the number of originals to be
copied onto one sheet of paper, the
layout, and the border.
OK
Special Modes
Cancel
Multi Shot
Layout
2in1
OK
Border
4in1
(1) Touch the [2in1] or the [4in1] key.
If needed, the images will be rotated.
(1)
(2)
(3)
(4)
(2) Select the layout.
Select the order in which the originals will be arranged on
the copy.
Shot number
Layout
2in1
4
4in1
The arrows in the above diagram indicate how the images
are arranged.
(3) Select the border.
Solid lines, broken lines, or no lines can be selected.
(4) Touch the [OK] key.
You will return to the base screen of copy mode.
Press the [COLOUR START] key
(
) or the [BLACK & WHITE
START] key (
).
or
Copying will begin.
• If the originals were placed in the document feeder tray, the
originals are copied.
• If you are using the document glass, copy each page one
page at a time. If you are using the sort function or other
function that requires all originals to be scanned before the
copies are printed, you must use the same [START] key that
you used to scan the first original to scan each of the
remaining originals.
5
To cancel scanning of the original and copying...
Press the [STOP] key (
).
89
When using the multi shot function, the appropriate copy ratio will be automatically set based on the original size, paper size,
and the number of originals to be copied onto one sheet. The minimum possible reduction ratio is 25%. The original size,
paper size, and selected number of original pages may require that the ratio be less than 25%. As copying will take place at
25% in this case, part of the original images may be cut off.
To cancel the multi shot setting...
Touch the [Cancel] key in the screen of step 4.
90
COPYING A PAMPHLET (Book Copy)
This function is used to make a copy of the two facing pages of an open book or other bound document.
Copies made with this function can be folded at the centre to create a booklet.
This function is convenient for arranging copies into an attractive booklet or pamphlet.
How to place the original
Originals
A
1
Back cover
Cover
Inside of cover
C
B
2
1st page
2nd page
D
3
4
3rd page
4th page
Inside of back
cover
Place the original
A
C
1
3
B
D
2
4
3
1
The copies are in the same
layout as the original.
Ready to scan for copy.
0
Full Colour
Colour Mode
1
2-Sided Copy
Output
Job Detail
Settings
Auto
Exposure
100%
Copy Ratio
Plain
A4
1.
2.
3.
4.
A4
A4R
B4
A3
Special Modes
File
Quick File
OK
Special Modes
2/4
2
Covers/Inserts
Transparency
Inserts
Multi Shot
Book Copy
Tab Copy
Card Shot
(2)
Touch the [Special Modes] key.
Select Book Copy.
(1) Touch the
the screens.
keys to switch through
(2) Touch the [Book Copy] key.
(1)
91
OK
Special Modes
Cancel
Book Copy
Left
Binding
3
OK
Select the binding position ([Left
Binding] or [Right Binding]).
Right
Binding
Cover
Setting
OK
Special Modes
Cancel
Book Copy
Left
Binding
OK
Right
Binding
Select cover settings if needed.
If a different type of paper will be used for the cover, touch the
[Cover Setting] key. If a cover will not be added, go to step 8.
Cover
Setting
4
Cover settings cannot be selected if insertion of covers and inserts is disabled in the system settings (administrator).
Cancel
Cover Setting
Paper Tray
Print on Cover
5
Yes
Bypass
Tray
No
If the cover sheet will be copied on,
touch the [Yes] key. Otherwise, touch
the [No] key.
A4
Plain
Cancel
Cover Setting
Paper Tray
Print on Cover
Yes
No
2-Sided
(A)
(B)
6
OK
Bypass
Tray
A4
Plain
OK
Select the paper tray for the cover.
(A) The currently selected paper tray for the cover is displayed.
(B) The size and type of paper in the currently selected tray is
displayed.
In the example screen, A4 (8-1/2" x 11") size plain paper is
loaded in the bypass tray.
To change the paper tray for the cover, touch the tray selection
key. (In the screen example, the "Bypass Tray" display is the
tray selection key.)
The tray selection screen appears when the tray selection key
is touched. Select the paper tray for the cover in the tray
selection screen and touch the [OK] key.
OK
Cover Setting
A4
Plain
A4R
Plain
B4
Plain
A3
Plain
If the cover will be copied on, label sheets, transparency film, and tab paper cannot be used.
92
A4
Plain
Cancel
Cover Setting
No
Touch the [OK] key.
OK
Touch the [OK] key.
OK
You will return to the base screen of copy mode.
Paper Tray
Print on Cover
Yes
OK
Bypass
Tray
2-Sided
A4
Plain
7
To cancel cover settings...
Touch the [Cancel] key.
Special Modes
Cancel
Book Copy
8
Left
Binding
Right
Binding
Cover
Setting
Place the original face down on the
document glass.
Place the opened front cover and back cover face down.
9
Scan the original.
or
(1) Press the [COLOUR START] key (
the [BLACK & WHITE START] key (
) or
).
(2) Place the next opened pages and press the
[COLOUR START] key (
) or the
[BLACK & WHITE START] key (
).
10
or
You must use the same [START] key that you used to
scan the first set of originals to scan each of the remaining
sets. Repeat this step until all original pages have been
scanned.
Scan the original pages in the following order:
Opened inside of front cover and 1st page
Opened 2nd and 3rd page
·
·
·
Opened last page and inside of back cover
93
Touch the [Read-End] key.
Place next original. Press [Start].
When finished, press [Read-End].
Copying will begin.
Read-End
11
To cancel scanning of the original and copying...
Press the [STOP] key (
).
• Scan the originals from the first page to the last page. The order of copying will be automatically adjusted by the machine.
• Four original pages will be copied onto each sheet of paper. Blank pages may be automatically added at the end
depending on the number of original pages.
• If a saddle stitch finisher is installed, the book copy function can be used in combination with the saddle stitch function.
• When book copy is selected, 2-sided copying is automatically selected. When settings that prevent 2-sided copying are
selected, the book copy function cannot be used.
To cancel book copy...
Touch the [Cancel] key in the screen of step 3.
94
COPYING CAPTIONS ONTO TAB PAPER
(Tab Copy)
Captions can be copied onto the tabs of tab paper. Prepare appropriate originals for the tab captions.
ABC
ABC
ABC
DEF
DEF
GHI
GHI
Prepare originals that
match the tab heights
The image is shifted with
the width of the tab
RELATION BETWEEN THE ORIGINALS AND THE TAB
PAPER
Tab copying with a left binding
Originals
Placing the originals
Loading tab paper
• Document feeder tray
1
Face down
Final image
1
Originals
Insert the originals so that the side with no
tab text enters first
• Document glass
1
Load the tab paper so that the tab on the
first sheet is toward you.
Place so that the side with the tab text is
on the left
95
Tab copying with a right binding
Originals
Placing the originals
Loading tab paper
• Document feeder tray
1
Insert the originals so that the side with no
tab text enters first
Final image
• Document glass
1
1
Face down
Load the tab paper so that the tab on the
first sheet is away from you.
Originals
Place so that the side with the tab text is
on the left
Place the original.
1
Place the original face up in the document feeder tray, or face
down on the document glass.
1
Ready to scan for copy.
0
Full Colour
Colour Mode
2
Original A4
Plain
A4
1.
2.
3.
100%
Copy Ratio
2-Sided Copy
Output
Job Detail
Settings
Auto
Exposure
4.
A4
A4R
B4
A3
Special Modes
File
Quick File
OK
Special Modes
2/4
3
Touch the [Special Modes] key.
Covers/Inserts
Transparency
Inserts
Multi Shot
Book Copy
Tab Copy
Card Shot
Select Tab Copy.
(1) Touch the
key.
(2) Touch the [Tab Copy] key.
(2)
(1)
96
OK
Special Modes
OK
Cancel
Tab Copy
Original
Image Shift
Copy
4
10
(0
mm
20)
Set the tab width.
(1) Set the image shift width (tab width) with
the
keys.
0 mm to 20 mm (0" to 5/8") can be entered.
(2)
(1)
(2) Touch the [OK] key.
You will return to the base screen of copy mode.
Place tab paper in the bypass tray.
Face down
Place tab paper face down on the bypass tray.
Tab paper can only be placed in the bypass tray. Place the
paper so that the sides with the tabs enter the machine last.
5
The width of the tab paper can be up to the width of A4 width (210 mm) plus 20 mm (or 8-1/2" x 11" paper (8-1/2") plus
5/8").
Full Colour
Colour Mode
Auto
Original
Job Detail
Settings
6
2-Sided Copy
A4
Paper Select
Output
Plain
Special Modes A4
Auto
Exposure
(1) Touch the [Job Detail Settings] key.
Special Modes
File
100%
Copy Ratio
Open the paper settings screen.
(2) Touch the [Paper Select] key.
Quick File
(1)
(2)
97
Paper Select
Select settings for using tab paper.
OK
A4
Plain
A4R
Plain
B4
Plain
A3
Plain
A4
(1) Touch the appropriate paper type key.
Plain
(2) Touch the [Tab Paper] key.
Cancel
Bypass Tray Type/Size Setting
Select the paper type.
1/2
Plain
Letter Head
Thin Paper
Transparency
Pre-Printed
Pre-Punched
Heavy Paper
Tab Paper
Recycled
Colour
Labels
Envelope
1/2
(3) Touch the [OK] key.
Type
Bypass Tray Type/Size Setting
Size
Type
7
Tab Paper
OK
Auto-Inch
Auto-AB
81/2x11
A4
2/2
(4) Touch the [OK] key.
Paper Select
OK
A4
Plain
A4R
Plain
B4
Plain
A3
Plain
A4
Tab Paper
When the [OK] key is touched, you will return to the job
detail setting screen. Touch the [Job Detail Settings] key
to return to the base screen of copy mode.
Press the [COLOUR START] key
(
) or the [BLACK & WHITE
START] key (
).
or
Copying will begin.
• If the originals were placed in the document feeder tray, the
originals are copied.
• If you are using the document glass, copy each page one
page at a time.
If you are using the sort function or other function that
requires all originals to be scanned before the copies are
printed, you must use the same [START] key that you used
to scan the first original to scan each of the remaining
originals.
8
To cancel scanning of the original and copying...
Press the [STOP] key (
).
To cancel tab copy...
Touch the [Cancel] key in the screen of step 4.
System Settings (Administrator): Initial Tab Copy Setting
The default image shift width can be set from 0 mm to 20 mm (0" to 5/8"). The factory default setting is "10 mm (1/2")".
98
COPYING BOTH SIDES OF A CARD ON ONE
SHEET OF PAPER (Card Shot)
When copying a card, this function allows you to copy the front and reverse sides together onto a single sheet of paper.
This function is convenient for making copies for identification purposes and helps save paper.
Copies
Originals
Front
Back
Example of an A4 (8-1/2" x 11")
size portrait copy
Full Colour
Colour Mode
Auto
Original
Job Detail
Settings
1
2-Sided Copy
Auto
A4
Paper Select
Output
Plain
Special Modes A4
Auto
Exposure
(1) Touch the [Job Detail Settings] key.
(2) Touch the [Paper Select] key.
Quick File
(2)
(1)
Paper Select
2
Open the paper settings screen.
Special Modes
File
100%
Copy Ratio
Example of an A4 (8-1/2" x 11")
size landscape copy
OK
A4
plain
A4R
plain
B4
plain
A3
plain
(1)
A4
Select the paper to be used.
(1) Touch the key of the desired paper size.
Plain
(2) Touch the [OK] key.
When the [OK] key is touched, you will return to the job
detail setting screen. Touch the [Job Detail Settings] key
to return to the base screen of copy mode.
(2)
Place the original face down on the
document glass.
3
99
Ready to scan for copy.
Full Colour
Colour Mode
4
2-Sided Copy
Output
Job Detail
Settings
Plain
A4
Auto
Exposure
1.
2.
3.
100%
Copy Ratio
4.
Special Modes
A4
A4R
B4
A3
File
Quick File
2/4
Covers/Inserts
Transparency
Inserts
Multi Shot
Book Copy
Tab Copy
Card Shot
Cancel
OK
Specify the original size.
OK
(1) Enter the original size.
X
86
(25
mm
210)
Size Reset
Y
54
(25
mm
210)
Fit to
Page
With the [X] key highlighted, enter the X (horizontal)
dimension of the original with the
keys.
Touch the [Y] key and enter the Y (vertical) dimension of
the original with the
keys.
(A) The [Size Reset] key can be pressed to return the
horizontal and vertical dimensions to the values set in
"Card Shot Settings" in the system settings
(administrator).
(B) To enlarge or reduce the images to fit the paper based
on the entered original size, touch the [Fit to Page]
key.
Y
(1)
(A)
keys to switch through
(1)
Special Modes
Card Shot
(1) Touch the
the screens.
(2) Touch the [Card Shot] key.
(2)
X
Select Card Shot.
OK
Special Modes
5
Touch the [Special Modes] key.
0
(B)
(2)
6
(2) Touch the [OK] key.
You will return to the base screen of copy mode. "Extra"
will appear in the original size display in the base screen.
Press the [COLOUR START] key
(
) or the [BLACK & WHITE
START] key (
) to scan the front of the
card.
or
7
To cancel scanning...
Press the [STOP] key (
).
100
Press the [COLOUR START] key
(
) or the [BLACK & WHITE
START] key (
) to scan the back of the
card.
or
8
Use the same [START] key that you used for the front side of
the card.
To cancel scanning...
Press the [STOP] key (
).
Touch the [Read-End] key.
Place next original. Press [Start].
When finished, press [Read-End].
Copying will begin.
Read-End
9
To cancel copying...
Press the [STOP] key (
).
• The original must be placed on the document glass.
• Copying is only possible on standard size paper.
• XY Zoom cannot be used when using this function.
• The image cannot be rotated when using this function.
To cancel card shot...
Touch the [Cancel] key in the screen of step 6.
System Settings (Administrator): Card Shot Settings
This is used to set the values to which the size returns when the [Size Reset] key is pressed. 25 mm to 210 mm (1" to 8-1/2")
can be entered for both the horizontal and vertical dimensions.
The factory default settings are 86 mm (3-3/8") for X (the width) and 54 mm (2-1/8") for Y (the height).
101
PRINTING THE DATE AND A STAMP ON
COPIES (Stamp)
Use this function to print the date, a stamp, the page number. and text on copies.
Six printing positions are available: top left, top centre, top right, bottom left, bottom centre, and bottom right.
The printing positions are separated into areas that are used for the date, page number and text (A below), and areas
that are used for a stamp (B below).
Top centre
Top left
Top right
A
Stamp
B
Bottom left
Maximum number
of positions
Print area
Date
A
1 position only
Stamp
B
6 positions
Page
Numbering
A
1 position only
Text
A
6 positions
Bottom right
Bottom centre
• In the event that one print item overlaps another print item, the order of placement will be as follows: item on the right side
at the front, item on the left side behind the right item, item at the centre behind the left item. Only the content that is at the
front will be printed. Content that is hidden due to overlapping will not be printed.
• Text will be printed at the preset size regardless of the copy ratio or paper size setting.
• Text will be printed at the preset exposure regardless of the exposure setting.
• Depending on the size of the paper, some printed content may be cut off or shifted out of position.
When used in combination with other special modes
When the Stamp is used in combination with other special modes, the special modes are reflected in the printed items.
Special Modes
Printing
Margin Shift
The printed item is shifted the amount of the margin width along with the image.
Dual Page Copy
The item is printed on each copy sheet.
Pamphlet Copy
Book Copy
The item is printed on each page of the resulting pamphlet or book.
Multi Shot
Card Shot
The item is printed on each copy sheet.
Covers/Inserts
Use the Stamp to select whether or not the item is printed on inserted covers/inserts.
When used in combination with "Erase", "Job Build", "Mirror Image", or "B/W Reverse", the item is printed in the set position
as usual.
102
ADDING THE DATE TO COPIES (Date)
The date can be printed on copies. The position of the date, colour, format, and page (first page only or all pages) can
be selected.
Example: Printing AUG/01/2005 in the top right corner of the paper.
AUG/01/2005
Place the original.
Place the original face up in the document feeder tray, or face
down on the document glass.
1
1
Ready to scan for copy.
0
Full Colour
Colour Mode
2
Original A4
Plain
A4
1.
2.
3.
100%
Copy Ratio
4.
A4
A4R
B4
A3
(2)
Special Modes
File
Quick File
Select Stamp.
OK
Special Modes
3
2-Sided Copy
Output
Job Detail
Settings
Auto
Exposure
Touch the [Special Modes] key.
Stamp
Image Edit
Colour
Adjustments
Quick File
File
Proof Copy
3/4
(1) Touch the
the screens.
keys to switch through
(2) Touch the [Stamp] key.
(1)
103
Layout
Stamp
Cancel
OK
1/2
Date
Stamp
Page
Numbering
Text
Select the print position.
Select from 6 positions: top left, top centre, top right, bottom
left, bottom centre, bottom right.
The keys that show the print positions will appear as follows
depending on the state of the settings.
Not selected, stamp setting has not
been selected.
Selected during selection of the stamp
setting.
4
Not available, stamp setting has already
been allocated.
The above key is the top left key. The appearance of the keys
varies by position.
• The "Date" cannot be set in a position that already has "Page Numbering" and "Text" settings.
• The "Date" cannot be set in multiple positions. If the "Date" has already been set and the [Date] key is touched at a
different position, a message will appear asking you if you wish to move the date to the selected position. If you wish
to move the date, touch the [Yes] key. If not, press the [No] key.
• If the "Date" is set without selecting a position, the date will be printed in the top right position.
Layout
Stamp
Cancel
OK
Touch the [Date] key.
1/2
5
Date
Stamp
Page
Numbering
Text
Cancel
Date
6
YYYY/MM/DD
/
MM/DD/YYYY
.
DD/MM/YYYY
-
(1)
Bk(Black)
Print Colour
AUG/01/2005
All Pages
Date Change
MM DD, YYYY
(2)
OK
First Page
Set the date format.
(1) Touch the key that shows the desired date
format.
(2) If you selected [YYYY/MM/DD],
[MM/DD/YYYY], or [DD/MM/YYYY], touch the
[/], [.], [-], or [ ] key to select the separator.
104
Cancel
Date
YYYY/MM/DD
/
MM/DD/YYYY
.
DD/MM/YYYY
-
OK
Bk(Black)
Print Colour
First Page
AUG/01/2005
All Pages
Touch the [Print Colour] key and select
the print colour.
Touch the desired colour and touch the [OK] key.
Date Change
MM DD, YYYY
OK
Print Colour
7
Bk(Black)
C(Cyan)
M(Magenta)
Y(Yellow)
If you selected a colour other than [Bk (Black)], press the [COLOUR START] key (
WHITE START] key (
) will print the date in black and white.
Cancel
Date
YYYY/MM/DD
/
MM/DD/YYYY
.
DD/MM/YYYY
-
OK
Bk(Black)
Print Colour
First Page
AUG/01/2005
All Pages
Check the displayed date. If you need to
change the date, touch the [Date
Change] key.
Set the date that you wish to use and touch the [OK] key.
Date Change
MM DD, YYYY
). Pressing the [BLACK &
OK
Date Change
8
Year
Mon
Day
2005
08
01
• If you select a date that does not exist (such as Feb. 30), the [OK] key will be greyed out to prevent entry.
• Changing the date here will not change the date that is set in the machine using "Clock" in the system settings.
Cancel
Date
9
YYYY/MM/DD
/
MM/DD/YYYY
.
DD/MM/YYYY
-
OK
Bk(Black)
Print Colour
First Page
AUG/01/2005
All Pages
Select the pages that the date will be
printed on and touch the [OK] key.
Select printing on the first page only, or printing on all pages.
Date Change
MM DD, YYYY
Layout
Stamp
Cancel
OK
Touch the
key.
1/2
10
Date
Stamp
Page
Numbering
Text
Layout
Stamp
Original Orientation
Cancel
OK
2-Sided Original Type
11
Print on Covers/Inserts when Copying on Covers/Inserts
2/2
Touch the [Original Orientation] key and
specify the orientation of the placed
original.
If 2-sided originals have been placed, touch the
key
and specify the binding position (booklet binding or tablet
binding) of the originals.
105
Layout
Stamp
Original Orientation
Cancel
If covers/inserts will be inserted, select
whether or not you want the stamp
printed on the covers/inserts.
OK
2/2
2-Sided Original Type
If not, touch the checkbox to remove the checkmark
Print on Covers/Inserts when Copying on Covers/Inserts
12
.
• When copying on covers/inserts is not selected, printing will not take place even if a checkmark appears.
• This setting cannot be selected if insertion of covers and inserts is disabled in the system settings (administrator).
Layout
Stamp
Original Orientation
Cancel
Touch the [OK] key.
OK
2-Sided Original Type
You will return to the base screen of copy mode.
2/2
13
Print on Covers/Inserts when Copying on Covers/Inserts
Press the [COLOUR START] key
(
) or the [BLACK & WHITE
START] key (
).
or
Copying will begin.
• If the originals were placed in the document feeder tray, the
originals are copied.
• If you are using the document glass, copy each page one
page at a time.
If you are using the sort function or other function that
requires all originals to be scanned before the copies are
printed, you must use the same [START] key that you used
to scan the first original to scan each of the remaining
originals.
14
• If you selected printing in colour, press the [COLOUR START] key (
). Even if colour is selected, pressing
the [BLACK & WHITE START] key (
) will print the date in black and white.
• If the date is printed in colour on a black and white copy, the copy will be included in the full colour count.
To cancel scanning of the original and copying...
Press the [STOP] key (
).
• To cancel the stamp...
Touch the [Cancel] key in the screen of step 4.
• To cancel the date print setting...
Touch the [Cancel] key in the screen of step 6.
106
STAMPING COPIES (Stamp)
Text such as "CONFIDENTIAL" can be printed in white on a dark background as a "Stamp" on copies.
The position, colour, size, density, and pages (first page only or all pages) can be selected for a stamp.
Printing "CONFIDENTIAL" in the top left corner of a copy
CONFIDENTIAL
The following 12 selections are available for the stamp text.
CONFIDENTIAL
PRIORITY
PRELIMINARY
FINAL
FOR YOUR INFO.
DO NOT COPY
IMPORTANT
COPY
URGENT
DRAFT
TOP SECRET
PLEASE REPLY
3 levels can be selected for the density of the stamp background.
4 colours can be selected for the stamp colour.
2 stamp sizes can be selected.
Place the original.
Place the original face up in the document feeder tray, or face
down on the document glass.
1
Ready to scan for copy.
0
Full Colour
Colour Mode
2
Original A4
Plain
A4
1.
2.
3.
100%
Copy Ratio
4.
A4
A4R
B4
A3
(2)
Special Modes
File
Quick File
Select Stamp.
OK
Special Modes
3
2-Sided Copy
Output
Job Detail
Settings
Auto
Exposure
Touch the [Special Modes] key.
Stamp
Image Edit
Colour
Adjustments
Quick File
File
Proof Copy
3/4
(1) Touch the
the screens.
keys to switch through
(2) Touch the [Stamp] key.
(1)
107
Layout
Stamp
Cancel
OK
1/2
Date
Stamp
Page
Numbering
Text
Select the print position.
Select from 6 positions: top left, top centre, top right, bottom
left, bottom centre, bottom right.
The keys that show the print positions will appear as follows
depending on the state of the settings.
Not selected, stamp setting has not
been selected.
4
Selected during selection of the stamp
setting.
Not available, stamp setting has already
been allocated.
The above key is the top left key. The appearance of the keys
varies by position.
If a "Stamp" is set without selecting a position, the stamp will be printed in the top left position.
Layout
Stamp
Cancel
OK
Touch the [Stamp] key.
1/2
5
Date
Stamp
Page
Numbering
Text
Cancel
Stamp
6
CONFIDENTIAL
PRIORITY
FOR YOUR INFO.
DO NOT COPY
URGENT
DRAFT
1/2
Bk 1 2 3
Bk(Black)
Size
Larger
OK
First Page
Touch the key of the stamp that you
wish to use.
All Pages
Smaller
Cancel
Stamp
CONFIDENTIAL
PRIORITY
FOR YOUR INFO.
DO NOT COPY
URGENT
1/2
Bk 1 2 3
Bk(Black)
Size
Larger
DRAFT
Smaller
OK
First Page
All Pages
Touch the [Print Colour] key and set the
colour and density.
Touch the colour that you wish to use.
If you wish to darken the selected colour, touch the
key.
If you wish to lighten the selected colour, touch the
key.
When you have finished the settings, touch the [OK] key.
OK
Print Colour
7
Bk(Black)
C(Cyan)
M(Magenta)
Y(Yellow)
If you selected a colour other than [Bk (Black)], press the [COLOUR START] key (
WHITE START] key (
) will print the stamp in black and white.
108
Exposure
). Pressing the [BLACK &
8
OK
Cancel
Stamp
CONFIDENTIAL
PRIORITY
FOR YOUR INFO.
DO NOT COPY
URGENT
DRAFT
Bk 1 2 3
Bk(Black)
1/2
Size
Larger
First Page
Touch the [Larger Smaller] key to
select the size of the stamp.
All Pages
Smaller
9
OK
Cancel
Stamp
CONFIDENTIAL
PRIORITY
FOR YOUR INFO.
DO NOT COPY
URGENT
Bk 1 2 3
Bk(Black)
1/2
Size
Larger
First Page
Select the pages that the stamp will be
printed on and touch the [OK] key.
Select printing on the first page only, or printing on all pages.
All Pages
DRAFT
Smaller
Layout
Stamp
Cancel
OK
Touch the
key.
1/2
10
Date
Stamp
Page
Numbering
Text
Layout
Stamp
Original Orientation
Cancel
OK
2/2
2-Sided Original Type
11
If 2-sided originals have been placed, touch the
key
and specify the binding position (booklet binding or tablet
binding) of the originals.
Print on Covers/Inserts when Copying on Covers/Inserts
Layout
Stamp
Original Orientation
Cancel
OK
2/2
2-Sided Original Type
If covers/inserts will be inserted, select
whether or not you want the stamp
printed on the covers/inserts.
If not, touch the checkbox to remove the checkmark
Print on Covers/Inserts when Copying on Covers/Inserts
12
Touch the [Original Orientation] key and
specify the orientation of the placed
original.
.
• When copying on covers/inserts is not selected, printing will not take place even if a checkmark appears.
• This setting cannot be selected if insertion of covers and inserts is disabled in the system settings (administrator).
Layout
Stamp
Original Orientation
Cancel
OK
2-Sided Original Type
2/2
Touch the [OK] key.
You will return to the base screen of copy mode.
13
Print on Covers/Inserts when Copying on Covers/Inserts
109
Press the [COLOUR START] key
(
) or the [BLACK & WHITE
START] key (
).
or
Copying will begin.
• If the originals were placed in the document feeder tray, the
originals are copied.
• If you are using the document glass, copy each page one
page at a time.
If you are using the sort function or other function that
requires all originals to be scanned before the copies are
printed, you must use the same [START] key that you used
to scan the first original to scan each of the remaining
originals.
14
• If you selected printing in colour, press the [COLOUR START] key (
). Even if colour is selected, pressing
the [BLACK & WHITE START] key (
) will print the stamp in black and white.
• If the stamp is printed in colour on a black and white copy, the copy will be included in the full colour count.
To cancel scanning of the original and copying...
Press the [STOP] key (
).
The stamp text cannot be edited.
• To cancel the stamp...
Touch the [Cancel] key in the screen of step 4.
• To cancel the stamp setting...
Touch the [Cancel] key in the screen of step 6.
PRINTING PAGE NUMBERS ON COPIES (Page Numbering)
Page numbers can be printed on copies.
The position, colour, format, and page number can be selected for page numbering.
Printing the page number at the bottom centre of the paper.
1
2
3
Place the original.
1
Place the original face up in the document feeder tray, or face
down on the document glass.
110
Ready to scan for copy.
0
Full Colour
Colour Mode
2
Original A4
2-Sided Copy
Output
Job Detail
Settings
Plain
A4
Auto
Exposure
1.
2.
3.
100%
Copy Ratio
4.
A4
A4R
B4
A3
Special Modes
File
Quick File
Select Stamp.
OK
Special Modes
3
Touch the [Special Modes] key.
Stamp
Image Edit
Colour
Adjustments
Quick File
File
Proof Copy
3/4
(1) Touch the
the screens.
keys to switch through
(2) Touch the [Stamp] key.
(2)
(1)
Layout
Stamp
Cancel
OK
1/2
Date
Stamp
Page
Numbering
Text
Select the print position.
Select from six positions: top left, top centre, top right, bottom
left, bottom centre, bottom right.
The keys that show the print positions will appear as follows
depending on the state of the settings.
Not selected, stamp setting has not
been selected.
Selected during selection of the stamp
setting.
4
Not available, stamp setting has already
been allocated.
The above key is the top left key. The appearance of the keys
varies by position.
• "Page Numbering" cannot be configured in a position that already has "Date" and "Text" settings.
• "Page Numbering" cannot be selected in multiple positions. If the [Page Numbering] key is touched when Page
Numbering has already been set, a message will appear asking you if you wish to move the page numbers to the
selected position. If you wish to move the page numbers, touch the [Yes] key. If not, press the [No] key.
• If "Page Numbering" is set without selecting a position, the page numbers will be printed in the bottom centre
position.
Layout
Stamp
Cancel
OK
Touch the [Page Numbering] key.
1/2
5
Date
Stamp
Page
Numbering
Text
111
Cancel
Page Numbering
Page Numbering Format
OK
Bk(Black)
Print Colour
1,2,3..
(1),(2),(3)..
-1-,-2-,-3-..
P.1,P.2,P.3..
Total Page
Auto
<1>,<2>,<3>..
1/5,2/5,3/5..
Manual
Page Number
Select a format for the page number.
If "1/5, 2/5, 3/5" is selected,
"Page number / Total pages" will be printed. "Auto" is initially
selected for the total pages, which means that the number of
scanned original pages is automatically set as the total pages.
If you need to set the total pages manually, such as when a
large number of originals are divided into sets for scanning,
touch the [Manual] key to display the total pages entry screen.
Cancel
Page Numbering
Page Numbering Format
6
OK
OK
Bk(Black)
Print Colour
1,2,3..
(1),(2),(3)..
-1-,-2-,-3-..
P.1,P.2,P.3..
Total Page
Auto
<1>,<2>,<3>..
1/5,2/5,3/5..
Manual
Total Page
1
Page
Enter the total pages (1 to 999) with the numeric keys and
touch the [OK] key.
• When 2-sided copying is performed, the total pages is the total number of sides of the paper. If the final page is
blank, it is not counted. However, if a back cover will be added and the [Count Back Cover] checkbox is selected
, the final page is counted. (See step 11.)
• When used in combination with "Dual Page Copy", "Multi Shot", or "Card Shot", the number of sides of the paper
copied on is the total pages.
• When used in combination with "Pamphlet Copy" or "Book Copy", the total number of pages in the resulting
pamphlet or booklet is the total pages.
Cancel
Page Numbering
Page Numbering Format
1,2,3..
(1),(2),(3)..
Bk(Black)
Print Colour
-1-,-2-,-3-..
P.1,P.2,P.3..
Total Page
Auto
<1>,<2>,<3>..
1/5,2/5,3/5..
Manual
OK
Touch the [Print Colour] key.
Touch the colour that you wish to use.
Touch the [OK] key.
OK
Print Colour
Page Number
7
Bk(Black)
C(Cyan)
M(Magenta)
Y(Yellow)
If you selected a colour other than [Bk (Black)], press the [COLOUR START] key (
WHITE START] key (
) will print the page numbers in black and white.
Cancel
Page Numbering
Page Numbering Format
8
1,2,3..
(1),(2),(3)..
Bk(Black)
Print Colour
-1-,-2-,-3-..
P.1,P.2,P.3..
Total Page
Auto
<1>,<2>,<3>..
1/5,2/5,3/5..
Manual
OK
Page Number
). Pressing the [BLACK &
To change the first number or last
number of page numbering, the page
from which printing begins, or the insert
printing setting, touch the [Page
Number] key.
112
OK
Page Number
First Number
Auto
Last Number
Covers/Inserts
Counting
Auto
1
Printing Starts from Page
Manual
1
(1)
Select page number settings.
(1) Touch the [Manual] key.
(2) Set the first number, the last number, and
the "Printing Starts from Page" number.
Touch each key and enter a number with the numeric
keys. (1 to 999)
The [CLEAR] key (
) can be pressed to return the
setting of the selected item to the default value. If you
make a mistake, press the [CLEAR] key (
) and then
enter the correct number.
(2)
9
• A last number smaller than the first number cannot be set.
• The "Last Number" is initially set to "Auto", which means that page numbers are automatically printed through the
last page based on the "First Number" and "Printing Start from Page" settings.
• If the last number is set to a smaller number than the total pages, page numbers are not printed on pages after the
page set as the last number.
• Set a page number in "Printing Starts from Page". For example, if "3" is set and one-sided copying is being
performed, page numbers will be printed beginning from the 3rd copy sheet (the 3rd original page). If two-sided
copying is being performed, page numbers will be printed beginning from the front side of the 2nd copy sheet (the
3rd original page).
OK
Page Number
First Number
10
Auto
1
Last Number
Covers/Inserts
Counting
Auto
Printing Starts from Page
Manual
1
OK
Covers/Inserts Counting
Count Front Cover
Count Inserts
Count Back Cover
(A)
(1)
(B)
(C) (2)
11
If covers/inserts will be inserted, touch
the [Covers/Inserts Counting] key if you
want the covers/inserts to be counted in
the page numbers.
Touch each item that you want counted
in the page numbers so that a
checkmark appears
, and then touch
the [OK] key.
Items with a checkmark
will be reflected in the print image
on the right side of the screen.
(A): Front cover image
(B): Insert image
(C): Back cover image
• When the checkboxes are selected
, each inserted sheet of paper (front cover, insert, or back cover) will be
counted as one page in the case of 1-sided copying, or two pages in the case of 2-sided copying. However, when
the body sheets are 1-sided copies and the inserted sheets are 2-sided copies, each body sheet is counted as one
page and each inserted sheet is counted as two pages.
• Page numbers are printed on covers/inserts if the covers/inserts are counted and if they are copied on.
OK
Page Number
First Number
12
Auto
Manual
1
Touch the [OK] key.
Last Number
Auto
Covers/Inserts
Counting
Printing Starts from Page
1
113
Cancel
Page Numbering
Page Numbering Format
13
1,2,3..
(1),(2),(3)..
-1-,-2-,-3-..
P.1,P.2,P.3..
<1>,<2>,<3>..
1/5,2/5,3/5..
OK
Bk(Black)
Print Colour
Total Page
1
Auto
Page Number
Manual
Layout
Stamp
Touch the [OK] key.
Cancel
OK
Touch the
key.
1/2
14
Date
Stamp
Page
Numbering
Text
Layout
Stamp
Original Orientation
Cancel
OK
2/2
2-Sided Original Type
15
If two-sided originals have been placed, touch the
key
and specify the binding position (booklet binding or tablet
binding) of the originals.
Print on Covers/Inserts when Copying on Covers/Inserts
Layout
Stamp
Original Orientation
Cancel
OK
2/2
2-Sided Original Type
Touch the [Original Orientation] key and
specify the orientation of the placed
original.
If covers/inserts will be inserted, select
whether or not you want the text printed
on the covers/inserts.
If not, touch the checkbox to remove the checkmark
Print on Covers/Inserts when Copying on Covers/Inserts
.
16
• When copying on covers/inserts is not selected, printing will not take place even if a checkmark appears.
• Page numbers are printed on covers/inserts if the covers/inserts are counted and if they are copied on.
• This setting cannot be selected if insertion of covers and inserts is disabled in the system settings (administrator).
Layout
Stamp
Original Orientation
Cancel
OK
2-Sided Original Type
2/2
Touch the [OK] key.
You will return to the base screen of copy mode.
17
Print on Covers/Inserts when Copying on Covers/Inserts
114
Press the [COLOUR START] key
(
) or the [BLACK & WHITE
START] key (
).
or
Copying will begin.
• If the originals were placed in the document feeder tray, the
originals are copied.
• If you are using the document glass, copy each page one
page at a time.
If you are using the sort function or other function that
requires all originals to be scanned before the copies are
printed, you must use the same [START] key that you used
to scan the first original to scan each of the remaining
originals.
18
• If you selected printing in colour, press the [COLOUR START] key (
). Even if colour is selected, pressing
the [BLACK & WHITE START] key (
) will print the page numbers in black and white.
• If page numbers are printed in colour on black and white copies, the copies will be included in the full colour count.
To cancel scanning of the original and copying...
Press the [STOP] key (
).
• When "Page Numbering" is selected, copying in group mode is not possible. The mode automatically changes to sort
mode.
• When the page number printing position is set to the right side or left side and pamphlet copy or book copy is used, the
print position is changed so that the page numbers always appear on the outer side of each opened page (the left and right
sides of the opened pages). If a stamp is set in the area where page numbering is set, the position of the stamp changes
together with the page number.
If another print item is set in this changing position, the page numbers will alternate sides with the stamp.
A stamp item that is in a position not affected by the changing page number position will be printed in its set position.
Example: When four pages are copied using pamphlet copy and the page number format is "1, 2, 3...", the result is as
follows:
In this example, the page number is set at the bottom of the page and the date is set at the top, and thus the
date does not move.
Print settings
AUG/01/2005
Date
Stamp
No.
Side 1
AUG/01/2005
CONFIDENTIAL
Text
4
Side 2
AUG/01/2005
CONFIDENTIAL
AAA AAA
• To cancel the stamp...
Touch the [Cancel] key in the screen of step 4.
• To cancel the page numbering setting...
Touch the [Cancel] key in the screen of step 6.
115
1
AUG/01/2005
CONFIDENTIAL
2
CONFIDENTIAL
AAA AAA
3
PRINTING TEXT ON COPIES (Text)
Entered text can be printed on copies. Up to 30 frequently used text strings can be stored.
Example: Printing "August 2005 Planning Meeting" in the top left corner of the paper
August 2005 Planning Meeting
Place the original.
Place the original face up in the document feeder tray, or face
down on the document glass.
1
1
Ready to scan for copy.
0
Full Colour
Colour Mode
2
Original A4
Plain
A4
1.
2.
3.
100%
Copy Ratio
4.
A4
A4R
B4
A3
(2)
Special Modes
File
Quick File
Select Stamp.
OK
Special Modes
3
2-Sided Copy
Output
Job Detail
Settings
Auto
Exposure
Touch the [Special Modes] key.
Stamp
Image Edit
Colour
Adjustments
Quick File
File
Proof Copy
3/4
(1) Touch the
the screens.
keys to switch through
(2) Touch the [Stamp] key.
(1)
116
Layout
Stamp
Cancel
OK
1/2
Date
Stamp
Page
Numbering
Text
Select the print position.
Select from 6 positions: top left, top centre, top right, bottom
left, bottom centre, bottom right.
The keys that show the print positions will appear as follows
depending on the state of the settings.
Not selected, stamp setting has not
been selected.
4
Selected during selection of the stamp
setting.
Not available, stamp setting has already
been allocated.
The above key is the top left key. The appearance of the keys
varies by position.
• "Text" cannot be configured in a position that already has "Date" and "Page Numbering" settings.
• If "Text" is configured without selecting a position, the text will be printed in the top left position.
Layout
Stamp
Cancel
Touch the [Text] key.
OK
1/2
5
Date
Stamp
Page
Numbering
Text
Cancel
Text
Touch the [Recall/Entry] key.
OK
First Page
6
Pre-Set
Recall/Entry
Store/Delete
Bk(Black)
Print Colour
All Pages
(2)
Cancel
Text
3
Recall
7
No.01 AAA AAA
No.04
No.02 BBB BBB
No.05
No.03
No.06
6
To store or delete a text string, touch the [Store/Delete] key.
☞ Storing, editing, and deleting text strings (page 120)
OK
Direct Entry
1/5
Specify the text to be printed.
The [Direct Entry] key can be touched to display the text entry
screen. To enter text, see "6. ENTERING TEXT" in the User's
Guide. When all characters have been entered, touch the [OK]
key.
(1) Touch the text string that you wish to
select.
(1)
The [3
6] key can be touched to switch between
3-item display and 6-item display. When 3-item display is
selected, the entire text string appears in each key.
(2) Touch the [OK] key.
117
Cancel
Text
OK
First Page
AAA AAA
Touch the [Print Colour] key.
Touch the colour that you wish to use. Touch the [OK] key.
Pre-Set
Recall/Entry
Store/Delete
OK
Print Colour
All Pages
Bk(Black)
Print Colour
8
Bk(Black)
C(Cyan)
M(Magenta)
Y(Yellow)
If you selected a colour other than [Bk (Black)], press the [COLOUR START] key (
WHITE START] key (
) will print the text in black and white.
Cancel
Text
First Page
AAA AAA
9
OK
). Pressing the [BLACK &
Select the pages that the text will be
printed on and touch the [OK] key.
Select printing on the first page only, or printing on all pages.
Pre-Set
All Pages
Recall/Entry
Bk(Black)
Print Colour
Store/Delete
Layout
Stamp
Cancel
OK
Touch the
key.
1/2
10
Date
Stamp
Page
Numbering
Text
Layout
Stamp
Original Orientation
Cancel
OK
2/2
2-Sided Original Type
11
If 2-sided originals have been placed, touch the
key
and specify the binding position (booklet binding or tablet
binding) of the originals.
Print on Covers/Inserts when Copying on Covers/Inserts
Layout
Stamp
Original Orientation
12
Cancel
OK
2-Sided Original Type
Print on Covers/Inserts when Copying on Covers/Inserts
Touch the [Original Orientation] key and
specify the orientation of the placed
original.
2/2
If covers/inserts will be inserted, select
whether or not you want the text printed
on the covers/inserts.
If not, touch the checkbox to remove the checkmark
.
• When copying on covers/inserts is not selected, printing will not take place even if a checkmark appears.
• This setting cannot be selected if insertion of covers and inserts is disabled in the system settings (administrator).
118
Layout
Stamp
Original Orientation
Cancel
Touch the [OK] key.
OK
2-Sided Original Type
You will return to the base screen of copy mode.
2/2
13
Print on Covers/Inserts when Copying on Covers/Inserts
Press the [COLOUR START] key
(
) or the [BLACK & WHITE
START] key (
).
or
Copying will begin.
• If the originals were placed in the document feeder tray, the
originals are copied.
• If you are using the document glass, copy each page one
page at a time.
If you are using the sort function or other function that
requires all originals to be scanned before the copies are
printed, you must use the same [START] key that you used
to scan the first original to scan each of the remaining
originals.
14
• If you selected printing in colour, press the [COLOUR START] key (
). Even if colour is selected, pressing
the [BLACK & WHITE START] key (
) will print the text in black and white.
• If the text is printed in colour on a black and white copies, the copies will be included in the full colour count.
To cancel scanning of the original and copying...
Press the [STOP] key (
).
Text settings can also be configured in the Web pages. Click [Application Settings], [Copy Settings] and then [Text Settings
(Stamp)] in the Web page menu.
• To cancel the stamp...
Touch the [Cancel] key in the screen of step 4.
• To cancel the text setting...
Touch the [Cancel] key in the screen of step 6.
119
Storing, editing, and deleting text strings
Ready to scan for copy.
0
Full Colour
Colour Mode
1
Original A4
2-Sided Copy
Output
Job Detail
Settings
Plain
A4
Auto
Exposure
1.
2.
3.
100%
Copy Ratio
4.
A4
A4R
B4
A3
Special Modes
File
Quick File
Select Stamp.
OK
Special Modes
2
Touch the [Special Modes] key.
Stamp
Image Edit
Colour
Adjustments
Quick File
File
Proof Copy
(2)
3/4
(1) Touch the
the screens.
keys to switch through
(2) Touch the [Stamp] key.
(1)
Layout
Stamp
Cancel
OK
Touch the [Text] key.
1/2
3
Date
Stamp
Page
Numbering
Text
Cancel
Text
OK
Touch the [Store/Delete] key.
First Page
4
Pre-Set
Recall/Entry
Store/Delete
Bk(Black)
Print Colour
All Pages
120
Store a text string, or edit/delete a stored
text string.
● Storing a text string
(1) Touch a key that has not been stored.
Text
3
Store/Delete
No.01 Do not copy
No.04
No.02 Confidential
No.05
No.03 AAA AAA
No.06
6
A text entry screen appears. Enter the text string
(maximum of 50 characters). To enter text, see "6.
ENTERING TEXT" in the User's Guide. When you have
finished entering the text, touch the [OK] key. The text
entry screen will close.
Back
1/5
(1)
● Editing/deleting a text string
5
Text
3
Store/Delete
No.01 Do not copy
No.04
No.02 Confidential
No.05
No.03 AAA AAA
No.06
6
Back
1/5
(1) Touch the key that has the text that you
wish to edit or delete.
(2) To edit the text, touch the [Amend] key. To
delete the text, touch the [Delete] key.
A text has been already stored to this
location. change the text?
Cancel
Delete
Amend
When the [Amend] key is touched, a text entry screen
appears. The selected text string is entered in the screen.
To enter text, see "6. ENTERING TEXT" in the User's
Guide. When you have finished editing the text, touch the
[OK] key. The text entry screen will close.
Text Settings can also be configured in the Web pages. Click [Application Settings], [Copy Settings] and then [Text
Settings (Stamp)] in the Web page menu.
121
CHECKING THE STAMP LAYOUT (Layout)
After stamp items have been selected, you can check the print layout, change the print position, and delete print items.
Ready to scan for copy.
2-Sided Copy
Original A4
Output
Job Detail
Settings
1
Plain
A4
Auto
Exposure
Special Modes
A4
A4R
B4
A3
1.
2.
3.
100%
Copy Ratio
4.
File
Quick File
Select Stamp.
OK
Special Modes
2
Touch the [Special Modes] key.
0
Full Colour
Colour Mode
Stamp
Image Edit
Colour
Adjustments
Quick File
File
Proof Copy
(2)
3/4
(1) Touch the
the screens.
(2) Touch the [Stamp] key.
(1)
Layout
Stamp
Cancel
Touch the [Layout] key.
OK
If the layout is correct, touch the [OK] key.
1/2
3
keys to switch through
Date
Stamp
Page
Numbering
Text
The [Layout] key can only be touched when stamp items have been selected.
1
2
3
1
AAA AAA
2
3
DO NOT COPY
CONFIDENTIAL
4
4
4
5
Touch the key of the print item that you
want to delete or whose position you
want to change.
OK
Layout
5
6
6
1,2,3..
A maximum of 14 characters appear in each key.
Do you want to move or delete the
selected item?
Cancel
5
Delete
Move
To change the position of the print item,
touch the [Move] key. To delete the item,
touch the [Delete] key.
If the [Move] key is touched, a screen for selecting the
destination position appears.
If the [Delete] key is touched, the print item is deleted. (Go to
step 8.)
122
OK
Move
Select the location to move the selected item.
Touch the key of the desired destination
position.
The touched position key is highlighted and the print position
changes.
The keys that show the print positions will appear as follows
depending on the state of the settings.
Not selected, stamp setting has not
been selected.
6
Selected during selection of the stamp
setting.
Not available, stamp setting has already
been allocated.
The above key is the top left key. The appearance of the keys
varies by position.
If you wish to swap the position of the selected print item with the position of another print item, temporarily move
either one of the print items to an unoccupied position and then switch the print positions.
OK
Move
Touch the [OK] key.
If you attempt to move the print item to a position that is already
occupied by another print item, a message will appear asking
you if you wish to overwrite the other print item. To overwrite
the other print item, touch the [Yes] key. To cancel the move,
touch the [No] key.
Select the location to move the selected item.
7
An item has been already selected to
this location. Overwrite the item?
No
OK
Layout
1
2
3
8
1
AAA AAA
2
CONFIDENTIAL
4
4
5
5
6
Touch the [OK] key.
3
DO NOT COPY
6
1,2,3..
Layout
Stamp
Cancel
OK
Touch the [OK] key.
1/2
9
Date
Stamp
Page
Numbering
Text
123
Yes
REPEATING PHOTOS ON A COPY
(Photo Repeat)
Photo Repeat is used to create repeated images of a photo-size original (130 x 90 mm size, 100 x 150 mm size,
70 x 100 mm size, 65 x 70 mm size or 57 x 100 mm size (3" x 5" size, 5" x 7" size, 2-1/2" x 4" size or 2-1/2" x 2-1/2" size
or 2-1/8" x 3-5/8" size)) on a single sheet of copy paper as shown below. Up to 24 images (when the image is
65 x 70 mm size (2-1/2" x 2-1/2" size)) can be repeated on a single sheet of paper.
• Original size (to 100 x 150 mm (5" x 7"))
• Original size (to 130 x 90 mm (3" x 5"))
Four copies are made on a
sheet of A4 (8-1/2" x 11")
size paper.
Two copies are made on a
sheet of A4 (8-1/2" x 11")
size paper.
Eight copies are made on
a sheet of A3 (11" x 17")
size paper.
Four copies are made
on a sheet of A3
(11" x 17") size paper.
• Original size (to 65 x 70 mm (2-1/2" x 2-1/2"))
• Original size (to 70 x 100 mm (2-1/2" x 4"))
12 copies are made on a
sheet of A4 (8-1/2" x 11")
size paper.
Eight copies are made on a
sheet of A4 (8-1/2" x 11")
size paper.
16 copies are made on
a sheet of A3 (11" x 17")
size paper.
24 copies are made on
a sheet of A3 (11" x 17")
size paper.
• Original size (to 57 x 100 mm (2-1/8" x 3-5/8"))
10 copies are made on a sheet
of A4 (8-1/2" x 11") size paper
(95% ratio).
Place the original face down on the
document glass.
1
• When placing an 130 x 90 mm, 100 x 150 mm,
70 x 100 mm, 65 x 70 mm or 57 x 100 mm (3" x 5", 5" x 7",
2-1/2" x 4", 2-1/2" x 2-1/2" or 2-1/8" x 3-5/8") photo size
original, place the original with the long side aligned against
the left side of the document glass.
• When placing a business card size original, place the original
with the long side aligned against the far side of the
document glass.
124
Ready to scan for copy.
Full Colour
Colour Mode
2-Sided Copy
Output
Job Detail
Settings
2
Plain
A4
Auto
Exposure
Special Modes
A4
A4R
B4
A3
1.
2.
3.
100%
Copy Ratio
4.
File
Quick File
Stamp
Image Edit
Colour
Adjustments
Quick File
File
Proof Copy
3/4
A3
Full Bleed
Multi-Page
Enlargement
Mirror
Image
Centring
B/W
Reverse
(1)
(1) Touch the key showing the original type and
paper size combination that you wish use.
(2)
OK
Image Edit
Cancel
Photo Repeat
Original Size
. 130x90mm
.
Touch the [Photo Repeat] key.
OK
Photo Repeat
keys to switch through
(1)
Image Edit
5
(1) Touch the
the screens.
(2) Touch the [Image Edit] key.
(2)
4
Select Image Edit.
OK
Special Modes
3
Touch the [Special Modes] key.
0
1/5
Repeat Type
A4/81/2x11
4
3x5"
Touch the
keys to switch through the screens
and touch the desired repeat type key (A4 or A3)
(8-1/2" x 11" or 11" x 17").
OK
A3/11x17
(2) Touch the [OK] key.
8
When the [OK] key is touched, you will return to the
special mode screen. Touch the [OK] key to return to the
base screen of the copy mode.
When making repeat copies of a business card size original (up to 57 x 100 mm (2-1/8" x 3-5/8")), only A4
(8-1/2" x 11") can be selected for the paper size.
Press the [COLOUR START] key
(
) or the [BLACK & WHITE
START] key (
).
or
Copying of the original on the document glass begins.
If you are using the sort function or other function that requires
all originals to be scanned before the copies are printed, you
must use the same [START] key that you used to scan the first
original to scan each of the remaining originals.
6
To cancel scanning of the original and copying...
Press the [STOP] key (
).
125
• The original must be placed on the document glass.
• Only A4 (8-1/2" x 11") or A3 (11" x 17") size paper can be used.
• The copy ratio is 100% when this function is used. (The ratio cannot be changed.) However, for a business card size
original (up to 57 x 100 mm (2-1/8" x 3-5/8")), the images are reduced to 95%.
To cancel the photo repeat setting...
Touch the [Cancel] key in the screen of step 5.
126
CREATING A LARGE POSTER (Multi-Page
Enlargement)
This function is used to enlarge an image of an original and print it as a composite image using multiple sheets of paper.
Original (A4 (8-1/2" x 11") size)
Copy (enlarged image on 8 sheets
of A3 (11" x 17") paper)
Ready to scan for copy.
0
Full Colour
Colour Mode
1
2-Sided Copy
Output
Job Detail
Settings
Plain
A4
Auto
Exposure
Special Modes
A4
A4R
B4
A3
1.
2.
3.
100%
Copy Ratio
4.
File
Quick File
Stamp
Image Edit
Colour
Adjustments
Quick File
File
Proof Copy
3/4
OK
A3
Full Bleed
keys to switch through
(1)
Image Edit
Photo Repeat
(1) Touch the
the screens.
(2) Touch the [Image Edit] key.
(2)
3
Select Image Edit.
OK
Special Modes
2
Touch the [Special Modes] key.
Multi-Page
Enlargement
Mirror
Image
Centring
B/W
Reverse
Touch the [Multi-Page Enlargement] key.
127
Select the size system that you wish to
use for multi-page enlargement.
A sizes
OK
Image Edit
Multi-Page Enlargement
Enlargement Size
Original Size &
(A Size)
Orientation
A2
A1
A3
A4
A0x2
A0
Cancel
OK
1/3
Touch the
keys to display the screen that shows the
desired group of sizes.
A5
B sizes
OK
Image Edit
4
Multi-Page Enlargement
Enlargement Size
Original Size &
(B Size)
Orientation
B3
B2
B4
B5
Cancel
OK
2/3
B0
B1
Inch sizes
OK
Image Edit
Multi-Page Enlargement
Enlargement Size
Original Size &
(Inch)
Orientation
81/2x14
22x17
22x34
11x17
44x68
34x44
Cancel
OK
3/3
81/2x11
Set the enlargement size and the original size.
OK
Image Edit
Multi-Page Enlargement
Enlargement Size
Original Size &
(A Size)
Orientation
A2
A1
A3
A4
A0x2
A0
(1)
Cancel
OK
1/3
(1) Select the enlargement size.
(2) Select the size of the original to be used.
A suitable original placement orientation and the number of
sheets of paper required for the enlarged image are displayed
based on the selected original size and enlargement size.
Check the placement orientation and the number of
sheets of paper to be used for the enlarged image.
The following combinations of original sizes and
enlargement sizes are possible for multi-page
enlargement.
A5
(2)
(3)
Enlargement size
A system
5
B system Inch system
A2
A1
A0
A0 x 2*
B3
B2
B1
B0
22" x 17"
22" x 34"
34" x 44"
44" x 68"
Original size
A3, A4, A5
A3, A4, A5
A3, A4
A3
B4, B5
B4, B5
B4, B5
B4
11" x 17", 8-1/2" x 14", 8-1/2" x 11"
11" x 17", 8-1/2" x 14", 8-1/2" x 11"
11" x 17", 8-1/2" x 14", 8-1/2" x 11"
11" x 17"
* The size that is twice A0 size.
An A size original cannot be enlarged to a B size, and a B size original cannot be enlarged to an A size.
128
Place the original face down on the
document glass in the orientation
indicated in the screen.
6
Ready to scan for copy. Copies will be
delivered in 2 parts.
Multi-Page Enlargement
Enlargement Size
Original Size &
(A Size)
Orientation
A2
A1
A3
A4
A0
When the [OK] key is touched, you will return to the special
mode screen. Touch the [OK] key to return to the base screen
of the copy mode.
OK
Image Edit
7
Touch the [OK] key.
0
A0x2
Cancel
OK
1/3
A5
Press the [COLOUR START] key
(
) or the [BLACK & WHITE
START] key (
).
or
Copying of the original on the document glass begins.
If you are using the sort function or other function that requires
all originals to be scanned before the copies are printed, you
must use the same [START] key that you used to scan the first
original to scan each of the remaining originals.
8
To cancel scanning of the original and copying...
Press the [STOP] key (
).
• Overlap of sections of image
• There will be a margin around the edges of each copy.
• Areas for overlapping the copies will be created at the leading and trailing edges of each copy.
• If an original size is selected first, a message will appear indicating the enlargement sizes that can be selected. If an
enlargement size is selected first, a message will appear indicating the original sizes that can be selected.
• If a combination of settings is selected for which multi-page enlargement is not possible, invalid selection beeps will sound.
• The paper size, number of sheets required for the enlarged image, and the ratio are automatically selected based on the
selected original size and enlargement size. (The paper size and ratio cannot be selected manually.)
• If no paper trays have the size of paper that was automatically selected, "Load XXX paper" will appear. Change the paper
in one of the trays or the bypass tray to the indicated size of paper.
• The original must be placed on the document glass.
To cancel the multi-page enlargement setting...
Touch the [Cancel] key in the screen of step 5.
129
REVERSING THE IMAGE (Mirror Image)
This feature is used to make a copy that is a mirror image of the original.
Originals
Mirror image copy
Place the original.
Place the original face up in the document feeder tray, or face
down on the document glass.
1
1
Ready to scan for copy.
0
Full Colour
Colour Mode
2
2-Sided Copy
Original A4
Output
Job Detail
Settings
Plain
A4
Auto
Exposure
Special Modes
A4
A4R
B4
A3
1.
2.
3.
100%
Copy Ratio
4.
File
Quick File
Stamp
Image Edit
Colour
Adjustments
Quick File
File
Proof Copy
3/4
OK
A3
Full Bleed
keys to switch through
(1)
Image Edit
Photo Repeat
(1) Touch the
the screens.
(2) Touch the [Image Edit] key.
(2)
4
Select Image Edit.
OK
Special Modes
3
Touch the [Special Modes] key.
Multi-Page
Enlargement
Mirror
Image
Centring
B/W
Reverse
(1)
Select Mirror Image.
(1) Touch the [Mirror Image] key so that it is
highlighted.
(2) Touch the [OK] key.
When the [OK] key is touched, you will return to the
special mode screen. Touch the [OK] key to return to the
base screen of the copy mode.
(2)
130
Press the [COLOUR START] key
(
) or the [BLACK & WHITE
START] key (
).
or
Copying will begin.
• If the originals were placed in the document feeder tray, the
originals are copied.
• If you are using the document glass, copy each page one
page at a time.
If you are using the sort function or other function that
requires all originals to be scanned before the copies are
printed, you must use the same [START] key that you used
to scan the first original to scan each of the remaining
originals.
5
To cancel scanning of the original and copying...
Press the [STOP] key (
).
To cancel the mirror image setting...
Touch the [Mirror Image] key in the screen of step 4 so that it is not highlighted.
131
COPYING A3 (11" x 17") SIZE ORIGINAL
WITHOUT CUTTING OFF THE EDGES
(A3 (11x17) Full Bleed)
This feature lets you copy an entire A3 (11" x 17") size original at full size with no image cut-off at the edges.
A3W (12" x 18") size is used, which is slightly larger than A3 (11" x 17") size.
A3 (12" x 18") full bleed copy
A3 (11" x 17") size original
Place the original face down on the
document glass.
1
Ready to scan for copy.
0
Full Colour
Colour Mode
2
Original
2-Sided Copy
A3
Output
Job Detail
Settings
Plain
A4
Auto
Exposure
Special Modes
A4
A4R
B4
A3
1.
2.
3.
100%
Copy Ratio
4.
File
Quick File
Stamp
Image Edit
Colour
Adjustments
Quick File
File
Proof Copy
3/4
OK
A3
Full Bleed
(1)
keys to switch through
(1)
Image Edit
Photo Repeat
(1) Touch the
the screens.
(2) Touch the [Image Edit] key.
(2)
4
Select Image Edit.
OK
Special Modes
3
Touch the [Special Modes] key.
Select A3 Full Bleed (11x17 Full Bleed).
Multi-Page
Enlargement
Mirror
Image
(1) Touch the [A3 Full Bleed] key ([11x17 Full
Bleed] key) so that it is highlighted.
Centring
B/W
Reverse
(2) Touch the [OK] key.
When the [OK] key is touched, you will return to the
special mode screen. Touch the [OK] key to return to the
base screen of the copy mode.
(2)
132
Place A3W (12" x 18") paper in the
bypass tray.
Pull out the extension tray, adjust the guides to the width of
A3W (12" x 18") paper, and place the paper in the bypass tray.
5
Full Colour
Colour Mode
Auto
Original
Job Detail
Settings
6
2-Sided Copy
A3W
Paper Select
Output
Plain
Special Modes A3W
Auto
Exposure
(1) Touch the [Job Detail Settings] key.
Special Modes
File
100%
Copy Ratio
Open the paper settings screen.
(2) Touch the [Paper Select] key.
Quick File
(2)
(1)
Paper Select
OK
A4
Plain
A4R
Plain
B4
Plain
A3
Plain
A3W
Select settings for A3W (12" x 18")
paper.
Plain
(1) Touch the appropriate paper type key.
Touch the key that shows the type of A3W (12" x 18")
paper you loaded.
(1)
(3)
Cancel
Bypass Tray Type/Size Setting
Select the paper type.
1/2
7
Plain
Letter Head
Thin Paper
Transparency
Pre-Printed
Pre-Punched
Heavy Paper
Tab Paper
Recycled
Colour
Labels
Envelope
1/2
(2) Touch the [OK] key.
Type
Bypass Tray Type/Size Setting
Type
Plain
Auto-Inch
Auto-AB
Custom Size
Size
12x18,11x17,81/2x14
81/2x11,81/2x11R,51/2x81/2R
71/4x101/2R,A3,A4,B4,B5
A3W,A3,A4,A4R,A5R,B4
B5,B5R,216x330(81/2x13)
11x17,81/2x11
OK
8K
16K
16KR
X420 Y297
2/2
(3) Touch the [OK] key.
When the [OK] key is touched, you will return to the job
detail setting screen. Touch the [Job Detail Settings] key
to return to the base screen of copy mode.
133
Press the [COLOUR START] key
(
) or the [BLACK & WHITE
START] key (
).
or
Copying of the original on the document glass begins.
If you are using the sort function or other function that requires
all originals to be scanned before the copies are printed, you
must use the same [START] key that you used to scan the first
original to scan each of the remaining originals.
8
To cancel scanning of the original and copying...
Press the [STOP] key (
).
• This function can be used when a right tray, a finisher, or a saddle stitch finisher is installed.
• The copy ratio is 100% when this function is used. The ratio cannot be changed.
• Automatic 2-sided copying is not possible.
• The punch function cannot be used.
• The original must be placed on the document glass.
To cancel A3 Full Bleed (11x17 Full Bleed)...
Touch the [A3 Full Bleed] key ([11x17 Full Bleed] key) in the screen of step 4 so that it is not highlighted.
134
COPYING IN THE CENTRE OF THE PAPER
(Centring)
This is used to centre the copied image on the paper.
This lets you place the image in the centre of the paper when the original size is smaller than the paper size or when the
image is reduced.
Not using the centring function
Using the centring function
Place the original.
Place the original face up in the document feeder tray, or face
down on the document glass.
1
1
Ready to scan for copy.
0
Full Colour
Colour Mode
2
2-Sided Copy
Original A4
Output
Job Detail
Settings
Plain
A4
Auto
Exposure
Special Modes
A4
A4R
B4
A3
1.
2.
3.
100%
Copy Ratio
4.
File
Quick File
Stamp
Image Edit
Colour
Adjustments
Quick File
File
Proof Copy
3/4
OK
A3
Full Bleed
keys to switch through
(1)
Image Edit
Photo Repeat
(1) Touch the
the screens.
(2) Touch the [Image Edit] key.
(2)
4
Select Image Edit.
OK
Special Modes
3
Touch the [Special Modes] key.
Select Centring.
Multi-Page
Enlargement
Mirror
Image
(1) Touch the [Centring] key so that it is
highlighted.
Centring
B/W
Reverse
(2) Touch the [OK] key.
(1)
When the [OK] key is touched, you will return to the
special mode screen. Touch the [OK] key to return to the
base screen of the copy mode.
(2)
135
Press the [COLOUR START] key
(
) or the [BLACK & WHITE
START] key (
).
or
Copying will begin.
• If the originals were placed in the document feeder tray, the
originals are copied.
• If you are using the document glass, copy each page one
page at a time.
If you are using the sort function or other function that
requires all originals to be scanned before the copies are
printed, you must use the same [START] key that you used
to scan the first original to scan each of the remaining
originals.
5
To cancel scanning of the original and copying...
Press the [STOP] key (
).
• The image can be reduced when using the Centring function, but not enlarged.
• When the original size or the paper size is displayed as a special size, this function cannot be used.
To cancel centring...
Touch the [Centring] key in the screen of step 4 so that it is not highlighted.
136
REVERSING BLACK AND WHITE IN A COPY
(B/W Reverse)
This is used to reverse black and white in a copy to create a negative image. This function can only be used for black
and white copying.
Originals with large black areas (which use a large amount of toner) can be copied using Black/White Reverse to reduce
toner consumption.
Originals
B/W Reverse copy
Place the original.
Place the original face up in the document feeder tray, or face
down on the document glass.
1
1
Ready to scan for copy.
0
Full Colour
Colour Mode
2
2-Sided Copy
Original A4
Output
Job Detail
Settings
Plain
A4
Auto
Exposure
Special Modes
A4
A4R
B4
A3
1.
2.
3.
100%
Copy Ratio
4.
File
Quick File
Stamp
Image Edit
Colour
Adjustments
Quick File
File
Proof Copy
3/4
OK
A3
Full Bleed
keys to switch through
(1)
Image Edit
Photo Repeat
(1) Touch the
the screens.
(2) Touch the [Image Edit] key.
(2)
4
Select Image Edit.
OK
Special Modes
3
Touch the [Special Modes] key.
Multi-Page
Enlargement
Mirror
Image
Centring
B/W
Reverse
(1)
Select B/W Reverse.
(1) Touch the [B/W Reverse] key so that it is
highlighted.
(2) Touch the [OK] key.
When the [OK] key is touched, you will return to the
special mode screen. Touch the [OK] key to return to the
base screen of the copy mode.
(2)
137
Press the [BLACK & WHITE START] key
(
).
Copying will begin.
• If the originals were placed in the document feeder tray, the
originals are copied.
• If you are using the document glass, copy each page one
page at a time.
5
When using this function, the [COLOUR START] key (
) cannot be used.
To cancel scanning of the original and copying...
Press the [STOP] key (
).
• When this function is selected, the exposure mode setting automatically changes to "Text".
• This function is not available in some countries and regions.
To cancel B/W reverse...
Touch the [B/W Reverse] key in the screen of step 4 so that it is not highlighted.
138
ADJUSTING RED/GREEN/BLUE IN COPIES
(RGB Adjust)
This feature is used to strengthen or weaken any one of the three colour components R (red), G (green), or B (blue).
For an image adjustment example, see "Adjusting red/green/blue in copies (RGB Adjust)" in the Quick Start Guide.
Place the original.
Place the original face up in the document feeder tray, or face
down on the document glass.
1
1
Ready to scan for copy.
0
Full Colour
Colour Mode
2
Original A4
Plain
A4
1.
2.
3.
100%
Copy Ratio
2-Sided Copy
Output
Job Detail
Settings
Auto
Exposure
4.
A4
A4R
B4
A3
Special Modes
File
Quick File
OK
Special Modes
3
Stamp
Image Edit
Colour
Adjustments
Quick File
File
Proof Copy
(2)
3/4
Select Colour Adjustments.
(1) Touch the
the screens.
keys to switch through
(2) Touch the [Colour Adjustments] key.
(1)
OK
Colour
Adjustments
4
Touch the [Special Modes] key.
RGB Adjust
Sharpness
Suppress
Background
Colour Balance
Brightness
Intensity
Touch the [RGB Adjust] key.
139
Colour
Adjustments
Adjust red, green, or blue.
OK
Cancel
RGB Adjust
OK
(1) Touch the key of the colour that you wish to
adjust: [R (Red)], [G (Green)], or [B (Blue)].
Only one colour can be adjusted.
R(Red)
5
G(Green)
(1)
Only one colour can be adjusted. (If you adjust one colour
and then adjust another colour, the adjustment of the first
colour is cancelled.)
B(Blue)
(2)
(3)
(2) Adjust the selected colour.
Touch the [+] key to strengthen the selected colour, or
touch the [-] key to weaken the colour.
(3) Touch the [OK] key.
When the [OK] key is touched, you will return to the
special mode screen. Touch the [OK] key to return to the
base screen of the copy mode.
Press the [COLOUR START] key
(
).
Copying will begin.
• If the originals were placed in the document feeder tray, the
originals are copied.
• If you are using the document glass, copy each page one
page at a time.
6
To cancel scanning of the original and copying...
Press the [STOP] key (
).
To cancel the RGB adjust setting...
Touch the [Cancel] key in the screen of step 5.
140
ADJUSTING THE SHARPNESS OF AN
IMAGE (Sharpness)
This is used to sharpen an image or make it softer.
For an image adjustment example, see "Adjusting the sharpness of an image (Sharpness)" in the Quick Start Guide.
Place the original.
Place the original face up in the document feeder tray, or face
down on the document glass.
1
1
Ready to scan for copy.
0
Full Colour
Colour Mode
2
Original A4
2-Sided Copy
Output
Job Detail
Settings
Plain
A4
Auto
Exposure
A4
A4R
B4
A3
1.
2.
3.
100%
Copy Ratio
4.
Special Modes
File
Quick File
OK
Special Modes
3
Stamp
Image Edit
Colour
Adjustments
Quick File
File
Proof Copy
3/4
OK
RGB Adjust
Sharpness
Suppress
Background
Colour Balance
Brightness
Intensity
(1)
(2)
Colour
Adjustments
Cancel
Sharpness
Soft
(1) Touch the
the screens.
keys to switch through
(1)
Colour
Adjustments
5
Select Colour Adjustments.
(2) Touch the [Colour Adjustments] key.
(2)
4
Touch the [Special Modes] key.
Touch the [Sharpness] key.
Adjust the image.
OK
(1) Touch the [Soft] key or the [Sharp] key.
OK
(2) Touch the [OK] key.
When the [OK] key is touched, you will return to the
special mode screen. Touch the [OK] key to return to the
base screen of the copy mode.
Sharp
141
Press the [COLOUR START] key
(
).
Copying will begin.
• If the originals were placed in the document feeder tray, the
originals are copied.
• If you are using the document glass, copy each page one
page at a time.
6
To cancel scanning of the original and copying...
Press the [STOP] key (
).
To cancel the sharpness setting...
Touch the [Cancel] key in the screen of step 5.
142
WHITENING FAINT COLOURS IN COPIES
(Suppress Background)
This feature is used to suppress light background areas.
Level [+]
The lightness level at which
suppression takes place
can be adjusted.
Light areas
are suppressed.
Level [-]
Place the original.
Place the original face up in the document feeder tray, or face
down on the document glass.
1
1
Ready to scan for copy.
0
Full Colour
Colour Mode
2
Original A4
Output
Job Detail
Settings
Auto
Exposure
Plain
A4
1.
2.
3.
100%
Copy Ratio
4.
A4
A4R
B4
A3
Special Modes
File
Quick File
OK
Special Modes
3
Stamp
Image Edit
Colour
Adjustments
Quick File
File
Proof Copy
(2)
3/4
Select Colour Adjustments.
(1) Touch the
the screens.
keys to switch through
(2) Touch the [Colour Adjustments] key.
(1)
OK
Colour
Adjustments
4
Touch the [Special Modes] key.
2-Sided Copy
RGB Adjust
Sharpness
Suppress
Background
Colour Balance
Brightness
Intensity
Touch the [Suppress Background] key.
143
Select suppress background settings.
(2)
Colour
Adjustments
(1) Adjust the background suppression level.
OK
Cancel
Suppress Background
To strengthen the background suppression level
(suppress darker backgrounds), touch the [-] key. To
weaken the level (suppress only light backgrounds), touch
the [+] key.
OK
Light areas of the original may be suppressed as background.
5
(2) Touch the [OK] key.
(1)
When the [OK] key is touched, you will return to the
special mode screen. Touch the [OK] key to return to the
base screen of the copy mode.
Press the [COLOUR START] key
(
).
Copying will begin.
• If the originals were placed in the document feeder tray, the
originals are copied.
• If you are using the document glass, copy each page one
page at a time.
6
To cancel scanning of the original and copying...
Press the [STOP] key (
).
To cancel the suppress background settings...
Touch the [Cancel] key in the screen of step 5.
144
ADJUSTING THE COLOUR (Colour Balance)
The colour, tone, and density of colour copies can be adjusted.
For an image adjustment example, see "Adjusting the colour (Colour Balance)" in the Quick Start Guide.
1
2
3
4
5
6
7
8
1
2
3
4
5
6
7
8
Cancel
Colour Balance
Y
M
C
Bk
Each of the colours yellow, cyan, magenta, and black
are divided into 8 gradations from light to dark, and the
average density of each gradation can be adjusted,
Each of the 8 gradations can be adjusted separately, or
all eight gradations can be adjusted at once.
Dark
Light
OK
All
Place the original.
Place the original face up in the document feeder tray, or face
down on the document glass.
1
1
Ready to scan for copy.
0
Full Colour
Colour Mode
2
Original A4
Plain
A4
1.
2.
3.
100%
Copy Ratio
2-Sided Copy
Output
Job Detail
Settings
Auto
Exposure
4.
A4
A4R
B4
A3
Special Modes
File
Quick File
OK
Special Modes
3
Stamp
Image Edit
Colour
Adjustments
Quick File
File
Proof Copy
(2)
3/4
Select Colour Adjustments.
(1) Touch the
the screens.
keys to switch through
(2) Touch the [Colour Adjustments] key.
(1)
OK
Colour
Adjustments
4
Touch the [Special Modes] key.
RGB Adjust
Sharpness
Suppress
Background
Colour Balance
Brightness
Intensity
Touch the [Colour Balance] key.
145
Adjust the colour balance.
(4)
Examples of colour balance adjustment
Colour
Adjustments
OK
Cancel
Colour Balance
1
Y
M
C
Bk
(1)
2
3
4
5
6
7
8
The settings of all gradations
are moved toward +
OK
All
The settings of all gradations
are moved toward -
(2), (3)
(1) Select the colour to be adjusted.
Select [Y] (yellow), [M] (magenta), [C] (cyan), or [Bk]
(black).
If only the rectangular area around the letter in a key is
highlighted, the settings have been changed from the
factory default settings.
(2) Select the gradation to be adjusted.
5
Select the gradation with the
keys.
Touch the
keys to move the highlighting to one
of gradations "1" to "8" or "All".
To adjust all eight gradations at once, move the
highlighting to "All".
(3) Adjust the density.
To darken the density of the selected gradation, touch the
key. To lighten the density, touch the
key. Each
time one of the keys is touched, the indicator frame
moves up or down one level.
(4) Touch the [OK] key.
When the [OK] key is touched, you will return to the
special mode screen. Touch the [OK] key to return to the
base screen of the copy mode.
To return the colour balance values to the default settings...
Touch the
key. The values of all 8 gradations return to the default colour balance values.
The default colour balance values are set in "Initial Colour Balance Setting" in the system settings (administrator).
Press the [COLOUR START] key (
).
Copying will begin.
• If the originals were placed in the document feeder tray, the
originals are copied.
• If you are using the document glass, copy each page one
page at a time.
6
To cancel scanning of the original and copying...
Press the [STOP] key (
).
To cancel the colour balance setting...
Touch the [Cancel] key in the screen of step 5.
System Settings (Administrator): Initial Colour Balance Setting
This is used to set the default values to which the colour balance values return when the
146
key is pressed.
ADJUSTING THE BRIGHTNESS OF A COPY
(Brightness)
The brightness of colour images can be adjusted.
For an image adjustment example, see "Adjusting the brightness of a copy (Brightness)" in the Quick Start Guide.
Place the original.
Place the original face up in the document feeder tray, or face
down on the document glass.
1
1
Ready to scan for copy.
2
Original A4
Plain
A4
A4
A4R
B4
A3
1.
2.
3.
100%
Copy Ratio
2-Sided Copy
Output
Job Detail
Settings
Auto
Exposure
4.
Special Modes
File
Quick File
Stamp
Image Edit
Colour
Adjustments
Quick File
File
Proof Copy
3/4
Touch the [Brightness] key.
OK
RGB Adjust
Sharpness
Suppress
Background
Colour Balance
Brightness
Intensity
Colour
Adjustments
Adjust the brightness.
OK
Cancel
Brightness
keys to switch through
(1)
Colour
Adjustments
5
(1) Touch the
the screens.
(2) Touch the [Colour Adjustments] key.
(2)
4
Select Colour Adjustments.
OK
Special Modes
3
Touch the [Special Modes] key.
0
Full Colour
Colour Mode
OK
(1) Adjust the brightness.
Touch the [+] key to make the image brighter, or the [-]
key to make the image darker.
2 0 2
(2) Touch the [OK] key.
(1)
(2)
147
When the [OK] key is touched, you will return to the
special mode screen. Touch the [OK] key to return to the
base screen of the copy mode.
Press the [COLOUR START] key
(
).
Copying will begin.
• If the originals were placed in the document feeder tray, the
originals are copied.
• If you are using the document glass, copy each page one
page at a time.
6
To cancel scanning of the original and copying...
Press the [STOP] key (
).
To cancel the brightness setting...
Touch the [Cancel] key in the screen of step 5.
148
ADJUSTING THE INTENSITY OF A COPY
(Intensity)
This is used to adjust the intensity (saturation) of colour images.
For an image adjustment example, see "Adjusting the intensity of a copy (Intensity)" in the Quick Start Guide.
Place the original.
Place the original face up in the document feeder tray, or face
down on the document glass.
1
1
Ready to scan for copy.
0
Full Colour
Colour Mode
2
Original A4
Plain
A4
1.
2.
3.
100%
Copy Ratio
2-Sided Copy
Output
Job Detail
Settings
Auto
Exposure
4.
A4
A4R
B4
A3
Special Modes
File
Quick File
OK
Special Modes
3
Stamp
Image Edit
Colour
Adjustments
Quick File
File
Proof Copy
3/4
OK
RGB Adjust
Sharpness
Suppress
Background
Colour Balance
Brightness
Intensity
(1)
Colour
Adjustments
5
Cancel
2 0
2
(1) Touch the
the screens.
keys to switch through
(1)
Colour
Adjustments
Intensity
Select Colour Adjustments.
(2) Touch the [Colour Adjustments] key.
(2)
4
Touch the [Special Modes] key.
Touch the [Intensity] key.
(2)
Adjust the intensity.
OK
(1) Adjust the intensity.
Touch the [+] key to strengthen the intensity, or the [-] key
to weaken the intensity.
OK
(2) Touch the [OK] key.
You will return to the base screen of copy mode.
149
Press the [COLOUR START] key
(
).
Copying will begin.
• If the originals were placed in the document feeder tray, the
originals are copied.
• If you are using the document glass, copy each page one
page at a time.
6
To cancel scanning of the original and copying...
Press the [STOP] key (
).
This function cannot be used in combination with "Colour Tone Enhancement" in the copy exposure settings.
To cancel the intensity setting...
Touch the [Cancel] key in the screen of step 5.
150
CHECKING COPIES BEFORE PRINTING
(Proof Copy)
This feature prints only one set of copies, regardless of how many sets have been specified. After the first set is checked
for errors, the remaining sets can be printed. Normally it is necessary to re-scan the original each time changes to
settings are required. However, this feature makes it possible to change settings for the scanned original without
scanning it again, allowing you perform copying more efficiently.
If OK
A
A
AA
A
A
AA
A
A
AA
A
A
AA
5 sets of copies are specified
1 set of copies is printed
Adjust the
settings
A
A
AA
A
A
AA
The remaining 4 sets are printed
If OK
A
A
AA
A
A
AA
A
A
AA
1 set is printed after the
settings are adjusted
A
A
AA
A
A
AA
The remaining 4 sets are printed
Place the original.
Place the original face up in the document feeder tray, or face
down on the document glass.
1
1
Full Colour
Colour Mode
2
Auto
Original
2-Sided Copy
Auto
A4
Paper Select
Job Detail
Settings
Plain
Special Modes A4
Auto
Exposure
Special Modes
File
100%
Copy Ratio
Quick File
Ready to scan for copy.
0
Full Colour
Colour Mode
3
Original A4
Plain
A4
1.
2.
3.
100%
Copy Ratio
Touch the [Special Modes] key.
2-Sided Copy
Output
Job Detail
Settings
Auto
Exposure
Select copy settings.
Output
4.
A4
A4R
B4
A3
Special Modes
File
Quick File
151
OK
Special Modes
4
Stamp
Image Edit
Colour
Adjustments
Quick File
File
Proof Copy
(2)
3/4
(3) (1)
keys to switch through
(3) Touch the [OK] key.
Press the [COLOUR START] key
(
) or the [BLACK & WHITE
START] key (
).
5
).
If there are no problems with the first set
that is printed, touch the [End] key. If
you need to make changes, touch the
[Change] key.
Press [End] to continue.
To make a proof copy again, press
[Start].
Change
End
6
If the [End] key is touched, the remaining sets are printed.
If you touched the [Change] key, go to the next step.
To cancel copying...
Press the [STOP] key (
).
OK
Proof Copy
7
(1) Touch the
the screens.
(2) Touch the [Proof Copy] key.
or
To cancel copying...
Press the [STOP] key (
Select Proof Copy.
Colour Mode
Paper Select
Output
Special
Modes
2-Sided Copy
Select the settings that you wish to
change.
After changing a setting, touch the [OK] key in that screen. You
will return to this screen.
• Special modes that can be adjusted are margin shift, pamphlet copy, tandem copy, covers/inserts, transparency
inserts, multi shot, and stamp.
• For pamphlet copy, covers/inserts and multi shot, only changes to the settings of those functions can be made;
neither of these functions can be newly added or deleted.
• For the transparency insert function, settings can be changed and the function can be newly added when changes
are made to the settings; however, if the transparency insert function has been previously selected, it cannot be
cancelled.
OK
Proof Copy
8
Colour Mode
Paper Select
Output
Special
Modes
Touch the [OK] key.
2-Sided Copy
152
Press the [COLOUR START] key
(
) or the [BLACK & WHITE
START] key (
).
or
One set of copies is printed again using the adjusted settings.
The number of sets does not change at this time.
If settings must be adjusted again, repeat steps 6 through 9
until there are no problems.
When you are ready to print the remaining sets, go to the next
step.
9
Touch the [End] key.
Press [End] to continue.
To make a proof copy again, press
[Start].
Change
You will return to the base screen of copy mode and the
remaining sets will be printed.
End
10
To cancel scanning of the original and copying...
Press the [STOP] key (
).
If proof copy is performed when the machine is already printing a copy job or other job, the job in progress will stop
temporarily and the set of proof copies will be printed. The previous job will resume after the proof copies are printed.
When the [End] key is touched, printing of the remaining sets will start after the copy job in progress is completed.
153
COPYING ORIGINALS OF DIFFERENT SIZES
(Mixed Size Original)
Originals of mixed sizes can be copied together, such as A3 (11" x 17") originals mixed in with B4 (8-1/2" x 14")
originals. When scanning the originals, the machine automatically detects the size of each original and uses paper
appropriate for that size.
Copies
Originals
B4
B4
A3
A3
There are two settings for mixed size originals.
Same Width
Different Width
Use this setting for originals that are different sizes but have sides that are the same length. The
originals are inserted in the document feeder tray with the sides that are the same length aligned
together on the left.
A3 and A4, B4 and B5, A4R and A5 (11" x 17" and 8-1/2" x 11", 8-1/2" x 14" and 8-1/2" x 11"R,
8-1/2" x 14" and 5-1/2" x 8-1/2", 8-1/2" x 13" and 8-1/2" x 11"R, 8-1/2" x 13" and 5-1/2" x 8-1/2",
8-1/2" x 11"R and 5-1/2" x 8-1/2")
Use this setting when the originals are different sizes and do not have sides that are the same length.
This setting can only be used for the following combinations of sizes:
A3 and B4, B4 and A4R, A4 and B5, B5 and A5 (11" x 17" and 8-1/2" x 14", 11" x 17" and
8-1/2" x 13", 11" x 17" and 5-1/2 x 8-1/2")
154
Insert the originals face up in the
document feeder tray.
● When "Same Width" is used
Place with the sides that
are the same length aligned
on the left.
Place the originals with the sides that are the same length
aligned on the left.
A3 (11" x 17")
A4 (8-1/2" x 11")
1
● When "Different Width" is used
Place the originals aligned
to the far left corner.
B4
(8-1/2" x 14")
Place the originals with the corners aligned in the far left corner
of the document feeder tray.
B4
(8-1/2" x 14")
A3 (11" x 17")
Ready to scan for copy.
0
Full Colour
Colour Mode
2
Original
Output
Job Detail
Settings
Auto
Exposure
100%
Copy Ratio
Plain
A4
1.
2.
3.
4.
A4
A4R
B4
A3
Special Modes
File
Quick File
OK
Special Modes
Mixed Size
Original
A3
Touch the [Special Modes] key.
2-Sided Copy
4/4
Slow Scan
Mode
3
Select Mixed Size Original.
(1) Touch the
the screens.
keys to switch through
(2) Touch the [Mixed Size Original] key.
(2)
(1)
155
Select Mixed Size Original settings.
(2)
Cancel
Mixed Size Original
4
(1) Touch the [Same Width] key or the
[Different Width] key as appropriate for the
originals.
OK
Special Modes
OK
Place the same width
originals.
Same Width
(2) Touch the [OK] key.
Different
Width
You will return to the base screen of copy mode.
(1)
Press the [COLOUR START] key
(
) or the [BLACK & WHITE
START] key (
).
or
5
Copying of the originals in the document feeder tray begins.
To cancel scanning of the original and copying...
Press the [STOP] key (
).
• When "Different Width" is used on the MX-3501N/4501N, "2-Sided to 2-Sided" and "2-Sided to 1-Sided" of automatic
two-sided copying can be used.
On other models, automatic two-sided copying cannot be used.
• When "Different Width" is used, the staple function cannot be used.
• "Different Width" cannot be used to place the same size of originals in different orientations.
To cancel the mixed size original setting...
Touch the [Cancel] key in the screen of step 4.
156
COPYING THIN ORIGINALS
(Slow Scan Mode)
Use this function when you wish to scan thin originals using the automatic document feeder. This function helps prevent
thin originals from misfeeding.
A
A
B
C
D
C
D
Place the originals face up in the
document feeder tray with the edges
aligned evenly.
1
Indicator
line
B
Place the originals face up. Insert the originals all the way into
the document feeder tray. The stack must not be higher than
the indicator line.
1
If the originals are inserted with too much force, they may crumple and misfeed.
Ready to scan for copy.
0
Full Colour
Colour Mode
2
Original A4
Output
Job Detail
Settings
Auto
Exposure
Plain
A4
1.
2.
3.
100%
Copy Ratio
4.
A4
A4R
B4
A3
Special Modes
File
Quick File
OK
Special Modes
Mixed Size
Original
Touch the [Special Modes] key.
2-Sided Copy
4/4
Slow Scan
Mode
3
Select Slow Scan Mode.
(1) Touch the
the screens.
keys to switch through
(2) Touch the [Slow Scan Mode] key so that it is
highlighted.
(2)
(3) (1)
(3) Touch the [OK] key.
You will return to the base screen of copy mode.
157
Press the [COLOUR START] key
(
) or the [BLACK & WHITE
START] key (
).
or
4
Copying of the originals in the document feeder tray begins.
To cancel scanning of the original and copying...
Press the [STOP] key (
).
The "2-Sided to 2-Sided" and "2-Sided to 1-Sided" modes of automatic two-sided copying cannot be used.
To cancel the slow scan mode setting...
Touch the [Slow Scan Mode] key in the screen of step 3 so that it is not highlighted.
158
STORING COPY OPERATIONS (Job Programs)
A job program is a group of copy settings stored together. When copy settings are stored in a job program, the settings
can be called up and used for a copy job by means of a simple operation.
For example, suppose A3 (11" x 17") size CAD drawings are copied once a month for archive purposes using the
following settings:
(1) The A3 (11" x 17") size CAD drawings are reduced to A4 (8-1/2" x 11") size.
(2) The drawings have fine lines that do not show clearly, and thus a dark exposure setting (level 4) is used.
(3) To reduce paper use by a half, 2-sided copying is used.
(4) Margin shift is used so that holes can be punched for filing.
A3 (11" x 17") size CAD drawings
Copies
When a job program is not stored
When a job program is stored
Set A3 (11" x 17") to A4 (8-1/2" x 11") reduction
Press the [Program] key (
).
Change the exposure setting
Exit
Job Programs
Press program number.
Select 2-sided copying
1/6
1
2
3
4
5
6
7
8
Store/Delete
Recall
Select margin shift
Touch the stored program key.
Select punch hole settings
or
or
Press the [COLOUR START] key or the [BLACK & WHITE
START] key.
Press the [COLOUR START] key or the [BLACK & WHITE
START] key.
Considerable time is required to copy the drawings each
month because the above settings must be selected.
In addition, mistakes are occasionally made when selecting
the settings, so some copies must be redone.
The settings are stored in a job program, so they can be
selected by the touch of a key. This is simple and takes no time.
In addition, the settings are all stored so there are no chances for
mistakes, and thus no need to redo copies due to setting mistakes.
• Up to 48 job programs can be stored. The job programs are retained even if an interruption occurs in the power supply.
• Job programs can also be stored in the Web pages. Click [Job Program Registration] and then [Copier] in the Web page
menu to store a job program.
159
STORING A JOB PROGRAM
The procedure for storing copy settings in a job program is explained below.
Press the [PROGRAM] key (
).
1
LOGOUT
Press program number.
2
1/6
1
2
3
4
5
6
7
8
Store/Delete
Recall
Touch a numeric key that is not
highlighted.
Exit
Job Programs
Press program number.
1/6
1
2
3
4
5
6
7
8
Numeric keys in which job programs are already stored are
highlighted.
Store/Delete
Recall
3
Touch the [Store/Delete] tab.
Exit
Job Programs
If a highlighted numeric key is touched, the following screen appears.
The [Store] key can be touched to delete the stored settings and store new settings.
A job program has been already stored
in this location.
Cancel
Delete
Store
When "Disabling Deletion of Job Programs" is enabled in the system settings (administrator), this function cannot be used.
To store, make selections and press
[OK], to delete, press [Cancel].
Full Colour
Colour Mode
Cancel
Original A4
4
100%
Copy Ratio
2-Sided Copy
Output
Job Detail
Settings
Auto
Exposure
OK
Plain
A4
1.
2.
3.
4.
A4
A4R
B4
A3
A4
Program Name
Select the copy settings that you wish to
store in the job program and touch the
[OK] key.
To assign a name to the program, touch the [Program Name]
key. A text entry screen will appear.
Up to 10 characters can be entered for the name.
To enter text, see "6. ENTERING TEXT" in the User's Guide.
When you have finished entering the name, touch the [OK] key.
The number of copies cannot be stored.
160
Press program number.
5
Touch the [Exit] key.
Exit
Job Programs
1/6
1
2
3
4
5
6
7
8
Store/Delete
Recall
DELETING A JOB PROGRAM
The procedure for deleting a job program is explained below.
Press the [PROGRAM] key (
).
1
LOGOUT
Exit
Job Programs
Press program number.
2
1/6
1
2
3
4
5
6
7
8
Store/Delete
Recall
Exit
Job Programs
Press program number.
3
1/6
1
2
3
4
5
6
7
8
A job program has been already stored
in this location.
Cancel
Touch the numeric key in which the job
program that you wish to delete is
stored.
Store/Delete
Recall
4
Touch the [Store/Delete] tab.
Delete
Touch the [Delete] key.
Store
161
Exit
Job Programs
Press program number.
5
1/6
1
2
3
4
5
6
7
8
Recall
Touch the [Exit] key.
Store/Delete
When "Disabling Deletion of Job Programs" is enabled in the system settings (administrator), this function cannot be used.
162
APPENDIX
Examples of covers and inserts
The relations between the originals and finished copies when covers or inserts are inserted are shown on the following
pages.
Covers
• 1-sided copying of 1-sided originals
• 2-sided copying of 1-sided originals
• 1-sided copying of 2-sided originals
• 2-sided copying of 2-sided originals
Inserts
• 1-sided copying of 1-sided originals
• 1-sided copying of 2-sided originals
• 2-sided copying of 1-sided originals
• 2-sided copying of 2-sided originals
Symbols used for covers and inserts
Symbol
Meaning
Icon
appearing
in display
Type
Type
The following symbols are used to make the explanations easier to understand.
The numbers that appear indicate what original a copy corresponds to, and will vary depending on the settings.
Symbol
Front cover when not
copied on.
5
6
1
1
Back cover when both
sides are copied on.
6
5
163
4
Back cover when not
copied on.
Insert when both sides are
copied on.
1-sided original or output
page of regular 1-sided
copying.
2
Inserts
3
Back cover when a 2-sided
original is copied on 1 side
of the back cover. (One
page is not copied.)
Insert when a 2-sided
original is copied on 1 side
of the insert. (One page is
not copied.)
3
Front cover when both
sides are copied on.
Back cover when a 1-sided
original is copied on 1 side
of the back cover.
Insert when 1 side is
copied on.
3
Other symbols
6
Back cover
6
2
Front cover
Front cover when a 2-sided
original is copied on 1 side
of the cover. (One page is
not copied.)
1
1
Insert when not copied on.
Front cover when 1 side is
copied on.
1
Meaning
2-sided original or output
page of regular 2-sided
copying.
1-sided original or output
page of regular 1-sided
copying.
Output page of 2-sided
copying when only 1 side is
copied on due to lack of
originals.
Icon
appearing
in display
Covers (1-sided copying of 1-sided originals)
1-sided copies are made of the following 1-sided originals.
1st page
1
2nd page
2
3rd page
4th page
3
5th page
4
6th page
5
6
Cover copying condition
Resulting copies
No copying
1
2
3
4
5
1
2
3
4
5
6
1
3
4
5
6
2-sided
copying
No copying
No copying
1-sided
copying
1
2
3
4
5
2-sided
copying
1
2
3
4
5
1
2
3
4
5
1-sided
copying
2-sided
copying
1
2
3
4
5
2-sided
copying
1-sided
copying
1
2
3
4
5
2-sided
copying
2-sided
copying
1
3
4
5
164
6
1-sided
copying
6
6
1-sided
copying
2
No copying
6
No copying
2
1-sided
copying
6
6
No copying
Back cover
6
Front cover
Covers (2-sided copying of 1-sided originals)
2-sided copies are made of the following 1-sided originals.
1st page
1
2nd page
2
3rd page
4th page
3
5th page
4
6th page
5
6
Cover copying condition
Resulting copies
1-sided
copying
2-sided
copying
1
2
2-sided
copying
1-sided
copying
1
2
3
2-sided
copying
2-sided
copying
1
3
6
6
6
5
4
5
5
4
6
4
6
2
5
5
6
1
5
6
1-sided
copying
2
2
1-sided
copying
3
4
1
3
4
2-sided
copying
No copying
5
6
5
1
4
5
6
1-sided
copying
3
2
No copying
1
3
No copying
2
4
2-sided
copying
1
2
No copying
2
1-sided
copying
3
3
1
3
No copying
4
No copying
Back cover
4
Front cover
165
Covers (1-sided copying of 2-sided originals)
1-sided copies are made of the following 2-sided originals.
3
3rd page
5
6
2nd page
4
1
2
1st page
Cover copying condition
Resulting copies
No copying
1
2
3
4
5
1
2
3
4
5
6
1
3
4
5
6
2-sided
copying
No copying
No copying
1-sided
copying
1
2
3
4
5
2-sided
copying
1
2
3
4
5
1
2
3
4
5
1-sided
copying
2-sided
copying
1
2
3
4
5
2-sided
copying
1-sided
copying
1
2
3
4
5
2-sided
copying
2-sided
copying
1
3
4
5
166
6
1-sided
copying
6
6
1-sided
copying
2
No copying
6
No copying
2
1-sided
copying
6
6
No copying
Back cover
6
Front cover
Covers (2-sided copying of 2-sided originals)
2-sided copies are made of the following 2-sided originals.
3
3rd page
5
6
2nd page
4
1
2
1st page
Cover copying condition
Resulting copies
6
3
4
3
1
3
1-sided
copying
2-sided
copying
1
3
4
2-sided
copying
1-sided
copying
1
2
3
4
2-sided
copying
2-sided
copying
1
3
4
1-sided
copying
2
2
1-sided
copying
5
5
5
167
6
1
6
2-sided
copying
No copying
4
1
6
1-sided
copying
3
6
No copying
1
6
No copying
3
6
2-sided
copying
1
6
5
No copying
5
6
4
5
1-sided
copying
4
2
3
4
1
4
No copying
2
No copying
Back cover
2
Front cover
Inserts (copying of 1-sided originals)
1-sided and 2-sided copying is performed using the following 1-sided originals. The insert is added as the third page.
6
2
1-sided
copying
1
2
2-sided
copying
1
2
3
4
5
3
4
5
6
3
5
6
6
1
1
1
3
5
3
4
6
3
5
6
1
4
Resulting copies
(Two-sided copying)
Resulting copies (one-sided copying)
5
No copying
5
6
Insert
copying
condition
4
6th page
4
3
5th page
2
2
4th page
2
1
3rd page
2
2nd page
4
1st page
Inserts (copying of 2-sided originals)
1-sided and 2-sided copying is performed using the following 2-sided originals.
2
5
6
3
5
6
1
1
168
3
3
5
3
5
5
6
1
4
1
4
2-sided
copying
3
6
6
2
5
6
1
4
4
1-sided
copying
3
2
2
2
1
4
No copying
Resulting copies
(Two-sided copying)
Resulting copies (one-sided copying)
2
Insert
copying
condition
5
6
3
3rd page
4
1
2nd page
2
1st page
Copier Guide
MODEL: MX-2300G
MX-2300N
MX-2700G
MX-2700N
MX-3500N
MX-3501N
MX-4500N
MX-4501N
MX4500-EX-CPY-Z1