1
OWNER' SMANUAL
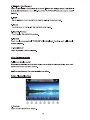
Car Multimedia System
lnteq
1-DIN DVD Multimedia receiver'Nith Touch Screen Display wth DVDIAMIFM Receiver
TABLE OF CONTENTS
FEATURES ................................................................................................4
FRONT PANEL........................................................................................... 5
BASE PANEL..............................................................................................6
REMOTE CONTROL ..................................................................................7
MAIN MENU ............................................................................................... 11
RADIO MODE ............................................................................................ 13
DVD MODE ................................................................................................ 14
SD CARD MODE. ....................................................................................... 17
USBMODE ................................................................................................ 20
PHOTO MODE ........................................................................................... 21
BLUETOOTH MODE ....................................................................................22
I POD MODE ............................................................................................... 28
TVMODE.....................................................................................................32
NAVI MODE............................................................................................... 34
AVIN MODE..............................................................................................34
DIM MODE ................................................................................................ 36
SETTINGS MODE. ......................................................................................37
SAFETY INSTRUCTIONS.............................................................................41
INCLUDED PARTS ..................................................................................42
UNIT INSTALLATION AND REMOVAL ...........................................................43
WIRE CONNECTION ...................................................................................47
WIRING DIAGRAM .................................................................................... 49
SPECIFICATIONS ....................................................................................... 50
TROUBLESHOOTING .................................................................................. 51
DISC NOTES .............................................................................................. 54
3
FEATURES
•
•
Digital LCD Touch Screen Accepts KS-1 Desktop Media Player
800x480 High Definition Screen Resolution
•
•
•
Motorized Angle Adjustment & Last Angle Memory
Theft Deterrent Detachable Panel
Playback from DVDR/RW & CDR/RW, of MP3, MP4, DivX, & AVI
•
•
•
Complete Integration of iPod by Touch Screen Control (IC-3 cable sold separetly)
Blue Tooth V2.1 & A2DP for Wireless MP3 Playback
32GB USB2.0 & SO Readers for MP3, FLAC, MP4, DivX, & AVI
•
•
•
Front Panel 3.5mm AUX A/V Input
Accepts GPS Navigation Module NAVIBOX-2, Powered by Navteq
Accepts ATSC Digital TV Tuner DTV-3
•
•
•
Accepts Axxess ASWC OEM Steering Wheel Control Interface
4-Channel 2V Pre-Amp RCA Audio Outputs
Variable 2V Subwoofer Output w/ Low-Pass Crossover
•
•
•
A/V Outputs for Multiple Component Integration
Rear View Camera Input w/ Trigger
52x4 MOSFEET Powered Speaker Level Outputs
•
•
•
18FM/12AM Station Memory
Selectable Region FM/AM Frequency Stepping
Custom & Preset EQ Settings
•
•
•
12/24 Hour Clock
NTSC/PAL Auto Selection
Built-in Analog TV Tuner (select models)
KS-1 Desktop Media Player Kick-Stand (sold separetly)
•
Combine with Detachable Faceplate to Use as Desktop Multimedia Player
Bluetooth Features
•
Work with Most Bluetooth Enabled Phones
•
•
•
Noise & Echo Cancellation
Contact List Transferred for Easy Access Dialing
Caller ID Shows Name and Number from Contacts List
•
•
Recent Calls & Talk Time Logs
A2DP for Wireless MP3 Playback
4
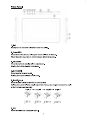
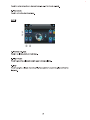
Front Panel
...~
1
--@
1. MIC
Microphone for use with Bluetooth hands free calling.
2. Power/SRC
Press to tum the unit ON, holding the button will tum off the unit.
W'len the unit is on, press to switch between different sources.
3. VOUMENU
Press the button to display volume adjustment.
Holding the button will enter main menu.
4. MUTEINAVI
Press to mute/ unmute sound.
Holding the button will enter NAVI mode.
5. EjectJP.Angle
Press to open I close the monitor to eject the disc
Holding the button will enter angle adjustment mode, press it again to adjust the angle
of the front panel as following:
Angle 1 ---. Angle 2 ---. Angle 3---. Angle 4
6.REL
Press to release the detachable panel.
5
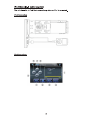
7. SO CARD SLOT
The unit will be switched to the SD CARD Source automatically when an SD CARD Is
connected.
8. Remote Sensor
Receives remote infrared receiver signals.
9.AVIN Jack
Connect an external AN device to this jack to watch/listen to the device through your car
audio/video system.
10. USB
The unit will be switched to USB Source automatically when a USB is connected.
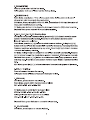
BASE PANEL
(
all ·- ,
r-' lle
1
(JJlo p
]
lilli3
(
110
11. RESET
Remove the face plate to gain access to the RESRT buttcn.
Press and hold 1his buttcn for 3 sec to switch back to all the original factory settings.
Keep in mind this will erase all your preset radio stations and any EQ seUings you may
have made and saved.
6
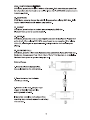
Remote Control
II
(!)
2
3
f1
11
A
f' , ..-:~.l~
::;:o:_,
4
5
6
NAV:
7
8
9
0
m
~
flil
..
...
m
~
til
..,
II
.....
...
Kl!
":
SUB·T
fFT
:XC•I\'
A· B
/"'
m
"'"
~
6
~~
m
~4m
"
m
gj
m
4
m!
•
~
-
11+1
aw
~
I
I
I
I
TITLE
"H
lQQ\1
ol
OISP
ml
m
~
~
m
ml
1. POVVERISOU RCE
10. VOLUME-
20. LEFT
2. OPEN I CLOSE I
P.ANGLEI EJECT
11. PLAY I PAUSE
12. STOP
21. EQ/LOUD
22.AUDIO/#
3. NAVI/ SYSTEM
13. PREVIOUS
23. FAST FORWARD
4. NUMBER PAD
5. UP
14. NEXT
15. TITLE
24. REWIND
25. SUB-T/RDM
6. VOLUME+
7. OK/BAND
16.AST/PBC
17. DISP/ST
26. MENUr
27. RPT/A-8
8. RIGHT
9. DOWN
18. ZOOM/ CALL
19. MUTE
28. SLOW/ END CALL
NOTE:
This is a universal remote; some functions would be depending on optional equipments.
1. [POWER/SOURCE]
Press to tum the unit ON, holding the button will tum off the unit.
When the unit is on, press to switch between different sources.
2. [OPEN/CLOSEIP.ANGLEIEJECl]
Press to open I close the monitor to eject the disc
Holding button for 3 sec will enter angle adjustment mode, press it again to adjust the
angle of the front panel as following:
ANGLE1-ANGLE2-ANGLE3-ANGLE4
7
3. [NAVI/SYSTEM]
Press to quickly enter I exit the Navi mode.
Holding button for 3 sec will enter I exit the Settings Mode.
4. [NUMBERS 0-9]
Radio Mode, press buttons 1-6 to select a preset station, Holding button for 3 sec will
store current radio frequency to the preset station.
DVD Mode, When playing DVD, VCD, CD, MP3, press buttons 0-9 to input the number of
track, press the [OK] button to confirm.
TV Mode, press buttons 0-9 to choose the channel and press the [OK] button to confirm.
Bluetooth Mode, press buttons 0-9 to input phone numbers.
5. [A] I 8. [>]I 9. [v] /20. [<] Direction Keys
DVD Mode and System Parameters Setup, press the [v] I [A] buttons to move the cursor
upward I downward to select an item. Press the[<] I[>] buttons to move the cursor
leftward I rightward to select item.
Radio Mode, press the[<] I[>] buttons to switch the stored stations. Holding the[<] I[>]
buttons for 3 sec will seek the next available channel by decreasing I increasing the tuning
frequency; seeking will stop by pressing any button. Press the [v] I [A] buttons to decrease
I increase the frequency manually.
TV Mode, Holding the[<] I[>] buttons for 3 sec will tune channels automatically. Press the
[A] I [v] buttons to select the stored channel upward I downward. (Optional tuner required)
Bluetooth Mode, press[<] I[>] buttons to switch between dialing page, phonebook, music
and setup page. Press the[<] I[>] buttons to move the cursor leftward I rightward to select
item.
NAVI Mode, press the [v] I [A] buttons to decrease I increase the brightness of the screen.
6. [VOL+] /10. [VOL-]
Press to increase I decrease the volume.
Holding the button will keep increasing/decreasing the volume.
7. [OK/BAND]
DVD Mode, press to confirm the selection.
Radio Mode, press to switch the wave band as follows:
FM1-FM2-FM3-AM1-AM2-FM1
TV Mode, press to switch the TV audio as follows:
NTSC - PAUBG -PAUl - PAUDK- NTSC
Holding will switch the TV system area as follows:
USA- CCIR -ITALY- AUS- NZ- USA
Bluetooth Mode, press the button to turn on/off selected item.
11. [PLAY/PAUSE]
DVD Mode, press to pause or resume playback.
8
12. [STOP]
DVD Mode, when in DVDNCD/CD playback, press the button once to stop playback,
press the [Play/Pause] button agian to resume playback. Press the button twice to reset
playback, press the [Play/Pause] button to start the playback from the beginning of disc.
MP3 disc playback, press the button to stop the playback, press the [Play/Pause] button to
start the playback from the beginning of track.
13. [PREVIOUS] /14. [NEXT]
DVD Mode, press to go to the pervious I next chapter, track or song.
15. [TITLE]
DVD Mode, press to enter the title menu when playing DVD disc.
Bluetooth Mode, press to enter the next page of phone number list in phonebook.
16. [AST/PBC]
DVD Mode, press to switch the PBC function on I off when playing VCD disc.
Radio Mode, press to review stored stations; holding the button for 3 sec will automatically
program the 6 strongest stations available into the presets in the each wave band.
TV Mode, automatically seek the stations available.
17. [DISP/ST]
Main menu, press to set the background by default picture
DVD Mode, press to display current playback information.
Bluetooth Mode, press to return to the previous page.
18. [ZOOM/CALL]
DVD Mode, press to zoom the picture display when playing DVD, VCD disc. Each press
changes speed from 2x to 3x to 4x to 3x to 2x then back to normal play.
Bluetooth Mode, press to call a number or to receive a cell phone call.
19. [MUTE]
Press to switch mute sound; press it again to resume to the previous volume level.
21. [LOUD/EQ]
Press to adjust the EQ setting as following:
USER -POP- CLASSIC- ROCK- JAZZ- USER
Holding for 3 sec will switch the "LOUD" function ON I OFF.
22. [AUDIO]
DVD Mode, press to change dialogue language when playing DVD disc; Press to select
different audio channels when playing VCD, CD disc.
Bluetooth Mode, press to input the symbol#.
9
23124.(FAST FORWARD/REWIND]
DVD Mode, press to fast forward I rewind at 2x speed. Each press changes speed from
2x to 4x to 8x to 20x then back to nonnal play. Press the [PLAY/PAUSE] button to resume
to normal playt:Jack.
25. [SUBTIRDM]
DVD Mode, press to change the subtitle language when playing DVD disc. Hold
ing for 3 sec will activevate random play function.
26. [MENU]I"
DVD Mode, press to retum to the boot menu when playing DVD disc.
Bluetooth Mode, press to input the symbol*.
ZT. f.RPT/A·BJ
DVD Mode, press to set point A, press it again to set point B, the player will repeat from
points A to B. When playing DVD, MP3, press it again to stop repeating. VIlhan playing
VCD, CD, press it again to repeat all1racks. Holding the button fer 3 sec will repeat
playing.
28. [SLOWIEND CALLJ
DVD Mode, press for slOW' motion playback at 112x speed when playing DVDNCD disc.
Each press changes speed from 112x to 1/4x to 118x to 1/16x then back to nonnal play.
Bluetooth Mode, press to ignore or hang up a call.
Battery Change
1. Press to unlock the battery holder,
then pull outward as the arrow shows.
CD
I~
~
2. Place the battery into the holder
with the (+)side up.
I
3. Push the holder back. Use your !Inger
to push In the holder back until the
: : : : · : :••
•
Nncticnor•~ ~i'l·7m~O.zit:l w-22wwzll:
m~
operating range reduced, replace the old battery
with new one.
10
~~~~ ·
@
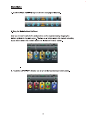
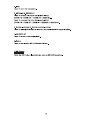
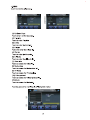
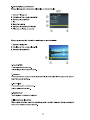
Main Menu
1. Touch the PAGE TURNING key to tum to the next page of Sources.
2. Drag the Mode buflons UpJDown
User can choose to activate the mode buttons on 1he touch seteen by dragging the
buttons up/down to 1he main saeen. The blue color button means this mod& is not active,
a gray button means this mode is active and located on the main screen.
3. Touch 1he LEFriRIGHT direction key to 11Jm to 1he next/previous mode buttons.
11
CD ® ® ®
1. Touch to access 1he DVD Source.
2. Touch to access the RADIO Source
3. Touch access the SD CARD Source.
4. Touch to access the USB Sources.
5. Touch to access the iPod Source
6. Touch to access the NAVI Source.
7. Touch to access the BLUETOOTH Source.
8. Touch to access the TV Source.
9. Touch to access the AV IN Source.
10. Touch to access PHOTO Source.
11. Touch to access Dimmer function.
12. Touch to access Setting Source.
General Operations
The folloYJing operations are general operations for all modes:
Volume Key
Touch the volume key in any mode to display the volume adjustment bar.
Touch " +/- " buttons to increase I decrease the volume.
Touch "MUTE" button to mute the sound; press it again to resume to the previous volume
level.
Return Key
Touch this button to return to the main menu from any mode
12
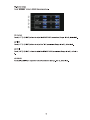
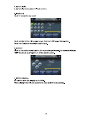
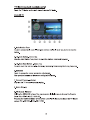
Radio Mode
1.Band
Tbuch to swttch the FMIAM wave band as folows:
FM1 • FM2 • FM3 • AM1· AM2 • FM1
2. Auto S1atlon rune
Touch to scan through all tuned prese1s stations and play them for 5 seconds each. Touch any
button to stop scannllg.
Holding the button to automatiCally program the 6 strongest stations available into the presets in the
each wave band, a total of30 stations can be stored. Touch any button to stop the tuning.
3. Local
Toucb to set the local tuning on/off. Wlen you are using the local searching funcdon, you can only
receive the radio stdon wtth strong enough signals.
4.. Tune Frequency- Down II. Tune Frequency -Up
Touch to tune the radio to a loWer 1 higher trequency by one step. Hold!~ the button allows
continuous tuning down/up.
6.ST
Turns stereo reception on/off
7. SEEK-II. SEEK+
Touch to seek to the next strong station at a lower I higher frequency. Touch any button to stop
seeking.
t. Current pla~ng station information dilplay
10. Preset Stldions
Touch to select a preset station, hokliniJ the button to store current radio frequency to the preset
station.
13
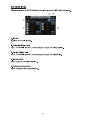
DVDMqdt
The unit will be swttdled to DVD Mode automatically when lnsertfng the disc.
1. Next 1
a. Previoutt
Touch to go to the next/ pervious chapter, 1rack or song.
2.8top
DVDNCDICD playback
press the button once to stop playback, press the (Play/Pause( button aglan to resume playback.
Press 1he button twice to reset playback. press IJle (Play/Pause] button to start the playback from
the beginning of disc.
MP3 disc playback
press the button to stop the playback, press the (Play/Pause] button to start the playback from the
beginning of track.
4. Rewind /8. Fast Forward
Press to fast forward I rewind at 2x speed. Each press changes speed from 2x to 4x to 8x to 20x
then back to nonnal play. Press IJle (PLAY/PAUSE] button to resume normal playback..
5. Play/Pause
Touch to pause or resume playback.
7. Full Screen Display
VIlhan displaying directory of DISC, touch this button to switch between Full screen and Function
operations Interface.
14
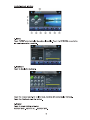
12. TITLE
Touch to go to the title menu of disc when playing a DVD.
f3. Sc:rHn setup
Touch "SCREEN' button to accsee the screen setup.
(1} Contrast
Touch (LEFT) I (RIGHT) buttons to adJust the CONTRAST parameters (Range: ·9 to 9), default Is 0.
(2}TINT
Touch (LEFT) /(.RIGHT) buttons to ad)Jst the TINT parameters (Range: -9 to 9} , default Is 0.
(3)BRIG
Touch (LEFT] I (RIGHT) buttons to adjust the BRIGHTNESS parameters (Range: ·9 to 9) , default iS
0.
(4}COL.OR
Touch (UP] I (DO\M\1( to adJust the COLOR parameters (Range: -9 to 9), default Is 0.
16
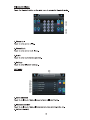
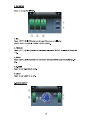
SDCARDMode
The unit will switch to SD CARD Mode automatically when an SD Card is ccnnected.
B
•
en r11on
0000
l OUOQfF
··~ · 1~·
fii F
0
6
6
~
•
•
...........
po:"'
...........
6
...........
6
···········
~
r
®
~
:o
r
r--;
1. BI"'W'M
Displays a~rrent tile location.
2. Folder list display area
Touch "UPJDOWN" arrows tc move through the pages and select a folder.
3. File list display area
Touch "UPJDOWN" arrows to move through the pages and select a file.
4. Return button
Touch tc retum tc the main directory.
5. Parent directory button
Touch to retum tc the parent directory.
17
Aydjo ptaybaclt lnterfact
1. MENU
Touch "MENU"bullon to display the audio playback list. Touch the UP/00'\AIN arrows in !tie
list area to search for a track/file.
2.Keyboard
Touch to display the keyboard.
Touch the number keys 0.9 to select a track, touch the OK button to play the track.
Touch the C button to dear 1he number.
3. Repeat
Touch to repeat rotating as follows:
REPEAT ONE- REPEAT ALL- REPEAT OFF.
18
4. Rewind/5. Fast Forward
Touch to fast rewind I fast fotward at 1x speed .Each touch changes speed from 2x to 4x
to 8x to 20xlhen badt tc normal play. Touch the "PLAYJPOUSE"button to resume normal
playback.
6.STOP
During playtlack, touch 1he button to stop the playing the a~rrent track.
7.Retum
Touch to retum to the f!le list, then awttch tc other folder.
a.NexU10.Pnnnous
Touch tc play the next/previous song.
I. Random
Touch to play songs randomly "RANDOMw will be displayed. Touching again will cancel
random playtlack.
11. PAUSEJPLAY
Touch to pause or resume playback.
VIdeo Playback lntelface
Full •creen display awltch
Wlen playing video ~las, touch the video display area to swttch to fullsaeen display, touch again
switch to the fUnction operation lnter1ace.
All o1her operalfons are the same as Audio operalfons.
Picture Playback Interface
1. Previous
Touch to open the previous picture.
19
2. Next
Touch to open the next picture.
3. ZOOM IN /4. ZOOM OUT
Touch to zoom in the picture display as following:
ZOOM X 2-ZOOM X 3- ZOOM X 4-ZOOM X 5..
Touch to zoom out the pictre display as following:
ZOOM X 5-ZOOM X 4-ZOOM X 3-ZOOM X 2-ZOOM OFF.
5. Rotate clockwise I 6. Rotate counterclockwise
Touch to make picture rotate colockwise I counterclockwise 90 degree at a time.
7. PAUSE/PLAY
Touch to pause or resume playback.
8. Return
Touch to return to the SD CARD main interface.
USB Mode
Under the USB mode, all operations are same as SD CARD operations.
20
Photo Mode
Touch the PHOTO buUcn en the main menu to access the Photo mode, two options w111
appear: USB I SO CARD in photo Mode.
Touch SO CARD/USB buttons to aelect, displaying 1he pic from 1he device,
All1he functions and operations are the same as in SO CARD ..Wen displaying picture.
Support Backgroud Music Display
From any mode while playing music, touch the PHOTO buUon in the main menu to
browlse picture files, music will be played at the same time.
21
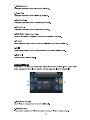
Bluetooth Mode
Touch the Bluetcolh bullon on the main menu to access the Bluetooth mode.
,.
,. e e
• • ,e
I
I
t,.
I
I
T
c
....
~
I
fj
....
:::: e-
0
Q
0
~ ...
D
I
I
... m
"'
~
_
0
1. Phone Call
Touch to enter phone calling.
2. Phone Book
Touch to enter phone book lookup.
3.Audio
Touch to enter audio device operalfon.
4. Settings
Touch to enter Bluetoolh settings.
SETnNGS
II
f1
Pt«J~
11
-----PHONJ:
II
li
""'
AUtOANSV•EI{
CONNECT
AUTO
~1NG
:::: 6
Ol"f
Al..Ut0 PAIRING
ON
1-'\NCOOE
'""
,.,
...
~ ~.
1. AUTO ANSWER
Touch to select auto I manual answer when a call is coming in.
2. PHONE CONNECT
Touch to select auto I manual phone connect when returning to the car.
3. PHONE PAIRING
22
A-B
A-B
A -B
Select INTEQ after your phone has searched for available devices.
Phone Call
1. can
Touch to c:all a number or receive a phone call. Touch to call the last number if no number
is input.
2. End Call
Touch to ignore or hang up a call.
3. Transfer
VI/hen talking on the phone, touch to transfer the call between the unit and cell phone.
4.Ciear
Touch to ca.ncel or dear the numbers you have input.
5. Number Kep
Touch the buttons to input a phone number.
6. lnformldfon Display
CALLOUT
While dialing, the display will read:
.
CALLOUT. ..
While on a call, the display will read:
'
TALKING ...
24
CALL IN
'IJVhen receiving an incoming call, you will see the screen below:
'IJVhen talking, you will see the screen below:
PHONEBOQK
mJ
4"
"
I
~
I
~ "'
t
Iii
1 MV PHONE BOOK
A
2 SIIJ PHONEBOOK
1 O!AU:.O CALL
T
r?
4 RECE:IVED CA.Ll
~MIS
S£0 CALL
I
fj
m
1. My Phonebook
The phone numbers ltlat are stored in ltle phone.
25
II
~
~
a
~
2. SIM Phonebook
The phone numbers that ars stored in the SIM card.
3. Dialed can
The phone numbers that were dialed by the phone.
4. Received can
The phone numbera that \Wre received by the phone.
5. Mi•••d can
The phone numbers that were miaaed by the phone.
8. Next Page 110. Previous Page
There are 5 numbers in each page, touch to see the previous/ next page.
7. Transfer
V'Jhen talking the phone, touch to transfer the call between the unit and cell phone.
a. can
Touch to call a selected number from phonebook or to receive a cell phone cal..
9. End Call
Touch to ignore or hang up a call.
Phone Number Ust
Touch buttons 1--5, when Item Is changed to blue color, the hem Is selected. Touch It again and the
hem Is changed to wfllte color, the operatton Is aelM and you will see the Image below:
1.1nformldfon Display
You will see the phone number of the hem In blue color.
2. Phone Number
Itthis number Is stored, you will see the name: If not. you w111 see the phone number.
26
Touch the button when Item Is changed to yelloW color, the Item Is selected.
3.Phonebook
Touch to return the phonebook page.
AUDIO
1. Previous /2. Next
Touch to select the prelltous I next traclc.
3. Play I Pause
Touch to pause the playbaclc; touch h again to resume playing.
4. Stop
Touch to stop the playbaclc, touch the [Play/Pause) button to restart the playbaclc from the
beginning.
27
iPod Mode(IC-3 cable required)
The unit will switch to iPod Mode automatically when an iPod is connected.
iPod Connection
=
=
iPod Operations
@(j)@
®
®
28
1.MENU
Touch to enter the play menu.
(1) UpJDawn Page
Touch to tum to the next page.
(2) Play lists
Touch to enter Play lists
(3)Artists
Touch to enter the Artist list.
(4)Aibums
Touch it to enter the Album list.
(5) Genres
Touch to enter the Genre llat
(8) All Music
Touch to enter the all music list
(1) Vicleo lists
Touch to access the Video list
(8) Music video
Touch to access the Music video list.
(9)TVVidec
Touch to access the TV video list.
(10) VIdeo podcast
Touch to acoesa the VIDEO podcast list.
(11) Movie
Touch to access th& Movie list
Touching (2) to (11), it will displayfcllcwing information:
29
1, Current playlist
2, Current play track number I All track numbers
2. Key Board
Touch to acce&S the key beard:
Touch number button 0-9 to select songs, then touch OK to play the selection.
Touch the C button to cancel the number inpul
3.REPEAT
Touch to tum on the repeat function, the current song will repeatThe screen will display
aREP" aa picture, tDuch again tum off the repeat function.
4. SCREEN Setting
No runction when you playing an Audio file.
'\lllhen playing video files, the operation is same as DVD screen setting.
5. Currant playing Information
When playing music, inl'ormation will display as pictured below:
1, Current Playing time
2, Total time of 1he current playing file
3, Current playing position
4,103
5, Music file playing
6, Current playing trackltatal tracks
7, Play status, playing or paused
When play a video file, information will display as pictured below:
1, Current Playing time
2, Total time of 1he current playing file
3, Current playing position
I
G)
6. Nextl F.FWD
P..ss to clloose the next track.
Hold Holding will fast forward 1he track.
T.Random
Press to tum on the random function. 1he music will play randomly selected traclcs, touc:b again to
tum of the random function.
8. Pre I F.REV
Press to clloose the previous track.
Holding will NWfncl the track.
9. PAUSEJPLAY
Touch to pause or resume 1he playback
Full screen display switch
\Mien playing \ideo flies, touch the 'llldeo display area to swttch to full sen~ en display, touc:b again
swltc:b to the function operaUon Interface.
31
TV Mode (select models only)
Touch the TV button on the main menu to access TV mode.
ANALOG TV
1. Auto Station TUne
Touch to automatically seek all strongest stations available; 1Duch any button to stop the
timing.
2./3. Nut Station- Down I Up
After the Auto Station Tune, touch to select the stations downward I upward.
4./5. Seek Next Station- Down I Up
Touch to seek the next available channel by increasing I decreasing the tuning frequency.
&.SCREEN
Touch to access the screen parameter adjusiments.
The operation Is same as the screen setting In DVD mode.
7. Current Channel Indicator
Displays the TV channel currently playing.
I. Media Display
9. lV System Indicator
Holding the OK/BAND butlcn of the remote control will allow you to choose the Counlly
Zone USA I CCIR /ITALY I AUS I NZ.
Pressing the OK/BAND button of the remote control v.ill allow you to choose the TV Sound
system PAL· BG I PAL-l/ PAL-OK/ NTSC.
32
DIGITAL lV(DTV-3 BOX sold separately)
1. REnJRN
Touch to retum to parent directory of TV Main Menu.
2. MENU
Touch to access TV Menu Settings.
3. EXIT
Touch to exit Menu SeUings.
4.SCREEN
Touch to access the sa-een parameter adjustments.
The opemlion is same as the seteen setting in DVO mode.
5. CH-18. CH+
Touch to choose the next I previous program list , or touch to c:hoose the menu settings
v.tten the set list on the screen.
6. ENTER
Touch to ccnl'irm the Cllrrent seleded itam.
7.-19.+
Touch to decrease I increase the Volume.
33
NAVI Mode (NAVIBOX-2 sold separately)
Naviaation Map Connection
1. calibration
Touch to enter navigation touch Calibration Interface.
+
2. Navigation
Touch to enter the prompt interface for navigation important infoonalion.
Pleas. read th& important information, touch the "I agree" button to proceed to the
navigation map interface.
3. Browse
Touch to select navigation routing.
Touch the "Confirm" button to confirm the selected routing; Touch Cancel buUcn 1D cancel
the rountlng selectfon.
4. RETURN
Touch to retum to main menu interface.
NOlE:
Under NAVI mode. pleae Wew all opemlona by Navlgtttlon Device NAVIBOX·21Jtter'll
manuel.
3S
AVIN Mode
Connect the desired extemal AN deivce to the AV IN 3.5mm jack on the front panel,
watchllisten to the device through your car audio/video system.
1.SCREEN
Only while external video source input, touch the SCREEN button 'NilI enter SCREEN settings.
The operation is same as DVD mode screen setting.
DIM Mode
Touch to s'Nitc:tl the screen brightness levels as following:
DIM1 -> DIM2-> DIM3-. DIM4 (Screen Off)-> DIM1
2, Default
Touch to reset BALANCE/FADER parameters to default settings.
2.EQSETUP
Touch to ac:c:ess EQ SETUP.
1,EQ
Touch [lEFr]/ [RIGHl] buttons 1D change EQ presets as fcllo\'lling:
USER-+POP--+CLASSIC-+ROCK-+JAZZ-+USER.
2, TREBLE
Touch [lEFr]/ [RIGHl] buttons 1D increase or decrease TREBLE parameters (Range: -9
- 9).
3,BASS
Touch [lEFr]/ [RIGHl] buttons 1D increase or decrease BASS parameters (Range: -9 9).
4,X-BASS
Touch to rum X-BASS on ot off.
S,LOUD
Touch to rum LOUD on ot Off.
3. CLOCK SETUP
1, CURRENT TIME
VI/hen the mode is set to 12 hours the dock will pass from 12 midnight to 12 noon ancf so
on. VVhen set to 24 hour mode the clock hours will pass to 13 after 12 noon and so on till
0:00 for midnight
2,HOUR
Touch [UP] I [DO'It"vttl] buttons to adjust hours.
3, MIN
Touch [UP] I [DO'It"vttl] buttons to adjust minutes.
4,MODE
Touch to switch the time motle as 12 hours or 24 hours.
4. SYSTEM SETUP
1, RADIO AREA
Touch llEFT] I [RIGHT] buttons to switch the RADIO AREA as following:
EUROPE I ASWUSA/ JAPAN I OIRT.
2, FACTORY SETTING
Touch to reset all the system parameters to default settings.
3, VERSION
Touch to display the version number.
39
4, CAIJBRATION
Touch to access the calibration of touch screen as follows:
+
-'IIIIG-GN'IItl-
-IUCCUIIID
If a mistake is made the display will read as befow In this case you will need to restart the
procedure from the beginning.
40
Safety Instructions
PLEASE READ COMPLETELY AND BECOME FAMILIAR WITH THE CONTENTS OF
THIS MANUAL BEFORE INSTALLATION AND OPERATION OF THIS UNIT. KEEP THIS
MANUAL FOR FUTURE REFERENCE.
This unit is a class 1 laser product. The laser beam may cause hazardous radiation if
exposed to laser system directly. Do not attempt to disassemble the unit personally.
This unit has been designed and manufactured to assure personal safety. Improper use
can result in electric shock or fire hazard.
A
warnings
-Do not expose the product to rain, water or excessive moisture. This could cause
electrical shorts, fire or other damage.
-This product is designed to operate with a 12 volt DC, negative ground battery system.
Use the proper power supply.
-The monitor is operated automatically. Do not push in or pull out the monitor or try to
rewind the monitor manually! Do not attempt to adjust the monitor angle upward or
downward manually. It will cause damage to the Monitor Mechanism Structure.
-Do not impact the monitor with a hard object. It may cause permanent damage.
-Do ground all equipments and works in order to avoid causing damage to the unit by
electrostatic discharges.
-The user who handles this product should take all necessary precautions to avoid ESD
(Electro-Static Discharge) failures.
-Do not attempt to install or service your unit by yourself. Installation or servicing of the unit
by persons without training and experience in electronic equipment and automotive
accessories may be dangerous and could expose you to the risk of electric shock or
other hazards.
Important Safeguards
<D To reduce the risk of fire or electric shock, and annoying interference, use only the
recommended accessories.
<D
While driving, keep the volume level low enough to be aware road and traffic
conditions.
<D
Parking in direct sunlight can produce very high temperatures inside your vehicle. Give
the interior a chance to cool down before starting playback.
CD
Do not use any chemical solvent, cleaning agent or corrosive detergent to clean away
dirt on the surface of the TFT monitor screen. It may cause irreversible damage.
<D
Small black and shiny dots inside the liquid crystal panel should be considerd normal
for liquid crystal displays.
<D
In extremely cold temperatures, the movement of the picture may be slow and the
picture may be dark, this is not a malfunction. The unit will work normally once reaching
proper operating temperatures.
CD
Do not use and store the unit in dusty, high temperature and high humidity environments.
41
INCLUDED PARTS
1
2
3
4
~
Bolt and Nut M5 x 1
5
Back strap x 1
M5X5 Screws x 4
Power VVire x 1
6
7
8
D
ll
RCA connetor x 1
9
Mounting Sleeve x 1
10
Trim Bezel x 1
Operational Manual x 1
11
12
B
Dl
Faceplate case
Remote Control x 1
13
~
~
USB/AUXAdapler
42
Keysx2
External Microphone x 1
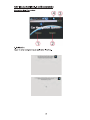
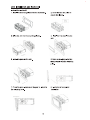
Unit Installation and Removal
Installation method 1
1, Install the mounting sleeve into the dashboard.
2, Bend the tabs into place to
secure the sleeve.
3, Slide the unit into the mounting sleeve.
4, Install the trim bezel into the
unit.
5, Install the panel to the unit.
6, Make sure all faceplate tabs
meet properly with the mounting
plate.
7, Press the panel, make sure the gear is locked to
the mounting hole.
8, illustration of completed
installation
43
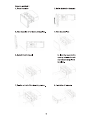
Removal method 1
1, Press the button
2, Safely detach the faceplate
\
3, Take faceplate off of the mounting plate.
4, Take the panel out
I
.
...
l
5, Detach the trim bezel.
6, Insert the keys into the
opening between the unit
and the mounting sleeve
to unlock.
7, Pull the unit out of the mounting sleeve.
8, illustration of removal
..
\
44
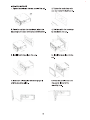
Installation method 2
1, Tighten the bolt onto the rear panel of the unit.
2, lighten the back strap onto
your car inside the dashboard.
3, Place the unit into the dashboard, attach the
backstrap to the back of the chasis with Nut M5.
4, Bolt the unit to the backstrap
by attached to the car.
5, Install the trim bezel onto the unit.
6, Install the faceplate onto the
unit.
7, Make sure all faceplate tabs meet properly
with the mounting plate.
8, Press the panel, make sure
the gear is locked to the
mounting hole.
45
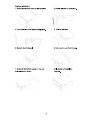
Removal method 2
1, Press the button to remove the faceplate
2, Safely remove the faceplate.
3, Take faceplate off of the mounting plate.
4, Take faceplate off.
5, Detach the trim bezel.
6, Unscrew the unit from the car.
7, Unscrew the Nut MS screw on the rear
8, illustration of completed
and remove the chasis
removal.
46
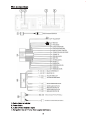
Wire Connections
~ YELLOWBATI
""'= REDACC•
Plt\K BRAKE
BLACK POWER GND
BLUE(WHITE)AMP REM
BLUE AUTO ANT CONTROL
ORANGE(BLACK)REVERSE
I
ORANGE Ill
GREY(BLACK)FR·
GREYFR+
WHITE(BLACK)Fl·
WHITE Fl•
PURPLE RR•
PURPLE BLACKI RR·
GREEN RL·
GREEN(BL.ACKJRL·
Iff
L
»- tJD
IP
BLACK STEERING IR
BLACK MIC_IN
YELLOWVIOEO_OUT
YELLOW RV-VlDEO INPUT
3
BLACK SUBWOOFER OUTPUT
WHITE AUDIO OUTPUT FL
RED AUDIO OUTPUT FR
WHITE AUDIO OUTPUT RL
RED AUDIO OUTPUT RR
TVBOX-IN ADAPTER (OPTIO~All
NAVIBOX·IN AOAPTERtOf'TIONAL)
1. RadioAntennaAdapter
2. Power Cable
3. Audio & Video Output & Input
4. Navigation Box & TV tuner Box Adapter (Optional)
47
Brake Control
Connect the brak• control wire (see Wring Diagram). It is necessary to connect the Brake
Control wire to the parking brake Sllllitx:h in the car. 'Nhile driving, the TFT monitor will
display the waming label (as shown below) as a safety precaution.
Under Rear View Mode the Brake Control function has no effect.
Rewind 1rigger
Connect to the rewind trigger wire to switch the video display to RN video input whenever
the vehicles rewind gear is engaged. This is required for back up camera functions.
Auto Anlanna Control
Connect the auto antenna control wire (see Vlllring Diagram}. The power antenna (rf
equippt)d} will raise whenever the unit is powered up. It will retract when the unit is
switched off.
Steering Wheel Control
This steering wheel control function is optional and requires both OEM steering wheel
controls and the AXXess brand ASWC module. Follow wiring instructions for the ASWC
and connect to the steering wheel control plug on your lnteq unit.
48
_,
[~]
I
POWER AMPLIFIER
(OPTIOttAq
ASWC
- ..
AXXESS
""""""'
TVluMr
~
AUTO ~
BLUE
Specifications
General
Power source :
Load impedance :
Maximum power output :
Frequency Response:
Distortion:
Signal-to-Noise Ratio:
14.4V DC (11-16 VAIIowable)
40(4-8 0 Allowable)
45Wx4
20Hz -20KHz OdB±2dB
s0.1% (1KHz)
~70dB(1 KHz)
AVOUT
(MODE:DVD Bluetooth IPODAV IN)
Precut max output
Frequency Response:
Distortion:
Signal-to-Noise Ratio:
Subwoofer Output
Subwoofer Frequency:
Video Output :
Color System:
1.8V±0.2 load1 OKohm
20Hz -20KHz OdB±2dB
s0.1% (1KHz)
~BOdB(AUX IN 1KHz)
1.8V±0.21oad10Kohm
80Hz/120Hz/160Hz
CVBS 1Vp-p/75ohm load
NTSC/PAL
TV
Frequency Range:
VHF-low 55.25MHz-181.25MHz
VHF-high 181.25MHz-471.25MHz
UHF 471.25 MHz-885.25MHz
VHF-low 32 dBuV
VHF-high 32 dBuV
UHF 35 dBuV
Maximum Sensitivity
DIGITAL TV
Frequency Range :
VHF-low 54 MHz-162MHz
VHF-high 162MHz-456MHz
UHF 456 MHz-858MHz
50dBuV
ANT leakage at input terminal
FM
Frequency Range :
87.5 -108MHz
87.5 -107.9MHz
10.7MHz
s10dBuV
~26dB (1KHz)
20Hz -20KHz OdB±2dB
IF-FRE :
Usable Sensitivity :
Stereo Separation :
Frequency Response:
AM
Frequency Range :
IF-FRE :
Usable Sensitivity :
531-1602KHz
522 - 1620KHz
530 -1710KHz
450KHz
:S35dBuV
Bluetooth
Reception Sensitivity :
Transmission Distance:
[email protected] %BER
~1OM CNo obstacles)
GPS
Frequency Range :
Bandwidth:
1575.42MHz±1.02 MHz
> 10 MHz
so
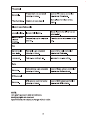
TROUBLE SHOOTING
If any of problem persists after checking the below list, Please consult your nearest
service dealer. Never attempt to disassemble and repair unit personally.
Problem
Cause
Action
GENERAL
Yellow wire is not connected or
incorrect
voltage Red wire not connected
Unit will not
tum on
(no power)
or incorrect
voltage
Check connections for proper
voltage(11-16vdc)
Black wire not connected
Check connection to ground
ACC Fuse blown or Car battery
fuse blown
Install new fuse with correct rating
Invalid operation
Press the RESET button
Speaker wires not connected
Check connections at speakers
One or more speaker wires
touching each other or touching
chassis ground
Insulate all bare speaker wires from
each other and chassis ground
Speakers damaged
Review wiring diagram
Speaker power rating not
compatible with unit
Connect proper speakers
Speaker is shorted
Check speaker wire contacts
Incorrect connection between
ACC and Positive battery wire
Check wiring and correct
Yellow or red wire touching
chassis ground
Check for pinched wire
Speaker wires touching chassis
ground
Check for pinched wire
Incorrect fuse rating
Use fuse with correct rating
Unit has
audio
(when in
rewind)
Parking brake safety circuit not
connected
Check connections at parking brake
Parking brake not applied
Apply parking brake
Excessive
skipping
Unit is not mounted correctly
Check mounting
Physical defect in media
Check media for scratches
Dead battery
Replace battery
Battery installed incorrectly
Remove battery and install correctly
Auto antenna is not fully
extended
Connect the auto antenna control wire
properly
Unit has
power
(but no/low
audio output)
Poor sound
quality or
distortion
Unit resets
itself when
engine is off
Unit blows
fuse
IR remote
does not
work
TUNER
Weak station
searching
51
Auto antenna not proper1y
connected
Connect the auto antenna control cable
proper1y
LOCAL function is activated
Turn LOCAL function off
Problem
Cause
Action
TFTMONITOR
Rewind circuit not connected
No video display
(when in rewind) Vehicle is not in rewind
Check connections at rewind lamp
Front panel will
not
open/close
Front panel obstructed
Remove the obstruction and press
OPEN to resume the monitor
open/close sequence
DVD is not compatible with
current TV system settings
Image blurred, distorted, or dark
Change setup to accommodate
disc
Improper video signal
connections
Check wiring and correct
Improper aspect ratio setup
Use correct aspect ratio setting
Under different conditions, for
example: temperature, humidity,
etc.
perform touch screen calibration
Flashing image
or interference
appears on
screen
Improper
height/width ratio
of displayed
image
Touch screen
controls are not
accurate
Select rewind gear
DISC
Cannot insert
disc
A disc is already inside unit
Eject current disc and insert new
one
Disc is warped or scratched
Use disc in good condition
Disc is dirty or wet
Clean disc with soft cloth
Incompatible disc
Use compatible disc
Disc rating exceeds Parental
Lock rating limit
Change parental Lock settings to
Disc region code is not
compatible with unit
Use a disc with the proper region
code
Disc is inserted upside down
Insert disc with label side up
Copied disc is not compatilbe
Use original disc
No repeat or
searching while
playingVCD
PBC is on
Turn PBC off
Interruption
occurred during
M P3 playback
Disc is dirty or scratched
Clean disc or replace new disc
DVD playback
does not start
Image blurred ,
distorted, or dark
52
lower restriction
TV (optional)
No signal.
TV antenna is not connected
correctly, or broken.
TV picture fuzzy.
Detection of weak signal.
Connect TV antenna correctly or
replace new TV antenna.
Go to place where have strong
signal.
Bluetooth (specified models)
Low call volume.
Improper MIC location.
Speak closer to the MIC or use an
external MIC.
Bluetooth music
playback
skipping.
Distance from unit to cell phone
is too far.
Place the phone to the closer to the
unit.
iPod mode.
iPod cable is not connected
correctly, or broken.
Connect iPod cable correctly or
replace new iPod cable.
Low sound.
iPod volume setting is low.
Increase the volume setting.
Radio antenna is not connected
Connect Radio antenna correctly or
correctly, or broken.
replace new Radio antenna.
GPS antenna is not connected
correctly, or broken.
Connect GPS antenna correctly or
iPod
Can not select
Radio
No signal.
GPS(optional)
No signal.
NOTE:
This user's manual is only for reference.
Modifying rights are reserved.
Specifications are subject to change without notice.
53
replace new GPS antenna.
DISC NOTES
Handling and Cleaning
e Dirty, dusty, scratched or warped discs will cause misoperalion.
e Do not place slickers or make scratches on discs.
• Do not warp discs.
e A disc should always be kept in its case when not in use to prevent from damage.
e Do not place discs in the following places:
1.
Direct sunlighL
2.
Dirty, dusty and damp areas.
3.
High temperature places.
4.
On the seats or dashboard.
Disc Cleaning
Use a dry soft cloth to wipe the surface. If the disc is quite dirty, use a soft
cloth slightly moist with isopropyl (rubbing) alcohol. Never use solvent such
as benzene, thinner or conventional record cleaners which may mar the
surface of the disc.
NOTE:
A disc may became somewhat scratched (although not enough to made it unusable)
depending on your hand;ng it ;n the condition of the usage environment. These
scratches ate not an indication of any problem with the player.
Repairing New Discs with Rough Spots
A new disc may have rough edges on its inside
and outside edges. If a disc with rough edges is
used, the proper setting will not be performed
and the player will not play the disc. Therefore,
remove the rough edges in advance by using a
ballpoint pen or pencil. To remove the rough edges,
press the side of the pen or pencil against the
inside and outside edges of the disc.
S4
Oonottouen
ttl& unaerlloe
..
~
olthec!ll<:
Oonot bend
Wipe"'" atse rrom
tna eantra toward
edgo
Please Keep This Information For Your Records
Product Model:_ _ _ _ _ _ _ _ _ _ _ _ _ _ _ _ _ _ _ _ _ _ _ _ _ _ __
Serial Number: _ _ _ _ _ _ _ _ _ _ _ _ _ _ _ _ _ _ _ _ _ _ _ _ _ _ __
Date P u r c h a s e d : - - - - - - - - - - - - - - - - - - - - - - - - - - - Name of Dealer: _ _ _ _ _ _ _ _ _ _ _ _ _ _ _ _ _ _ _ _ _ _ _ _ _ _ __
Dealer Address: _ _ _ _ _ _ _ _ _ _ _ _ _ _ _ _ _ _ _ _ _ _ _ _ _ _ __
City: _ _ _ _ _ _ _ _ _ _ _ State: _ _ _ _ _ _ _ _ _ _ Zip: _ _ _ _ __
,.
, ------------------------------------------------------------------------------------------------------------------------------------------
STAMP
Epsilon Electronics
1550 S. Maple Ave.
Montebello, CA 90640
Attn. Customer Service
Epsilon Electronics wanants this product to be free from defects in materials and workmanship under normal use and conditions, for a period of 1 year
from the original date of purchase, if purchased and professionally installed by an authorized dealer. Any product purchased from and/or installed by
others will be wananted for 90 days only. This wananty does not cover any expenses incurred in the removal or re-installation of the product, and is
offered to the original purchaser only.
Should service be necessary for any reason, due to a manufacturing defect or malfunction during the warranty period, Epsilon Electronics will repair or
replace, at ita discretion, the defective merchandise at no charge upon delivery of the product to the address shown below, with proof of purchase.
Before returning the product for service:
•
•
•
Enclose with the defective product a brief description of the problem with a name and daytime phone number so we may be in contact
with any questions or concerns regarding the return.
Enclose a copy of the orig inaI sales receipt for proof of purchase and installation.
Enclose a $15.00 US certified check or money order to cover shipping and handling for return or the product. Do not include cash.
Carefully pack the product to protect it from damage during shipping and send it prepaid to:
Epsilon Electronics
1550 S. Maple Ave.
Montebello, CA 90840
Attn. Customer Service
Ph: 800-724-1377 Fax: 323-722-8125
Please note, the warranty will not cover the following:
•
Any product that has been misused or physically damaged.
Any product that has been installed incorrectly. (i.e. over powered, incorrect enclosure, incorrect wiring, etc.)
•
•
Any units that have been previously opened or repaired by a service center which is not authorized by Epsilon Electronics.
Any applicable implied warranties, including the warranty ofthe merchants ability are limited in duration to a maximum of2 years from the date of the
original purchase at retail and no warranties, whether expressed or implied, shall apply to this product there after. Under no circumstances shall Epsilon
Electronics be liable for any loss or damage, direct or consequential arising out of the use of, or inability to use this product. (some states do not allow for
limitations of implied warranties or exclusion of consequential damage therefore these restrictions may not apply.)
-X---------------------------------------------------
Owners Registration Card.
Please complete and return immediately to the address on the reverse side
Name: ____________________________________________________________________________________
Address: _________________________________________
City: _ _ _ _ _ _ _ _ _ _ _ __
State:------------- Zip:-------
Vehicle M a k e / M o d e l : - - - - - - - - - - - - - - - - - - - - - - - - - - - - - - - - - Product M o d e l : - - - - - - - - - - - - - - - - - - - - - - - - - - - - - - - - - - SenaiNumber: ______________________________________
Date P u r c h a s e d : - - - - - - - - - - - - - - - - - - - - - - - - - - - - - - - - - - - Name of D e a l e r : - - - - - - - - - - - - - - - - - - - - - - - - - - - - - - - - - - - - - Dealer A d d r e s s : - - - - - - - - - - - - - - - - - - - - - - - - - - - - - - - - - - - C i t y : - - - - - - - - - - - - - - S t a t e : - - - - - - - - - - - - - Zip: _ _ _ _ _ __
P h o n e : - - - - - - - - - - - - - - Website: _ __
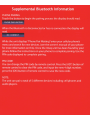
Supplemental Bluetooth Information
PHONE PAIRING
Touch the button to begin the pairing process the display should read.
PHONE PAIR WAITING
When the Bluetooth is disconnected or has no connection the display will
read.
NO CONNECT
While the unit displays "Phone Pair Waiting" enter your cellular phone's
menu and search for new devices. (see the owner's manual of your phone
for more information on this). Once the lnteq unit has been found by your
phone follow the instructions on your phone to complete pairing. Use the
PIN code displayed to complete pairing.
PIN CODE
You can change the PIN code by remote control. Press the [AST] button of
remote control to clear the PIN code, and input the new 4 digit number,
press the [OK] button of remote control to save the new code.
NOTE:
The unit can pair a total of 5 different devices including cell phones and
audio players.
Supplemental Troubleshooting Information
1. AM/FM or Audio settin s memor loss
If the lnteq unit will not keep AM/FM station or audio settings memory it may
be necessary to confirm proper wiring connections have been made. Confirm
that the yellow (constant power) wire is receiving 11 -15 volts of positive DC
power at all times regardless of key position. Some vehicles may supply 12
volts for only a period of time after the key has been switched off.
2. Touch screen controls will not work or are not properl aligned
If touch screen controls are not working properly a touch screen calibration
should be performed. You can enter the calibration set up through lnteq
system settings (see page 40 of your owner's manual for more information).
after beginning the touch screen calibration press and briefly hold the+ marks
on the screen. After each press the mark will move to another point of the
screen. Continue until the screen reads "Checking calibration please wait" this
should be followed by the words "Calibration succeeded"
PRESSTHECROSSONTHESCREEN
+