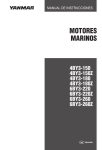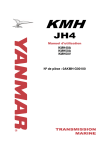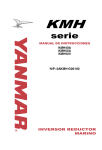
1
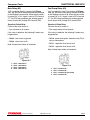
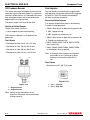
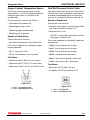
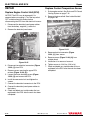
BY series SERVICE MANUAL BY Service Manual 4BY 6BY P/N: 0BBY0-U00102 MARINE ENGINES This Service Manual has been developed for the exclusive use of service and repair professionals such as Yanmar authorized Distributors and Yanmar authorized Dealers. It is written with these professionals in mind and may not contain the necessary detail or safety statements that may be required for a non-professional to perform the service or repair properly and / or safely. Please contact an authorized Yanmar repair or service professional before working on your Yanmar product. Disclaimers: All information, illustrations and specifications in this manual are based on the latest information available at the time of publishing. The illustrations used in this manual are intended as representative reference views only. Moreover, because of our continuous product improvement policy, we may modify information, illustrations, and / or specifications to explain and / or exemplify a product, service, or maintenance improvement. We reserve the right to make any change at any time. Yanmar and other countries. are registered trademarks of Yanmar Co., Ltd. in Japan, the United States and / or All Rights Reserved: No part of this publication may be reproduced or used in any form by any means - graphic, electronic, or mechanical, including photocopying, recording, taping, or information storage and retrieval systems - without the written permission of Yanmar Marine International. © 2007 Yanmar Marine International 1207 ii NOV 2007 (Rev. 03) © 2007 Yanmar Marine International BY Service Manual BY Service Manual Section 1 INTRODUCTION This manual gives specific instructions for the proper repair of Yanmar BY series marine engines. Please follow the procedures carefully to ensure quality service. Yanmar recommends that you read this Service Manual completely before starting repairs. BY Service Manual Along with standard tools, Yanmar recommends the use of special tools necessary to perform repairs correctly. Yanmar products are continuously undergoing improvement. This Service Manual has been checked carefully in order to avoid errors. However Yanmar is not liable for any misrepresentations, errors of description or omissions. Contact an authorized Yanmar marine dealer or distributor for any questions you have regarding this Service Manual. DEC 2006 (Rev. 01) © 2007 Yanmar Marine International 1-1 INTRODUCTION Revision History REVISION HISTORY This manual is a living document. Periodic manual revisions are published to document product improvements and changes. This practice ensures the manual has the most current information. As manual revisions become necessary, individual pages are prepared and sent to those who need the information. If a page, or number of pages should be replaced, the replacement information is sent along with a revised Revision Control Table. Discard the older, obsolete information. At times, the revision involves inserting additional pages in one or more sections. Replace the Revision Control Table and insert the new pages. This method of revision control represents the most cost-effective solution to providing current, updated information as needed. Revision Control Table Revision Date Revision Number DEC 2006 Rev. 01 NOV 2007 Rev. 02 NOV 2007 Rev. 02 1-2 New Page Numbers Involved All Initiating Dept. Remarks Re-release 3-2, 12-12 to 12-22 3-17, 3-18, 3-22, 4-3, 4-6, 4-10, 4-11, 5-54 and 12-11 YMU Table of Contents correction, pin identification information update Removed back pressure and negative intake pressure information, updated marine gear information, units of measure, periodic maintenance intervals, camshaft bearing cap marks, ECM legend NOV 2007 (Rev. 02) © 2007 Yanmar Marine International BY Service Manual YMU YMI BY Service Manual Section 3 GENERAL SERVICE INFORMATION Page Safety Precautions .......................................................................... 3-3 Engine Outline Drawings................................................................. 3-4 4BY with KMH40A ..................................................................... 3-4 6BY with KMH40A ..................................................................... 3-5 Engine Piping Diagrams.................................................................. 3-6 Location of Nameplates................................................................... 3-8 Engine Nameplates (Typical) .................................................... 3-8 Diesel Fuel ...................................................................................... 3-9 Diesel Fuel Specifications ......................................................... 3-9 Bleeding the Fuel System........................................................ 3-10 Engine Oil...................................................................................... Engine Oil Specifications......................................................... Acceptable Engine Oil ............................................................. Recommended Marine Gear or Stern Drive Oil....................... Recommended Power Steering Fluid...................................... 3-10 3-10 3-12 3-14 3-14 Engine Coolant.............................................................................. 3-15 Engine Coolant Specifications................................................. 3-15 Acceptable Engine Coolant ..................................................... 3-16 Principal Engine Specifications ..................................................... 3-17 Tightening Torques for Standard Bolts and Nuts .......................... Tightening Fasteners............................................................... Hexagon Bolts and Nuts.......................................................... Hose Clamps ........................................................................... 3-19 3-19 3-19 3-19 Prepare Engine for Long-Term Storage ........................................ 3-20 Abbreviations and Symbols........................................................... 3-21 Abbreviations........................................................................... 3-21 Symbols................................................................................... 3-21 BY Service Manual DEC 2006 (Rev. 01) © 2007 Yanmar Marine International 3-1 GENERAL SERVICE INFORMATION Unit Conversions ........................................................................... Unit Prefixes ............................................................................ Units of Length ........................................................................ Units of Volume ....................................................................... Units of Mass........................................................................... Units of Force .......................................................................... Units of Torque........................................................................ Units of Pressure..................................................................... Units of Power ......................................................................... Units of Temperature............................................................... 3-2 NOV 2007 (Rev. 02) © 2007 Yanmar Marine International 3-22 3-22 3-22 3-22 3-22 3-22 3-22 3-22 3-22 3-22 BY Service Manual Principal Engine Specifications GENERAL SERVICE INFORMATION 12/05 PRINCIPAL ENGINE SPECIFICATIONS Engine Model 4BY150 / 150Z 4BY180 / 180Z 6BY220 / 220Z 6BY260 / 260Z Models numbers with no suffix letter are used in marine gear applications. Models having a “Z” suffix are used with stern drive. Application Design Number of Cylinders In-line 4 Type In-line 6 15° inclined, water-cooled, dual overhead camshaft, 4-cycle diesel Combustion System Direct injection Aspiration Turbocharged with charge air cooler Bore x Stroke 84 mm x 90 mm (3.307 in. x 3.543 in.) Displacement 1.995 L (121.7 cu in.) 2.993 L (182.6 cu in.) Order* 1-3-4-2 1-5-3-6-2-4 Compression Ratio 16.5:1 16.5:1 Firing Rated Power Output** Continuous Output (at 3600 rpm) Maximum Output (at 4000 rpm) Mean Pressure 4BY150 / 4BY150Z 4BY180 / 4BY180Z 6BY220 / 6BY220Z 6BY260 / 6BY260Z 85 kW (114 hp) 102 kW (137 hp) 124 kW (166 hp) 147 kW (197 hp) 110 kW (150 hp) 132 kW (180 hp) 162 kW (220 hp) 191 kW (260 hp) 1.66 MPa (240.76 psi) 1.98 MPa (287.18 psi) 1.62 MPa (234.96 psi) 1.92 MPa (278.47 psi) Low Idle Speed (Warm Engine @ 88°C [190°F]) Cold Start Speed @ 20°C (68°F) 750 rpm (ECU-controlled) 670 rpm (ECU-controlled) 1200 rpm gradually decreasing to warm engine idle @ 88°C (190°F) (ECU-controlled) High Idle Speed 4600 rpm Rotation Direction Counterclockwise (viewed from flywheel) No. of Valves per Cylinder 4 Valve Adjustment Hydraulic self-adjusting Turbocharger MHI with pneumatic wastegate Charge Air Cooler HOLSET with pneumatic wastegate Seawater cooled Electrical System 12 V Starter 12 V / 2 kW (2.7 hp) Charging System 12 V / 150 A Battery Capacity - Recommended 12 V / 74 Ah / 680 CCA (cold cranking amps) Fuel Injection System Common rail (ECU-controlled) Fuel Injection Pressure Variable depending on rpm; 250 - 1600 bar (3626 - 23,206 psi) Injection Timing Variable (ECU-controlled) ECU Threshold Voltage 7.8 V Cooling System Closed cooling system with heat exchanger Coolant Capacity (Approximate) 10.0 L (10.6 qt) BY Service Manual NOV 2007 (Rev. 02) © 2007 Yanmar Marine International 13.5 L (14.3 qt) 3-17 GENERAL SERVICE INFORMATION Engine Model 4BY150 / 150Z Principal Engine Specifications 4BY180 / 180Z 6BY220 / 220Z 6BY260 / 260Z Seawater Pump Rubber impeller, belt driven Capacity 140 L / hour minimum (37 gal / hour minimum) at 4000 engine rpm Maximum Lift 2000 mm (78.75 in.) Hydraulic Oil Cooler Seawater cooled Lubrication System Totally enclosed, forced lube system Oil Cooler Engine coolant system Lube Oil Pressure at 4000 rpm 3.5 - 6.0 bar (51 - 87 psi) Lube Oil Pressure at 1000 rpm Lube System Capacity*** 0.6 - 1.0 bar (8.7 - 14.5 psi) 8.0 L (8.45 qt)**** Crankcase Ventilation 11.0 L (11.5 qt)**** Closed, with filter Drive Options Stern Drive Marine Gear Bravo-1, -2, -3 KMH40A or KMH50A KMH40 or KMH50 Installation Angles: Static Angle Front-to-Rear ± 4° Left-to-Right ± 0° Operational Angles: Front-to-Rear and Left-to-Right Continuous 10° maximum Peak 20° maximum Height 721 mm (28.4 in.) Length (without marine gear) Stern Drive (front-to-middle of engine mount) 760 mm (29.9 in.) 942 mm (37.1 in.) Marine Gear (front-to-marine gear mounting face) 644 mm (25.4 in.) 825.5 mm (32.5 in.) Overall Length 861 mm (33.9 in.) 1001 mm (39.4 in.) Width 670 mm (26.4 in.) (local exceeding) Weight (without marine gear) Dry (without mixing elbow) 250 kg (551 lb) 310 kg (683 lb) Wet (with mixing elbow) 270 kg (595 lb) 340 kg (750 lb) * ** Cylinder numbering starts at the coolant pump end of the engine. Rating condition: ISO 8665. Temperature of fuel: 40°C (104°F) at fuel pump inlet. Fuel condition: Density at 15°C (59°F) = 0.827 g/cm3. Fuel temperature at the inlet of the fuel injection pump. 1 hp (metric horsepower) = 0.7355 kW *** The “Total Engine Lubricating Oil Capacity” includes oil in the oil pan, channels, coolers, and filter. The “Effective Engine Lubricating Capacity” indicates the difference in maximum scale of the dipstick and minimum scale. **** Capacity may vary depending on installation angle. 3-18 NOV 2007 (Rev. 02) © 2007 Yanmar Marine International BY Service Manual Abbreviations and Symbols GENERAL SERVICE INFORMATION 12/05 ABBREVIATIONS AND SYMBOLS kgf/cm² Abbreviations A AC ACEA Ah API ARB ATDC BDC BTDC °C CARB CCA cfm cm cm³ cm³/min cu in. D DC DI DVA EPA ESG °F fl oz fl oz/min ft ft-lb ft-lbf/min g gal gal/hr gal/min GL hp hr I.D. ID IDI in. in.Aq in.Hg in.-lb J JASO K kg ampere alternating current Association des Constructeurs Européens d’Automobilies ampere-hour American Petroleum Institute Air Resources Board after top dead center bottom dead center before top dead center degree Celsius California Air Resources Board cold cranking amp cubic feet per minute centimeter cubic centimeter cubic centimeter per minute cubic inch diameter direct current direct injection direct volt adapter Environmental Protection Agency electronic speed governor degree Fahrenheit fluid ounce (U.S.) fluid ounce (U.S.) per minute foot foot pound foot pound force per minute gram gallon (U.S.) gallon (U.S.) per hour gallon (U.S.) per minute gear lubricant horsepower (U.S.) hour inside diameter identification indirect injection inch inches Aqueous (water) inches Mercury inch pound joule Japanese Automobile Standards Organization kelvin kilogram BY Service Manual kgf/m km kPa kW L L/hr lb lbf m mL mm mmAq MPa mV N N·m No. O.D. oz Pa PS psi qt R rpm SAE sec. t TBN TDC V VAC VDC W kilogram force per square centimeter kilogram force per meter kilometers kilopascal kilowatt liter liter per hour pound pound force meter milliliter millimeter millimeter Aqueous (water) megapascal millivolt newton newton meter number outside diameter ounce pascal horsepower (metric) pound per square inch quart (U.S.) radius revolutions per minute Society of Automotive Engineers second short ton 2000 lb total base number top dead center volt volt alternating current volt direct current watt Symbols ° + ± Ω μ % DEC 2006 (Rev. 01) © 2007 Yanmar Marine International degree plus minus plus or minus ohm micro percent 3-21 GENERAL SERVICE INFORMATION Unit Conversions UNIT CONVERSIONS Units of Torque Unit Prefixes ft-lb ft-lb in.-lb in.-lb kgf/m kgf/m kgf/m N·m N·m N·m Prefix Symbol mega kilo centi milli micro M k c m Power x 1,000,000 x 1,000 x 0.01 x 0.001 x 0.000001 μ Units of Length mile ft in. in. km m cm mm x x x x x x x x 1.6090 0.3050 2.5400 25.4000 0.6210 3.2810 0.3940 0.0394 = km =m = cm = mm = mile = ft = in. = in. x x x x x x x x 3.78540 0.94635 0.01639 16.38700 0.02957 29.57000 1.00000 0.03382 =L =L =L = mL =L = mL = mL = fl oz (U.S.) x x x x 0.45360 28.35000 2.20500 0.03527 = kg =g = lb = oz 4.4480 0.4536 0.2248 0.1020 2.2050 9.8070 =N = kgf = lbf = kgf = lbf =N Units of Force lbf lbf N N kgf kgf 3-22 x x x x x x = N·m = kgf/m = N·m = kgf/m = ft-lb = in.-lb = N·m = ft-lb = in.-lb = kgf/m psi psi psi bar bar bar kPa kPa kPa kgf/cm² kgf/cm² kgf/cm² in.Hg (60°) in.Hg (60°) in.Hg (60°) mmAq x x x x x x x x x x x x x x x x 0.0689 6.8950 0.0703 14.5030 100.0000 29.5300 0.1450 0.0100 0.0102 98.0700 0.9807 14.2200 0.0333 3.3770 0.0344 0.0394 = bar = kPa = kgf/cm² = psi = kPa = inHg (60°F) = psi = bar = kgf/cm² = psi = bar = kPa = bar = kPa = kgf/cm² = in.Aq Units of Power Units of Mass lb oz kg g 1.3558 0.1383 0.1130 0.0115 7.2330 86.8000 9.8070 0.7376 8.8510 0.1020 Units of Pressure Units of Volume gal (U.S.) qt (U.S.) cu in. cu in. fl oz (U.S.) fl oz (U.S.) cm³ cm³ x x x x x x x x x x hp (metric or PS) hp (metric or PS) hp SAE hp SAE kW kW x 0.9863201 = hp SAE x 0.7354988 = kW x x x x 1.0138697 0.7456999 1.3596216 1.3410221 Units of Temperature °F = (1.8 x °C) + 32 °C = 0.556 x (°F - 32) NOV 2007 (Rev. 02) © 2007 Yanmar Marine International BY Service Manual = hp (metric or PS) = kW = hp (metric or PS) = hp SAE Introduction PERIODIC MAINTENANCE 12/05 INTRODUCTION EPA REQUIREMENTS This section of the Service Manual describes the procedures for proper care and maintenance of the engine. The EPA emission regulation is applicable only in USA. The Importance of Periodic Maintenance This product is an EPA-approved engine. Engine deterioration and wear occurs in proportion to length of time the engine has been in service and the conditions the engine is subject to during operation. Periodic maintenance prevents unexpected downtime, reduces the number of accidents due to poor machine performance and helps extend the life of the engine. Performing Periodic Maintenance Perform periodic maintenance procedures in an open, level area free from traffic. If possible, perform the procedures indoors to prevent environmental conditions such as rain, wind or snow from damaging the engine. WARNING! NEVER block windows, vents or other means of ventilation if the engine is operating in an enclosed area. All internal combustion engines create carbon monoxide gas during operation. Accumulation of this gas within an enclosure could cause illness or even death. The following are the conditions that must be met in order to ensure that the emissions during operation meet the EPA standards: • Ambient temperature: -16° to +40°C (3° to 104°F) • Relative humidity: 80% or lower The fuel and lubricating oil used should be as follows: • Diesel fuel: ASTM D975 No. 1-D or No. 2-D, or equivalent (minimum cetane No. 45) • Lubricating oil: Type API, Class SM, SL, SJ, SH / CF and CF Be sure to perform inspections as outlined in Periodic Maintenance Procedures on page 4-9 and keep a record of the results. Pay particular attention to these important points: • Replacing the engine oil Yanmar Replacement Parts Yanmar recommends that you use genuine Yanmar parts when replacement parts are needed. Genuine replacement parts help ensure long engine life. Required EPA Maintenance To maintain optimum engine performance and compliance with the Environmental Protection Agency (EPA) Regulation Engines, it is essential that you follow the Periodic Maintenance Schedule on page 4-5 and Periodic Maintenance Procedures on page 4-9. BY Service Manual Conditions to Ensure Compliance with EPA Emission Standards • Replacing the lube oil filter • Replacing the fuel filter • Replacing the air filter Note: Inspections are divided into two sections in accordance with who is responsible for performing the inspection: the user or the maker. NOV 2007 (Rev. 02) © 2007 Yanmar Marine International 4-3 PERIODIC MAINTENANCE EPA Requirements Inspection and Maintenance See Inspection and Maintenance of EPA Emission-Related Parts on page 4-8. Inspection and maintenance procedures not shown in the Inspection and Maintenance of EPA Emission-Related Parts section are covered in Periodic Maintenance Schedule on page 4-5. This maintenance must be performed to keep the emission values of your engine in the standard values during the warranty period. The warranty period is determined by the age of the engine or the number of hours of operation. 4-4 DEC 2006 (Rev. 01) © 2007 Yanmar Marine International BY Service Manual Periodic Maintenance Schedule PERIODIC MAINTENANCE 12/05 PERIODIC MAINTENANCE SCHEDULE Daily and periodic maintenance is important to keep the engine in good operating condition. The following is a summary of maintenance items by periodic maintenance intervals. Periodic maintenance intervals vary depending on engine application, loads, diesel fuel and engine oil used and are hard to establish definitively. The following should be treated only as a general guideline. c: Check : Replace Periodic Maintenance Interval System Whole Fuel System Item Every 50 hours or monthly whichever comes first Daily Visual inspection of engine exterior c Before starting Check for fuel leakage c Before starting Check the fuel level and refill if necessary c Before starting Drain water and sediment from fuel tank Drain the fuel filter / water separator Every 250 hours or one year whichever comes first Replace fuel filter / water separator element c c Before starting Change the engine oil and replace the oil filter element Visual inspection of cooling system Cooling Check coolant level and System check for leaks Engine Coolant Initial 50 c Before starting c Before starting Drain and refill closed cooling system (engine coolant) BY Service Manual Every 2000 hours or 8 years whichever comes first c Check the fuel pump and fuel lines Lubricating System Every 1000 hours or 4 years whichever comes first c Replace the fuel fine filter Check the engine oil level Every 500 hours or 2 years whichever comes first DEC 2006 (Rev. 01) © 2007 Yanmar Marine International 4-5 PERIODIC MAINTENANCE Periodic Maintenance Schedule c: Check : Replace Periodic Maintenance Interval System Cooling System Seawater Circuit Item Daily Visual inspection of cooling system c Before starting Check the seawater outlet c Before starting Check seawater pump belt for wear, replace if necessary Check or replace the seawater pump impeller c c c Check the exhaust / water mixing elbow c Replace the air filter element c Check the electrolyte level in the battery (serviceable batteries only) c c Before starting Check alternator belt for wear or replace belt 4-6 Every 2000 hours or 8 years whichever comes first Check the air intake pipes Check the wiring connectors Every 1000 hours or 4 years whichever comes first c Before starting Replace turbocharger heat shield Check the exhaust pipe Every 500 hours or 2 years whichever comes first c Replace the zinc anodes* Visual inspection Electrical System Every 250 hours or one year whichever comes first Check seawater filter (if equipped) and inlet Air Intake and Exhaust System Every 50 hours or monthly whichever comes first c NOV 2007 (Rev. 02) © 2007 Yanmar Marine International BY Service Manual Periodic Maintenance Procedures PERIODIC MAINTENANCE 12/05 PERIODIC MAINTENANCE PROCEDURES Every 50 Hours of Operation After Initial 50 Hours of Operation Perform the following maintenance after the initial 50 hours of operation. • Change the Engine Oil and Replace the Engine Oil Filter • Check Shift Cable Adjustment After you complete the initial 50 hour maintenance procedures, perform the following procedures every 50 hours or monthly thereafter. • Check Seawater Filter (If Equipped) and Inlet • Check the Air Intake Pipes • Check Battery Electrolyte Level (Serviceable Batteries Only) • Adjust the Propeller Shaft Alignment (If Equipped with Marine Gear) BY Service Manual DEC 2006 (Rev. 01) © 2007 Yanmar Marine International 4-9 PERIODIC MAINTENANCE Periodic Maintenance Procedures Every 250 Hours of Operation Every 500 Hours of Operation Perform the following maintenance every 250 hours of operation or one year, whichever comes first. Perform the following maintenance every 500 hours of operation or 2 years, whichever comes first. • Drain Water and Sediment from Fuel Tank • Check Fuel Pump and Fuel Lines • Replace the Fuel Fine Filter • Drain and Refill Closed Cooling System (Engine Coolant) • Replace the Fuel Filter / Water Separator Element • Change the Engine Oil and Replace the Engine Oil Filter Element • Check / Replace the Seawater Pump Belt • Replace the Zinc Anodes • Check or Replace the Seawater Pump Impeller • Replace the Turbocharger Heat Shield • Check the Exhaust / Water Mixing Elbow • Replace the Air Filter Element • Check / Change the Alternator Belt • Check / Change the Power Steering Fluid • Check the Shift Cable Adjustment • Adjust the Propeller Shaft Alignment • Check the Hydraulic Oil Cooler • Check or Replace Rubber Hoses • Check Flexible Engine Mounts 4-10 NOV 2007 (Rev. 02) © 2007 Yanmar Marine International BY Service Manual Periodic Maintenance Procedures PERIODIC MAINTENANCE 12/05 Every 1000 Hours of Operation Every 2000 Hours of Operation Perform the following maintenance every 1000 hours of operation or 4 years, whichever comes first. Perform the following maintenance every 2000 hours of operation or 8 years, whichever comes first. • Check Flexible Engine Mounts • Replace Alternator Belt • Replace Seawater Pump Impeller BY Service Manual NOV 2007 (Rev. 02) © 2007 Yanmar Marine International 4-11 PERIODIC MAINTENANCE Periodic Maintenance Procedures This Page Intentionally Left Blank 4-12 DEC 2006 (Rev. 01) © 2007 Yanmar Marine International BY Service Manual Camshaft and Timing Gear Train ENGINE 12/05 Figure 5-98 Figure 5-100 Figure 5-98 Figure 5-100 18. Remove camshaft sprocket (Figure 5-98, (2)) from chain (Figure 5-98, (1)) as shown by arrow. 22. Do not remove loop casting bolts. NOTICE: NEVER remove bolts retaining loop casting (Figure 5-100). Figure 5-99 Install Camshafts 1. Lubricate all camshaft bearings, caps and journals with clean engine oil. (2) Figure 5-101 (3) (1) (1) 0003776 Figure 5-99 19. Evenly loosen all camshaft bearing cap bolts (Figure 5-99, (1)) in 1/2-turn increments, working from each end towards the center. 20. Remove all bearing caps. NOTICE: Camshaft bearing caps are numbered and must be installed in their original locations. Figure 5-101 2. Identify the intake (Figure 5-101, (E)) and exhaust (Figure 5-101, (A)) camshafts. 21. Remove the intake (Figure 5-99, (2)) and exhaust (Figure 5-99, (3)) camshafts. BY Service Manual DEC 2006 (Rev. 01) © 2007 Yanmar Marine International 5-53 ENGINE Camshaft and Timing Gear Train 4. Install bearing caps in their proper locations. Figure 5-102 (1) • Intake camshaft bearing caps are marked A1 - A7. • Exhaust camshaft bearing caps are marked E1 - E7. 5. Lightly oil the threads of all bolts and install finger-tight. 6. Tighten all bearing caps evenly in 1/2-turn increments, starting at the center and working toward each end, until all bearing caps are seated. (2) 0003778 Figure 5-102 3. Install camshafts. Ensure the timing marks (Figure 5-102, (1)) on the gears align as shown. When the timing marks are aligned, the lobes (Figure 5-102, (2)) for cylinder No. 1 will face the exhaust side of the engine. Note: The valves will hold the camshafts above the bearing seats until all bolts are tightened. Figure 5-103 7. Tighten all bearing cap bolts to 10 N·m (89 in.-lb). 8. Install chain on sprocket and install sprocket on intake camshaft. Tighten bolts until snug. 9. Install guide rails. 10. Apply medium strength thread lock and sealer to the threads of the guide rail bearing pins. Install and tighten to 20 N·m (177 in.-lb). 11. Adjust camshaft timing. See Adjust Camshaft Timing on page 5-45. 12. Remove flywheel holding tool and install protective cap. 13. Remove chain tensioner locks. E1 A1 14. Install alternator drive belt. See Remove and Install Alternator on page 11-5. (1) E2 A2 (2) 15. Fill engine with coolant. See Drain and Fill Closed Cooling System on page 7-10. 16. Install cylinder head cover. See Remove and Install Cylinder Head Cover on page 5-17. 0003779 Figure 5-103 Note: Bearing caps are numbered beginning at the front (Figure 5-103, (1)) of the engine. The numbered markings of all caps should face the exhaust side (Figure 5-103, (2)). 5-54 NOV 2007 (Rev. 02) © 2007 Yanmar Marine International BY Service Manual Function Description - Engine Management System ELECTRICAL AND ECU 12/05 1 – Engine Control Unit (ECU) 2 – Internal ECU Sensors (operating voltage and ambient air pressure) 3 – Fuse (F2) 10 A1 - Start 4 – Fuse (F1) 3 A - CAN Switched Power 5 – Fuse (F6) 10 A - Auxiliary Power 6 – Start Signal from Key Switch 7 – Fuse (F4) 30 A - ECU Switched Power 8 – Fuse (F3) 15 A - Fuel Supply Pump 9 – Fuse (F5) 20 A - Fuel Pressure Regulator, Water-in-Fuel, Camshaft Sensor, and Fuel Volume Regulator 10 – Circuit Breaker (Boatbuilder Installed) 11 – Power to Starter Solenoid Primary Terminal 12 – Starter Relay K1 13 – Main Power Relay K2 14 – Fuel Supply Pump Relay K3 15 – Power to Fuel Supply Pump 16 – B+ to Water-in-Fuel Sensor 17 – Not Used 18 – Check Engine Indicator Output 19 – Fuel Rail Pressure Control Valve 20 – Fuel Volume Control (high-pressure pump) 21 – Fuel Injector No. 4 (4BY) or No. 6 (6BY) 22 – Fuel Injector No. 2 (4BY) or No. 2 (6BY) 23 – Fuel Injector No. 3 (4BY) or No. 5 (6BY) 24 – Fuel Injector No. 1 (4BY) or No. 3 (6BY) 25 – Fuel Injector No. 1 (6BY) 26 – Fuel Injector No. 4 (6BY) 1 27 – CAN Signal - Low 28 – CAN Signal - High 29 – Panel, ECU, and CAN Ground 30 – K-Line 31 – Neutral Start Switch (NC in neutral) 32 – Jumper Fuse (F8) 3 A - CAN / Analog Throttle Selection, default is analog (fuse out). Insert 3 A fuse to configure for CAN. 33 – Jumper Fuse (F7) 3 A - Single / Port Selection, default is single / port (fuse in). Remove fuse for starboard configuration. 34 – Fuel Rail Pressure Sensor 35 – Fuel Temperature Sensor 36 – Subthrottle Sensor 2 37 – Subthrottle Sensor 1 38 – Oil Pressure Sensor 39 – Water-in-Fuel Sensor 40 – Camshaft Speed Sensor 41 – Crankshaft Speed Sensor 42 – Charge Air Pressure Sensor 43 – Charge Air Temperature Sensor 44 – Engine Coolant Temperature Sensor 45 – Ignition Power Input from Key Switch (terminal X1-D) 46 – Auxiliary Power Output (terminal X1-G) 47 – CAN+ to Warning Indicator (terminal X1-H) 48 – Battery Power to Key Switch (terminal X1-B) 49 – CAN Signal Blocking Diode 50 – High Bench 1 51 – High Bench 2 NEVER connect any additional devices to F2. F6 may be used however, it is not switched. BY Service Manual NOV 2007 (Rev. 02) © 2007 Yanmar Marine International 12-11 ELECTRICAL AND ECU Component Tests Figure 12-5 shows a general schematic diagram of all ECU input and output assignments. The ECU is supplied by Bosch and has a hardware specification of EDC 16. The base ECU software is Bosch DDE 5. The engine control software is application specific version NSW 3.0, which is a torque-based software structure. It is NMEA 2000 implemented and provides diagnostics through OBD protocol. The ECU monitors data from the various sensors and controls such functions as low-pressure fuel pump operation, fuel injection pressure, fuel injection system volume, and the timing and volume of fuel injected by the Bosch electronic fuel injectors. Throttle control is fly-by-wire, meaning it is controlled by electric signals from the helm. The throttle control is either analog or digital depending on the level of control options installed. The ECU also uses sensor inputs to monitor engine condition and will generate a trouble code if a system or sensor indicates a problem. In most cases, a Check Engine light will be displayed. The engine may or may not run normally depending on the fault. If an engine coolant overheat is detected, for instance, the ECU will reduce the engine power output and the coolant overheat indicator will illuminate. If an audible alarm is installed, it too will sound. Not all inputs are monitored by the ECU. Low oil pressure and water in fuel are two examples. Either of these conditions will result in a warning indicator and possible audible alarm. Low oil pressure will also be indicated by the oil gauge at the helm. COMPONENT TESTS NOTICE: When using a common automotive test lamp to test relays and their circuits, contact with terminal 85 (Figure 12-6, (2)) will cause the relay to engage. This will result in starter engagement or fuel pump operation. Relays Relays control power to the starter, fuel feed pump and main system power. The winding ground circuit (terminal 85) of all relays is controlled by the ECU. Start Relay (K1) 12 V is supplied by fuse F5 to winding terminal 86. When the start signal from the key switch is seen at ECU terminal 224, the winding ground circuit (terminal 85) is completed at ECU terminal 234 (assuming neutral is sensed at ECU terminal 250) and current passes through terminals 87 and 30 to energize the starter motor. Results of Failed Relay Failure of the relay results in: • Inability to start engine If this relay is defective, no P-codes will be generated. Note: Viewed from bottom of connector. Figure 12-6 0004173 Figure 12-6 1 2 3 4 5 12-12 – Pin 2 - terminal 87 (not used) – Pin 4 - terminal 85 – Pin 5 - terminal 87 – Pin 6 - terminal 30 – Pin 8 - terminal 86 NOV 2007 (Rev. 02) © 2007 Yanmar Marine International BY Service Manual Component Tests ELECTRICAL AND ECU 12/05 Main Relay (K2) Fuel Pump Relay (K3) 12 V is supplied directly to terminal 30 (Figure 12-7, (4). An internal connection connects one end of the winding to terminal 30. When the key switch is turned ON, a 12 V signal is sent to ECU terminal 27. The ECU then completes the winding ground circuit (terminal 85) through ECU terminal 220. 12 V is supplied by fuse F3 to terminal 30 (Figure 12-8, (4). An internal connection connects one end of the winding to terminal 30. When the key switch is turned ON, a 12 V signal is sent to ECU terminal 27. The ECU then completes the winding ground circuit (terminal 85) through ECU terminal 232. Results of Failed Relay Failure of the relay results in: Results of Failed Relay Failure of the relay results in: • Loss of power to all systems • Fuel supply pump will not operate If this relay is defective, the following P-codes may be generated. If this relay is defective, the following P-codes may be generated. • P0689 - short circuit to ground • P0230 - power interruption - defective fuse (F5) or relay or connections • P0690 - short circuit to B+ Note: Viewed from bottom of connector. • P0231 - regulation short circuit to B• P0232 - regulation short circuit to B+ Figure 12-7 Note: Viewed from bottom of connector. Figure 12-8 0004173 Figure 12-7 1 2 3 4 – Pin 2 - terminal 87 – Pin 4 - terminal 85 – Pin 5 - terminal 87 – Pin 6 - terminal 30 BY Service Manual 0004173 Figure 12-8 1 2 3 4 – Pin 2 - terminal 87 – Pin 4 - terminal 85 – Pin 5 - terminal 87 (not used) – Pin 6 - terminal 30 NOV 2007 (Rev. 02) © 2007 Yanmar Marine International 12-13 ELECTRICAL AND ECU Component Tests Oil Pressure Sensor Fuel Injector This sensor measures the engine oil pressure and sends the signal to the helm gauge. It is a pressure sensitive variable resistor. It is mounted in the front heat exchanger bracket and is connected to the engine block via a pressure line. The fuel injectors are continuously supplied with high-pressure fuel and are electronically triggered by the ECU. The ECU controls the frequency, duration and timing of injection. The sensor output is not used by the ECU. Results of Failed Injector Results of Failed Sensor If an injector-related failure occurs, the following P-codes may be generated: Failure of the sensor results in: • P2049 - Short circuit on high side to ground or B+ • Loss of engine oil pressure monitoring 4BY - engine will stop If this sensor is defective, no P-codes will be generated. 6BY - engine may continue to run • P2052 - Short circuit on high side to ground or B+ Test Values • P0261, P0264, P0267, P0270, P0273, P0276 short circuit to B+ • Resistance at 0 bar (0 psi): 10 +3 -5 ohm • Resistance at 2 bar (29 psi): 52 ±4 ohm • P0201, P0202, P0203, P0204, P0205, P0206, no connection / short to ground • Resistance at 4 bar (58 psi): 88 ±4 ohm • Resistance at 6 bar (87 psi): 124 ±5 ohm Note: A minimum of two injectors must function for the 4BY to run. A minimum of three injectors must function for the 6BY to run. Figure 12-9 (1) Engine may continue to run (2) Test Values • Resistance at 20°C (68°F): 0.4 ohm Figure 12-10 1 2 0004169 Figure 12-10 0004171 1 – Pin 1 - Low side 2 – Pin 2 - High side Figure 12-9 1 – Engine harness 2 – Engine harness Note: Polarity of wire connections is not important. Either wire can be connected to either terminal. 12-14 DEC 2006 (Rev. 01) © 2007 Yanmar Marine International BY Service Manual Component Tests ELECTRICAL AND ECU 12/05 Engine Coolant Temperature Sensor Fuel Rail Pressure Control Valve This sensor measures the temperature of the engine coolant. It is a NTC (negative temperature coefficient) type sensor. It is mounted in the cylinder head. This valve controls the fuel pressure in the fuel rail. The ECU uses values supplied by several sensors and sends corresponding signals to control fuel pressure. It is mounted on the rear of the fuel rail. The sensor output is used by the ECU for: Results of Failed Valve • Calculation of the injection rate Failure of the valve results in: • Regulating glow plug on-time • Limitation of the injection rate (See Engine Faults and Torque Limitations on page 13-3.) • Regulating engine low idle speed • Engine may fail to start • Regulating fuel rail pressure NOTICE: If a fault code is generated, check the fuel supply and delivery first. Results of Failed Sensor Failure of the sensor results in: • Destruction of the sensor if short circuit to B+ If this valve is defective, the following P-codes may be generated: If this sensor is defective, the following P-codes may be generated: • P0088 - fuel rail pressure out of range • P0117 - short circuit to B+ • P0089 - fuel rail pressure out of range • P0118 - No connection / short to ground • P0090 - not connected / valve failure Test Values • P0091 - short circuit to ground / valve failure • Resistance at 20°C (68°F): 2.5 to 3.0 k-ohm • Resistance at 50°C (122°F): 0.7 to 0.9 k-ohm • Resistance at 100°C (212°F): 0.12 to 0.17 k-ohm • P0087 - fuel rail pressure out of range • P0092 - short circuit to B+ / valve failure Test Values • Resistance at 20°C (68°F): 4.0 ohm Figure 12-11 (1) (2) • At 1800 bar (26 107 psi) (relative): 4.5 V Figure 12-12 1 2 0004168 Figure 12-11 0004169 Figure 12-12 1 – Pin 1 - Out (ECU pin 182) 2 – Pin 2 - Ground (ECU pin 17) BY Service Manual 1 – Pin 1 - 12V (Fuse F5) 2 – Pin 2 - Out (ECU pin 172) NOV 2007 (Rev. 02) © 2007 Yanmar Marine International 12-15 ELECTRICAL AND ECU Component Tests Water-in-Fuel Sensor • The control of the injection start This sensor monitors fuel for the presence of water and sends the signal to the helm display. If water is present, the resistance between the probes drops below the threshold of 47 k-ohms and results in a warning at the helm. It is mounted on the bottom of the fuel filter / water separator. • The calculation of the limitation of the injection rate The sensor output is not used by the ECU. • The control of the injection rate Results of Failed Sensor • The control of the rail pressure Failure of the sensor results in: • The control at idle speed • Loss of water-in-fuel monitoring • The calculation if an external regulation of the injection rate is necessary • The control of the glow plugs Results of Failed Sensor If this sensor is defective, no P-codes will be generated. Failure of the sensor results in: • Inability to start the engine. Engine can not run without this sensor. Test Values • No test values are available for this device If this sensor is defective, the following P-codes may be generated: Figure 12-13 1 2 3 • P0344 - disagreement between camshaft speed sensor and crankshaft speed sensor • P2617 - no connection / short circuit 0004170 Figure 12-14 Figure 12-13 1 – Pin A - Black wire 2 – Pin B - Red wire 3 – Pin C - Yellow wire 0004167 Figure 12-14 Crankshaft Speed Sensor This sensor measures the speed of the crankshaft. This value is compared with the camshaft speed by the ECU. It is mounted on the rear crankshaft seal housing at the rear of the engine. The ECU supplies 5V and ground. 1 – Pin 1 - 5V (ECU pin 139) 2 – Pin 2 - F_out (ECU pin 187) 3 – Pin 3 - Ground (ECU pin 115) The sensor signal is used by the ECU for: • The calculation of the actual rotations of the engine • The check of the starting conditions • The calculation of the injection rate at the starting procedure 12-16 NOV 2007 (Rev. 02) © 2007 Yanmar Marine International BY Service Manual Component Tests ELECTRICAL AND ECU 12/05 Glow Plug / Control Unit The glow plug control system consists of the following components: Post-Heating Once the engine is started and the coolant temperature increases above 30°C (86°F), post heating will occur to improve idle and reduce emissions. • ECU Results of Component Failure • Electronic glow plug control unit Component failure results in: • Glow plugs • P0671 - cylinder 1 glow plug circuit - not connected / short circuit The System • Bit-serial data (BSD) interface and electrical cables The following information is important to understand the glow plug control: • P0672 - cylinder 2 glow plug circuit - not connected / short circuit • P0673 - cylinder 3 glow plug circuit - not connected / short circuit • Glow plugs are designed for operating voltage between 5.3 and 7.8 volts • Glow plugs are fast-start type • P0674 - cylinder 4 glow plug circuit - not connected / short circuit • Glow plug regulation is pulse-width modulated • P0675 - cylinder 5 glow plug circuit - not connected / short circuit • The electronic glow plug control unit replaces the more commonly used relay • P0676 - cylinder 6 glow plug circuit - not connected / short circuit • The implementation of a function for emergency cases • P0670 - Glow control unit - component failure / short circuit / over-current • Each circuit can be individually diagnosed • P0380 - Glow control relay actuator - not connected / short circuit Function The glow plug control unit communicates with the ECU via the bit-serial data interface. The heating output is calculated by the ECU according to the coolant temperature and the system voltage. Engine speed and injection rate effect the rate that the glow plugs are switched on and off. Test Values • Glow plug resistance at 20°C (68°F): 0.5 ohm Preheating When the coolant temperature is above 25°C (77°F), the unit will operate for 0.5 seconds. As temperatures decrease below 25°C (77°F), the on-time will increase up to a maximum of 2.7 seconds, depending on temperature. If the key switch is turned ON but the engine is not started immediately, the controller will continue to implement the glowing process for 10 seconds. BY Service Manual NOV 2007 (Rev. 02) © 2007 Yanmar Marine International 12-17 ELECTRICAL AND ECU Component Tests • P0183 - No connection / short to ground Figure 12-15 Test Values • Resistance at -20°C (-4°F): 20 to 24 k-ohm • Resistance at 0°C (32°F): 16.5 to 8 k-ohm 0004172 • Resistance at 20°C (68°F): 2.4 to 3.2 k-ohm Figure 12-15 • Resistance at 120°C (248°F): 0.5 to 0.6 k-ohm 1 2 3 4 5 6 7 – Pin 1 - Glow plug No. 1 – Pin 2 - Glow plug No. 2 – Pin 3 - Glow plug No. 3 – Pin 4 - Glow plug No. 4 – Pin 5 - Glow plug No. 5 – Pin 6 - Glow plug No. 6 – Pin 12 - Signal of measured value (ECU pin 168) 8 – Pin 6 - Ground (ECU pin 170) 9 – Pin 5 - 12V (Fuse F5) Figure 12-16 (1) 0004168 Figure 12-16 Connector X3 The control signals travel via connector X3. If the glow control unit is not installed, connector X3 must be protected by a cover. Fuel Temperature Sensor This sensor measures the temperature of the fuel being supplied to the high-pressure fuel pump. It is a NTC (negative temperature coefficient) type sensor. It is mounted in the fuel line just upstream from the high-pressure fuel pump. 1 – Pin 1 - Ground (ECU pin 111) 2 – Pin 2 - Out (ECU pin 183) Fuel Volume Regulator This component controls fuel volume in the fuel injection system. The ECU uses values supplied by several sensors and sends corresponding signals to control fuel pressure. It is mounted on the rear of the high-pressure fuel pump. Results of Failed Regulator Failure of the regulator results in: The sensor output is used by the ECU for: • Limitation of the injection rate (See Engine Faults and Torque Limitations on page 13-3.) • Protecting the engine from overheating • Calculation of the injection rate • All high-pressure fuel system control is provided by the fuel rail pressure control valve. • Calculation of the rate of the fuel pump NOTICE: If a fault code is generated, check the fuel supply and delivery first. Results of Failed Sensor Failure of the sensor results in: • Limitation of the injection rate (See Engine Faults and Torque Limitations on page 13-3.) • Destruction of the sensor if short circuit to B+ If this sensor is defective, the following P-codes may be generated: • P0182 - short circuit to B+ 12-18 (2) If this regulator is defective, the following P-codes may be generated: • P0001 - not connected • P0003 - short circuit to ground • P0004 - short circuit to B+ • P0088 - fuel rail pressure out of range DEC 2006 (Rev. 01) © 2007 Yanmar Marine International BY Service Manual Component Tests ELECTRICAL AND ECU 12/05 • P0087 - fuel rail pressure out of range Figure 12-18 (1) (2) • P0089 - fuel rail pressure out of range • P0090 - fuel rail pressure out of range Test Values 0004168 • Resistance at 20°C (68°F): 3.0 ohm Figure 12-18 Figure 12-17 1 – Pin 1 - Out (ECU pin 157) 2 – Pin 2 - Ground (ECU pin 16) 1 2 Charge Air Pressure Sensor This sensor measures the charge air pressure as absolute value (charge air pressure + atmospheric pressure). It is mounted on the charge air pipe and is sealed by an O-ring. 0004169 Figure 12-17 1 – Pin 1 - 12V (Fuse F5) 2 – Pin 2 - Out (ECU pin 171) Results of Failed Sensor Charge Air Temperature Sensor Failure of the sensor results in: This sensor measures the temperature of the compressed air coming from the turbocharger. It is mounted on the charge air pipe. • Limitation of the injection rate (See Engine Faults and Torque Limitations on page 13-3.) Results of Failed Sensor If this sensor is defective, the following P-codes may be generated: Failure of the sensor results in: • P0238 - short circuit to B+ • Limitation of the injection rate (See Engine Faults and Torque Limitations on page 13-3.) • P0237 - no connection / short circuit to ground • P0236 - no plausibility • Reduction in rated power • Destruction of the sensor if short circuit to B+ If this sensor is defective, the following P-codes may be generated: • P0112 - short circuit to B+ • P0113 - No connection / short to ground Test Values Note: Pressure is kPa (absolute) • Relation to supply voltage: Vout = (2/875 x pressure value - 1/70) x supply voltage Examples: • At 5V supply voltage and atmospheric pressure (98 kPa), Vout is approximately 1.04 V Test Values • Resistance at -20°C (-4°F): 40 to 48 k-ohm • Resistance at 0°C (32°F): 14.5 to 16.5 k-ohm • At 5V supply voltage and 200 kPa (absolute), Vout is approximately 2.21 V • Resistance at 20°C (68°F): 6.0 to 6.5 k-ohm • Resistance at 120°C (248°F): 0.18 to 0.22 k-ohm BY Service Manual NOV 2007 (Rev. 02) © 2007 Yanmar Marine International 12-19 ELECTRICAL AND ECU Component Tests Figure 12-19 Figure 12-20 0004167 0004167 Figure 12-19 Figure 12-20 1 – Pin 1 - 5V (ECU pin 139) 2 – Pin 2 - Ground (ECU pin 180) 3 – Pin 3 - Out (ECU pin 154) 1 – Pin 1 - Ground (ECU pin 178) 2 – Pin 2 - Out (ECU pin 156) 3 – Pin 3 - 5V (ECU pin 130) Fuel Rail Pressure Sensor Camshaft Speed Sensor This sensor measures the fuel pressure in the fuel rail. The values are used by the ECU for fuel quantity regulation and fuel pressure regulation. It is mounted on the front of the fuel rail. The ECU supplies 5V and ground. This sensor measures the speed of the camshaft. This value is compared with the crankshaft speed by the ECU. It is mounted on the cylinder head cover near the front of the engine. Results of Failed Sensor Failure of the sensor results in: Failure of the sensor results in: • Default value in the ECU • Limitation of the injection rate (See Engine Faults and Torque Limitations on page 13-3.) NOTICE: If a fault code is generated, check the fuel supply and delivery first. If this sensor is defective, the following P-codes may be generated: • P0088 - fuel rail pressure out of range Results of Failed Sensor • Difficulty starting and reduction in power (See Engine Faults and Torque Limitations on page 13-3.) If this sensor is defective, the following P-codes may be generated: • P0344 - disagreement between camshaft speed sensor and crankshaft speed sensor • P2614 - no connection / short circuit Figure 12-21 • P0087 - fuel rail pressure out of range • P0089 - fuel rail pressure out of range 0004167 • P0090 - fuel rail pressure out of range Figure 12-21 • P0193 - no connection / short circuit B+ 1 – Pin 1 - 12V (Fuse F5) 2 – Pin 2 - F_out (ECU pin 187) 3 – Pin 3 - Ground (ECU pin 115) • P0192 - short circuit to ground Test Values • At 0 bar (0 psi) (relative): 0.5 V • At 1800 bar (26, 107 psi) (relative): 4.5 V 12-20 NOV 2007 (Rev. 02) © 2007 Yanmar Marine International BY Service Manual Component Tests ELECTRICAL AND ECU 12/05 Throttle Position Sensor Figure 12-22 This sensor is located in the remote control head. It communicates with the ECU with varying signals based on throttle position. The ECU then calculates the position of the throttle lever in percent, and adjusts fuel injection to adjust engine speed. The ECU supplies 5V and ground connections. Results of Failed Sensor Failure of the sensor results in: 0004167 Figure 12-22 1 – Pin 1 - Ground (ECU pin 178) 2 – Pin 2 - Out (ECU pin 156) 3 – Pin 3 - 5V (ECU pin 130) Voltage Set-Point Values • One failed sensor - limitation of the injection rate (See Engine Faults and Torque Limitations on page 13-3.) • Two failed sensors - engine low idle will increase Sensor Low Idle High Idle PWG 1 0.70 - 0.80 3.65 - 4.10 PWG 2 0.31 - 0.43 1.83 - 2.04 If this sensor is defective, the following P-codes may be generated: • Sensor 1+2 (PWG): • P0122 - both throttle signals are missing / short circuit to ground • P0222 - both throttle signals are missing / short circuit to ground • Sensor 1 only (PWG): • P0123 - throttle signal 1 short circuit to B+ • P0122 - throttle signal 1 is missing / short circuit to ground • Sensor 2 only (PGS): • P0223 - throttle signal 2 short circuit to B+ • P0222 - throttle signal 2 is missing / short circuit to ground Test Values • At 0 bar (0 psi) (relative) - 0.5 V • At 1800 bar (26 107 psi) (relative) - 4.5 V BY Service Manual NOV 2007 (Rev. 02) © 2007 Yanmar Marine International 12-21 ELECTRICAL AND ECU Repair REPAIR Replace Coolant Temperature Sensor Replace Engine Control Unit (ECU) 1. Drain engine coolant. See Drain and Fill Closed Cooling System on page 7-10. NOTICE: The ECU may be damaged if it is powered when you unplug it. Turn the key switch OFF and disconnect the battery before disconnecting the ECU from the electrical harness. 2. Remove intake manifold. See Intake Manifold on page 5-66. Figure 12-24 1. Disconnect the electrical panel power cables from the battery, negative (-) cable first. 2. Remove the electrical panel cover. (2) Figure 12-23 (1) (2) (1) 0003767A (3) Figure 12-24 3. Remove electrical connector (Figure 12-24, (1)) from sensor. 0003799 4. Remove sensor (Figure 12-24, (2)) from cylinder head. 5. Installation is in reverse of removal. Figure 12-23 3. Disconnect two electrical connectors (Figure 12-23, (1)) from ECU. 4. Remove screws securing the upper ECU retainer (Figure 12-23, (2)). 6. Tighten sensor to 13.4 N·m (119 in.-lb) 7. Check and delete any trouble codes that are registered in the ECU after the work has been completed. 5. Loosen the lower attaching screws (Figure 12-23, (3)) and remove the ECU. 6. Install the new control unit and tighten the screws. 7. Connect the electrical connectors to the ECU. 8. Connect the electrical panel power cables to the battery. 9. Check and delete any trouble codes that are registered in the ECU after the work has been completed. 12-22 NOV 2007 (Rev. 02) © 2007 Yanmar Marine International BY Service Manual