1
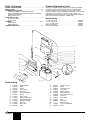
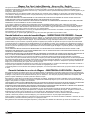
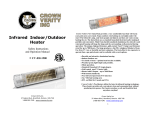
R
Cordless Power Roller
Owner’s Manual
Gude d’utilisation • Manual del propietario
Quick-start
Easy does it from setup to cleanup:
1
Install the batteries
Insérer les piles
Instalar las pilas
5
Fill the fluid tank
Remplir le réservoir à liquides
Llenar el depósito de fluidos
2
Attach the strap
Fixer la bandoulière
Conectar la correa
6
Attach the drive housing
Fixation du logement du mécanisme
Conectar el mecanismo impulsor
3
4
Remove the drive housing
Enlever du logement du mécanisme
Extraer el mecanismo impulsor
7
Attach the hoses
Fixation des tuyaux flexibles
Conectar las mangeras
8
Press the on/off switch
Appuyer sur le bouton marche/arrêt
Oprimir el botón de encendido
/ apagado
Apply paint
Appliquer la peinture
Aplicar pintura
9
Cleanup
Nettoyage
Limpieza
Read this manual for complete instructions.
Ce manuel contient les instructions
complètes.
Lea este manual para obtener instrucciones
completas.
Need help? Call us first for answers fast.
Call Wagner toll-free if you have any comments
or problems with this Wagner product.
1-800-328-8251
Wagner Technical Service
Weekdays: 8:00 - 4:30 Central time
Weekends: 9:00 - 4:00 Central time
1770 Fernbrook Lane, Minneapolis, MN 55447
Form No. 0156934C
Español Français English
9709
Table of Contents
Product Registration Card
PRODUCT REGISTRATION. . . . . . . . . . . . . . . . . . . . . . . . . . . . 2
PARTS LISTING . . . . . . . . . . . . . . . . . . . . . . . . . . . . . . . . . . . . 2
ASSEMBLING THE ROLLER . . . . . . . . . . . . . . . . . . . . . . . . . . 3
Installing the batteries and attaching the strap
Removing and Attaching the Drive Housing to the Fluid Tank
Attaching the Fluid Hose
Filling the Fluid Tank
USING THE ROLLER . . . . . . . . . . . . . . . . . . . . . . . . . . . . . . . . 3
Pump On/Off Switch
Applying Paint
CLEANUP. . . . . . . . . . . . . . . . . . . . . . . . . . . . . . . . . . . . . . . . 4-5
Quick Cleanup
Detailed Cleanup
STORING THE ROLLER . . . . . . . . . . . . . . . . . . . . . . . . . . . . . . 5
Send in your Wagner product registration card. Proper registration
will serve as proof of purchase in the event your original receipt
becomes misplaced or lost. Returning this card will not affect
warranty coverage, but may expedite the processing of your warranty
and enable you to contact us in the event of loss or theft. The
additional information will also help us to develop new products that
best meet your needs and desires. THANK YOU!
Accessories
9” x 3/8” roller cover . .
9” x 3/4” roller cover . .
9” x 1-1/4” roller cover .
Ball check assembly . .
Check valve assembly.
.
.
.
.
.
.
.
.
.
.
.
.
.
.
.
.
.
.
.
.
.
.
.
.
.
.
.
.
.
.
.
.
.
.
.
.
.
.
.
.
.
.
.
.
.
.
.
.
.
.
.
.
.
.
.
.
.
.
.
.
.
.
.
.
.
.
.
.
.
.
.
.
.
.
.
.
.
.
.
.
.
.
.
.
.
.
.
.
.
.
.
.
.
.
.
.
.
.
.
.
.
.
.
.
.
.
.
.
.
.
.
.
.
.
.
.
.
.
.
.
.
.
.
.
.
. 0155206
. 0155209
. 0155209
. 0156270
. 0156276
1
25
2
3
4
5
6
7
8
9
24
26
23
27
22
21
20
11
12
10
14
15
19
18
13
16
17
Parts Listing
1
2
3
4
5
6
7
8
9
10
11
12
13
14
0156400
0156595
0327312
0156596
0327226
0156471
0327327
0156579
0156276
0156270
0156582
0156464
0156580
0016551
R
15
16
17
18
19
20
Strap Assembly
Piston
O-Ring
Pump, Upper
Clip, Spring
Spring, Anti-kinking
O-Ring
Pump, Lower
Valve Cap Assembly
Inlet Valve Assembly
Retainer, Inlet Ball
Ball, Inlet
Body, Valve
Filter
English
21
22
23
24
25
26
27
2
0156421
0280346
0156607
0156606
0156566
0155206
0155208
0156556
0156559
0245401
0156290
-----0156585
0156409
Adapter, Faucet
Brush
Container, Fluid
Tray, Roller
Shield, Splatter
Roller Cover, 3/8"
Roller Cover, 3/4" Opt.
Cap, End
Core, Roller
Seal
Arm, Roller
Drive Housing
Cap, Pump Retaining
Cover
©1997 Wagner Spray Tech. All rights reserved.
Assembling the Roller
Checking the Inlet Valve
Installing the Batteries and Attaching the Strap
If the unit is new or has been stored for an extended period of time
the inlet ball can become stuck and the pump may be difficult to
prime. To check:
1. Turn the valve body
counterclockwise and pull
down to remove.
2. Shake the inlet valve
assembly gently. If it does
not rattle, remove the inlet
ball retainer and clean the
ball.
3. Reassemble the inlet valve.
+ +
- +
+
-
1. Open the battery
door. The battery
door is located on
the drive housing.
2. Insert the batteries
in the proper
direction.
Inlet Ball
Retainer
Ball
Inlet Valve
Assembly
Inlet Ball
Holder
Filling the Fluid tank
1. Place the drive housing on the fluid tank at a 90° angle.
CAUTION
2. Remove the fluid tank cap
and fill the tank with paint.
Improper installation of batteries may cause batteries to
overheat and leak acid. Acid may cause severe injury and/or
property damage.
3. Wipe the lip, threads, and
body of the fluid tank to
remove any spilled or
splattered material.
4. Replace the cap and lock the
drive housing securely onto
the fluid tank.
NOTE: Use high quality alkaline batteries only.
3. Attach the strap to the loops on the drive housing.
Using the Roller
The On/Off switch has two speeds for
controlling the paint flow – High and
Low. Choose the setting which is
appropriate for your application. If too
much paint is being delivered to the
roller on High speed, use the Low
speed setting. If paint flow is still too
great, shut the roller off, then turn back
on when more paint is needed.
Applying Paint
Begin rolling as paint appears to saturate the roller cover. If paint is
flowing faster than you can roll,turn the pump off until more paint is
needed.
Removing and Attaching the Drive Housing to
the Fluid Tank
Open
1. Remove the drive housing by
turning the drive housing
counterclockwise.
2. Attach the drive housing by
setting it onto the fluid tank at
a 90° angle and turning
clockwise.
NOTE: Do not place the roller below the level of the paint when
not in use. Paint will siphon to roller even if motor and
pump are turned off.
Close
Attaching the Fluid Hose
1. Slide the fluid hose through
the anti-kinking spring and
the spring clip.
2. Push the fluid hose to the
port on the side of the
drive housing.
3. Slide the spring clip over
the fitting to keep the hose
securely in place.
4. Slide the anti-kinking
spring up against spring
clip.
©1997 Wagner Spray Tech. All rights reserved.
Fluid Hose
3
English
R
Cleanup
Detailed Cleanup
A thorough cleaning after each use of the roller is important to keep
it in good working order.
Cleaning the Roller Cover
NOTE:
1. Pull one end of the splatter
shield out of the end cap and
slip opposite end off of the
roller handle.
2. Press the locking tab and
remove the roller cover and
roller core.
3. Unscrew the end cap and
slide the roller cover off of the
roller core.
4. Clean the roller cover with the appropriate solvent.
When using latex paint, use warm soapy water for
cleaning parts. When using oil paint, the appropriate
solvent is often mineral spirits. Always follow the paint
manufacturer's recommendations for appropriate solvent.
Not recommended for lacquer and other hard solvents.
CAUTION
Do not turn the roller upside down or on its side. If liquid gets
inside the drive housing it could damage the unit.
Tab
End Cap
Core
Cover
Shield
NOTE: For latex, clean roller cover, core and end cap
thoroughly in warm soapy water.
For oil-based paints, clean roller cover, core and end
cap in the appropriate solvent recommended by the
paint manufacturer.
Quick Cleanup
The following steps outline the basic cleanup procedures. For more
detailed instructions on how to perform each step, refer to the
Detailed Cleanup section in this manual.
Removing Paint from the Hose and Container
1. Clean the roller cover.
1. Remove the drive housing
from fluid container.
2. Hold the roller handle over
the paint pail and run the
pump to remove excess
paint from hose and pump.
3. Pour remaining paint from
container back into paint pail.
2. Remove paint in hose.
1
Cleaning the Hose
Thoroughly
3. Empty fluid tank.
4. Clean hose.
5. Clean roller handle.
6. Remove the pump assembly.
2
3
For Latex:
1. Remove the hose from the motor
compartment.
2. Insert the hard plastic tube of the
faucet adapter into the paint hose.
3. Push the adaptor over a faucet.
4. Slowly increase the water pressure
and run water through the hose and
handle until the water come out clean.
For Oil:
1. Fill the paint container with the appropriate solvent
recommended by the paint manuafacturer.
2. Circulate the solvent through hose and roller arm for several
minutes.
Cleaning the Roller Handle Assembly
7. Remove and clean the valves.
1. Remove the seal from the end of the
roller handle. Note the direction of the
lip for correct replacement.
2. Clean the handle and seal thoroughly.
3. Apply a thin layer of petroleum jelly to
the seal.
4. Replace the seal in the proper direction.
8. Clean the pump assembly.
Removing the Pump from the Drive Housing
1. Turn the retaining nut on the pump
counterclockwise.
2. Pull out the pump assembly.
9. Clean and lubricate the
piston and O-ring.
R
English
NOTE: The piston will remain
attached.
10. Reassemble the pump and
attach it to the drive housing.
3. Wipe excess paint off of the piston.
4. Apply a thin layer of petroleum jelly to the pump O-Ring.
4
©1997 Wagner Spray Tech. All rights reserved.
Cleaning the Pump Housing
NOTE: Remove the pump carefully or the piston may come off.
If the piston comes off, reassemble by sliding piston
onto the brass piston connecting rod.
NOTE: Wipe excess paint off the drive housing with an
appropriate solvent. DO NOT IMMERSE UNIT IN
SOLVENT OR OTHER LIQUID.
1. Clean pump housing with warm,
soapy water or the appropriate
solvent using the brush supplied.
2. Apply a thin layer of petroleum
jelly to the pump O-Ring.
NOTE: Be sure to clean all
small parts
thoroughly. Paint will
act as an adhesive
when dry.
Cleaning the Valves
Cleaning the Inlet Valve
1. Press down on the locking
tab and pull the valve
assembly out.
2. Turn valve body
counterclockwise and remove.
3. Remove the ball retainer and
inlet ball.
4. Remove the filter basket and
thoroughly clean all parts in
warm, soapy water or the
appropriate solvent.
Cleaning the Outlet Valve
Storing the Roller
CAUTION
Clean, dry, and lubricate the system thoroughly before storing.
Do not store with liquids inside unit. Storing the unit in cold
temperatures can cause the liquids to freeze and expand,
causing pressure to build and break parts. Let the equipment
come up to room temperature before operating.
When storing the roller for more than a day, take the following
precautions:
1. Remove the batteries.
2. Remove the hose from the pump fitting.
3. Store the hose in a large loop. If it is bent, it could be damaged.
1. Turn valve cap assembly counter
clockwise remove.
2. Clean all parts in warm, soapy
water or the appropriate solvent.
Troubleshooting
Problem
The pump will not run.
Cause
There is little or no power.
The batteries are not in properly.
The pump on/off button was not pressed.
The pump has seized up.
Solution
Put in new high quality alkaline batteries.
Put the batteries in properly.
Press and release the pump on/off button.
Clean the piston and pump housing.
The motor and piston run but
there is little or no fluid flow.
The batteries are low.
The fluid hose is leaking.
The inlet, outlet, or relief valves are dirty.
The fluid in the fluid tank is low.
The piston O-ring is worn.
The piston has slipped off the brass axle.
The seal is not in place.
Too much paint pumped to roller.
Put in new high quality alkaline batteries.
Tighten the fluid hose securely.
Clean the inlet and outlet valves.
Fill the fluid tank.
Replace the piston O-ring.
Snap the piston back on the axle
Check and place the seal properly.
Press and release the pump on/off button to turn the
the pump off until more paint is needed.
Remove the seal, lubricate and replace.
Paint leaks from the roller core.
Roller cover slides on the wall.
The seal is not lubricated.
Have you tried the recommendations above and are still having problems? In the United States, call our toll-free
consumer service at 1-800-328-8251 Monday through Friday between 8:00 AM and 4:30 PM Central time or between 9:00
AM and 4:00 PM Saturday or Sunday, or contact an authorized service center.
©1997 Wagner Spray Tech. All rights reserved.
5
English
R
Wagner One Year Limited Warranty - Keep on file - English
This product manufactured by Wagner Spray Tech Corporation (Wagner), is warranted to the original retail purchaser against defects in
material and workmanship for one year from date of purchase if operated in accordance with Wagner's printed recommendations and
instructions. This product is designed for home use only. If this product is used for professional/rental purposes, this warranty applies only for
30 days from date of purchase.
This warranty does not cover damage resulting from improper use, accidents, user's negligence or normal wear. This warranty does not
cover defects or damages caused by service or repair performed by anyone other than a Wagner Authorized Service Center. This warranty
does not apply to accessories.
ANY IMPLIED WARRANTY OF MERCHANTABILITY OR FITNESS FOR A PARTICULAR PURPOSE IS LIMITED TO ONE YEAR FOR
HOME USE AND 30 DAYS FOR PROFESSIONAL/RENTAL USE FROM DATE OF PURCHASE.
WAGNER SHALL NOT IN ANY EVENT BE LIABLE FOR ANY INCIDENTAL OR CONSEQUENTIAL DAMAGES OF ANY KIND, WHETHER
FOR BREACH OF THIS WARRANTY OR ANY OTHER REASON.
If any product is defective in material and/or workmanship during the applicable warranty period, return it with proof of purchase,
transportation prepaid to any Wagner Authorized Service Center. Contact Wagner Technical Service at 1770 Fernbrook Lane, Minneapolis,
MN 55447 or telephone 1-800-760-3844 for authorized service center locations. Wagner's Authorized Service Center will either repair or
replace the product (at Wagner's option) and return it to you, postage prepaid.
Some states do not allow limitations on how long an implied warranty lasts or the exclusion of incidental or consequential damages, so the
above limitation and exclusion may not apply to you.
This warranty gives you specific legal rights and you may also have other rights which vary from state to state.
Garantie limitée d’une année de la société Wagner – GARDEZ DANS VOS DOSSIERS – Français
Ce produit, fabriqué par la société Wagner Spray Tech (« Wagner »), est garanti au premier acheteur au détail contre toute défectuosité de
matériau ou d’exécution, pour une période d’une année à compter de la date d’achat, pourvu que l’on se serve du produit en suivant les
recommandations et consignes écrites de Wagner. Ce produit est destiné à l’usage domestique seulement. Si on l’utilise pour des fins
professionnelles ou pour la location, la présente garantie ne s’applique que pendant une période de 30 jours à compter de la date d’achat.
La présente garantie ne s’applique pas aux dégâts entraînés par une utilisation incorrecte, par un accident, par la négligence de l’usager ou
par l’usure normale. La présente garantie ne s’applique non plus aux défectuosités ou dommages résultant de l’entretien ou de la réparation
que fait une personne quelconque qui ne soit pas membre d’un centre d’entretien agréé de Wagner. La présente garantie ne s’applique pas
aux accessoires.
TOUTE GARANTIE IMPLICITE DE QUALITÉ MARCHANDE OU D’ADAPTATION À UN USAGE PARTICULIER EST LIMITÉE À UNE
PÉRIODE D’UNE ANNÉE POUR L’UTILISATION DOMESTIQUE ET DE 30 JOURS POUR UNE UTILISATION PROFESSIONNELLE OU DE
LOCATION, À COMPTER DE LA DATE D’ACHAT.
WAGNER NE SERA EN AUCUN CAS RESPONSABLE DE DOMMAGES ACCESSOIRES OU INDIRECTS DE QUELQUE NATURE QUE CE
SOIT, À LA SUITE D’UNE INOBSERVATION DE LA PRÉSENTE GARANTIE OU POUR UNE AUTRE RAISON QUELCONQUE.
Si un produit est défectueux en ce qui concerne les matériaux ou l’exécution pendant la période de garantie applicable, vous devez le
retourner, avec une preuve d’achat et frais de port payés, à n’importe quel centre d’entretien agréé de Wagner. Pour connaître l’emplacement
des centres d’entretien agréés de la société, communiquez avec le service technique de Wagner au 1770 Fernbrook Lane, Minneapolis, MN
55447 USA, ou téléphonez au 1-800-760-3844. Le centre d’entretien agréé de Wagner réparera ou remplacera le produit (à la discrétion de
Wagner) et vous le retournera par la poste, avec frais de port payés.
Certaines provinces interdisent les restrictions sur la durée d’une garantie implicite ou l’exclusion des dommages accessoires ou indirects. Il
se peut donc que la restriction et l’exclusion énoncées ci-dessus ne s’appliquent pas à vous.
Le présente garantie vous accorde des droits juridiques spécifiques, et vous avez peut-être d’autres droits, qui peuvent varier d’une province
à l’autre.
Garantía limitada de un año de Wagner – MANTENGALA ARCHIVADA – Español
Este producto fabricado por Wagner Spray Tech Corporation (Wagner) es garantizado al comprador original al por menor contra defectos en
el material y la mano de obra por un año a partir de la fecha de compra si se opera siguiendo las recomendaciones e instrucciones impresas
de Wagner. Este producto ha sido diseñado solamente para uso doméstico. Si se usa para propósitos profesionales o de alquiler, esta
garantía se aplica solamente por 30 días a partir de la fecha de compra.
Esta garantía no cubre daños que resulten del uso inadecuado, accidentes, negligencia del usuario o desgaste normal. Esta garantía no
cubre defectos ni daños causados en mantenimiento o reparaciones realizados por alguien que no sea un Centro de Servicio Autorizado por
Wagner. Esta garantía no se aplica a los accesorios.
TODA GARANTIA IMPLICITA DE COMERCIABILIDAD O APTITUD PARA UN PROPOSITO PARTICULAR ESTA LIMITADA A UN AÑO PARA
USO DOMESTICO Y A TREINTA DIAS PARA USO PROFESIONAL O DE ALQUILER A PARTIR DE LA FECHA DE COMPRA.
WAGNER NO SERA RESPONSABLE BAJO NINGUNA CIRCUNSTANCIA POR NINGUN DAÑO INCIDENTAL O INDIRECTO DE NINGUNA
CLASE, YA SEA POR VIOLACION DE ESTA GARANTIA O CUALQUIER OTRA RAZON.
Si cualquier producto resulta defectuoso en sus materiales y/o mano de obra durante el periodo de garantía aplicado, devuélvalo con el
comprobante de compra, flete pagado anticipadamente, a cualquier Centro de Servicio Autorizado por Wagner. Póngase en contacto con el
Departamento de Servicio Técnico de Wagner en 1770 Fernbrook Lane, Minneapolis, MN 55447 o llame por teléfono al
1-800-760-3844 para averiguar las ubicaciones de los Centros de Servicio Autorizados. El Centro de Servicio Autorizado de Wagner
reparará o cambiará el producto (a criterio de Wagner) y se lo devolverá a usted con el porte pagado anticipadamente.
Algunos estados no permiten limitaciones a la duración de una garantía implícita ni la exclusión de daños incidentales o indirectos, de modo
que la limitación y exclusión anteriores puede que no se apliquen a usted.
Esta garantía le da a usted derechos legales específicos y usted podría tener también otros derechos que varían de un estado a otro.
R
16
©1997 Wagner Spray Tech. All rights reserved.