1
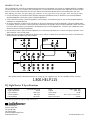
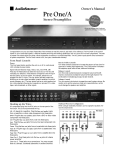
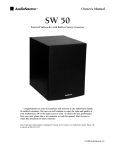
Owner’s Manual
EQ Eight/Series II
Ten-Band Stereo Graphic Equalizer with Spectrum Analyzer Display
1
7
2
3
4
5
6
Congratulations on your purchase. We trust that you will enjoy the value and quality of your AudioSource EQ Eight/Series II
for many years. To ensure the best performance from your unit, please take a few moments to read this manual. Also, be sure
to retain this document for future reference.
BASIC GUIDELINES
A graphic equalizer is a powerful tool for very detailed control over the sound of your speakers. Before adjusting the sliders, it
is very important to clearly define your objectives. Carefully listen to your system and ask yourself what you'd like to change
about its sound. If you want more bass, for example, either raise the sliders for the lowest frequencies or lower the sliders on
the midrange and higher frequencies. Do this for both the left and right channels. Conversely, if you'd like to hear more high
frequencies, either raise the sliders for the highest frequencies or lower the midrange and bass frequencies.
USING THE CONTROLS
1
Power
Press this button to turn the power on the unit on or off. The red LED will light to show power is on.
2
EQ Rec.
Press this button to record with the equalization curve you have just set. This can be useful when making a cassette tape to
play in your car. With this button in the off position, the copy will be recorded without equalization.
3
Monitor
Press this button to hear the sound from your cassette deck. Your deck should be connected into the tape in and tape out jacks
on the rear panel of the EQ 8/Series II.
4
Audio/Video
This button selects between audio (such as CD) or video (such as DVD or VCR) input sources. To select audio, press this button.
To select video, do not press this button. The red LED will be lit only when audio is selected. Of course, the EQ Eight/Series II
equalizes only sound; at no time does the EQ Eight/Series II alter any picture, and no video-type connections are included.
5
EQ/Pass
Use this switch to instantly compare the equalized and unequalized sound. Press this button to hear the equalized sound. The
red LED will light to show this selection. Leave this switch in the out position to hear the unequalized sound.
6
EQ Sliders
There are ten sliders per channel (ten for the left channel and ten for the right channel). The lowest frequency sliders are on
the left, the highest frequency on the right. Usually, identical adjustments should be made for both channels. Each of these
sliders has a range of 12 dB to boost or cut its particular frequencies.
These sliders are one octave apart from one another. This corresponds with the entire range of human hearing. The last page
of this owner's manual contains a chart, showing which sliders to adjust to affect the sound of various instruments. For
instance, the lowest note of a bass guitar is around 42 Hz. Adjusting the sliders at 30 Hz and 60 Hz can adjust the volume of
the bass guitar, bass drum, and any other musical instruments that occupy this frequency range.
7
Spectrum Analyzer Display
This provides a visual display for you to monitor the relative signal levels in each of the EQ sliders. The spectrum analyzer
display is divided into ten columns of LED's which correspond to the ten EQ sliders.
Note: If any part of this product is damaged or missing, do not contact your AudioSource dealer. Please call us directly at 800-435-7115.
HOOKING IT ALL UP
The EQ Eight/Series II should be connected through the tape monitor loop between your receiver (or integrated amplifier or preamplifier) and your tape deck (or CD player, VCR, DVD player, etc.). In other words, the sound goes from the tape deck into the EQ Eight/
Series II, where you adjust the sound, then into your receiver, which sends the adjusted sound to the speakers and to your ears.
When adjusting connections, turn off or unplug your component, so you won't hear any unexpected "pops" while connecting the cables.
1. Connect the Tape Out or Tape Record jacks (different components use different words) on the back of your receiver/integrated
amplifier/preamplifier to the Audio In jacks of the EQ Eight/Series II.
2. Connect the Main Out jacks of the EQ Eight/Series II into the Tape In or Tape Monitor jacks of your receiver/integrated amplifier/
preamplifier to completes the loop.
3. To connect a tape deck, CD player, VCR, DVD player or other such component to the EQ Eight/Series II, follow the diagram below.
For example, connect the Line In or Record jacks from a tape deck to the Tape Rec jacks on the EQ Eight/Series II. Next, connect the
Line Out or Monitor jacks on your tape deck to the Tape Mon jacks on the EQ Eight/Series II. To listen to your cassette deck, press
the Monitor switch on the EQ Eight/Series II.
4. You may use the Video In jacks on the EQ Eight/Series II to connect any high output source, such as a CD player, tape deck, or the
audio outputs of a VCR or DVD player.
5. Always make sure to engage the Tape Monitor button on your receiver, no matter which input source you listen to. This allows the
equalized signal to be heard on any source material.
This manual provides detailed instructions for setting up your equipment. We also offer friendly, toll-free assistance.
1.800.HELP.115
EQ Eight/Series II Specifications
Frequency Response . . . . . . . . . .5 Hz to 100 kHz ±1 dB
Signal to Noise Ratio . . . . . . . . . . . . . . . . . . . . . .>85 dB
Input Impedance . . . . . . . . . . . . . . . . . . . . . .100k Ohms
Output Impedance . . . . . . . . . . . . . . . . . . . . .600 Ohms
Load Impedance . . . . . . . . . . . . . . . . . . . . . .10k Ohms+
Inputs . . . . . . . . . . . . . . . . . . . . . . . .Audio, Video, Tape
Outputs . . . . . . . . . . . . . . . . . . . . . . . . . . . . .Main, Tape
Control Range . . . . . . . . . . . . . . . . . . . . . . . . . . .±12 dB
Dimensions . . . . . . . . . . . 16.5" x 2.25" x 7.125, 5.5 lbs.
Power Consumption . . . . . . . . . . . . . . . . . . . . . .6 Watts
Design and specifications are subject to change without notice.
9300 North Decatur
Portland, OR 97203
Tel. 503.286.9300
Fax 503.978.3302
[email protected]
www.audiosource.net
© 1999 AudioSource, Inc.
Safety Instructions
CAUTION
RISK OF ELECTRIC SHOCK.
DO NOT OPEN.
Warning: To reduce the risk of fire or electric shock, do not expose this appliance to rain or moisture.
Caution: To reduce the risk of electric shock, do not remove cover (or back); no user serviceable parts inside. Refer servicing to qualified service personnel.
Caution: To prevent electric shock, match wide blade of plug to wide slot, fully insert.
Attention: Pour eviter les chocs electriques, introduire la lame la plus large de la fiche dans la borne correspondante de la prise et pousser jusqu'au fond.
The lightning flash with arrowhead symbol, within an equilateral triangle, is intended to alert the user to the presence of uninsulated dangerous voltage within the product's
enclosure that may be of sufficient magnitude to constitute a risk of electrical shock to persons. The exclamation point within an equilateral triangle is intended to alert the
user to the presence of important operating and maintenance (servicing) instructions in the literature accompanying the appliance.
Read Instructions
Power Cord Protection
All the safety and operating instructions should be read before the appliance is
operated.
Power supply cords should be routed so that they are not likely to be walked
on or pinched by items placed on or against them, paying particular attention
to cords at plugs, convenience receptacles, and the point where they exit from
the appliance.
Retain Instructions
The safety and operating instructions should be adhered to.
Heed Warnings
All warnings on the appliance and in the operating instructions should be
adhered to.
Follow Instructions
All operating and use instructions should be followed.
Water and Moisture
Cleaning
The unit should be cleaned only as recommended by the manufacturer.
Power Lines
An outdoor antenna should be located away from power lines.
Non-Use Periods
The power cord of the appliance should be unplugged from the outlet when left
unused for a long period of time.
The appliance should not be used near water. For example, near a bathtub,
washbowl, kitchen sink, laundry tub, in a wet basement, or near a swimming
pool, etc.
Object and Liquid Entry
Ventilation
Damage Requiring Service
The appliance should be situated so that its location or position does not
interfere with its proper ventilation. For example, the appliance should not be
situated on a bed, sofa, rug, or similar surface that may block the ventilation
openings; or, placed in a built-in situation, such as a bookcase or cabinet that
may impede the flow of air through the ventilation openings.
The appliance should be serviced by qualified service personnel when:
a) The power supply cord or the plug has been damaged;
b) Objects have fallen, or liquid has been spilled into the appliance;
c) The appliance has been exposed to rain;
d) The appliance does not appear to operate normally or exhibits a marked
change in performance; or
e) The appliance has been dropped, or the enclosure damaged.
Heat
The appliance should be situated away from heat sources such as radiators, heat
registers, stoves, or other appliances (including amplifiers) that produce heat.
Power Sources
The appliance should be connected to a power supply only of the type
described in the operating instructions or as marked on the appliance.
Grounding or Polarization
Precautions should be taken so that the grounding or polarization means of
an appliance is not defeated.
Care should be taken so that objects do not fall and liquids are not spilled into
the enclosure through openings.
Servicing
The user should not attempt to service the appliance beyond that described in
the operating instructions. All other servicing should be referred to qualified
service personnel.
Product Servicing
In the event your EQ Eight/Series II fails to operated properly, please contact
the dealer where you purchased the unit. Or you may contact AudioSource
directly for further assistance.