1
MULTIMEDIA PROJECTOR
User’s Manual
Thank you very much for purchasing this Canon product.
The Power Projector LE-5W (from here on "this product" or "projector"), provides a
high performance LED optics engine and a variety of features for increased usability.
Features and design
The projector provides the following main features.
•
•
•
•
•
•
•
Long-life LED light source
LEDs provide a far longer service life when compared to standard lamps.
Optical engine using DLP technology
Allows you to display bright images at WXGA resolutions.
Easy to carry
The compact, light-weight design allows you to easily take the projector on
business trips, for leisure, and so on.
You can view documents, videos, or photos without having to worry about picking
a location.
Variety of image input
Built-in input terminals (P19) such as PC, video, HDMI, USB, and SD card, allow
you to connect a wide variety of devices.
Built-in stereo speaker
The 2.5 watt stereo speaker allows you to enjoy audio with a true sense of realism.
There is also an audio out terminal.
Easy-to-use On-screen Display (OSD) menu.
Wide variety of functions
The projector supports document viewers (P51), internal memory (P48), SD cards
(P48), USB storage devices (P48), and USB Display (P54).
Explanation of the symbols used in this manual
The following describes the meaning of symbols used in this manual
Indicates operational instructions and limitations.
2
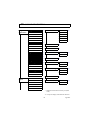
Table of contents
Features and design ........................ 2
Safety instructions .......................... 5
Connecting to a USB storage
device............................................ 43
Introduction....................17
Menu function
settings.............................44
Contents of package......................18
Projector part names .....................19
Control panel and indicators .........20
Remote control..............................21
Third party software......................23
About the menus........................... 45
Home screen ................................. 46
Projecting files on Internal Memory,
USB Drive, and SD Card ............. 48
Projecting........................25
Projecting photos.......................... 50
Playing music ............................... 50
Playing videos .............................. 51
Projecting documents ................... 51
Basic operations ........................... 26
Connecting the power cord ...........26
Turning on the projector ...............27
Adjusting the focus .......................27
Setting the language......................28
Switching the input signal.............28
Adjusting volume..........................29
Hiding the image...........................30
Turning off the projector...............30
Storing the projector in the carrying
bag.................................................31
Using USB Streaming.................. 54
USB Display................................. 54
USB File Transfer ........................ 56
Using the Setup menu .................. 58
Using the Setup menu................... 58
Setup menu configuration ............ 58
Basic menu ................................... 59
Advanced menu ............................ 62
Videos Settings menu ................... 65
Photos Settings menu ................... 67
Music Settings menu .................... 69
Information menu ......................... 70
Language menu ............................ 73
Positioning the projector .............. 32
Adjusting the size of the image.....32
Adjusting the image height ...........33
Connecting to a computer ............ 34
Connecting using the PC input
jack................................................34
Adjusting the image
automatically.................................35
Connecting using the HDMI input
jack................................................36
Connecting using the mini-B USB
jack................................................36
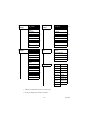
Key Lock...................................... 74
Using the On-Screen Display
(OSD)........................................... 75
Image Adjustment ........................ 76
Aspect ........................................... 79
Screen Color ................................. 80
Phase............................................. 80
H.Size ........................................... 81
3D Invert....................................... 81
Keystone ....................................... 82
LED Mode.................................... 82
HDMI level range......................... 83
Setup ............................................. 83
Information ................................... 84
Connecting to video devices ........ 38
Connecting HDMI devices ...........38
Connecting to a component video
device ............................................39
Connecting to a Video device.......40
Connecting an external speaker ....41
Connecting an external memory . 42
Watching 3D content ................... 85
Inserting an SD card .....................42
3
Appendix .........................87
LED Indicators..............................88
Troubleshooting ........................... 89
The projector does not turn on......89
No image.......................................90
No sound .......................................91
Blurred image ...............................91
The image does not display
properly.........................................92
Power shuts down .........................92
Remote control does not work ......93
Care and Cleaning ........................ 94
Cleaning the lens...........................94
Cleaning the projector...................94
Timing chart ................................. 95
Projector specifications ................ 98
Copyright information................ 100
Notes on copyrights ....................100
Trademarks .................................100
On-screen menu tree................... 101
Setup menu configuration .......... 102
4
Safety instructions
Before installing and operating the projector, read this manual thoroughly.
This projector provides many convenient features and functions. Operating the projector properly
enables you to manage those features and maintain it in good condition for many years to come.
Improper operation may result in not only shortening the product life, but also malfunctions, fire
hazards, or other accidents.
If your projector does not seem to be operating properly, read this manual again, check operations
and cable connections, and try the solutions in the “Troubleshooting” section in the user’s manual. If
the problem still persists, contact the Canon Customer Support Center.
CAUTION
RISK OF ELECTRIC SHOCK
DO NOT OPEN
CAUTION:
TO REDUCE THE RISK OF ELECTRIC SHOCK, DO NOT REMOVE
COVER (OR BACK). REFER SERVICING TO QUALIFIED
SERVICE PERSONNEL.
THIS SYMBOL INDICATES THAT DANGEROUS VOLTAGE
CONSTITUTING A RISK OF ELECTRIC SHOCK IS PRESENT WITHIN
THIS UNIT.
THIS SYMBOL INDICATES THAT THERE ARE IMPORTANT
OPERATING AND MAINTENANCE INSTRUCTIONS FOR THIS UNIT
IN THE OWNER’S MANUAL.
CAUTION
Not for use in a computer room as defined in the Standard for the Protection of Electronic
Computer / Data Processing Equipment, ANSI / NFPA 75.
5
Safety Precautions
WARNING:
• THIS APPARATUS MUST BE GROUNDED.
• TO REDUCE THE RISK OF FIRE OR ELECTRIC SHOCK, DO NOT
EXPOSE THIS APPLIANCE TO RAIN OR MOISTURE.
•
•
•
This projector produces intense light from the projection lens. Do not stare directly into
the lens, otherwise eye damage could result. Be especially careful that children do not
stare directly into the beam.
Install the projector in a proper position. Otherwise it may result in a fire hazard.
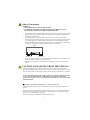
Allowing the proper amount of space on the top, sides, and rear of the projector cabinet
is critical for proper air circulation and cooling of the unit. The diagram shown here
indicates the minimum space required. If the projector is to be built into a compartment
or similarly enclosed, these minimum distances must be maintained.
SIDE
30 cm (1.0')
•
•
30 cm (1.0')
Do not cover the ventilation slots on the projector. Heat build-up can reduce the service
life of your projector, and can also be dangerous.
If the projector is unused for an extended time, unplug the projector from the power
outlet.
CAUTION ON HANGING FROM THE CEILING
When hanging the projector from the ceiling, clean the air intake vents and top of the
projector periodically with a vacuum cleaner. If you leave the projector unclean for a long
time, the cooling fans can be clogged with dust, and it may cause a breakdown or a disaster.
DO NOT SET THE PROJECTOR IN GREASY, WET, OR SMOKY CONDITIONS SUCH
AS IN A KITCHEN TO PREVENT A BREAKDOWN OR A DISASTER. IF THE
PROJECTOR COMES IN CONTACT WITH OIL OR CHEMICALS, IT MAY BECOME
DETERIORATED.
READ AND KEEP THIS MANUAL FOR LATER USE.
All the safety and operating instructions should be read before beginning to operate the
product.
Read all of the instructions given here and retain them for later use. Unplug this projector
from the AC power supply before cleaning. Do not use liquid or aerosol cleaners on the
projector. Use a damp cloth for cleaning.
Follow all warnings and instructions marked on the projector.
6
For added protection of the projector during a lightning storm, or when it is left unattended
or unused for long periods of time, unplug it from the wall outlet. This will prevent damage
due to lightning and power surges.
Do not expose this unit to rain or use near water. For example, in a wet basement, near a
swimming pool..., etc.
Do not use attachments not recommended by the manufacturer as they may result in
hazards.
Do not place this projector on an unstable cart, stand, or table. The projector may fall,
causing serious injury to a child or adult, and serious damage to the projector. Use only with
a cart or stand recommended by the manufacturer, or sold with the projector. For wall or
shelf mounting, use a tool such as a mounting kit to secure the projector.
An appliance and cart combination should be moved with care.
Sudden stops, excessive force, and uneven surfaces may cause the
appliance and cart combination to overturn.
Slots and openings in the rear and front of the cabinet are provided for
ventilation, to insure reliable operation of the equipment and to protect
it from overheating.
The openings should never be covered with cloth or other materials,
and the bottom opening should not be blocked by placing the projector on a bed, sofa, rug,
or other similar surface. This projector should never be placed near or over a radiator or heat
register.
This projector should not be placed in a built-in installation such as a book case unless
proper ventilation is provided.
Never push objects of any kind into this projector through cabinet slots as they may touch
dangerous voltage points or short out parts that could result in a fire or electric shock. Never
spill liquid of any kind onto the projector.
Do not install the projector near the ventilation duct of air-conditioning equipment.
This projector should be operated using only the type of power source indicated on the
marking label. If you are not sure of the type of power supplied, contact the Canon
Customer Support Center or local power company.
Do not overload wall outlets and extension cords as this can result in fire or electric shock.
Do not allow anything to rest on the power cord. Do not locate this projector where the cord
may be damaged by people walking on it.
Do not attempt to service this projector yourself as opening or removing covers may expose
you to dangerous voltages or other hazards. Refer all servicing to qualified service
personnel.
Unplug this projector from the wall outlet and refer servicing to qualified service personnel
under the following conditions:
a
When the power cord or plug is damaged or frayed.
b
If liquid has been spilled into the projector.
c
If the projector has been exposed to rain or water.
d
If the projector does not operate normally after following the operating instructions.
Adjust only those controls that are covered in the operating instructions as improper
7
adjustment of other controls may result in damage and will often require extensive
work by a qualified technician to restore the projector to normal operating condition.
e
If the projector has been dropped or the cabinet has been damaged.
f
When the projector exhibits a distinct change in performance-this indicates a need for
servicing.
When replacement parts are required, be sure the service technician uses replacement parts
specified by the manufacturer that have the same characteristics as the original parts.
Unauthorized substitutions may result in fire, electric shock, or injury.
Upon completion of any service or repairs to this projector, ask the service technician to
perform routine safety checks to determine that the projector is in safe operating condition.
8
AC Power Cord Requirement
The AC Power Cord supplied with this projector meets the requirements for use in the country you
purchased it.
AC Power Cord for the United States and Canada:
The AC Power Cord used in the United States and Canada is listed by
the Underwriters Laboratories (UL) and certified by the Canadian
Standard Association (CSA).
The AC Power Cord has a grounding-type AC line plug. This is a
safety feature to ensure the plug fits into the power outlet. Do not try to
tamper with this safety feature. Should you be unable to insert the plug
into the outlet, contact your electrician.
Ground
THE SOCKET-OUTLET SHOULD BE INSTALLED NEAR THE EQUIPMENT AND
EASILY ACCESSIBLE.
Only for European Union and EEA (Norway, Iceland and Liechtenstein)
These symbols indicate that this product is not to be disposed of with your
household waste, according to the WEEE Directive (2012/19/EU), the Battery
Directive (2006/66/EC) and/or national legislation implementing those
Directives.
If a chemical symbol is printed beneath the symbol shown above, in accordance
with the Battery Directive, this indicates that a heavy metal (Hg = Mercury, Cd
= Cadmium, Pb = Lead) is present in this battery or accumulator at a
concentration above an applicable threshold specified in the Battery Directive.
This product should be handed over to a designated collection point, e.g., on an
authorized one-for-one basis when you buy a new similar product or to an
authorized collection site for recycling waste electrical and electronic
equipment (EEE) and batteries and accumulators. Improper handling of this
type of waste could have a possible impact on the environment and human
health due to potentially hazardous substances that are generally associated
with EEE. Your cooperation in the correct disposal of this product will
contribute to the effective usage of natural resources.
For more information about the recycling of this product, please contact your
local city office, waste authority, approved scheme or your household waste
disposal service or visit www.canon-europe.com/weee, or www.canoneurope.com/battery.
For CA, USA only
Included lithium battery contains Perchlorate Material - special handing may apply.
See www.dtsc.ca.gov/hazardouswaste/perchlorate/ for details.
9
Federal Communication Commission Notice
Multimedia Projector, Model: LE-5W
This device complies with Part 15 of the FCC Rules. Operation is subject to the following two
conditions:
(1) This device may not cause harmful interference, and
(2) this device must accept any interference received, including interference that may cause
undesired operation.
Note: This equipment has been tested and found to comply with the limits for a Class B digital
device, pursuant to Part 15 of the FCC Rules. These limits are designed to provide reasonable
protection against harmful interference in a residential installation. This equipment generates, uses
and can radiate radio frequency energy and, if not installed and used in accordance with the
instructions, may cause harmful interference to radio communications. However, there is no
guarantee that interference will not occur in a particular installation. If this equipment does cause
harmful interference to radio or television reception, which can be determined by turning the
equipment off and on, the user is encouraged to try to correct the interference by one or more of the
following measures:
•
•
•
•
Reorient or relocate the receiving antenna.
Increase the separation between the equipment and receiver.
Connect the equipment into an outlet on a circuit different from that to which the receiver is
connected.
Consult the dealer or an experienced radio / TV technician for help.
The cable with a ferrite core provided with the projector must be used with this equipment in order
to comply with Class B limits in Subpart B of Part 15 of the FCC Rules.
Use of a shielded cable is required to comply with class B limits in Subpart B of Part 15 of FCC
Rules.
Do not make any changes or modifications to the equipment unless otherwise specified in the
instructions. If such changes or modifications should be made, you could be required to stop
operation of the equipment.
Canon U.S.A. Inc.
One Canon Park, Melville, New York 11747, U.S.A.
Tel No. 1-800-OK-CANON (1-800-652-2666)
10
Precautions for Use
As this section contains important safety-related information, be sure to read the following carefully
beforehand in order to use your projector correctly and safely.
Warning
If the following situations occur, turn the power off, remove the power plug from the power outlet
and contact the Canon Customer Support Center. Failure to do so could cause a fire or result in an
electric shock.
•
•
•
•
•
•
If smoke is emitted
If an unusual smell or noise is emitted
If a loud noise is heard and the light source turns off
If water or other liquid has entered the projector
If metal or any other foreign material has entered the projector
If the projector is knocked over or dropped and the cabinet is damaged
Warning
Pay attention to the following points for handling the power cord. Failure to pay attention to these
points could cause a fire, electric shock or personal injury.
•
•
•
•
•
•
•
•
•
Do not place any objects on the power cord and do not allow it to become trapped under the
projector. The power cord may be damaged.
Do not cover the power cord with a carpet.
Do not excessively bend, twist, pull or make modifications to the power cord.
Keep the power cord away from heaters and other sources of heat.
Do not use the power cord when it is bent finely, coiled or bundled.
Do not use a damaged power cord. If your power cord is damaged, contact the Canon
Customer Support Center.
Do not use any power cord other than the type that is included with this projector.
Be sure to connect the ground wire of the power cord to ground. Failure to do so could result
in an electric shock.
Be sure to connect the ground wire before connecting the power plug to the outlet. Also when
you disconnect the ground wire, be sure to unplug the power plug from the outlet beforehand.
11
Warning
Pay attention to the following point to prevent the small parts from being accidentally swallowed
by children.
•
Small parts such as the remote control battery, battery holder and adjustable feet that were
detached may be accidentally swallowed by small children, which may result in choking.
Parents/Guardians should keep them out of reach of children. If swallowed, consult a doctor
immediately.
Warning
Pay attention to the following points regarding the power source, power plug and handling of the
connector. Failure to do so could result in a fire, electric shock or personal injury.
•
•
•
•
•
•
•
•
Do not use any power source with a voltage other than the voltage indicated (AC 100 –
240 V).
Do not pull the power cord and be sure to hold the power plug or connector when removing.
The cord could be damaged as a result.
Do not insert any metal objects into the contact parts of the power plug or connector.
Remove the power plug from the outlet before performing cleaning or maintenance of the
projector.
Do not remove the power plug or connector with wet hands.
Insert the power plug and connector securely up to the base. Additionally, do not use a
damaged power plug or an outlet that is loose.
If using an extension cord attached to the outlet, make sure that the total electric power
consumption of connected devices does not exceed the rated capacity.
Periodically inspect the power plug and outlet and remove any dust or dirt from between the
plug and the outlet.
12
Precautions for Installation
Warning
Pay attention to the following points regarding installation and handling of the projector. Failure
to do so may cause a fire, electric shock or personal injury.
•
•
•
•
•
Do not use the projector in a bathroom or shower room.
Do not use the projector in rain or snow, by the sea, or in close proximity to a body of water.
Do not place containers containing a liquid on top of the projector.
Do not place the projector in any location where it will be exposed to oily smoke or steam,
such as a kitchen work surface or table etc.
Do not touch the projector itself, the power cord, or the cable if lightening strikes.
Warning
Pay attention to the following points regarding installation and handling of the projector. Failure
to do so may cause a fire, electric shock or personal injury.
•
•
•
•
•
•
•
Do not move the projector until you have switched off the power, removed the power plug
from the power outlet and unplugged any other cables.
Do not remove the cabinet from the projector or disassemble it. The interior of the projector
contains high-voltage components as well as parts that are hot. These could cause an electric
shock or burn. If inspection, maintenance or repair is required, contact the Canon Customer
Support Center.
Do not disassemble or modify the projector (including consumable parts) or the remote
control.
Do not insert any object into vents in the projector, such as the air intake vent or exhaust
vents.
Do not place a pressurized can in front of the exhaust vents. The pressure of the contents of
the can may increase due to heat from the exhaust vents and this could result in an explosion.
As strong light beams are emitted while the projector is in use, do not look directly into the
projector lens. Doing so could cause an eye injury. Pay particular attention in preventing
young children to do so.
When giving a presentation in front of the projector while it is projecting an image, conduct
your presentation from a position where your shadow will not be cast on the screen and where
you do not feel blinded by light from the projector.
13
Caution
Pay attention to the following points regarding installation and handling of the projector.
•
•
If the projector will not be used for a long period of time, be sure to remove the power plug
from the power outlet to ensure safety. Failure to do so could cause a fire.
The temperature of the cabinet around and above the exhaust vents can become hot during
projector operation. Touching these areas during operation could cause burns to the hands.
Do not touch these areas. Doing so may cause burns. Pay particular attention in preventing
young children from touching these parts. Additionally, do not place any metal objects on
these areas. Due to the heat from the projector, doing so could cause an accident or personal
injury.
Caution
Pay attention to the following points regarding installation and handling of the projector.
•
•
•
•
•
Do not place any heavy objects on top of the projector or sit/stand on it. Pay particular
attention to prevent small children from doing so. The projector may be knocked over and this
could result in damage or a personal injury.
Do not place the projector on an unstable or slanted surface. Doing so may cause the projector
to fall or be knocked over and could result in a personal injury.
Do not place any objects in front of the lens while the projector is operating. Doing so could
cause a fire.
When cleaning off dust or dirt from the projector lens etc., do not use any kind of spray that is
flammable.
If the projector is used for a long period of time, dust could accumulate inside the projector.
This could cause a fire or malfunction. It is recommended that periodic maintenance of the
projector be performed. For details of maintenance costs, contact the Canon Customer
Support Center.
14
Precautions for the remote control batteries
Warning
Pay attention to the following points regarding handling of batteries. Failure to do so could result
in a fire or injury.
•
•
•
•
Do not place the batteries in a fire or apply heat to, short circuit or disassemble the batteries.
Do not attempt to recharge the batteries.
Insert the batteries in the correct + / - positions.
If any liquid leaks from the batteries and comes into contact with skin, wash off thoroughly
with water.
Caution for viewing 3D content
Caution
Pay attention to the following points when viewing 3D content.
•
•
•
•
•
•
Photosensitive patients, patients with heart disease, pregnant women, elderly people, and
people with serious illness and/or with a history of epilepsy should not view 3D content.
We advise that you should refrain from viewing 3D content if you are in bad physical
condition, need sleep or have been drinking alcohol.
Stop watching 3D content if you experience the following symptoms. If you experience such
symptom, immediately stop viewing 3D content and take a break until the symptom has
subsided.
•
You see doubly-blurred images or you cannot view the image stereoscopically.
•
You feel fatigue or discomfort.
Take breaks when viewing 3D content for an extended period of time. As this may cause eye
fatigue. Viewing 3D content for an extended period of time or viewing them from an oblique
angle can cause eye strain.
Parents should accompany and monitor their children as children cannot properly express
discomfort with 3D content viewing. Children who are six year of age or younger should not
view 3D content.
The optimum 3D viewing distance from the screen is about 3 times of the vertical screen size
or more and your eyes should be level with the screen.
15
For Safe Use
Pay attention to the following points when carrying or transporting the projector.
•
This projector is a precision instrument. Do not knock it over or subject it to impacts. Doing
so may cause a malfunction.
Pay attention to the following points when installing or using the projector.
•
•
•
•
•
•
•
•
•
•
•
Be sure to install the projector in a location where the air intake and exhaust vents are
separated from the wall by more than 30 cm (1.0'). Failure to do so could cause a malfunction.
Do not install the projector in a location that is damp, or where there is a lot of dust, oily
smoke or tobacco smoke. Doing so could cause contamination of optical components such as
the lens and the mirror and may result in deterioration of image quality.
Do not touch the lens with bare hands. Doing so may result in deterioration of image quality.
If the projector is suddenly moved from a location where the temperature is low to a location
where the temperature is high, or if the temperature in the location where the projector is
installed increases suddenly, moisture in the air could cause condensation to form on the
projector lens or mirror. This may cause a blurred image. Wait until the condensation has
evaporated for the image projected to return to normal.
Do not install the projector in a location where the temperature is high or low. Doing so may
cause a malfunction.
Operating temperature: 0°C to 40°C
Humidity level: 10% to 90%
Storage temperature: -30°C to 60°C
Do not install the projector near high-voltage electrical power lines or an electrical power
source.
Do not use the projector on a soft surface such as carpet or sponge mat, etc. Doing so could
cause heat to build up inside the projector and this could result in a malfunction.
Do not block the air intake or exhaust vents of the cooling fan. Doing so could cause heat to
build up inside the projector and may cause a malfunction.
Do not place any objects on top of the projector that may change shape or color due to heat.
When using the projector at altitudes greater than 1500 m, please turn on the High Altitude
Mode.
Please do not brush or rub the surface of the top plate of the projector. The surface may be
damaged.
16
Introduction
17
Introduction
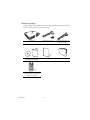
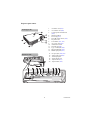
Contents of package
Carefully unpack and verify that you have all of the items shown below. If any of these
items are missing, contact your place of purchase.
(US)
(EU)
Projector
Power cord (1.8 m)
Computer cable (1.8 m)
(5K.1VC09.501)
User's Manual (CD-ROM)
and Quick Start Guide
Warranty card
Carrying bag
Remote control
(Model number: LE-RC01)
Battery (CR2025)
Introduction
18
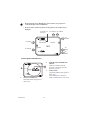
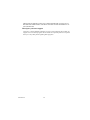
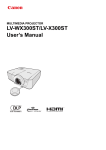
Projector part names
1.
2.
3.
Front/upper side
3
4
5
6
1
7
8
4
2
Rear/lower side
19
4.
5.
6.
7.
8.
9.
10.
11.
12.
13.
14.
Air intake vent (P20)
Air exhaust vent (P20)
Control panel and indicators
(P20)
Internal speakers
Focus ring (P27)
Front IR remote sensor (P22)
Projection lens
Lens shutter (P27, P31)
AC power jack (P26)
Anti-theft lock slot
SD card slot (P42)
Type A USB jack (P43)
Mini-B USB jack (P36)
HDMI input jack (P36)
15.
16.
17.
18.
19.
20.
PC input jack (P34, P39)
Video input jack (P40)
Audio input jack
Audio output jack
Adjuster feet (P33)
Tripod socket (P33)
20
19
10
11
12
13
14
15
16
17
18
9
19
Introduction
•
Do not block the vents. Blocking the vents can cause your projector to
overheat and may cause a malfunction.
•
Do not brush or rub the top surface of the projector The surface may be
damaged.
Caution
Air intake vent
in the base
Air exhaust Air exhaust
Air
exhaust
Air intake
Speaker
Speaker
Air
intake
Air exhaust
Air
intake
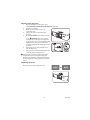
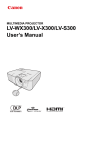
Control panel and indicators
2.
POWER button/POWER LED
indicator
Lights up or flashes when the
projector is operating. Turns the
projector on or off.
3.
INPUT button
Toggles through the input signals in
order. (P28)
Press and hold for 3 seconds to
enable or disable the key lock. (P74)
2
3
1
1.
STATUS LED indicator
The LEDs indicate the projector's
status. (P88)
Introduction
20
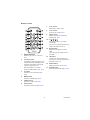
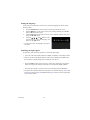
Remote control
2
8.
3
VOL+ button
Increases the volume. (P29)
5
9.
MENU button
Displays the On-Screen Display
(OSD) menu. (P75)
6
8
7
9
14
10 ~ 13 / / /
Directional buttons ( Up, Down,
Left, Right )
Allows you to perform operations in
menus, document viewer, etc.
10
12
15
16
13
17
14. BACK button
Returns to the upper level of the
OSD.
Closes the pop-up setting menu of
the OSD.
11
2.
VOL- button
Reduces the volume. (P29)
1
4
1.
7.
POWER button
Turns the projector on or off. (P27,
P30)
I
I
AUTO PC button
Automatically adjusts the projector to
the optimum status depending on the
computer signal when an analog PC
signal is being input. (P35)
Press and hold for 3 seconds to
enable or disable the key lock. (P74)
3.
PC button
Switches to PC/Component input.
(P28)
4.
HDMI button
Switches to HDMI input. (P28)
5.
VIDEO button
Switches to Video input. (P28)
6.
MUTE button
Temporarily mutes the audio. (P29)
21
15. OK button
Confirms the selected menu item.
Allows you to perform operations in
document viewer, etc.
16. HOME button
Displays the home screen. (P46)
17. BLANK button
Temporarily hides the image. (P30)
Introduction
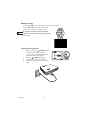
Remote control effective range
The Infra-Red (IR) remote control sensor is on the
front of the projector, so make sure you point the
remote control at the front.
The remote control must be held at an angle within
± 15 degrees vertically and ± 30 degrees horizontally
to the projector's IR remote control sensor, and within
a distance of approximately 8 meters.
•
You may not be able to perform operations if
there are any obstacles between the remote
control and the projector.
•
You may not be able to operate the remote control
if direct sunlight or strong light is shining onto the remote IR receiver.
Installing the batteries
1.
2.
3.
4.
Warning
Press the knob on the battery holder to the right
and slide it out.
Remove the old battery.
Make sure the positive side (+) of the new
battery (CR2025) is facing up when you place
it into the battery holder.
Slide the holder in until you hear it click into
place.
Note the following points when handling batteries. Failure to do so could result in
a fire or injury.
•
Do not place the battery in a fire, apply heat, short circuit, or disassemble the
battery.
•
Do not attempt to recharge the battery.
•
Remove the battery when it is drained, or if it will not be used for a long
period of time.
•
Insert the battery in the correct + or - position.
•
If any liquid leaks from the battery and comes into contact with skin, wash it
off thoroughly with water.
•
The remote control battery and battery holders can be a choking hazard if
swallowed accidentally by small children. Make sure these are placed out of
the reach of children. If they are swallowed accidentally, contact a physician
immediately.
Introduction
22
Third party software
This product includes third party software modules.
For more details, see the "ThirdPartySoftware.pdf" (third party software licenses) in
the thirdparty_software folder on the setup CD-ROM supplied.
You can also view the licensing conditions for each module in the thirdparty_software/
LICENSE folder.
■ GPL and LGPL software licenses
This product uses software modules licensed under GPL and LGPL.
The source code is included in the thirdparty_software/GPL(LGPL) folder on the setup
CD-ROM supplied.
■ Software programs based on the GNU General Public License
Version 2
The software programs ("these programs") included in this media are freeware. You
can redistribute and make changes under the conditions defined in the GNU General
Public License Version 2.
Each program is distributed in the hope that it will be useful, however they are
provided without warranty of any kind, including, but not limited to, the implied
warranties of merchantability and fitness for a particular purpose. See the following
"Warranty disclaimer" and "Third party software support". For more details see the
GNU General Public License Version 2.
Warranty disclaimer
BECAUSE THE PROGRAM IS LICENSED FREE OF CHARGE, THERE IS NO
WARRANTY FOR THE PROGRAM, TO THE EXTENT PERMITTED BY
APPLICABLE LAW. EXCEPT WHEN OTHERWISE STATED IN WRITING THE
COPYRIGHT HOLDERS AND/OR OTHER PARTIES PROVIDE THE PROGRAM
"AS IS" WITHOUT WARRANTY OF ANY KIND, EITHER EXPRESSED OR
IMPLIED, INCLUDING, BUT NOT LIMITED TO, THE IMPLIED WARRANTIES
OF MERCHANTABILITY AND FITNESS FOR A PARTICULAR PURPOSE. THE
ENTIRE RISK AS TO THE QUALITY AND PERFORMANCE OF THE
PROGRAM IS WITH YOU. SHOULD THE PROGRAM PROVE DEFECTIVE,
YOU ASSUME THE COST OF ALL NECESSARY SERVICING, REPAIR OR
CORRECTION.
IN NO EVENT UNLESS REQUIRED BY APPLICABLE LAW OR AGREED TO IN
WRITING WILL ANY COPYRIGHT HOLDER, OR ANY OTHER PARTY WHO
MAY MODIFY AND/OR REDISTRIBUTE THE PROGRAM AS PERMITTED
ABOVE, BE LIABLE TO YOU FOR DAMAGES, INCLUDING ANY GENERAL,
SPECIAL, INCIDENTAL OR CONSEQUENTIAL DAMAGES ARISING OUT OF
THE USE OR INABILITY TO USE THE PROGRAM (INCLUDING BUT NOT
LIMITED TO LOSS OF DATA OR DATA BEING RENDERED INACCURATE OR
LOSSES SUSTAINED BY YOU OR THIRD PARTIES OR A FAILURE OF THE
23
Introduction
PROGRAM TO OPERATE WITH ANY OTHER PROGRAMS), EVEN IF SUCH
HOLDER OR OTHER PARTY HAS BEEN ADVISED OF THE POSSIBILITY OF
SUCH DAMAGES.
Third party software support
Canon Inc., Canon's affiliated companies, as well as sales companies do not offer any
support services for these programs. We are unable to respond to questions or inquiries
from you or any other parties regarding these programs.
Introduction
24
Projecting
25
Projecting
Basic operations
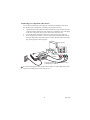
Connecting the power cord
1.
2.
Connect the power cord supplied to the AC power jack on the projector.
Connect the plug to a wall outlet. When the power is on, the POWER button/
POWER LED indicator lights red.
2
Projecting
1
26
Turning on the projector
1.
2.
3.
4.
5.
6.
7.
Connect the plug to a wall outlet. (P26)
The POWER button/POWER LED indicator lights red.
Open the lens shutter.
Make sure other cables are securely
connected. (P34)
Turn on all devices connected to the
projector.
Press the POWER button on the projector
or the II POWER button on the remote
control to turn on the projector. When the
projector turns on, the power indicator LED
lights blue. The start up procedure takes
several seconds, and the startup logo will be
projected.
If the image is not clear, adjust the focus
with the focus ring.
If the projector is turned on for the first time,
select the display language (P28).
AUT
PC
PC
HDMI
VIDE
If the frequency/resolution of the input signal
exceeds the projector's supported range, the
message "Out of Range" is displayed. Change to
an input signal that is supported by the projector
(P95).
Adjusting the focus
Rotate the focus ring to adjust the focus.
27
Projecting
Setting the language
If the projector is turned on for the first time, select the language for the On-Screen
Display (OSD).
1.
2.
3.
4.
Press the HOME button on the remote control to open the home screen.
Press the button on the remote control, select Setup, and then press the OK
button. The Setup menu opens.
Press the
button on the remote control, select Language from the menu, and
then press the OK button.
Press the , , , and
buttons on the
remote control to select your language, and
then press the OK button.
* You can select from 19 languages. See page 52
for details.
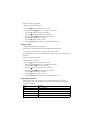
Switching the input signal
Perform one of the following operations to switch the input signal.
•
Press one of the input signal buttons (PC, HDMI, or VIDEO) on the remote control.
* There are no other input signals buttons aside from PC, HDMI, and VIDEO. Press
the PC button to display images from component video devices.
•
Press the INPUT button on the projector's control panel. Each time you press the
button, the input signal changes in the order: PC/Component, HDMI, VIDEO.
•
Select the input signal icon on the home screen, and then press the OK button.
* You then need to perform further menu operations for Internal Memory (P48), USB
Drive (P48), SD Card (P48), and USB Streaming (P54). Refer to each corresponding
section in this manual.
Projecting
28
The default aspect ratio for the projector is 16:10.
Depending on the input signal, the aspect ratio
may not be displayed correctly. If this occurs, you
need to change the aspect ratio. See "Aspect" on
page 79 for details.
AUTO
PC
PC
HDMI
VIDEO
MUTE
VOL-
VOL+
When PC/Component, HDMI, or VIDEO is
selected, the last used input signal is
automatically selected the next time the projector
starts up.
Adjusting volume
Follow the steps below to adjust the volume of the projector's internal speaker or the
volume being output from the audio output jack.
Audio volume
Press the VOL-/VOL+ buttons on the remote control to
adjust the volume.
PC
HDMI
VIDEO
MUTE
VOL-
VOL+
MENU
BACK
Muting
Press the MUTE button on the remote control to
temporarily mute the audio.
Press the MUTE button again to restore the audio.
PC
HDMI
VIDEO
MUTE
VOL-
VOL+
MENU
BACK
Audio is not output when no input signal is being
projected. However, when playing an audio file, audio can be output even when no
image is being projected. In this situation, you can adjust the volume.
* If no audio is output for the image being projected, check that the audio input is
connected to the projector correctly.
* When an external speaker is connected, audio is not output from the internal
speaker.
29
Projecting
Hiding the image
Press the BLANK button on the remote control to hide the image.
Press the BLANK button again on the remote
control or the projector to restore the image.
Caution
MENU
Do not place any objects in front of the lens
while the projector is operating. Doing so could
cause a fire.
BACK
OK
HOME
BLANK
Turning off the projector
1.
2.
3.
4.
When you press the II POWER button, a
confirmation message is displayed.
If no operation is performed within a few
seconds, the message disappears.
PC
Press the POWER button again.
The lamp turns off and the fans stop.
Disconnect the power cord from the wall
outlet.
I
I
2
1
Projecting
AUT
PC
30
HDMI
VIDE
Storing the projector in the carrying bag
After turning off the projector, store the projector and accessories as shown in the
following illustration.
Close the lens shutter
Retract the adjuster feet, and then place the projector in the carrying bag with the
lens facing up.
Put the cables and remote control in the pocket inside the carrying bag, or under the
rear of the projector.
Notes when storing in the carrying bag
•
If the lens shutter is open when the projector is stored, the lens could be cracked.
•
If the adjuster feet are extended when the projector is stored, the feet could break.
•
If the cables are placed on the top surface of the projector, the surface could be
damaged.
•
When carrying the projector in the carrying bag, do not subject it to any shocks, do
not drop it, or place anything heavy on top of it. Failure to do so could damage the
projector.
•
As dust accumulates easily in the carrying bag, clean the dust out of the bag before
storing the projector.
31
Projecting
Positioning the projector
As the projector does not have a zoom function, adjust the size of the projected image
by changing the projection distance.
The projector should be placed horizontally on top of a desk, etc. so that the projector
is perpendicular to the center of the screen.
16:10 screen size
Screen
Center of lens
Projection distance
This projector is designed to project at a slightly upward angle above the horizontal
plane of the projector. This is so that they can be readily placed on a table and will
project forward and upwards onto a screen positioned so that the bottom edge of the
screen is above the level of the table.
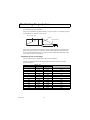
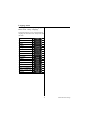
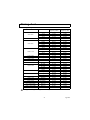
Adjusting the size of the image
The size of the image is determined by the projection distance.
The below information shows the relationship between the screen size and the
projection distance.
Screen size (inches)
20
30
40
50
60
70
80
90
100
120
150
200
240
Projecting
Image size
Width (mm)
431
646
862
1077
1292
1508
1723
1939
2154
2585
3231
4308
5169
Height (mm)
269
404
538
673
808
942
1077
1212
1346
1615
2019
2692
3231
32
Projection distance (m)
0.50
0.75
1.00
1.25
1.50
1.75
2.00
2.25
2.50
3.00
3.75
5.00
6.00
Adjusting the image height
The projector is equipped with 2 adjuster feet. Use
the front adjuster foot to adjust the height, and the
rear adjuster foot to adjust the inclination of the
image.
If the projector is not placed on a horizontal
surface or the screen and the projector are not perpendicular to each other, the
projected image becomes trapezoidal. To correct this distortion, see "Keystone" on
page 82 for details.
Warning
•
Do not look into the lens while the light source is on. Strong light from the light
source may damage your eyes. Be especially careful that children do not stare
directly into the lens.
•
Be careful when adjusting the feet as they are close to the exhausts that vent
hot air. The cabinet etc. gets very hot which could cause a burn.
•
The adjuster feet can be a choking hazard if swallowed accidentally by small
children. Make sure these are placed out of the reach of children. If they are
swallowed accidentally, contact a physician immediately.
When attaching a camera tripod
Caution
•
When adjusting the height using a tripod, be careful that the projector does
not fall. If it falls a malfunction could occur.
•
See the documentation provided with the tripod for more information on
handling and operating the tripod.
•
When using an elevating tripod, do not extend the elevator. This could cause
the projector to fall.
33
Projecting
Connecting to a computer
You can use the HDMI input jack, PC input jack, or the Mini-B USB jack to connect
the projector to a computer.
Jack name
HDMI input jack
Jack shape
PC input jack
Notes
Transmits high resolution digital
images and audio with a single cable
Transmits high resolution analog
signals
Mini-B USB jack
PC screen display
Transmits files from the PC to the
internal memory of the projector
If the selected input is not projected even when the projector is on (P27), check that the
computer is on and that the steps have been followed correctly. Also check the cable
connections.
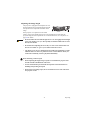
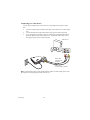
Connecting using the PC input jack
You can project analog PC images by connecting a computer cable to the projector's
PC input jack.
•
1.
2.
3.
4.
Use the computer cable supplied (P18).
Connect the computer cable supplied to the computer's monitor output jack.
Connect the other end of the computer cable to the projector's PC input jack.
To use the projector's internal speaker, connect a commercially available audio
cable to the computer's audio output jack, and the other end to the projector's
audio input jack.
Set the projector's input signal to PC (P28).
Notebook or desktop computer
Audio cable
(commercially
available)
Computer cable (supplied)
Projecting
34
When using a notebook computer, you need to change the output screen from the
computer. You can change the computer's output screen by using the computer's
keyboard. Usually a key combination such as [FN] + a function key ([F1] to [F12])
turns the external display on/off. Locate a function key labeled with a monitor symbol
or text, and then press the FN key and the monitor key at the same time. This is not
necessary for desktop computers.
The function keys and switching operations differ depending on the computer model.
See the documentation provided with your notebook for more information.
Adjusting the image automatically
If the projected computer screen does not fit
into the correct area or if the projected image
flickers when projecting an analog PC input
signal, execute the AUTO PC function to
automatically adjust to the optimum status.
AUTO
PC
HDMI
VIDEO
Press the AUTO PC button on the remote
control.
While executing the AUTO PC function,
information about the input signal is displayed
at the corner of the image for about three
seconds.
This function is only available when a computer
is connected (P34) to the projector's PC input
jack.
35
Projecting
Connecting using the HDMI input jack
By connecting an HDMI cable to the projector's HDMI input jack, you can display
higher quality images than analog PC images. You can also output the computer's
audio from the projector.
1.
2.
3.
Connect an HDMI cable to the computer's HDMI output jack.
Connect the other end of the cable to the projector's HDMI input jack. (P19)
Set the projector's input signal to HDMI. (P28)
HDMI cable
(commercially available)
Connecting using the mini-B USB jack
By connecting a computer to the projector with a USB cable and projecting the
computer's screen (USB Display), you can transfer files from the computer to the
projector's internal memory (USB File Transfer).
1.
2.
Connect a USB cable (type A) to the computer's USB jack.
Connect the mini-B end of the USB cable to the projector's mini-B USB jack.
(P19)
USB cable
(commercially available)
Projecting
36
3.
See page 54 for more information about USB Display, and page 56 for more
information about USB File Transfer.
Follow the steps below to disconnect the USB cable from the computer.
For Windows 7: (Other versions of Windows operate similarly. Follow the correct
procedure for removing a USB device from your computer safely for your version of
Windows.)
•
Click the Safely remove hardware icon on the Windows taskbar, and when the
message "This device can now be safely removed from the computer." is displayed,
disconnect the USB cable.
For Mac:
On your desktop, drag and drop the icon for the projector you want to disconnect to the
trash. Check that the eject sign is displayed on the trash, and then disconnect the USB
cable.
•
USB Display is not available for Mac.
•
Do not disconnect the USB cable while the files are being copied, as this could
result in loss of data or damage to the projector.
•
The connection does not end if files on the internal memory are open on the
computer.
•
Follow the correct procedure to remove a USB device from your computer
safely.
37
Projecting
Connecting to video devices
You can use the HDMI input jack, the Component video input jack, and the Video
input jack to connect to video devices. However each provides a different level of
video quality.
Jack name
HDMI input jack
Jack shape
Notes
Transmits high resolution digital
images and audio with a single cable
Component video
input jack
Transmits high resolution analog
signals
Video input jack
Transmits analog images
If the selected video input is not projected even when the projector is on (P27), check
that the video device is on and that the steps have been followed correctly. Also check
the cable connections.
Connecting HDMI devices
The projector provides an HDMI input jack that allows you to connect it to an HDMI
devices such as a Blu-Ray player.
HDMI (High-Definition Multimedia Interface) supports uncompressed video data
transmission between compatible devices like Blu-Ray players over a single cable.
HDMI provides a pure, high quality digital viewing and listening experience.
1.
2.
Connect an HDMI cable to the HDMI output jack of the HDMI device.
Connect the other end of the cable to the projector's HDMI input jack.
HDMI cable (commercially available)
Projecting
38
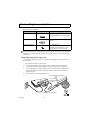
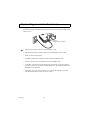
Connecting to a component video device
You can project component video images by connecting a component cable (RCAmini D-sub 15 pin) (commercially available) to the projector's PC jack.
1.
2.
3.
Connect the end of the component cable with three RCA type connectors to the
Component Video output jacks of the Video device. Match the color of the plugs
to the color of the jacks; green to green, blue to blue, and red to red.
Connect the cable's mini D-sub 15 pin jack to the projector's PC input jack.
To use the projector's speaker, connect a commercially available audio cable to
the audio output jacks of the Video device. Connect the audio cable's stereo mini
plug to the projector's audio input jack.
Video device
Audio cable
(commercially
available)
Component cable (RCA-mini D-sub 15 pin)
(commercially available)
No sound (audio signal) will be output from the speaker or audio output jack if video
signals are not being input from the video device.
39
Projecting
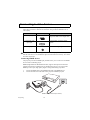
Connecting to a Video device
You can project images from a video device by connecting to the projector's Video
jack.
1.
2.
3.
Connect a commercially available video cable to the video device's video output
jack.
Connect the other end of the video cable to the projector's Video input jack.
To use the projector's speaker, connect a commercially available audio cable to
the audio output sockets of the Video device. Connect the audio cable's stereo
mini plug to the projector's audio input jack.
Video device
Audio cable
(commercially
available)
Video cable
(commercially available)
No sound (audio signal) will be output from the speaker or audio output jack if video
signals are not being input from the video device.
Projecting
40
Connecting an external speaker
You can connect an external speaker or headphones to the projector's Audio output
jack.
Connect a commercially available audio cable to the projector's Audio output jack
(ϕ3.5 stereo mini-plug) and the speakers or headphones.
Audio cable
(commercially
available)
•
When you connect an audio cable to the Audio output jack, no sound comes from
the projector's built-in speaker.
•
Audio is not output when no video signal is being input.
•
Use an audio cable without internal impedance. If the cable has internal impedance,
the audio volume will be low.
•
Turn down the projector's volume before connecting headphones to the Audio
output jack. You should also adjust the volume on the device connected to the
Audio input jack before connecting the audio cable.
41
Projecting
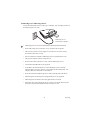
Connecting an external memory
Inserting an SD card
Insert an SD card into the SD card slot on the projector. You can display the files on the
SD card. (P48)
SD card
(commercially available)
•
The projector supports class 10 or older SD/SDHC cards.
•
The maximum memory capacity supported for an SD/SDHC card is 32 GB.
•
SDXC cards are not supported.
•
SD/SDHC cards must be formatted in FAT16/FAT32/NTFS file format.
•
The projector may not be compatible with some SD/SDHC cards.
•
As the data in the SD card can be damaged, be sure to back up important data to
avoid loss. The user is responsible for data management. This company shall not be
held liable for any data loss.
•
If the folder tree in the SD card is large, accessing the data may take some time.
The maximum number of folder tree layers is nine.
Projecting
42
Connecting to a USB storage device
Connect the USB storage device to the Type A USB jack. You can display the files on
the USB storage device. (P48)
USB storage device
(commercially available)
•
USB storage devices must be formatted in FAT16/FAT32/NTFS file format.
•
Some USB storage devices may take over 10 seconds to be recognized.
•
The projector provides a current supply of up to 500 mA. Do not use storage
devices that require more current.
•
Not all commercially available USB storage devices are guaranteed to work.
•
The projector supports USB 2.0 storage devices.
•
Do not connect other USB devices. Only connect USB storage devices.
•
Card readers and USB hubs are not supported.
•
As the data in the USB storage device can be damaged, be sure to back up
important data to avoid loss. The user is responsible for data management. This
company shall not be held liable for any data loss.
•
Do not disconnect the USB storage device while projecting data on the device.
•
USB storage devices that requires a designated driver are not supported.
•
USB storage devices that have been encrypted cannot be accessed.
•
If the folder tree in the USB storage device is large, accessing the data may take
some time. The maximum number of folder tree layers is nine.
43
Projecting
Menu function
settings
Menu function settings
44
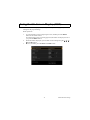
About the menus
From the projector's home screen you can perform a variety of settings such as
selecting an input signal, projecting files from a variety of storage devices, and
performing projector setup.
Also, when projecting images, the On-Screen Display menu (OSD) allows you to
make adjustments and change settings for the image. (P75)
Home screen
On-Screen Display menu
45
Menu function settings
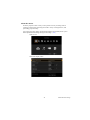
Home screen
Press the HOME button on the remote control to open the home screen.
The home screen is comprised of the following menus.
4. USB Streaming (P54)
5. PC/Component (P28)
3. SD Card (P48)
6. HDMI (P28)
2. USB Drive (P48)
7. Video (P28)
8. Setup (P58)
1. Internal Memory (P48)
Icon explanations
1.
2.
3.
4.
5.
6.
Internal Memory: Displays files on the internal memory.
USB Drive: Displays files on the USB storage device connected to the type A
USB jack.
SD Card: Displays files on the SD card in the SD card slot.
USB Streaming: When a computer is connected to the projector's mini-B USB
jack with a USB cable, you can project the computer's screen or transfer files to
the projector's internal memory.
PC/Component: Projects images from a computer or component video device
connected to the PC input jack.
HDMI: Projects images from the device connected to the HDMI jack.
Menu function settings
46
7.
8.
Video: Projects images from the device connected to the Video jack.
Setup: Performs projector setup.
Basic home screen operations
Use the / buttons on the remote control to select the function that you want to use
from the icons on the home screen, and then press the OK button.
To project PC/Component, HDMI, or Video input images, select the icon for the input
signal you want to project, and then press the OK button (The projector automatically
detects the analog PC signal/component video signal.).
Additional menu operations are required for other functions. See the following pages
for detailed explanations of each function.
•
Internal Memory, USB Drive, and SD Card (P48)
•
USB Streaming (P54)
•
Setup (P58)
47
Menu function settings
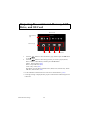
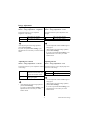
Projecting files on Internal Memory, USB
Drive, and SD Card
Home screen
Select memory
type
Select file type
Photos
1.
2.
Music
Video
Documents
Press the / buttons to select the memory type, and then press the OK button
or the
button.
Press the / buttons to select the type of file you want to project (Photos,
Music, Videos, or Documents), and then press the OK button.
Photos: Projects photos (P50)
Music: Plays audio files (P50)
Video: Plays videos (P51)
Documents: Projects Microsoft Office files (Word, Excel, PowerPoint), Adobe
PDF files, and text files. (P51)
* Use the USB File Transfer function to store files in internal memory. (P56)
* A warning message is displayed if the projector cannot detect a USB storage device
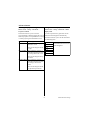
or SD card.
Menu function settings
48
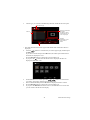
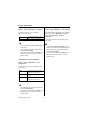
3.
The file type you selected is automatically detected, and the file browser opens.
Selected file type
Displays a thumbnail
for photos.
For Music, Videos,
and Documents, an
icon is displayed.
File list
Displays
information on the
selected file or
folder
Explanation for remote control buttons
•
4.
5.
6.
7.
8.
9.
Files that match the selected file type and the folders that contain these files are
displayed.
Press the / buttons to select the file you want to project/play, and then press
the OK button.
If you select a folder and press the OK button, the folder opens and the files in
the folder are displayed as a list.
Press the BACK button to return to the previous folder level.
If you press the
button while the file browser is displayed, the files are
displayed in thumbnail view.
On the thumbnail view screen, press the / / / buttons to select the file
you want to project/play, and then press the OK button.
Select a folder and then press the OK button to display the folder's content.
Press the BACK button to return to the previous folder level.
If you press the BACK button at the root level, the thumbnail view closes and
you will return to the file browser display.
49
Menu function settings
As the data in the internal memory, USB storage device, or SD card can be damaged,
be sure to back up important data to avoid loss. The user is responsible for data
management. This company shall not be held liable for any data loss.
•
Loading time may be longer for large files.
•
Unsupported files or damaged files are not projected/played correctly.
•
This projector does not support encrypted files (DRM).
•
When the Image Mode is set to other modes than the Presentation mode, the color
changes momentarily when switching to file browser display or file projection/
playback.
Projecting photos
The following file formats are supported.
File extension: JPG, JPEG, BMP
Supports progressive JPEGs with a width of up to 10,240 pixels and a height of up to
6,400 pixels.
* The projector may not be able to display all supported image files.
Operations while projecting photos
•
Press the BACK button to return to the file browser/thumbnail view.
•
Select "One Photo Click" or "All Photos in Folder" from Home screen > Setup >
Photos Settings > Slideshow Mode.
[When One Photo Click is selected in Slideshow Mode]
The selected image is displayed in full screen.
•
Press the
button to project the next image.
•
Press the
button to project the previous image.
[When All Photos in Folder is selected in Slideshow Mode]
The selected image is displayed in full screen, and the next image is automatically
displayed.
•
Press the OK button to pause/resume.
•
The
•
Press the BACK button to return to the file list/thumbnail view.
/
buttons are disabled while displaying the slideshow.
Playing music
The following file formats are supported.
File extension: OGG, AAC, WAV
WAV files: PCM and AD-PCM supported
* The projector may not be able to play all supported audio files.
Menu function settings
50
Operations while playing music
The selected music will be played.
•
Press the
button to play the next music file.
•
Press and hold the
•
Press the
•
Press and hold the
button for 2 seconds to rewind.
Press the OK button to stop rewinding.
•
Press the OK button to play or pause.
•
Press the BACK button to return to the file list/thumbnail view.
button for 2 seconds to fast forward.
Press the OK button to stop fast forwarding.
button to play the previous music file.
Playing videos
The following file formats are supported.
File extension: AVI, MKV, TS, DAT, VOB, MPG, MPEG, MOV, MP4
* The projector may not be able to play all supported video files.
If the peak bit rate of a video file is higher than 10 MBps, lag may occur during video
playback.
Operations while playing videos
The selected video is played.
•
Press the
button to play the next video file.
•
Press and hold the
button for 2 seconds to fast forward.
Press the OK button to stop fast forwarding.
•
Press the
•
Press and hold the
button for 2 seconds to rewind.
Press the OK button to stop rewinding.
•
Press the OK button to play or pause.
•
Press the BACK button to return to the file list/thumbnail view.
button to play the previous video file.
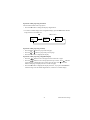
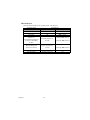
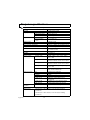
Projecting documents
The projector comes with a document viewer function that allows you to project
Microsoft Office files, Adobe PDF files, and text files. The following file types and
formats are supported.
Type
PDF
Microsoft PowerPoint
Microsoft Excel
Microsoft Word
Text
Format
1.0 to 1.4 (pdf)
97/2000/XP/2003/2007/2010 (ppt, pptx)
95/97/2000/XP/2003/2007/2010 (xls, xlsx)
95/97/2000/XP/2003/2007/2010 (doc, docx)
Text data (txt)
51
Menu function settings
Limitations when projecting documents
The projector's document viewer allows you to project the content of a file with limited
functions. Some files may look different from what you see on your computer. When
giving a presentation using the projector's document viewer, make sure you check that
the content of each page is projected satisfactorily beforehand. Projection may not be
possible depending on the file.
•
The projector only has 1 built-in font and this is used to display text in document
viewer. Because text is projected using a different font to the computer, text may
extend beyond the lines, or line breaks may appear at unexpected positions. Also,
some text may not be displayed correctly.
•
Some functions supported by the computer may not be supported by the projector.
For example, animations, 3D effects, SmartArt, hyperlinks, transparency, gradation
displays, WordArt, and graphs may not be displayed correctly.
•
Compared to the computer, it may take some time to project or skip pages in the
file.
•
Large files may close unexpectedly during projection.
•
Fonts for the following languages can be projected.
English
Norwegian
German
Turkish
French
Polish
Italian
Hungarian
Spanish
Czech
Portuguese
Danish
Swedish
Chinese (Simplified)
Russian
Chinese (Traditional)
Dutch
Japanese
Finnish
Menu function settings
52
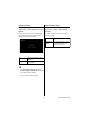
Operations while projecting documents
The selected document will be projected.
•
Press the OK button to change the display magnification.
* To return to normal display from a magnified display, press the OK button until the
image returns to its normal size.
OK: 8 times
OK
Normal
display
Magnified
display
Magnified
display
Operations while projecting normally
•
Press the
or
button to project the next page.
•
Press the
or
button to project the previous page.
•
Press the OK button to magnify the display.
Operations while projecting a magnified display
•
Press the
/
buttons to move the projected area to the left or right.
•
Press the / buttons to move the projected area up or down. Press
when the
top of the page is displayed to move to the previous page. Press
when the
bottom of the page is displayed to move to the next page.
•
Press the OK button to magnify the display. However, if you press the OK button
when the image is at maximum magnification, it returns to a normal display.
53
Menu function settings
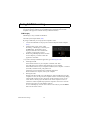
Using USB Streaming
By connecting the projector to a computer with a USB cable and using USB streaming,
you can project the computer's screen (USB Display) and transfer files from the
computer to the projector's internal memory (USB File Transfer).
USB Display
USB Display is only available for Windows.
Check the system requirements (P55).
By using a USB cable you can project the computer's screen.
1.
2.
3.
Connect the USB cable to the projector's mini-B USB jack and the computer
(P36).
From the home screen, select "USB
Streaming > USB Display", and then press
the OK button. The default screen is
displayed, and after a few moments the
computer recognizes the projector.
When using USB Display for the first time
on the computer, you need to install the
application "EZ USB".
* If you have already installed the application, go to Starting EZ USB.
4.
5.
Installing EZ USB
If the autorun function of your computer is enabled, click "Run
EZ_USB_Detect.exe" from the menu displayed on your computer.
If the autorun function of your computer is disabled, click Computer > CD Drive
(EZ USB), and then run EZ_USB_Detect.exe.
Follow the on-screen instructions to install the application.
When installation is complete, reboot your computer.
Starting EZ USB
Double-click the EZ USB icon on the desktop to start EZ USB and project the
computer's screen. (At this point, the computer monitor's resolution may change.)
The EZ USB operation screen is displayed. On the operation screen you can
select "Mirror" which projects the same screen as the computer's screen, or
"Extension" which expands and projects the computer's screen area. Click the
function you want to use. The default is "Mirror".
To close USB Display, click the "Exit" button in EZ USB, or press the BACK
button on the remote control.
Menu function settings
54
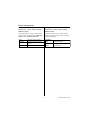
System requirements
CPU
Graphics card
Windows
Operating system
Memory
Intel/AMD Dual Core 2 GHz or faster
Intel 64 MB VRAM or higher, nVIDIA,
AMD graphics card
Windows XP (Professional) SP3 32/64bit,
Windows Vista (Home premium or higher)
SP2 32/64bit,
Windows 7 (Home premium or higher) SP1
32/64bit
1 GB or higher
55
Menu function settings
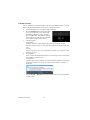
USB File Transfer
You can transfer files from the computer to the projector's internal memory. You can
then display the transferred file in the projector's file browser (P48).
1.
2.
3.
4.
Connect the projector to a computer using a USB cable.
Press the HOME button to display the home
screen. From the home screen, select USB
Streaming > USB File Transfer, and then
press the OK button. The USB File Transfer
screen is displayed, and after a few moments
the computer recognizes the projector.
Transferring files
For Windows:
From the start menu, open Computer (My Computer for Windows XP).
Open the projector's drive icon, and then copy and paste or drag and drop your
files.
For Mac:
Open the projector's drive icon on the desktop, and then copy and paste or drag
and drop your files.
Disconnecting
When you have finished transferring files, follow the steps below to disconnect
the computer from the projector.
For Windows:
Click the Safely remove hardware icon on the Windows taskbar, and check that
the message "This device can now be safely removed from the computer." is
displayed.
Press the BACK or HOME button on the remote control to leave the USB File
Transfer screen.
Menu function settings
56
For Mac:
Drag and drop the projector's icon to the trash.
Press the BACK or HOME button on the remote control to leave the USB File
Transfer screen.
Check that the connection has been disconnected. Do not disconnect the USB cable
while the files are being copied, as this could result in loss of data or damage to the
projector. The connection does not end if files on the projector are open on the
computer. Close all files on the projector, and then disconnect.
57
Menu function settings
Using the Setup menu
The Setup menu allows you to make a variety of settings for the projector's operation.
Using the Setup menu
1.
2.
Select the Setup menu icon on the home screen, and then press the OK button.
The Setup menu opens.
See P102 for a list of items that can be adjusted from the Setup menu.
3.
4.
5.
Press the / buttons to select the item you want to adjust.
After selecting the desired main menu item, press OK button to enter the feature
settings submenu.
Press the / buttons to adjust the selected item.
Press the BACK button to return to the top level menu.
To close the Setup menu, press the BACK button on the remote control
repeatedly, or press the HOME button.
Setup menu configuration
The Setup menu is comprised of the following 7 items.
•
Basic menu
•
Advanced menu
•
Videos Settings menu
•
Photos Settings menu
•
Music Settings menu
•
Information menu
•
Language menu
Menu function settings
58
Basic menu
Locking control buttons during
standby
Adjusting keystone distortion
automatically
Home screen > Setup > Basic > Key Lock
Home screen > Setup > Basic >
Auto Keystone
This function locks the control panel and
remote control buttons during standby to
prevent the projector from being turned on
accidentally.
Off
On
Start the projector as normal.
If you do not release the key
lock, you cannot turn on the
projector.
This function automatically detects the
projector's angle of tilt and adjusts keystone
distortion to project the optimum image.
Off
On
Auto Keystone is not
performed.
Auto Keystone is performed.
See the note below for more
details.
•
•
•
To turn on the projector when Key Lock is
on, press and hold the INPUT button on
•
the control panel or the AUTO PC button
on the remote control until the STATUS
LED lights up briefly. You can then turn on
the projector by pressing the POWER
button on the control panel or the remote
control.
•
If you press any buttons other than the
INPUT button on the control panel or the
AUTO PC button on the remote control
while the keys are locked, the STATUS
LED lights up (P88).
59
Keystone can be adjusted within ± 40
degrees. (When projecting an input signal
with 3D timing, the keystone can only be
adjusted within ± 4 degrees.)
Because digital processing is performed
when adjusting the image, the image after
adjustment may differ from the original
image. Also, the screen's aspect ratio may
change.
If you perform manual keystone
adjustment from the OSD, the auto
keystone function is disabled until the next
time the projector is started. However, you
can enable auto keystone again by setting
Auto Keystone to Off, and then setting it
back to On.
Menu function settings
Basic menu
Skipping the POWER button
Home screen > Setup > Basic >
Direct Power On
Turning the power off automatically
when no signals are received and no
operations are performed
Home screen > Setup > Basic >
This function turns on the projector
Auto Power Off
automatically by simply connecting the power
This function automatically turns off the
cord without having to press the POWER
projector to save power when no signals are
button.
received and no operations are performed for a
specified length of time.
Off
You need to press the
POWER button to turn on the
Disable
Auto Power Off is not
projector.
performed.
On
Connect the power cord to
5
min
The power turns off
turn on the projector.
automatically after the
10 min
selected time has passed and
15 min
no signals have been received
20 min
and no operations have been
• When Key Lock is set to On, Direct
25 min
performed.
Power On is automatically set to Off.
30 min
•
Menu function settings
60
About 30 seconds before the projector turns
off, a message is displayed warning you
that the projector will turn off shortly.
While the message is displayed, press the
POWER button once to turn off the
projector. Pressing any other button
removes the message.
Basic menu
Selecting the screen color when no
signal is received
Selecting the screen color when the
blank is set
Home screen > Setup > Basic >
Background Color
Home screen > Setup > Basic >
Blank Color
This function allows you to select the color of
the screen displayed when PC/Component,
HDMI, or Video is selected but no input signal
is detected.
This function allows you to select the color of
the screen displayed when you press the
BLANK button on the remote control to hide
the image.
Black
Blue
Displays a black screen when Black
no signal is being received.
Displays a blue screen when Blue
no signal is being received.
61
Displays a black screen when
Blank is set.
Displays a blue screen when
Blank is set.
Menu function settings
Basic menu
Advanced menu
Selecting the screen displayed when the Using the projector at high altitudes
projector is turned on
Home screen > Setup > Basic > Splash
Screen
Home screen > Setup > Advanced > High
Altitude Mode
Set this function to On to maintain optimum
This function allows you to select the splash system performance when using the projector
screen displayed when the projector is turned at an altitude of 1500 m to 3000 m within a
on.
temperature range of 0°C to 30°C.
Logo
Black
Blue
Displays the Canon logo.
Displays a black screen.
Displays a blue screen.
Off
On
Menu function settings
When using at an altitude of
0 m to 1499 m within a
temperature range of 0°C to
40°C.
When using at an altitude of
1500 m to 3000 m within a
temperature range of 0°C to
30°C.
•
Set High Altitude Mode to Off when
using the projector at an altitude of 0 m to
1499 m within a temperature range of 0°C
to 40°C.
•
If High Altitude Mode is set to On, the
cooling fan speeds up which increases the
operating noise, and the amount of power
consumed also increases.
62
Advanced menu
Inverting the projected image
Setting the menu display time
Home screen > Setup > Advanced >
Projector Position
Home screen > Setup > Advanced > Menu
Display Time
This function allows you to invert the
If you do not perform any operations on the
projected image so that the image looks correct OSD, the menu disappears automatically.
when the projector is suspended from a ceiling
This function allows you to set the time before
or when projecting from behind the screen.
the OSD disappears.
Front Table
Rear Table
Normal projection.
Select when projecting from
behind the screen.
Reverses the image from left
to right.
Rear Ceiling Select when the projector is
suspended upside down from
the ceiling behind the screen.
5 sec
10 sec
15 sec
20 sec
25 sec
30 sec
3 min
If no menu operations are
performed for the set time, the
menu disappears.
Reverses the image from top
to bottom.
Front Ceiling Select when the projector is
suspended upside down from
the ceiling in front of the
screen.
Reverses the image from left
to right and top to bottom.
63
Menu function settings
Advanced menu
Enabling closed captions
Selecting the closed caption channel
Home screen > Setup > Advanced > Closed Home screen > Setup > Advanced > Closed
Caption Enable
Caption Channel
This function allows you to display closed
This function allows you to select the closed
captions when they are available with the input caption channel.
signal.
CC1
Channel 1
* Closed captioning displays TV program or
* Channel 1 is the first
movie conversations, narrations, sound
language for the area.
effects, etc. as text on the screen. (When
available for TV programs, "CC" is usually CC2
Channel 2
displayed on the screen.)
CC3
Channel 3
CC4
Channel 4
Off
Do not used closed
captioning.
On
When closed captioning is
available, text is displayed on
the screen.
Menu function settings
64
Advanced menu
Videos Settings menu
Returning settings to their defaults
Setting the video file playback range
Home screen > Setup > Advanced > Factory Home screen > Setup > Videos Settings >
Defaults
Play Mode
This function allows you to return the Setup
menu/OSD settings to their defaults (the
settings at the time of purchase).
This function allows you to set the range of
video files to play.
One Video
Plays only the selected video
file.
All Videos in Plays all of the video files in
Folder
the folder containing the
selected video file.
Yes
No
Returns the settings to their
defaults.
Does not return the settings to
their defaults.
•
The LED Time, Language, Projector
Position, High Altitude Mode settings are
not returned to their defaults.
•
See P101 for the default settings.
65
Menu function settings
Videos Settings menu
Shuffling the video file play order
Repeating video files
Home screen > Setup > Videos Settings >
Play Order
Home screen > Setup > Videos Settings >
Repeat
This function allows you to select whether
video files are played in order of their file
names, or played in random order.
This function allows you to set whether or not
video files are repeated.
Normal
Shuffle
Plays the video files in order
of their file names.
Shuffles the video file play
order.
Off
On
•
Menu function settings
66
Does not repeat the video file.
Repeats the video file.
When set to On, the video files in the range
selected in Play Mode are played
repeatedly.
Photos Settings menu
Setting the slideshow speed
Changing images automatically
Home screen > Setup > Photos Settings >
Slideshow Speed
Home screen > Setup > Photos Settings >
Slideshow Mode
This function allows you to set the speed at
which images are changed when Slideshow
Mode is set to All Photos in Folder.
This function allows you to change images
manually using the remote control, or change
images automatically.
Fast
Normal
One Photo
Click
Slow
Changes images quickly.
Changes images at normal
speed.
Changes images slowly.
Press the / buttons to
change the image.
All Photos in Changes images
Folder
automatically.
67
Menu function settings
Photos Settings menu
Displaying the images randomly
Displaying image files repeatedly
Home screen > Setup > Photos Settings >
Slideshow Order
Home screen > Setup > Photos Settings >
Repeat
This function allows you to select whether
This function allows you to set whether or not
image files are displayed in order of their file image files are repeated.
names, or displayed in random order.
Off
Does not repeat the image
Normal
Displays the image files in
file.
order of their file names.
On
Repeats the image file.
Shuffle
Displays the image files in
random order.
Menu function settings
68
Music Settings menu
Setting the music file playback range
Shuffling the music file play order
Home screen > Setup > Music Settings >
Play Mode
Home screen > Setup > Music Settings >
Play Order
This function allows you to set the range of
music files to play.
This function allows you to select whether
music files are played in order of their file
names, or played in random order.
One music
All Music in
Folder
Plays only the selected music
file.
Normal
Plays all of the music files in
the folder containing the
Shuffle
selected music file.
69
Plays the music files in order
of their file names.
Shuffles the music file play
order.
Menu function settings
Music Settings menu
Information menu
Repeating music files
Checking the free space in the internal
memory
Home screen > Setup > Music Settings >
Repeat
Home screen > Setup > Information >
Memory/Internal Memory
This function allows you to set whether or not
This function allows you to project the
music files are repeated.
information about the amount of used and free
space in the internal memory.
Off
Does not repeat the music
file.
On
Repeats the music file.
•
When set to On, the music files in the
range selected in Play Mode are played
repeatedly.
Menu function settings
70
Information menu
Checking the amount of used and free Checking the amount of used and free
space in the SD card
space in the USB storage device
Home screen > Setup > Information >
Memory/SD Card
Home screen > Setup > Information >
Memory/USB Drive
This functions allows you to project the
This functions allows you to project the
information about the amount of used and free information about the amount of used and free
space in the SD card.
space in the USB storage device.
•
If no SD card is inserted, this is blank.
•
71
If no USB storage device is connected, this
is blank.
Menu function settings
Information menu
Checking the LED lit time
Checking the firmware version number
Home screen > Setup > Information > LED Home screen > Setup > Information >
Time
Firmware Version
This functions displays the information about This function allows you to display the
the total amount of time the projector's light projector's firmware version number.
source LED has been lit.
Menu function settings
72
Language menu
Selecting the menu display language
Home screen > Setup > Language
This function allows you to select the display
language for the home screen, Setup menu, and
the OSD.
English
German
French
Italian
Spanish
Portuguese
Swedish
Russian
Dutch
Finnish
Norwegian
Turkish
Polish
Hungarian
Czech
Danish
Chinese (Simplified)
Chinese (Traditional)
Japanese
73
Menu function settings
Key Lock
Key lock during standby
•
This function locks the control panel and remote control buttons during standby to
prevent the projector from being turned on accidentally.
•
You can turn the key lock function on or off from the Setup menu.
•
To turn on the projector when Key Lock is on, press and hold the INPUT button on
the control panel or the AUTO PC button on the remote control until the STATUS
LED lights up briefly and the key lock is released. (*1)
You can then turn on the projector by pressing the POWER button on the control panel
or the remote control.
* 1: Although the key lock is released, the key lock setting in the menu (On/Off) is not
changed. If you switch the projector off in this status, you need to release the key
lock again the next time the projector starts.
Key lock during projection
•
You can lock the projector's control panel and remote control button operations to
prevent settings from being changed accidentally during projection.
•
You can enable or disable the key lock function by pressing and holding the
INPUT button on the control panel or the AUTO PC button on the remote control
for at least 3 seconds.
Menu function settings
74
Using the On-Screen Display (OSD)
From the On-Screen Display menu (OSD) you can adjust the image quality and color
settings for the projected image.
Menu operations
1.
2.
3.
To open the OSD, project an input signal or file, and then press the MENU
button on the remote control.
If an input signal or file is not being projected, the OSD is not displayed even if
you press the MENU button.
When the OSD is displayed, you can make various settings using the / / /
and OK buttons.
To close the OSD, press the MENU or BACK button.
75
Menu function settings
Image Adjustment
Selecting the image mode
MENU > Image Adjustment > Image Mode
This function allows you to select the image
quality to suit the image being projected.
Presentation Suitable for projecting images
with a lot of text.
Standard
Suitable for projecting
computer screens or colorful
images (movies), etc.
sRGB
Suitable for projecting photos
from a digital camera that
supports sRGB. Compatible
with the sRGB standard.
Movie
Suitable for projecting
colorful images (movies).
User
You can save image quality
settings that you have made as
a custom setting. You can
then select the saved settings
as an image mode.
Making your own image quality
adjustments
MENU > Image Adjustment > Image Mode
> User
When you select User as the image mode, you
can adjust the image quality.
You can save your adjustments as a custom
setting.
Select User from Image Mode.
Select the image mode you want to use as the
base from Reference Mode.
Press the / buttons to adjust the
Brightness, Contrast, Color, Tint,
Sharpness and Color Temperature. (P77 ~
Press the OK button to confirm your selection, P78)
and then press the MENU or BACK button.
Select Save Settings, and then select OK to
save your settings.
•
The default is Standard.
•
The image quality settings like brightness,
•
contrast, etc. can only be adjusted in User.
Menu function settings
76
Make sure you perform Save Settings after
making your adjustments. If you do not
perform Save Settings, your adjustments
are reset when you select another mode.
Image Adjustment
Adjusting the brightness
Adjusting the color
MENU > Image Adjustment > Brightness
MENU > Image Adjustment > Color
This function allows you to adjust the
brightness of the image.
This function allows you to adjust the color
strength.
The image gets brighter.
The color gets stronger.
The image gets darker.
The color gets weaker.
•
After adjusting all of the image qualities,
perform Save Settings.
If you do not perform Save Settings, your
•
adjustments are reset when you select another
mode.
You can adjust this when a Video signal is
being input.
After adjusting all of the image qualities,
perform Save Settings.
If you do not perform Save Settings, your
adjustments are reset when you select
another mode.
Adjusting the contrast
Adjusting the tint
MENU > Image Adjustment > Contrast
MENU > Image Adjustment > Tint
This function allows you to adjust the contrast This function allows you to adjust purple and
of the image.
green tints in the image.
Increases the contrast. The
difference between dark and
light areas becomes clearer.
Reduces the contrast. The
image gets lighter.
•
After adjusting all of the image qualities,
perform Save Settings.
If you do not perform Save Settings, your
adjustments are reset when you select
another mode.
Adjusts green tints.
Adjusts purple tints.
•
You can adjust this when a Video signal is
being input.
•
After adjusting all of the image qualities,
perform Save Settings.
If you do not perform Save Settings, your
adjustments are reset when you select
another mode.
77
Menu function settings
Image Adjustment
Adjusting the sharpness
Saving your image quality adjustments
MENU > Image Adjustment > Sharpness
MENU > Image Adjustment > Save Settings
This function allows you to adjust the
sharpness of the image.
In the User under Image Mode, you can adjust
and save settings for Brightness, Contrast,
Color, Tint, Sharpness, and Color
Temperature.
The image becomes clearer.
The image becomes blurred.
You can then select the saved settings as an
image mode.
•
You can adjust this when a Video signal is
•
being input.
•
After adjusting all of the image qualities,
•
perform Save Settings.
If you do not perform Save Settings, your
adjustments are reset when you select
another mode.
Adjusting the color temperature
MENU > Image Adjustment > Color
Temperature
This function allows you to adjust the color
temperature.
High
Middle
Low
•
The image becomes tinted
with blue. (cold colors)
The image uses standard
colors.
The image becomes tinted
with red. (warm colors)
After adjusting all of the image qualities,
perform Save Settings.
If you do not perform Save Settings, your
adjustments are reset when you select
another mode.
Menu function settings
78
If you perform Factory Defaults, saved
settings are returned to their default values.
After adjusting all of the image qualities,
perform Save Settings.
If you do not perform Save Settings, your
adjustments are reset when you select
another mode.
Aspect
Selecting the aspect ratio for an image Select the Aspect with the OK button, press
MENU > Aspect
the / buttons to select an option, and then
press the OK button to confirm your selection.
This function allows you to adjust the aspect
ratio to suit the aspect of the image.
Press the MENU button or the BACK button.
Auto
Full Screen
4:3
16:9
16:10
True Size
Projects using the aspect ratio
of the input image. Select this •
mode for general projections. •
Projects at the full size of the
projection area regardless of
the input signal's aspect ratio.
Projects at an aspect ratio of
4:3. Select this when 4:3
images are not projected
correctly when using Auto.
Projects at an aspect ratio of
16:9. Select this when 16:9
images are not projected
correctly when using Auto.
Projects at an aspect ratio of
16:10. Select this when the
projecting a computer screen
with an aspect ratio of 16:10.
When the resolution for the
input signal is less than 1280
x 800, a smaller image is
projected in proportion to the
resolution. Select when you
want to project using almost
the same resolution as the
computer screen.
79
The default is Auto.
Aspect can only be adjusted when PC/
Component, HDMI, or Video is being
input.
Menu function settings
Screen Color
Phase
Projecting onto a colored wall
Adjusting the synchronization of the
input signal
MENU > Screen Color
(Analog PC)
This function allows you to adjust the color of
the projected image according to the color of MENU > Phase
the screen or wall being projected on.
This function allows you to fine tune the
timing of the image signal.
Normal
Select when using a standard
screen. Projects using a color Adjust when the screen shifts or flickers.
close to natural light.
Light Yellow Select when projecting onto a
light yellow wall.
Pink
Select when projecting onto a
pink wall.
Light Green Select when projecting onto a
light green wall.
Blue
Select when projecting onto a
blue wall.
Greenboard Select when projecting onto a
greenboard (dark green).
Make image colors look
closer to Normal when
projected on a greenboard.
Press the
•
This is only available when an analog PC
image is being input.
•
Use this if the image is not projected
correctly even after using executing the
AUTO PC function. (P21)
Press the MENU button or the BACK button.
The default is Normal.
•
This can be adjusted when connected to a
computer.
Menu function settings
buttons to adjust the values.
When you have finished making adjustments,
press the MENU button or the BACK button.
Select the Screen Color with the OK button,
press the / buttons to select the content,
and then press the OK button to confirm your
selection.
•
/
80
H.Size
3D Invert
Adjusting the projection width of the
input signal
Adjusting 3D images
(Analog PC)
MENU > 3D Invert
This function allows you to adjust 3D content
when the images are hard to view. Changes the
display sequence of the image on the left and
This function allows you to adjust the
horizontal width of the screen, making it wider right.
or narrower.
On
Changes the display sequence
Press the / buttons to adjust the values.
of the image on the left and
right.
When you have finished making adjustments,
Does not change the display
press the MENU button or the BACK button. Off
sequence of the image on the
left and right.
MENU > H.Size
•
This is only available when an analog PC
image is being input.
•
Use this if the image is not projected
correctly even after executing the AUTO
PC function. (P21)
Select the 3D Invert with the OK button, press
the / buttons to select the option, and then
press the OK button to confirm your selection.
Press the MENU button or the BACK button.
•
This is only available when 3D image
signals are being projected.
•
See "Watching 3D content" on page 85 for
details.
81
Menu function settings
Keystone
LED Mode
Adjusting keystone distortions
Adjusting the LED light intensity
MENU > Keystone
MENU > LED Mode
This function allows you to correct keystone
distortions.
This function allows you to adjust the
brightness of the LED light source.
Use this if you cannot correct the distortion
using Auto Keystone.
By changing the LED mode, you can reduce
the amount of electricity consumed and the
noise.
Press the
/
buttons to adjust the values.
When you have finished making adjustments, Normal
press the MENU button or the BACK button.
Eco
•
Keystone can be adjusted within ± 40
degrees.*1
•
If you perform manual keystone
adjustment, the auto keystone function is
disabled until the next time the projector is
started. However, you can enable auto
keystone again by setting Auto Keystone
to Off, and then setting it back to On.
Projects at standard
brightness.
Reduces the brightness of the
LED, and therefore the
amount of electricity
consumed as well as the fan
noise.
Select the LED Mode with the OK button,
press the / buttons to select the content,
and then press the OK button to confirm your
selection.
* 1 When projecting an input signal with 3D Press the MENU button or the BACK button.
timing, the keystone can only be adjusted
within ± 4 degrees.
• The default is Normal.
•
Menu function settings
82
The setting is saved even if you turn off the
projector.
HDMI level range
Setup
MENU > HDMI level range
MENU > Setup
Select if necessary when projecting movie
titles via HDMI input.
This function allows you to move to the home
screen's Setup screen from the OSD.
Auto
Full
Limit
Press the OK button to display the home
Automatically selects the
screen's Setup screen.
signal level.
This may not be supported
depending on the video
• You cannot return to the selected input
device.
signal with the BACK button.
Select when the HDMI output
for the video device is set to
"Extended".
The name for "Extended"
varies depending on the video
device.
Select when the HDMI output
for the video device is set to
"Limit".
The name for "Limit" varies
depending on the video
device.
Select the HDMI level range with the OK
button, press the / buttons to select the
option, and then press the OK button to
confirm your selection.
Press the MENU button or the BACK button.
83
Menu function settings
Information
MENU > Information
This function displays the current information
such as the input, resolution, and so on.
Menu function settings
84
Watching 3D content
This projector supports 3D content display using the DLP Link system.
This projector only supports 3D image signals in frame sequential format. Other
formats such as the Frame Packing format or the Side-by-Side format are not
supported.
You need the following items to project and watch 3D content.
•
3D content capable device
* For example, a computer with graphics board and software capable of outputting 3D
images at 120 Hz frame sequential.
•
3D content
•
DLP-Link active electronic shutter 3D glasses
* Not all 3D glasses are guaranteed to work correctly.
Supported 3D signal (120 Hz)
SVGA (800 x 600), XGA (1024 x 768, Reduce Blanking),
WXGA (1280 x 800, Reduce Blanking)
To watch 3D content:
1. Connect the projector to a computer with a computer cable or an HDMI cable.
* When connecting the projector to a computer, make sure you switch the
computer's output signal so that it is only outputting to the projector (do not use
dual mode).
2.
3.
4.
Output a 120 Hz frame sequential signal from the computer connected to the
projector.
Turn on the DLP-Link system 3D glasses, and wear them to enjoy the content.
If you cannot see 3D objects, change the "3D Invert" setting from the OSD.
•
It may be difficult to view 3D images if the room is too bright. Also, if there are
fluorescent lights (50 Hz) in the room, the light may flicker when using 3D glasses.
If this happens, turn down or turn off the fluorescent light.
•
You cannot change the image mode when viewing 3D content. Keystone can only
be adjusted within ± 4 degrees.
•
3D content may not be displayed depending on the computer performance such as
graphics board, memory, or CPU.
85
Menu function settings
Caution
Cautions when viewing 3D content
•
•
•
3D content should not be viewed by people with a history of photosensitive
epilepsy, people with heart conditions, pregnant women, the elderly, people
with serious illnesses, or people with a history of epileptic seizures.
Viewing 3D content could aggravate their pre-existing conditions.
Do not view 3D content if you are feeling unwell or are tired.
In addition, do not view 3D content if you are sleep deprived or inebriated.
If you notice any of the following symptoms, stop viewing the 3D content
immediately and wait until the symptoms subside.
- If the image appears to be doubled or if the 3D effect is not clear.
- Stop viewing if you feel your physical condition change, such as if you feel
fatigued or unwell.
- When enjoying 3D content that rotates, rolls, or shakes you may feel as if
you are were moving, which can trigger a form of "sea sickness".
•
•
•
•
Viewing 3D content for too long may cause eyestrain. To avoid this, be sure to
take regular breaks.
Viewing 3D content for too long or viewing them from an angle may cause
eyestrain and so on.
Children viewing 3D content should always be accompanied by an adult.
Children may not tell you if they are feeling unwell when viewing 3D content,
so always be sure to check with the child.
The minimum recommended age for viewing 3D content is six years old.
Make sure you are at an appropriate distance from the front of the screen
when viewing 3D content.
Make sure you are at least three times the height of the screen away from the
screen when viewing 3D content, and that your eyes are level with the screen.
The image source may be reversed.
Check that the settings are correct and that the 3D effect is being correctly
applied.
If the image is inversed and the left and right eye images are swapped, the 3D
effect does not work, which could cause eye strain or cause you to feel unwell.
Menu function settings
86
Appendix
87
Appendix
LED Indicators
The LED indicators display the operating status of the projector.
Operating status
Standby
Warm up
Projecting
Button pressed when Key
Lock is on
(Except buttons operations
in order to release Key
Lock.)
LED Indicator
STATUS
Off
Off
Off
Red lamp lights for 3
seconds
POWER
Red solid on
Blue blinking
Blue solid on
Standby: Red solid on
Projecting: Blue solid on
Standby: Red solid on
Appendix
Key Lock switched
between on and off
Lights up red for 0.5
second
Projecting: Blue solid on
Temperature abnormality
Fan abnormality
Flashes red 1 times
Flashes red 4 times
Off
Off
88
Troubleshooting
The projector does not turn on
Cause
The power cord is not properly
connected.
The power cord has just been
connected.
Remedy
Make sure that the power cord is properly
connected. (P26)
Wait for a few seconds. Power cannot be
turned on unit the POWER button lights
red. (P26)
Is the STATUS LED blinking?
An internal abnormality has
occurred.
If it is blinking, a temperature or fan
abnormality has occurred. (P88)
In the event of a temperature abnormality,
make sure that the exhaust vents aren't
blocked and check that the projector is not
being used in a high temperature
environment.
In the event of a fan abnormality, contact
the Canon Customer Support Center.
When you press the POWER button does
the STATUS LED light up?
Key lock is ON.
If lit, key lock is ON.
Press and hold the INPUT button on the
operation panel or the AUTO PC button on
the remote control. Clear the key lock and
then turn the power on. (P20, P21 , P74)
89
Appendix
No image
Cause
The cables are not properly
connected.
The image is not being output from
the video device.
The input signal to be projected is
not selected.
Remedy
Check that the computer and video device
are properly connected to the projector.
Make sure that the video device that is
connected is playing back the image.
Select the input signal to be projected by
pressing the INPUT button or the input
selection button on the remote control.
(P20, P21)
Make sure that the output on the source
device side will support the signals of the
projector. (P95 ~ P97)
Press the BLANK button on the remote
control. (P21)
Set the output to the external monitor for
the notebook computer to ON. To turn the
output to the external monitor ON, press
[LCD] or [VGA] while pressing and
holding [Fn] on the computer keyboard, or
press the function key that has the screen
icon on it. (P35)
The format of the image signal is
incorrect.
BLANK is on.
The output to the external monitor
on the notebook computer side is
not setup properly.
In addition, key operation will differ
depending on the notebook type. For more
information, check your notebook manual.
Open the lens shutter. (P27)
Lens shutter is not open.
Appendix
90
No sound
Cause
The audio cable is not properly
connected.
MUTE is on.
Remedy
Check the connection for the audio cable.
Press the MUTE button on the remote
control. (P21)
Adjust the volume by pressing the VOL+
button on the remote control. (P21)
Use a resistance-free audio cable.
The audio volume is low.
An audio cable equipped with too
much resistance is used.
No image.
When using PC/Component, HDMI or
video input, if the input signal is not
projected, the audio cannot be output.
Blurred image
Cause
The lens is not correctly focused.
The distance to the screen is too
close.
Remedy
Focus the image using the focus ring. (P27)
Check whether the distance to the screen is
appropriate.
If the screen is not about 0.5 m or more
away, the image will not focus. (P32)
Check whether or not the image is
projecting from too steep an angle relative
to the screen.
If the projector is moved from a cold area
to a hot one, the lens may cloud.
The projector and the screen are not
properly aligned.
The projector was moved to an area
where the temperature differs
significantly.
After a little while the lens will clear and
the image will be able to be properly
projected.
Clean the lens. (P94)
Dirty lens.
91
Appendix
The image does not display properly
Cause
The image shifts left or right with
analog PC inputs. Also, the image
flickers.
The image is top/bottom reversed or
left/right reversed.
Remedy
Execute the AUTO PC function.
There is a problem with the ceiling
mounting/rear projection feature setup.
Check the setting details for Setup >
Advanced > Projector Position. (P63)
Use the connector cable included with the
projector.
Using a computer cable in which
some of the pins do not connect.
For commercially available parts, use a
computer cable in which all of the pins
connect.
Power shuts down
Cause
The air intake vents or exhaust
vents are blocked.
Remedy
If the air intake vents or exhaust vents are
blocked, the temperature inside the
projector will rise and the projector will
automatically shut down for protection.
(P20)
After the temperature of the projector
drops, and the air intake vents and exhaust
vents are unblocked, turn it on again.
Check that the operating environment is
0°C to 40°C. (P16)
Improper operating environment.
When using the projector in a high altitude
location between 1500 m to 3000 m, set it
to the high altitude mode. (P62)
Technical problems may occur so unplug
the power cord. Contact your Canon
Customer Support Center as soon as
possible. (Back cover of this manual)
When the causes for the above
cannot be found.
Appendix
92
Remote control does not work
Cause
Batteries aren't inserted properly/
Batteries are drained.
Remedy
Check that the batteries are inserted
correctly.
If batteries are in the remote control,
replace them with new ones. (P22)
Check that the remote control is operating
within range of the remote control receiver
on the projector. (P22)
Remove any obstructions between the
remote control receiver on the projector and
the remote control. Operate the remote
control from a position free of obstructions.
Make sure that direct sunlight and strongly
lit lamps are not shining on the remote
control receiver of the projector. (P22)
When you press the POWER button, does
the STATUS LED light up?
The remote control is being
operated from a place outside its
range.
There is something between the
remote control and projector.
The operating environment of the
remote control is not appropriate.
Remote control operation has
stopped because of the key lock.
If lit, key lock is ON.
Press and hold INPUT on the operation
panel or the AUTO PC button on the
remote control to release the key lock.
(P74)
93
Appendix
Care and Cleaning
Cleaning the lens
Please clean the lens if dust and dirt can be seen on the lens surface.
•
To clean the lens, use an a commercially available blower brush for cameras or a
lens cleaning cloth.
•
Before cleaning the lens, disconnect the power cable and completely cool down the
projector.
•
Do not use waxes, alcohol, benzene, thinner or other chemical detergents.
Cleaning the projector
Before cleaning, turn off the projector in the order described on "Turning off the
projector" on page 30, and unplug the power cord.
•
•
•
Caution
•
Appendix
Remove dirt and dust from the projector by wiping it with a soft, lint-free
cloth.
To remove stubborn dirt or stains, moisten a cloth with a mild detergent
diluted with water and wipe the case.
Do not use waxes, alcohol, benzene, thinner or other chemical detergents.
Using these agents may damage the projector outer casing.
Do not rub or brush the surface of the top of the projector. Doing so may
damage the surface.
94
Timing chart
Analog PC input
Resolution
640 x 480
720 x 400
800 x 600
1024 x 768
1152 x 864
1024 x 576
1024 x 600
1280 x 720
1280 x 768
1280 x 800
1280 x 1024
1280 x 960
1366 x 768
1440 x 900
1400 x 1050
1680 x 1050
640 x 480@67Hz
832 x 624@75Hz
1024 x 768@75Hz
1152 x 870@75Hz
Mode
VGA
VGA
VGA
VGA
SVGA
SVGA
SVGA
SVGA
SVGA*
XGA
XGA
XGA
XGA
XGA*
WXGA
WXGA
WXGA
WXGA
WXGA*
SXGA
SXGA
WXGA+
SXGA+
WSXGA+
MAC13
MAC16
MAC19
MAC21
Horizontal
frequency (kHz)
31.469
37.861
37.500
43.269
31.469
37.879
48.077
46.875
53.674
77.425
48.363
56.476
60.023
68.667
97.551
67.500
35.820
41.467
45.000
47.776
49.702
62.795
71.554
101.563
63.981
79.976
60.000
85.938
47.712
55.935
65.317
65.290
35.000
49.722
60.241
68.68
Vertical
frequency (Hz)
59.940
72.809
75.000
85.008
70.087
60.317
72.188
75.000
85.061
119.854
60.004
70.069
75.029
84.997
119.989
75.00
60.00
64.995
60
59.870
59.810
74.934
84.880
119.909
60.020
75.025
60.000
85.002
59.790
59.887
59.978
59.954
66.667
74.546
75.020
75.06
* Supported timing for 3D signal in frame sequential format
95
Appendix
HDMI input (digital PC)
Resolution
640 x 480
720 x 400
800 x 600
1024 x 768
1152 x 864
1024 x 576
1024 x 600
1280 x 720
1280 x 768
1280 x 800
1280 x 1024
1280 x 960
1366 x 768
1440 x 900
1400 x 1050
1680 x 1050
640 x 480
832 x 624
1024 x 768
1152 x 870
Horizontal
frequency (kHz)
31.469
37.861
37.500
43.269
31.469
37.879
48.077
46.875
53.674
77.425
48.363
56.476
60.023
68.667
97.551
67.500
35.820
41.467
45.000
47.776
49.702
62.795
71.554
101.563
63.981
79.976
60.000
85.938
47.712
55.935
65.317
65.290
35.000
49.722
60.241
68.68
Mode
VGA
VGA
VGA
VGA
SVGA
SVGA
SVGA
SVGA
SVGA*
XGA
XGA
XGA
XGA
XGA*
WXGA
WXGA
WXGA
WXGA
WXGA*
SXGA
SXGA
WXGA+
SXGA+
WSXGA+
MAC13
MAC16
MAC19
MAC21
* Supported timing for 3D signal in frame sequential format
Appendix
96
Vertical frequency
(Hz)
59.940
72.809
75.000
85.008
70.087
60.317
72.188
75.000
85.061
119.854
60.004
70.069
75.029
84.997
119.989
75.00
60.00
64.995
60
59.870
59.810
74.934
84.880
119.909
60.020
75.025
60.000
85.002
59.790
59.887
59.978
59.954
66.667
74.546
75.020
75.06
HDMI input (digital video)
Signal format
Horizontal frequency (kHz)
480i
15.73
480p
31.47
576i
15.63
576p
31.25
720/50p
37.5
720/60p
45.00
1080/50i
28.13
1080/60i
33.75
1080/50P
56.25
1080/60P
67.5
Vertical frequency (Hz)
59.94
59.94
50
50
50
60
50
60
50
60
Component video input
Signal format
480i
480p
576i
576p
720/50p
720/60p
1080/50i
1080/60i
1080/50P
1080/60P
Horizontal frequency
(kHz)
15.73
31.47
15.63
31.25
37.5
45.00
28.13
33.75
56.25
67.5
Vertical frequency (Hz)
59.94
59.94
50
50
50
60
50
60
50
60
Video input
Signal format
NTSC
PAL
SECAM
PAL-M
PAL-N
PAL-60
NTSC4.43
Horizontal frequency
(kHz)
15.73
15.63
15.63
15.73
15.63
15.73
15.73
97
Vertical frequency (Hz)
60
50
50
60
50
60
60
Appendix
Projector specifications
All specifications are subject to change without notice.
Model name
LE-5W
System
1-Chip DLP system
Display device
Type
DMD x 1
Size/Aspect ratio
0.45 type/16:10
Resolution
WXGA equivalent
Projection lens
Zoom
Fixed
Focal length/F11.7 mm/F1.65
value
Light source
LED (R, G, B)
Screen size
20" (0.5 m) - 240" (6.1 m)
No. of colors reproduced
Approx. 1 billion 73.74 million colors
Brightness
500 Lumens (presentation)
Contrast ratio
3000:1 (All white: all black,
presentation time)
Brightness uniformity
85% (presentation)
Speaker
2.5 Watt x 2
Maximum input resolution
1920 x 1080
Video signal
Digital video
1080p /1080i / 720p / 576p / 480p /
576i / 480i
Digital PC
WSXGA+ / WXGA+ / SXGA+ /
WXGA / SXGA / XGA /VGA / MAC
Analog PC
WSXGA+ / WXGA+ / SXGA+ /
WXGA / SXGA / XGA /VGA / MAC
Component video
1080p /1080i / 720p / 576p / 480p /
576i / 480i
Video
NTSC/ NTSC4.43/ PAL/ PAL-M/
PAL-N/SECAM/PAL60
Input terminals
PC
Analog PC/Component
HDMI
Digital PC/Digital video
VIDEO
Video
AUDIO IN
(ϕ3.5 mm) Audio input
USB type A
Supports videos/photos/music/
documents
USB type B
USB display and USB file transfer
SD card slot
Videos/photos/music/documents
Audio output
AUDIO OUT
(ϕ3.5 mm) Audio output
terminal
Internal memory
1.5GB
Dimensions
248 mm (W) x 54.9 mm (H) x 193 mm (D) (including
protrusion)
248 mm (W) x 49.4 mm (H) x 193 mm (D) (excluding
protrusion)
Appendix
98
Weight
Power supply
Power consumption/Standby power
Operating temperature range
1.6 kg (3.5 lb)
AC100-240V, 50-60 Hz
130 W/0.5 W
0°C to 40°C
0°C ~ to 30°C (Above sea level: 1500
to 3000 m)
10% - 90% (without condensation)
Operating relative humidity
Remote control
Dimensions
Weight
Battery type
86.3 mm x 40.2 mm x 6.2 mm
16.4 g
CR2025
* Compliance with ISO/IEC 21118:2012.
* Note that using the projector continuously for a long period of time may make the
optical components deteriorate faster.
Dimensions
•
248 mm (W) x 54.9 mm (H) x 193 mm (D) (including protrusion)
•
248 mm (W) x 49.4 mm (H) x 193 mm (D) (excluding protrusion)
193
(7.6)
49.4 54.9
(1.9)_ (2.2)
248 (9.8)
Units: mm (inch)
99
Appendix
Copyright information
Notes on copyrights
Please be aware that if this projector is used for commercial purposes, or is used for
public viewing in coffee shops or hotels, and that if the screen size switching function
is used, screen compression or elongation can result, and there may be some
infringement on copyrights as defined under copyright laws.
Trademarks
•
DLP, Digital Micromirror Device, and DMD are trademarks of Texas Instruments.
•
Microsoft, Windows, Windows XP, Windows Vista, and Windows 7 are registered
trademarks, or trademarks and product names of Microsoft Corporation in the
United States and/or other countries.
•
Mac, Mac OS and Macintosh are trademarks of Apple Inc. registered in the United
States and/or other countries.
•
HDMI, HDMI logo and High-Definition Multimedia Interface are trademarks or
registered trademarks HDMI Licensing, LLC.
•
Other company names and product names are trademarks or registered trademarks
of their respective companies.
Optional accessory
•
Appendix
Remote control Part number: LE-RC01
100
On-screen menu tree
Image
Adjustment
Image Mode
P76
Screen Color
Presentation
Normal*
P80
Light Yellow
Standard*
Pink
sRGB
Light Green
Movie
Blue
User
Greenboard
Reference Mode
P76
Presentation
Phase
P80
H.Size
P81
Standard*
sRGB
Movie
Brightness
P77
Contrast
P77
Color
P77
Tint
P77
Sharpness
P78
Color Temperature
P78
3D Invert
Off*
P81
On
Keystone
LED Mode
High
P82
Normal*
P82
Eco
Middle*
HDMI level range
Low
Save Settings
P78
Auto*
P83
Full
OK
Limit
Cancel
Setup
Aspect
Auto*
Full Screen
P83
P79
Information (*1)
4:3
Source
P84
Resolution
16:9
16:10
True Size
* Indicates an item that is factory-set (after
reset).
*1 is only for display and cannot be selected.
101
Appendix
Setup menu configuration
Basic
Key Lock
P59
Advanced
Off*
On
Projector Position
P59
Off
Front Table*
On*
Rear Table
Direct Power On
P60
Front Ceiling
Menu Display Time
On
P60
10 sec
5 min
15 sec
10 min
20 sec
15 min*
25 sec
20 min
30 sec*
25 min
3 min
Closed Caption Enable P64
30 min
P61
Off*
Black*
On
Blue
Closed Caption
Channel
Blank Color
CC2
Blue
CC3
P62
CC4
Logo*
Firmware Upgrade
Black
Yes
Blue
No
Factory Defaults
Yes
No
Appendix
P64
CC1*
P61
Black*
Splash Screen
P63
5 sec
Disable
Background Color
P63
Rear Ceiling
Off*
Auto Power Off
P62
Off*
On
Auto Keystone
High Altitude Mode
102
P65
Videos
Settings
Play Mode
P65
Music
Settings
Play Mode
All Videos in
Folder*
All Music in Folder*
One Video
One music
Play Order
Play Order
P66
Normal*
Repeat
P69
Normal*
Shuffle
Photos
Settings
P69
Shuffle
Repeat
P66
Off*
Off*
On
On
Information
(*1)
P70
Memory/Internal
Memory
P70
Fast
Memory/SD Card
P71
Normal*
Memory/USB Drive
P71
Slideshow Speed P67
Slow
LED Time
P72
Slideshow Mode P67
Firmware Version
P72
All Photos in
Folder
Language
One Photo Click*
P73 English*
Norwegian
Slideshow Order P68
German
Turkish
Normal*
French
Polish
Shuffle
Italian
Hungarian
Spanish
Czech
Repeat
P68
Off*
Portuguese
On
Swedish
Russian
Dutch
Danish
Chinese
(Simplified)
Chinese
(Traditional)
Japanese
Finnish
* Indicates an item that is factory-set (after reset).
*1 is only for display and cannot be selected.
103
Appendix
Back cover
CANON INC.
30-2, Shimomaruko 3-chome, Ohta-ku, Tokyo 1468501, Japan
U.S.A.
CANON U.S.A. INC.
One Canon Park, Melville, NY 11747, U.S.A.
For all inquires concerning this product, call toll free
in the U.S. 1-800-OK-CANON
CANADA
CANON CANADA INC. HEADQUARTERS
6390 Dixie Road, Mississauga, Ontario L5T 1P7,
Canada
CANON CANADA INC. MONTREAL BRANCH
5990, Côte-de-Liesse, Montréal Québec H4T 1V7,
Canada
CANON CANADA INC. CALGARY OFFICE
2828, 16th Street, N.E. Calgary, Alberta T2E 7K7,
Canada
For all inquiries concerning this product, call toll free
in Canada
1-800-OK-CANON
EUROPE, AFRICA & MIDDLE EAST
CANON EUROPE LTD.
3 The Square Stockley Park, Uxbridge, Middlesex,
UB11 1ET United Kingdom
CANON EUROPA N.V.
Bovenkerkerweg 59, 1185 XB Amstelveen, The
Netherlands
CANON FRANCE S.A.S
17, quai du President Paul Doumer, 92414 Courbevoie Cedex, France
CANON UK LTD.
Woodhatch Reigate Surrey RH2 8BF, United Kingdom
CANON DEUTSCHLAND GmbH
Europark Fichtenhain A10, 47807 Krefeld, Germany
CANON ITALIA S.p.A.
Via Milano 8 I-20097 San Donato Milanese, Milano,
Italy
CANON Schweiz AG
Geschäftsbereich Wiederverkauf, Industriestrasse 12,
CH-8305 Dietlikon,
Switzerland
CANON GMBH
Zetschegasse 11, A-1230 Wien, Austria
CANON España, S.A.
Av. De Europa, 6 Alcobendas 28108 Madrid, Spain
CANON PORTUGAL S.A.
Rua Alfredo da Silva, 14 Alfragide 2610-016 Amadora, Portugal
CANON Belgium N.V. / S.A.
Berkenlaan 3, 1831 Diegem (Mechelen), Belgium
CANON Netherland NV
Neptunusstraat 1, 2132 JA Hoofddorp, The Netherlands
CANON LUXEMBOURG S.A.
Rue des Joncs 21, L-1818 Howald, Luxembourg
CANON DANMARK A / S
Knud Hoejgaards Vej 1 DK-2860 Soeborg, Danmark
CANON OY
Huopalahdentie 24 PL 1 00351 Helsinki, Finland
CANON SVENSKA AB
Gustav III:s Boulevard 26 169 88 Solna, Sweden
CANON NORGE as
Hallagerbakken 110, Postboks 33, Holmlia, 1201
Oslo, Norway
CENTRAL & SOUTH AMERICA
CANON LATIN AMERICA, INC.
703 Waterford Way, Ste. 400 Miami, FL 33126,
U.S.A.
ASIA
CANON (China) Co., Ltd.
15F Jinbao Building No.89 Jinbao Street,
Dongcheng District, Beijing 100005, China
CANON HONGKONG CO., LTD.
19 / F., The Metropolis Tower, 10 Metropolis Drive,
Hunghom, Kowloon, Hong Kong
CANON SINGAPORE PTE. LTD.
1 HarbourFront Avenue, #04-01 Keppel Bay Tower,
Singapore 098632
CANON KOREA CONSUMER IMAGING INC.
Canon BS Tower 5F, #168-12 Samseong-dong,
Gangnam-gu, Seoul, Korea
OCEANIA
CANON AUSTRALIA PTY. LTD.
1 Thomas Holt Drive, North Ryde, N.S.W. 2113,
Australia
CANON NEW ZEALAND LTD.
Akoranga Business Park, Akoranga Drive, Northcote, Auckland, New Zealand
©CANON INC.2013