1
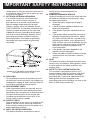
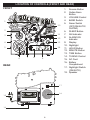
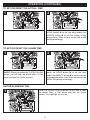
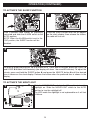
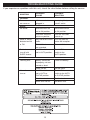
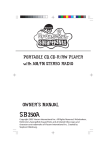
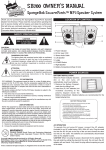
AM/FM Rocker
Alarm Clock Radio
OWNER'S MANUAL
SB816
Copyright 2006 Viacom International Inc. All Rights Reserved. Nickelodeon,
Nicktronics, SpongeBob SquarePants and all related titles, logos and characters
are trademarks of Viacom International Inc. Created by Stephen Hillenburg.
IMPORTANT SAFETY INSTRUCTIONS
CAUTION
RISK OF ELECTRIC SHOCK
DO NOT OPEN
CAUTION: TO REDUCE THE RISK OF ELECTRIC
SHOCK, DO NOT REMOVE COVER (OR BACK). NO
USER-SERVICEABLE
PARTS
INSIDE.
REFER
SERVICING TO QUALIFIED SERVICE PERSONNEL.
DANGEROUS VOLTAGE:
The lightning flash with arrowhead symbol
within an equilateral triangle is intended to
alert the user to the presence of uninsulated
dangerous voltage within the product’s
enclosure that may be of sufficient magnitude
to constitute a risk of electric shock to persons.
FCC WARNING:
This equipment may generate or
use radio frequency energy.
Changes or modifications to this
equipment may cause harmful
interference
unless
the
modifications are expressly
approved in the instruction
manual. Modifications not
authorized by the manufacturer
may void user ’s authority to
operate this device.
ATTENTION:
The exclamation point within an equilateral
triangle is intended to alert the user to the
presence of important operating and
maintenance (servicing) instructions in the
literature accompanying the appliance.
WARNING - To reduce the risk of fire or electric shock, do not expose this
appliance to rain or moisture.
CAUTION - ELECTRICALLY OPERATED PRODUCT - Not recommended for
children under 8 years of age. As with all electric products, precautions should
be observed during handling and use to prevent electric shock.
FCC NOTICE:
This equipment has been tested and found to comply with the limits for a Class B digital device,
pursuant to part 15 of the FCC Rules. These limits are designed to provide reasonable protection
against harmful interference in a residential installation. This equipment generates, uses and can
radiate radio frequency energy and, if not installed and used in accordance with the instructions, may
cause harmful interference to radio communications.
However, there is no guarantee that interference will not occur in a particular installation. If this
equipment does cause harmful interference to radio or television reception, which can be determined by
turning the equipment off and on, the user is encouraged to try to correct the interference by one or
more of the following measures:
•
Reorient or relocate the receiving antenna.
•
Increase the separation between the equipment and receiver.
•
Connect the equipment into an outlet on a circuit different from that to which the receiver is
connected.
•
Consult the dealer or an experienced radio/TV technician for help.
FCC CAUTION:
To assure continued compliance, follow the attached installation instructions and use only shielded
cables when connecting to other devices. Modifications not authorized by the manufacturer may void
user’s authority to operate this device.
1
IMPORTANT SAFETY INSTRUCTIONS
Before using the unit, be sure to read all
operating instructions carefully. Please note that
these are general precautions and may not
pertain to your unit. For example, this unit may
not have the capability to be connected to an
outdoor antenna.
1. READ INSTRUCTIONS
All the safety and operating instructions should
be read before the product is operated.
2. RETAIN INSTRUCTIONS
The safety and operating instructions should be
retained for future reference.
3. HEED WARNINGS
All warnings on the product and in the operating
instructions should be adhered to.
4. FOLLOW INSTRUCTIONS
All operating and use instructions should be
followed.
5. CLEANING
Unplug this product from the wall outlet before
cleaning. Do not use liquid cleaners or aerosol
cleaners. Use a dry cloth for cleaning.
6. ATTACHMENTS
Do not use attachments not recommended by
the product's manufacturer as they may cause
hazards.
7. WATER AND MOISTURE
Do not use this product near water–for example:
near a bathtub, washbowl, kitchen sink or
laundry tub; in a wet basement; or near a
swimming pool.
8. ACCESSORIES
Do not place this product on an unstable cart,
stand, tripod, bracket or table.
The product may fall, causing
serious injury and serious
damage to the product. Use
only with a cart, stand, tripod,
bracket or table recommended
by the manufacturer or sold with
the product. Any mounting of the product should
follow the manufacturer’s instructions, and
should use a mounting accessory recommended
by the manufacturer.
8A. An appliance and cart combination should be
moved with care. Quick stops, excessive force
and uneven surfaces may cause the appliance
and cart combination to overturn.
9. VENTILATION
Slots and openings in the cabinet and in the
back or bottom are provided for ventilation, to
ensure reliable operation of the product and to
protect it from overheating. These openings
must not be blocked or covered. The openings
should never be blocked by placing the product
10.
11.
12.
13.
14.
15.
16.
2
on a bed, sofa, rug or other similar surface. This
product should never be placed near or over a
radiator or heat source. This product should not
be placed in a built-in installation such as a
bookcase or rack unless proper ventilation is
provided or the manufacturer's instructions have
been adhered to.
POWER SOURCES
This product should be operated only from the
type of power source indicated on the marking
label. If you are not sure of the type of power
supply to your home, consult your appliance
dealer or local power company. For products
intended to operate from battery power, or other
sources, refer to the operating instructions.
GROUNDING OR POLARIZATION
This product is equipped with a polarized
alternating-current line plug (a plug having one
blade wider than the other). This plug will fit into
the power outlet only one way. This is a safety
feature. If you are unable to insert the plug fully
into the outlet, try reversing the plug. If the plug
should still fail to fit, contact your electrician to
replace your obsolete outlet. Do not defeat the
safety purpose of the polarized plug.
POWER-CORD PROTECTION
Power-supply cords should be routed so that
they are not likely to be walked on or pinched by
items placed upon or against them, paying
particular attention to cords at plugs,
convenience receptacles, and the point where
they exit from the appliance.
LIGHTNING
To protect your product from a lightning storm,
or when it is left unattended and unused for long
periods of time, unplug it from the wall outlet
and disconnect the antenna or cable system.
This will prevent damage to the product due to
lightning and power-line surges.
POWER LINES
An outside antenna system should not be
located in the vicinity of overhead power lines or
other electric light or power circuits, or where it
can fall into such power lines or circuits. When
installing an outside antenna system, extreme
care should be taken to keep from touching
such power lines or circuits as contact with them
might be fatal.
OVERLOADING
Do not overload wall outlets and extension cords
as this can result in a risk of fire or electric
shock.
OBJECT AND LIQUID ENTRY
Never push objects of any kind into this product
through openings as they may touch dangerous
IMPORTANT SAFETY INSTRUCTIONS
ceiling only as recommended by the
manufacturer.
22. DAMAGE REQUIRING SERVICE
Unplug the product from the wall outlet and refer
servicing to qualified service personnel under
the following conditions:
a. When the power-supply cord or plug is
damaged.
b. If liquid has been spilled or objects have
fallen into the product.
c. If the product has been exposed to rain or
water.
d. If the product does not operate normally by
following the operating instructions. Adjust
only those controls that are covered by the
operating instructions, as an adjustment of
other controls may result in damage and will
often require extensive work by a qualified
technician to restore the product to its
normal operation.
e. If the product has been dropped or the
cabinet has been damaged.
f. When the product exhibits a distinct change
in performance–this indicates a need for
service.
23. HEAT
The product should be situated away from heat
sources such as radiators, heat registers, stoves
or other products (including amplifiers) that
produce heat.
24. NOTE TO CATV SYSTEM INSTALLER
This reminder is provided to call the CATV
system installer's attention to Article 820-40 of
the NEC that provides guidelines for proper
grounding and, in particular, specifies that the
cable ground shall be connected to the
grounding system of the building, as close to the
point of cable entry as practical.
voltage points or short out parts that could result in
fire or electric shock. Never spill or spray any type
of liquid on the product.
17. OUTDOOR ANTENNA GROUNDING
If an outside antenna is connected to the
product, be sure the antenna system is
grounded so as to provide some protection
against voltage surges and built-up static
charges. Section 810 of the National Electric
Code, ANSI/NFPA 70, provides information with
respect to proper grounding of the mast and
supporting structure, grounding of the lead-in
wire to an antenna discharge product, size of
grounding conductors, location of antenna
discharge product, connection to grounding
electrodes and requirements for grounding
electrodes.
EXAMPLE OF ANTENNA GROUNDING AS PER
NATIONAL ELECTRICAL CODE
18. SERVICING
Do not attempt to service this product yourself
as opening or removing covers may expose you
to dangerous voltage or other hazards. Refer all
servicing to qualified service personnel.
19. REPLACEMENT PARTS
When replacement parts are required, be sure
the service technician uses replacement parts
specified by the manufacturer or those that have
the same characteristics as the original part.
Unauthorized substitutions may result in fire,
electric shock or other hazards.
20. SAFETY CHECK
Upon completion of any service or repairs to this
product, ask the service technician to perform
safety checks to determine that the product is in
proper operating condition.
21. WALL OR CEILING MOUNTING
The product should be mounted to a wall or
3
WARNING
0-8
Choking Hazard–Small Parts and Packaging Materials. Not for children under
8 years.
•
All materials for fastening or packing purposes are not part of the unit and
should be discarded for children’s safety.
•
Please keep all information for future reference.
•
This is not a toy.
Ages 8+
The product should be periodically examined for conditions that may
result in the risk of fire, electric shock, or injury to persons and that,
in an event such conditions, the product should not be used until
properly repaired.
Protect Your Furniture
This model is equipped with non-skid rubber “feet” to prevent the product
from moving when you operate the controls. These “feet” are made from
non-migrating rubber material specially formulated to avoid leaving any
marks or stains on your furniture. However certain types of oil based
furniture polishes, wood preservatives or cleaning sprays may cause the
rubber “feet” to soften and leave marks or a rubber residue on your
furniture. To prevent any damage to your furniture, we strongly
recommend that you purchase small self-adhesive felt pads, available at
hardware stores and home improvement centers everywhere, and apply
these pads to the bottom of the rubber “feet” before you place the product
on fine wooden furniture.
4
Emerson Radio Corp. has produced this audio product under license from
Nickelodeon. We have taken great care to make sure your unit was in
perfect working order when it left our factory.
Thank you for purchasing this SpongeBob SquarePants AM/FM Rocker
Alarm Clock Radio from Emerson. Please read this manual before
operating this unit to become familiar with its features and obtain the
performance that will bring you continued enjoyment for many years. In
the event you require technical assistance, please call the Emerson Radio
Consumer Affairs Department at: 800-898-9020.
5
FRONT
LOCATION OF CONTROLS (FRONT AND REAR)
1.
2.
1
10
2
11
3
12
4
13
5
14
6
7
8
9
REAR
3.
4.
5.
6.
7.
8.
9.
10.
11.
12.
13.
14.
15.
16.
17.
18.
17
18
15
16
6
Snooze Button
Guitar Alarm
Button
VOLUME Control
BAND Switch
Alarm Switch
(OFF/ON/AUTO/
GUITAR)
SLEEP Button
AM Indicator
ALARM ON
Indicator
Display
Nightlight
HOUR Button
MINUTE Button
TIME Button
TUNING Control
AC Cord
Battery
Compartment
Nightlight Switch
(ON/AUTO)
Speaker
PREPARATION FOR USE
REMOVING THE “TRY ME” BATTERY PACK
Before using, an adult must remove the enclosed
“Try Me” battery pack as it is not needed in daily use.
Dispose of the button batteries in accordance with
local regulations, then install a 9V battery as
described below.
CAUTION:
TO PREVENT ELECTRIC SHOCK, MATCH THE
WIDE BLADE OF THE PLUG TO THE WIDE SLOT
AND FULLY INSERT.
LOCATION OF
“TRY ME”
BATTERY PACK
AC Plug
AC Outlet
Unravel the AC cord and connect it to a conveniently
located AC outlet having 120V and 60Hz only. The
Clock Display will illuminate and “12:00” will blink in
the window.
NOTE: If the AC plug does not fit into a nonpolarized outlet, do not file or cut the wide
blade.
If the AC cord is disconnected or if there is a power failure, this electronic clock is
designed to continue operating internally (without showing the time on the Clock Display)
with a 9 volt battery (not included). To install the battery, remove the battery compartment
cover by pressing in on the tab, then connect the battery to the terminals of the battery
snap inside the compartment (use of an alkaline battery is
recommended). Replace the battery compartment cover.
7
9V
Be sure to check the condition of the battery periodically by
disconnecting the AC cord and connecting it again 2 or 3
minutes later. The preset times should continue operating. If
the present time does not appear, it indicates the battery is
dead or not connected properly.
TO LISTEN TO THE RADIO
1
OPERATION
2
1
2
Slide the ALARM switch to the ON position to
turn the unit on.
Slide the BAND switch 1 to select AM or FM.
Rotate the TUNING control 2 to select a
station.
3
4
Adjust the VOLUME control as desired.
Slide the ALARM switch to the OFF position
to turn the unit off.
8
OPERATION (CONTINUED)
TO SET OR RESET THE ACTUAL TIME
1
2
2
3
1
Press and hold the TIME button.
While holding the TIME button 1, press
HOUR button 2 to set the hour and/or
MINUTE button 3 to set the minute of
present time. Make sure to set the AM or
setting accordingly.
TO SET OR RESET THE ALARM TIME
1
2
1
Press and hold the GUITAR ALARM button.
(NOTE: When you press the GUITAR ALARM
button, you will hear the preset Rock ‘n Roll
music and see the Guitar motion.)
GUITAR ALARM BUTTON
1
the
the
the
PM
2
3
While holding the GUITAR ALARM button 1,
press the HOUR button 2 to set the hour
and/or the MINUTE button 3 to set the minute
of the desired alarm time. Make sure to set the
AM or PM setting accordingly.
Press the GUITAR ALARM button at any time to hear
the preset Rock ‘n Roll music and see the Guitar
motion. The nightlight will turn on.
9
OPERATION (CONTINUED)
TO SET THE ALARM TO WAKE TO RADIO
1
2
1
2
Set the alarm time as previously instructed.
Slide the ALARM switch to the ON position.
Slide the BAND switch 1 to the AM or FM
position, then tune a station using the
TUNING control 2.
3
4
Make sure the VOLUME control is set as
desired.
NOTE: Please make sure the volume is not
set to the minimum; otherwise, when it
reaches the alarm time, you will not hear the
radio sound.
Slide the ALARM switch to the AUTO
position. When the alarm time matches the
present time, the radio will automatically turn
on for one hour and 59 minutes and then will
shut off.
To shut off the alarm or for the Snooze
feature, see the next page.
10
OPERATION (CONTINUED)
TO SET THE ALARM TO WAKE TO GUITAR
1
Set the alarm time as previously instructed. Slide the ALARM
switch to the GUITAR position. When the alarm time matches
the present time, the radio will automatically turn on for one
hour and 59 minutes and then will shut off.
To shut off the alarm or for the Snooze feature, see below.
TO SHUT THE ALARM OFF
1
To shut the alarm off, press the GUITAR ALARM button ❶
once and the alarm time will be reset for the next day. Slide
the ALARM switch ❷ to the OFF position to turn off the alarm
and not set it for the next day. The nightlight will turn off.
1
2
SNOOZE
1
The alarm can be temporarily turned off manually by pressing
the SNOOZE button; the alarm will turn back on
automatically 9 minutes later.
11
OPERATION (CONTINUED)
TO ACTIVATE THE SLEEP FUNCTION
1
2
Tune a desired radio station as previously
instructed and slide the ALARM switch to the
AUTO position.
NOTE: When the ALARM switch is set to the
"ON" position, the SLEEP function will be
disabled.
Press the SLEEP button and 0:59 will appear
on the clock display, then release the button;
the radio will turn on.
3
2
3
1
To select a longer playing time, up to a maximum of 1 hour and 59 minutes, press the SLEEP 1
and HOUR 2 buttons simultaneously (the display will show 1 hour and 59 minutes). To adjust the
minute, press and hold the SLEEP button 1 and press the MINUTE button 3 until the desired
time is shown on the clock display. Release the button when the preferred time is shown in the
display.
TO ACTIVATE THE NIGHTLIGHT
1
Slide the NIGHTLIGHT switch to the ON position to turn the
nightlight on. Slide the NIGHTLIGHT switch to the AUTO
position to turn the nightlight off.
The LED inside the nightlight is not replaceable as it will last
a lifetime.
12
TROUBLESHOOTING GUIDE
If you experience a problem with this unit, check the chart below before calling for service.
SYMPTOM
POSSIBLE
CAUSE
Power does
AC line cord not
GENERAL
not come on.
RADIO
No sound.
Noise or sound
distorted on AM
into AC outlet.
ALARM switch not
Set ALARM switch
VOLUME control at
Turn the VOLUME
set to ON position.
minimum position.
AM–Interference from
traffic.
FM–AC Cord
Radio does not
ALARM switch
SLEEP feature.
CLOCK
Flashing time.
not extended.
not in AUTO position.
Battery connected
improperly, not connected or dead.
Alarm does not
turn on.
Insert plug firmly
plugged in.
or FM.
turn off with
POSSIBLE
SOLUTION
Clock not set.
ALARM switch
not in AUTO or
to ON position.
control up.
Turn the radio for
better AM reception.
Extend AC Cord.
Set ALARM
switch to the
AUTO position.
Check the battery.
Set the clock.
Set ALARM
switch to the AUTO
GUITAR position.
or GUITAR position.
Alarm time not set.
Set alarm time.
Clock is not set.
13
Set the clock.
EMERSON RADIO CORP.
LIMITED WARRANTY
Emerson Radio Corp. warrants manufacturing defects in original material, including original
parts and workmanship, under normal use and conditions, for a period of ninety (90) days
from the date of original purchase in the U.S. With your dated proof of purchase, we will
provide repair service at no charge for labor and parts at an authorized Depot Repair
Facility, or replace the product in our discretion. For repair or replacement, pack your unit in
a padded box, enclose your check or money order payable to Emerson Radio Corp. in the
amount of $9.00 (not required by California residents) to cover shipping and handling costs,
and enclose a copy of your proof of purchase. Send your unit to:
Emerson Radio Corp.
5101 Statesman Drive
Irving, TX 75063
This warranty does not cover damage from negligence, misuse, abuse, accident, failure to
follow operating instructions, commercial use, rental, repairs by an unauthorized facility, or
products purchased, used, serviced or damaged outside of the United States.
THIS WARRANTY GIVES YOU SPECIFIC LEGAL RIGHTS, AND YOU MAY ALSO HAVE
OTHER RIGHTS WHICH VARY FROM STATE TO STATE.
AU898M
The serial number of your system is located on a label on the bottom cabinet. Please take
a moment now to locate the serial number and write the number in the space provided
below. You may be asked to provide this number when calling for product service.
Model Number: SB816
Serial Number: __________________________________________
®
SB816-092806-03
Printed in China