1
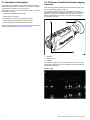
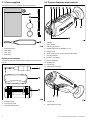
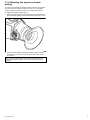
TH2 4 / TH3 2
Us e r re fe re nce
En g lis h
Da te : 01-2012
Docume nt numbe r: 81333-2-EN
© 2012 Ra yma rine UK Limite d
Trademark and patents notice
Autohelm, hsb2, RayTech Navigator, Sail Pilot, SeaTalk, SeaTalkNG, SeaTalkHS and Sportpilot are registered trademarks of Raymarine
UK Limited. RayTalk, Seahawk, Smartpilot, Pathfinder and Raymarine are registered trademarks of Raymarine Holdings Limited.
FLIR is a registered trademark of FLIR Systems, Inc. and/or its subsidiaries.
All other trademarks, trade names, or company names referenced herein are used for identification only and are the property of
their respective owners.
This product is protected by patents, design patents, patents pending, or design patents pending.
Fair Use Statement
You may print no more than three copies of this manual for your own use. You may not make any further copies or distribute or use the
manual in any other way including without limitation exploiting the manual commercially or giving or selling copies to third parties.
Product handbooks
The latest versions of all English and translated handbooks are available to download in PDF format from the website www.raymarine.com.
Please check the website to ensure you have the latest handbooks.
Copyright ©2012 Raymarine UK Ltd. All rights reserved.
ENGLISH
Document number: 81333-2
Date: 01-2012
Contents
Chapter 1 Important information............................. 7
Protect from direct sunlight .............................................. 7
Product disposal ............................................................. 7
Technical accuracy ......................................................... 7
Warranty registration....................................................... 7
Water ingress ................................................................. 7
EMC conformance .......................................................... 7
Cleaning the thermal camera........................................... 7
Chapter 2 Introduction ............................................. 9
2.1 Handbook information ............................................... 10
2.2 TH-Series handheld thermal imaging cameras ............ 10
Chapter 3 Using your camera.................................. 13
3.1 Parts supplied........................................................... 14
3.2 Camera features and controls .................................... 14
3.3 Charging the camera................................................. 15
3.4 Switching on and off .................................................. 15
3.5 Power management .................................................. 16
3.6 Battery status indicator .............................................. 16
3.7 Adjusting the display brightness ................................. 17
3.8 Changing the display mode........................................ 17
3.9 Zooming the display (TH32 model only)...................... 18
3.10 Freezing the display (TH24 model only) .................... 18
3.11 Adjusting the eyepiece diopter setting ....................... 19
Chapter 4 Troubleshooting and support ................ 21
4.1 TH-Series troubleshooting ......................................... 22
4.2 Raymarine customer support ..................................... 23
Chapter 5 Technical specification........................... 25
5.1 TH-Series model-specific features.............................. 26
5.2 TH-Series technical data — all models ....................... 26
Chapter 6 Options and accessories ....................... 27
6.1 Accessories and spare parts ...................................... 28
5
6
TH24 / TH32 handheld thermal cameras – User reference
Chapter 1: Important information
Warranty registration
Warning: Ensure safe navigation
To register your Raymarine product ownership, please visit
www.raymarine.com and register online.
This product is intended only as an aid to navigation
and must never be used in preference to sound
navigational judgment. Only official government
charts and notices to mariners contain all the current
information needed for safe navigation, and the
captain is responsible for their prudent use. It is the
user’s responsibility to use official government charts,
notices to mariners, caution and proper navigational
skill when operating this or any other Raymarine
product.
It is important that you register your product to receive full warranty
benefits. Your unit package includes a bar code label indicating the
serial number of the unit. You will need this serial number when
registering your product online. You should retain the label for future
reference.
Water ingress
Water ingress disclaimer
Warning: Maintain a permanent watch
Always maintain a permanent watch, this will allow
you to respond to situations as they develop. Failure
to maintain a permanent watch puts yourself, your
vessel and others at serious risk of harm.
Although the waterproof rating capacity of this product meets the
IPX7 standard, water intrusion and subsequent equipment failure
may occur if the product is subjected to commercial high-pressure
washing. Raymarine will not warrant products subjected to
high-pressure washing.
Caution: Do not open the unit
EMC conformance
The unit is factory sealed to protect against
atmospheric humidity, suspended particulates and
other contaminates. It is important that you do not
open the unit or remove the casing for any reason.
Opening the unit will:
To ensure performance is not compromised, keep product away
from high levels of interference.
• compromise the seal with possible damage to the
unit, and
• void the manufacturer’s warranty.
Caution: Service and maintenance
This product contains no user serviceable
components. Please refer all maintenance and repair
to authorized Raymarine dealers. Unauthorized repair
may affect your warranty.
Cleaning the thermal camera
The camera housing and lenses (objective and eyepiece) will
require occasional cleaning. Raymarine suggests that you clean
lenses when image quality degradation is noticed or excessive
contaminant buildup is seen.
When cleaning this product:
• Do NOT wipe lenses with a dry cloth, as this could scratch the
coating.
• Do NOT use abrasive, or acid or ammonia based products.
• Do NOT pressure wash.
Protect from direct sunlight
Protect from direct sunlight.
To protect your product against the damaging effects of ultra-violet
light, always keep your product in the supplied pouch, and out of
direct sunlight when not in use.
To clean the camera:
1. Switch off the power to the unit.
2. Clean the camera body with a clean, soft cotton cloth. You can
moisten the cloth and use a mild detergent if required.
3. Clean the camera lenses (objective and eyepiece).
• Rinse lenses with fresh water to remove all dirt particles and
salt deposits, and allow to dry naturally.
Product disposal
Dispose of this product in accordance with the WEEE Directive.
• If any spots or smears remain, very gently wipe the lenses
with a clean microfibre cloth or soft cotton cloth.
• If necessary, use isopropyl alcohol (IPA) or a mild detergent to
remove any remaining spots or marks.
The Waste Electrical and Electronic Equipment (WEEE)
Directive requires the recycling of waste electrical and electronic
equipment. Whilst the WEEE Directive does not apply to some
Raymarine products, we support its policy and ask you to be aware
of how to dispose of this product.
Technical accuracy
To the best of our knowledge, the information in this document
was correct at the time it was produced. However, Raymarine
cannot accept liability for any inaccuracies or omissions it may
contain. In addition, our policy of continuous product improvement
may change specifications without notice. As a result, Raymarine
cannot accept liability for any differences between the product
and this document. Please check the Raymarine website
(www.raymarine.com) to ensure you have the most up-to-date
version(s) of the documentation for your product.
Important information
7
8
TH24 / TH32 handheld thermal cameras – User reference
Chapter 2: Introduction
Chapter contents
•
2.1 Handbook information on page 10
•
2.2 TH-Series handheld thermal imaging cameras on page 10
Introduction
9
2.1 Handbook information
This handbook describes operation of Raymarine TH-Series
handheld thermal cameras. It provides an overview of features
available and examples of the controls used.
This handbook covers the TH24 and TH32 models. It includes
information to help you:
• operate the handheld thermal camera.
• obtain support if required.
2.2 TH-Series handheld thermal imaging
cameras
TH-Series is a maritime handheld thermal camera that helps you to
see in low-light and no-light conditions.
The TH-Series camera uses an infra-red sensor and optics to
detect the heat emitted by objects. This enables you to see in total
darkness, helping you to navigate at night in dark anchorages,
identify obstacles (such as rocks, buoys, and floating debris) and
find people in the water.
The handbook is for use with the following products:
• TH24 – 240x180 pixel handheld thermal camera.
• TH32 – 320x240 pixel handheld thermal camera.
3
1
This and other Raymarine product documentation is available to
download in PDF format from www.raymarine.com.
2
D12283-1
1. Eyepiece
2. Objective lens
3. Tasklight
The following images show how the TH-Series camera can reveal
objects that could be a hazard to navigation, and that are difficult to
see with the naked eye.
Visible image
10
TH24 / TH32 handheld thermal cameras – User reference
TH-Series camera image
The TH-Series camera has the following key functions and features:
• Rugged design — built to withstand the demands of maritime use.
• Palm-sized portability and lightweight — only 12 oz. (340 g).
• 240x180 (TH24) or 320x240 (TH32) Microbolometer sensor for
excellent image quality and clarity.
• FLIR proprietary Digital Detail Enhancement.
• 19mm lens with 24 degree field of view.
• Freeze frame (TH24 model) or digital zoom (TH32 model).
• Automatic focus.
• LED tasklight.
• Rechargeable internal Li-Ion battery (charged via USB cable) —
up to 5 hours of camera operation on a single charge.
Introduction
11
12
TH24 / TH32 handheld thermal cameras – User reference
Chapter 3: Using your camera
Chapter contents
•
3.1 Parts supplied on page 14
•
3.2 Camera features and controls on page 14
•
3.3 Charging the camera on page 15
•
3.4 Switching on and off on page 15
•
3.5 Power management on page 16
•
3.6 Battery status indicator on page 16
•
3.7 Adjusting the display brightness on page 17
•
3.8 Changing the display mode on page 17
•
3.9 Zooming the display (TH32 model only) on page 18
•
3.10 Freezing the display (TH24 model only) on page 18
•
3.11 Adjusting the eyepiece diopter setting on page 19
Using your camera
13
3.1 Parts supplied
3.2 Camera features and controls
The following items are included in the camera package:
1
2
3
4
5
6
7
1
2
3
9
8
10
D12286-1
4
1. Tasklight.
2. Power button.
D12284-1
1. Drawstring pouch.
3. USB charging socket.
4. Display brightness and tasklight on / off.
2. USB cable.
5. Display mode.
3. Lens cover.
6. Zoom (TH32 model) / Freeze frame (TH24 model).
4. Wrist strap.
7. Charging indicator.
8. Eyepiece and display.
Optional accessories
The following optional accessories are available for the TH-Series
camera:
9. Diopter adjustment.
10. Objective lens.
11. Lanyard clip.
12. Tripod attachment point.
1
2
3
1
2
D12285-1
D12288-1
1. Floating lanyard.
2. Soft carrying pouch.
1. Lanyard clip.
2. Tripod attachment point.
3. Hard-shell storage case.
14
TH24 / TH32 handheld thermal cameras – User reference
3.3 Charging the camera
3.4 Switching on and off
You must fully charge the camera's internal Li-Ion battery before
using the camera for the first time.
Ensure that the camera's internal battery is charged.
To charge the camera:
1. Lift the cover on the USB socket, and plug in the USB cable
provided with the camera.
2. Plug the other end of the cable into a USB power source.
When charging correctly, the charging indicator is lit yellow.
When fully charged, the charging indicator is lit green. The initial
charge time is approximately 4 hours.
To switch the camera on and off:
1. With the camera switched off, press the Power button.
An audible alert sounds, the display turns on, and the camera
buttons are back-lit. The camera is ready to use in approximately
4 seconds.
2. With the camera switched on, press the Power button.
An audible alert sounds, the display turns off, and the camera
buttons go dark.
If you press the Display Brightness button, the LED tasklight
turns on.
Note: The LED tasklight is disabled while the camera is switched
on.
Using your camera
15
3.5 Power management
3.6 Battery status indicator
Your camera is equipped with a power management system that
provides up to 5 hours of continuous operation.
Your camera is equipped with a sophisticated power system, using
a rechargeable internal Li-Ion battery.
When switched off, the battery will hold a charge for up to 2 months.
While the camera is switched on, a battery status indicator is shown
in the corner of the display. This indicator provides an estimate
of the remaining battery charge:
If no buttons are pressed for approximately 5 minutes, the camera
will switch off automatically. This prevents the battery from draining
if you inadvertently leave the camera switched on.
When auto-shutdown begins, Auto shutdown 30s is shown in the
display. After counting down for 30 seconds, the camera will switch
off.
To stop the auto-shutdown process once it has begun, press any
button. (The normal function of the button will not occur.)
16
Display icon
Battery status
Full charge
Half charge
Charging
TH24 / TH32 handheld thermal cameras – User reference
3.7 Adjusting the display brightness
3.8 Changing the display mode
You can adjust the display brightness on the camera to the level
you find most comfortable to use.
Your camera has 3 display modes. You can switch between display
modes to help you see more clearly in different environmental
conditions.
To adjust the display brightness:
1. Press the Display brightness button once.
One of the following icons is displayed for a few seconds,
indicating the current brightness level:
Display icon
Brightness level
Low
To adjust the display mode:
1. Press the Display mode button once.
One of the following icons is displayed for a few seconds,
indicating the current display mode:
Display icon
Display mode
White hot — hotter objects appear as white
or light grey.
Medium-low
Medium
Black hot — hotter objects appear as black or
dark grey.
Medium-high
High
2. To select a different brightness level, press the Display
brightness button again.
Subsequent button presses will cycle through all available
brightness levels.
Note: If the camera is switched off, holding down the Display
brightness button turns on the LED tasklight. The tasklight is
disabled if the camera is switched on.
Using your camera
Marine red — similar to the White hot display
mode, but the hottest objects in the scene are
colored red to maintain normal night vision.
2. To select a different display mode, press the Display mode
button again.
Subsequent button presses will cycle through all 3 display
modes.
Note: While White hot is the most commonly used and visually
intuitive way of viewing thermal images, Black hot can enhance
the contrast of certain objects, or provide better visual perspective
in some conditions.
17
3.9 Zooming the display (TH32 model
only)
3.10 Freezing the display (TH24 model
only)
Your camera (TH32 model only) has a zoom function. Zooming the
display enables you to inspect the scene more closely.
Your camera (TH24 model only) has a freeze-frame function.
Freezing the display enables you to inspect the scene more closely.
To switch the camera to 2x zoom:
1. Press the Zoom button once.
The central part of the image is magnified to twice its normal
size, and the zoom icon is displayed:
To freeze the display:
1. Press the Freeze frame button once.
The display image is frozen.
2. To return to normal video display, press the Freeze frame button
again.
Zoom icon
2. To return to no zoom (full resolution), press the Zoom button
again.
18
TH24 / TH32 handheld thermal cameras – User reference
3.11 Adjusting the eyepiece diopter
setting
Your camera has a diopter adjustment system built into the eyepiece.
You can use this to adjust the eyepiece focus up to ±2 diopters,
making it easier to use the camera if you usually wear glasses.
To adjust the eyepiece diopter setting:
1. While looking through the eyepiece with the camera switched on,
slowly rotate the diopter control until the display appears in focus.
D12289-1
2. Once you have adjusted the diopter setting, leave the diopter
control in its new position unless someone else needs to use
the camera.
Note: When the pointed side of the diopter control is directed
towards the camera eyepiece, it is in its neutral position (zero
diopters).
Using your camera
19
20
TH24 / TH32 handheld thermal cameras – User reference
Chapter 4: Troubleshooting and support
Chapter contents
•
4.1 TH-Series troubleshooting on page 22
•
4.2 Raymarine customer support on page 23
Troubleshooting and support
21
4.1 TH-Series troubleshooting
Problems with the thermal camera and their possible causes and solutions are described here.
Problem
Possible causes
Possible solutions
No image visible on display.
The camera is switched off, or has
automatically shut down.
If no buttons are pressed for approximately 5 minutes, the camera will shut
down automatically. To switch on, press the Power button. The camera
will be ready to use in approximately 4 seconds.
The internal battery is discharged.
Charge the camera, as described in this manual. When fully charged, the
charging indicator is lit green.
The lens cover has not been removed.
Remove the lens cover from the objective lens on the front of the camera
while in use. Remember to replace the lens cover after use, to protect the
objective lens from damage.
The display brightness is set too low.
Press the Display brightness button several times to select an appropriate
brightness level.
The display mode is not appropriate for
the current conditions.
A particular environment may benefit from a different display mode setting.
For example, a very cold background (such as the sky) could cause the
camera to use a wider temperature range than appropriate. Press the
Display mode button to cycle through the different display modes.
The camera was pointed at an intense
light source (such as the sun), for an
extended period.
Image artifacts will disappear in time. The camera periodically performs
automatic corrections to remove image artifacts.
Image too dark or too light.
Image artifacts visible on display.
22
TH24 / TH32 handheld thermal cameras – User reference
4.2 Raymarine customer support
Raymarine provides a comprehensive customer support service.
You can contact customer support through the Raymarine website,
telephone and email. If you are unable to resolve a problem, please
use any of these facilities to obtain additional help.
Web support
Please visit the customer support area of our website at:
www.raymarine.com
This contains Frequently Asked Questions, servicing information,
e-mail access to the Raymarine Technical Support Department and
details of worldwide Raymarine agents.
Telephone and email support
In the USA:
• Tel: +1 603 324 7900
• Toll Free: +1 800 539 5539
• Email: [email protected]
In the UK, Europe, the Middle East, or Far East:
• Tel: +44 (0)13 2924 6777
• Email: [email protected]
Product information
If you need to request service, please have the following information
to hand:
• Product name.
• Product identity.
• Serial number.
• Software application version.
You can obtain this product information using the menus within your
product.
Troubleshooting and support
23
24
TH24 / TH32 handheld thermal cameras – User reference
Chapter 5: Technical specification
Chapter contents
•
5.1 TH-Series model-specific features on page 26
•
5.2 TH-Series technical data — all models on page 26
Technical specification
25
5.1 TH-Series model-specific features
Model
number
5.2 TH-Series technical data — all
models
Features
Startup from standby
< 5 seconds
TH24
Video resolution: 240 x 180 pixels (with freeze-frame)
Detect man* (1.8 m x 0.5 m) at 350 yd (320 m)
Thermal sensitivity
< 50 mK @ f/1.0
TH32
Video resolution: 320 x 240 pixels (with 2x digital electronic
zoom)
Detect man* (1.8 m x 0.5 m) at 500 yd (450 m)
Waveband
7.5 - 13.5 μm
Detector type
VOx Microbolometer
Image processing
FLIR proprietary Digital Detail Enhancement
Focus
Fixed
Video refresh rate
9 Hz
Field of view (FOV)
24° x 18°
Battery type
Internal Li-Ion
Battery Life
Approximately 5 hours (at room temperature)
Operational temperature
range
-4°F to 122°F (-20°C to 50°C)
Storage temperature
range
-40°F to 140°F (-40°C to 60°C)
Ratings
IP-67; 1 metre drop
Weight
12 oz. (340 g) with battery
Size (Length x Width x
Height)
6.70” x 2.31” x 2.44” (172 mm x 58.7 mm x 62 mm)
*Actual range may vary depending on camera setup, environmental conditions,
and user experience.
26
TH24 / TH32 handheld thermal cameras – User reference
Chapter 6: Options and accessories
Chapter contents
•
6.1 Accessories and spare parts on page 28
Options and accessories
27
6.1 Accessories and spare parts
Optional accessories and spare parts for TH-Series cameras.
Optional accessories
Item
Part number
Floating lanyard
A80021
Soft carry pouch
A80022
Hard storage case
A80023
Notes
Spare parts
Item
Part number
USB charging cable
A80028
Drawstring pouch
A80029
Lens cap
A80030
Eye cup
A80031
Wrist strap
A80032
28
Notes
TH24 / TH32 handheld thermal cameras – User reference
www.ra ym a rin e .c o m