1
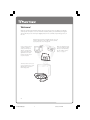
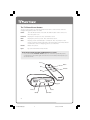
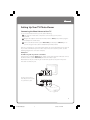
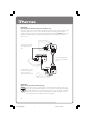
M
Hardware Design Group
Part No.
X08-22768
Date
4/23/01
Description
A5 Cover
Contact
vball
User’s Guide
*X08-22768*
M
Contents
Welcome . . . . . . . . . . . . . . . . . . . . . . . . . . . . . . . . . . . . . . . . . . . . . . . . . . . . . . . . . . . . . . .
What’s In the Box? . . . . . . . . . . . . . . . . . . . . . . . . . . . . . . . . . . . . . . . . . . . . . . . . . . . . . . . . . . . . . . . . .
Using TV Photo Viewer with or without a Computer . . . . . . . . . . . . . . . . . . . . . . . . . . . . . .
The TV Photo Viewer Buttons . . . . . . . . . . . . . . . . . . . . . . . . . . . . . . . . . . . . . . . . . . . . . . . . . . . . . .
2
3
3
4
Setting Up Your TV Photo Viewer . . . . . . . . . . . . . . . . . . . . . . . . . . . . . . . . . . . . . . . .
Connecting the Photo Viewer to Your TV . . . . . . . . . . . . . . . . . . . . . . . . . . . . . . . . . . . . . . . . . .
Inserting the Batteries in the Remote Control . . . . . . . . . . . . . . . . . . . . . . . . . . . . . . . . . . . . .
Selecting the Video Input Source from Your TV . . . . . . . . . . . . . . . . . . . . . . . . . . . . . . . . . . . .
5
5
7
7
Viewing Pictures on Your TV . . . . . . . . . . . . . . . . . . . . . . . . . . . . . . . . . . . . . . . . . . . .
Viewing Pictures from a Floppy Disk . . . . . . . . . . . . . . . . . . . . . . . . . . . . . . . . . . . . . . . . . . . . . . .
Searching for a Particular Picture . . . . . . . . . . . . . . . . . . . . . . . . . . . . . . . . . . . . . . . . . . . . . . . . . .
Viewing Floppy Disks Directly from Your Digital Camera . . . . . . . . . . . . . . . . . . . . . . . . . .
8
8
8
8
Using the Software to Create Floppy Disks . . . . . . . . . . . . . . . . . . . . . . . . . . . . . . 9
What Software Is Included? . . . . . . . . . . . . . . . . . . . . . . . . . . . . . . . . . . . . . . . . . . . . . . . . . . . . . . . . 9
Installing the TV Photo Viewer Software . . . . . . . . . . . . . . . . . . . . . . . . . . . . . . . . . . . . . . . . . . . 9
Creating a TV Photo Viewer Album on a Floppy Disk . . . . . . . . . . . . . . . . . . . . . . . . . . . . . 10
Viewing Sample Photo Albums . . . . . . . . . . . . . . . . . . . . . . . . . . . . . . . . . . . . . . . . . . . . . . . . . . . 11
If You Don’t Have a Computer . . . . . . . . . . . . . . . . . . . . . . . . . . . . . . . . . . . . . . . . . . . . . . . . . . . . 11
Troubleshooting Tips . . . . . . . . . . . . . . . . . . . . . . . . . . . . . . . . . . . . . . . . . . . . . . . . . . 11
Getting Help . . . . . . . . . . . . . . . . . . . . . . . . . . . . . . . . . . . . . . . . . . . . . . . . . . . . . . . . . .
Visit Us on the Web . . . . . . . . . . . . . . . . . . . . . . . . . . . . . . . . . . . . . . . . . . . . . . . . . . . . . . . . . . . . . . .
Click Help in the TV Photo Viewer Software . . . . . . . . . . . . . . . . . . . . . . . . . . . . . . . . . . . . . .
Microsoft Product Support Services . . . . . . . . . . . . . . . . . . . . . . . . . . . . . . . . . . . . . . . . . . . . . .
13
13
13
13
Legal Information . . . . . . . . . . . . . . . . . . . . . . . . . . . . . . . . . . . . . . . . . . . . . . . . . . . . .
License and Warranty . . . . . . . . . . . . . . . . . . . . . . . . . . . . . . . . . . . . . . . . . . . . . . . . . . . . . . . . . . . . .
Software Product License . . . . . . . . . . . . . . . . . . . . . . . . . . . . . . . . . . . . . . . . . . . . . . . . . . . . . . . .
Regulatory Information . . . . . . . . . . . . . . . . . . . . . . . . . . . . . . . . . . . . . . . . . . . . . . . . . . . . . . . . . . .
14
14
16
16
Information in this document, including URL and other Internet Web site references, is subject to change without notice. Unless
otherwise noted, the example companies, organizations, products, people and events depicted herein are fictitious and no
association with any real company, organization, product, person or event is intended or should be inferred. Complying with all
applicable copyright laws is the responsibility of the user. Without limiting the rights under copyright, no part of this document may
be reproduced, stored in or introduced into a retrieval system, or transmitted in any form or by any means (electronic, mechanical,
photocopying, recording, or otherwise), or for any purpose, without the express written permission of Microsoft Corporation.
Microsoft may have patents, patent applications, trademarks, copyrights, or other intellectual property rights covering subject matter
in this document. Except as expressly provided in any written license agreement from Microsoft, the furnishing of this document
does not give you any license to these patents, trademarks, copyrights, or other intellectual property.
© 2001 Microsoft Corporation. All rights reserved. Microsoft, Windows, and Picture It! are either registered trademarks or trademarks
of Microsoft Corporation in the U.S.A. and/or other countries/regions.
The names of actual companies and products mentioned herein may be the trademarks of their respective owners.
Patents Pending.
0401 Part No. X08-22768
1-X08822768bdy.p65
1
1
5/7/2001, 11:22 PM
Welcome!
Welcome to Microsoft TV Photo Viewer. No longer do you have to gather your friends
around your computer screen to show the vacation photos you took with your digital
camera. Now you can show your digital photos in the comfort of your living room...on
the TV!
Download pictures from your digital camera onto your
computer, and then use the TV Photo Viewer software
to put your pictures onto a floppy disk.
With some digital cameras,
you can insert floppy disks
from your camera directly
into the TV Photo Viewer
device. See page 8.
Use the TV Photo Viewer
computer software to
create your own photo
albums on floppy disks,
using pictures from your
digital camera or other
pictures you have saved
on your computer.
The Photo Viewer connects to
your TV, allowing you to view
digital pictures on your TV
from a floppy disk.
2
1-X08822768bdy.p65
2
5/7/2001, 11:22 PM
M
What’s in the Box?
Microsoft TV Photo Viewer includes:
•
•
•
•
•
•
•
•
•
Photo Viewer device that connects to your TV
Remote control and two AA batteries
Power cable with AC adapter
Video cable
CD-ROM that includes the Microsoft TV Photo Viewer software and
Microsoft Picture It! Express 2001
Start Here card
User’s Guide
Quick Tour floppy disk
One blank floppy disk
Using TV Photo Viewer with or without a Computer
You don’t need a computer to use your Photo Viewer with your TV. However, the TV
Photo Viewer computer software gives you the ability to create your own digital photo
albums on floppy disks.
If you do not have a computer:
• You can insert and view pictures from a floppy disk that already has a TV Photo
Viewer album on it, or from a floppy disk that has digital pictures in 640 x 480 JPEG
format.
•
For some digital cameras, you can insert floppy disks from your camera directly into
the TV Photo Viewer device. See page 8 for more details.
•
If your friends or relatives have computers, they can use the TV Photo Viewer
software to create floppy disks for you. They can download the TV Photo Viewer
software from our Web site at http://www.microsoft.com/tvphotoviewer/.
If you do have a computer:
• You can do everything listed above, and more!
•
You can use the TV Photo Viewer software to create your own digital photo albums
on floppy disks, using pictures from your digital camera, the Internet, a CD-ROM, a
scanner, or other pictures you have saved on your computer.
•
You can create floppy disks using the sample photo albums included with the
TV Photo Viewer software.
3
1-X08822768bdy.p65
3
5/7/2001, 11:22 PM
The TV Photo Viewer Buttons
You can use the buttons on either the Photo Viewer device or the remote control to
navigate through the pictures on a disk.
Power
Turns the Photo Viewer on and off. The Power button on the device is lit
when the power is on.
Forward
Displays the next picture. Press and hold to search.
Back
Displays the previous picture. Press and hold to search.
Auto
Displays pictures automatically as a slideshow. Press any button on the
remote control to stop the slideshow. The Auto button on the Photo Viewer
is lit when the device is displaying pictures as a slideshow.
Rotate
Rotates the picture.
Eject
Ejects the disk from the Photo Viewer.
Note about using the Forward and Back buttons to search
• Press and hold the Forward or Back buttons to search for a particular picture.
A small image in the lower right corner of the screen indicates which picture you
are about to view.
Power
Rotate
Auto
Forward
Back
Eject
Power
Auto
Back
Forward
4
1-X08822768bdy.p65
4
5/7/2001, 11:22 PM
M
Setting Up Your TV Photo Viewer
Connecting the Photo Viewer to Your TV
To connect the Photo Viewer to your TV, do the following:
1 Turn off your TV and other components connected to your TV, such as
your VCR.
2 Plug the AC adapter’s cable into the Photo Viewer’s Power jack, and then plug the
AC adapter into a wall outlet.
3 Connect the Photo Viewer’s yellow Video Out jack directly to a Video In jack on
your TV using the video cable included with your Photo Viewer.
There are several ways to connect the Photo Viewer to your TV, depending on the type of
TV you have and whether you have other components connected to your TV. See the
following diagrams for connection examples.
Example A
If a Video In jack on your TV is available
If your TV has an available Video In jack, simply use the video cable (included) to connect
the Photo Viewer’s yellow Video Out jack to the TV’s Video In jack.
Note that there may be a Video In jack on the front of your TV, and your TV may have
more than one Video In jack.
The Photo Viewer’s yellow
Video Out jack connects to the
TV’s yellow Video In jack.
5
1-X08822768bdy.p65
5
5/7/2001, 11:22 PM
Example B
If all of your TV’s Video In jacks are already in use
If another component, such as a VCR, is already connected to your TV, first disconnect that
component from the TV. Then connect the Photo Viewer according to the diagram
below, connecting the other component to the Photo Viewer’s black Video In jack. In the
example below, the VCR’s video signal automatically passes through when the Photo
Viewer is off.
The Photo Viewer’s yellow
Video Out jack connects to
the TV’s yellow Video In
jack.
The VCR’s Audio Out jacks
connect to the TV’s Audio In
jacks.
The Video Out jack on your
VCR (or other component)
connects to the Photo
Viewer’s black Video In jack.
Example C
If your TV doesn’t have a Video In jack
If your TV has only an antenna input, connect the Photo Viewer to your TV by
means of a powered RF modulator. You can purchase a powered RF modulator
and an RF cable from a consumer electronics store. Connect the RF modulator
to the TV, and then connect your Photo Viewer to the RF modulator. (See the
user instructions that accompany the RF modulator.)
6
1-X08822768bdy.p65
6
5/7/2001, 11:22 PM
M
Inserting the Batteries in the Remote Control
The remote control requires two AA-size alkaline batteries, which are included with the
Microsoft TV Photo Viewer.
1 Slide open the battery compartment door on the
back of the remote control.
2 Insert the batteries, taking care to orient them
properly with the flat (negative) end toward the
spring inside the battery compartment.
Notes about batteries
• Keep batteries out of reach of children.
• Do not mix old and new batteries, or batteries of different types. Follow
manufacturer’s instructions on battery use.
• Remove old, weak, or worn-out batteries promptly.
• Always recycle or dispose of used batteries in accordance with your local
ordinances.
• If a battery leaks, remove all batteries and thoroughly clean the battery
compartment with a damp paper towel, or follow the battery manufacturer’s
recommendations for cleanup. If fluid from the battery comes into contact with
skin or clothes, flush skin with water immediately.
Selecting the Video Input Source from Your TV
It is important to select the proper video input source on your TV. When the correct input
source is selected, your TV screen should display the TV Photo Viewer startup screen.
1 Turn on your TV.
2 Press the Power button to turn on the Photo Viewer.
3 Press the button on your TV or your TV remote control that changes the video input
source. Depending on your TV, the name of this button may vary:
•
•
•
•
•
•
•
•
Input
Source
TV/Video
TV/VCR
TV/AV
Input Select
TVGame
Game Mode/Video Mode
If your TV has more than one of these buttons, make sure you try them all.
If you can’t find any of these buttons on your TV, try using your TV’s Channel
button to find a channel called Line.
7
Viewing Pictures on Your TV
Once you have set up your Photo Viewer, you can start viewing digital pictures on your
TV. To help you get started, try viewing the Quick Tour disk included in the box with
Microsoft TV Photo Viewer.
Viewing Pictures from a Floppy Disk
1 Turn on both your TV and your Photo Viewer.
2 Make sure you’ve selected the proper video input source on your TV, as described
on the previous page.
3 Insert the floppy disk into the Photo Viewer.
4 Press the Forward button once to start reading the disk. Press Forward again to
navigate through the pictures in your album. Or, press Auto to display pictures
automatically as a slideshow.
5 When you’ve finished viewing the pictures on the disk, just eject the disk and put in
another disk to view more pictures.
Searching for a Particular Picture
You can search for a particular picture on a disk by pressing and
holding the Forward or Back button. A small image appears in the
lower right corner of the TV screen, indicating which picture you are
about to view.
The small images are created automatically when you use the TV Photo Viewer
computer software to create a floppy disk. If you choose not to use the software to
create your floppy disk, a small square with a number inside it will appear instead of the
small image.
Viewing Floppy Disks Directly from Your Digital Camera
If you have a digital camera that can take pictures in 640 x 480 JPEG format and save them
to a floppy disk, your Photo Viewer may be able to display those pictures directly on the
TV without first using the TV Photo Viewer software. However, if you have taken pictures
in a format other than 640 x 480 JPEG, you need to use the TV Photo Viewer software to
resize and compress the pictures and put them onto a floppy disk. This is the case for
most digital cameras.
Note about viewing images on your television
• Leaving an image on your television screen for an extended length of time is not
recommended.
8
1-X08822768bdy.p65
8
5/7/2001, 11:22 PM
M
Using the TV Photo Viewer Computer Software
to Create Floppy Disks
With the TV Photo Viewer software, you can create your own digital photo albums on
floppy disk, using pictures from your digital camera or other pictures you have saved on
your computer.
What Software Is Included?
The Microsoft TV Photo Viewer compact disc includes two programs:
Microsoft TV Photo Viewer software. Use the TV Photo Viewer software to
create digital photo albums and then save your albums onto floppy disks for
use with the Microsoft TV Photo Viewer device. Once you import pictures
into an album, you can make minor edits, such as cropping pictures or adding
captions.
Microsoft Picture It! Express 2001. For advanced photo-editing features, try
using Picture It! Express to edit your digital pictures before adding them to
your TV Photo Viewer album. For example, you can use Picture It! Express to
adjust color tint, fix red-eye, sharpen the focus, and more.
Installing the TV Photo Viewer Software
To Install the TV Photo Viewer Software on your Computer
1 Insert the Microsoft TV Photo Viewer CD-ROM into your computer’s CD-ROM drive.
If the Setup wizard does not appear automatically after a few seconds, open My
Computer, double-click the CD-ROM drive icon, and then double-click Setup.exe.
2 Follow the Setup instructions on your screen. If you have an Internet connection,
you can register your TV Photo Viewer during the software installation process.
To Start the TV Photo Viewer Software
After you have installed the TV Photo Viewer software on your computer, you can start
the software as follows:
•
Click Start, point to Programs, and then click Microsoft TV Photo Viewer.
9
1-X08822768bdy.p65
9
5/7/2001, 11:22 PM
Creating a TV Photo Viewer Album on a Floppy Disk
Use the Microsoft TV Photo Viewer software to create digital photo albums, and then save
the albums onto floppy disks. The following is an overview of the basic steps. For more
details, click Help in the TV Photo Viewer software.
1 Download pictures from your digital camera or the Internet, and save the pictures
on your computer’s hard disk or other storage media such as a CD-ROM.
2 If you want to edit your pictures, use Microsoft Picture It! Express or another photo-
editing program, and then save the pictures to your computer’s hard disk before
adding the pictures to your TV Photo Viewer album.
3 Start the TV Photo Viewer software.
4 Click Add Pictures to start adding pictures to your album, using pictures on your
computer’s hard disk or other storage media. When you’ve finished adding pictures,
click Done Adding.
5 Edit and arrange your TV Photo Viewer album. For example, crop or rotate a picture, add
captions to your pictures, or add a title page to your album.
6 Insert a blank 1.44 MB high-density disk (HDD) into your computer’s floppy disk
drive. (One blank disk is included with Microsoft TV Photo Viewer.)
7 Click Create Floppy Disk to save the pictures in your album onto a floppy disk that
you can view on your TV with your Photo Viewer device.
Notes about TV Photo Viewer albums and floppy disks
• Once you save an album to a floppy disk, do not modify the pictures on the disk.
If you want to edit your album, save a backup copy of your album on your
computer that you can modify later.
• For best picture quality, we recommend albums with up to 20 pictures, but you
can add as many as 40 pictures.
• When you use the TV Photo Viewer software to create a floppy disk, the software
copies the original pictures and resizes them to 640 x 480 resolution, optimizing
the size, shape, and color depth for your TV. The software also compresses the files
on the floppy disk, which may result in lower image quality than the original
picture. Therefore, do not use the compressed copies of your pictures on a TV
Photo Viewer floppy disk to permanently store your digital pictures. Instead,
always keep your original pictures on a reliable storage media such as your
computer’s hard disk or a compact disc.
• TV Photo Viewer albums can include pictures with several file formats: JPEG, GIF,
MIX, BMP, and TIF. All pictures are converted to JPEG format when you create an
album on floppy disk using the TV Photo Viewer software. (Note that the original
files are not modified.)
10
1-X08822768bdy.p65
10
5/7/2001, 11:22 PM
M
Viewing Sample Photo Albums
To help get you started using your TV Photo Viewer, we’ve included several sample photo
albums with the TV Photo Viewer software. These pictures look great on your TV and can
even be used as TV screensavers!
To use these sample albums, simply start the TV Photo Viewer software, open an album
from the Sample Albums from Corbis folder on your computer, and then click Create
Floppy Disk. Once you’ve created the floppy disk, you can insert the disk into your Photo
Viewer to view the pictures. To view the album as a TV screensaver, press the Auto
button on the remote control and watch the pictures change automatically. For more
details, click Help in the TV Photo Viewer software.
If You Don’t Have a Computer
If you don’t have a computer, your friends and relatives can create TV Photo Viewer
albums on floppy disk and send the disks to you. One copy of the TV Photo Viewer
software is included on the CD-ROM that came with Microsoft TV Photo Viewer. Or,
your friends and relatives can download the TV Photo Viewer software from our Web
site at http://www.microsoft.com/tvphotoviewer/..
Troubleshooting Tips
If you’re having problems viewing pictures on the TV, try the following troubleshooting
tips. For more tips, click Help in the TV Photo Viewer software.
If pressing the Power button does not turn on the green light:
• Make sure the AC adapter is plugged into a wall outlet and connected securely to the
Photo Viewer’s Power jack. Wait 5 secconds and then try pressing the Power button.
If you don’t see the TV Photo Viewer startup screen:
• Check that the Photo Viewer’s yellow Video Out jack is connected directly to your TV’s
Video In jack, and that the cable connections are secure. If you have a VCR or other
components connected to your TV, connect the Photo Viewer directly to your TV, and
then connect the other components to the Photo Viewer’s Video In jack , as shown in
connection example B on page 6.
•
Make sure you’ve selected the correct video input source from your TV. To do this, turn
on both your TV and your Photo Viewer, and then press the button on your TV or your
TV remote control that changes the video input source. Depending on your TV, this
button may be called Input, Source, or TV/Video.
If you connected your VCR to the Photo Viewer, and now your VCR doesn’t
work:
• Turn off your Photo Viewer when using your VCR, but make sure your Photo Viewer is
plugged into a wall outlet.
11
1-X08822768bdy.p65
11
5/7/2001, 11:22 PM
If the remote control isn’t working:
• Check that the remote control has fresh batteries installed and that the batteries are
oriented properly.
•
Try moving closer to the Photo Viewer. When you use the remote control, point it
directly at the Photo Viewer.
•
Make sure that bright lights aren’t shining directly at the Photo Viewer. Sometimes
bright lights can interfere with the remote control signal.
If a picture is shown on the title page, but it isn’t displayed on the TV:
Either the picture was deleted from the disk or the picture file has become damaged.
Use the TV Photo Viewer software to re-create the floppy disk.
•
If you see the message “Unable to read images” on your TV screen:
The pictures on the disk may be the wrong size, resolution, or JPEG type, or the disk
may have more than 40 pictures. TV Photo Viewer requires images on the disk to be
640 x 480 baseline JPEG images. Each image must be smaller than 120KB. For best
results, use the the TV Photo Viewer software to put pictures onto floppy disks, so you
don’t have to worry about file types and compression settings.
•
•
The floppy disk may be an unrecognized disk type. Check that the disk is a 1.44 MB
high-density disk (HDD). TV Photo Viewer does not work with other types of disks,
such as low-density disks or Apple Macintosh disks.
•
Physical damage, heat, or magnets may have caused the disk to become unreadable.
Use the TV Photo Viewer software to re-create your album on a different disk.
If some of the images on your disk are not displayed:
The image files are most likely in a file format that the Photo Viewer cannot read. Your
Photo Viewer works with floppy disks that have 640 x 480 baseline JPEG images. Each
image must be smaller than 120KB. We recommend that you use the the TV Photo
Viewer software to put your pictures onto floppy disks, so that you don’t have to worry
about file types and compression settings.
•
•
Physical damage, heat, or magnets may have caused some of the files on the disk to
become unreadable. Use the TV Photo Viewer software to re-create your album on a
different disk.
If you see numbers instead of small images in the lower right corner when
you navigate rapidly through the pictures:
• Some of the files on the disk were modified after the disk was created with the TV
Photo Viewer software. Or, if you chose not to use the TV Photo Viewer software to
create the floppy disk, a small square with a number inside it will always appear
instead of a small image. (The small images are created automatically when you use
the TV Photo Viewer software to create an album on floppy disk.)
12
1-X08822768bdy.p65
12
5/7/2001, 11:22 PM
M
Getting Help
Visit Us on the Web
Please visit our Web site at: http://www.microsoft.com/tvphotoviewer/.
Click Help in the TV Photo Viewer Software
Click Help in the TV Photo Viewer software for detailed information about creating digital
photo albums and floppy disks with the TV Photo Viewer software.
Microsoft Product Support Services
Product Name:
Microsoft TV Photo Viewer
Support Info Online:
http://support.microsoft.com/directory/
productsupportoption.asp
Phone Numbers:
In the United States, please call 1 (425) 635-7040 for support.
In Canada, visit http://www.microsoft.ca/support
In Canada, please call (905) 568-3503 for support.
Worldwide:
Support options, hours and cost in your country may differ
from the US, please check with your local office for details.
Conditions:
Microsoft’s support services are subject to then-current
prices, terms, and conditions, which are subject to change
without notice.
Personal Support Options
The following support information applies to Microsoft TV Photo Viewer. If you have
questions about Microsoft Picture It! Express 2001 (included on the TV Photo Viewer CDROM), please start Picture It! Express, click the Help menu, click Help & Ideas, and then click
Technical Support.
Online Self-Help Options
Get your information online. Try our FAQ’s, WebCasts or search our Knowledge Base at
http://support.microsoft.com/directory/ for articles targeted to your issue.
Products included with the sale of a new computer
If your product was included with the purchase of your computer, your computer
manufacturer provides support for this product version. For contact details, please go to
http://support.microsoft.com/directory/directory/oemdirectory.asp/.
13
1-X08822768bdy.p65
13
5/7/2001, 11:22 PM
Legal Information
Limited Warranty (United States and Canada)
LIMITED WARRANTY. Microsoft warrants that the enclosed Hardware Device will be free from defects in
materials and workmanship under normal use and service for a period of one (1) year from the date of
purchase. If an implied warranty or condition is created by your state/jurisdiction and federal or
state/provincial law prohibits disclaimer of it, you may have an implied warranty or condition, but
only as to defects discovered during the one (1) year period of this Limited Warranty. As to defects discovered after that period, there is no warranty or condition of any kind. Some states/
jurisdictions do not allow limitations on duration of an implied warranty, so the above limitation
may not apply to you.
CUSTOMER REMEDIES. Microsoft’s and its suppliers’ entire liability and your exclusive remedy shall be, at
Microsoft’s option, either (a) return of the price paid, or (b) repair or replacement of the Hardware Device
that does not meet Microsoft’s Limited Warranty and which is returned to Microsoft with a copy of your
receipt of purchase. This Limited Warranty is void if failure of the Hardware Device has resulted from
accident, abuse, or misapplication. Any replacement Hardware Device will be warranted for the remainder
of the original warranty period or thirty (30) days, whichever is longer.
NO OTHER WARRANTIES. To the maximum extent permitted by applicable law, Microsoft and its suppliers
disclaim all other warranties and conditions, either express or implied, including, but not limited to, implied
warranties of merchantability, fitness for a particular purpose, title and non-infringement with respect to
the Hardware Device and the provision of or failure to provide Support Services. This limited warranty
gives you specific legal rights. You may have others, which vary from state/jurisdiction to state/jurisdiction.
LIMITATION OF LIABILITY. To the maximum extent permitted by applicable law, in no event shall
Microsoft or its suppliers be liable for any special, incidental, indirect or consequential damages
whatsoever (including without limitation, damages for loss of business profits, business interruption, loss of business information, or any other pecuniary loss) arising out of the use of or inability
to use this Microsoft Hardware Device product or the provision of or failure to provide Support
Services, even if Microsoft has been advised of the possibility of such damages. In any case,
Microsoft’s entire liability under any provision of this warranty shall be limited to the greater of
the amount actually paid by you for the Hardware Device or an amount equivalent to U.S. $5.00
in local currency. Because some states and jurisdictions do not allow the exclusion or limitation of
liability, the above limitation may not apply to you.
If you acquired this product in the United States, this Agreement is governed by the laws of the State of
Washington.
If you acquired this product in Canada, this Agreement is governed by the laws in force in the Province of
Ontario. Each of the parties hereto irrevocably attorns to the jurisdiction of the courts of the Province of
Ontario and further agrees to commence any litigation which may arise hereunder in the courts located in
the Judicial District of York, Province of Ontario.
Should you have any questions concerning this Warranty, or if you desire to contact Microsoft for any
reason, please contact the Microsoft subsidiary serving your country, or write: Microsoft Sales Information
Center, One Microsoft Way, Redmond, WA USA 98052-6399.
14
1-X08822768bdy.p65
14
5/7/2001, 11:22 PM
M
Garantie Limitée
GARANTIE LIMITÉE. Microsoft garantit que, pendant une période de d’un (1) an à compter de la date
d’acquisition, le Matériel Informatique ci-inclus sera exempt de défaut de matière première ou de vice de
fabrication dans des conditions normales d’utilisation et d’entretien. Si une garantie ou condition
implicite est créée par votre État ou votre territoire et qu’une loi fédérale ou provinciale ou État en
interdit le déni, vous pouvez également jouir d’une garantie ou condition implicite, mais uniquement pour les défauts découverts durant la période d’un an de la présente garantie limitée. Il n’y a
aucune garantie ou condition de quelque nature que ce soit quant aux défauts découverts après
cette période d’un an. Certains États ou territoires ne permettent pas de limiter la durée d’une
garantie ou condition implicite de sorte que la limitation ci-dessus peut ne pas s’appliquer à vous.
RECOURS DU CLIENT. La seule responsabilité de Microsoft et de ses fournisseurs et votre unique recours
sont, au choix de Microsoft, soit (a) le remboursement du prix payé, ou (b) la réparation ou le remplacement du Matériel Informatique qui n’est pas conforme à la Garantie Limitée de Microsoft et qui est retourné à Microsoft avec une copie de votre reçu d’achat. Cette Garantie Limitée est nulle si la défectuosité
du Matériel Informatique résulte d’un accident, d’un abus d’utilisation ou d’un usage non approprié. Tout
Matériel Informatique de remplacement sera garanti pendant le reste de la période de garantie initiale ou
pendant trente (30) jours, selon la période la plus longue.
EXCLUSION DE TOUTE AUTRE GARANTIE. Dans toute la mesure permise par la législation en vigueur,
Microsoft et ses fournisseurs excluent toute autre garantie et condition, expresse ou implicite, y compris,
mais sans limitation, toute garantie et condition implicite de qualité marchande, d’adaptation à une fin
particulière, du titre de propriété et d’absence de contrefaçon, relativement au Matériel Informatique et à
la prestation des services de soutien technique ou de l’omission d’une telle prestation. Cette garantie
limitée vous accorde des droits spécifiques reconnus par la loi. Il est possible que vous en ayez d’autres
variant d’un état ou d’une juridiction à l’autre.
ABSENCE DE RESPONSABILITÉ POUR LES DOMMAGES INDIRECTS ET ACCESSOIRES. Dans toute la
mesure permise par la législation applicable, Microsoft et ses fournisseurs ne sont en aucun cas
responsables de dommages spéciaux, indirects ou accessoires quels qu’ils soient (y compris, mais
sans limitation, la perte de profits, l’interruption des affaires, la perte de renseignements commerciaux ou toute autre perte pécuniaire), découlant de l’utilisation de, ou de l’impossibilité d’utiliser,
ce Matériel Informatique de Microsoft ou de la prestation des services de soutien technique ou
de l’omission d’une telle prestation, même si Microsoft a été avisée de l’éventualité de tels dommages. Dans tous les cas, la responsabilité intégrale de Microsoft aux termes de toute disposition
de la présente garantie limitée se limite au plus élevé entre les montants suivants : le montant
que vous avez réellement payé pour le Matériel Informatique ou un montant équivalent à
5,00 $US. en devises locales. Puisque certains états ou juridictions ne permettent pas l’exclusion
ou la limitation de la responsabilité à l’égard de dommages accessoires ou indirects, il est possible
que la restriction ci-dessus ne vous concerne pas.
Si vous avez acquis ce produit aux États-Unis, cette convention est régie par les lois de l’État de
Washington.
Si vous avez acquis ce produit au Canada, cette convention est régie par les lois en vigueur dans la province d’Ontario. Chacune des parties à la présente reconnaît irrévocablement la compétence des tribunaux de la province d’Ontario et consent à instituer tout litige qui pourrait découler de la présente auprès
des tribunaux situés dans le district judiciaire de York, province d’Ontario.
Si vous avez des questions concernant cette Garantie, ou si vous désirez communiquer avec Microsoft
pour quelque raison que ce soit, veuillez contacter la succursale Microsoft desservant votre pays, ou écrire
à: Microsoft Sales Information Center, One Microsoft Way, Redmond, Washington, USA 98052-6399.
15
1-X08822768bdy.p65
15
5/7/2001, 11:22 PM
Software Product License
The TV Photo Viewer software and Picture It! Express 2001 software (“Software Product”) accompanying
the TV Photo Viewer device are licensed not sold. To install, copy or otherwise use the Software Product
you must agree to the terms of the End-User License Agreement (EULA) in the Software Setup screen for
each Software Product. If you do not agree to the terms of the EULA, you may not use the Software
Product and may promptly return the entire product to the place of purchase for a full refund.
Regulatory Information
This device complies with part 15 of the FCC Rules. Operation is subject to the following two conditions:
(1) This device may not cause harmful interference, and (2) this device must accept any interference
received, including interference that may cause undesired operation.
This equipment has been tested and found to comply with the limits for a class B digital device, pursuant
to part 15 of the FCC rules. These limits are designed to provide reasonable protection against harmful
interference in a residential installation. This equipment generates, uses, and can radiate radio frequency
energy and, if not installed and used in accordance with the instructions, may cause harmful interference
to radio communications. However, there is no guarantee that interference will not occur in a particular
installation. If this equipment does cause harmful interference to radio or television reception, which can
be determined by turning the equipment off and on, the user is encouraged to try to correct the interference by one or more of the following measures:
•
•
•
•
Reorient or relocate the receiving antenna.
Increase the separation between the equipment and receiver.
Connect the equipment to an outlet on a circuit different from that to which the receiver is connected.
Consult the dealer or an experienced radio/TV technician for help
Changes or modifications to the equipment could void the user’s authority to operate the equipment.
Tested to comply with FCC standards, for home or office use.
Model: Microsoft TV Photo Viewer
This Class B digital apparatus complies with ICES-003.
Cet appareil numérique de la classe B est conforme à la norme NMB-003 du Canada.
16
1-X08822768bdy.p65
16
5/7/2001, 11:22 PM