1
Handheld
Microscope
Users
Guide
www.ScopeCurriculum.com
ii
Handheld Microscope Users Guide
Hand-Held Microscope User’s Guide
Table of Contents
INTRODUCTION ..................................................................................................................................1
What is a Scope-On-A-Rope? .....................................................................................................1
Which model do you have?.........................................................................................................2
Analog vs. Digital .........................................................................................................................3
Where can I buy a SOAR? ...........................................................................................................3
NEW SCOPE-ON-A-ROPE ..................................................................................................................4
Parts and Assembly of SOAR .....................................................................................................4
Connections .................................................................................................................................5
Turning It On.................................................................................................................................5
Comparing and Installing Lenses...............................................................................................6
How to Use and Capture Images with the 30X Lens.................................................................7
Polarization with the 30X Lens ...................................................................................................9
How to Use the 200X Lens ..........................................................................................................9
How to Use the 1X Lens ............................................................................................................10
How to Use the Stand ................................................................................................................11
Troubleshooting .........................................................................................................................12
OLD SCOPE-ON-A-ROPE.................................................................................................................14
L2 SCOPE ..........................................................................................................................................15
Parts and Assembly of the L2...................................................................................................15
Turning the L2 On ......................................................................................................................15
Comparing and Installing Lenses.............................................................................................16
How to Use the 50X Lens ..........................................................................................................17
How to Use the 30X Lens (Including Polarization)..................................................................18
How to Use the 100X, 200X and 400X Lenses .........................................................................19
How to Use the 1X Lens ............................................................................................................20
How to Use the Stand ................................................................................................................21
Troubleshooting .........................................................................................................................22
PROSCOPE HR .................................................................................................................................23
Parts and Assembly of the ProScope HR ................................................................................23
Setting Up and Turning on the ProScope HR..........................................................................23
Lenses and Setups ....................................................................................................................24
How to Use the ProScope HR and its Software ......................................................................24
Saving Images with the ProScope HR .....................................................................................24
Using the ProScope HR as a Video Camera............................................................................25
Troubleshooting .........................................................................................................................26
INFORMATION AND FEATURES THAT APPLY TO ALL MODELS ...............................................27
Capturing Digital Images and Movies ......................................................................................27
How to Use the XYZ Mechanical Stage ....................................................................................27
Lamp and Light Blocker ............................................................................................................30
How to Prepare Slides ...............................................................................................................30
Care & Maintenance...................................................................................................................31
iii
Author:
Adrienne S. Lopez
Scope-On-A-Rope Program Coordinator
Louisiana State University
Museum of Natural Science
Publisher:
Real Curriculum, Inc.
Glendale, CA
Copyright © 2009 Real Curriculum, Inc. ALL RIGHTS RESERVED.
iv
Handheld Microscope Users Guide
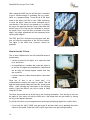
Introduction
This guide is intended to answer your questions about how to use your scope: the different parts
and their functions, how to change lenses, how to take images, care and maintenance, etc. If you
need further assistance, please visit www.ScopeCurriculum.com, where you will find directions on
how to get further support, as well as instructional videos. You can also visit the LSU Scope-OnA-Rope Program site: www.scopeonarope.lsu.edu.
What is a Scope-On-A-Rope?
The Scope-On-A-Rope, abbreviated SOAR, is a hand-held microscope that shows focused,
magnified images on a television, computer, or projector screen. First manufactured for medical
applications, it was later developed for educational use at Louisiana State University. The SOAR
has interchangeable lenses for viewing objects at different magnifications. Simply touching a
sample with the lens tip produces an image that is well lighted and in focus. This is especially
appealing to elementary students, who typically struggle with traditional microscopes.
Here are some of the many reasons why teachers and students can benefit from using a SOAR in
the classroom:
1. It is easy to use, compact, and durable.
2. It serves many functions–operating as a regular video camera, document camera1,
microscope, and presentation aid.
3. The entire class can see an object at once.
4. Hands-on exploration and cross-curricular applications are endless!
5. All kinds of samples can be examined with it (no slide preparation necessary).
6. Still images and movies can be saved for discussion and analysis.
7. Connections to state and national education standards are easy.
8. It can be used in special needs classrooms.
9. It produces high-quality images that inspire and motivate students of all ages and ability levels
with their “wow” factor!
10. Its use engages students and helps them to become better thinkers, inquirers, and problem
solvers.
1
A document camera (also called docucam, visual presenter, digital overhead and digital visualizer) is
basically a high-tech overhead projector. It is a specialized camera that can be used to take images of a
document (or object) and project them onto a computer screen, TV screen, or projector screen. A
document camera is similar to a web cam, but the camera is normally mounted on a movable “arm” that can
be moved around to view the particular object or part of the document desired.
1
Handheld Microscope Users Guide
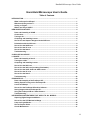
Which model do you have?
There are several types of hand-held microscopes, some of which are sold as toys. This manual
provides detailed instructions for four models designed for classroom use: the “New” Scope-OnA-Rope (VL-7EX II), the “Old” Scope-On-A-Rope (VL-7EX), the L2, and the ProScope. The chart
below will help you distinguish these different models.
The name Scope-On-A-Rope is trademarked to Louisiana State University and is used to denote
the model used by its outreach program. Although there are several models of hand-held scopes
available, the outreach program at Louisiana State University recommends the Scalar VL-7EX II
(aka the “New” SOAR), which was introduced in the Fall of 2008. It is the most durable, has the
highest resolution, and is the most versatile of all the hand-held scopes currently available. The
original VL-7EX SOAR (aka the “Old” SOAR) was first sold in 1998. These two versions of the
scope are virtually identical, and both have superior resolution and durability.
LSU VL-7EX II
(“New” SOAR)
LSU VL-7EX
(“Old” SOAR)
L2
ProScope HR
Currently
available for
purchase?
Yes, it was
released in Fall
2008
No
(only available prior
to 2008)
Yes
Yes
Analog or
digital output?
(see
explanation
below)
Analog, although
output can be
converted for
digital use
Analog, although
output can be
converted for digital
use
Analog, although
output can be
converted for
digital use
Digital only
Has a button
labeled “LIGHT”
Has a button
labeled “ON”
White color; has a
yellow video cable
for connecting to a
TV
Silver color;
has a USB cable
that plugs into a
computer
Model
Image
Other
Features
2
Handheld Microscope Users Guide
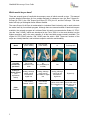
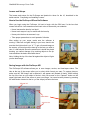
Analog vs. Digital
The type of output refers to the types of devices that can be used to display the images created
by the scope. A digital scope has to be connected to a computer, usually via a USB cable.
Software needs to be installed on the computer before using the instrument. Analog scopes,
however, are true “plug and play” devices–you don’t need to install any software to operate them.
They can be connected directly to a television, DVD player, projector, interactive white board, or
any other display that has a yellow video input.
Yellow video inputs jacks indicate devices that can display analog signals. On the left are shown typical connections
for a television (yellow is video, red and white are audio), on the right are connections for a digital projector.
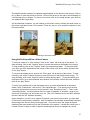
Any analog scope can be connected to a computer, but this must be done with the help of a
converter. For example, the “New” Scope-On-A-Rope education kits come with a converter and
software, but there are many other options available.
Converters change analog output of SOARs to digital format for display on computer or other digital device. The
converter on the left (black) is part of the VL-7 Education Kit; on the right (white) is a commercially available model.
Considering that everything is moving towards digital technology, why would anyone want an
analog scope? There are several reasons:
• No installation disc is necessary; there is no software needed.
• You get better resolution. (This seems counterintuitive, but it’s true!)
• You have more display options—any television, projector, or active board.
• You have more software options. (Again, this seems counterintuitive, but there are many
digital converter/ software packages available that make it possible for your analog scope to
work with a great variety of software. Some digital microscopes will only work with the
software that comes with them.)
Where can I buy a SOAR?
Although ProScopes are available for purchase from several vendors, School Technology
Resources (STR) is the sole vendor of the LSU Scope-On-A-Rope (VL-7EX II). Founded by a
teacher, School Technology Resources has also created unique education kits for these
instruments.
To contact STR, call 877-395-1001, or visit www.schooltr.com.
3
Handheld Microscope Users Guide
New Scope-On-A-Rope
The LSU VL-7EX II is the instrument used in Louisiana State University’s education outreach
program. This section describes parts and assembly of the SOAR, how to use lenses and
buttons, and how to set up the SOAR in different ways using accessories.
Note: The information on the “new” scope contained in this section applies equally to the “old”
scope. The only differences are (1) that where the new SOAR has a LIGHT button, the same
button on the old SOAR says ON; and (2) that the new SOAR does not have an ERASE button.
Parts and Assembly of SOAR
The Scope-On-A-Rope comes with three cords, three lenses, a scope body, and a cradle. All
cords connect to the cradle, with the curly, telephone-like cord connecting the body to the
cradle–hence the name “Scope-On-A-Rope”!
1.
2.
3.
4.
5.
6.
7.
12
2
3
13
4
1
5
11
6
7
10
8
4
9
Scope
Cradle
Cover
30X lens
1X lens
200X lens
Camera cable
(aka “rope”)
8. Power cable
9. Video cable
10. Stand
11. XYZ stage
12. Lamp
13. Lamp shade
Handheld Microscope Users Guide
Connections
• The white camera cable (aka “rope”) connects the scope to
the cradle.
• The black power cable connects the cradle to a power outlet.
• The yellow-tipped video cable connects the cradle to your
display–whether you choose to use a TV, projector, active
board, or computer via digital converter.
Each cable has a differently shaped end, which means that unless you can fit a square peg in a
round hole, you can’t get it wrong!
Turning It On
1. Once all the cords are connected and
you are ready to begin using the SOAR,
make sure the power switch is turned
on (it will glow red when it’s on).
2. Press the LIGHT button to turn on the
lights of the lens. Note: Skip this step if
you are using the “Old” SOAR.
3. Turn on the television, projector, or other display device that you are using with the scope.
Depending on the display you are using, you might need to take steps to make sure the display
finds the proper input. You’ll know it’s working when you see a letter “A” on the screen. If you
have the “New” SOAR, the small, yellow letter will appear in the upper right hand corner. If you
have an “Old” SOAR, the small, white letter will appear in the lower right hand corner. For more
tips, refer to the Troubleshooting section.
New SOAR display
Old SOAR display
You are now ready to begin “scoping”!
5
Handheld Microscope Users Guide
Comparing and Installing Lenses
Both the New and Old Scope-On-A-Rope education kits come with three lenses: 1X, 30X, and
200X. Refer to the table below for general information on these lenses. Detailed instructions for
using each lens are included in the following pages of this section.
Lens
1X
30X
200X
Magnification
Variable – depending on
how far away the object
is from the lens
30X
200X
How to use
This lens works like a
video camera and/or
document camera.
Touch an object to see
it magnified 30 times.
Touch an object to see it
magnified 200 times.
Focusing
The black ring can be
used to focus the image.
This lens does not
have a focusing
mechanism.
The white, scalloped
(having a pattern of
semicircles) ring is for
fine focusing.
Lighting
Does not have internal
lights
Internal lights can be
polarized by pressing
the LIGHT/ON button
Has internal lights (but
cannot be polarized)
Best used for…
Demonstrations, showing
pictures in books, viewing
whole objects
Examining any of a
multitude of objects up
close
Looking at prepared
slides, cells, small and/or
flat objects
Image
To remove a lens, rotate it counterclockwise until the small index marks on the lens and the
camera body line up. The lens should then be easily removed. To place a lens on, you must
reverse the process. First, line up the small index marks on the lens and the camera body. Do
not force the lens onto the scope! There are several contact points that need to meet up just
right for the lens to function properly. Once the lens is in place, twist it clockwise until it firmly
clicks into place. You should hear a satisfying “snap” when it’s on correctly.
Positions of index marks on lens and camera body
before the lens is twisted into place
6
Positions of index marks after lens has been twisted
into place and is securely attached
Handheld Microscope Users Guide
How to Use and Capture Images with the 30X Lens
When you are first using the Scope-On-A-Rope, it’s best to begin with the 30X lens. Just
remember some basic rules to share with your students:
• Never immerse the lens tip in a liquid.
• Never touch anyone’s eye or mouth with the lens tip.
• Never point the lens at someone’s eye.
• Take proper precautions to avoid spread of infection.
After setting up your scope, make sure the power is on for
both the scope and the display (TV, projector, etc.). If you
are using the “New” SOAR, you will also have to press the
LIGHT button on the scope to ensure that the lights are on
(refer to “Parts and Assembly” section). To get a focused
image on the screen, you must touch the lens tip to the
item you wish to view. It’s that simple! Since the actual lens
is inside the plastic housing, you cannot damage it by
touching objects to the tip. Just remember the basic rules
listed above.
Note: Holding the tip of the lens flat against the object will
give you the best image.
If you would like to save an image temporarily, press the
REC button while keeping the lens touching the object. This
will record a snapshot of what you were viewing. To see
your snapshot, press the PLAY button.
The Scope-On-A-Rope can hold two images at a time; if you take more than two pictures, only
the last two will be saved. To see more than one image on the screen, make sure to take two
snapshots, then press PLAY three times. When you hit PLAY the first time, you’ll see the first
picture you took (labeled “A”). When you hit PLAY the second time, you’ll see the second
picture you took (labeled “B”). On the third push of the PLAY button, you’ll see a split screen
showing both images at once–the “A” image on the left and the “B” image on the right.
"A" image
"B" image
Split screen
7
Handheld Microscope Users Guide
Press the REC button to get back to live capture mode. You can take as many pictures as you
want during a class session, but these images will not be saved after the scope is turned off. To
save these images permanently, you will need to use a converter and connect your scope to a
computer.
The steps above can be used with any of the three lenses. In fact, you can switch lenses to
compare items at two different magnifications at once. This split screen feature is great for
students to compare and contrast two objects!
Butterfly wing split screen 30x/200x
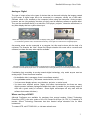
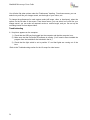
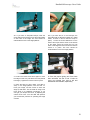
Non-Contact Viewing
What if you want to examine an object that you cannot touch? Perhaps it’s behind glass (such
as a fish in an aquarium), the object is wet, or it has a complex structure that cannot be touched
(such as the inside of a small geode). The contact tip of the 30X lens can be removed by simply
pulling it off. Since you will not touch the object, it is best to put the scope in the stand before
trying this “non-contact” setup (see section “Using the Stand" for set-up instructions).
Notice (at left) that the mouth of the sea star is not in focus because the scope isn’t able to touch it. When the
contact tip is removed, at right, the scope can see further into the sea star, bringing the mouth into focus.
8
Handheld Microscope Users Guide
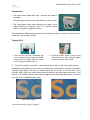
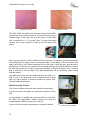
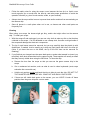
Polarization with the 30X Lens
The lights in the 30X lens can be polarized (a process that reduces unwanted reflection/glare)
by pressing the LIGHT/ON button. This should greatly reduce the reflection. You can continue
to switch the LIGHT/ON button on and off to switch between polarized and unpolarized
illumination. Try looking at different objects with polarized and unpolarized light. What
differences do you notice?
Unpolarized/polarized skin
Unpolarized/polarized glass slide
Unpolarized/polarized watch
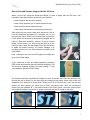
How to Use the 200X Lens
Once you have the hang of using the 30X lens, change to the 200X lens to see the same
objects under higher magnification. (Follow instructions for changing lenses in previous section.)
You will find that the 30X is best for looking at certain larger items, such as fingerprints, rocks,
etc., but the 200X will allow much closer examination of smaller objects, such as salt crystals,
cells, and clothing fibers. To adjust the focus with the 200X lens, twist the white, scalloped
(having a pattern of semicircles) ring.
The 200X has a fine focus mechanism due to the smaller field of view of this lens. This means
that the higher the magnification, the smaller the area (field) the lens can view at one time. For
example, you can see an entire fingerprint pattern with the 30X, but you will only see part of a
few ridges with the 200X.
Finger 30x
The 200X works the same way as the 30X—you touch the
object with the tip of the lens housing to get a focused image.
In this case, the tip of the lens is a clear dome with a small hole
in it. The actual lens is inside this plastic housing, and it "sees"
whatever is lined up with the hole in the plastic. (This image
shows how the lens is focused by twisting the scalloped ring.)
Finger 200x
200X lens tip with hole
9
Handheld Microscope Users Guide
When using the 200X lens for the first time, it’s easiest
to get a focused image of something flat (e.g. paper,
fabric, or a prepared slide). Touch the tip of the clear
dome to the object you’d like to view. While continuing
to touch the object, rotate the white, scalloped ring in
one direction. If the focus is not cleared up, try rotating
the ring in the opposite direction. Keep in the mind that
several turns of the ring may be necessary to achieve
the proper focus. Once the lens is focused on the flat
object, only slight adjustments will be necessary when
viewing other objects.
The REC and PLAY buttons work the same with this
lens, so follow the instructions in the 30X lens section.
The lights in the 200X lens, however, cannot be
polarized.
200x touch-and-view setup
How to Use the 1X Lens
The 1X lens is different from the 30X and 200X lenses in
several ways:
• It does not have its own lights, so it cannot be used
as a “touch lens.”
• Its magnification is variable–the closer the object is
to the lens, the higher the magnification. Objects that
are far away will actually appear smaller than they
are in real life.
• It can be used as a video camera and/or a document
camera.
Since the 1X lens is not a “touch lens,” it is
recommended to secure the scope in a stand. This will
help the scope remain stable and avoid the “home movie
effect.” After following the instructions in the following
section (“Using the Stand”) you will be ready to begin
using the 1X lens.
1x lens in stand
The black ring around the tip of the lens is the focusing mechanism. Turn the ring to focus on
the object of your choice. As with the 200X lens, if the image does not get clearer, try turning
the ring in the opposite direction.
Try this tip if the color of your image does not seem right (everything might have a yellow hue):
• If you have the “New” SOAR, turn the scope off and then back on by pressing the power
switch on the cradle. Press the LIGHT button to go back to the previous light setting.
10
Handheld Microscope Users Guide
• If you have the “Old” SOAR, press the ERASE button, located on the
underside of the scope. Pressing the ON button will allow you to go
back to the previous light setting. Note: the ERASE button also
erases any images previously taken with the SOAR.
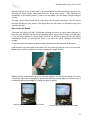
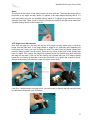
How to Use the Stand
The stand that comes with the Scope-On-A-Rope kit comes in handy when using the 1X lens,
using the 30X with the contact tip removed, or in any situation where you might want to use the
scope hands-free. Some people find that it is difficult to hold and focus the 200X lens, so
securing the scope in its stand can aid in obtaining well-focused images.
To put the scope in the stand, first remove the lens from the scope. This will give you greater
freedom of movement. Next, locate the metal screw plate on the underside of the scope. If your
scope does not have a screw plate, check your kit contents (a screw plate is included in all
Scope-On-A-Rope education kits). There are two holes on the scope body used to attach the
screw plate with two smaller screws.
Screw plate
Attaching scope to stand
Once the screw plate is on the scope, hold it up to the screw on the stand. Turn the screw
clockwise to secure it to the scope. Make sure to screw it on tightly so that the scope doesn’t
wiggle around.
Spread the legs of the stand to give you maximum stability. Once the scope is secure in the
stand, attach the lens of your choice. You can use the stand in a variety of positions, and it can
be extended to give greater distance from the object you wish to view. It can also be twisted at
an angle for viewing the sides of objects.
From left to right: 1X close to object, 1X far from object, 200x viewing slide, 30x viewing side of rock.
11
Handheld Microscope Users Guide
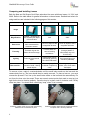
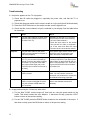
Troubleshooting
A. No picture appears on the TV or projector.
1) Check that all cords are plugged in, especially the power cord, and that the TV or
projector is on.
2) Check that the power switch on the scope’s cradle is on (the red light will be illuminated).
3) Press the LIGHT/ON button on the scope to make sure the lights are on.
4) Check that the correct channel or input is selected in your display. See the table below
for some tips:
Step 1
Step 2
Television
Plug the video cable into a yellow video
input port (this could be on the front or
the back of the TV).
Depending on the type of TV you have,
you will have to do one of the following:
• go to the channel below 2
• press the input button on the remote
until you see “AV, video, or composite”
• go to the menu and select the input
source to be one of the above choices
Projector
Plug the video cable into the yellow
video input port (located on the back or
side of the projector)
The projector might find the correct input
on its own, but if not, press the input
button and select “composite video.”
DVD/VCR
If you have a DVD or VCR hooked up to
your TV, you can have the SOAR go
through it (so you don’t have to unplug
it from the TV). Plug the video cable
into a yellow video input port on the
DVD/VCR (this could be on the front or
the back).
Make sure the TV is on the right channel
to view the DVD/VCR. Then either press
channel down on the DVD/VCR until you
get to a channel below 2 (AV, video, etc.)
or go to the DVD/VCR menu and select
the proper input.
White Board
Plug the video cable into the yellow
video input port.
There are many different brands of active
board. You may need to consult the
manual for your instrument or contact the
school/district technology specialist.
Computer
Plug the video cable into the yellow
video input port on a digital converter.
Plug the converter’s USB cable into
your computer.
You have to install the software first.
Refer to the software instructions if
necessary.
B. Image produced by the 1X lens is a weird color.
1) For the “New” SOAR, turn the scope off, then back on, using the power switch on the
cradle. This should correct the color balance. If that does not help, press the LIGHT
button to return to the previous setting.
2) For the “Old” SOAR, press the ERASE button located on the underside of the scope. If
that does not help, press the ON button to return to the previous setting.
12
Handheld Microscope Users Guide
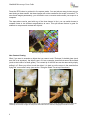
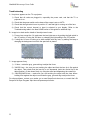
C. Image is too dark and/or details of the object aren’t seen.
1) If using the 30X or 200X lens, make sure the lights in the lens are on by pressing the
LIGHT/ON button on the scope.
2) If using the 1X lens or looking at a water sample with the 30X or 200X lens, try adding a
lamp or changing the background on which the specimen is placed.
salt on a white background
salt on a dark background
D. Image appears fuzzy.
1) 1X lens – rotate the black ring to adjust the focus.
2) 30X lens – make sure you are touching the object and that the lens tip is flat against the
object. If that doesn’t help, try the using the stand and removing the contact tip, as
described above (in the section “Viewing Without Contact Tip”).
3) 200X lens – make sure you are touching the object and rotate the white scalloped ring to
adjust the focus.
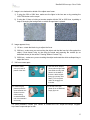
E. 30X lens comes apart.
1) Check to make
sure you have all
pieces of the lens.
2) Take the donut shaped
piece (with the light bulbs
and visible circuitry) and
place it on the base of
the lens, with the lights
facing up (circuitry side
down). Turn it in place
until it fits snuggly into
the base.
3) Locate the gray
plastic tip with the
screw threads on it.
Screw it into the
white housing
counterclockwise
until it is screwed in
all the way.
4) If the top of the gray
plastic tip is not attached,
simply pop it on.
For other problems, contact your vendor or consult the LSU Scope-On-A-Rope Program:
http://www.scopeonarope.lsu.edu.
13
Handheld Microscope Users Guide
Old Scope-On-A-Rope
This is the instrument previously used in Louisiana State University’s education outreach
program.
To learn about this model, please refer to the section above ("New Scope-On-A-Rope”). The
above information on the new SOAR equally applies to the old SOAR. The minor differences
are that where the new SOAR has a LIGHT button, the same button on the old SOAR says ON,
and that the “new” SOAR does not have an ERASE button. These differences are addressed
above where applicable.
If you have the collar and stage set up for aquatic viewing, refer to LSU’s SOAR website for
instructions on how to use it: www.scopeonarope.lsu.edu.
collar and stage
14
SOAR in inverted setup
Handheld Microscope Users Guide
L2 Scope
The L2 Scope connects to a TV or projector like the Scope-On-A-Rope, but is designed to work
with the same accessories as the ProScope (see next section). This section describes parts and
assembly of the L2, how to use lenses, and how to set it up in different ways using accessories.
Parts and Assembly of the L2
12
14
7
9
8
13
5
11
10
6
1
2
3
4
1.
2.
3.
4.
5.
6.
7.
8.
9.
10.
11.
12.
13.
14.
L2 scope
Video cable
Power cable
Power supply
50X lens
1X lens
30X lens
200X lens
100X lens
400X lens
Stand
Lamp
Lamp shade
XYZ stage
The L2 comes with a
scope with a cord
attached to the bottom of
it, a separate power cord,
and one or more lenses.
Turning the L2 On
1. Locate the black cord coming out of the
bottom of the scope. It has three
connectors at the end of it–for video
(yellow), audio (white), and power (red).
2. Connect the black power supply cord to
the red cable coming out of the scope,
and plug the other end into a power
outlet.
3. Connect the yellow-tipped video cable
coming out of the bottom of the scope to
your display–whether you choose to use
a TV, projector, active board, or
computer via digital converter.
L2 with cords connected
15
Handheld Microscope Users Guide
4. Once all the cords are connected and you
are ready to begin using the scope, make
sure the power switch is turned to the
AUTO position.
5. Find the light switch on the side of
the scope and put it on the “A”
setting.
6. Turn on the television, projector, or other device that you are using with the scope.
Depending on the kind of display you are using, you might need to go through a couple of steps
to make sure the display finds the proper input. (Refer to the Troubleshooting Section below if
you need further assistance.)
You are now ready to begin “scoping”!
Comparing and Installing Lenses
There are several lenses that can be used with the L2 and ProScope: 1X, 30X, 50X, 100X,
200X, and 400X. Refer to the table below for general information on the lens types. Detailed
instructions for using each lens are included later in this section.
Lens
1X
30X & 50X
100X, 200X, & 400X
Magnification
Variable – depending
on how far away the
object is from the lens
30X or 50X
100X, 200X, or 400X
How to use
This lens works like a
video camera and/or
document camera.
Touch an object to see it
magnified 30 or 50 times.
Touch an object to see it
magnified 100, 200, or 400
times.
Focusing
The gray, grooved
ring can be used to
focus the image.
This lens does not have a
focusing mechanism.
The gray, grooved ring is
for fine focusing.
Best used for…
Demonstrations,
showing pictures in
books, viewing whole
objects
Examining any of a
multitude of objects up
close
Looking at prepared
slides, cells, small and/or
flat objects
Image
16
Handheld Microscope Users Guide
To remove a lens, press the lens release button and, while
holding it, rotate the lens counterclockwise until the small
index marks on the lens and the camera body line up. The
lens should then be easily removed. To place a lens on,
simply reverse the process. First, line up the small index
marks on the lens and the camera body. Do not force the
lens onto the scope! There are several contact points that
need to meet up just right for the lens to function properly.
Once the lens is seated properly, twist it clockwise until it
firmly clicks into place–you do not need to press the button.
You should hear a “snap” when it’s on correctly.
Index marks
Lens release button
How to Use the 50X Lens
When first using the L2, it’s best to begin with the 50X lens; it’s the lens that comes with all kits.
Just remember some basic rules to share with your students:
• Never immerse the lens tip in a liquid
• Never touch anyone’s eye or mouth with the lens tip
• Never point the lens at someone’s eye
• Take proper precautions to avoid spread of infection
After setting up your scope, make sure the power is
on both the scope and the display (TV, projector,
etc.). If there are no lights shining in your lens,
check to be sure that the power is set to AUTO and
the light switch is on “A”. To get a focused image on
the screen, you must touch the lens tip to the item
you wish to view. It’s that simple! Since the actual
lens is inside the plastic housing, you cannot
damage it by touching objects to the tip. Just
remember the basic rules listed above.
Note: holding the tip of the lens flat against the
object will give you the best image.
17
Handheld Microscope Users Guide
Non-Contact Viewing
What if you want to examine an object that you cannot touch? Perhaps it’s behind glass (such
as a fish in an aquarium), or the object is wet, or it has a complex structure that cannot be
touched (such as the inside of a small geode). The contact tips of the 30X and 50X lenses can
be depressed by twisting the conical tip. Since you will not touch the object, it is best to put the
scope in the stand before trying this “non-contact” setup (see “Using the Stand” for setup
instructions).
Viewing sea star with contact tip. Notice that the mouth
of the sea star is not in focus because the scope isn’t
able to touch it.
Viewing sea star with contact tip depressed. When the
contact tip is depressed, the scope can see further into
the sea star, bringing the mouth into focus.
How to Use the 30X Lens (Including Polarization)
The 30X lens works the same way as the 50X lens,
except that its lights can be polarized (a process that
reduces unwanted reflection/glare). When first using the
30X lens, change the light setting to “B” using the
switch on the side of the scope. (If you are using any
other lens except for the 30X, this setting will turn the
lights off.) It is recommended to begin with unpolarized
light, because the details are best seen in most objects
with this light setting.
light switch
To polarize the lights, change the light switch to the “A” position. This should greatly reduce the
reflection. (There is a short delay when changing light settings, so don’t be alarmed if the lights
turn off temporarily.) Try looking at different objects with polarized and unpolarized light, and
notice the differences.
18
Handheld Microscope Users Guide
Unpolarized light
Polarized light
Skin
Glass
slide
Watch
How to Use the 100X, 200X and 400X Lenses
Once you have the hang of using the 30X and 50X lenses, change to the 100X or 200X lens to
see the same objects under higher magnification. (Follow above instructions for changing
lenses.) You will find that the 30X/50X is best for looking at certain larger items, such as
fingerprints, rocks, etc., but the 100X/200X will allow much closer examination of small objects,
such as salt crystals, cells, and clothing fibers. Each of these higher powered lenses has a fine
focus mechanism due to the smaller field of view. This means that the higher the magnification,
the small the area (field) the lens can view at one time. For example, you can see an entire
fingerprint pattern with the 50X, but you will only see part of a few ridges with the 200X.
19
Handheld Microscope Users Guide
Fingerprint at 50x
Fingerprint at 200x
The 100X, 200X, and 400X work the same way as the 30X/50X–
you must touch the object with the tip of the lens housing to get a
focused image. In this case, the tip of the lens is a clear dome
with a small hole in it. The actual “lens” is inside this plastic
housing, and it sees whatever is lined up with the hole in the
plastic.
When you are using the 100X or 200X lens for the first time, it’s easiest to get a focused image
of something flat (e.g. paper, fabric, or a prepared slide). Touch the tip of the clear dome to the
object you’d like to view. While continuing to touch the object, rotate the gray, grooved ring in
one direction. If the focus is not cleared up, try rotating the ring in the opposite direction. Keep in
the mind that several turns of the ring may be necessary to achieve the proper focus. Once the
lens is focused on the flat object, only slight adjustments will be necessary when viewing
different objects.
The 400X lens is best used for slides and other flat objects. Its
field of view is so small–only a half a millimeter–that it might
take you some practice to become proficient in getting wellfocused images with this lens.
How to Use the 1X Lens
The 1X lens is different from the other lenses in several ways:
It does not have its own lights, so it cannot be used as a “touch
lens.”
Its magnification is variable–the closer the object is to the lens,
the higher the magnification. Objects that are far away will
actually appear smaller than they are in real life.
It can be used as a video camera and/or a document camera.
20
L2 with 1x lens in stand
Handheld Microscope Users Guide
Since the 1X lens is not a “touch lens”, it is recommended to secure the scope in a stand. This
will help the scope remain stable and avoid the “home movie effect.” After following the
instructions in the following section–“How to Use the Stand”–you are ready to begin using the
1X lens.
The gray, grooved ring around the tip of the lens is the focusing mechanism. Turn the ring to
focus on the object of your choice. If the image does not get clearer, try turning the ring in the
opposite direction.
How to Use the Stand
The stand that comes with the L2/ProScope education kit comes in handy when using the 1X
lens, using the 30X/50X with the contact tip depressed, or in any situation where you might want
to use the scope hands-free. Some people find that it is difficult to hold and focus the higher
magnification lenses, so securing the scope in its stand can aid in obtaining well-focused
images.
To put the scope in the stand, locate the screw attachment on the underside of the scope.
Hold the scope up to the screw on the stand. Turn the screw clockwise to secure it to the scope.
Make sure to screw it on tightly so that the scope doesn’t wiggle around.
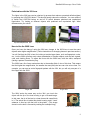
Spread the legs of the stand to give you maximum stability. You can use the stand in a variety
of positions, and it can be extended to give greater distance from the object you wish to view. It
can also be twisted at an angle for viewing the sides of objects.
Prepared slide viewed with 200x lens on stand
Rock sample viewed with 30x lens on stand
21
Handheld Microscope Users Guide
Troubleshooting
A. No picture appears on the TV or projector.
1) Check that all cords are plugged in, especially the power cord, and that the TV or
projector is on.
2) Check that the power switch on the base of the scope is set on AUTO.
3) Check that the light switch is set to position “A” and that light is coming out of the lens.
4) Check that the correct channel or input is selected in your display. Refer to the
Troubleshooting table in the New SOAR section of this guide for additional tips.
B. Image is too dark and/or details of the object aren’t seen.
1) For any lens except the 1X, make sure the lens lights are on by putting the light switch in
the “A” position. If using the 30X lens, try changing the light setting to the “B” position.
2) If using the 1X lens or looking at a water sample with any lens, try adding the lamp or
changing the background on which the specimen is placed.
salt on a white background
salt on a dark background
C. Image appears fuzzy.
1) 1X lens – rotate the gray, grooved ring to adjust the focus.
2) 30X/50X lens – be sure you are touching the object and that the lens tip is flat against
the object. Then check that the lens tip is not depressed (twist the conical tip to the
tallest position). If that doesn’t help, try using the stand and depressing the contact tip.
3) 100X/200X/400X lens – make sure you are touching the object with the clear dome–
holding it flat against the object–and rotate the gray, grooved ring to adjust the focus.
For other problems, contact your vendor, go to www.ScopeCurriculum.com, or consult the LSU
Scope-On-A-Rope Program: http://www.scopeonarope.lsu.edu.
22
Handheld Microscope Users Guide
ProScope HR
This instrument is a digital scope, meaning that it connects to a computer via a USB cable. It
was designed to work with the same accessories as the L2 Scope (outlined in the previous
section). This section outlines the setup and general use of the ProScope, but for detailed
instruction on using the lenses and accessories, see the section on the L2 Scope.
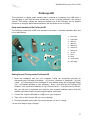
Parts and Assembly of the ProScope HR
The ProScope comes with a USB cord attached to its bottom, a software installation disc, and
one or more lenses.
12
4
6
5
7
10
11
9
3
8
1
1.
2.
3.
4.
5.
6.
7.
8.
9.
10.
11.
12.
ProScope
USB cable
50X lens
30X lens
200X lens
100X lens
400X lens
1X lens
Stand
Lamp
Lamp shade
XYZ stage
2
Setting Up and Turning on the ProScope HR
1. Insert the installation disc into your computer. Follow the instructions provided for
downloading the ProScope HR software: (a) Click on “Windows” or “Macintosh.” (b) Click
“install.” (c) A Proscope HR icon will appear on your desktop (along with a Quicktime Player
icon, if not already installed on your computer). Note: If you have the old ProScope HR
software, it only works with Windows XP up to Service Pack 2. If you have Service Pack 3,
then you will need to download and install the free upgraded software version from this
website: http://www.bodelin.com/proscopehr/support_proscopehr.
2. Connect the scope’s USB cable to a USB port on your computer.
3. Then, click on the Proscope HR icon on your desktop.
4. Find the light switch on the side of the scope and put it on the “A” setting.
You are now ready to begin “scoping”!
23
Handheld Microscope Users Guide
Lenses and Setups
The lenses and setups for the ProScope are identical to those for the L2, described in the
earlier section “Comparing and Installing Lenses.”
How to Use the ProScope HR and its Software
When you begin using the ProScope, it’s best to begin with the 50X lens; it’s the lens that
comes with all kits. Just remember some basic rules to share with your students:
• Never immerse the lens tip in a liquid
• Never touch anyone’s eye or mouth with the lens tip
• Never point the lens at someone’s eye
• Take proper precautions to avoid spread of infection
After setting up your scope, make sure the software is
running. If there are no lights shining in your lens, check to be
sure that the light switch is on “A.” To get a focused image on
the screen, you must touch the lens tip to the item you wish to
view. It’s that simple! Since the actual lens is inside the plastic
housing, you cannot damage it by touching objects to the tip.
Just remember the basic rules listed above.
Note: Holding the tip of the lens flat against the object will give
you the best image.
Saving Images with the ProScope HR
The ProScope HR software allows you to save images, movies, and time-lapse videos. The
tabs at the top of the screen allow you to select which format you want. To capture pictures,
make sure the “Still Image” tab is selected; it will appear red (instead of black). While holding
the tip of the lens on your object of choice, click your mouse on the “Capture!” button on the
upper right-hand side of the screen to save your image. You can also take pictures by pressing
the white button located on the bo.y of the scope just below the lens.
24
Handheld Microscope Users Guide
Thumbnails (smaller versions) of captured images appear on the bottom of the screen. Click on
any of them to view the picture at full size. Click on the arrows to the right of the thumbnails to
scroll through all your images. To return to live mode, click on the image window (you will then
see whatever the scope sees).
On the Macintosh computer, you can change to full-screen view by clicking the small button on
the bottom right-hand corner of the screen. Press any key on your computer keyboard to exit
full-screen mode.
Switching to full-screen mode
Using the ProScope HR as a Video Camera
To use your scope as a “video camera,” click on the “Video” tab at the top of the screen. To
start recording, click on the “Capture” button (or press the button on the handle of the scope).
To stop recording, click on the “Capture” button (or scope button) again. To play and watch
your video, go to the thumbnails at the bottom of the screen, click on the video, and then click
on the “play” button.
To record a time-lapse movie, click on the “Time Lapse” tab at the top of the screen. To start
recording, click on the “Capture” button (or press the button on the handle of the scope). To
stop recording, click on the “Capture” button (or scope button) again. To play and watch your
time-lapse move, go to the thumbnails at the bottom of the screen, click on the video, and then
click on the “play” button.
To set up your preferences for the time-lapse movie, go to the left-hand side of the screen
where it says “Preferences,” and click on “Time Lapse Movies.” From there you will choose
how many total pictures you want to record (where it says “Recording Count”). Then, under
“Recording Interval,” you will note how often you want a “snapshot” to be taken—such as one
shot every 30 minutes, one shot every hour, etc. [The “HH” indicates hours, the “MM” indicates
minutes, and the “SS” indicates seconds.]
As an example, if you set it up to capture 55 pictures, one picture every minute, you must wait
55 minutes for the process to complete. After it completes, the software automatically combines
those images into a movie that you can play back. You have to leave the scope set up and
stationary (the stand works best) for the full duration of the capture. Usually this is done over a
number of hours or days in order to capture something that moves or changes very slowly.
25
Handheld Microscope Users Guide
You will also find other options under the “Preferences” heading. From these menus, you can
select how you’d like your images saved, set the length of your videos, etc.
To change the preferences for each capture mode (still image, video, or time-lapse), select the
options on the left side of the screen. From these menus, you can select how you’d like your
images saved, you can make all captured movies a certain length, and you can set up the
recording interval for time-lapse videos.
Troubleshooting
A. No picture appears on the computer.
1) Check that the USB cord is plugged into the computer and that the computer is on.
2) Make sure that the ProScope HR software is running. (You’ll need to have installed the
program from the installation disc included in the kit.)
3) Check that the light switch is set to position “A” and that lights are coming out of the
lens.
Refer to the Troubleshooting section for the L2 scope for other issues.
26
Handheld Microscope Users Guide
Information and Features that Apply to all Models
This section contains information and features that apply to all of these models: LSU VL-7EX
(“old” SOAR), LSU VL-7EX II (“new" SOAR), L2, and ProScope HR.
Capturing Digital Images and Movies
The ProScope HR is a digital microscope, and information on capturing images with it is
included in the previous section. Both the Old and New Scope-On-A-Rope and the L2 Scope
are analog scopes, meaning that they connect to a television or video projector through a
yellow, video cable. Although the benefits of using these analog scopes are outlined in the
beginning of this guide (page 3), many teachers would like to be able to save their images and
videos on a computer. Fortunately, any “TV” scope can be connected to a computer through the
use of an analog-to-digital converter. This converter digitizes the video signal so a computer can
recognize it. There are many types of converters, and they can be found in electronics stores or
by searching the web. Two examples are shown below:
The converter shown on the left is included in many of the scope education kits sold by School
Technology Resources www.schooltr.com. It has a place to plug in the yellow, video cable of
the scope on one end of the device, and a USB cable for insertion into a computer. As with
most converters, it comes with software and instructions on how to install and use it. These
instructions include how to capture images.
Pictured on the right is the converter used to capture all the scope images in this book. It works
the same way as the previous converter, except that it connects to the computer via a firewire
cable instead of a USB cable [Firewire and USB cables are methods of transferring information
between digital devices]. This converter was used to capture video clips in iMovie, a free
program for Macintosh computers. The pictures seen in this book were taken from such video
clips.
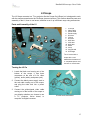
How to Use the XYZ Mechanical Stage
The “New” Scope-On-A-Rope, L2, and ProScope education kits come with a mechanical stage.
It is particularly useful for viewing water samples and slides. It can be used with any lens, but it
was designed primarily for use with the 200X lens. It is called an XYZ mechanical stage
because it has knobs that allow you to move a sample in three planes: left to right (X axis),
towards you and away from you (Y axis), and up and down (Z axis).
27
Handheld Microscope Users Guide
Z axis
Z knob
(fine focus)
Y axis
X axis
Coarse focus
knob
X knob
Y knob
To use the stage with the 100X, 200X, or 400X lens, follow these directions:
1. Turn the focus knob of the lens clockwise until it
is almost flush with the lens housing (it will feel
tight).
28
2. Loosen the coarse focus knob on the stage
to raise the stage platform as high as it will go.
[A coarse focus knob makes larger
adjustments to the focus; a fine adjustment
knob makes very small adjustments to the
focus.] Then tighten the knob to hold the stage
in place.
Handheld Microscope Users Guide
3A. If you have a Scope-On-A-Rope, slide the
scope with the lens facing up into the metal holder
on the base of the stage. The lens should be
underneath the hole in the stage platform.
3B. If you have the L2 or the Proscope, the
XYZ stage will be different (instead of a metal
holder, a screw is used to hold the scope in
place). Locate the screw attachment on the
back of the scope and the screw on the bottom
of the stage. Place the scope face up onto
base of the stage and screw it onto the base to
secure it in place. The lens should be
underneath the hole in the stage platform.
4. Loosen the coarse focus knob again to lower
the stage so that it is just above the lens (almost
touching it). Tighten the knob to hold it in place.
6. Once the proper lighting and focus have
been achieved, use the X and Y knobs to
move your sample from right to left and
backwards and forwards, respectively.
5. Place the slide (or other object you’d like to
view) on the stage platform over the hole. To
focus your image, use the Z knob to move the
stage up and down. This is similar to using a fine
focus knob on a traditional microscope. If you
can’t get your sample into focus, try adjusting the
coarse focus knob. You’ll find that with practice
you will become proficient in operating the stage
controls.
29
Handheld Microscope Users Guide
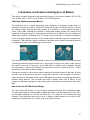
Lamp and Light Blocker
You may need to provide additional lighting to get the best image of your object, especially if it’s
a water sample. Use the lamp and light blocker included in your scope kit to achieve optimal
lighting. Slide the light blocker onto the lamp, place the lamp over your sample, and adjust the
position of the lamp and/or blocker until you get the desired image.
The light blocker allows light to strike the object from sides, but not directly overhead
Water sample without lamp
Water sample with lamp and light blocker. Colors
in the sample are much more clearly seen.
How to Prepare Slides
These hand-held scopes are not water resistant, so care must be taken when viewing aquatic
samples. There are many activities that can be done with the scope that involve wet samples
(pond water, cheek cells, etc.), so detailed instructions are included below on how to make
slides. For elementary students, we recommend using either plastic Petri dishes (30-60 mm
diameter) or deep well slides (described below). Both are included in the Scope Manual
Material Kit, and they also can be ordered from a variety of science education supply catalogs.
30
Handheld Microscope Users Guide
A. The Deep Well Slide
These plastic slides are perfect for use with the hand-held microscope! The depressed, circular
area in the center holds a few drops of water and other small objects, such as algae. It has a 12mm thick ridge with a cover, so your organisms do not get crushed and the water does not spill
out! Organisms can live in a deep well slide for as much as a week, as long as the water does
not dry up and you have some plant matter inside of it to produce oxygen.
B. The Petri Dish Sandwich
Since not everyone has deep well slides handy, Petri dishes are a good alternative. You can
“sandwich” your specimens in between the cover and the bottom of the dish to create a slide.
Just place your sample (a few drops of pond water, onion skin, etc.) inside the lid of the Petri
dish. Then cover it with the bottom of the dish, creating a sandwich. There are small ridges
inside the lid of Petri dishes, so your organisms will not get crushed in this setup either. Care
must be taken when using a Petri dish, as water will spill out if it is disturbed.
Care & Maintenance
General
Your scope should give you years of successful use, as long as you follow some basic rules of
use. There are a few tips that will ensure its optimal performance and longevity.
31
Handheld Microscope Users Guide
•
Follow the safety rules for using the scope: never immerse the lens tip in a liquid; never
touch anyone’s eye or mouth with the lens tip; and take proper precautions to avoid the
spread of infection (e.g. don’t touch mouths, scabs, or open wounds).
•
Always store the scope with a lens on to prevent dust and/or moisture from accumulating on
the camera chip.
•
Store all pieces in a safe place when not in use, as lenses and other small parts are
frequently lost.
Cleaning
When using your scope, the lenses might get dirty, and/or dust might collect on the camera
chip. To clean your scope:
1. With the scope off and unplugged, you can use a dry cloth to wipe any dirt or dust that has
collected on the scope. It is not advisable to use a damp cloth, as water could get inside of
the scope and damage the electronic components.
2. The tip of most lenses cannot be removed, but you may carefully wipe the plastic tip with
disinfectant, if needed. Just be careful not to drip any liquid inside the hole in the lens tip!
(Note: If you have the new or old SOAR, the tip of the 30X lens can be removed for
cleaning.)
3. If you find that your images have the same dark spots no matter what sample is viewed, you
most likely have dust accumulated on the camera’s chip. These specks are usually so small
that they are only visible when using the 200X lens. To clean the chip:
a. Remove the lens from the scope so that you can see the green camera chip in the
scope.
b. Get a condensed air canister, such as what is used to clean keyboards (most scope
education kits come with one).
c. Hold the air canister upright and bend the tube to blow air onto the chip. DO NOT TILT
THE CANISTER OR MOISTURE WILL COME OUT AND RUIN YOUR SCOPE!
d. If there are still visible dark spots on the screen, you can LIGHTLY brush off these
particles from the green chip with a cotton swab.
32
Handheld Microscope Users Guide
Stand
The screws at the bottom of the stand loosen over time with use. The stand should be able to
be placed at any angle and stay where it is placed. If the stand begins drooping–that is, if it
won’t stay where you put it–you probably need to tighten it. To tighten, all you need is two coins
(pennies work best). Place a coin in the slot of each screw and turn the right screw away from
you while turning the left screw towards you.
XYZ Stage Care & Maintenance
Over time and with use, you may find that the XYZ stage is wobbly when trying to focus an
image with the 200X lens. If the stage seems to wiggle a lot, especially when adjusting the
focus using the Z knob, you need to tighten the mast. The mast is the long metal cylinder that
holds the stage in place over the scope. There are two screws at the base of this cylinder that
keep it in place. First, remove the stage from its base (loosen the coarse focus knob and slide
the stage off the mast). Then use the hex wrench tool included with your XYZ stage to gently
tighten the two screws at the base of the mast. Be careful not to tighten the screws too much,
though, because they will make the X knob too tight to move fluidly.
If the X or Y knobs become too hard to turn, you can loosen (or tighten) the bolt using the other
tool that was included with your XYZ stage:
33