1
magicolor 2300 DL
Installation Guide
®
1800686-002C
Thank You
Thank you for purchasing a magicolor 2300 DL. You have made an excellent choice.
Your magicolor 2300 DL is specially designed for optimal performance in Windows
and TCP/IP networking environments.
Trademarks
The following are registered trademarks of MINOLTA-QMS, Inc.: QMS, the
MINOLTA-QMS logo, and magicolor.
Minolta is a trademark of Minolta Co., Ltd. Other product names mentioned in this
guide may also be trademarks or registered trademarks of their respective owners.
This product uses Software Developer Kit of Peerless Systems Corporation.
Copyright © 2001 Peerless Systems Corporation. All rights reserved.
This product uses NEST Office SDK of Novell, Inc. Copyright © 1999 by Novell, Inc.
NEST is a trademark of Novell, Inc. in the United States and other countries.
Proprietary Statement
The digitally encoded software included with your printer is Copyrighted © 2002 by
MINOLTA-QMS, Inc. All Rights Reserved. This software may not be reproduced,
modified, displayed, transferred, or copied in any form or in any manner or on any
media, in whole or in part, without the express written permission of MINOLTA-QMS,
Inc.
Copyright Notice
This manual is Copyrighted © 2003 by MINOLTA-QMS, Inc., One Magnum Pass,
Mobile, AL 36618. All Rights Reserved. This document may not be copied, in whole or
part, nor transferred to any other media or language, without written permission of
MINOLTA-QMS, Inc.
Manual Notice
MINOLTA-QMS, Inc. reserves the right to make changes to this manual and to the
equipment described herein without notice. Considerable effort has been made to
ensure that this manual is free of inaccuracies and omissions. However,
MINOLTA-QMS, Inc. makes no warranty of any kind including, but not limited to, any
implied warranties of merchantability and fitness for a particular purpose with regard
to this manual. MINOLTA-QMS, Inc. assumes no responsibility for, or liability for,
errors contained in this manual or for incidental, special, or consequential damages
arising out of the furnishing of this manual, or the use of this manual in operating the
equipment, or in connection with the performance of the equipment when so
operated.
Registering the Printer
Internet—Go to www.onlineregister.com/minolta-qms/ and follow the instructions
given there.
CD-ROM—Follow the instructions on the CD-ROM.
Contents
Getting Acquainted with Your Printer ........................................................1
Documentation Set .......................................................................................1
Space Requirements .....................................................................................2
Locate your Printer ......................................................................................2
Printer Parts ................................................................................................... 3
Setting up Your Printer .................................................................................5
Installing Accessories ................................................................................ 10
Plugging in/Turning on the Printer ...........................................................10
What’s Next? ...............................................................................................11
About the interface panel ........................................................................... 11
Configuration Menu Overview ...................................................................12
About the Control Panel ............................................................................. 13
Troubleshooting ..........................................................................................17
Accessories and Consumables ................................................................. 18
Regulatory Compliance ..............................................................................19
Safety Information ....................................................................................... 20
Warranty Considerations ........................................................................... 22
Contents
iii
iv
Contents
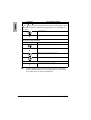
Getting Acquainted with Your Printer
Features
Print speed (A4 or letter)
Resolution
SDRAM
200-sheet Tray 1
200-sheet face-down output tray
500-sheet lower feeder unit with Tray 2
Duplex option
IEEE-1284 parallel
Ethernet
USB
Details
16 ppm monochrome black/4 ppm color
600 x 600, 1200 x 600, or 2400 x 600 dpi
32 MB
Standard
Standard
Optional (only one feeder allowed)
Optional
Standard
Standard
Standard
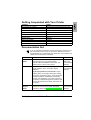
Documentation Set
If you’re using the Acrobat PDF version of this guide, click this icon to
play a QuickTime video clip of the procedure described in the text.
Acrobat Reader and a download link to QuickTime are provided on the
Utilities and Documentation CD-ROM.
Manual
Description
Location
Installation
Guide
Hardware Installation: You’re looking at this
document right now. This guide provides
information about installation of the printer, the
interface panel, and the control panel.
Hard copy and
Utilities and
Documentation
CD-ROM
User’s Guide Software Installation: This chapter guides you
through software, driver, and status display
installation.
Utilities and
Documentation
CD-ROM
Day-to-day Operation of Your Printer: These
chapters guide you through printing files, refilling
print media, and replacing toner. This manual also
includes information on additional accessories;
cleaning, and maintaining your printer; improving
print quality; troubleshooting printer problems; and
technical specifications and safety information for
your printer.
Service &
Support
Guide
This lists sources of service and support in the
Americas. For the most up-to-date worldwide
information, please visit www.minolta-qms.com.
Getting Acquainted with Your Printer
Utilities and
Documentation
CD-ROM
1
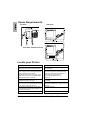
Space Requirements
Top View
Side View
Side View with Accessories
Locate your Printer
With these characteristics...
But away from...
On a hard, flat, stable, level (±1° or less slant
at any point around the machine) surface.
Direct sunlight. Heating and cooling sources,
wind, and dust.
Close to an easily accessible grounded
power supply (on an exclusively dedicated
power outlet) that meets printer
specifications. Near your computer. At the
length 2 m (6.5') or less for an IEEE 1284
bidirectional parallel connection.
A connection to the same electrical circuit as
high-current machines. Noise-generating
equipment, such as an air conditioner or
copier, and strong magnetic or
electromagnetic fields, such as a
refrigerator.
With enough space to allow adequate
ventillation and easy servicing.
Small, loose metal parts, such as paper clips
and staples.
With an ambient temperature range of 10°–
35° C (50°–95° F) and temperature gradient
of 10° C (50° F) per hour or less.
Water, water pipes, liquid (drink) containers,
and corrosive chemicals or vapors, such as
ammonia.
With relative humidity range of 15%–85%
(noncondensing) and humidity gradient of
20% per hour or less.
Excessive vibration.
At an altitude of 0–2,500 m (0–8,202’).
Open flames or items that can easily burn.
2
Space Requirements
WARNING!
Obstructing the ventilation grilles could present a fire hazard.
Attention
For products installed outside North America, do not connect the
groundwire to gas or water pipes or grounding for telephones.
For further details, refer to the User’s Guide on the Utilities and
Documentation CD-ROM.
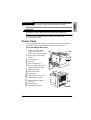
Printer Parts
The following illustrates the parts of your printer are referred to throughout
this guide, so please take some time to become familiar with them.
Front View/Right Side View
1
2
3
4
5
6
7
8
9
10
11
12
13
14
Output tray with output tray
support (the output tray
support is in the open position)
Control panel and message
window
1
3
12
Front door latch
11
Front door
10
Tray 1 media support
9
Tray 1 (multipurpose tray, for
all supported media sizes)
Media size guides
2
7
4
8
6
5
Power cord socket
Power switch
Parallel interface connector
USB interface connector
Ethernet network interface
connector
13
Right-side door
Right-side door release
Printer Parts
14
3
Front Inside View
15
16
17
18
19
Transfer belt
Transfer belt
release lever
Waste toner
bottle removed
15
16
OPC drum
cartridge
Waste toner
bottle
Toner
cartridges in
carrousel
(cyan/
magenta/yellow/black)
19
17
18
Right Inside View
20
21
22
20
Fuser
Misfeed-clearing dial (manual
paper feed dial)
21
22
Transfer roller
View with Accessories
23
24
25
26
Duplex option
Duplex option cover
23
Optional lower feeder unit
24
Tray 2 media tray (A4
or letter only)
25
26
4
Printer Parts
Setting up Your Printer
WARNING!
Your printer weighs approximately 28 kg (62 lbs) with consumables.
Be sure to have help when lifting and moving it.
Do not plug in the power cord until told to do so.
Shipment Contents
Printer (with four toner cartridges, OPC drum cartridge and output tray
support installed)
A Waste toner bottle
Media support for Tray 1
Power cable
Utilities and Documentation CD-ROM
Interface cables are not included in the shipment. If you need cables, contact
your local vendor or computer store.
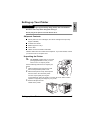
Unpacking the Printer
We strongly suggest that you save the
packaging materials in case you ever
need to move or ship the printer.
Use the following instructions to unpack your
printer.
1
2
Open the shipping box from the top and
remove the protective plastic cover.
With another person’s help, lift the printer
from the carton. Do not tilt the printer.
For best output quality and longest
consumables life, place the printer on a hard, flat, level, stable surface
capable of supporting the weight of your printer.
3
Remove the tape from the
outside of the printer.
Setting up Your Printer
5
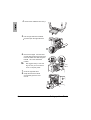
4
5
Remove the cardboard from Tray 1.
Pull the right-side door release ,
and then open the right-side door
.
6
Remove the tags from the base
of both green levers at the top of the
fuser unit. Make sure that the green
levers are in the downward
position.
7
8
We suggest that you save the
tags in case you ever need to
move or ship the printer.
Close the right-side door.
Grasp the front door latch
and carefully open the front
door .
6
Setting up Your Printer
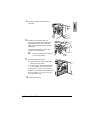
9
10
Remove the tape from the inside of
the printer.
Pressing on the transfer belt unit
with one hand, take the tag attached to
the transfer belt unit fixture with your
other hand, and pull the fixture straight
toward you.
This fixture protects the transfer belt
during initial transportation.
11
Dispose of the fixture according to
your local regulations.
Insert the waste toner bottle.
a Insert the bottom of the waste toner
bottle
b
into the printer.
If the waste toner bottle is not correctly
installed or the transfer belt release lever is
at its top position (11 o’clock), the front
door cannot be closed.
12
Push the top of the waste toner bottle
into position so it is firmly seated.
Close the front door.
Setting up Your Printer
7
Installing the Tray 1 Media Support
Remove the media support from its
plastic shipping bag, and then attach
it to Tray 1.
Insert the three tabs on the media
support into the three holes in Tray 1,
and then lower the two tabs into their
corresponding holes below Tray 1.
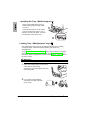
Loading Tray 1 (Multipurpose Tray)
The multipurpose tray is used for all supported media types, including
envelopes, labels, Japanese-sized postcards, thick stock, and
transparencies.
Check www.minolta-qms.com/support (click on Answer Base) for currently
approved media. To order approved media, go to www.q-shop.com. For
information about loading different types of media, refer to “Using Media” in
the User’s Guide.
Attention
Do not mix media types/sizes in the media trays.
1
Adjust the media guides to fit the size of
media that you are loading.
Squeeze the front media guide and open
the media guides.
2
8
Fan a stack of approximately
200 sheets of media of 80 g/m²
(22 lb bond).
Setting up Your Printer
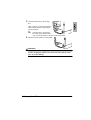
3
Load the media face up, short edge
first.
Often, an arrow on the media package
label indicates the face-up (printing)
side of the paper.
4
A fill limit mark is provided on
the inside of the media guides.
Tray 1 holds 200 sheets of 80 g/m² (22 lb bond) media.
Adjust the media guides to fit the media.
Attention
Always adjust the media guides after inserting the media. Guides
that are not properly adjusted can cause poor print quality, media
jams, or printer damage.
Setting up Your Printer
9
Installing Accessories
Attention
Installing accessories always requires that the printer be turned off
and unplugged.
If you purchased any additional printer accessories (such as a duplex option
or additional memory), then install them now. If installation instructions are
included with the accessory, follow them. If not, instructions are included in
the User’s Guide (in PDF on the Utilities and Documentation CD-ROM).
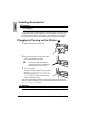
Plugging in/Turning on the Printer
1 Make sure the printer is turned off.
2
Plug the printer power cord into the printer
and into a dedicated, grounded,
surge-protected electrical outlet.
3
In compliance with UL guidelines,
“The appliance inlet is considered to
be the main disconnect device.”
Turn on the printer.
After approximately 180 seconds, the printer
displays “IDLE/MAGICOLOR 2300DL” in
the message window. If “IDLE/MAGICOLOR
2300DL ” does not display in the message
window, recheck the setup.
The printer automatically switches to power-saving (Energy Saver) mode
after 30 minutes of inactivity. You can change the number of minutes in the
Engine/Energy Saver menu.
Attention
Never turn off or unplug the printer while it is receiving data or printing.
10
Installing Accessories
What’s Next?
You have now completed the hardware setup of your printer. There are
some more important steps:
1
2
3
4
If your language is other than English, refer to “Selecting a Message
Window Language” on page 14. Select the message window language
you prefer. If you print via the parallel or USB port, skip to step 3
Set your IP address in one of the following ways:
a. If your network supports DHCP (Dynamic Host Configuration Protocol),
your IP address will be automatically assigned by the DHCP server when
you attach and power up your printer (refer to the NIC User’s Manual).
b. You may manually change the printer’s IP (Internet Protocol) address.
Refer to “Manually select an Ethernet IP Address” on page 15.
Connect the printer to your computer or a network.
Insert the Utilities and Documentation CD-ROM and follow the instructions on the screen to install a printer driver and printer utilities (refer to
“Software Installation” in the User’s Guide).
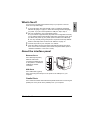
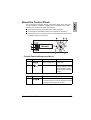
About the interface panel
Ethernet Port
Use a twisted-pair (RJ45)
Ethernet cable when
connecting the Ethernet port
on the printer to a 10BaseT/
100BaseTX network
connection.
USB Port
Use a USB cable (Type B)
when connecting the USB port on the printer to the USB port on your
computer.
Parallel Port
Use a Centronics IEEE 1284 bidirectional parallel cable when connecting the
parallel port on the printer to the parallel port on your computer.
What’s Next?
11
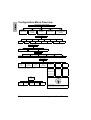
Configuration Menu Overview
IDLE/MAGICOLOR 2300DL
MENU/
LANGUAGE
MENU/
ENGINE
MENU/
SPECIAL
PAGES
MENU/
NETWORK
MENU/
CONSUMABLE
USAGE
MENU/LANGUAGE
SET
ENGLISH
SET
FRENCH
SET
GERMAN
SET
ITALIAN
SET
PORTUGUESE
SET
SPANISH
SET
CZECH
SET
JAPANESE
MENU/SPECIAL PAGES
PRINT CONFIG PAGE
PRINT DEMO PAGE
PRINT MENU MAP*
MENU/ENGINE
CHANGE TONER SZ
REPLACE TONER
AUTO CONTINUE
ENERGY SAVER
CHAINING TRAY **
SERVICE
MENU/NETWORK
IP ADDRESS
Default:
192.168.1.2
SUBNET MASK
Default:
255.255.255.0
GATEWAY
Default:
192.168.1.1
HW ADDRESS
Default:
00206Bxxxxxx
IP ADDRESS, SUBNET MASK and GATEWAY are displayed
only when both DHCP and BOOTP are set to off.
DHCP
BOOTP
DHCP SET: ON
BOOTP SET: OFF
HTTP
HTTP SET: ON
HTTP SET: OFF
SNMP
SNMP SET: ON
SNMP SET: OFF
DHCP SET: OFF
BOOTP SET: ON
DHCP SET: OFF
BOOTP SET: OFF
MENU/
CONSUMABLE
USAGE
BLACK
TONER
YELLOW
TONER
MAGENTA
TONER
Legend
CYAN
TONER
DRUM
UNIT
Defaults are bolded.
*English language only.
**Displays only when lower feeder unit is attached.
12
Configuration Menu Overview
About the Control Panel
The control panel, located on the top of the printer, allows you to direct the
printer’s operation. In addition, it displays the current status of the printer,
including any condition that needs your attention.
Two indicators (LEDs) to provide printer status information.
A message window displays status and configuration information.
Six keys allow you to control the printer’s configuration through access to
frequently used printer functions.
4
1
5
6
Message
Window
2
3
8
7
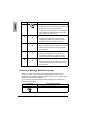
Control Panel Indicators and Keys
Number LED Indicator
Off
On
1
The printer is not
ready to accept data.
The printer is ready to
accept data.
2
No problem.
The printer requires
operator attention (usually
accompanied by a status
message in the message
window)
Number
Key
3
About the Control Panel
Function
Allows you to cancel one or all print jobs
Cancels the menu choice or selection if the user
is in the menu structure at the time
13
Number
Key
Function
4
5
6
7
8
Initially enters the menu system
If within the menu system and on a menu level,
moves down in in the menu structure
If within the menu system and on a selectable
item, selects the displayed choice (no matter
what position the cursor is in)
Moves up in the menu structure
If within a selectable menu choice that is
changeable character by character, scrolls
upward through the available characters
Moves right in the menu structure
Moves right through the scrollable menu choice
selections when selections are whole words,
not characters
Moves down in the menu structure.
If within a selectable menu choice that is
changeable character by character, scrolls
downward through the available characters
Moves left in the menu structure
Moves left through the scrollable menu choice
selections when selections are whole words,
not characters
Selecting a Message Window Language
When you receive your printer, the message window language is set to
English. However, status messages and configuration menus can be
displayed in the message window in English, Czech, French, German, Italian,
Japanese, Portuguese, and Spanish.
If you want to change the message window language, use the following
control panel sequence:
Press Key
(Until) Display Reads
IDLE/MAGICOLOR 2300DL
MENU/LANGUAGE
14
About the Control Panel
Press Key
(Until) Display Reads
LANGUAGE SET/ENGLISH
Press the Right or Left key until the appropriate
language is displayed.
<LANGUAGE> is selected.
IDLE/MAGICOLOR 2300DL
Manually select an Ethernet IP Address
You must enter a unique IP address compatible with your local Ethernet network environment.
When manually setting the IP address, turn off DHCP and BOOTP
first.
Attention
You should always notify your network administrator before changing
the printer’s IP address.
IP ADDRESS, SUBNET MASK and GATEWAY are displayed only when both
DHCP and BOOTP are set to off.
Use the following quick control panel sequence to change the IP address of
your printer:
Press Key
(Until) Display Reads
IDLE/MAGICOLOR 2300DL
MENU/LANGUAGE
MENU/NETWORK
IP ADDRESS/192.168.1.2
IP ADDRESS/192.168.1.2
About the Control Panel
15
Press Key
Use the
and
(Until) Display Reads
keys to move to each of the four number triplets. With the
and
keys you may increment/decrement each number triplet. Leading
zeros of each triplet are automatically suppressed (".001." will display as
".1.", etc.).
IP ADDRESS
IDLE/MAGICOLOR 2300DL
You are advised to verify the correct IP address by means of printing a
Configuration page as follows:
IDLE/MAGICOLOR 2300DL
MENU/LANGUAGE
MENU/SPECIAL PAGES
PRINT/CONFIGURATION PAGE
A Configuration page will print. Verify the IP address on this page.
IDLE/MAGICOLOR 2300DL
16
In certain network environments you may also have to select the
printer’s Gateway address to be compatible with your local network
environment. Ask your network administrator.
About the Control Panel
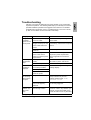
Troubleshooting
Although your printer is designed to be highly reliable, it may occasionally
experience a problem. The following table helps you to identify the cause of
possible installation problems and suggests some solutions. For detailed
troubleshooting information, refer to “Troubleshooting” in the User’s Guide
(in PDF on the Utilities and Documentation CD-ROM).
Symptom
No lights or
messages
appear on the
control panel.
Cause
Solution
There is no power supply Make sure there is power supplied to
to the AC outlet.
the AC outlet.
Turn the printer off, plug in the power
The power cord is not
plugged securely into the cord securely, and then turn the printer
back on.
power outlet and/or the
printer.
The printer is not
turned on.
Turn on the printer.
The line voltage from the
power outlet doesn’t
match the printer’s power
requirements.
Make sure the line voltage matches
the printer’s power requirements.
Refer to appendix A in the User’s
Guide.
You can’t print a The tray does not have
media.
configuration
page.
The media is jammed.
Check that the media trays are loaded
with media, in place, and secure.
A consumable or tray is
not correctly installed.
Handle the message according to the
message display.
An error
message is
displayed.
Check for a media jam.
Media is jammed.
A problem occurred
inside the printer.
The printer is
not receiving
data from the
computer.
Printouts seem
faded on one
side of the
page.
The printer is not ready.
Make sure the printer is online (the
Ready indicator is lit) and the
message window reads IDLE/
MAGICOLOR 2300DL.
The interface cable(s)
may not be properly
attached.
Make sure that the interface cable(s)
are securely plugged in.
The printer is not on a
level enough surface.
Level the printer surface. It should not
exceed ±1° slant in any direction (for
example, a round pencil laid on the
surface shouldn’t roll in any direction).
Troubleshooting
17
If you’ve followed all of the instructions and still have problems you can’t
solve, refer to the User’s Guide or see the Service & Support Guide for
sources of service and support in the Americas and how to contact the
MINOLTA-QMS office closest to you. The most up-to-date worldwide
information can be found at www.minolta-qms.com.
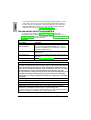
Accessories and Consumables
Contact your local vendor or www.minolta-qms.com for purchase
information, parts numbers, and pricing. To order approved media, go to
www.q-shop.com. If you have any questions, refer to www.minolta-qms.com/
support, then click on the Answer Base.
Accessories
Description
Dual In-Line Memory
Modules (DIMMs)
Remark(s)
Additional memory must be 128 or 256 MB, PC-100- or
PC-133-Compliant SDRAM DIMMs, up to a printer
maximum of 288 MB (one slot available). The printer
ships with 32 MB on board.
Duplex option
Only plain paper, 60–90 g/m2 (16–24 lb), can be
autoduplexed.
This provides an optional 500-sheet media tray (A4 or
letter only).
Check www.minolta-qms.com for availability.
Lower feeder unit
Other accessories
Consumables
Consumable life is expressed in simplex A4/letter pages at normal 5%
coverage in continuous printing. A duplex page is equivalent to two simplex
pages. The stated life expectancy of each consumable is based on printing
under specific operating conditions, such as media type and size. The actual
life expectancy will vary (or be reduced) depending on these and other
printing variables, including average print job size, ambient temperature, and
humidity. The average continuous print job size is defined as a four-page
simplex job. The average intermittent print job size is defined as a one-page
simplex job.
Toner cartridge—standard capacity (Cyan, Magenta, Yellow and Black)
Toner cartridge—high capacity (Cyan, Magenta, Yellow and Black)
OPC drum cartridge
Waste toner bottle
Notes: Refer to the User’s Guide in PDF on the Utilities and Documentation
CD-ROM for consumable life expectancies. Your printer ships with
standard-capacity Cyan, Magenta, Yellow and Black toner cartridges. Replacement
Black toner cartridges are available only in high-capacity size.
18
Accessories and Consumables
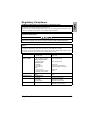
Regulatory Compliance
CE Marking (Declaration of Conformity) For European Users
This product complies with the following EU directives: 89/336/EEC, 73/23/EEC, and 93/68 EEC directives.
This declaration is valid for the areas of the European Union.
This device must be used with shielded interface cables. The use of non-shielded cable is likely to result in
interference with radio communications, and is prohibited under EU directives.
Electro-Magnetic Interference For All Users (Except for American and
Canadian Users) Users
This is a Class B product. In a domestic environment, this product may cause radio
interferences in which case the user may be required to take adequate measures.
Interference-causing Equipment Standard (ICES-003 ISSUE 3) For Canada
Users
This Class B digital apparatus complies with Canadian ICES-003.
Cet appareil numérique de la classe B est conforme à la norme NMB-003 du Canada.
This devise must be used with shielded interface cables. The use of non-shielded cable is likely to result in
interference with radio communications, and is prohibited under ICES-003.
cTick Mark
Electromagnetic
Emissions (EMI)
Energy Saver
Immunity Requirements (EU)
Product Safety
Laser Safety
ACA (Australia)
AS/NZS 3548
FCC (USA)
Title 47 CFR Ch. I, Part 15
Industry Canada (Canada)
ICES-003 Issue 3
International (EU)
EN 55022
EN 61000-3-2
EN 61000-3-3
Japan
VCCI V-3/01.04
Harmonic Current Measure
Guideline (2001) of JBMIA
ENERGY STAR (USA, EU and
Japan)
International (EU)
EN 55024
UL (USA)
cUL (Canada)
International (EU)
CDRH (USA) International (EU)
Regulatory Compliance
Class B ITE
Class B Digital Device
Class B Digital Device
Class B ITE
Harmonic Current Emissions
Voltage Fluctuations and Flicker
Class B ITE
Class A
ENERGY STAR Compliant in basic configuration
Immunity Characteristics
UL 60950,
CAN/CSA C22.2 60950
EN 60950 and IEC 60950
Title 21 CFR Ch. I, Subchapter J
EN 60825-1 and IEC 60825-1
19
FCC Compliance Statement For American Users
This equipment has been tested and found to comply with the limits for a Class B digital device, pursuant to
Part 15 of the FCC Rules. These limits are designed to provide reasonable protection against harmful
interference when the equipment is operated in a commercial installation. This equipment generates, uses,
and can radiate radio frequency energy and, if not installed and used in accordance with the instruction
manual, may cause harmful interference to radio communications. However, there is no guarantee that
interference will not occur in a particular installation. Operation of this equipment in a residential area is
likely to cause harmful interference, in which case, the user will be required to correct the interference at his
own expense.
If this equipment does cause harmful interference to radio or television reception, which can be determined
by turning the equipment off and on, the user is encouraged to try to correct the interference by one or more
of the following measures:
Reorient or relocate the receiving antenna.
Increase the separation between the equipment and receiver.
Connect the equipment into an outlet on a circuit different from that to which the receiver is connected.
Consult the dealer or an experienced radio/TV technician for help.
This device must be used with shielded interface cables. The use of non-shielded cable is likely to result in
interference with radio communications, and is prohibited under FCC rules.
Attention
Any modifications or changes to this product not expressly approved in writing
by the manufacturer responsible for compliance to Federal Regulations could
void the user’s authority to operate this product within the Laws and
Regulations of the Federal Communications Commission.
Safety Information
Toner
Do not throw the toner cartridge or toner into an open flame. The hot toner may
scatter and cause burns or other damage.
CAUTION: Keep out of reach of children.
Laser Safety
This printer is a page printer which operates by means of a laser. There is no possibility of danger from the
laser, provided the printer is operated according to the instructions in this manual.
Since radiation emitted by the laser is completely confined within protective housings and external covers,
the laser beam cannot escape from the machine during any phase of user operation.
This printer is certified as a Class 1 laser product under the U.S. Department of Health and Human
Services (DHHS) Radiation Performance Standard according to the Radiation Control for Health and
Safety Act of 1968. This means that the printer does not produce hazardous laser radiation.
Internal Laser Radiation
Maximum Average Radiant Power: 4.68 µW at the surface of the OPC drum
Wavelength: 770–795 nm
This product employs a Class IIIb Laser Diode that has an invisible laser beam. The Laser Diode and
Scanning Polygon Mirror are incorporated in the print head unit. The print head is in the interior of the
printer in front of the toner cartridge. The laser beam is emitted from the print head unit, and then is
radiated through the laser aperture to the interior of the printer.
20
Safety Information
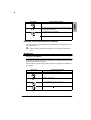
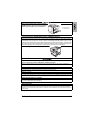
The internal components of the print head
unit are NOT A FIELD SERVICEABLE
ITEM. Therefore, the print head unit should
not be opened under any circumstances.
1 - Print head unit
2 - Laser aperture
1
2
Laser Caution For United States Users—CDRH Regulations
This printer is certified as a Class I laser product under the Regulation Performance Standard according to
the Food, Drug, and Cosmetic Act of 1990. Compliance is mandatory for laser products marketed in the
United States, and is reported to the Center for Devices and Radiological Health (CDRH) of the U.S. Food
and Drug Administration (FDA) of the Department of Health and Human Services (DHHS). This means that
the product does not produce hazardous laser radiation.The label shown below indicated compliance with
the CDRH regulations and must be attached to laser products marketed in the United States.
Laser Safety Label—CDRH Requirement
CAUTION: Use of controls, adjustments, or performance other than those specified
in this manual may result in hazardous radiation exposure.
This is a semiconductor laser. The maximum power of the laser diode is 5 mW, and the wavelength is
770–795 nm.
International Notices—Power Cord
The following power cord requirements are in effect for your 230 V printer.
Minimum: 0.75 mm2
Minimum: H05 VV - F
The male plug is certified in the country in which the equipment is to be installed, and the female plug is an
IEC 60320 connector.
International Notices—Voltage
Attention Norwegian users: This equipment is designed to operate within an IT power system where the
line-to-line voltage does not exceed 240 V.
Ozone Release
During printer operation, a small quantity of ozone is released. This amount is not large enough to harm
anyone adversely. However, be sure the room where the printer is being used has adequate ventilation,
especially if you are printing a high volume of materials, or if the machine is being used continuously over
a long period.
Safety Information
21
Warranty Considerations
Various factors can affect a printer’s warranty, such as electrostatic damage, unsupported consumables, and other actions listed below. Read your
printer warranty carefully. For information about your warranty, go to
www.minolta-qms.com/support, then click on the Answer Base.
If MINOLTA-QMS printer failure or damage is found to be directly attributable to the use of non-MINOLTA-QMS approved consumables, print media,
and/or accessories, MINOLTA-QMS will not repair the printer free of charge.
In this case, standard time and material charges will be applied to service
your printer for that particular failure or damage.
These Actions Will Result in Voiding Your Warranty
Print Media
Use of nonsupported media, such as inkjet paper.
Electrostatic
Discharge
Instructions
Modifications
Consumables
See “Using Media” in the User’s Guide for approved
media. Contact your local vendor or
www.minolta-qms.com for purchase information.
Failure to protect the printer controller board and any
associated daughterboard or module from electrostatic
discharge or damage while performing any task involving
the controller board.
Failure to follow instructions in the printer documentation.
Any modifications or changes to this product not expressly
approved in writing by the manufacturer responsible for
compliance to Federal Regulations could void your
authority to operate this product within the Laws and
Regulations of the Federal Communications Commission.
Use of consumables not manufactured or supported by
MINOLTA-QMS. Any damage to the printer or quality
problems caused by a refilled toner cartridge use.
Any damage resulting from mishandling the OPC or toner
cartridge.
OPC Drum
Cartridge and
Toner Cartridge
Accessories
Use of accessories not manufactured/supported by
MINOLTA-QMS.
22
Warranty Considerations