1
MITEL
CLOUD ENDPOINT
MITEL 5360 SIP PHONE USER AND
ADMINISTRATION GUIDE
RELEASE 6.0
Mitel 5360 SIP Phone User Guide
NOTICE
The information contained in this document is not warranted by Mitel Networks Corporation or any of its
affiliates or subsidiaries ("Mitel") and is subject to change without notice. Mitel assumes no liability for any
errors or omissions. This document may be reproduced, either wholly or in part, solely for distribution to
authorized users of Mitel's products.
TRADEMARKS
Mitel is the registered trademark of Mitel Networks Corporation.
Windows and Microsoft are trademarks of Microsoft Corporation.
Other product names mentioned in this document may be trademarks of their respective companies and
are hereby acknowledged.
Mitel 5360 SIP Phone User and Administration Guide
Cloud Endpoint Release 6.0
March 2014
®,™ Trademark of Mitel Networks Corporation
© Copyright 2014, Mitel Networks Corporation
All rights reserved
- ii -
Table of Contents
GETTING STARTED ................................................................................................. 1 SIP User Accounts and Passwords ..................................................................................... 1 SIP Administrative Mode ..................................................................................................... 1 About your SIP Phone ......................................................................................................... 1 Elements of Your Phone...................................................................................................... 3 Ring/Message Indicators ..................................................................................................... 4 Using Your IP Phone with Mitel Unified Communicator Express......................................... 4 HTML Applications............................................................................................................... 4 TIPS FOR YOUR COMFORT AND SAFETY ............................................................ 5 Don't Cradle the Handset! ............................................................................................................... 5 Protect your Hearing ....................................................................................................................... 5 Adjust the Viewing Angle................................................................................................................. 5 USING YOUR DEFAULT PHONE WINDOW ............................................................ 6 5360 SIP Phone Default Window ........................................................................................ 7 Gadget Sidebar on the 5360 SIP Phone ............................................................................. 7 USING APPLICATIONS ON THE 5360 SIP PHONE ................................................ 9 Accessing Your Phone Applications .................................................................................... 9 Tips for Setting up Your Phone and Touch Screen ............................................................. 9 Call Encryption................................................................................................................... 10 SUPPORTING DOCUMENTATION ........................................................................ 11 Accessing the Web Configuration Tool Online Help .......................................................... 11 Accessing Other Documentation ....................................................................................... 11 CUSTOMIZING YOUR PHONE............................................................................... 12 MENU Key Menu Interface ................................................................................................ 12 Web Configuration Tool ..................................................................................................... 12 Web Configuration Tool Accounts and Passwords....................................................................... 12 Accessing the Web Configuration Tool ......................................................................................... 13 Using the Settings Application ........................................................................................... 13 Specify Text Size ............................................................................................................... 14 - iii -
Mitel 5360 SIP Phone User Guide
Calibrate the Display.......................................................................................................... 14 Cleaning Your 5360 SIP Phone......................................................................................... 14 Text Entry .......................................................................................................................... 14 Text Entry Window ........................................................................................................................ 15 Keyboards ..................................................................................................................................... 16 Adjust the Ringer ............................................................................................................... 17 Handset Volume Control.................................................................................................... 18 Speaker Volume Control.................................................................................................... 18 Display Contrast Control.................................................................................................... 18 SETTING UP YOUR CONTACT LIST..................................................................... 19 Adding Names to Your Contact List................................................................................... 19 Editing Information in Your Contact List ............................................................................ 19 USING THE CALL HISTORY APPLICATION......................................................... 20 View Call History Details.................................................................................................... 20 Delete Call History ............................................................................................................. 21 CALL FORWARDING ............................................................................................. 22 PROGRAMING FEATURES ON YOUR KEYS ....................................................... 23 MAKING AND ANSWERING CALLS ..................................................................... 24 Dial by Number .................................................................................................................. 24 Dial by Name ..................................................................................................................... 24 Dial by SIP URL or IP Address .......................................................................................... 24 Dial using the People Application ...................................................................................... 24 Dial using the Call History Application ............................................................................... 25 Answer a Call..................................................................................................................... 25 Auto Answer ...................................................................................................................... 25 Answer a Call Waiting........................................................................................................ 26 Calling and Called Party Display ....................................................................................... 26 Handsfree Operation ......................................................................................................... 26 - iv -
Table of Contents
CALL HANDLING ................................................................................................... 28 Hold ................................................................................................................................... 28 Hold a Call..................................................................................................................................... 28 Retrieve a Call from Hold .............................................................................................................. 28 Change On-Hold Settings ............................................................................................................. 28 Call Forward ...................................................................................................................... 28 Mute................................................................................................................................... 29 Transfer ............................................................................................................................. 29 Transfer a Call to a Third Party Already on Hold .......................................................................... 30 Conference ........................................................................................................................ 30 Add a Party On Hold to a Call in Progress.................................................................................... 30 Return to a Conference Call after Accepting an Outside Caller.................................................... 30 Messages - Advisory ......................................................................................................... 31 USING ADVANCED FEATURES ............................................................................ 32 Do Not Disturb ................................................................................................................... 32 Call History ........................................................................................................................ 32 Handset, Handsfree and Headset Modes.......................................................................... 32 Switch between Handset and Handsfree ...................................................................................... 32 Switch between Handset and Headset ......................................................................................... 33 Switch between Headset and Handsfree ...................................................................................... 33 People................................................................................................................................ 33 RSS Feed .......................................................................................................................... 33 Enable/Disable RSS Feed............................................................................................................. 34 Shared Lines and Keys...................................................................................................... 34 Shared Lines and Keys Programming Requirements................................................................... 34 Programming Shared Line Keys ................................................................................................... 40 Shared Line Key Status................................................................................................................. 41 Programming Busy Lamp Field Keys............................................................................................ 42 Time and Date ................................................................................................................... 48 ADMINISTRATOR TOOLS ..................................................................................... 49 SIP Administrator Phone Passwords ................................................................................. 49 USING YOUR PHONE WITH THE CORDLESS MODULE AND ACCESSORIES . 50 Elements of Your Cordless Module and Accessories ........................................................ 51 -v-
Mitel 5360 SIP Phone User Guide
Handset/Headset Combinations ........................................................................................ 52 Pairing the Cordless Module and Accessories .................................................................. 52 Pairing a DECT Cordless Accessory with a DECT Cordless Module........................................... 52 Pairing a Bluetooth Accessory with a Bluetooth Module............................................................... 53 Unpairing an Accessory ................................................................................................................ 54 Cordless Module LED Indicators ....................................................................................... 54 Using the Mute Key on a Cordless Device ........................................................................ 54 Using the Volume Keys on Cordless Device ..................................................................... 55 USING THE MITEL CORDLESS HANDSET .......................................................... 56 Elements of the Cordless Handset .................................................................................... 56 Answer a Call..................................................................................................................... 57 Hang up ............................................................................................................................. 57 Dialing – Auto Dial Disabled .............................................................................................. 57 Dialing – Auto Dial Enabled ............................................................................................... 57 Handset Alerting Tones and LEDs .................................................................................... 58 USING THE MITEL DECT CORDLESS HEADSET ................................................ 60 Answer a Call..................................................................................................................... 60 Hang Up............................................................................................................................. 60 Dialing – Auto Dial Disabled .............................................................................................. 61 Dialing – Auto Dial Enabled ............................................................................................... 61 Headset Alerting Tones and LEDs .................................................................................... 61 USING A BLUETOOTH HEADSET......................................................................... 63 Answer a Call..................................................................................................................... 63 Hang Up............................................................................................................................. 63 Dialing – Auto Dial Disabled .............................................................................................. 63 Dialing – Auto Dial Enabled ............................................................................................... 64 USING THE CORDLESS DEVICES APPLICATION............................................... 65 Low Battery Level .............................................................................................................. 65 Viewing Cordless Module Information ............................................................................... 65 - vi -
Mitel 5360 SIP Phone User Guide
GETTING STARTED
In SIP mode, the Mitel® 5360 SIP Phone manages its own call states and features. SIP uses
the Internet to connect your phone to other SIP phones. You can make calls on the Public
Switched Telephone Network (PSTN), or “regular”, phone network. If you are registered with
a SIP Service Provider, you may also be able to dial by user ID, name (when using the
People Application, page 24), or extension number.
For information about programming features on your SIP-supported phone, refer to this guide
and to the Web Configuration Tool online Help (see Supporting Documentation on page 11).
SIP User Accounts and Passwords
Your Administrator usually configures SIP accounts for SIP phone Users and Administrators.
You need a SIP User account in order to Register your phone with your SIP Service Provider.
If you do not have a SIP user account, you can still use your phone with limited access to SIP
features and functionality.
SIP Administrative Mode
Administrators need an administrator user account and password to:
Modify network configuration settings and SIP Service Provider information
Access SIP setting menus through the Web Configuration Tool Administrator pages.
See Administrator Tools on page 49 for more information.
About your SIP Phone
The Mitel® 5360 SIP Phone is a high-end color phone with a touch display that delivers
graphically rich applications. It is a full-feature enterprise-class phone that provides a large
color backlit graphics display with 48 programmable self-labeling keys, six intuitive call state
sensitive softkeys, superior sound quality, and a built-in HTML toolkit for desktop applications
development.
Equipped with a Gadget Sidebar, the seven-inch display enables one-touch access to
embedded or internet-based content and applications. The Gadget Sidebar provides you with
a quick launch tool for embedded applications as well as HTML applications.
The 5360 SIP Phone is compatible with the Mitel MiVoice Business platform. The 5360 SIP
Phone is ideal for any enterprise executive or manager, Teleworker, and Contact Center
supervisor. The 5360 SIP Phone also features a Unified Communicator (UC) Express
application, which is a PC-based desktop programming tool, that allows you to easily
configure your phone from your Personal Computer (PC).
For more key and feature information, see Elements of Your Phone on page 3.
-1-
Mitel 5360 SIP Phone User Guide
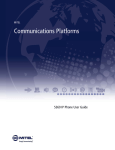
The 5360 SIP Phone
-2-
Mitel 5360 SIP Phone User Guide
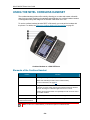
Elements of Your Phone
Feature
1) Display
Function
Provides a large, high-resolution touch screen that assists you in selecting and
using phone features and applications.
The display area provides 48 self-labeling buttons that can be programmed as
speed call keys, fixed function keys, hard keys, applications, or line appearance
keys, according to your communication needs. On your home page, the bottom
right feature key is always your Prime Line key.
2) Ring/Message Indicator
Flashes to signal an incoming call and to indicate a message waiting in your
voice mailbox.
3) Volume, Speaker
and Mute Controls
Provide the following audio control capability:
4) Fixed Function Keys
(UP) and
(DOWN) provide volume control for the ringer,
handset, and handsfree speakers.
(SPEAKER) enables and disables Handsfree mode.
(MUTE) enables Mute, which allows you to temporarily turn your
phone's handset, headset or handsfree microphone off during a call.
Give you access to the following phone functions:
(MENU): provides access to menus for your phone's applications and
settings.
(CANCEL): ends a call when pressed during the call, and, when you
are programming the phone, eliminates any input and returns to the
previous menu level.
(REDIAL): calls the last number dialed.
(HOLD): places the current call on hold.
(TRANS/CONF): initiates a call transfer or establishes a three-party
conference call.
(MESSAGE): provides access to your voice mailbox and flashes to
notify you of messages waiting in your voice mailbox. Note: The
Ring/Message indicator also flashes when messages are waiting.
5) Keypad
Use to dial.
6) Gadget Sidebar
Provides up to nine quick launch icons that allow you to quickly navigate to any
application (including the Phone/Home icon).
7) Navigation Page
Keys and Context Icon
Use navigation keys to display additional pages of information. There are two
page navigation keys: Back and Next. Additionally, a context icon shows the
application in use.
8) Handsfree Speaker
Provides sound for Handsfree calls and background music.
9) Handset
Use for handset calls. If you are in headset or handsfree mode, you do not need
to use the handset.
-3-
Mitel 5360 SIP Phone User Guide
Ring/Message Indicators
When indicator is
it means that
Flashing rapidly
Your phone is ringing
Flashing slowly
A message or callback message is waiting at your phone
On
Your phone is ringing another phone
Off
Your phone is idle, or you are on a call
Using Your IP Phone with Mitel Unified Communicator Express
When used with the Unified Communicator® Express application, the 5360 SIP Phone
becomes a powerful communications tool that helps streamline communications between
people and organizations. This leads to improved productivity, enhanced customer service,
reduced costs, and ultimately improved business process integration. See the appropriate
user guide at http://edocs.mitel.com for details.
HTML Applications
Your 5360 SIP Phone may have HTML Applications available for customized use. The HTML
Desktop Toolkit enables simple, intuitive development of customized applications that are
easily integrated with telephony functions of your 5360 SIP Phone.
-4-
Mitel 5360 SIP Phone User Guide
TIPS FOR YOUR COMFORT AND SAFETY
Don't Cradle the Handset!
Prolonged use of the handset can lead to neck, shoulder, or back discomfort, especially if you
cradle the handset between your ear and shoulder. If you use your phone a lot, you may find
it more comfortable to use a headset. See the section on headset usage elsewhere in this
guide for more information.
Protect your Hearing
Your phone has a control for adjusting the volume of the handset receiver or headset.
Because continuous exposure to loud sounds can contribute to hearing loss, keep the
volume at a moderate level.
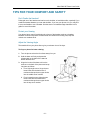
Adjust the Viewing Angle
The stand built into your phone tilts to give you a better view of the keys.
To tilt your phone for better viewing:
1. Turn the phone so that the front faces away from you.
2. Hold the base unit firmly and press the
release tabs on the sides of the stand to
detach the base unit.
3. Hinge the hooks of the base unit into the
notches on the back of the phone and snap
into place as follows:
a. For a high-angle mount, hinge the two
lower hooks into the bottom set of
notches and snap the two upper hooks
into the middle set of notches.
b. For a low-angle mount, hinge the two
lower hooks into the middle set of
notches and snap the two upper hooks
into the top set of notches.
-5-
Mitel 5360 SIP Phone User Guide
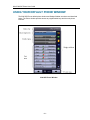
USING YOUR DEFAULT PHONE WINDOW
The 5360 SIP Phone default phone window and Gadget Sidebar are shown and described
below. The Phone window provides access to programmable keys and the main phone
interface.
5360 SIP Phone Window
-6-
Mitel 5360 SIP Phone User Guide
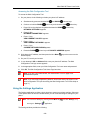
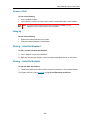
5360 SIP Phone Default Window
Feature
1) Status Bar
Function
Displays time, date, and icons indicating feature states as follows:
Call History (
Call Forward Always On (
activated.
Message Waiting (
Headset (
DND (
) – Indicates new missed calls
) – Indicates Call Forward Always is
) - Indicates new voice mail.
) - Indicates that the phone is in headset mode.
) - Indicates DND (Do not disturb) mode.
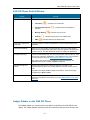
2) Information Display/User
Prompt Area
Provides prompts in most phone applications. Content changes based on the
application.
3) Control Area/Softkeys
Allow you to access specific call control features, which are context sensitive.
These are non-programmable feature keys, which are specific to the application
or state of the set. The 5360 SIP Phone provides six softkeys for applications.
4) Programmable Keys
Provides 48 self-labeling keys that can be programmed as speed call keys, fixed
function keys, hard keys, applications, or line appearance keys. For instructions
on programming the keys, see Programming Features on Your Keys.
This dynamic area is also used for displaying components based on the
applications being used, including a QWERTY keyboard.
5) Navigation Page Keys
(Footer)
Shows context and summary information based on information in the
Programmable Keys area, such as Page Indicators, numbers of items, and so
forth.
Navigation keys display additional pages of information. There are two page
navigation keys: Back and Next.
6) Gadget Sidebar
Provides up to nine quick launch icons that allow you to quickly navigate to any
application (including the Phone/Home icon). See Gadget Sidebar on the 5360
SIP Phone.
Gadget Sidebar on the 5360 SIP Phone
The Gadget Sidebar is a vertical bar that runs down the right side of the 5360 SIP Phone’s
display. The Gadget Sidebar contains a series of icons that provide one-touch access to the
-7-
Mitel 5360 SIP Phone User Guide
most commonly accessed phone applications and features, including HTML applications. The
Gadget Sidebar is designed to accommodate up to nine quick launch icons, including the
Phone icon, which always returns you to the main phone screen. The Gadget Sidebar
consists of the following icons for applications:
Call History
People
Settings
Backlight/Light bulb (for turning off the backlight)
-8-
Mitel 5360 SIP Phone User Guide
USING APPLICATIONS ON THE 5360 SIP PHONE
Your 5360 SIP Phone provides applications that simplify the use of your phone. This table
describes the applications that you may have on your 5360 SIP Phone. The associated icon
appears on the Gadget Sidebar or as a context icon in the navigation area. Simply touch the
Gadget Sidebar icon to open the application.
Applications/Icons
Call History
People/Contact List
Settings
Function
Use the Call History application to display lists of the calls that you have missed,
made, and answered. This feature allows you to filter the call records and display
information on each call on the list. See Using the Call History Application for
more information.
Use the People application to add, delete and edit contact names and numbers.
You can also dial anyone on your contact list from the People application. The
People window displays up to eight contacts per page, ordered alphabetically by
last name. For information on using the People application, refer to Setting Up
Your Contact List and Dial From Your People Application.
Use the Settings application to display and quickly change your phone’s current
communications settings. See Using the Settings Application for more
information.
Turns the backlight off.
Backlight On/Off
Press the Home icon to bring you back to the main Phone/Home window.
Phone/Home
Accessing Your Phone Applications
To open the Applications window, press the blue Menu key
window gives the current list of your phone’s applications.
. The Applications home
To open an application, touch the specific application icon on the Gadget Sidebar or touch
the application name on the display.
For information on programming features and applications, see Programming Features On
Your Keys.
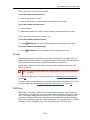
Tips for Setting up Your Phone and Touch Screen
After you receive your 5360 SIP Phone, use the options in the Settings application to
customize your phone.
Calibrate your display for maximum touch accuracy. You may also want to turn on the
button beep to receive an audible tone that indicates you have engaged the button or
icon. See Error! Reference source not found. and Calibrate the Display.
-9-
Mitel 5360 SIP Phone User Guide
Call Encryption
The 5360 SIP Phone provides both Secure Real-time Transport Protocol (SRTP) and
Transport Layer Security (TLS) for voice encryption when connected to a phone that also
supports SRTP or TLS. SRTP is enabled by default. You can enable SRTP or TLS on your
phone using the Media Configuration page of the Web Configuration Tool. SRTP is the
default setting. (See Accessing the Web Configuration Tool Online Help on page 11.)
- 10 -
Mitel 5360 SIP Phone User Guide
SUPPORTING DOCUMENTATION
Accessing the Web Configuration Tool Online Help
To access programming instructions in the Web Configuration Tool online Help:
1. Access the Web Configuration Tool Home Page (see
Note: For Administrator default user name and password, see Administrator Tools on page
49.
3. Accessing the Web Configuration Tool on page Error! Bookmark not defined. ).
4. Scroll to the bottom of the page.
5. In the left pane, under Support, click Help. The Help system opens, presenting links to
the User Web Configuration Tool online Help and to this guide.
Note: If you have administrative privileges, you will have access to both the User and
the Administrator Web Configuration Tool online Help systems.
Accessing Other Documentation
To access other Mitel phone and peripheral documentation, in your browser, go to
http://edocs.mitel.com/UG/Index.html.
- 11 -
Mitel 5360 SIP Phone User Guide
CUSTOMIZING YOUR PHONE
To customize and use your phone features, use either of the following two interfaces:
Menu Key Menu Interface
Web Configuration Tool
MENU Key Menu Interface
The fixed-function keys provide access most features on your phone. The phone’s Settings
menu interface provides access to additional features.
To access the Settings menu interface, press the blue Menu key
.
Web Configuration Tool
The Web Configuration Tool is a tool that you can use in addition to your phone to make calls
and to personalize and modify your phone settings.
You can access the Web Configuration Tool from any personal computer (PC) connected to
the Internet and running a web browser that is one of the following:
Mozilla Firefox 14 or later
Internet Explorer 8 or later
Any equivalent browser
Note: If your network is protected by a firewall, you may not be able to access your
phone using the Web Configuration Tool from outside the firewall.
Web Configuration Tool Accounts and Passwords
You must have either a User or Administrator account to access the tool. Your account
determines the type of web configuration pages you can access when you connect to the
phone.
Your Administrator may change the default user name and password settings. If necessary,
obtain your new user name and password from your Administrator.
Table 1: Web Configuration Tool Default User Name and Password
Default User Name
User
User's DN
Default Password
hello
Note: For Administrator default user name and password, see Administrator Tools on page
49.
- 12 -
Mitel 5360 SIP Phone User Guide
Accessing the Web Configuration Tool
To access the Web Configuration Tool:
1. On your phone, do the following to obtain your phone’s IP address:
a. Simultaneously press and hold the UP
b. Continue to hold the DOWN
c.
and DOWN
volume keys.
volume key and release the UP
Press 234 on the telephone keypad and release the DOWN
NETWORK SETTINGS? appears.
volume key.
volume key.
d. Press #. (No).
NETWORK PARAMETERS? appears
e. Press * (Yes).
VIEW CURRENT VALUES? appears.
f.
Press * (Yes).
VIEW CURRENT NETWORK? appears.
g. Press * (Yes).
CURRENT NETWORK PARMS appears.
h. Press the DOWN
volume key until PHONE IP ADDRESS appears.
2. Write down the IP address, and then press the blue Menu
default display.
key twice to return to the
3. On your PC, launch your browser.
4. In your browser’s URL or Address field, enter your phone’s IP address. The Web
Configuration Tool login screen appears.
5. In the appropriate fields, enter your Web Configuration Tool user name and password.
6. Click OK. The Web Configuration Tool Home Page launches.
Note: If you are a SIP Administrator, see Administrator Tools on page 49 for
administrative options.
Note: If you need help programming features, access the online help system in the
Web Configuration Tool (see Accessing the Web Configuration Tool Online Help on
page 11).
Using the Settings Application
The Settings application provides a single location to access your phone settings. Select any
of the options below to access a window where you can view and configure settings for your
phone.
Note: You can access Settings by pressing the blue Menu key
touching the Settings
application
The Settings window provides the following:
- 13 -
, and then Settings, or by
Mitel 5360 SIP Phone User Guide
Text Size: Allows you to specify the font size (large or small) for the 5360 SIP Phone.
Calibrate Display: Allows you to calibrate the touch display for optimum touch sensitivity.
About 5360 SIP Phone: This screen displays the software release.
Specify Text Size
To specify the text size that displays on the phone:
1. Press the blue Menu key
-orTouch the Settings
, then press Settings.
application.
2. Press Text Size.
3. Select Large Text or Small Text.
4. Press Save.
Calibrate the Display
To calibrate the phone screen for touch accuracy:
1. Press the blue Menu key
-orTouch the Settings
, then press Settings.
application.
2. Press Calibrate Display.
3. Touch the center of each + to calibrate the display.
Cleaning Your 5360 SIP Phone
You can wipe clean the touch screen of your 5360 SIP Phone without causing touch-sensitive
controls to be activated.
1. Press the blue Menu key
.
2. Press Clean Mode.
3. Clean the screen of your phone.
4. Press the blue Menu key
to end Clean Mode.
Text Entry
The Text Entry feature provides a standard set of windows used by all applications for
accepting user-entered text and numeric data. The Text Entry window opens when an
application requires text input.
The People Application uses the Text Entry feature.
- 14 -
Mitel 5360 SIP Phone User Guide
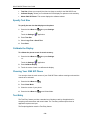
Text Entry Window
The Text Entry window remains open during calls and other activities (see diagram below).
For example, if you are entering the text of a Programmable Key label in the Settings
application, and you receive an incoming call, the Text Entry’s window will remain open even
though it is hidden. When you eventually re-display Settings, the edit window reappears in
the same state as when Settings was hidden.
The user interface consists essentially of
An Input Area that displays up to a maximum of two lines of text.
Text manipulation Control Keys, such as cursor right, cursor left, backspace, clear, and
delete digit.
Control Keys for saving and canceling the user’s input
Keyboard
Navigation Keys
Status Line
The Text Entry window’s Status Line displays either a text string or the time and date and this
depends on the application that requires text entry.
- 15 -
Mitel 5360 SIP Phone User Guide
Input Area
The Input area lets you see the text as you enter it, either in the name or number field.
Text Manipulation Control Keys
The text manipulation control keys provided in the Text Entry window are Cursor Left, Cursor
Right, Backspace, Clear, and Delete Digit.
To use these control keys, an Input Field must be selected.
The Cursor Left (
) and Cursor Right (
) keys move the cursor left and right,
respectively, in the Input Field without deleting characters.
The Backspace (
The Clear (
) key removes the character to the left of the cursor in the Input Field.
) key removes all characters from the Input Field.
) key deletes a character to the right of the cursor in the Input Field. If
The Delete Digit (
there is no character following the cursor the Backspace key is ignored.
Note: In some applications a Delete Digit key will be displayed instead of the Clear key.
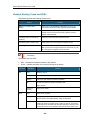
Keyboards
Two keyboard interfaces are provided for Text Entry: a numeric keyboard interface and an
alphanumeric keyboard as described below.
Alphanumeric Keyboard
The alphanumeric keyboard consists of consists of thirty-six character keys, space and three
control keys. The thirty-six character keys can be shifted case to provide thirty-six additional
characters, providing a total of seventy-three different characters for data input.
The character set includes the Space key, the numbers 0 through 9, the letters of the English
language in both lowercase and uppercase and a subset of other Unicode characters which
would be similar to the ASCII characters provided on a typical PC keyboard.
The Alphanumeric keyboard has four Character Keys views; only one view can be displayed
at a time.
Default view: This view consists of the lowercase version of the letters and numbers.
- 16 -
Mitel 5360 SIP Phone User Guide
Shifted Default view: This view consists of the uppercase version of the letters and the
supported Unicode characters.
Caps view: This view consists of the uppercase version of the letters and regular
numbers.
Shifted Caps view: This view consists of the lowercase version of the letters and the
supported Unicode characters.
Special Character view: This view consists of the supported symbols and the supported
accented characters. Unlike the three views above, this view has a matrix layout and
consists of more than one page of characters.
Numeric Keyboard
The numeric keyboard interface is used when the Input Field requires phone numbers or
other numerical input. The numeric keyboard provides nineteen character keys that represent
the standard dial pad on a phone: the numbers 0 through 9, the * key and the # key. The
numbers appear as they would on a typical telephony dial pad. The seven remaining
character keys include the Space key, -, +, (, ), Pause and Flash.
Note: Some of the last seven character keys may not be displayed if the host application does
not require them.
Pressing a character key adds the character associated with the key to the left of the cursor
in the input field. The Pause and Flash character keys will appear as P and F, respectively, in
the input field.
Numeric Keyboard
Some input buttons will not be available in some applications depending on the input
required.
The keypad normally used for dialing calls can be used to enter numbers when the numeric
keyboard is displayed.
Adjust the Ringer
Adjust the ringer volume when the phone is ringing:
Press
(UP) or
(DOWN)
Note: If the phone is in talk state, this action adjusts the volume of the handset,
headset or speaker.
- 17 -
Mitel 5360 SIP Phone User Guide
Handset Volume Control
To adjust handset volume:
When the handset is in use, press
(UP) or
(DOWN)
Speaker Volume Control
When on a handsfree call, press
(UP) or
(DOWN)
Display Contrast Control
To adjust display contrast:
When the phone is idle, press
(UP) or
- 18 -
(DOWN)
Mitel 5360 SIP Phone User Guide
SETTING UP YOUR CONTACT LIST
Use the People application
to set up your contact list.
Adding Names to Your Contact List
You can add a name to your contact list by entering it directly using the People application or
by copying a number using the To People from Call History.
To add a name to your contact list using the People application:
1. Open the People application.
2. Press New.
3. Enter the name using the on-screen keyboard and press the appropriate letters to spell
the first name of your contact.
4. Press Edit Number and using the on-screen numeric keyboard or the keypad, enter the
number.
5. Press Save.
6. Press Close.
Editing Information in Your Contact List
1. Open the People application.
2. Press the name you wish to edit.
Note: If you wish to delete the name from your contact list, press Delete.
3. Press Edit … .
4. In the on-screen keyboard, update the appropriate information for the name.
5. Press Edit Number and using the on-screen numeric keyboard or keypad, edit the
number.
6. Press Save.
7. Press Close.
- 19 -
Mitel 5360 SIP Phone User Guide
USING THE CALL HISTORY APPLICATION
Use the Call History application
to display details of your most recent 50 calls. The
maximum number of entries for each type of call are:
Missed: 20
Made: 15
Answered: 15
After the 50-call limit has been reached, the oldest call is replaced each time a new call is
missed, made, or answered.
From this application, you can
display calls by type
display detailed information (if available) for the calls
return missed calls by pressing a key
delete or modify digits before saving or dialing a call
delete calls
View Call History Details
To view call history details:
1. Press Call History.
2. Press
Missed to view your missed calls (if any).
All to view a list of all calls
Answered to view a list of your incoming calls
Made to view a list of your outgoing calls.
3. Use the navigation keys at the bottom of the display to move to the previous or next page
of calls. The total number of pages in the current list is shown at the bottom of the
display.
to the right of the call item to call the contact
4. Press the Dial icon
or
Press on a Call item to display the call details:
Name and number (if available)
Call type and number of attempts (for example, Missed, 2x)
Type of call: Transfer (Tsf.) or Conference (Conf.)
Time and date of the call
Duration of call in hours:minutes:seconds (for Made and Answered calls).
- 20 -
Mitel 5360 SIP Phone User Guide
5. Do one of the following:
If necessary, use the keypad cursor left, cursor right, Delete, and Backspace keys to
modify the number. . If an outgoing prefix is required to access an external trunk, you
must add the digit(s. Press Dial to call the number or press To People to save the
contact details to the People application.
Press
Press Close to return to the previous list.
or
at the bottom of the set to display details for another call.
Delete Call History
To delete an individual call:
Press the key to the left of the call item to display the call details and then press Delete.
To delete all of the call history by type:
1. Press Call History.
2. Press
Missed to view your missed calls (if any)
All to view all calls
Answered to view a list of your incoming calls
Made to view a list of your outgoing calls.
3. Press Delete List to delete all calls from the currently displayed list.
4. You are prompted to confirm the delete. Press Delete.
- 21 -
Mitel 5360 SIP Phone User Guide
CALL FORWARDING
Call Forwarding redirects incoming calls to an alternate number when
your phone is busy
when you're not answering, or
all the time.
You can program, activate, and deactivate Call Forwarding using the Web Configuration
Tool. See the Web Configuration Tool Online Help for details about programming Call
Forwarding.
- 22 -
Mitel 5360 SIP Phone User Guide
PROGRAMING FEATURES ON YOUR KEYS
Use the Web Configuration Tool to program features on the phone's various keys. The
following features can be programmed:
Speed Dial
Shared Line
Call History
People
Forwarding
Do Not Disturb (DND)
Advisory Message on/off
PC Application
Headset on/off
RSS Feed
HTML Application
Use the Web Configuration Tool to clear the programming from a key if it is no longer being
used.
See the Web Configuration Tool Online Help for details about programming features to phone
keys.
- 23 -
Mitel 5360 SIP Phone User Guide
MAKING AND ANSWERING CALLS
You can make a call using one of the following methods:
Dialing the extension number or phone number
Dialing a number from the People application
Using the Call History application
Press the programmed key associated with the party you want to call. For more
information about programming keys, see Programing Features On Your Keys.
Dialing the number using the dial pad
Dial by Number
1. Lift the handset (optional).
2. If you want to use a line other than Line 1, press a Line key.
3. Do one of the following:
a. Dial the number.
b. Press a Speed Dial key.
c.
Press
(REDIAL).
Dial by Name
Dial by Name can only be done using the Web Configuration Tool. To dial by a user ID name,
you must be registered with a SIP Service Provider.
Dial by SIP URL or IP Address
Dial by a SIP URL or IP Address can only be done using the Web Configuration Tool. To dial
by a SIP URL or IP Address, you must be registered with a SIP Service Provider.
Dial using the People Application
To dial a contact from your People list:
1. Open the People application.
2. Use the navigation keys to page through the contact list and select the name.
3. Dial the contact name using one of the following methods:
Press the Dial icon
to the right of the contact’s name in the main list. (The
contact name does not need to be selected.)
Select a contact name and press Dial.
- 24 -
Mitel 5360 SIP Phone User Guide
Press the dial pad key that contains the first letter of the contact name and then press
the Dial icon
or press Dial.
4. Continue the call using the speakerphone or lift the handset.
Dial using the Call History Application
1. Press Call History.
2. Press
Missed to view your missed calls (if any).
All to view a list of all logs
Answered to view logs of your incoming calls
Made to view logs of your outgoing calls.
3. Use the navigation keys at the bottom of the display to move to the previous or next page
of logs. The total number of pages in the current list is shown at the bottom of the display.
4. Press the Dial icon
to the right of the log to call the contact
Answer a Call
Incoming calls ring Line 1, if all lines are free, or the next available line. If all lines are busy
and Call Forward – Busy is not enabled (see Enable/Disable Call Forward on pageError!
Bookmark not defined.), callers hear a busy signal.
To answer a call, do one of the following:
In handset mode, lift the handset.
In headset mode, press the Headset key, then press the flashing Line key.
In handsfree mode, press
(SPEAKER), or press the flashing Line key.
For more information about handset, handsfree (Speaker), or headset calls, see Handset,
Handsfree and Headset Modes on page 32.
Auto Answer
You can use Auto Answer to automatically answer incoming calls in handsfree or headset
mode.
To enable or disable Auto Answer:
Access the Feature Configuration page of the Web Configuration tool (see Accessing the
Web Configuration Tool on page Error! Bookmark not defined.).
To answer an Auto Answer call:
Begin speaking when the call arrives.
- 25 -
Mitel 5360 SIP Phone User Guide
To end an Auto Answer call, do one of the following:
(CANCEL).
-
Press
-
Wait for the caller to hang up.
Answer a Call Waiting
The 5360 SIP Phone allows a default quantity of three calls waiting while you are on a call.
New calls wait on the next free line. When a new call arrives, you hear a call waiting tone, the
name of the new caller appears, and the corresponding Line key flashes. If all lines are busy,
callers hear a busy signal. (Number of calls waiting is dependent upon the number of Line
keys you have programmed.)
To answer a waiting call:
1. Press the flashing Line key of the call waiting. The current call is put on hold, and you are
connected to the new caller.
2. To return to the original call:
3. Press the associated flashing Line key.
Calling and Called Party Display
SIP phones display the true (programmed) identity of the called/calling party rather than the
standard number/name display.
Handsfree Operation
To use Handsfree to make a call:
1. If you want to use a Non-Prime Line, press a Line Appearance key.
Note: Your administrator must program Line Appearances to your phone.
2. Dial the number.
3. Begin speaking when the called party answers. Your phone's Handsfree microphone and
Handsfree speaker transmit and receive audio.
To use Handsfree operation to answer calls:
1. Press the flashing line key or Error! Reference source not found..
2. Begin speaking. Your phone's Handsfree microphone and Handsfree speaker transmit
and receive audio.
To hang up while using Handsfree operation:
Press
(SPEAKER).
To turn Mute on during Handsfree operation:
Press
(MUTE). The Mute key light turns ON.
- 26 -
Mitel 5360 SIP Phone User Guide
To turn Mute off and return to conversation:
Press
(MUTE). The Mute key light turns OFF.
To disable Handsfree operation:
Lift the handset.
To return to Handsfree operation:
1. Press
(SPEAKER).
2. Hang up the handset.
- 27 -
Mitel 5360 SIP Phone User Guide
CALL HANDLING
Hold
The 5360 SIP Phone supports a maximum of four simultaneously held calls.
When you place a call on hold, or when another party puts you on hold, the on-hold beep
reminds you that you are holding or on hold. If the handset is in its cradle, you hear the beep
through the handsfree speaker. You can disable this beep if desired, using the Web
Configuration Tool.
Note: The call hold tone takes precedence over Music On Hold.
Hold a Call
Press
(HOLD). The associated Line key flashes.
Retrieve a Call from Hold
Press the associated flashing Line key. The Line key changes from flashing to lit solid.
Change On-Hold Settings
Access the Feature Configuration page of the Web Configuration (see Accessing the Web
Configuration Tool on page 12). Note: You cannot change your hold settings while in a call.
Call Forward
Call Forward redirects incoming calls to an alternate number. Choose from the following Call
Forward options:
Call Forward – Always redirects all incoming calls
Call Forward – No Answer redirects calls if you don’t answer after the programmed
number of rings (1 – 10)
Call Forward – Busy redirects calls when all lines are busy.
All Call Forward options are OFF by default.
You can turn on Call Forward No Answer and Call Forward Busy at the same time.
You cannot change your Call Forward settings while in a call.
To program, enable, or disable Call Forward using the Web Configuration Tool, access the
Feature Configuration page (see Accessing the Web Configuration Tool on page 12).
- 28 -
Mitel 5360 SIP Phone User Guide
Mute
Mute lets you temporarily turn your phone's handset, headset or handsfree microphone off
during a call.
To turn Mute on during a call:
Press
(MUTE). The
(MUTE) light turns ON.
To turn Mute off and return to the conversation:
Press
(MUTE). The
(MUTE) light turns OFF.
Note: If you are on a Handsfree MUTED call and you lift the handset, the handset microphone
is automatically enabled and the MUTE light turns OFF.
NOTE FOR USERS ON RESILIENT MCD SYSTEMS: If your phone switches to the secondary
system while your speaker or handset is muted (that is, while the Mute key is lit) the call
remains muted until you hang up.
Transfer
You can transfer an active call to another party (one line must be free on your phone). The
5360 SIP Phone supports four lines. If all lines are busy on your phone, no calls can be
transferred.
Note: During a conference call, any party can perform a call transfer when one line
on the phone that initiated the conference call is not in use.
To Transfer an active call:
1. Press
(TRANS/CONF).
2. Dial the number of the third party.
3. Do one of the following:
To complete the Transfer, hang up.
To announce the Transfer, wait for an answer, consult, and hang up.
To cancel the Transfer, press
(CANCEL).
To transfer an active call during headset operation:
1. Press
(TRANS/CONF).
2. Dial the number of the third party.
3. To complete the Transfer, press the Release feature key.
- 29 -
Mitel 5360 SIP Phone User Guide
Transfer a Call to a Third Party Already on Hold
1. While on a call, press
(TRANS/CONF). The call is put on hold.
2. Press the Line key of the call on hold, and then press
(TRANS/CONF).
3. Hang up.
Conference
When two parties are connected on a call, either of those parties can originate a three-way
conference by adding a third party to the call in progress. Once three parties are connected,
no more parties can be added to that call.
A party can be involved in more than one three-way conference call at a time, but the calls
cannot be merged. For example, A and B are on a call. A adds C to create three-way
conference call ABC. B adds D to the call with A to make conference call ABD. ABC and ABD
remain separate– D is not added to conference call ABC.
To form a Conference when a two–party call is already in place, or to add another party
to an existing Conference:
1. Press
(TRANS/CONF).
2. Dial the number of the next party.
3. Wait for an answer.
4. Press
(TRANS/CONF).
To leave a Conference:
Hang up or press
(CANCEL).
Add a Party On Hold to a Call in Progress
1. Press
(TRANS/CONF). The current call is put on hold.
2. Press the Line key of the party already on hold.
3. Press
progress.
(TRANS/CONF). The call put on hold in step 1 is connected to the call in
Return to a Conference Call after Accepting an Outside Caller
If the originator of a conference responds to a call from another party during a conference,
the other two conference members are put on hold.
To resume the conference, the originator must:
1. Select one of the held lines and then press
2. Select the remaining held line and then press
- 30 -
(TRANS/CONF).
(TRANS/CONF).
Mitel 5360 SIP Phone User Guide
Messages - Advisory
You can set an advisory message about your whereabouts to appear on your caller's display.
To create an advisory message, access the Feature Configuration page of the Web
Configuration Tool (see Accessing the Web Configuration Tool on page 12).
- 31 -
Mitel 5360 SIP Phone User Guide
USING ADVANCED FEATURES
Do Not Disturb
Do Not Disturb (DND) stops incoming calls from ringing at your phone. If Do Not Disturb is
enabled, callers hear a busy signal.
To enable or disable Do Not Disturb, access the Key Programming page of the Web
Configuration Tool (see Accessing the Web Configuration Tool on page 12).
You can enable and disable DND by pressing the DND key.
When Do Not Disturb is enabled, *DND ON* alternates with other information in the phone’s
Status bar area. If both Call Forward and Do Not Disturb are on, *DND ON* and *FWD ON*
both display only if they have been enabled by the administrator.
Call History
The Call History application keeps a record of your missed, answered and outgoing calls. The
5360 SIP Phone logs the 20 most recent missed calls, the 15 most recent answered calls,
and the 15 most recent outgoing calls. The most recent call appears at the top of each log.
Note that by default, the number of Missed calls will not display.
Call History records calling party name, number, call duration, and the time and date of each
call. When you have missed incoming calls, the number of calls appears in the information
display area of your phone’s display (for example, *2 CALLS*). You can disable this display
using the Display Control section of the Feature Configuration page of the Web Configuration
Tool.
Note: Call History information is saved automatically every 15 minutes. If you reset
your phone in that 15-minute interval, any call history generated during that
time will not be stored.
See Using the Call History Application on page 20 for details.
To view History entries using the Web Configuration Tool, access the tool’s Call History page
(see Accessing the Web Configuration Tool on page 13).
Handset, Handsfree and Headset Modes
Switch between Handset and Handsfree
To go from handset to handsfree mode:
1. Press
(SPEAKER).
2. Hang up the handset. Use the handsfree speaker to communicate with your party.
To go from handsfree to handset mode:
1. Lift the handset, and use it to communicate with your party.
- 32 -
Mitel 5360 SIP Phone User Guide
Switch between Handset and Headset
To go from handset to headset mode:
1. Lift the headset from its cradle.
2. Hang up the handset. Use the headset to communicate with your party.
To go from headset to handset mode:
1. Lift the handset.
2. Replace the headset in its cradle. Use the handset to communicate with your party.
Switch between Headset and Handsfree
To go from headset to handsfree mode:
Press
(SPEAKER). Use the handsfree speaker to communicate with your party.
To go from handsfree to headset mode:
Press
(SPEAKER). Use your headset to communicate with your party.
People
The People Application is a scrollable list of contacts from which you can make a call. The
5360 SIP Phone holds a maximum of 50 People contacts. Using the User Web Configuration
tool, the maximum is 60 contacts, but only 50 will display on the phone set.
People entries contain the contact’s name (maximum of 20 characters) and number, SIP
URL, or IP address.
Note: The SIP URL and IP Address are programmable from the Web Configuration
Tool only.
To create and modify entries in the People Application, see Setting Up Your Contact List
on page 19.
To create, modify, or make calls from your People using the Web Configuration Tool, access
the tool’s People page (see Accessing the Web Configuration Tool on page 13).
RSS Feed
RSS feeds (or “web feeds”) are text formats used to deliver information such as news and
weather reports. Your Mitel SIP Phone can act as an RSS feed reader, displaying the feed on
Line 1 of the phone display when the phone is idle. You can program one or more keys on
your phone to display an RSS feed or to display your own customized message (branding).
Use the Key Programming Page in the Web Configuration Tool to program one or more RSS
feed keys. For more information, refer to the Web Configuration Tool Online Help.
- 33 -
Mitel 5360 SIP Phone User Guide
Enable/Disable RSS Feed
Once an RSS Feed key is programmed, press the key to display the feed. The LED on the
key will remain lit while the RSS feed scrolls continuously across Line 1 of your phone
display. Press the key again to stop the feed.
Note: If your Administrator has programmed a global RSS feed or branding message
for your phone, this text will be displayed when your phone is idle. When one
of your own personal RSS Feed keys is enabled, it will override any global
feed set by your Administrator for your phone.
TIp: To improve RSS readability, you can disable other displays (like Call Forwarding and
Missed Calls). Use the Feature Configuration page of the Web Configuration Tool to set
Display Controls.
Shared Lines and Keys
There are two types of shared lines:
SIP: basic shared line with limited features (supports call forking but does not have LED
activity and lines are not linked. This type of shared line is available in normal SIP mode).
SIP_SCA line type: server-enhanced Broadworks Shared Call Appearance line type
SCA line types allow calls and lines to be shared by multiple users. A SIP server provides
support for call presentation to multiple phones, call state notifications, and access control.
SIP mode shared lines are shared among users but, normally, only the user who initiates
activity on the line has full control over it. For example, if a shared line is in use (not on Hold),
and secondary share users press their corresponding line button, the shared line will not
change state. If the shared line is Ringing, or on Hold, any share user who presses the
corresponding line button will change the state of that call and get connected to the
calling/held party. An exception to this scenario occurs when the server is configured to allow
line seizure by multiple lines. Mitel SIP phones support multi-call server programming.
Requirements for making calls and picking up held calls from shared lines are the same as
for normal (non-shared) lines.
Shared Lines and Keys Programming Requirements
Before programming the Shared Lines and Keys, the Broadsoft server must be configured
with a list of shared users.
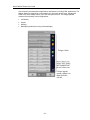
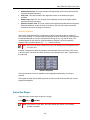
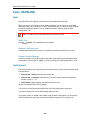
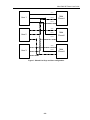
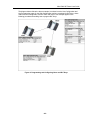
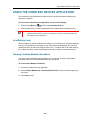
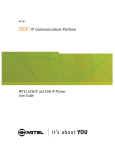
The diagram below shows an example of how Mitel Users 1 – 3 have been configured on the
Broadsoft server to communicate with 3 Mitel phones. The three lines used on these phones
are shared lines; if a call is directed to User 1 then all three phones are alerted. If User 3
answers the call then Line 1 on Phone 1 and Line 2 on Phone 2 indicate an active line.
- 34 -
Mitel 5360 SIP Phone User Guide
mitel1
User 1
mitel1a
Mitel
Phone1
mitel1b
mitel2
mitel2a
User 2
Mitel
Phone2
mitel2b
mitel3
mitel3a
User 3
mitel3b
Mitel
Phone3
Figure 1: Shared Line Keys and User Configuration
- 35 -
Mitel 5360 SIP Phone User Guide
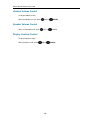
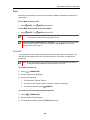
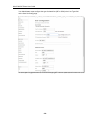
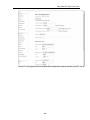
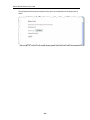
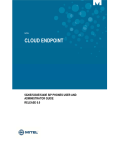
The diagram below reflects the above example, but shows how the User Configuration and
Key Programming pages (in the Web Configuration tool) are completed for Shared Line Keys.
This example applies to the following procedures describing how to program Shared Line
Keys.
Figure 2: Programming and Configuring Users and Shared Line Keys
- 36 -
Mitel 5360 SIP Phone User Guide
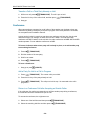
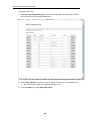
Your Administrator must create a user entry (on the User List Config page of the Web
Configuration tool) for the user(s) with whom you want to share a line.
- 37 -
Mitel 5360 SIP Phone User Guide
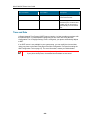
Your Administrator must configure the type of shared line (SIP or SCA) in the Line Type field
on the User List Config page.
- 38 -
Mitel 5360 SIP Phone User Guide
- 39 -
Mitel 5360 SIP Phone User Guide
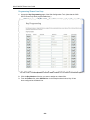
Programming Shared Line Keys
1. Access the Key Programming page of the Web Configuration Tool. (Note that the 5360
SIP IP Phone only has 8 programmable keys.)
2. Click the Key Number of the key you want to assign as a shared line.
3. From the Feature list, select Shared Line. In the example shown below, Key 12 has
been configured as a Shared Line.
- 40 -
Mitel 5360 SIP Phone User Guide
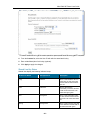
4. From the Context list, select the User ID with which to associate this key.
5. Enter a label/description for this key (optional).
6. Click Apply to apply the changes.
Shared Line Key Status
Shared lines display the following indicator lamps:
Shared Line Status
LED Appearance
Description
Trying
Solid Red
When a user initiates a call on a
shared line, the LED of that line
and the LEDs of all shared lines
glow red.
Active
Solid Green
When a call has been
successfully connected, the LED
of that line and the LEDs of all
shared lines glow green.
Held
Flashing Red
When a user puts another party
on hold, the LED of that line and
the LEDs of all shared lines flash
red.
Alerting
Flashing Green
When a call is incoming, the LED
of the called line and the LEDs of
all shared lines flash green.
- 41 -
Mitel 5360 SIP Phone User Guide
Programming Busy Lamp Field Keys
The Busy Lamp Field (BLF) feature allows you to program a key on your IP phone that
monitors whether or not another user is on a call.
Before programming the BLF Keys, the Broadsoft server must be configured with a list of BLF
users.
Note: Before programming the Busy Lamp Field keys, the Broadsoft server must be
configured with the blflist Group, and with the capability to provide the BLF
feature to SIP phones.
In the example that follows, the “blflist” is configured on the Broadsoft sever as
a BLF list URL with two users, mitel1 and mitel2, as the monitored user IDs.
The diagram below shows an example of how Users 1 – 3 have been configured on the
Broadsoft server, with User3 (on mitel3) configured to monitor User1 and User2 (from the
blflist Group).
Figure 3: User Configuration for BLF
- 42 -
Mitel 5360 SIP Phone User Guide
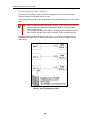
The diagram below reflects the above example, but shows how the User Configuration and
Key Programming pages (in the Web Configuration tool) are completed for BLF Keys, where
mitel3 has been configured to monitor mitel1 and mitel2. This example applies to the
following procedures describing how to program BLF Keys.
Figure 4: Programming and Configuring Users and BLF Keys
- 43 -
Mitel 5360 SIP Phone User Guide
The illustration below shows an example of the User List configuration for the single user on
mitel3.
- 44 -
Mitel 5360 SIP Phone User Guide
Your Administrator must configure the BLF User Group List on the User List Config page.
- 45 -
Mitel 5360 SIP Phone User Guide
To program a BLF Key:
1. Access the Key Programming page of the Web Configuration Tool. (Note that the 5360
SIP IP Phone only has 8 programmable keys.)
2. Click the Key Number of the key you want to assign as a BLF key. In this example, Key
11 - left is selected to monitor user mitel2 on extension 1002.
3. From the Feature list, select Speed Dial + BLF.
- 46 -
Mitel 5360 SIP Phone User Guide
4. From the Context list, you can only select the PRIME USER to associate this key.
5. Enter a label/description for this key to indicate which User is being monitored (optional).
6. Enter the User ID of the monitored user in the Speed Dial/RSS Address filed.
7. From the Type list, select name/number.
8. Click Apply to apply the changes.
The same procedure would be followed to configure mitel1a on Key 12-(left) as the BLF Key.
The BLF Key also acts as a Speed Dial key to the monitored user’s number, and a Call
Pickup key on behalf of the monitored user. The appearance of the LED indicator for the BLF
key is as follows:
BLF Line Status
BLF Indicator
Description
Idle (On hook)
Off
The user being monitored is not
on a call, nor dialing a call. The
BLF key can be used as a speed
dial key to the monitored user.
Off hook/Outgoing call
Solid Red
The monitored user is in the
process of placing a call. The
BLF key can be used as a speed
dial key to the monitored user.
Incoming call
Flashing Green
A call is incoming for the
monitored user. Press the BLF
- 47 -
Mitel 5360 SIP Phone User Guide
BLF Line Status
BLF Indicator
Description
key to pick up the call on behalf
of the monitored user.
Connected call
Solid Green
The incoming call has been
answered by the monitored user.
The BLF key can be used as a
speed dial key to the monitored
user.
Time and Date
A Simple Network Time Protocol (SNTP) server (version 4 or later) provides your phone with
the date and time. Your Administrator configures your time zone once using the Web
Configuration Tool. If Daylight Savings Time is configured, your phone automatically adjusts
to DST.
If an SNTP server is not available in your system setup, you can modify the time and date
using your phone or the Date/Time page of the Web Configuration Tool (see Accessing the
Web Configuration Tool on page 12). For more information, contact your Administrator.
Note: You cannot change your time and date settings while on a call.
If your phone loses power, the modified time and date are not saved.
- 48 -
Mitel 5360 SIP Phone User Guide
ADMINISTRATOR TOOLS
All administrator-related activities are carried out using the Web Configuration Tool. Use the
Web Configuration Tool to carry out the following activities:
Phone passwords
SIP user accounts
Device parameters
Access protocols
Network settings
Phone IP and MAC address
Phone firmware upgrades
Adjusting for daylight savings time
Configuration files
Hot line
Media configurations
Program configuration options
RSS feed
SIP Administrator Phone Passwords
To log in for the first time as an Administrator, use the default administrator name and
password. Change these passwords as soon as possible to prevent unauthorized access to
the administrator-related configuration items. For the 5360 SIP Phone, the default
administrator name is "admin", and the password is "5360".
- 49 -
Mitel 5360 SIP Phone User Guide
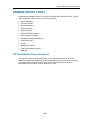
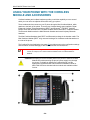
USING YOUR PHONE WITH THE CORDLESS
MODULE AND ACCESSORIES
Cordless handsets and cordless headsets provide you with the capability to move around
within your own office or adjacent offices while using your phone.
These cordless devices connect to your IP phone through a Mitel Cordless Module, which
attaches to the back of the phone. There are two Cordless Module types available: Digital
Enhanced Cordless Telecommunications (DECT) and Bluetooth®. The DECT Cordless
Module works with the Mitel DECT Cordless Handset and the Mitel DECT Cordless Headset.
The Bluetooth Module works the Mitel Bluetooth Handset and most third-party Bluetooth
headsets.
The Mitel Cordless Handsets (both DECT and Bluetooth) recharge in the handset cradle. The
Mitel Cordless Headset (DECT only) rests and recharges in a headset cradle that attaches to
the side of the phone.
The Cordless Devices Application (see page 63) provides access to the configuration settings
and information screens that apply to the Cordless Module and accessories.
Note: Since only one module type can be attached to the phone at any given time, you
cannot, for example, use a 5310 Conference Module when a Cordless Module is
attached.
CAUTION: Attempting to remove the back plate on the phone to install a Cordless
Module before disconnecting the phone’s power supply may damage
the phone. For details on installing a Cordless Module, see the
appropriate Cordless Module and Accessories Installation Guide for
Mitel 5360 SIP Phone included with the module and available at Mitel
OnLine.
- 50 -
Mitel 5360 SIP Phone User Guide
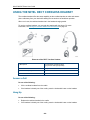
DECT Cordless Module and Accessories on a 5360 SIP Phone
Rear View of 5360 SIP Phone
Elements of Your Cordless Module and Accessories
Feature
Function
1) Cordless Module (either DECT or
Bluetooth)
Attached to the back of the phone, the module contains a
Light Emitting Diode (LED) indicating that a cordless device is
in use; also indicates the state of pairing between the module
and a cordless device.
2) Cordless Headset (photo shows
DECT headset)
Cordless handsfree operation for calls. If you are using a
cordless headset, you do not need to use the handset.
3) Cordless Headset Charging Cradle
(DECT only)
Provides power to recharge the cordless headset battery.
(Not available for Bluetooth headsets.)
4) Cordless Handset Charging Plate
Provides power to recharge the cordless handset battery.
Replaces the handset cradle plate supplied with the phone for
corded handsets.
5) Cordless Handset
Cordless operation for handset calls. (You can transfer from
the phone handset to the cordless headset at any time.)
6) Cordless Module Pairing Button
Initiates pairing between the Cordless Module and a cordless
accessory.
- 51 -
Mitel 5360 SIP Phone User Guide
Feature
7) Cordless Headset Cradle Cable
(DECT only)
Function
Connects to the Cordless Module to provide power to the
charging cradle.
Handset/Headset Combinations
The following combinations of corded and cordless headset and handset are supported on
the 5360 SIP Phone:
Corded handset only
Corded handset and corded headset
Cordless handset only
Cordless handset and cordless headset
Corded handset and cordless headset
Corded headset and cordless handset
The DECT Cordless Handset, DECT Cordless Headset, and Bluetooth Handset are all Mitelbranded accessories available only from Mitel. Bluetooth headsets are third-party
accessories available from a variety of manufacturers.
Pairing the Cordless Module and Accessories
Before using a cordless handset or headset, it must establish communication with the
Cordless Module using a procedure called pairing.
Pairing a DECT Cordless Accessory with a DECT Cordless Module
Notes:
An IP phone can have only one DECT Cordless Handset and one DECT Cordless
Headset.
A cordless handset or headset can be paired with only one IP phone at a time.
Pairing a new cordless handset or headset with the IP phone overwrites the configuration
of any previous handset or headset.
Pairing cannot be performed when a cordless device is already in use.
To pair a DECT cordless accessory:
1. Ensure that the battery of the cordless device to be paired is at least partially charged.
2. Press and hold the pairing button on the back of the Cordless Module (see page 51) for 5
seconds to activate phone pairing mode. The LED on the Cordless Module blinks. The
Cordless Devices application opens on the phone and prompts you to place the
accessory in pairing mode.
3. Press and hold the hookswitch on the side of the cordless handset (see page 56) or
headset (see page 60) for 5 seconds to activate accessory pairing mode. The LED on the
cordless accessory blinks. After a moment, the Cordless Devices application displays
protocol, firmware, hardware, and IPEI information for the device to be paired.
- 52 -
Mitel 5360 SIP Phone User Guide
Note: If the LED on the Cordless accessory does not start to blink after 10 seconds, the
accessory requires charging or is still in factory battery saving mode (handset
only). Place the accessory on the charger and charge. The green LED starts to
flash indicating that the accessory is charging. It could take up to 60 minutes for
the green LED to start flashing. Allow the accessory to fully charge, approximately
3 hours.
4. Press Yes to confirm pairing. The Cordless Devices application confirms the pairing by
displaying the paired device name and its battery level indicator.
5. Press Close to exit.
Pairing a Bluetooth Accessory with a Bluetooth Module
Notes:
An IP phone can have one Bluetooth Handset and up to five Bluetooth headsets (or up to
six headsets if no handset is paired).
To pair a new Bluetooth Handset, you must first unpair the existing Bluetooth Handset.
Pairing cannot be performed when a Bluetooth device is already in use.
To pair a Bluetooth accessory:
1. Ensure that the battery of the Bluetooth device to be paired is at least partially charged.
2. Press and hold the pairing button on the back of the Bluetooth Module for 5 seconds to
activate phone pairing mode. The LED on the Bluetooth Module blinks. The Cordless
Devices application opens on the phone and prompts you to place the accessory in
pairing mode.
3. For Mitel Bluetooth Handsets: Press and hold the hookswitch on side of the Bluetooth
Handset (see page 56) for 5 seconds to activate accessory pairing mode. The LED on
the handset blinks. The pairing confirmation window on the IP Phone appears, displaying
the product name for the device to be paired.
Note: If the LED on the handset does not start to blink after 10 seconds, the handset
requires charging or is still in factory battery saving mode. Place the handset on the
charger. The green LED starts to flash indicating that the handset is charging. It could
take up to 60 minutes for the green LED to stop flashing. Allow the handset to fully
charge, approximately 3 hours.
For third-party Bluetooth headsets: Follow the manufacturer’s instructions to place the
Bluetooth headset in pairing mode. The pairing confirmation window on the IP Phone
appears, displaying the product name for the device to be paired.
4. Press Yes to confirm the pairing. The Cordless Devices application prompts you to enter
a passcode.
5. Enter a valid passcode for the Bluetooth device (default is 0000) using the keyboard on
the display, and press OK.
For third-party Bluetooth headsets: An Auto Connect window displays. Press Yes if
the phone will not be shared with other users; press No if the phone will be shared with
other users and multiple headsets.
- 53 -
Mitel 5360 SIP Phone User Guide
6. The LED on the Bluetooth Module lights and remains lit for a few seconds and then
resumes normal behavior. The Bluetooth device is paired to the Bluetooth Module.
7. Press OK to return to the Cordless Devices application.
8. Press Close to exit the application.
Unpairing an Accessory
To unpair a cordless accessory:
1. Press the blue Menu key
and then press Cordless Devices.
2. Press the device name that you want to unpair. The information screen for the selected
device appears.
3. Press Unpair this Device. If the accessory is in use, an error message displays.
Otherwise, the accessory is unpaired, removed from the display, and can no longer be
used to interact with the phone.
4. Press Close.
For more information about the Cordless Devices Application, see page 63.
Cordless Module LED Indicators
The Cordless Module has a blue light-emitting diode (LED) that indicates the current status of
the module:
Blue LED
Function
Solid
Audio is active between the module and either the handset or headset.
Blinking
Pairing mode is active or a firmware upgrade is in progress.
Off
No audio is active.
Solid for several seconds
Pairing is successful.
Blinking: LED is On and Off for equal amount of time
Using the Mute Key on a Cordless Device
When using a Mitel-branded cordless accessory, the Mute key on the cordless accessory is
synchronized with the Mute key on your phone. Pressing the Mute key on either the phone or
the accessory also controls the Mute function on the other device.
There is no synchronization between a third-party Bluetooth headset mute control (if one is
available) and your phone Mute key. The procedure for muting a Bluetooth headset depends
on the headset manufacturer. Some headsets have a mute control and some do not. You
can, however, use the Mute key on your phone to mute a conversation on any type of
Bluetooth headset.
- 54 -
Mitel 5360 SIP Phone User Guide
Using the Volume Keys on Cordless Device
When using a Mitel-branded cordless accessory, the Volume keys on the cordless accessory
are synchronized with the Volume keys on your phone. Pressing the Volume keys on either
the phone or the accessory also controls the Volume function on the other device.
When using a third-party Bluetooth headset, the volume control on the headset (if one is
available) is not synchronized with the Volume keys on your phone. Pressing the Volume
keys on the phone does not change the headset volume.
- 55 -
Mitel 5360 SIP Phone User Guide
USING THE MITEL CORDLESS HANDSET
The cordless handset provides office mobility, allowing you to make and answer calls while
away from your desk. Replacing the standard corded handset, the cordless handset contains
a rechargeable battery that charges in the handset cradle when not in use.
To use the cordless handset (whether DECT or Bluetooth), you must pair the handset with
the phone. For details, see Pairing the Cordless Module and Accessories on page 52.
Cordless Handset on a 5360 SIP Phone
Elements of the Cordless Handset
Feature
1) Cordless Handset LED
Function
Blue: Light-emitting diode (LED) indicating the status of the handset.
Green: LED indicating the status of the handset battery.
For more information, see page 58.
2) Hookswitch Button
Lifting the handset from the cradle activates the handset. If the handset
is already out of the cradle, pressing the hookswitch takes the handset
off-hook. Pressing the hookswitch again returns it to on-hook.
Pressing the hookswitch while on a speakerphone call moves the call to
the cordless handset.
3) Mute button
Mute allows you to turn the microphone off during a call.
4) Volume Up and
5) Volume Down buttons
Up and Down provide volume control for the ringer and handset/headset.
Note: To return to a corded handset, you must first unpair the cordless handset.
- 56 -
Mitel 5360 SIP Phone User Guide
Answer a Call
Do one of the following:
Lift the cordless handset.
If the handset is already out of the cradle, press the hookswitch button on the handset.
Note: If you have a call on hold on your Prime Line and answer another on a Line
Appearance key, it will be presented over the speaker.
Hang up
Do one of the following:
Replace the cordless handset in the cradle.
Press the hookswitch button on the handset.
Dialing – Auto Dial Disabled
To dial a number with Auto Dial disabled:
1. Lift the handset or press the hookswitch.
2. Make the call using the dial pad, or press a programmed speed dial key on the phone.
Dialing – Auto Dial Enabled
To dial with Auto Dial enabled:
To dial the predefined Auto Dial number, press the hookswitch on the cordless handset.
To program Auto Dial, refer to Auto Dial on page Error! Bookmark not defined..
- 57 -
Mitel 5360 SIP Phone User Guide
Handset Alerting Tones and LEDs
The handset provides the following alerting tones:
Feature
Function
Mute key on cordless device
ON/OFF
2-pitch tone occurs immediately. Reminder tone occurs 30
seconds after activation and then regularly until deactivated.
Mute key on Phone ON/OFF
Immediate tone with Bluetooth; no immediate tone with DECT.
Reminder tone occurs 30 seconds after activation and then
regularly until deactivated.
Low battery (within 10 minutes left
for DECT)
3 beeps and 20 second pause repeated 3 times
Low battery (within 2 minutes left)
3 rapid beeps and 1.5 second pause repeated 3 times
Out of range
Repetitive 3-pitch tone until you are back in range.
Note: If you are out of range for more than 10 seconds, any call
that is in progress is dropped and not recovered..
Note: Audio indications are heard in the handset only when it is in use and may interrupt voice
transmission.
The handset has two LEDs:
Blue – indicates the operational status of the handset
Green – indicates the status of the electrical charge of the battery
LED Color
Blue
LED State
Indicates
Solid
Handset is muted
Blinking
Handset is in pairing mode
Winking
Active audio path between Handset and Module
Off
No audio path between Handset and Module OR
Battery is dead
Green
Solid for 2
seconds
Pairing is successful.
Solid
Battery is fully charged
Blinking
Battery is charging. Note: It is normal for the handset LED to cycle
between blinking and solid as battery charge is maintained.
Off
When handset is cradled and the LED does not flash or illuminate, this
indicates an absence of battery power. During the first 30 – 60 minutes
that the light is off, the battery may be trickle charging. If that is the case,
the LED will resume normal behavior within that 60 minute period. If the
- 58 -
Mitel 5360 SIP Phone User Guide
LED Color
LED State
Indicates
LED remains off for more than 60 minutes, then either the battery is no
longer chargeable or there is a problem in the charging circuit.
Blinking: LED is On and Off for equal amount of time
Winking: LED is On for a short period of time and Off for a longer period
- 59 -
Mitel 5360 SIP Phone User Guide
USING THE MITEL DECT CORDLESS HEADSET
The cordless headset offers the same capability as the cordless handset to make and answer
phone calls away from your desk while adding the convenience of handsfree operation.
When not in use, the cordless headset sits in the headset charging cradle.
To use the cordless headset, you must pair the headset with the phone. For more
information, see Pairing the Cordless Module and Accessories on page 52.
Elements of the DECT Cordless Headset
1) Microphone
5) Hookswitch and pairing button
(gray section with logo imprinted)
2) Boom arm
6) Speaker
3) Link indicator (LED)
7) Headband
4) Volume control with mute switch
8) Ear hook
Answer a Call
Do one of the following:
Lift the cordless headset from the cradle.
If the headset is already out of the cradle, press the hookswitch button on the headset.
Hang Up
Do one of the following:
Replace the cordless headset in the cradle.
If the headset is already out of the cradle, press the hookswitch button on the headset.
- 60 -
Mitel 5360 SIP Phone User Guide
Dialing – Auto Dial Disabled
To dial a number with Auto Dial disabled:
1. Lift the headset or press the hookswitch.
2. Make the call using the dial pad, or press a programmed speed dial key on the phone.
Dialing – Auto Dial Enabled
To dial with Auto Dial enabled:
To dial the predefined Auto Dial number, press the hookswitch on the cordless handset
or headset.
To program Auto Dial, refer to Auto Dial on page Error! Bookmark not defined..
Headset Alerting Tones and LEDs
The cordless headset provides the following alerting tones:
Feature
Function
Mute ON/OFF
2-pitch tone occurs immediately. Reminder tone occurs 30
seconds after activation and then regularly until deactivated.
Mute key on Phone ON/OFF
No immediate tone. Reminder tone occurs 30 seconds after
activation and then regularly until deactivated.
Low battery (within 10 minutes left)
3 beeps and 20 second pause
Low battery (within 2 minutes left)
3 rapid beeps and 1.5 second pause
Out of range
Repetitive 3-pitch tone until you are back in range.
Note: If you are out of range for more than 10 seconds, any
call that is in progress is dropped and not recovered.
- 61 -
Mitel 5360 SIP Phone User Guide
There are two LEDs associated with the cordless headset:
A blue LED on the headset indicates the headset status
A green LED in the headset charging cradle indicates battery status
LED Color
Blue
(on headset)
LED State
Indicates
Solid
Headset microphone is muted
Blinking
Headset is in pairing mode
Winking
Active audio path between Headset and Module
Solid for 2
seconds
Pairing successful OR
Off
No audio path between Headset and Module OR
New battery installed
Battery is dead
Green
(on cradle)
Solid
Battery is fully charged
Blinking
Battery is charging. Note: It is normal for the headset LED to cycle
between blinking and solid as battery charge is maintained.
Winking
Indicates low voltage when headset is uncradled
Off
When headset is cradled, indicates battery is not charging
Blinking: LED is On and Off for equal amount of time
Winking: LED is On for a short period of time and Off for a longer period
- 62 -
Mitel 5360 SIP Phone User Guide
USING A BLUETOOTH HEADSET
A third-party Bluetooth headset offers some of the same capability as the Bluetooth Handset
to make and answer phone calls away from your desk while adding the convenience of
handsfree operation.
Note: If you move out of range of the phone while connected using Bluetooth, you will notice
that the audio quality quickly degrades. If you do not move back within range within about 10
seconds, the call is dropped.
To use a Bluetooth headset, you must first pair the headset with the Bluetooth Module on
your phone. For more information, see Pairing the Cordless Module and Accessories on page
52.
For information on using mute and volume functions, see Using the Mute Key on a Cordless
Device and Using the Volume Keys on Cordless Device on page 54.
Note: To switch from the Bluetooth Headset to the 5360 IP Phone speaker press the
hookswitch twice on the Bluetooth headset.
Note: The specific operation of third-party Bluetooth headsets can vary somewhat by
manufacturer and model. Refer to the documentation accompanying the Bluetooth headset for
details on operation, alerting tones, LEDs, and charging. Note that all Bluetooth devices will
drop any call in progress if the maximum range is exceeded.
Answer a Call
To answer a call:
Press the hookswitch button on the headset.
Hang Up
To hang up on a call:
Press the hookswitch button on the headset.
Dialing – Auto Dial Disabled
To dial a number with Auto Dial disabled:
3. Press the hookswitch button on the headset.
4. Make the call using the dial pad, or press a programmed speed dial key on the phone.
- 63 -
Mitel 5360 SIP Phone User Guide
Dialing – Auto Dial Enabled
To dial a number with Auto Dial enabled:
To dial the predefined Auto Dial number, press the hookswitch button on the headset.
To program Auto Dial, refer to Auto Dial on page Error! Bookmark not defined..
- 64 -
Mitel 5360 SIP Phone User Guide
USING THE CORDLESS DEVICES APPLICATION
The Cordless Devices Application provides access to module information and pairing for
handsets or headsets.
To access the Cordless Devices Application, do one of the following:
Press the blue Menu key
Press a feature key you have programmed as the Cordless Devices Application key.
, and then press Cordless Devices.
Note: When the pairing button on the Cordless Module is pressed, or when the battery level of
a Mitel-branded cordless accessory is critically low, the phone will automatically open
the Cordless Devices Application.
Low Battery Level
When the battery of a Mitel cordless device reaches a near-critical level, the phone displays a
warning. Until the battery is recharged (or until it becomes fully discharged), the warning is
repeated at each new call made using the Prime Line. To continue with a call while charging
the cordless accessory, switch to speakerphone and then cradle the cordless accessory.
Viewing Cordless Module Information
You can use the Cordless Devices Application to view protocol, firmware, and hardware
information about the Cordless Module attached to your phone.
To view Cordless Module information:
1. Access the Cordless Devices Application.
2. Press Cordless Module Info or Bluetooth Module Info. Device information appears on
the screen.
3. Press Close to exit.
- 65 -
Mitel 5360 SIP Phone User Guide
- 66 -