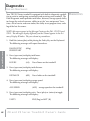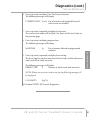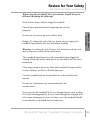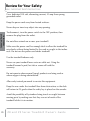
1
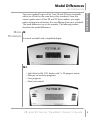
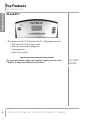
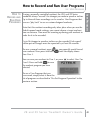
Z8 and Z9 Series Commercial Treadmill O w n e r ’s G u i d e Thank You For Selecting A True Treadmill In 1981, Frank Trulaske launched True Fitness Technology, Inc. and began manufacturing hand-crafted treadmills. His team’s obsession with quality has propelled True to the top of the industry and has created one of America’s oldest, largest and most respected fitness equipment manufacturers. Over the years, True has designed, developed, patented and fabricated many new and cuttingedge innovations for their products: including advanced features, manufacturing components and technological breakthroughs. True is rapidly becoming the choice for workouts among beginners, rehab patients and top athletes world-wide. “Our original goal was to build the world’s best treadmills, and today we believe we’re doing it!” -Frank Trulaske Intensive quality control standards guarantee excellence in every phase of production, resulting in the finest products available in the marketplace. True treadmills are consistently rated #1 for their smooth, quiet and comfortable performance. Today, True is the choice for workouts among beginners, rehab patients and top athletes world-wide. Today True offers a full line of treadmills, upright and recumbent bikes, elliptical trainers, strength and flexibility equipment. True is proud to “Deliver The Best!” Table of Contents 1 - Introduction 2 - The Console 3 - Basic Operation Introduces key features, as well as a guide to where to go next in this manual. Describes each key and display window. page 3 page 11 page 19 4 - Operation in Greater Detail 5 - Heart Rate Control Workouts 6 - User Programs How to get the treadmill started and stopped, as well as discussing calories estimation and heart rate monitoring. You can record your workout to play back as a custom-designed workout. All the details of manual and preset programs. Four different kinds of treadmill-controlled heart rate feedback workouts. page 29 page 37 page 47 7 - Designing an Exercise Program 8 - Care and Maintenance 9 - Important Safety Instructions Advice on various ways to use your treadmill in a rewarding exercise regime. Basic requirements, as well as a simple troubleshooting and diagnostics guide. Be sure to familiarize yourself with this section. page 51 page 61 page 71 Appendix A - Target Heart Rate Chart: A guide to help you pick an page 77 initial target heart rate. Appendix B - METs Table: How speed and incline affect workload, expressed in METs. page 83 Appendix C - METs Explanation and Formulas: The metabolic formulas behind energy expenditure estimates. page 87 Appendix D - Specifications: The physical attributes of your Z8 and Z9 page 91 Series Treadmill. Appendix E - Glossary: Fitness terms defined. page 95 Bibliography - References, selected readings and credits. page 103 Z 8 a n d Z 9 S e r i e s Tr e a d m i l l O w n e r ' s G u i d e chapter one In This Chapter: Introduction Introduction Model Differences Where to Go From Here Chapter 1: Introduction Chapter 2: The Console Chapter 3: Basic Operation Chapter 4: Operation in Greater Detail Chapter 5: Heart Rate Control Workouts Chapter 6: User Programs Chapter 7: Designing an Exercise Program: The F.I.T. Concept Chapter 8: Care and Maintenance Chapter 9: Important Safety Instructions Z 8 a n d Z 9 S e r i e s Tr e a d m i l l O w n e r ' s G u i d e Model Differences one : Introduction Model Z8 Differences Introduction Your new treadmill is part of the True Z8 and Z9 Series treadmills, which are all built to the same heavy-duty standards. Since this owner’s guide covers all five Z8 and Z9 Series models, you might notice explanations of features that are different from your treadmill. The main differences are in the consoles. The following section describes the model differences: A manual treadmill with a simplified display. Z8.1 • Light-blue backlit LCD display with 7 x 20 progress matrix •Four pre-set workout programs • User programs • Heart rate control Z 8 a n d Z 9 S e r i e s Tr e a d m i l l O w n e r ' s G u i d e Top Features Introduction one : Introduction Z9 and Z9.1 • Deep-blue backlit LCD display with 10 x 28 progress matrix • Dot-matrix LCD message center • Four pre-set workout programs • User programs • Heart rate control For your maximum safety and comfort, make sure you read Chapter 9, Important Safety Instructions. Z 8 a n d Z 9 S e r i e s Tr e a d m i l l O w n e r ' s G u i d e For Your Safety Where to go from Here one Chapter 1: Introduction. Introduces key features, as well as a guide on where to go next in this manual. Chapter 2: The Console. Describes each console key and display window. Chapter 3: Basic Operation. How to get the treadmill started and stopped; calorie consumption estimates; heart rate monitoring. Introduction Where to Go From Here : Introduction Chapter 4: Operation in Greater Detail. All the details of manual and pre-set programs. Chapter 5: Heart Rate Control Workouts. Four different kinds of treadmill-controlled heart rate feedback workouts. Chapter 6: User Programs. You can record your workout to play back as a custom-designed workout. Chapter 7: Desiging an Exercise Program. Advice on various ways to use your treadmill in a rewarding exercise regime. Chapter 8: Care and Maintenance. Basic requirements, as well as a simple troubleshooting and diagnostics guide. Chapter 9: Important Safety Instructions. Make sure you familiarize yourself with this section. Z 8 a n d Z 9 S e r i e s Tr e a d m i l l O w n e r ' s G u i d e Where to Go From Here Introduction one : Introduction Appendix A: Target Heart Rate Chart. A guide to help you pick an initial target heart rate. Appendix B: METs Table. How speed and incline affect workload, expressed in METs. Appendix C: METs Explanation and Formulas. The metabolic calculations behind energy expenditure estimates. Appendix D: Specifications. Bibliography: References and selected readings. Z 8 a n d Z 9 S e r i e s Tr e a d m i l l O w n e r ' s G u i d e chapter two The Console In This Chapter: Lower Console Z9 and Z9.1 Console Z8.1 Console Z8 Standard Console Chapter 1: Introduction Chapter 2: The Console Chapter 3: Basic Operation Chapter 4: Operation in Greater Detail Chapter 5: Heart Rate Control Workouts Chapter 6: User Programs Chapter 7: Designing an Exercise Program: The F.I.T. Concept Chapter 8: Care and Maintenance Chapter 9: Important Safety Instructions Z 8 a n d Z 9 S e r i e s Tr e a d m i l l O w n e r ' s G u i d e 11 Removable magnetic key must be in place for treadmill to operate. Safety Key Clears current numeric entry. Adjusts incline. Also used to choose programs. Direct entry of numeric data. Numeric Keys Grade Up/Down Starts the belt in motion. Also resets workout data when held for 3 seconds. Start/Reset Adjusts speed in 0.1 mph increments. Also used to set weight and other workout parameters. Speed Slow/Fast Stops the belt and pauses workout. If held for 3 seconds, resets all workout information. Stop/Pause Accepts workout parameters, and toggles the dual function displays. Select/Enter Identical to Select/Enter with additional function when changing speed or incline using numeric keys. Enter two Z 8 a n d Z 9 S e r i e s Tr e a d m i l l O w n e r ' s G u i d e The Console Clear Lower Console - Common to all Models Lower Console : The Console 13 14 Z 8 a n d Z 9 S e r i e s Tr e a d m i l l O w n e r ' s G u i d e Incline in percent grade in 0.5% increments. Grade Time remaining in your workout. (This is elapsed time in default Manual mode or Quick Start.) Time Time per mile at current speed. Pace Estimated total calories burned. Calories Energy expenditure rate. See Appendix C. METs Miles per hour in 0.10 increments. Speed Instantly change from program to program. Express Keys The above console readout definitions describe workout information available in the message center. These readouts can be toggled while exercising by pressing the key. Miles traveled in 0.01 mile increments up to 9.99 miles, or 0.10 mile increments past 10 miles. Can also be set to count down. Distance Shows workout progress. Matrix Display Z9 and Z9.1 Console The Console Z9 and Z9.1 Two : The Console Incline in percent grade in 0.5% increments. Grade Time remaining in your workout. (This is elapsed time in default Manual mode or Quick Start.) Time Time per mile at current speed. Pace Estimated total calories burned. Calories Energy expenditure rate. See Appendix C. METs Miles per hour in 0.10 increments. Speed Instantly change from program to program. Express Keys two ' s nGe ur 'isd eG u i d e Z 8 a n55 d 0ZZ9T SX eTr ri e sa dTm r ei al ld O mw i l nl eOr w The Console The above console readout definitions describe workout information available in the message center. These readouts can be toggled while exercising by pressing the key. Miles traveled in 0.01 mile increments up to 9.99 miles, or 0.10 mile increments past 10 miles. Can also be set to count down. Distance Shows workout progress. Matrix Display Z8.1 Console Z8.1 : The Console 15 16 Z 8 a n d Z 9 S e r i e s Tr e a d m i l l O w n e r ' s G u i d e Incline in percent grade in 0.5% increments. Grade Time remaining in your workout. (This is elapsed time in default Manual mode or Quick Start.) Time Time per mile at current speed. Pace Estimated total calories burned. Calories Energy expenditure rate. See Appendix C. METs Miles per hour in 0.10 increments. Speed The above console readout definitions describe workout information available in the message center. These readouts can be toggled while exercising by pressing the key. Miles traveled in 0.01 mile increments up to 9.99 miles, or 0.10 mile increments past 10 miles. Can also be set to count down. Distance Shows workout progress. two Matrix Display Z8 Standard Console The Console Z8 Standard Console : Basic Operation chapter three Basic Operation In This Chapter: Starting Your Treadmill Safely Speed and Incline Adjustment Stopping Your Treadmill Safely Setting Your Weight A Note About Calorie Expenditure Calculations Monitoring Your Heart Rate Using the Heart Rate Transmitter Strap The Treadmill’s Heart Rate Display Chapter 1: Introduction Chapter 2: The Console Chapter 3: Basic Operation Chapter 4: Operation in Greater Detail Chapter 5: Heart Rate Control Workouts Chapter 6: User Programs Chapter 7: Designing an Exercise Program: The F.I.T. Concept Chapter 8: Care and Maintenance Chapter 9: Important Safety Instructions Z 8 a n d Z 9 S e r i e s Tr e a d m i l l O w n e r ' s G u i d e 19 Starting Your Treadmill three Starting Your Treadmill Safely : Basic Operation Straddle the treadbelt by placing your feet on the straddle covers. Attach the lanyard to your clothing at roughly waist height. Place the safety key on the key holder on the console. Set your weight using the press . Press the or… keys or the numeric keys and key for a quick start into a manual control workout, to set up a manual workout, or… keys or an Express Command Key to begin setting Press the up a different workout, as described in later sections. Basic Operation Press and Z 8 a n d Z 9 S e r i e s Tr e a d m i l l O w n e r ' s G u i d e 21 Adjusting Speed and Incline three : Basic Operation Speed and Incline Adjustment Speed Control: use either the and keys by themselves to change speed. Or, to quickly go to a specific speed... Basic Operation ...enter a target speed with the numeric keys... ...then press the small Enter key... ...and then press either the key to change to that speed. 22 or Z 8 a n d Z 9 S e r i e s Tr e a d m i l l O w n e r ' s G u i d e Setting Your Weight three : Basic Operation Incline Control: use either the up and down keys by themselves to change incline. Or, enter a target incline with the numeric keys, then press the small Enter key , and then press either the up or down key to change to that incline. Care should be taken when using the numeric keys to control your treadmill's speed and incline, since large changes in those values are possible with just a few keystrokes. Slow the treadmill to below 2 mph using the key. Press . Basic Operation Stopping Your Treadmill Safely Your body weight must be entered so that the treadmill accurately Setting Your estimates your calorie expenditure. This weight must include your Weight workout clothing, too, which typically adds about three pounds. The treadmill will work fine without your weight setting, but will be unable to calculate your total calories. The treadmill will remember the last weight you entered. Z 8 a n d Z 9 S e r i e s Tr e a d m i l l O w n e r ' s G u i d e 23 Calorie Expenditure Calculations three : Basic Operation True treadmills use the calorie expenditure formula as described in Guidelines for Exercise Testing and Prescription from the American College of Sports Medicine. This is the most widely accepted formula for running and walking. Basic Operation The ACSM guide says that running burns calories twice as fast as walking, e.g., a 150-pound person jogging at 5 mph requires 548 calories per hour, while walking at 5 mph requires 274 per hour. See Appendix C for more details. (Other respected researchers such as David Costill think the ACSM overstates the energy difference between running and walking. Costill believes running requires 60% more energy than walking, not 100% as calculated by the ACSM. Using the same example, Costill's calculations result in 496 cal/hour for running 5 mph, with 313 cal/ hour for walking 5 mph.) One potential source of calorie estimate error is that the treadmill doesn't know if you are running or walking, so it has to make some assumptions. It assumes you are walking at 3 mph and slower, and running at 5 mph and faster. Between those two speeds, the treadmill combines the walking and running formulas to make its best guess. Variations in human exercise efficiency are another potential source of error, with differences of plus or minus 10% common in the population 24 Z 8 a n d Z 9 S e r i e s Tr e a d m i l l O w n e r ' s G u i d e A Note About Calorie Expenditure Calculations Heart Rate Monitoring three Monitoring Your Heart Rate : Basic Operation The Z8 and Z9 Series (except the Z8 and Z9 Non) can monitor your heart rate when you wear the transmitter strap provided. It will display it as a digital beatsper-minute readout, and it very accurate, typically within one beat per minute. is Using the Heart Rate Transmitter Strap The transmitter strap should be worn directly against your skin, about one inch below the pectoral muscles/breast line. Basic Operation Although the treadmill functions fine without using the heart rate monitoring feature, this kind of monitoring gives you valuable feedback on your effort level. It also allows you to use the most advanced training system available on a treadmill: True's Heart Rate Control, where the treadmill automatically adjusts your workout level based on your heart rate. See the Heart Rate Control section of this manual for details. Women should be careful to place the transmitter below their bra line. Some moisture is necessary between the strap and your skin. Sweat from your exercise works best, but ordinary tap water may be used prior to your workout if desired. Z 8 a n d Z 9 S e r i e s Tr e a d m i l l O w n e r ' s G u i d e 25 The Heart Rate Display three : Basic Operation Basic Operation The Treadmill’s Heart Rate Display Once you start your workout, your heart rate will be displayed in beats per minute. The contact heart rate system lets you monitor your heart rate without wearing a strap. Gently grasp the contact heart rate pads as shown below. 26 Z 8 a n d Z 9 S e r i e s Tr e a d m i l l O w n e r ' s G u i d e Contact Heart Rate (CHR) chapter four Operation in Greater Detail In This Chapter: Pre-Set Program Operation Tuning Your Workout Pre-Set Program Profiles Chapter 1: Introduction Chapter 2: The Console Chapter 3: Basic Operation Chapter 4: Operation in Greater Detail Chapter 5: Heart Rate Control Workouts Chapter 6: User Programs Chapter 7: Designing an Exercise Program: The F.I.T. Concept Chapter 8: Care and Maintenance Chapter 9: Important Safety Instructions Z 8 a n d Z 9 S e r i e s Tr e a d m i l l O w n e r ' s G u i d e 29 Workout Setup four Starting Cool-Down : Operation in Greater Detail Confirm that the body weight setting is correct. If it is not, adjust it with the or numeric keys and press . For a Quick Start, simply press moving at 0.5 mph. . The treadmill belt will start During your workout, the treadmill will count down from your target time. When it reaches 0:00, it will enter a 2.5-minute cool-down period, with the tread belt at the same speed it was at 0:00 and the treadmill in Manual control mode. After 2.5 minutes, the treadbelt will stop. If you set a distance target in Manual mode, the cool-down period will begin as soon as either time or distance reach zero. Manual Note: if you don't choose a time or distance target, Time will be elapsed time instead of time remaining. Making Time and/or Distance Count Down Instead of Up Operation in Greater Detail To use manual control, which is the first program suggested, press . Adjust your workout parameters using the or numeric Operation keys, then press to accept each parameter. You can keep adjusting your workout setup by repeatedly pressing . Your workout won't begin until you press . After adjusting your weight if necessary, press twice or until the lights in the time and distance windows flash. Press to set distance and to set time. When you press , time and distance will begin counting down. When the time or distance reaches zero, the treadbelt will continue to move and whichever readout reached zero (time or distance) will begin counting up. No other readouts will reset. Z 8 a n d Z 9 S e r i e s Tr e a d m i l l O w n e r ' s G u i d e 31 Pre-Set Program Details four : Operation in Greater Detail Press any Express Command key to select a program. (To get more program options, including re-selecting Manual, use the keys.)... Operation in Greater Detail ...adjust the starting level using the keys... ...Press when done. After program and level have been selected, set time using the or numeric keys, from 5 to 99 minutes. To stop or pause your workout: slow machine to below 2 mph by pressing , then press . This will stop the treadmill and remain in a Pause mode, saving your workout information. To restart your workout, press . 32 Z 8 a n d Z 9 S e r i e s Tr e a d m i l l O w n e r ' s G u i d e Pre -Set Program Operation Tuning Your Workout four : Operation in Greater Detail To change level during your workout, press . Press keys to change level, then press . If a new program is selected, it will join that program at the same point as the previously selected program. To change to another pre-set program, press one of the Express Command Keys, then press . The treadmill joins the workout in progress at the same elapsed time as the previous workout. To reset distance, time, and calories during your workout, press and hold until zeros appear in the time, distance, calorie windows. To reset the treadmill back to workout setup mode, press and hold for three seconds. Note: All workouts can be set from 5 to 99 minutes, with the timer counting down from your chosen workout time. The default value (if no time entered) is 30 minutes. When the timer reaches 0:00 it will beep and begin counting up. You must press to end your workout. Some users may prefer a minimal data display. When the treadbelt is moving, pressing the Advanced Options key will remove the progress matrix, speed, and grade readouts. The data readouts will then be Elapsed Time, Distance, and Pace (with heart rate displayed if available). Pressing or Operation in Greater Detail Runner’s Mode returns the display to normal operation. Z 8 a n d Z 9 S e r i e s Tr e a d m i l l O w n e r ' s G u i d e 33 Pre-Set Program Profiles four : Operation in Greater Detail Hill Interval Workout Green is Incline Red is Speed Operation in Greater Detail Level 34 Speed (MPH) Grade (%) Min Max Min Max 1 1.4 2.6 0.0 2.0 2 1.6 2.8 0.5 3.0 3 1.8 3.0 0.0 4.0 4 2.0 3.2 1.0 5.0 5 3.4 3.4 1.5 6.0 6 2.4 3.6 2.0 7.0 7 2.6 3.8 2.5 8.0 8 2.8 4.0 3.0 9.0 9 3.0 4.2 3.5 10.0 Level Speed (MPH) Grade (%) Min Max Min Max 1 2.0 2.4 1.0 4.0 2 2.2 2.8 1.5 5.0 3 2.6 3.2 2.0 6.0 4 3.0 3.6 3.0 7.0 5 3.4 4.2 4.0 8.0 6 3.8 4.6 5.0 9.0 7 4.0 5.0 6.0 10.0 8 4.4 5.4 7.0 11.0 9 4.8 6.0 8.0 12.0 Weight Loss Workout Green is Incline Red is Speed Z 8 a n d Z 9 S e r i e s Tr e a d m i l l O w n e r ' s G u i d e Pre-Set Program Profiles four Cardiovascular Workout Green is Incline Red is Speed Level Speed (MPH) Max 1 2.0 2.4 2.0 4.0 2 2.2 2.8 3.0 5.0 3 2.6 3.2 4.0 6.0 4 3.0 3.6 5.0 7.0 5 3.4 4.2 6.0 8.0 6 3.8 4.6 7.0 9.0 7 4.0 5.0 8.0 10.0 8 4.4 5.4 9.0 11.0 9 4.8 6.0 10.5 12.0 Level Speed (MPH) Grade (%) Min Max Min Max 1 2.0 2.4 1.0 4.0 2 2.2 2.8 0.5 5.0 3 2.6 3.2 0.5 6.0 4 3.0 3.6 1.0 7.0 5 3.4 4.2 1.0 8.0 6 3.8 4.6 1.0 9.0 7 4.0 5.0 1.0 10.0 8 4.4 5.4 1.0 11.0 9 4.8 6.0 1.5 12.0 Speed Interval Workout Green is Incline Red is Speed Z 8 a n d Z 9 S e r i e s Tr e a d m i l l O w n e r ' s G u i d e Operation in Greater Detail Grade (%) Min Max Min : Operation in Greater Detail 35 chapter five Heart Rate Control Workouts In This Chapter: HRC Workout Introduction The Easy Steps to a Heart Rate Control Workout More Details on Interval HRC Tips on the Warm Up Stage How the HRC System Controls Your Heart Rate Examples of HRC Workouts Cruise Control Examples of Walking Workouts Examples of Running Workouts Important Points About HRC Chapter 1: Introduction Chapter 2: The Console Chapter 3: Basic Operation Chapter 4: Operation in Greater Detail Chapter 5: Heart Rate Control Workouts Chapter 6: User Programs Chapter 7: Designing an Exercise Program: The F.I.T. Concept Chapter 8: Care and Maintenance Chapter 9: Important Safety Instructions HRC Safety Features Z 8 a n d Z 9 S e r i e s Tr e a d m i l l O w n e r ' s G u i d e 37 HRC Introduction Five : Heart Rate Control Workouts HRC True’s heart rate control (HRC) workouts let the treadmill monitor Workout your relative exercise intensity by way of your heart rate, then Introduction automatically adjust the workload to keep you at your target heart rate and thus your desired exercise intensity. Your heart rate is a good measure of your body’s exercise stress level. It reflects differences in your physical condition, how tired you are, the comfort of the workout environment, even your diet and emotional state. Using heart rate to control workload takes the guesswork out of your workout settings. Consult your physician before using heart rate controlled workouts for advice on selecting a target heart rate range. Also, it is important to use the bike for several workouts in the manual mode while monitoring your heart rate. Compare your heart rate with how you feel to ensure your safety and comfort. See Appendix A for a chart that may help you pick a target heart rate. You need to wear a heart rate monitoring chest strap to use heart rate control. See the “Monitoring Your Heart Rate” section in Chapter 3 for a guide to proper usage. It is not recommended that you use the contact heart rate system for heart rate control workouts. Heart Rate Control Workouts Z 8 a n d Z 9 S e r i e s Tr e a d m i l l O w n e r ' s G u i d e 39 HRC Types and a Workout Quick-Guide five : Heart Rate Control Workouts 1 - Put on a Polar or compatible transmitter chest strap as described on page 25. 2 - Pick the HRC workout. 3 - Enter your workout parameters. This includes target heart rate, maximum treadbelt speed, workout time or distance, and maximum incline. 4 - Press . 5 - Warm up. At the beginning of an HRC workout, the treadmill is in full Manual control mode. Gradually increase your work level to slowly raise your heart rate to within 10 beats per minute (bpm) of your target heart rate. 6 - Heart rate control stage. Now the treadmill takes control of speed and incline, keeping your heart rate within a few bpm of your target. 7 - Cool-down. At the end of your workout time or distance, the treadmill reduces workload by half and goes back into Manual control mode, where you directly control your cool-down. During workout setup, if you keep pressing , you will continue to scroll through the workout setup parameters. You can press at any time to accept the current parameters and begin your workout. or will exit Heart Rate Control Workouts Pressing any key other than HRC mode. Adjust your target heart rate at any time during your workout by pressing keys as , using the needed, and pressing again. If you are lowering your target, you are limited to a 5 bpm change. 40 Z 8 a n d Z 9 S e r i e s Tr e a d m i l l O w n e r ' s G u i d e The Easy Steps to a Heart Rate Control Workout During Workout Setup Choices During Workout Setup five : Heart Rate Control Workouts The time and distance accumulated during warmup are not counted against your selected workout time or distance; those values start at zero when the treadmill reaches heart rate control mode. This time and distance are accumulated into the workout summary data, as is your cooldown exercise. Tips on the Warm Up Stage Increase speed and incline gradually to slowly increase your heart rate to within 10 bpm of your target. For best results, you should take about five minutes to get to that point. The treadmill operates in a manual control mode during the warmup stage. You control both speed and incline. You may only increase speed and incline to the preset maximum values entered. It is important that you start at a low level of effort and gradually increase your work load over several minutes until you approach your target heart rate. This allows your body to adapt to your workout. Increasing work load gradually will allow you to enter the heart rate control stage without overshooting your target. Warming up too fast may cause you to overshoot your target. If this occurs, it may take several minutes before the computer software can control your heart rate. You may overshoot and undershoot your target for several minutes until stable control is achieved. Heart Rate Control Workouts Z 8 a n d Z 9 S e r i e s Tr e a d m i l l O w n e r ' s G u i d e 41 During Your Workout five : Heart Rate Control Workouts To raise your heart rate in HRC mode, speed will always increase until maximum speed is attained, followed by incline (if incline is used in the workout). To lower your heart rate in the HRC mode, incline will always decrease until zero incline is reached, followed by speed (if incline is used in the workout). How the HRC System Controls your Heart Rate Speed changes are in 0.1 mph increments. Incline changes are in 0.5% incline increments. This is equal to between 0.10 and 0.15 METs. 1 - A user who physically cannot walk over 2.5 mph can safely use heart rate control by entering maximum speed of 2.5 in an HRC workout. 2 - A runner can run up to a speed of 10 mph, without hills, by entering a maximum speed of 10 mph and a maximum incline of 0%. Heart Rate Control Workouts 3 - A walker enters a maximum speed of 4.0 mph and a maximum incline of 6%. The walker is limited to a maximum speed of 4.0 mph and incline will be used if required to elevate the heart rate up to a maximum of 6%. 42 Z 8 a n d Z 9 S e r i e s Tr e a d m i l l O w n e r ' s G u i d e Examples of HRC Workouts Tips and How HRC Works five : Heart Rate Control Workouts Cruise This is the simplest way to enter target heart rate training. While in Control manual or any program you can enter Target Heart Rate Control by simply pressing the Target HRC/Cruise Control key. Your current heart rate will be set as the target. For best results, you should be at least five minutes into your workout and warmed up. This will allow Cruise Control to more accurately control your heart rate. Remember, you must be wearing a chest strap, and your heart rate should be displayed in the Heart Rate window. To change your target heart rate press . Edit the target using and press . If you are lowering your target, you are limited to a 5 bpm change. It is important to note that if you are raising your target, the speed and grade change safety limits (described next) may prevent the treadmill from raising your heart rate to your desired new target. How Cruise Control Determines How to Change Your Excercise Intensity If you enter the HRC stage below 5 mph, the speed you enter will be the maximum speed of your workout. If you like to walk at a maximum speed of 3.8 mph, you should enter HRC at 3.8 mph. If you enter the HRC stage above 5 mph, you will have an additional 1 mph of speed. If you enter HRC at 6 mph, your maximum attainable speed in the HRC stage will be 7 mph. If you do not enter the HRC stage with incline, no incline will be available during the HRC stage of your workout. Only speed will be used to control your heart rate. Z 8 a n d Z 9 S e r i e s Tr e a d m i l l O w n e r ' s G u i d e Heart Rate Control Workouts If at any time you enter the HRC stage with incline, you will have an additional 4% of incline available in the HRC stage. If you enter the HRC stage at 1% incline, your maximum attainable incline will be 5%. 43 Examples and Cruise Control five : Heart Rate Control Workouts 1 - Enter HRC at 3.5 mph and 4% incline to allow a maximum speed of 3.5 mph and 8% incline. 2 - Enter HRC at 4.2 mph and 6% incline to allow a maximum speed of 4.2 mph and 10% incline. 1 - Enter HRC at 6 mph and 0% incline to allow a maximum of 7 mph and 0% incline. 2 - Enter HRC at 5 mph and 2% incline to allow a maximum of 6 mph and 6% incline. The heart rate monitor transmitter strap provided with your treadmill should be worn directly against your skin at about one inch below the pectoral muscles/breast line. Women should be careful to place the transmitter below their bra line. Some moisture is necessary between the strap and your skin. Sweat from your exercise works best, but ordinary tap water may be used prior to your workout if desired. Heart Rate Control Workouts If the transmitter strap is adjusted or moved while exercising, communication may be temporarily affected. 44 If communication is lost for 30 seconds, the treadmill will automatically shut off. The transmitter strap sends a low-level radio signal to the treadmill, so interference from other radio and sound waves (including everything from cordless telephones to loudspeakers) is possible. The good news is that interference is usually quite brief. If you Z 8 a n d Z 9 S e r i e s Tr e a d m i l l O w n e r ' s G u i d e Examples of Walking Workouts Using Cruise Control Examples of Running Workouts Using Cruise Control General Tips More Examples five : Heart Rate Control Workouts continue to have intermittent heart rate display problems, consult your local service technician, as the transmitter strap batteries may be low. Make sure you breath smoothly and regularly. Talking during your workout usually causes heart rate spikes of five beats per minute or more, so avoid talking as much as possible. Maintain a smooth walking or running motion. A grounded outlet is critical for the HRC system to function properly. Use a dedicated 110 VAC, grounded outlet to help prevent interference. Technical Tips Two users wearing the same kind of transmitter at the same time and in close proximity may cause false heart rate display readings. Use only the transmitter provided with your True HRC Treadmill or a Polar brand standard transmitter. True's Heart Rate Control is patented under USPTO #5,462,504. If your heart rate exceeds your target by 12 beats, there will be a 30% MET reduction in workload to reduce your heart rate. If your heart rate exceeds your target by 20 beats, the unit will automatically shut off as a precautionary measure. (Be cautious when selecting your target heart rate so the 20 beat variance will not exceed your maximum heart rate as determined by your physician). Heart Rate Control Workouts Heart Rate Control Safety Features Z 8 a n d Z 9 S e r i e s Tr e a d m i l l O w n e r ' s G u i d e 45 chapter six User Programs In This Chapter: How to Record and Run User Programs Chapter 1: Introduction Chapter 2: The Console Chapter 3: Basic Operation Chapter 4: Operation in Greater Detail Chapter 5: Heart Rate Control Workouts Chapter 6: User Programs Chapter 7: Designing an Exercise Program: The F.I.T. Concept Chapter 8: Care and Maintenance Chapter 9: Important Safety Instructions Z 8 a n d Z 9 S e r i e s Tr e a d m i l l O w n e r ' s G u i d e 47 How to Record and Run User Programs six : User Programs During a manually-controlled workout, the Z8.1 and Z9 Series Record and treadmills always "records" the changes you make in speed or incline. Run User Up to three of these recordings can be saved as User Programs that Programs you can "play back" to use as custom-designed workouts. Note that this workout recording only takes place when you use the default manual mode settings; you cannot choose a target workout time or distance. Time must be counting up during your workout in order for it to be recorded. User Programs How to Up to 36 changes in speed or incline can be recorded. Each speed/ incline pair of changes must be separated by at least 30 seconds. To save a manual workout, press your workout. Now press and hold Save User 1. as you normally would to end until the display shows You can save your workout in User 1, or press User 3. Press and hold to save the workout program you have selected. to select User 2 or To use a User Program that you have saved, simply select it from the list of programs as described in "Pre-Set Program Operation" in the previous section. Z 8 a n d Z 9 S e r i e s Tr e a d m i l l O w n e r ' s G u i d e 49 chapter seven Designing an Exercise Program In This Chapter: What is the F.I.T. Concept? Using the F.I.T. Concept Your Fitness Program Determining Your Needs Beginning Your Exercise Program Establishing and Maintaining Aerobic Fitness Managing Weight Sports Training Chapter 1: Introduction Chapter 2: The Console Chapter 3: Basic Operation Chapter 4: Operation in Greater Detail Chapter 5: Heart Rate Control Workouts Chapter 6: User Programs Chapter 7: Designing an Exercise Program: The F.I.T. Concept Chapter 8: Care and Maintenance Chapter 9: Important Safety Instructions Z 8 a n d Z 9 S e r i e s Tr e a d m i l l O w n e r ' s G u i d e 51 The F.I.T. Concept Defined seven What is the F.I.T. Concept? : Designing an Exercise Program The workout portion of your exercise program consists of three major variables: Frequency, Intensity, and Time. Frequency: How Often You Exercise Intensity: How Hard You Exercise Intensity of exercise is reflected in your heart rate. Exercise must be sufficiently rigorous to strengthen your heart muscle and condition your cardiovascular system. Only your doctor can prescribe the target training heart range appropriate for your particular needs and physical condition. Designing an Exercise Program You should exercise three to five times a week to improve your cardiovascular and muscle fitness. Improvements are significantly smaller with less frequent exercise. Start with exercise that stimulates you to breathe more deeply. Alternate days of moderate and easy exercise to help your body adapt to new levels of exertion without unnecessary strain. If you are just beginning an exercise program, you may be most comfortable walking at a speed of 1-2 mph. As you use your treadmill regularly, higher speeds may be more comfortable and more effective. Inability to maintain a smooth, rhythmic motion suggests that your speed and/or elevation may be too great. If you feel out of breath before you have exercised 12 minutes, you are probably exercising too hard. Z 8 a n d Z 9 S e r i e s Tr e a d m i l l O w n e r ' s G u i d e 53 More F.I.T. Concept Overview Designing an Exercise Program seven : Designing an Exercise Program As your fitness level improves, you will need to increase your workout intensity in order to reach your target heart rate. The first increase may be necessary after two to four weeks of regular exercise. Never exceed your target heart rate zone. Increase the speed and/or incline on the treadmill to raise your heart rate to the level recommended by your doctor. The incline feature can be used to greatly increase the workload without increasing speed. The chart below indicates how much the effort changes with each percent of incline at common speeds for a person weighing 155 pounds. METs One MET is the amount of energy your body uses when you're resting. If a physical activity has an equivalent of 6 METs, its energy demands are 6 times that of your resting state. The MET is a useful measurement because it accounts for differences in body weight. See Appendix C for more details. Time: How Long You Exercise Sustained exercise conditions your heart, lungs, and muscles. The longer you are able to sustain exercise within your target heart range, the greater the aerobic benefits. To begin, maintain two to three minutes of steady, rhythmic exercise and then check your heart rate. The initial goal for aerobic training is 12 continuous minutes. Increase your workout time approximately one or two minutes per week until you are able to maintain 20-30 continuous minutes at your training heart rate. 54 Z 8 a n d Z 9 S e r i e s Tr e a d m i l l O w n e r ' s G u i d e Utilizing the F.I.T. Concept seven : Designing an Exercise Program The F.I.T. concept and chart are designed to help you begin a program tailored to your needs. You may wish to keep an exercise log to monitor your progress. Your Fitness Program You can get valuable fitness benefits from your True Treadmill. Using the treadmill regularly may increase the ability of your heart and lungs to supply oxygen and nutrients to exercising muscles over an extended period of time. The treadmill will also help you develop added muscle endurance and balanced strength throughout your body. Determining Your Needs Calculate your maximum heart rate as a first step in developing your fitness program. The formula to calculate average maximum heart rate for one minute is 220 beats per minute minus your age. To find your pulse, locate a vein on your neck or inside your wrist, then count beats for ten seconds, then multiply by six. (See chart in Appendix A.) Designing an Exercise Program Using the F.I.T. Concept It's also important to know your target training zone or target heart rate. The American Heart Association (AHA) defines target heart rate as 60-75 percent of your maximum heart rate. This is high enough to condition, but well within safe limits. The AHA recommends that you aim for the lower part of the target zone (60 percent) during the first few months of your exercise program. As you gradually progress you can increase your target to 75 percent. According to the AHA, "Exercise above 75 percent of the maximum heart rate may be too strenuous unless you are in excellent physical condition. Exercise below 60 percent gives your heart and lungs little conditioning." Z 8 a n d Z 9 S e r i e s Tr e a d m i l l O w n e r ' s G u i d e 55 Beginning Your F.I.T. Program seven : Designing an Exercise Program Designing an Exercise Program In addition to monitoring your heart rate as you exercise, be certain of how quickly your heart rate recovers. If your heart rate is over 120 beats per minute five minutes after exercising, or is higher than normal the morning after exercising, your exertion may be too strenuous for your current level of fitness. Reducing the intensity of your workout is recommended. The age-adjusted target heart rates indicated in the chart in Appendix A reflect averages. A variety of factors (including medication, emotional state, temperature, and other conditions) can affect the exercise heart rate appropriate for you. Warning: Consult your doctor to establish the exercise intensity (target heart rate zone) appropriate for your age and condition before beginning any exercise program. Warm-Up: Slow and Deliberate Exercise You are not warmed up until you begin to perspire lightly and breath more deeply. Warming up prepares your heart and other muscles for more intense exercise and helps you avoid premature exhaustion. Begin each workout by walking even if you plan to run. Start slowly, exploring different speeds until you can comfortably sustain your speed. A good suggestion is a minimum of three minutes. Perspiration on your brow is a good indicator of a thorough warm-up. The older you are, the longer your warm-up period should be. 56 Z 8 a n d Z 9 S e r i e s Tr e a d m i l l O w n e r ' s G u i d e Beginning Your Exercise Program Your F.I.T. Program Continued seven : Designing an Exercise Program Workout: Brisk and Rhythmic Exercise Cool-Down: Slow and Relaxed Exercise Cooling down relaxes your muscles and gradually lowers your heart rate. Slowly reduce your workload until your heart rate is below 60 percent of your maximum heart rate. The cool down should last at least five minutes, followed by some light stretching to enhance your flexibility. Designing an Exercise Program The workout trains and conditions your heart, lungs, and muscles to operate more efficiently. Increase exercise in response to your heart rate to train and strengthen your cardiovascular system. Concentrate on moving your arms and legs smoothly. Walk naturally and avoid jerking motions that can cause pulled muscles, sprained joints, and loss of balance. Beginning a Fitness Program If you cannot sustain 12 continuous minutes in your target heart rate zone, exercise several times a day to get into the habit of exercising. Try to reach and maintain 60-65 percent of your maximum heart rate. Alternate exercise with periods of rest until you can sustain 12 continuous minutes of exercise at 60-65 percent of your maximum heart rate. Begin exercising in three to five minute sessions. Z 8 a n d Z 9 S e r i e s Tr e a d m i l l O w n e r ' s G u i d e 57 Establishing and Maintaining Fitness seven : Designing an Exercise Program If you can sustain 12 but not 20 continuous minutes of exercise in your target heart rate zone: Exercise three to five days a week. Establishing Aerobic Fitness Designing an Exercise Program Rest at least two days per week. Try to reach and maintain 60-75 percent of your maximum heart rate with moderate rhythmic exercise. Begin with 12 continuous minutes. Increase your time by one to two minutes per week until you can sustain 20 continuous minutes. If you can sustain 20 continuous minutes in your target heart rate zone, begin to increase the length and intensity of your workout: Exercise four to six days a week or on alternate days. Maintaining Aerobic Fitness Try to reach and maintain 70-85 percent of your maximum heart rate with moderate to somewhat hard exercise. Exercise for 20-30 minutes. Consistent aerobic exercise will help you change your body composition by lowering your percentage of body fat. If weight loss is a goal, combine an increase in the length of your workouts with a moderate decrease in caloric intake. For weight control, how long and how often you exercise is more important than how hard you exercise. Exercise four to five times a week. 58 Z 8 a n d Z 9 S e r i e s Tr e a d m i l l O w n e r ' s G u i d e Managing Weight Weight and Sports Training Programs seven : Designing an Exercise Program Try to reach and maintain 60-75 percent of your maximum heart rate with moderate exercise. Exercise for 30-45 minutes at 60-65 percent of your target heart rate. Here are some tips to achieving your weight management goal: Exercise before meals. Moderate exercise will help suppress your appetite. Take exercise breaks throughout the day to help increase metabolism (calorie expenditure). Designing an Exercise Program Consume most of your dietary calories at breakfast and lunch, and eat a light dinner. Do not eat close to bedtime. Sports When you are training to improve strength and performance: Training Exercise four to five days a week. Alternate exercise days and intervals of hard to very hard exercise with easy to moderate exercise. Exercise for 30 minutes or longer. Warning: these strategies are intended for average healthy adults. If you have pain or tightness in your chest, an irregular heartbeat, shortness of breath or if you feel faint or have any discomfort when you exercise, stop! Consult your physician before continuing. Remember, every workout should begin with a warm-up and finish with a cool-down. Z 8 a n d Z 9 S e r i e s Tr e a d m i l l O w n e r ' s G u i d e 59 chapter eight Care and Maintenance In This Chapter: Maintenance Schedule Calibration Error Codes E6 Level and Blink Codes Diagnostics Chapter 1: Introduction Chapter 2: The Console Chapter 3: Basic Operation Chapter 4: Operation in Greater Detail Chapter 5: Heart Rate Control Workouts Chapter 6: User Programs Chapter 7: Designing an Exercise Program: The F.I.T. Concept Chapter 8: Care and Maintenance Chapter 9: Important Safety Instructions Z 8 a n d Z 9 S e r i e s Tr e a d m i l l O w n e r ' s G u i d e 61 Maintenance Schedules Care and Maintenance CAUTION Servicing is to be done with appliance disconnected from the supply circuit. To disconnect, turn all controls to the off position, then remove the plug from the outlet. Daily Care and Service To extend the life and appearance of your TRUE Z-Series treadmill, we recommend that you perform the following steps daily: 2. Unplug the unit during nonbusiness hours to prevent damage caused by power surges. Weekly Care and Service Care and Maintenance 1. Wipe clean your TRUE Z-Series Treadmill to remove perspiration. We also recommend that you encourage your employees and clients to wipe perspiration from the unit after each use. Use a damp soft towel or cloth. NOTE: Do not wipe under the treadbelt when cleaning dust or debris off the unit as this may damage the treadbelt and deck. To extend the life and appearance of your TRUE Z-Series treadmill, we recommend that you perform the following tests and inspections weekly: 1. A test of all the keys including the Express Keys. 2. Inspection of the power cord for frayed or damaged areas. 3. Inspection of the power cord ground plug. 4. Inspection of the circuit breaker to see if it is tripped. 5. Inspection of the treadbelt for proper tension and alignment. 6. Check that the handrail screws are tight. 7. Check that the ON/OFF switch toggles on and off. 8. Check that the pedestal screws, pedestal hinge screws, and motor cover screws are tight. 9. Check that the heart rate contacts are working. Z 8 a n d Z 9 S e r i e s Tr e a d m i l l O w n e r ' s G u i d e 63 Maintenance Schedules Care and Maintenance Care and Maintenance To extend the life and appearance of your TRUE Z-Series treadmill, we recommend that you monthly: 1. Clean the treadmill of dust and dirt that might accumulate under and behind the treadmill. Vacuum small rubber particles from the soles of running shoes that accumulate alongside the belt and behind the machine. 2. Inspect the autowaxer for sufficient wax in the wax channel. a. Lay treadmill on its side. b. Pull back the treadbelt (on the bottom of the treadmill) to expose the wax channel. c. The wax channel should be at least ¼” thick at its thinnest point. d. Feel along the full length of the wax channel for consistent thickness. e. Call authorized service technician to replace wax channel if it is less than ¼” thick at any point. NOTE: To prevent damage to the treadbelt, do not allow the treadmill to run without sufficient wax in the wax channel. Once every three (3) months we recommend that the motor cover be removed and the motor area vacuumed thoroughly to remove dust and particles. Only authorized service personnel should perform this procedure as only authorized service technicians are allowed access to the area under the motor hood. A thorough visual inspection should be performed at this time as well. Have the technician check for tight wire harness connections, damaged motor or power wires, tight motor and tensioner bolts, tight ground screw connections and wire tie downs, properly attached incline motor cotter pin and clevis pin, and tight motor controller and interface screws. Expert service and maintenance at a modest cost are available through your factory trained authorized TRUE dealer. He maintains a stock of repair parts and has the technical knowledge to meet your service needs. 64 Monthly Care and Service Z 8 a n d Z 9 S e r i e s Tr e a d m i l l O w n e r ' s G u i d e Monthly Care and Service Calibration Care and Maintenance Incline and Speed Calibration The Incline and Speed Calibration mode is used to troubleshoot and calibrate the treadmill. Calibration will cause the treadmill to speed up to 15 mph and incline up to 15%. CAUTION: Keep area under the treadmill free from obstructions because the deck returns to 0% grade when the safety key is replaced. Failure to do so could cause personal injury or damage to the machine. NOTE: Messages appear in the Message Center on the Z8.1, Z9, Z9.1 and Z9.15. The messages display differently on the Z8 and appear in the Primary Display Window. They are shown below in parentheses. 1. Hold (up/down) while placing the SAFETY KEY onto the Keyboard to enter the Calibration Mode. CALIBRATION PRESS START (CAL) (PrSS) (Strt) NOTE: While in this mode, (up/down) and (plus/minus) can be used to change the treadmill incline and speed. The SPEED Window will display actual speed. Care and Maintenance The following messages will repeat themselves one at a time: 2. Press (Start) to start calibration. The treadmill will lower to zero incline and then start increasing incline to 15% and speed to 15 mph. 3. When the calibration is complete: The following message will display in the Message Center: CALIBRATION SUCCESSFUL (PASS) Z 8 a n d Z 9 S e r i e s Tr e a d m i l l O w n e r ' s G u i d e 65 Error Codes Care and Maintenance Or to indicate an error in speed or incline: INVALID INCLINE DATA INVALID SPEED DATA CALIBRATION ABORTED: NO SPEED SENSOR (bAd grad dAtA) (bAd SPd dAtA) (CAL StOP) (nO SPd SEnS) Care and Maintenance 4. Remove and replace Safety Key and exit Calibration Mode The following Error Codes and Service Codes will follow a double “beep” and show on the display. Service Codes provide preventative maintenance reminders. A Service Code will repeat for the next five times you start the treadmill. A Service Code will clear after any key has been pressed. When an Error Code occurs, call an authorized service technician. Z8.1/9/9.1/9.15 E1: MINIMUM Z8 E1 E1:RANGE E1 r E1:STALL E1 S E1:INCLINE E1 i E2:OVERSPEED E2 O 66 E2:CAL E2 C E2:RECAL E2 r E5:SENSOR E5 S Description Not used This error occurs when the incline values on the display do not match the values stored during calibration. This error occurs when the incline motor does not move in response to an incline command. This error occurs when the incline motor moved without an incline command. This error occurs when acceleration exceeded design limits. This error occurs when the speed displayed does not match the stored value from calibration. This error occurs when a data error is detected at start up. The Control Panel has reset to default values. This error occurs when no speed sensor data has been detected at the Control Panel. Z 8 a n d Z 9 S e r i e s Tr e a d m i l l O w n e r ' s G u i d e Error and Service Codes E6 Level and Blink Codes Care and Maintenance E6 Level and Blink Codes The failure code displayed will be “E-5 Sensor” when receiving the E5 Sensor error, enter diagnostic mode and check the error log. Below is a list of status display codes. When the drive is faulted, the Status LED blinks out the default code. The code will blink the proper number of times, pause with the LED off, and then repeat the code. Description Implication No Blink (Steady On) No Faults Running Fast (Steady Blink) No Faults Ready LED Off AC Line Power Insufficient No or Low Voltage 1 Blink (E601) 100% Command Runaway Command 2 Blink (E602) Sensor Feedback Error Sensor Error 3 Blink (E603) Voltage Trip Error Motor Issue 4 Blink (E604) Output Over Current High Motor Current 5 Blink (E605) Control Supply Under Voltage Inadequate Power Line 6 Blink (E606) Drive Over Temperature MCB Over Temperature 7 Blink (E607) AC Over Voltage Line Voltage Too High 8 Blink (E608) Output Short Circuit Short Circuit to Motor Z 8 a n d Z 9 S e r i e s Tr e a d m i l l O w n e r ' s G u i d e Care and Maintenance Status Code 67 Diagnostics Care and Maintenance Your TRUE Z-Series treadmill is equipped with built in diagnostic capabilities to assist in configuring, maintaining and servicing your treadmill. The Field Diagnostic mode provides total hours, distance, average speed, ability to change the units of measure, ability to set the “user not present” function, a list of service and error codes, the ability to set program time, and a log of the last five errors. NOTE: Messages appear in the Message Center on the Z8.1, Z9, Z9.1 and Z9.15. The messages display differently on the Z8 and appear in the Primary Display Window. They are shown in parentheses. Care and Maintenance 1. Hold the (minus/plus) while placing the Safety Key on the Keyboard. The following messages will repeat themselves: DIAGNOSTIC PRESS START (diAg) 2. Press (up arrow) to display total hours. The following messages will display: HOURS (ttL) No. of hours on the treadmill 3. Press (up arrow) to display total distance. The following messages will display: DISTANCE (dIS) No. of miles on the treadmill 4. Press (up arrow) to display average speed. The following messages will display: AVG SPEED (ASP) average speed on the treadmill 5. Press (up arrow) to display units. Press (plus) or (minus) to toggle. The following messages will display: 68 UNITS ENG(Eng) or MET (H) Z 8 a n d Z 9 S e r i e s Tr e a d m i l l O w n e r ' s G u i d e Diagnostics Diagnostics (cont.) Care and Maintenance 6. Press (up arrow) to display User Not Present function. The following messages will display: CURRENT SHUT (Crnt) No. of seconds until treadmill shuts off with no user on treadbelt 7. Press (up arrow) repeatedly to display list of errors. The service/error codes will be listed. See Error and Service Codes on the previous page. 8. Press (up arrow) to display program time. The following messages will display: MAXTIME (t) No. of minutes allowed in programmed workouts 9. Press (up arrow) repeatedly to display the error log. The Error Log lists the five most recent Error Codes and the distance at which each Error Code occurred. The following messages will display: ERROR CODE () Distance at which error code occurred NOTE: If there are no errors in the error log, the following message will be displayed: LOG EMPTY Care and Maintenance (LgCL) 10. Remove SAFETY KEY to exit Diagnostics. Z 8 a n d Z 9 S e r i e s Tr e a d m i l l O w n e r ' s G u i d e 69 chapter nine Important Safety Instructions In This Chapter: Review for Your Safety Chapter 1: Introduction Chapter 2: The Console Chapter 3: Basic Operation Chapter 4: Operation in Greater Detail Chapter 5: User Programs Chapter 6: Heart Rate Control Workouts Chapter 7: Designing an Exercise Program: The F.I.T. Concept Chapter 8: Care and Maintenance Chapter 9: Important Safety Instructions Z 8 a n d Z 9 S e r i e s Tr e a d m i l l O w n e r ' s G u i d e 71 Review for Your Safety nine : Important Safety Instructions When using this treadmill, basic precautions should always be followed, including the following: Read all instructions before using this treadmill. Consult your physician before beginning any exercise program. Danger: To reduce the risk of electric shock, always unplug this treadmill immediately after use and before cleaning. Warning - to reduce the risk of burns, fire and electric shock, and injury to persons, follow these instructions: Important Safety Instructions Do not use if you have an acute cold or fever. This treadmill should never be left unattended when plugged in. Unplug it from the outlet when not in use and before any service is performed. Close supervision is necessary when this treadmill is being used by or near children, invalids, or disabled persons. Use this treadmill only for its intended use as described in this manual. Do not use attachments not recommended by the manufacturer. Never operate this treadmill if it has a damaged power cord or plug, if it is not working properly, if it has been damaged or dropped, or if it has been submerged in water. In these cases, the treadmill should be examined by a qualified service technician. Z 8 a n d Z 9 S e r i e s Tr e a d m i l l O w n e r ' s G u i d e 73 Review for Your Safety nine : Important Safety Instructions Use a dedicated 110 volt, alternating current, 15 amp three-prong grounded outlet. Keep the power cord away from heated surfaces. Important Safety Instructions Never drop or insert any object into any opening. To disconnect, turn the power switch to the OFF position, then remove the plug from the outlet. Do not allow animals on or near your treadmill. Make sure the power cord has enough slack to allow the treadmill to raise freely without being limited by the cord or caught in the incline rack. Do not run the power cord under treadmill. Use the treadmill indoors only. Never use your treadmill near water or while wet. Using the treadmill around a pool, hot tub or sauna will void the warranty. Do not operate where aerosol (spray) products are being used or where oxygen is being administered. Allow only trained personnel to service this equipment. Keep the area under the treadmill free from obstruction, as the deck will return to 0% grade when the safety key is placed on the console. Avoid the possibility of bystanders being struck or caught between moving parts by making sure that they are out of reach of the treadmill while it is in motion. 74 Z 8 a n d Z 9 S e r i e s Tr e a d m i l l O w n e r ' s G u i d e Review for Your Safety nine : Important Safety Instructions Keep the space behind and on both sides of the treadmill clear should you lose your balance. Allow only one person at a time on your machine. Always straddle the treadbelt and allow the belt to begin moving before stepping onto the belt. Use extreme caution when stepping onto moving treadbelt. Some programs begin at speeds as high as 4.8 mph. Important Safety Instructions Do not operate treadmill without the safety key attached to the console and the lanyard clipped to your clothing at approximately waist height. Gradually slow down the belt before stopping. This will minimize the sensation of movement after you stop. When making treadbelt adjustments, keep fingers, loose clothing, jewelry, and long hair away from moving parts. Z 8 a n d Z 9 S e r i e s Tr e a d m i l l O w n e r ' s G u i d e 75 appendix a Target Heart Rate Chart A Guide to Help You Pick an Initial Target Heart Rate Z 8 a n d Z 9 S e r i e s Tr e a d m i l l O w n e r ' s G u i d e 77 Appendix A - Target Heart Rate Chart Contact Heart Rate Monitoring Contact heart rate monitoring (perhaps more accurately called handtouch heart rate monitoring) uses the same principles as chest strap monitoring: electrically conductive pads detect the faint electrical signals produced by a beating heart and are converted to a data signal which can then be displayed digitally as a numeric beats per minute value. The only difference is that a chest strap is right next to the heart, so the signals are relatively strong. Contact heart rate (CHR) using the fingers and palms receives an inherently much fainter signal. This is the sole reason for the performance differences between the two systems. This is also the reason why CHR systems must typically use two pads per side for a total of four detection pads, while a chest strap uses just one pad per side; the extra pads are required to help detect the fainter signal. The electrical signals detected by heart rate monitoring systems are a side-effect of the electrical control signals the heart generates to fire its muscles in the right sequence. The signals start in the top, or upper-right part of the heart (known as the sinoatrial node), then travel down to the bottom, or lower-left part of the heart (known as the Purkinje fibers). It is the fact that the heart is tilted in the chest cavity, and thus these signals move from the right to the left side of the body, that makes it possible for monitoring pads on each side of the body to detect the heart rate. (The CHR pads correspond roughly to leads I and III in a standard 12-lead ECG setup.) If a person’s heart is tilted less than average, the signal is weaker. (Note that this is not indicative of heart strength or health.) In some people, their heart is nearly vertical in their chest, and even a chest strap cannot pick up their heart rate signal. (12-pad medical ECG systems still work well on such an individual.) Less than 1% of the population are in this category. Z 8 a n d Z 9 S e r i e s Tr e a d m i l l O w n e r ' s G u i d e 79 Appendix A - Target Heart Rate Chart Because CHR is already trying to detect a fainter signal compared to a chest strap, it takes less of a vertical heart position to cause it to stop working. Depending on the CHR system, somewhere between 3% and 5% of the population cannot be picked up by any contact heart rate monitoring system. This heart-in-the-chest-cavity position is by far the leading cause of CHR performance variation among individuals. Other factors which negatively affect CHR performance are: 1. Dry or dirty hands. 2. Lotion or moisturizer on hands. 3. Excessive upper body motion, such as when using cross-trainer ellipticals and in running. 4. Excessively tight grip. 5. Erratic or labored breathing or excessive talking. 80 Z 8 a n d Z 9 S e r i e s Tr e a d m i l l O w n e r ' s G u i d e Causes of CHR Performance Variation Remember to check with your physician before beginning any exercise program. He can help determine an appropriate target heart rate. Medications often affect heart rate. Appendix A - Target Heart Rate Chart Z 8 a n d Z 9 S e r i e s Tr e a d m i l l O w n e r ' s G u i d e 81 appendix b METs Table How Speed and Incline Affect Workload, Expressed in METs Z 8 a n d Z 9 S e r i e s Tr e a d m i l l O w n e r ' s G u i d e 83 Appendix B - METs Table Z 8 a n d Z 9 S e r i e s Tr e a d m i l l O w n e r ' s G u i d e 85 appendix c METs Explanation and Formulas The Metabolic Formulas Behind Energy Expenditure Estimates Z 8 a n d Z 9 S e r i e s Tr e a d m i l l O w n e r ' s G u i d e 87 Appendix C - METs Explanation and Formulas METs As stated earlier, the MET is a unit of exercise measurement that Explanation takes into account body weight. Since energy expenditure in a and weight-bearing exercise such as running, walking, or stairclimbing is Formulas directly proportional to body weight, the formulas to calculate METs are a bit simpler than for, say, an exercise bike. For example, 7 mph running is always 11.7 METs, no matter who you are. A MET is defined as 3.5 ml/min/kg of oxygen usage by the body, where: ml is milliliters, the actual measured volume of gaseous oxygen min is minutes kg is bodyweight in kilograms This energy consumption rate corresponds to about 72 calories per hour for a 150-pound person, which approximates the average basal metabolic rate of the general population. The best formulas for treadmill energy expenditure also use oxygen usage by the body, or VO2. The two formulas are: walking VO2 = (2.68 * speed) + (0.48 * speed * incline) + 3.5 running VO2 = (5.36 * speed) + (0.24 * speed * incline) + 3.5 To get METs, divide the result by 3.5. (Noted exercise physiologist David Costill's speed constants for walking and running are 3.06 and 4.86, respectively.) Z 8 a n d Z 9 S e r i e s Tr e a d m i l l O w n e r ' s G u i d e 89 appendix d Specifications The Size and Performance Attributes of Your Z8 or Z9 Series Treadmill Z 8 a n d Z 9 S e r i e s Tr e a d m i l l O w n e r ' s G u i d e 91 Appendix D - Specifications Specifications Maximum speed: 12 mph; Z9.15: 15 mph Incline range: 0 to 15%; Z9.1 -3% to +12% Drive motor: 6 hp. Treadbelt area: Z9 & Z9.1: 23” x 63”; Z8 and Z8.1: 20” x 63” Treadmill Weight: 400 Pounds Maximum user weight: 400 pounds. Z 8 a n d Z 9 S e r i e s Tr e a d m i l l O w n e r ' s G u i d e 93 appendix e Glossary Definitions of common terms used throughout this document Z 8 a n d Z 9 S e r i e s Tr e a d m i l l O w n e r ' s G u i d e 95 Appendix E - Glossary Glossary ACSM: the American College of Sports Medicine, probably the single most-respected sports medicine and exercise physiology organization. This doesn’t mean they’re always right, however, even on important subjects, but if you don’t know better, you trust the ACSM. Their Guidelines for Exercise Test and Prescription, now in it’s seventh edition, is the universal reference handbook for the field. Their monthly journal, Medicine and Science in Sports, is one of the two big sports medicine journals (the other is the Journal of Exercise Physiology). aerobic capacity: a measurement of an individual’s potential for intensity and duration of cardiovascular exercise which is primarily derived from oxygen metabolism. This distinguishes it from anaerobic, or non-oxygen metabolism exercise. The most common laboratory measurement is maximal oxygen uptake, or VO2max. The other big factor affecting aerobic capacity is the lactate threshold, which is very difficult to measure and thus seldom used. (Number three on the aerobic capacity factor list is biomechanical efficiency.) Non-laboratory measurements of aerobic capacity include submaximal fitness tests and 1.5-mile maximal runs. basal metabolic rate (BMR): the rate of energy expenditure while at rest, but not sleeping. body weight: your unclothed weight, except for treadmills, where you must include your clothing weight, too (typically 3 or 4 pounds). bpm: beats per minute measurement of heart rate. calorie, calorie expenditure: the calorie is a unit of measure of energy quantity that is commonly used for expressing human energy expended and food energy consumed. This type of calorie is technically a kilocalorie, or 1,000 calories of the strict physics definition. Calorie expenditure is an energy rate, often expressed in calories per hour. Z 8 a n d Z 9 S e r i e s Tr e a d m i l l O w n e r ' s G u i d e 97 Appendix E - Glossary chest strap, transmitter: use to detect heart rate, then transmit using a 5 kHz radio signal to a receiver in fitness equipment (or wristwatch). Originally invented by the Finnish company Polar in the early 1980s, this technology is now widely available from other sources. CHR (contact heart rate) pads: stainless steel handgrips used to detect ECG signals. Typically the two top pads are “hot” or positive, while the two bottom pads are common. These pads are roughly equivalent to lead I and lead III in a standard 12-lead ECG system. constant power: a type of workload control system, most commonly found on self-generating exercise bikes. Since power = torque x rpm, a constant power system lowers torque when pedal rpm increases, and increases torque when rpms decrease. constant torque: a type of workload control system, most commonly found on ellipticals and low-end plug-in exercise bikes. Unlike constant power, torque does not change when pedal rpm does. contact heart rate (CHR): a system to acquire ECG data from handgrips, eliminating the need for a chest strap. A better name would be hand touch heart rate. CHR is less accurate than chest strap monitoring, and doesn’t work well during high-intensity or strong-motion exercise, such as running or upper-body exercise. Newer digital CHR systems, are greatly improved in these areas. CSAFE: Communications Specification for Fitness Equipment. This poorly-acronymed spec was created by a consortium of fitness equipment manufacturers back in early 1997. It is intended to be a general-purpose data communication protocol on top of RS232. Later additions to the spec included a small voltage supply to power an external controller, and commands to control volume and channel in entertainment systems. The original consortium was, in alphabetical order: Cardio Theater, Fitlinxx, On Base, Precor, 98 Z 8 a n d Z 9 S e r i e s Tr e a d m i l l O w n e r ' s G u i d e Appendix E - Glossary Quinton, Schwinn, Stairmaster, Star Trac, Tectrix, and Trotter. See fitlinxx.com/csafe/. exercise: the different metabolic state during any activity greater than rest. More commonly, the voluntary activity undertaken for health and conditioning reasons. exercise intensity: a measurement of the extra metabolism above basal metabolic rate (BMR). Sometimes this measurement includes BMR, but this is less desirable. This measurement is usually using standardized formulas for different exercises. Direct measurement requires oxygen uptake monitoring equipment. Typical units of measurement are watts, calories per hour, METs, and VO2. Note that this is not the same as the amount of power being applied to an external machine, due the body’s efficiency of between 20% and 30%. exercise, weight-bearing: where the body’s full weight must be lifted and moved. With exercise equipment, only treadmills and stairclimbers meet this requirement. (Ellipticals are not true weightbearing exercise, although riding style does affect this somewhat.) The reason weight-bearing exercise is important to distinguish from non-weight-bearing exercise is because in the former, calorie consumption varies directly with body weight, whereas in the latter (which includes exercise bikes) body weight does not affect calorie consumption. Z 8 a n d Z 9 S e r i e s Tr e a d m i l l O w n e r ' s G u i d e 99 Appendix E - Glossary fitness test, maximal: the only valid way to accurately determine maximal oxygen uptake, using VO2 monitoring. Several protocols exist, but in general a treadmill is used and the exercise intensity is gradually increased over a five to eight minute period. The subject is strongly encouraged to run to absolute exhaustion which, given the psychological and safety difficulties of this, creates inevitable variations in test results. This maximal effort is supposed to contain within it some point where the subject is consuming the maximum amount of oxygen. fitness test, submaximal: a safer, easier, and more convenient way to estimate maximal oxygen uptake, at the expense of a great deal of accuracy. The best results from such tests is typically +/- 15% compared with “true” VO2max. These tests are usually staged extrapolation protocols, such as the YMCA bike protocol and some treadmill protocols. Non-extrapolation protocols include the AstrandRyhming bike protocol and the Gerkin treadmill protocol. heart rate, maximum (HRmax): the heart rate at which the body will allow no further increase. For healthy people, reaching maximum heart rate is not unsafe. HRmax is usually an estimate based on age, as it decreases with age. heart rate reserve (HRR): the range of heart rate values between maximum and resting heart rates. This is useful because it corresponds very closely to the VO2 range from resting to maximum. %HRR reserve thus is a very good estimate of % VO2max. heart rate, resting: most accurately measured when laying down in the morning, with no food or caffeine ingestion for at least the previous three hours. interval workout: consists of alternating periods of widely different exercise intensities, usually called the work and rest intervals. (In the origin of the phrase, interval referred only to the rest interval.) 100 Z 8 a n d Z 9 S e r i e s Tr e a d m i l l O w n e r ' s G u i d e Appendix E - Glossary Interval workouts are popular because they are superior training for sports activities, which almost always involve highly varying exercise intensities. Interval workouts are not optimal for weight loss or weight control, since steady-state exercise is most efficient for maximal total energy expended for a given effort. METs: unit of energy expenditure used for exercise prescriptions, defined as the current energy expenditure rate divided by the basal metabolic rate (BMR). In the case of METs, BMR is defined as a VO2 of 3.5, meaning it varies directly with body weight. This is incorrect, as BMR varies with the 2/3-root of body weight. See TMET. oxygen uptake: also referred to as VO2, the rate of consumption of oxygen, usually expressed as a rate per unit of body weight, or milliliters per kilogram per minute, or ml/kg/min, or ml/kg*min-1. This is the best way to accurately measure energy expenditure during aerobic exercise. RJ-45: an 8-conductor locking connector used for the CSAFE system, also commonly used for Ethernet cables (where only four wires are used). The RJ-45 is typically wired using the EIA/TIA-568 twisted-pair wiring standard. rpm: revolutions per minute, the most common unit of measure of angular motion in the non-scientific world. The International System (SI) unit that is more useful is radians per second, which is equal to 0.1047 rpm. segment, work and rest: same as work and rest interval. See interval training. speed, estimated running: applies the measured energy expenditure to walking and running equations, producing a more friendly or familiar speed feedback. Z 8 a n d Z 9 S e r i e s Tr e a d m i l l O w n e r ' s G u i d e 101 Appendix E - Glossary speed, simulated ground: applies the measured energy expenditure to an outdoor bike equation, producing a speed feedback more applicable to an elliptical or exercise bike rider. T-MET: a replacement for METs that properly takes body weight into account. A T-MET = watts / kg2/3, where watts is power applied to an external machine by the exerciser, and kg is the exerciser’s body weight in kilograms. True’s marketing name for the T-MET concept is Personal Power. VO2: see oxygen uptake. VO2max: maximal oxygen uptake, the single best way to measure aerobic capacity (see). watts: the International System unit of power measurement, defined as Joules per second. One watt is roughly equal to 4.2 calories per hour. Watts are commonly used to report workload on exercise bikes, less so on ellipticals, and virtually never on treadmills. workload: the amount of power being demanded of an exerciser, manifesting itself in the exerciser as exercise intensity. Common workloads are treadmill running belt speed, bike torque and pedal rpm, or stairclimber vertical climbing speed. 102 Z 8 a n d Z 9 S e r i e s Tr e a d m i l l O w n e r ' s G u i d e bibliography Bibliography References and Selected Readings Z 8 a n d Z 9 S e r i e s T r e a d m i l l O w n e r ’s G u i d e 103 Bibliography American College of Sports Medicine, ACSM's Guidelines for Exercise Testing and Prescription. 6th edition. Philadelphia: Lippincott Williams & Wilkins, 2000. Feynman, Richard P., The Feynman Lectures on Physics. Original edition. Boston: Addison Wesley, 1970. ISBN: 0-201-02115-3. Huszar, Robert J., Basic Dysrhythmias. Third Edition. St. Louis, Missouri: Mosby, 2002. McArdle, William D., Katch, Frank I., and Katch, Victor L., Exercise Physiology, 5th edition. Baltimore: Lippincott Williams & Williams, 2001. McMahon, Thomas A. and Bonner, John T., On Size and Life. New York: W. H. Freeman, 1985. ISBN: 0-716-75000-7. Pollack, Michael L., Gaesser, Glenn A., Butcher, Janus D., et al. (1998) The recommended quantity and quality of exercise for developing and maintaining cardiorespiratory and muscular fitness in healthy adults. (The ACSM Position Stand on Fitness.) Medicine and Science in Sport and Exercise, 30(6): 975-991. URL: <ipsapp006.lwwonline.com/content/getfile/2320/20/1050/fulltext. htm> Other ACSM position stands are found here: <www.acsm-msse.org> Bibliography Z 8 a n d Z 9 S e r i e s T r e a d m i l l O w n e r ’s G u i d e 105 Bibliography Robergs, Robert A. and Landwehr, Roberto. (2002) The Surprising History of the "HRmax = 220 - age" Equation. Journal of Exercise Physiology, 5(2). ISSN 1097-9751.2 Article URL: <http://www.asep.org/Documents/Robergs2.pdf> Journal URL: <http://www.asep.org/FLDR/JEPhome.htm> Starr, Robert M. and Doyle, Jay D., 550 ZTX Owner’s Guide, Colophon edition. O’Fallon: True Fitness Technologies, 2003. Swain, David P. and Leutholtz, Brian C., Metabolic Calculations - Simplified. Baltimore: Williams & Wilkins, 1997. Tufte, Edward R, Visual Explanations. Chesire, Connecticut: Graphics Press, 1997. Bibliography Whitmore, Jack H. and Costill, David L., Physiology of Sport and Exercise. 2nd edition. Champaign, Illinois: Human Kinetics, 1999. 106 Whitt, Frank R. and Wilson, David G., Bicycling Science. Cambridge: The MIT Press, 1982. Z 8 a n d Z 9 S e r i e s T r e a d m i l l O w n e r ’s G u i d e True offers a full line of leading edge Cardiovascular and Flexibility equipment. Z Series Bikes Z Series Treadmills TrueStretch Flexibility Unit F o u n d e d 1 9 8 1 865 Hoff Road O’Fallon, MO 63366 800.426.6570 truefitness.com ©2005 TRUE FITNESS TECHNOLOGY, INC. TRUE is a registered trademark of TRUE FITNESS. Specifications subject to change. Revision: 8/2005 Part: 00345300