1
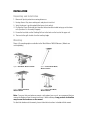
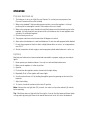
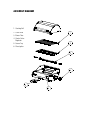
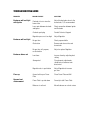
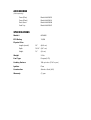
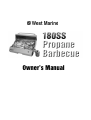
®
Owner’s Manual
If you are missing any parts or have questions regarding assembly,
performance or operation please contact Customer Service at
1-800-663-8515 or [email protected].
INTRODUCTION
Thank you for selecting the West Marine 180SS Propane Barbecue. Your unit was carefully
inspected and tested at our factory. We take pride in producing one of the finest barbecues
manufactured for marine use. Please take the time to read this manual carefully before installing
and using your barbecue; many of the instructions are essential to the safe operation of your new
Propane Barbecue.
Due to the continuing refinement of our product designs, your barbecue may possess features not
discussed in the manual. We have tried to supply all the information you might need. West Marine
advises strongly against unauthorized modification of this product, but we do encourage you to
correct problems which may arise by undertaking the simple repairs and maintenance described
in this manual.
Barbecue mounting options are not included. To satisfy your specific mounting application
for your West Marine 180SS Propane Barbecue, the mount is sold separately. Please read the
“Installation Instructions” section entitled “Mounting” for more details.
Safety
Read all Instructions before Operating.
• For outdoor use only.
• Use high pressure propane cylinders only.
• Always light barbecue with lid open.
• Do not leave the barbecue unattended when in use.
• Always turn propane off after use.
• Do not make unauthorized modifications to this product.
Caution: The Barbecue lid is hot – Do not touch when in use. Open lid with handle only.
INSTALLATION
Unpacking and Installation
1. Remove all plastic protective covering before use.
2. Unstrap Grease Tray from cooking rack and place in front slot.
3. Verify the burner is positioned with the burner slots vertical.
4. Position the Flavor Plate with the flat end to the back and the indent facing up on the lower
rails (See item 2 in Assembly Diagram).
5. Ensure the back tabs on the Cooking Grill are in the holes on the back of the upper rail.
6. The front of the grill should sit on the front top ledge.
Mounting
There a (4) mounting options available for the West Marine 180SS Barbecue. (Mounts are
sold separately)
Figure 1 Rail Mount, Model # 6816540
Figure 2 60º Rod Holder Mount,
Model # 6816573
Figure 3 Flush Socket Mount,
Model # 6956122
Figure 4 Surface Deck Mount,
Model # 6956148
Note: To ensure that your barbecue remains safely aboard your vessel, we recommend that you
remove the Barbecue from the mount and store it while underway. Long periods of vibration
may loosen the barbecue on the mount.
To attach the barbecue to the mount, please follow the instructions included with the mount.
OPERATION
Propane Gas Hook-up
1. This barbecue is set-up for High Pressure Propane. To use low pressure propane a Low
Pressure Conversion kit must be installed.
2. When using standard 1 lb disposable propane canisters, ensure the regulator is in the off
position prior to fastening the canister. Take caution not to cross thread.
3. When using a propane supply already on board, the barbecue must be hooked up prior to the
regulator, or using a low pressure conversion kit as the barbecue has its own regulator valve
assembly. Do not double regulate!
4. Check for leaks prior to use.
5. The propane canister must not be more than 45 degrees off vertical.
6. Store and use the barbecue in a well ventilated area. Do not store with propane bottle attached.
7. Do not store propane fuel tanks in direct sunlight, below decks on vessels, or in temperatures
over 120°F.
8. Shut off connections at tank supply or remove propane cylinder when barbecue is not in use.
Lighting
Now that your barbecue has been mounted and connected to a propane supply you are ready to
light it.
1. Never operate your barbecue indoors. Use only in a well ventilated outdoor area.
2. Make sure the regulator is in the off position.
3. Open lid.
4. Push and turn the regulator counter-clockwise to the high setting.
5. Repeatedly Push in Piezo igniter until burner lights.
6. Visually confirm burner is lit by looking through the grease tray opening on the front of the
barbecue.
7. Adjust heat setting.
8. To shut off, turn knob clockwise to the Lock-Off position.
Note: If burner does not light after (10) seconds, turn valve to off position and wait (5) minutes
before repeating.
Tip: If the Burner does not light with the Piezo igniter, it can be lit with a barbecue Butane lighter
or long match by placing the flame in the manual burner hole on the left side of the barbecue.
Cooking
1. Do not overheat barbecue. This barbecue does not require preheating.
2. Do not cook on the high setting with the lid closed.
Tip: You can add extra flavor to your meals by putting some hickory or cherry wood chips on your
flavor plate. Place pre-soaked wood chips directly into the cavity in the middle of the Flavor Plate.
Use Caution not to overheat when using as a smoker.
Note: Lock the lid securely with the latches when the barbecue is not in use.
Adjustments
There are two types of adjustments that can be made on the barbecue to optimize performance;
Air adjustments and Regulator adjustments.
Air
There are two air adjustment locations on the West Marine 180SS Barbecue.
The external air baffle is located on the regulator housing on the right side of the barbecue. When
cooking in windy conditions, slide the baffle forward to reduce the cross wind effect on the orifice.
There is a primary air shutter located on the far end of the burner in the regulator housing (Shown
below). This air shutter adjusts the flame quality of the burner.
Adjustment Screw
33mm
mm toto
4.5mm
4.5
mm
Air Shutter Adjustment
The burner flame should be mostly blue with yellow tips. If the flame is completely blue with a wild
flame, the opening at air shutter needs to be reduced (Do not completely close this opening). If the
flame is completely yellow, the opening needs to be made larger.
Regulator Removal
The regulator pressure may be set too low and you may have to reset it. Remove the silver label in
the center of the regulator (where it says “Push to Turn”). By turning the Phillips head or 3/32 hex
screw found below this label, you can increase or decrease the gas flow. Clockwise increases the
gas flow, and counterclockwise decreases the gas flow.
Remove Label
Adjustment Screw
CAUTION: You can increase the gas flow too much and the gas will not shut off. Check this
carefully after each adjustment.
CLEANING AND MAINTENANCE
Cleaning
Stainless Steel exposed to high heat will change color over time. Discoloration of components
does not affect the operation or performance of the barbecue.
The exterior of the barbecue can be cleaned with soapy water. We recommend covering the
barbecue between uses. West Marine recommends the following covers designed for this product:
Blue # 6816615 or Black # 6816623.
Clean the grease from the Grease Tray on a regular basis.
Clean the Flavor Plate on a regular basis. Build up of grease and food particles can cause flare ups
or poor heat disbursement.
Clean the grill after every use using a wire brush.
Maintenance
The following procedure will allow for the removal of the Burner Tube and Regulator for cleaning
or replacement.
Burner Removal
The burner can be removed from the barbecue by removing the machine screw connecting the
burner to the left side of the barbecue and sliding it out.
Regulator Removal
1. Remove the barbecue’s burner, described above.
2. The orifice is located at the entrance to the burner. It is a brass fitting with a fine hole that
controls the maximum amount of gas to enter the burner.
3. Remove the orifice from the barbecue using an 11/16'' wrench.
4. Do not lose the spring washer that goes between the orifice and the regulator housing.
Observe the orientation of this washer for proper reinstallation.
ASSEMBLY DIAGRAM
1. Cooking Grill
2. Flavor Plate
1
3. Burner Tube
4. Control Valve
Regulator
2
5. Grease Tray
6. Piezo Igniter
3
4
5
6
TROUBLESHOOTING GUIDE
PROBLEM
POSSIBLE CAUSE
SOLUTION
Barbecue will not light
with Igniter
Electrode is too far from the
burner tube
Adjust the electrode closer to the
burner tube, 1/8'' recommended
Loose wire between electrode
and Igniter
Check connection between Igniter
and Electrode
Cracked spark plug
Contact Technical Support
Regulator pressure is too high
Adjust Regulator
No gas flow
Check propane bottle
Obstruction
Remove and clean orifice and
burner tube
No gas flow, full propane,
no obstruction
Adjust or replace Regulator
Low flame
Increase flame by adjusting heat
setting
Strong wind
Close down air adjustments,
shield back of barbecue from
direct wind
Regulator out of specification
Adjust Regulator to increase
gas flow
Flare up
Grease build-up on Flavor
Plate
Clean Flavor Plate and Grill
Uneven heat
disbursement
Flavor Plate is upside down
Correctly install Flavor Plate
Barbecue is not level
Mount barbecue on a level surface
Barbecue will not light
Barbecue blows out
ACCESSORIES
(Sold separately)
Cover (Blue)
Model # 6816615
Cover (Black)
Model # 6816623
Dock Stand
Model # 6816698
Food Tray
Model # 6816581
SPECIFICATIONS
Model #
6816508
BTU Rating
14,000
Physical Size
Length (overall)
25''
(63.5 cm)
Depth
15.25'' (38.7 cm)
Height
13''
(33 cm)
Weight
24 lbs
Fuel Type
Propane (LPG)
Cooking Surface
180 sq inches (1161 sq cm)
Ignition
Piezo
Construction
Stainless Steel (304)
Warranty
(1) year
LIMITED WARRANTY
The manufacturer warranties this Propane Barbecue to the original consumer to be free from
defective material(s) and workmanship while under normal use and service for a period of
(1) year.
During the warranty period, the manufacturer, at its option and without charge, may repair
and/or replace but not remove or reinstall the faulty product.
This limited warranty applies only to products that have been installed and used in accordance to printed instructions in this owner’s manual and does not cover improper use,
vandalism, negligence or accidents.
West Marine
500 Westridge Drive
Watsonville, CA 95076
Westmarine.com
1-800-BOATING