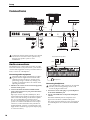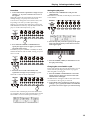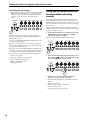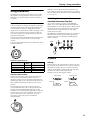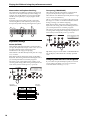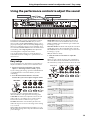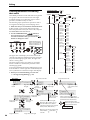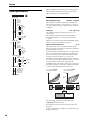
1
PS60 Owner’s Manual E 1 Thank you for purchasing the Korg PS60 Performance Synthesizer. To help you get the most out of your new instrument, please read this manual carefully. About this manual The owner’s manuals and how to use them Conventions in this manual The following documentation is included with the PS60. In the documentation, references to the manuals are abbreviated as follows. Printed: • PS60 Easy Start Guide PDFs on the ACCESSORY disc (CD-ROM): • PS60 Owner’s Manual • PS60 Voice Name List • PS60 Parameter Guide • PS60 USB-MIDI Setup Guide • PS60 Editor/Plug-In Editor User’s Guide The above PDF files are located in the “MANUALS” folder of the included CD-ROM. The owner’s manuals for the Korg USB-MIDI driver etc. are in the same folder as the driver. PS60 Easy Start Guide Read this first. It’s a simple explanation of how to poweron the PS60 and try out the sounds. PS60 Owner’s Manual This explains the various parts of the PS60 and their function, how to make connections, basic operations, and what you’ll need to know in order to edit sounds. It also provides a simple explanation of the quick parameters that can be edited from the PS60 itself. It also contains troubleshooting information, a list of error messages, and specifications. PS60 Voice Name List This contains lists of the programs, performances, multisamples, and audition riffs that are built into the PS60. PS60 Parameter Guide This contains a detailed explanation of the quick parameters that can be edited from the PS60 itself, all of the PS60’s parameters which can be edited using PS60 Editor, and functionality that is specific to the Editor. Refer to this guide when you’re using the PS60 Editor to edit, or when you want to know more about the quick parameters that can be edited from the PS60 itself. PS60 USB-MIDI Setup Guide This explains how to set up the PS60 with your computer via USB for MIDI communication. PS60 Editor/Plug-In Editor User’s Guide This explains how to set up and use PS60 Editor and PS60 Plug-In Editor. ii Abbreviations for the manuals: OM, PG OM: PS60 Owner’s Manual PG: PS60 Parameter Guide Symbols , , Note, Tips These symbols respectively indicate a caution, a MIDIrelated explanation, a supplementary note, or a tip. Example screen displays The parameter values shown in the example screens of this manual are only for explanatory purposes, and may not necessary match the values that appear in the Display of your instrument. MIDI-related explanations CC# is an abbreviation for Control Change Number. In explanations of MIDI messages, numbers in square brackets [ ] always indicate hexadecimal numbers. Table of Contents About this manual . . . . . . . . . . . . . . . . . . . . . . . . . ii Editing . . . . . . . . . . . . . . . . . . . . . . . . 23 About editing . . . . . . . . . . . . . . . . . . . . . . . . . . . . 23 Introduction to the PS60 . . . . . . . . 1 Main features of the PS60 . . . . . . . . . . . . . . . . . . 1 Front and rear panels . . . . . . . . . . . . . . . . . . . . . . 2 Front panel . . . . . . . . . . . . . . . . . . . . . . . . . . . . . . . . 2 Rear panel . . . . . . . . . . . . . . . . . . . . . . . . . . . . . . . . . 5 About the PS60 . . . . . . . . . . . . . . . . . . . . . . . . . . . . 7 How the PS60 is organized. . . . . . . . . . . . . . . . . . . 7 Basic operations in the edit pages . . . . . . . . . . . .23 Saving (Storing/Writing) . . . . . . . . . . . . . . . . . . . .25 Performance edit . . . . . . . . . . . . . . . . . . . . . . . . . 27 A performance’s structure and settings . . . . . . .27 Major performance edit parameters . . . . . . . . . .27 Operating flow on the PS60 . . . . . . . . . . . . . . . . .28 Quick parameter list . . . . . . . . . . . . . . . . . . . . . . .29 Program edit . . . . . . . . . . . . . . . . . . . . . . . . . . . . . 37 A program’s structure and settings. . . . . . . . . . .37 Setup . . . . . . . . . . . . . . . . . . . . . . . . . . 9 Turning the power on/off. . . . . . . . . . . . . . . . . . . 9 Connecting the AC adapter . . . . . . . . . . . . . . . . . . 9 Major program editing functions. . . . . . . . . . . . .37 Operating flow on the PS60 . . . . . . . . . . . . . . . . .39 Quick parameter list . . . . . . . . . . . . . . . . . . . . . . .40 Turning the power on . . . . . . . . . . . . . . . . . . . . . . . 9 Global settings . . . . . . . . . . . . . . . . . . . . . . . . . . . 47 Turning the power off. . . . . . . . . . . . . . . . . . . . . . . 9 Major global settings . . . . . . . . . . . . . . . . . . . . . . .47 Connections . . . . . . . . . . . . . . . . . . . . . . . . . . . . . . 10 Quick parameters . . . . . . . . . . . . . . . . . . . . . . . . . .48 Audio connections. . . . . . . . . . . . . . . . . . . . . . . . . 10 Connecting a damper pedal, foot switch, or foot pedal . . . . . . . . . . . . . . . . . . . . . . . . . . . . . . . . 11 Appendix . . . . . . . . . . . . . . . . . . . . . 55 Connecting the PS60 to a computer . . . . . . . . . . 12 Restoring the factory settings . . . . . . . . . . . . . 55 Connecting MIDI devices . . . . . . . . . . . . . . . . . . . 12 Loading the preload data . . . . . . . . . . . . . . . . . . .55 Initialization . . . . . . . . . . . . . . . . . . . . . . . . . . . . . .55 Playing the PS60 and using the performance controls . . . . . . 13 Troubleshooting . . . . . . . . . . . . . . . . . . . . . . . . . 56 Power supply . . . . . . . . . . . . . . . . . . . . . . . . . . . . .56 Audio output . . . . . . . . . . . . . . . . . . . . . . . . . . . . .56 Playing. . . . . . . . . . . . . . . . . . . . . . . . . . . . . . . . . . . 13 Effect priority order. . . . . . . . . . . . . . . . . . . . . . . 59 Selecting a timbre (sound) . . . . . . . . . . . . . . . . . . 13 Error messages . . . . . . . . . . . . . . . . . . . . . . . . . . . 59 Using the automatic Audition function when selecting sounds . . . . . . . . . . . . . . . . . . . . . 16 Error and confirmation messages . . . . . . . . . . . .59 Using controllers . . . . . . . . . . . . . . . . . . . . . . . . . . 17 Specifications . . . . . . . . . . . . . . . . . . . . . . . . . . . . 60 Using the performance controls to adjust the sound . . . . . . . . . . . . . . . . . . . . . . . . . . . . . . . . 19 Operating requirements . . . . . . . . . . . . . . . . . . 62 MIDI Implementation Chart . . . . . . . . . . . . . . . 63 Easy setup . . . . . . . . . . . . . . . . . . . . . . . . . . . . . . . . 19 Master effect and EQ . . . . . . . . . . . . . . . . . . . . . . . 20 Storing a performance. . . . . . . . . . . . . . . . . . . . . . 22 iii iv Introduction to the PS60 Main features of the PS60 The PS60 is a lightweight and compact performance synthesizer that delivers high-quality sound and easy operation, making it an ideal choice for live use. High-quality sound for live or band performance The PS60 features high-quality sounds delivered by the EDS-i (Enhanced Definition Synthesis-integrated) sound engine which inherits the sound of Korg’s professional synthesizers. Centered on sounds such as acoustic piano, electric piano, strings, brass and synth. The PS60 contains 440 sounds that will integrate into any live or studio performance. A total of up to 512 programs can be saved into the internal memory. Easy selection of sounds, and layer/split settings The sounds are organized into six categories ranging from acoustic piano (A.PIANO) thru to synth (SYNTH). With dedicated buttons for each group, you can quickly and easily select sounds, create layers, splits and layered splits in the upper and lower regions of the keyboard. Performances allow instant recall of your favorite settings You can use the buttons and knobs of the performance control section on the center and right side of the PS60’s front panel to edit the sounds and effects. The performance section on the left of the front panel allows you to save twenty of these settings. Your saved performances are easily recalled using the performance buttons. Richly expressive keyboard and controllers The PS60 features a semi-weighted 61-note naturaltouch keyboard that allows you to play anything from piano sounds to synthesizer sounds with a natural feel. The controllers you need for expressive playing are also provided, including a joystick to modify the sound, a button that holds the current position of the joystick, a button that switches the rotary speaker between slow/fast for organ sounds and buttons that allow you to shift the octave and transpose settings. There are also two jacks to which you can connect a damper pedal, foot switch or foot pedal, allowing you to adjust the volume, control effect modulation or switch performances. “PS60 Editor” is a standalone editor. “PS60 Plug-In Editor” supports VST, Audio Units, and RTAS formats, and allows you to use the PS60 from within your DAW (Digital Audio Workstation) or other host application just as though it was a plug-in instrument. The latest version of the editor, plug-in editor, and Korg USB-MIDI driver can be downloaded from the following website. Korg website: http://www.korg.com (Enhanced Definition Synthesis - integrated) The EDS-i sound engine integrates the main functionality such as oscillators, filters, amp, LFO/EG and effects of the “EDS” (Enhanced Definition Synthesis) sound engine from the M3 and M50. It delivers the widely acclaimed rich and vivid sound of EDS. The oscillator section lets you use a wide variety of high-quality PCM sources that were sampled at 48 kHz, occupying a total of 49 Mbytes (when calculated as 16-bit linear PCM data). The filter section that is so important to creative sound-making provides two high-quality filters for each oscillator, and allows you to freely combine four types of filter: low-pass, high-pass, band-pass and band-reject. Modulation functionality is indispensible to detailed sound design, and here too, the PS60 brings you fullfledged synthesis power with EG (envelope generator), LFO, key tracking generator, AMS (alternate modulation sources) and AMS mixer inherited from the EDS sound engine. The effect section lets you add the final touches to the overall sound using one insert effect for each timbre (except for the STRINGS timbre, making a total of five), whose effect type can be one of 63 types including dynamics effects such as compressor or limiter and amp modeling powered by Korg’s proprietary “REMS” modeling technology. Effect dynamic modulation (Dmod) allows you to control the effects in a wide variety of ways. You can also use two master effects (modulation and reverb/delay) and an EQ. Lightweight and compact design What is The PS60’s lightweight and compact design make it a breeze to carry between live gigs and studio practice sessions. (Resonant structure and Electronic circuit Modeling System) is KORG’s proprietary sound modeling technology which precisely reproduces the complex character and nature of both acoustic and electric instruments as well as electronic circuits in real world environments. emulates a wide variety of sound generation characteristics including instrument bodies, speakers & cabinets, acoustic fields, microphones, vacuum tubes, transistors, etc. Editor and plug-in editor The bundled software “PS60 Editor” and “PS60 Plug-In Editor” are applications that let you use your computer to edit the PS60’s performances and programs. These editors allow more detailed editing than is possible on the PS60 front panel. It is possible to make multisample selections and settings, edit the filter type and routing, make detailed settings for EG, LFO, AMS, insert effects and even create user scales. ? 1 Introduction to the PS60 Front and rear panels Front panel Performance controls 2 9 3 14 1 10 12 13 15 5 4 11 16 1. VOLUME knob This knob adjusts the volume of the OUTPUT L/ MONO, R outputs, as well as the volume of the headphone jack (p. 9). Performance 2. PERFORMANCE Here you can save the sound, effect and split settings you’ve made using the performance controls. There are four banks, each containing five performances, allowing you to save a total of twenty performances (p. 22). BANK button Use this button to select the desired performance bank. After you’ve selected a performance bank, use the 1–5 buttons to select the desired performance number from that bank. 1, 2, 3, 4, 5 buttons Use these buttons to select a performance number. STORE button This button stores the performance. The performance control settings and performance edit settings will be saved. After pressing the STORE button, use the BANK and buttons 1–5 to specify the save-destination bank and number. Press this STORE button once again to save the performance. 2 Performance controls 3. EASY SETUP Here you can adjust settings such as the volume and effect send for each timbre. EASY SETUP button This button selects the function that the knobs to the right will control. Each press of the button will cycle through the following functions. VOLUME: Adjust the volume OCTAVE: Switch the octave in a range of –5 to +5 octaves MOD SEND: Adjust the level of signal sent to the modulation effect REV/DLY: Adjust the level of signal sent to the reverb/ delay effect Off: (all indicators unlit) A.PIANO, E.PIANO, ORGAN, STRINGS, BRASS, SYNTH knobs For each timbre, these knobs adjust the function selected by the EASY SETUP button (p. 19). 4. Timbre selector Timbre On buttons Use these buttons to select the timbre(s) that you want to play. By holding down a button and pressing other buttons you can create layered sounds in which multiple timbres are heard simultaneously. You can also create split sounds in which different timbres are heard when you play higher or lower regions of the keyboard ( “SPLIT SETTING,” p. 3). Front and rear panels Front panel 6 7 8 When you press one of these buttons, the display will alternate between showing performance-related information and timbre-related information. Note: If you’re making single or layer settings, make sure that the indicators are lit for all of the timbres that are turned on. When making split settings, you can press the LOWER or UPPER button to see the indicators of the timbres that are turned on for the lower and upper regions specified by the SPLIT SETTING buttons. Variation the buttons Use these buttons to select variations (programs) for each timbre. 5. SPLIT SETTING SUB OFF/RECALL button This button temporarily cancels the split setting so that only the main timbre (p. 7) will be played by the full range of the keyboard. If you press this button to cancel the split setting, the button indicator will light. The sub timbre settings are remembered while this button is lit. Audition function: If you press the SUB OFF/RECALL button and the LOWER button simultaneously, a riff (phrase) specified for each timbre program will play repeatedly. This function will turn off when you press either button or the EXIT button. You won’t be able to turn this function on if layer or split settings are active (p. 16). Here you can divide the PS60’s keyboard into lower and upper regions and specify timbres separately for each region. Such setups are called “splits” (p. 14). 6. MODULATION LOWER and UPPER buttons Use these buttons to specify the timbres for the lower or upper region, or to check the timbres that are split. MODULATION TYPE button Use this button to select the effect type. Each press of the button will cycle through the effect types (the corresponding indicator will light). If you press one of these buttons when (non-split) single or layer settings are active, the Timbre On button will blink, and you’ll be able to select the timbre used by the button you pressed (LOWER or UPPER). You can press the EXIT button to exit this state. If split settings are active, pressing one of these buttons lets you see which timbres are used by the lower or upper region; the Timbre On button of the corresponding timbres will light. How to specify the split point: Press the LOWER button and UPPER button simultaneously. Then press the key that you want to specify as the split point; that key will be the new split point. If you decide not to make the setting, press either of these buttons or the EXIT button. Here you can add rich spaciousness, modulation, or movement to the sound (p. 20). CHORUS: Stereo chorus that adds richness and warmth to the sound FLANGER: Stereo flanger that applies dramatic modulation and a sense of pitch change to the sound VINTAGE CHO/FLG: Vintage analog chorus/flanger that produces the warm and rich sound typical of an analog effect processor PHASER: Stereo phaser that produces modulation by shifting the phase of the sound EFFECT OFF: (no indicators lit) 3 Introduction to the PS60 RATE knob This knob adjusts the speed of LFO modulation. DEPTH knob This knob adjusts the depth of LFO modulation. Tip: In addition to these settings, there’s a “Global EQ Offset” function that lets you apply adjustments to all performances or programs (p. 49). FEEDBACK knob This knob adjusts the amount of feedback (which returns a portion of the output back to the input). Controllers Note: The specific result of adjusting RATE, DEPTH, and FEEDBACK will depend on the effect type. You can control the sound by moving this joystick up, down, right, or left while you perform. You can use this to apply modulation or filtering, or control the pitch in a way that’s similar to a guitarist bending notes (p. 17). 7. REVERB/DELAY Here you can apply effects that give the sound more depth and spaciousness, or add echo or reverberation (p. 20). REVERB/DELAY TYPE button Use this button to select the effect type. Each press of the button will cycle through the effect types (the corresponding indicator will light). HALL: Hall-type reverb typical of the reverberation of a mid-sized concert hall or ensemble hall PLATE: Plate reverb that produces a warm (dense) reverberation ROOM: Room-type reverb with emphasis on early reflections, producing a tight feel DELAY: Simple and easy-to-use monaural delay with a maximum delay time of 549 ms EFFECT OFF: (no indicators lit) TIME knob This knob adjusts the reverberation time of the reverb or the delay time of the delay. LEVEL knob This knob adjusts the output level of the reverb or delay. FEEDBACK knob This knob adjusts the decay time of the reverb or the feedback amount of the delay. Note: The specific result of adjusting TIME, LEVEL, and FEEDBACK will depend on the effect type. 8. EQ This is a three-band parametric equalizer. You can individually adjust the low, mid, and high-frequency regions (p. 20, 34, 45). 9. Joystick Joystick lock button This button holds the effect that’s being applied by the joystick. This button will light while the joystick is locked. 10.Rotary speaker simulator ORGAN SLOW/FAST button If the ORGAN timbre is on and the rotary speaker simulator effect is being used, this button will blink. By pressing the blinking button, you can switch the rotary speaker simulator between slow and fast states (p. 17). Keyboard and keyboard settings 11.Keyboard This is a velocity-sensitive 61-note natural touch keyboard (aftertouch is not supported). You can use the OCTAVE or TRANSPOSE buttons to shift the pitch instantly. 12.OCTAVE DOWN and UP buttons These buttons shift the pitch of the keyboard in oneoctave steps over a range of –3 to +3 octaves (p. 18). 13.TRANSPOSE and buttons These buttons shift the pitch of the keyboard in semitone steps over a range of –1 to +1 octaves (p. 18). BASS knob This knob adjusts the low-frequency region. In edit mode, you can switch this band between Shelf and Peak types. MID knob This knob adjusts the mid-frequency region. This band is a Peak type adjustment. TREBLE knob This knob adjusts the high-frequency region. In edit mode, you can switch this band between Shelf and Peak types. 6 4 5 4 3 Front and rear panels Rear panel Display Rear panel 14.Display 1. Power supply This shows the names of performances or timbres, the single/layer/split status, and the values of parameters. Power switch This switch turns the power on/off (p. 9). You can make the display automatically scroll if text contains too many characters to be shown in the screen at once (p. 49). DC 9V jack Connect the DC plug of the included AC adapter here (p. 9). Connections must be made with the power turned off. Please be aware that careless operation may damage your speaker system or cause malfunctions. Main operation 15.Main operation VALUE knob Use this knob to switch performances or programs and to edit the value of parameters. CURSOR/VALUE buttons Use these buttons to switch performances or programs, to select quick parameter edit pages or parameters and to edit their values. PERFORMANCE EDIT and PROGRAM EDIT buttons These buttons allow you to edit the corresponding quick parameters (p. 23). GLOBAL button This button allows you to make overall settings that apply to the entire PS60 (p. 23). EXIT button This button exits an edit page, taking you back to the main page of the performance (p. 23). Headphones 16.PHONES jack You can plug in your headphones here. (This jack will output the same signal as the OUTPUT L/MONO and R jacks.) Use the VOLUME knob to adjust the headphone volume. Cable hook Use this to secure the cable of the included AC adapter. After connecting the AC adapter, loop the cable around the hook located on the PS60’s rear panel so that the cable won’t get pulled out inadvertently. Leave enough slack on the plug end so that you can disconnect it if you want to (p. 9). Be careful not to bend the base of the plug any more than necessary. 2. OUTPUT L/MONO and R jacks These are analog stereo outputs. If you want to use monaural output, connect the L/MONO jack. Use the VOLUME knob to adjust the volume (p. 10). 3. USB 2.0 USB connector (for connecting to computer) Use this connector to connect the PS60 to your computer. You can use the PS60 Editor to edit sounds, or use your DAW software to transmit note data messages and other performance data or sound settings via MIDI (“PS60 USB-MIDI Setup Guide”). Note: The PS60’s USB connector is only able to transmit and receive MIDI data. 4. Contrast knob This knob adjusts the contrast of the display for the best viewing from any angle or under changing light conditions. 5. MIDI IN connector OUT connector MIDI lets you connect the PS60 to a computer or other MIDI devices, for sending and receiving notes, controller messages, sound settings, and so on (p. 12). 2 1 5 Introduction to the PS60 6. ASSIGNABLE PEDAL/SW ASSIGNABLE PEDAL/SW1/DAMPER jack You can connect a damper pedal, foot switch, or foot pedal to this jack. You can use the pedal or switch to control the damper effect, modulate an effect, or switch performances (p. 11). ASSIGNABLE PEDAL/SW2 jack You can connect a foot switch or foot pedal to this jack and use it to apply modulation to the sound or effect, or switch performances (p. 11). 6 About the PS60 How the PS60 is organized About the PS60 How the PS60 is organized five EGs. The program also has one insert effect. (The STRINGS timbre does not have an insert effect.) In the center of the PS60’s front panel there are six sets of buttons that allows you select acoustic piano, electric piano, organ, strings, brass, and synthesizer sounds and variations of those sounds. You can use these buttons to instantly select the sound you want to play. On the PS60, each of these sounds is referred to as a “timbre.” The output from the insert effect passes through a three-band EQ and is sent to the L/MONO and R OUTPUT jacks. At the same time, the output from the insert effect can also be sent to two master effects (a modulation effect and a reverb/delay effect) and sent through the three-band EQ to the L/MONO and R OUTPUT jacks. These buttons also let you make settings so that two or more sounds will be heard together as a layer, or in different regions of the keyboard as a split. You can use EASY SETUP to adjust the volume balance of the timbres, or to shift their pitch in one-octave units. Although it’s easy to use the performance controls on the PS60’s front panel to adjust the sounds to your taste, you can also use edit modes (Performance Edit, Program Edit, and Global) to make more detailed changes to the sound. Effects that add movement or spaciousness to the sound can also be adjusted from the panel, making it easy for you to get the sounds you desire. If you want to edit in even greater detail, you can use the included editor software to edit all of the PS60’s parameters. When you’ve adjusted the sounds to your liking, you can save the settings as a “performance” and recall it when required. As already stated above, the PS60 has six timbres that normally you will use as “main timbres.” If you’ve made split settings, you’ll be able to use additional “sub timbres” in the other keyboard region. This means that when using split settings, you can use a total of up to twelve timbres: six timbres in the upper keyboard region and six timbres in the lower keyboard region. For each of these timbres you can select and play one of a wide variety of programs. You can play one timbre by itself, or combine multiple timbres as layers or splits. The timbre used by a program consists of an oscillator that can trigger up to eight stereo multisamples for each voice, up to four filters, two amps, five LFOs and PERFORMANCE SUB TIMBRES MAIN TIMBRES VOLUME OCTAVE SEND (TIMBRE1) PROGRAM OSC Filter Amp IFX Variations VOLUME OCTAVE SEND (TIMBRE2) PROGRAM OSC Filter Amp IFX Variations VOLUME OCTAVE SEND (TIMBRE3) PROGRAM OSC Filter Amp IFX Variations VOLUME OCTAVE SEND (TIMBRE4) VOLUME OCTAVE SEND PROGRAM OSC Filter Amp Variations (TIMBRE5) PROGRAM OSC Filter Amp IFX Variations VOLUME OCTAVE SEND (TIMBRE6) PROGRAM OSC Filter Amp IFX Variations EQ MOD REV/DELAY Single: Play one timbre. Layer: Play multiple timbres simultaneously. Up to six timbres can be layered. OUTPUT L/MONO, R Split: Play different programs in different regions of the keyboard. Split point 7 Introduction to the PS60 8 Setup Turning the power on/off Connecting the AC adapter 1. Make sure that the PS60’s power switch is pressed to the STANDBY position, turning the power off. 2. Connect the DC plug of the included AC adapter to the PS60’s rear panel DC 9V jack. 3. Turn on the power of the powered monitor speakers or other external output device connected to the PS60’s OUTPUT L/MONO and R jacks. 4. Use the PS60’s VOLUME knob and the volume control of your external equipment to set the volume appropriately. You must use only the included AC adapter. Using any other AC adapter may cause malfunctions. 3. Plug the AC adapter into an electrical outlet. 4. Fasten the AC adapter’s cable around the PS60’s cable hook so that it will not be unplugged accidentally. Power switch DC 9V jack Cable hook AC adapter (included) DC plug to an electrical outlet Turning the power on 1. Turn the PS60’s VOLUME knob all the way to the left, minimizing the volume. If external equipment such as a powered monitor speaker system is connected, minimize its volume as well and turn off its power. Turning the power off Settings that have not been saved in the PS60’s internal memory will be lost when you turn off the power. Be sure to save important data such as sounds or global settings you’ve edited (p. 25). 1. Turn the PS60’s VOLUME knob all the way to the left, minimizing the volume. 2. If external equipment such as a powered monitor speaker system is connected, minimize its volume as well and turn off its power. 3. Press the PS60’s power switch to the STANDBY position, turning the power off. The data inside the PS60 might be destroyed if you turn off the power while processing is occurring. Never turn off the power while data is being processed. One of the following messages is displayed while data is being written to internal memory. 2. On the PS60’s rear panel, press the power switch to the ON position. The display will show the model name and the software version. (The version indication may change without notice.) === Store === =Write Program = ==Write Global== Now Executing 9 Setup Connections Connecting to a computer Connecting a MIDI device Connecting headphones Computer MIDI keyboard MIDI OUT MIDI IN MIDI cables MIDI IN MIDI OUT Connecting pedals SWITCH PEDAL PHONES USB AUDIO OUTPUT R L/MONO DAMPER SWITCH AC adapter (included) INPUT PEDAL Powered monitor speakers or audio system Connecting audio equipment Connections must be made with the power turned off. Please be aware that careless operation may damage your speaker system or cause malfunctions. Connecting the AC adapter Powered monitor speakers INPUT Audio connections to an electrical outlet L/MONO INPUT R The PS60 does not contain built-in speakers. In order to hear the sound of your performance, you’ll need to connect audio equipment such as powered monitors, a mixer, a stereo set or headphones. Connecting audio equipment The PS60’s audio output is designed to produce a signal level that is higher than consumer audio equipment such as CD players. For this reason, performing at high a volume may damage your speakers or equipment. Please use caution when adjusting the volume. 1. Minimize the volume of all connected equipment, and turn off the power. 2. Connect the PS60’s OUTPUT L/MONO and R jacks to the input jacks of your powered monitor speakers or mixer. Tip: If you connect only the L/MONO jack, the L and R sound will be mixed for monaural output. In order to take full advantage of the PS60’s capabilities, we recommend that you listen in stereo. If you’re playing back through your stereo audio system or a cassette-radio that has external input connectors, connect the PS60 to the jacks that are marked LINE IN, AUX IN, or external input. (You might need to obtain the appropriate adapter plug or conversion cable.) 10 PHONES Headphones Connecting headphones Using headphones at high volume for an extended time may cause hearing damage. Please avoid excessively high volume levels. 1. Connect the stereo mini-plug of your headphones to the PS60’s PHONES jack. 2. Use the VOLUME knob to adjust the headphone volume. The PS60’s PHONES jack will output the same signal as the OUTPUT L/MONO and R jacks. The output from the OUTPUT jack is not turned off even if headphones are connected to the PHONES jack. Connections Connecting a damper pedal, foot switch, or foot pedal Connecting a damper pedal, foot switch, or foot pedal If you connect an optional damper pedal, foot switch, or foot pedal to the PS60, you’ll be able to control the PS60 using your feet. When using the ASSIGNABLE PEDAL/SW1/DAMPER jack, you can connect a damper pedal, foot switch, or foot pedal. (The default setting is Damper.) When using the ASSIGNABLE PEDAL/SW2 jack, you can connect a foot switch or an assignable pedal. (The default setting is Switch.) Note: A foot switch or foot pedal can be connected to either the ASSIGNABLE PEDAL/SW1/DAMPER jack or the PEDAL/SW2 jack. In global mode, specify the controller type (Type) (p. 52). Connecting a foot switch You can use a foot switch to control the sound or effect modulation while you perform, switch portamento on/ off, or switch performances. With the factory settings, the ASSIGNABLE PEDAL/ SW2 jack is set to use a Korg PS-1 foot switch. If you want to change this setting, proceed as follows. 1. Connect an optional Korg PS-1 foot switch to the ASSIGNABLE PEDAL/SW2 jack or the PEDAL/ SW1/DAMPER jack. 2. Depending on which assignable jack you have connected the pedal to, set the controller type (Type) to Switch, and set the Polarity as appropriate (p. 51, 52). Connecting a damper pedal When you press the damper pedal, the notes you’ve pressed will be sustained so that they will continue even after you take your hands off the keyboard. This is also called a sustain pedal; it has the same function as the damper pedal of an acoustic piano. If the optional Korg DS-1H damper is connected, you’ll be able to take advantage of the “half-damper” effect, in which the depth to which you press the pedal will vary the damper amount. If any other type of pedal is connected, it will function as a damper switch. With the factory settings, the PS60 is set so that connecting a DS-1H to the ASSIGNABLE PEDAL/ SW1/DAMPER jack allows you to use it as a damper pedal. If you want to change this setting, proceed as follows. 1. Connect a Korg DS-1H damper pedal to the ASSIGNABLE PEDAL/SW1/DAMPER jack. 2. Depending on which assignable jack you have connected the pedal to, set the controller type (Type) to Damper, and set the Polarity as appropriate (p. 52). DAMPER SWITCH Connecting a foot pedal You can use a foot pedal to control settings such as the volume, modulation, portamento time, pan, or effect send amount while you perform. 1. Connect a separately sold Korg EXP-2 foot controller or XVP-10 expression/volume pedal to the ASSIGNABLE PEDAL/SW2 jack or 1/ DAMPER jack. 2. Depending on which assignable jack you have connected the pedal to, set the controller type (Type) to Pedal (p. 51). Note: The foot pedal sensitivity is adjusted to a standard value when the PS60 is shipped from the factory. If the foot pedal you’re using does not respond appropriately, please adjust the sensitivity (p. 53). PEDAL Note: The half-damper sensitivity is adjusted to a standard value when the PS60 is shipped from the factory. If the half-damper pedal you’re using does not respond appropriately, please adjust the sensitivity (p. 53). 11 Setup Controlling PS60’s tone generator from an external MIDI device Connecting the PS60 to a computer The PS60 provides both MIDI and USB connectors as standard equipment. By connecting the PS60 to your computer via USB, you can use it as a controller and MIDI sound module for your DAW software with single cable convenience; and with out the need for a MIDI interface. When you wish to play or control the PS60’s tone generator from an external MIDI keyboard or sequencer etc., use a MIDI cable to connect the MIDI OUT connector of the external MIDI device to the MIDI IN connector of PS60. MIDI IN By using the dedicated editor, you can edit the PS60 from your computer as though it were a software plugin. For details, see “PS60 USB-MIDI Setup Guide” and “PS60 Editor/Plug-In Editor User’s Guide” (PDF). Connecting MIDI devices The PS60 has MIDI connectors that can transmit and receive note messages and other types of performance data, as well as sound settings. By connecting the PS60 to other MIDI equipment, you can enjoy an even broad range of performance possibilities. MIDI OUT MIDI keyboaerd PS60 Controlling two or more external MIDI tone generators from PS60 You can also use a MIDI patch bay to control multiple MIDI devices. About MIDI MIDI stands for Musical Instrument Digital Interface, and is a world-wide standard for exchanging various types of musical data between electronic musical instruments and computers. When MIDI cables are used to connect two or more MIDI devices, performance data can be exchanged between the devices, even if they were made by different manufacturers. Controlling an external MIDI tone generator from PS60 If you want to use the PS60’s keyboard and joystick to play and control an external MIDI sound module, use a MIDI cable to connect the PS60’s MIDI OUT connector to your external MIDI sound module’s MIDI IN connector. MIDI OUT MIDI IN MIDI keyboaerd PS60 12 PS60 MIDI OUT MIDI IN MIDI IN MIDI patch bay MIDI OUT MIDI OUT MIDI IN MIDI tone generator MIDI keyboard Playing the PS60 and using the performance controls Playing Selecting a timbre (sound) 2. Use the variation buttons to select a program. Using a single timbre (Single) 1. Press the ON button of the timbre you want to play (A.PIANO–SYNTH). (The button will light.) When the lower line of the display shows the program name, you can also use the VALUE knob to make a selection. In addition, you can use the CURSOR/ VALUE buttons to switch the selection in steps of one, or the buttons to switch the selection in steps of 10. At this time, the effect and equalizer settings will also be set appropriately for the sound you selected. The upper line of the display shows the timbre type, and the lower line shows the program (number: name). Timbre type Program (index number: name) If you press the ON button once again, the upper line of the display will show the performance (number: name), and the lower line will show an abbreviation (e.g., the first letter) of the timbre that is on. Performance (number: name) Timbre on/off status Timbre category A.Piano Abbreviation Index number (bank number) A 01–29 (A000–A028) E.Piano E 01–73 (A029–A101) Organ O 01–52 (A102–B025) Strings S 01–59 (B026–B084) Brass B 01–60 (B085–C016) Synth Y 01–167 (C017–D055) (Factory settings) Note: The A.Piano preload programs 13:SoloStretch Grand–15:SoloStretch Classic are programmed with stretch tuning in order to make the sounds as natural as possible. Stretch tuning adjusts the high notes slightly higher relative to their equal-tempered pitches, and the low notes slightly lower. This may cause a slight modulation to be noticeable when you play these programs together with other programs or layers, due to the pitch discrepancy in the high and low regions. Note: The index number is automatically added in ascending order of the program’s bank number. This means that if you change a program’s category and then save it, each program’s index number may change. Tip: You can press the CURSOR/VALUE buttons simultaneously to view the program’s bank number. 13 Playing the PS60 and using the performance controls Layering multiple sounds (Layer) You can play multiple sounds simultaneously. This type of setting is called a “layer.” Layer Playing different sounds in different regions of the keyboard (Split) You can divide the PS60’s keyboard into two regions, and play different sounds in each region. This type of setting is called a “split.” The two regions are referred to as the Lower region (lower notes) and Upper region (higher notes), and the key at which they are divided is called the “split point.” The split point is the lowest key in the upper region. 1. Hold down one of the ON buttons whose timbres you want to layer, and then press the ON buttons for the other desired timbres, making their indicators light. When you release the buttons, the sounds will be selected. The master effect and EQ settings of the timbre you first turned on will be used. Split Split point Main timbres and sub timbres For example, suppose you hold down A.PIANO and then press and hold STRINGS and BRASS consecutively, then release these buttons. The display will show as depicted in the following illustration. When you play the keyboard, you’ll hear these three sounds layered. This allows you to play richer sounds than a single program could produce. The master effect and EQ settings of the A.PIANO program will be used. Tip: When you’re using layer settings, you can switch a timbre on/off by holding down the EXIT button and pressing that timbre’s ON button. The six timbres A.PIANO–SYNTH you used as described above in “Using a single timbre (Single)” and “Layering multiple sounds (Layer)” (p. 13) are the “main timbres.” When you’re using split settings, you can use another six “sub timbres” A.PIANO– SYNTH in addition to these six main timbres. Since you can use up to six categories each for lower and upper, this allows you to play a total of twelve sounds simultaneously. The “main timbres” are used regardless of whether split is on/off; the “sub timbres” are added when you make split settings. In the display when you’re selecting performances, the main timbres are enclosed in square brackets [ ]. (Split is off ) Main timbres (split is off ) (Split is on) Lower: main timbres / Upper: sub timbres Timbre type (Split is on) Lower: sub timbres / Upper: main timbres Timbre on/off status Note: An “E” symbol is shown in the left side of the display’s upper line, indicating that the settings have been edited. This “E” symbol appears when you’ve modified the saved settings by operating the performance controls, etc. 2. Use each timbre’s variation buttons to select a program for that timbre. Note: The master effect and EQ settings of the program of the timbre you first turned on in step 1 will be used; these settings will not change even if you switch variations. Although these master effect and EQ settings are maintained until you return to single mode, you are free to adjust them using the buttons and knobs on the right side of the front panel (p. 20). The insert effect assigned to each program will be reloaded each time you switch variations. 14 The effect and EQ settings of the main timbres will take priority for the main timbres and the sub timbres. When split settings are used, sub timbres are added but the number of effects does not change, so they are shared by the main timbres and sub timbres. The order of priority is as follows. • The insert effects are shared by identically-named timbres (categories); the settings of the main timbre take priority. • The master effect and EQ are shared by the main timbre and sub timbres, and the settings of the main timbres take priority. ( “Effect priority order,” p. 59) Playing Selecting a timbre (sound) Procedure Setting the split point 1. As described in the explanation of single or layer settings (p. 13), select a sound to use in one of the regions. Note: This will be the main timbre; the master effect and EQ settings you specify here will be used. You are free to change the sound, master effect, and EQ settings even after you make split settings. 1. Hold down the LOWER button and press the UPPER button. Both indicators will blink, and the display will indicate a note number. Note: If you cancel the split settings (by pressing the SUB OFF/RECALL button), only this main timbre will play across the entire keyboard (p. 16). 2. Press either the LOWER or UPPER button to specify the region (lower or upper) you want to assign the other sound. The button you press (LOWER or UPPER) will blink, and the ON buttons will also blink, waiting for you to select a sound. 2. Press the key that you want to specify as the split point. The split point key will be the lowest note of the upper region. 3. Press the LOWER, UPPER, or EXIT button to exit the split point setting. Changing the sound within a split 3. Select the other sound as described in the explanation of single or layer settings (p. 13). Note: This sound will be the sub timbre. Even if split settings have already been made, you can switch sounds by changing the timbre or program that’s assigned to each region. 1. Press the LOWER or UPPER button to select the region (lower or upper) you want to switch (the selected button will light). The ON buttons will light to indicate the on/off status of each timbre in the region you selected. 2. As described in the explanation of single or layer settings (p. 13), specify the timbre or sound that you want to use for the region you selected in step 1. The lower line of the display shows the timbres that are assigned to the lower region and the upper region. Main timbres are enclosed in square brackets [ ]. 15 Playing the PS60 and using the performance controls Cancelling the split settings • When split settings are in effect, press the SUB OFF/ RECALL button; the indicator will light, and split settings will be cancelled. Only the main timbre(s) will play across the entire keyboard (single or layer). Using the automatic Audition function when selecting sounds Each of the PS60’s programs specifies an appropriate riff (phrase) that demonstrates the sound. You can make this riff play automatically, so that you can easily hear the character of each sound as you step through the selections. Make sure that the timbres are in single mode. The Audition function is available only when layer settings and split settings are all off. The split settings you made (e.g., timbre and split point) are remembered while the SUB OFF/RECALL button indicator is lit. 1. In the SPLIT SETTING area, hold down the SUB OFF/RECALL button and press the LOWER button (both buttons will light). The riff assigned to the program will be heard. If you press the lit SUB OFF/RECALL button, you will return to the split settings. Tip: This is convenient if you’re playing a split performance and would like to temporarily cancel split and play only the main timbre(s). Note: The state of the SUB OFF/RECALL button and its settings cannot be saved to a performance memory. The settings of when the SUB OFF/RECALL button is lit will be lost if you do any of the following actions. • • • • • Specify a new split Store the settings to a performance Recall a different performance Enter program edit mode Enter global mode 2. Press a timbre ON button to switch timbres, or use the variation buttons to switch programs; the riff will change as you switch sounds. 3. When you’re ready to turn off the Audition function, do any one of the following. • Press the SUB OFF/RECALL, LOWER or UPPER button. • Make layer settings. • Choose a layer or split performance. • Move to Global mode. • Save the performance or program. 16 Playing Using controllers Using controllers In addition to its keyboard, the PS60 lets you modify the sounds by using controllers such as the joystick and button, or optional damper pedal, foot switch or foot pedal. Joystick You can modify the sound by moving this joystick up/ down/left/right. Many of the preload programs will vary the pitch in response to left/right movement, apply vibrato for upward movement, and apply a wah effect for downward movement. However, there are also many programs that apply distinctive effects in response to the joystick. Near the joystick is a LOCK button that memorizes the position of the joystick even after you release the joystick. Note: You can use the Global mode Controllers -JS Lock setting to specify the direction (X or Y) in which the Lock function will be effective. (The default setting is +Y.) (p. 51). Switching the rotary speaker simulator between slow/fast As you select various programs for the ORGAN timbre, you’ll notice that the ORGAN FAST/SLOW button blinks for some of the programs. These sounds use an insert effect that simulates the rotary speaker that has become an expected part of such organ sounds (63: Rotary SP). The ORGAN SLOW/FAST button lets you switch this effect between slow/fast speeds. When playing an organ sound, you can control this switching at the touch of a button. You can assign a different effect to each direction of the joystick as desired. Keyboard Standard Joystick functions Move the joystick… Controller Name Normally controls… Left JS–X Pitch bend down Right JS+X Pitch bend up Up (away from yourself ) JS+Y Vibrato Down (towards yourself ) JS–Y Filter LFO (wah) Velocity Velocity refers to the speed (force) at which you play a key, and this can be used to control various aspects of the sound. Normally, velocity is used to control the volume and brightness of the sound. This will affect the character of the sound’s initial attack. Example: Velocity affecting the volume Joystick Lock function When you release the joystick, it will automatically return to the center position and the effect will disappear. However if you press the LOCK button to make it light while you’re still applying the effect, the effect will be maintained even after you release the joystick. For example if you move the joystick away from yourself and then turn Lock on, the operation of the joystick will be locked (held) at that state, so that modulation will continue being applied even after the joystick returns to its normal position. You can then operate the joystick in the –Y direction (toward yourself) to apply both types of modulation simultaneously. Played slowly Volume Played quickly Volume Time Time 17 Playing the PS60 and using the performance controls Note number and keyboard tracking Transposing (TRANSPOSE) The sound can be modified according to the position of the note on the keyboard (keyboard tracking). For example, the sound might be set to become brighter and decay more quickly as you play higher on the keyboard. These buttons shift the pitch that is produced when you play the keyboard, in steps of a semitone. Normally, keyboard tracking is used to affect the volume, brightness, LFO sensitivity, and EG speed. Example: Keyboard tracking affecting the EG speed These buttons can shift the keyboard’s pitch in a range of +/–1 octave (12 semitones). This is a convenient way to transpose the pitch to suit the range of a vocalist or another instrument without having to change your familiar fingering. Note: These buttons change the setting of the PS60’s keyboard. This setting will remain unchanged even if you switch performances or timbre programs. The same is true of the global Transpose setting; if you save the global settings, that setting will be preserved even when you turn off the power (p. 48, 26). Keyboard settings Octave (OCTAVE) These buttons shift the pitch that is produced when you play the keyboard, in steps of one octave. You can use these when the range of the keyboard is insufficient for the song you’re playing. These buttons can shift the keyboard’s pitch in a range of +/–3 octaves. Note: These buttons change the setting of the PS60’s keyboard. This setting will remain unchanged even if you switch performances or timbre programs. The same is true of the global Octave setting; if you save the global settings, that setting will be preserved even when you turn off the power (p. 49, 26). Press the DOWN button Press the UP button Indicator status Blinking rapidly Blinking slowly Lit Unlit Lit Blinking slowly Blinking rapidly 18 Keyboard range +3 octaves +2 octaves +1 octave –1 octave –2 octave –3 octave Tip: When you press an OCTAVE or TRANSPOSE button, the display will indicate the currently specified value. Damper pedal and foot switch/pedal If you connect an optional damper pedal, foot switch or foot pedal to the PS60, you can use your foot to control the PS60’s sound (p. 11, 51). Using the performance controls to adjust the sound Easy setup Using the performance controls to adjust the sound Performance memory Performance controls Easy setup Split settings Timbre select Master effect and EQ The PS60 provides a variety of performance controls. In addition to the timbre selectors that you use to select sounds, and the split settings that allow you to play keyboard splits, there are also easy setup settings that let you adjust the volume, octave and effect send for each timbre, master effects such as modulation and reverb/delay, and an EQ (equalizer) that adjusts the overall brightness or depth of the sound. MOD SEND: The knobs will adjust the amount of sound that is sent to the modulation effect. Use the MODULATION section to edit the type of effect and its settings (p. 20). You can adjust these settings to create the desired sound and save those settings as a “performance” for instant recall. Off: (all indicators unlit) Easy setup Let’s try using the easy setup knobs of each timbre to adjust each timbre’s volume, octave and effect send. REV/DLY SEND: The knobs will adjust the amount of sound that is sent to the reverb/delay effect. Use the REVERB/DELAY section to edit the type of effect and its settings (p. 20). 3. Turn the knob for each timbre to adjust the settings. When you turn a knob, the upper line of the display shows an abbreviation of the timbre and the name of the selected easy setup; the lower line shows the value. 1. Select a program for each timbre you want to adjust ( “Selecting a timbre (sound),” p. 13). If you’re using split settings, press the LOWER button or UPPER button to choose the timbres you’ll be controlling. 2. Press the EASY SETUP button to select the function that you want to adjust using the knobs. VOLUME OCTAVE Each time you press the EASY SETUP button, a different indicator will light in the following order. MOD SEND VOLUME: The knobs will adjust the volume of each timbre. This is a convenient way to set the volume balance between the sounds in a layer or split. OCTAVE: The knobs will switch the pitch of each timbre in steps of one octave. The range of this setting is +/–5 octaves. REV/DLY SEND Note: Unlike the OCTAVE keyboard setting (p. 18), this OCTAVE setting affects only the timbre for which you’re editing it. 19 Playing the PS60 and using the performance controls Master effect and EQ St.Phaser (Stereo Phaser) To adjust the effect amount for each sound, use EASY SETUP to set the MOD SEND and REV/DLY SEND for each timbre ( “Easy setup,” p. 19). This effect produces modulation by shifting the phase of the sound. It’s particularly good when applied to instruments such as electric piano. This is a stereo effect whose modulation is applied by a LFO whose phase is reversed for left and right sides, creating a spacious phaser effect. Modulation-type effects (MODULATION) RATE: Adjusts the speed of LFO modulation. 1. Press the MODULATION button to select the effect type. Each time you press the button, you’ll cycle through the available effects (the corresponding indicator will light). CHORUS, FLANGER, VINTAGE CHO/FLG, PHASER, EFFECT OFF (all indicators unlit) Note: When you switch effects, the default settings for each effect will be applied. DEPTH: Adjusts the depth of LFO modulation. FEEDBACK: Adjusts the amount of feedback. Reverb/delay-type effects (REVERB/ DELAY) 1. Press the REVERB/DELAY button to select the effect type. Each time you press the button, you’ll cycle through the available effects (the corresponding indicator will light). HALL, PLATE, ROOM, DELAY, EFFECT OFF (all indicators unlit) Note: When you switch effects, the default settings for each effect will be applied. 2. Adjust the RATE, DEPTH, and FEEDBACK knobs. 2. Adjust the TIME, LEVEL, and FEEDBACK knobs. Effect types St.Chorus (Stereo Chorus) This effect adds depth and warmth to the sound by modulating the delay time of the input signal. Modulation is applied by an LFO whose phase is reversed for left and right sides, creating a spacious chorus effect. St.Flanger (Stereo Flanger) This effect adds an intense modulation and a sense of pitch movement. It is effective when applied to sounds that contain numerous overtones. It also provides independent flanger output for the left and right sides of stereo input. HALL Vntg.Cho/Flg (Vintage Chorus/Flanger) This is a plate reverb that produces a warm (dense) reverberation. This models the sound of two popular vintage effects, an analog chorus and an analog flanger. It produces the warm and rich sound that is distinctive of an analog effect. When the feedback level is low, you get a tone that’s ideal for chorus, while raising the feedback level automatically switches to a tone that’s ideal for a flanger. This means that you can obtain a wide range of sounds from chorus to flanger simply by operate three knobs. This is a monaural effect. 20 Effect types This is a hall-type reverb that produces the reverberation typical of a mid-sized concert hall or ensemble hall. PLATE ROOM This is a room-type reverb that emphasizes the early reflections, producing a tight impression. TIME: Adjusts the reverb time. LEVEL: Adjusts the output level of the reverb. FEEDBACK: Adjusts the amount of high-frequency decay. Using the performance controls to adjust the sound Master effect and EQ DELAY This is a simple and easy-to-use monaural delay with a maximum delay time of 549 ms. Using the effects and EQ TIME: Adjusts the delay time. Switching master effects and EQ LEVEL: Adjusts the output level of the delay sound. FEEDBACK: Adjusts the feedback amount for the delay sound. When you switch performances, the master effect and EQ settings saved in each performance are recalled. When you switch timbres or programs, the master effect and EQ settings individually maintained by each program, are recalled subject to the following conditions. EQ Single settings (i.e., other than split or layer) Use EQ to adjust the overall sound of the performance. When you turn a timbre on, or when you switch the program for that program, the master effect and EQ settings of the selected program will be recalled. BASS: Adjusts the low-frequency gain. MID: Adjusts the mid-frequency gain. TREBLE: Adjusts the high-frequency gain. Note: In the edit page, you can adjust the frequency (Freq) at which gain is adjusted for each band, and the width of the band (Q value) (p. 34, 45). Switching from single → layer settings When you switch from single settings to layer settings, the master effect and EQ settings of the program you first turned on will be recalled. Subsequently, these settings will not change even if you switch the timbre’s program. When you return from layer settings to single settings, the settings described above in “Single settings” will be applied. Switching from single → split Master effect and EQ will not be switched when you make split settings. The same master effect and EQ settings that were active for the single or layer settings, will continue to be used. EQ offset Effect switch The PS60’s EQ provides an EQ Offset function that you can use to adjust the overall response of the audio output as appropriate for the acoustics of the live venue in which you’re performing, or the speakers you’re using ( “EQ Offset:,” p. 49). If you don’t want to use the PS60’s master effects, such as when you’ve connected an external effect, you can globally turn the PS60’s master effects off at all times ( “Effect SW:,” p. 49). 21 Playing the PS60 and using the performance controls Storing a performance The sound settings you’ve made using the performance controls, as well as the Performance Edit settings, can be stored as a performance. Note: This will not store the settings for Joystick Lock, or the keyboard settings for octave and transpose. 1. Press the STORE button. The upper line of the display will indicate “=== Store ===” and the lower line will indicate the storedestination. The indicators of the STORE button and of the bank and number buttons for the currently selected performance will blink. 2. Specify the store-destination bank and number. If you want to store the settings in the same bank and number, simply proceed to step 3 without specifying anything. 3. Press the STORE button; the settings will be stored to internal memory. When the button blinks rapidly, storing has been completed. The internal data might be lost if you turn off the power while data is being stored. Never turn off the power while this process is occurring. 22 Editing About editing From the PS60 itself, you can edit the parameters that are most useful in creating sounds, as well as parameters that determine how the PS60 will operate. These parameters are called “quick parameters.” To edit these parameters, you’ll use the PS60’s edit modes: Performance Edit, Program Edit and Global. • Detailed settings for EG and LFO • AMS and AMS Mixer settings • Detailed settings for insert effects, etc. Global: • Create user scales By using PS60 Editor/Plug-In Editor on your computer, you can edit all of the PS60’s parameters (i.e., “full parameter” editing). Basic operations in the edit pages Here’s how to enter the Performance Edit, Program Edit, Global edit pages and modify the various values. Editing from the PS60 itself Performance control Selecting an edit mode You can use the performance control knobs and buttons on the front panel to select timbres, make layer or split settings, adjust the volume and pitch of each timbre, and adjust the master effects ( “Playing the PS60 and using the performance controls,” p. 13). 1. Select the performance or program that you want to edit. For details, please refer to “Selecting a timbre (sound)” (p. 13). Performance edit 2. Press one of the front panel edit buttons to select the desired edit mode. In addition to the performance control settings, you can edit detailed settings for each timbre. These include tone parameters such as pan, brightness, attack and decay, as well as control settings that specify the range of pitch change produced by the joystick, or enable/disable the damper pedal. These settings do not change the settings of the program itself, so you can adjust them to your own preferences. ( “Performance edit,” p. 27). Program edit You can edit the actual program, which is the basic sound (e.g., piano or brass). This allows you to make detailed changes to the oscillator, filter, amp, EG, LFO, and insert effect settings ( “Program edit,” p. 37). Global Here you can make settings that affect the entire PS60, such as adjusting the pitch, turning effects on/off, and settings for functions such as MIDI and controllers ( “Global settings,” p. 47). Editing from your computer You can connect the PS60 to your computer via USB and use the included PS60 Editor/Plug-In Editor to edit all of the PS60’s parameters (full parameter editing). • PERFORMANCE EDIT button: Enters the performance edit page. • PROGRAM EDIT button: If you’re using single settings, that program will be selected automatically, and you’ll enter the program edit page. If you’re using layer or split settings, all timbres that are turned on will blink. Press the LOWER or UPPER button as desired, and then press one of the ON buttons to select the timbre whose program you want to edit; you will enter the program edit page for that program. At this time, you’ll hear only the selected program. Parameters available in full parameter editing In addition to the quick parameters, the PS60’s full parameters allow you to edit the following. For details, refer to “Parameter guide.” • GLOBAL button: Enters the Global Setting page. Performance edit: same content Program edit: • Select the multisample used by the oscillator, and make various settings • Detailed pitch settings • Detailed settings for filter type and routing 3. When you’ve finished editing, press the EXIT button to return to performance mode. 23 Editing Selecting parameters and editing their value Performance Edit The editable parameters in each edit mode are organized into groups as the tree structure shown at the right. Common Rename SplitPoint :Value Scale :Value Character Type Key Ramdom To edit the settings, move between pages to select a parameter, and then modify its value. The following steps explain basic operations such as moving between edit pages and modifying values. Main Timbres Tempo :Value A.Piano Prog. Select Volume Pan(Pre) Pan(Post) Send1(Mod) Send2(Rev) Status MIDI Ch. OSC Select OSC Mode Portamento Octave Transpose Detune Bend Range UserPrgScl Filter/Amp 1. Make sure that you’ve selected the desired edit mode. In this example, we’ll be using Performance Edit. Select the performance that you want to edit, and press the PERFORMANCE EDIT button. 2. Use the CURSOR/VALUE buttons to move between pages or parameters. If you’ve selected a numerical value, you can use the buttons to change the value. The upper line of the display shows the name of the currently selected page and the name of the parameter. (If you’re renaming a program name, the upper line shows a cursor guide.) The lower line shows the page names or parameter names available for selection, the parameter values and the page guides. As shown in the illustration below, additional pages may be located below or to the right. This is indicated by the arrow symbols shown on the left or right of the display. E.Piano 3. When you’ve finished editing, save the data ( “Saving (Storing/Writing),” p. 25). Page guide Page exists below Page exists at the left Page exists at the right Page exists below Page exists at the left Pages exist above and below Pages exist above and below Page exists above 24 Page exists at the right Page exists at the right :Value :Value :Value :Value :Value :Value :Value :Value :Value :Value :Value :Value :Value :Value :Value :Value Cutoff Resonance Flt EG Int AmlVel Int Firter/ Attack Amp EG Decay Sustain Release MIDI Filter Damper Foot SW Foot Pedal JS X as AMS JS+Y JS-Y ProgChange Porta. SW Ribbon#16 Other CC# (Same as A.Piano) :Value :Value :Value :Value :Value :Value :Value :Value :Value :Value :Value :Value :Value :Value :Value :Value :Value :Value :Value :Value :Value Page exists at the left Page exists at the right Page exists at right, or the cursor can be moved Parameter value is to the right. When this “ ” is shown, you can turn the Value knob to edit the value. (An exception is No.: Program Name, and No.: Effect Name.) When you can select a program and effect number, “ ” rather than “ ” is shown. Page exists at right, or the cursor can be moved Value or character can be edited. Use the Cursor/Value buttons or the Value knob to edit the value. : Upper limit of the value : Value has an upper and lower limit : Lower limit of the value Value guide About editing Saving (Storing/Writing) Saving (Storing/Writing) Sounds and settings you’ve edited on the PS60 are not preserved unless you specifically save them. When you’ve come up with sounds you like, or settings that you use frequently, be sure to save them. Note: Your sound or settings cannot be recovered if you perform the following operations without saving. • Recall a performance • Recall a program and edit it • Turn off the power Caution when saving • Performances store the program numbers; they do not store the actual program data used by each timbre. The sound of the performance will change if you edit a program that’s used by a performance, or if you specify a different program number when saving one of the programs used by a performance. • In order to save a performance or program, you must turn the Global memory protect setting Off. With the factory setting, this is Off ( “Memory Protect,” p. 49). About the edit buffer When you switch performances, switch the timbre ON buttons, or switch program variations, the data is loaded into PS60’s edit buffer. When you use Performance Edit or Program Edit modes to edit parameters, you are modifying the data in the edit buffer. If you want to keep this modified data, you must save it to the PS60’s internal memory. When you save, the data in the edit buffer is written to the performance number and program number of the corresponding bank. If you select another performance or program without saving, new data will be loaded into the edit buffer and the data you modified will be lost. Your editing modifies the data that’s in the edit buffer. When you play a performance or program, the data in the edit buffer determines how sound is produced. When you write, the Edit Buffer performance and program settings are saved to internal Write Select memory. In contrast, global settings are loaded into a memory area for global data when you turn on the power. When you use Global mode to edit these parameters, you are modifying the data in this memory area. If you want to keep this modified data, you must save it to the PS60’s internal memory. The changes you make are remembered while the power remains on, but if you turn off the power without saving, the data in the memory area will disappear. Editing is done on the data that’s loaded into the memory area. When you write, the settings of Global mode are saved to internal memory. Memory Area Edit Settings are loaded into the Write Power On memory area when you turn on the power. Internal Memory Global Setting Storing a performance (STORE) After you’ve used the performance controls and performance edit to modify the sound, press the STORE button to store the changes you made ( “Storing a performance,” p. 22). When you store, the settings you adjusted using the performance controls and the parameters you edited in performance edit mode will be stored. Writing a program (WRITE) 1. Make sure that program edit (PROG EDIT) is selected. 2. Press the CURSOR/VALUE button to move to the top level of the edit page tree. The top level is the page in which no is shown in the upper left of the display. 3. Press the button to select the Write page. Edit When you select a performance or program, the settings are loaded from internal memory into the edit buffer. 4. Press the button. Internal Memory PERFORMANCE A-1...D-5 A.PIANO E.PIANO ORGAN STRINGS BRASS SYNTH PROGRAM PROGRAM PROGRAM PROGRAM PROGRAM PROGRAM 5. If you want to edit the program name, press the button to enter the rename page, and assign the desired name (p. 26). When you’ve finished assigning the name, press the button to return to the page of step 4. 25 Editing 6. Press the button to enter the page where you can specify the program’s category. Specify the desired category. When selecting a timbre from the front panel, you’ll be able to select this program for the timbre whose name matches the category you specify here. Note: If you change the category and save the program, the insert effect settings might be modified ( “Use caution when changing the category,” PG p.80). Writing the global settings When you execute this Write operation, all global parameters except for Effect SW will be saved. 1. Make sure that global (GLOBAL) is selected. 2. Press the CURSOR/VALUE button to move to the top level of the edit page tree. The top level is the page in which no is shown in the upper left of the display. 3. Press the button to select the Write Global page. 7. Press the button. In this page, specify the bank number of the writing-destination program. Note: With the factory settings, bank numbers D56– D127 are in the initialized state. We recommend that you save to these bank numbers. If you specify one of these bank numbers as the writing-destination, the program will be placed after the preload programs in each category. If you save by overwriting one of the preload programs, the index numbers within the performance will automatically be re-assigned starting at the lowest-numbered program bank number, meaning that if you change the program’s category or save it to a different number, the program’s index number might change. Note: To view the bank number, simultaneously press the CURSOR/VALUE buttons when a program name of the performance is displayed (p. 13). 8. Press the button to make the display indicate “OK?” Press the button to execute the Write operation. If you decide not to execute, press a different button. 26 4. Press the button to make the display indicate “OK?” 5. Press the button to execute the Write operation. Assigning a name (Rename) You can change the name of a performance or program. Although you may specify up to 24 characters, the PS60’s display can show only 11 characters for a performance or 13 characters for a program. 1. Select the rename page. If you want to rename a performance, select the performance edit Common page Rename, and then press the button. If you want to rename a program, select the program edit Write page Name, and then press the button. 2. Use the CURSOR/VALUE buttons to select the character that you want to change, and use the buttons or the VALUE knob to select the desired character. Tip: If the program or performance name contains more characters than can be shown in the display at once, you can view the full name by scrolling it (p. 49). Performance edit A performance’s structure and settings Performance edit A performance’s structure and settings A performance consists of the sound sources “main timbres” and “sub timbres,” and the “master effect” and “EQ” sections that apply effects to the overall sound and adjust its tonal character. A “program” is assigned to each timbre; “tone parameters” adjust the sound of this program, and “timbre parameters” specify how the timbre will operate. Each program (except for the STRINGS timbre) has one “insert effect.” Insert effect settings are made in Program Edit mode. Timbre parameter settings You can make the following settings for each timbre. • Adjust the volume and pan. “Volume,” “Pan (Pre),” “Pan (Post)” (p. 30) • Adjust the pitch/tuning. “Octave,” “Transpose,” “Detune” (p. 31) • Switch the portamento on/off and adjust its speed. “Portamento” (p. 31) Portamento is a function that creates a smooth change in pitch between notes when you play a note before releasing the previous note. • Specify the amount of pitch change that can be produced by moving the joystick to left or right. “Bend Range” (p. 31) • Specify whether the damper effect will be applied to each timbre. “MIDI Filter:” (p. 32) Major performance edit parameters Tone parameter adjustments Each timbre has eight tone parameters (located in “Filter/Amp:” and “Filter/Amp EG:”); these allow you to make overall adjustments to the brightness, attack, and decay speed of the selected program (p. 31). • Specify whether each timbre can be played by an external MIDI device, or whether each timbre can play an external MIDI sound module. “Status” (p. 30) Structure of a performance A.PIANO TimbreParameters Tone Parameters Program E.PIANO TimbreParameters Tone Parameters Program ORGAN TimbreParameters IFX IFX Tone Parameters Program IFX L/MONO, R SEND1 SEND2 L/MONO, R SEND1 SEND2 L/MONO, R SEND1 SEND2 MODULATION Chain On/Off REVERB/DELAY Return2 Return1 EQ STRINGS TimbreParameters Tone Parameters Program BRASS TimbreParameters Tone Parameters Program SYNTH TimbreParameters IFX Tone Parameters Program IFX L/MONO, R SEND1 SEND2 Master Volume AUDIO OUTPUT L/MONO, R L/MONO, R SEND1 SEND2 L/MONO, R SEND1 SEND2 MAIN TIMBRES SUB TIMBRES (used only with split settings) 27 Editing Master effect adjustments The program’s output passes through the insert effect (except for the STRINGS timbre) and is then sent to the master effect section, where the modulation effect and reverb/delay effect add movement and spaciousness to the sound. You can adjust each effect and the amount of sound that is returned from each effect to L/R, and you can also connect the output from the modulation effect to the reverb/delay effect. See “MFX1 (Mod.)” and “MFX2 (Rev/Dly)” (p. 33). EQ adjustments The three-band EQ located at the final stage of the output lets you make overall adjustments to the sound. The front panel performance controls let you adjust the gain of the low-frequency (Bass), mid-frequency (Mid), and high-frequency (Treble) ranges. In addition, the performance edit EQ settings page lets you make finer adjustments such as adjusting the center frequency and bandwidth (p. 34). 28 Operating flow on the PS60 1. Press the front panel PERFORMANCE EDIT button to select Performance Edit mode. The display will show the edit page, allowing you to edit the performance that you’re currently using. 2. Use the CURSOR/VALUE buttons to select the parameter that you want to edit. 3. Use the buttons or VALUE knob to edit the value or setting. 4. To exit Performance Edit mode, press the EXIT button. 5. Save the settings to performance memory (p. 25). Performance edit Quick parameter list Quick parameter list The tree diagram shown on the left shows how the performance edit parameters (quick parameters) are organized. These parameters are explained below. Performance Edit Common Rename SplitPoint Scale Common Type Key Ramdom Rename Specifies the name of the performance (p. 26). Tempo Main Timbres Sub Timbres MFX1 (Mod.) A.Piano Program Select Volume Pan(Pre) Pan(Post) Send1(Mod) Send2(Rev) Status MIDI Ch. Bank MSB* (*Status:EX2) Bank LSB* OSC Select OSC Mode Portamento Octave Transpose Detune Bend Range UserPrgScl Filter/Amp Cutoff Resonance Flt EG Int AmlVel Int Firter/ Attack Amp EG Decay Sustain Release MIDI Filter Damper Foot SW Foot Pedal JS X as AMS JS+Y JS-Y ProgChange Porta. SW Ribbon#16 Other CC# E.Piano (Same as A.Piano) Organ (Same as A.Piano) Strings (Same as A.Piano) * There is no “Pan(Post)” Brass (Same as A.Piano) Synth (Same as A.Piano) (Same as Main Timbres.) Effect Type Rate(Hz) Depth Feedback On/Off Return1 Chain ChainLevel MFX2 (Rvb/Dly) Effect Type Time(sec) Level Feedback On/Off Return2 EQ Master Vol Comand Trim BassGain Bass BassFreq Bass Q Mid Gain Mid Freq Treble G Treble Treble F Treble Q SplitPoint [C#2...C7] Specifies the split point. This value is effective only when split is on. Tip: You can set this from the front panel. Press the LOWER button and UPPER button. Then press the key that you want to specify as the split point. The key you pressed will be the lowest key of the upper region. Scale: Specifies the scale used by the performance. Separately from this setting, you can make the “Scale” parameter of the program take priority for each timbre ( “UsePrgScl (Use Prog Scale),” p. 31). Type [EqualTemp...UsrOct 03] Selects the scale ( “Type,” PG p.5). EqualTemp (Equal Temperament) PureMajor (Pure Major) PureMinor (Pure Minor) Arabic Pythagras (Pythagoras) Werkmeist (Werkmeister): Werkmeister III Kirnbrger (Kirnberger): Kirnberger III Slendro Pelog Stretch: This tuning is used for acoustic pianos. UsrAllNte (User All Notes Scale): (PG p.75). UsrOct (User Octave Scale) 00...03: (PG p.75). Note: User All Notes Scale and User Octave Scale can be specified using the Global mode User Scale settings in PS60 Editor/Plug-In Editor. Note: Use Equal Temperament for the preload programs 13:SoloStretch Grand –15:SoloStretch Classic. Key (Scale Key) [C…B] Selects the key of the specified scale. This setting does not apply to the Equal Temperament, Stretch, and User All Notes scales. Random [0…7] This parameter creates random variations in pitch for each note. Initialize Copy MFX/EQ 29 Editing Tempo [40.00...300.00, EXT] This is the current tempo of the performance. This setting is used when an LFO or effect is synchronized to the tempo (PG p.80). 040.00…300.00 allow you to set a specific tempo in BPM, with 1/100 BPM accuracy. If “Clock (MIDI Clock Source)” (p. 50) is set to Ext.MIDI or Ext.USB, EXT is shown. This is also shown if “MIDI Clock” is Auto and MIDI clock data is being received from an external device. Tip: You can set the tempo by repeatedly pressing the assignable switch (separately sold PS-1) at the desired interval (p. 51). Main Timbres Here you can make settings for the main timbres 1–6. The PS60 has six main timbres (1–6) and six sub timbres (1–6). When you’re playing only one program, or when using layer settings across the entire keyboard, you’ll use only the main timbres. When you’re playing split settings, the sub timbres are used together with the main timbres. Timbre (A. PIANO...SYNTH) Program Select [Index No.: Program Name] Here, you can select the program used by each timbre. Note: The index number is assigned automatically in ascending order of the program’s bank number (when “Status” is INT). Note: The contents of the display will depend on the “Status” setting (p. 30, PG p.7). [L001...C064...R127] This specifies the pan setting after the sound has passed through the insert effect. The STRINGS timbre does not have this parameter. Send1 (Mod) [000...127] Send2 (Mod) [000...127] These specify the send level of the audio to the timbre’s master effect 1 (Modulation) and 2 (Reverb/Delay). Tip: These parameters can be directly controlled by choosing MOD SEND or REV/DLY SEND in EASY SETUP. Status [INT, EXT, EX2] This controls the status of MIDI and the internal tone generator for each Timbre. Normally, if you’re playing an internal Program, this should be set to INT. The EXT and EX2 settings allow the Timbre to control an external MIDI device. MIDI Ch. (MIDI Channel) [01...16, Gch] This specifies the MIDI channel on which the timbre will transmit and receive data. When you operate the PS60’s keyboard or controllers, MIDI messages are transmitted on the Gch. In addition, each timbre is set so that it will produce sound when it receives MIDI messages on the Gch from an external device. If you change a timbre’s MIDI channel, it will produce sound when MIDI messages sent from an external device are received on that channel. Adjusts the volume of each timbre. If a timbre’s “Status” is set to EXT or EX2, the data from the PS60’s keyboard and controllers will also be transmitted on the MIDI channel specified for the timbre (in addition to being transmitted on the Gch), allowing you to use the PS60 as a master keyboard that can control multiple channels. Tip: This parameter can be directly controlled by choosing VOLUME in EASY SETUP. If the 01...16 setting matches the global MIDI channel, a “G” is shown at the right. Pan (Pre) Bank MSB (When Status = EX2) [000...127] Bank LSB (When Status = EX2) [000...127] Volume [000...127] [RND, L001...C064...R127] This specifies the pan setting immediately before the program’s insert effect. Pan(Pre) CC#10 Pan(Post) CC#8 A.PIANO IFX E.PIANO IFX ORGAN IFX BRASS IFX SYNTH IFX L001…C064…R127: A setting of L001 is far left and R127 is far right. A setting of C064 will reproduce the pan setting of the Program. RND: The oscillator pan will change randomly at each note-on. 30 Pan (Post) Specifies the bank number that will be transmitted when “Status” is set to EX2. The upper line is the MSB, and the lower line is the LSB. This setting has no effect if “Status” is other than EX2. OSC Select [BTH, OS1, OS2] If the timbre is using a Program whose “OSC Mode” is Double (PG p.22), and you want only OSC1 or OSC2 (not both) to sound, set this to OSC1 (only OSC1 will sound) or OSC2 (only OSC2 will sound). If you specify BTH (Both), OSC1 and 2 will produce sound according to the program’s setting. Normally you’ll specify BTH. Performance edit Quick parameter list OSC Mode [PRG, Poly, Mono, Legt] This specifies whether multiple notes can be played simultaneously, or whether only one note will be heard at a time. Normally you’ll set this to PRG so that the settings of the original program will be used. If you wish to force a polyphonic program to sound monophonically, set this either to Mono or Legt (Legato). Conversely, set this to Poly if you wish to force a monophonic program to play polyphonically. Portamento [PRG, Off, 001...127] This is a function that causes the pitch to change smoothly from one note to the next. Normally you’ll leave this set to PRG so that the program’s own setting will be used. If you want to forcibly disable portamento regardless of the programs’ setting, turn this parameter Off. About the tone parameters The “Filter/Amp” and “Filter/Amp EG” parameters simultaneously adjust multiple parameters of the program. These parameters are called “relative parameters,” and have an indication of “Rel” beside the values listed below. Since these parameters simultaneously increase or decrease the values of multiple filter or amp parameters, you can use them to make overall adjustments to the sound. The changes you make are saved in the performance, and will not affect the original program (PG p.9). Filter/Amp: The filter boosts or cuts a specific frequency region of the sound ( “Editing the filter,” p. 38). The amp controls the volume ( “Editing the amp,” p. 38). Cutoff (Filter Cutoff) [–99...+99 (Rel, CC#74)] Conversely, if you want to forcibly turn portamento on, or if you want to change the portamento time, set this parameter to a value 001–127. Portamento will be applied using the time setting you specify here. This scales the cutoff frequency of all of the filters at once (p. 38). Octave Resonance adds a boost to the region near the cutoff frequency. This parameter adjusts the resonance of all filters simultaneously (p. 38). [–5...+0...+5] Adjusts the pitch of each timbre in one octave. Tip: This parameter can be directly controlled by choosing OCTAVE in EASY SETUP (p. 19). Transpose [–60...+00...+60] Adjusts the pitch of each timbre in semitone steps. 12 units equal one octave. Detune [–1200...+0000...+1200] Adjusts the pitch of each timbre in one-cent units. +0000: Normal pitch. With a setting of +0100, the pitch will be the same as a “Transpose” setting of +01. Bend Range [PRG, –24...+00...+24] This specifies the amount of pitch change that will occur when you move the joystick left or right (–X or +X axis). PRG: The pitch range specified by the program will be used. –24…+24: This setting will be used regardless of the setting in the program. Adjusts the pitch of each timbre in semitone steps. 12 units equal one octave. UsePrgScl (Use Prog Scale) Resonance (Filter Resonance) [–99...+99 (Rel, CC#71)] Filt EG Int (Filter EG Intensity) [–99...+99 (Rel, CC#79)] This adjusts the filter EG intensity (the depth of change produced by the filter EG). Lower values will decrease the effect of the filter EG, and higher values will increase the effect. Since the filter EG operates relative to the filter cutoff frequency, adjusting both the Cutoff and this Filt EG Int parameter will control the tonal changes produced by the filter. Level Time [Off, On] Timbre can use the scale that is specified by the program (Full Parameter p. 29). AmpVel Int (Amp Velocity Intensity) [–99..+99 (Rel)] On: The scale specified by the program will be used. This adjusts the depth by which the amp level will change in response to velocity. Off: The scale specified by “Type” (p. 29) will be used. If this is set to –99, the amp level will not be affected by velocity at all. +99 means maximum modulation in the same direction, positive or negative, as the original Program. 31 Editing Filter/Amp EG: Foot Pedal This adjusts the filter EG and amp EG parameters of the program used by the timbre. This specifies whether the effect assigned to a foot pedal connected to the PS60 will be transmitted and received. This setting is effective if the foot pedal is assigned to a MIDI control change (p. 52). Note-on Attack Level Break Level Level Note-off JS X as AMS Release Level Sustain Level Time Decay Time Attack Time Slope Time [Off, On] [Off, On] Specifies whether or not MIDI pitch bend messages (the X axis of the joystick) will be received to control the AMS effect assigned to JS X. (This is not a filter for MIDI pitch bend message reception.) Release Time JS+Y [Off, On] Specifies whether CC#1 will be transmitted and received. Start Level Attack (Filter/Amp EG Attack Time) [–99...+99 (Rel. CC#73)] This scales the attack times of the Filter and Amp EGs, along with other related parameters. When the value is +1 or more, this also affects the Amp EG’s Start and Attack Levels, Start Level AMS, and Attack Time AMS, as described below: Between values of +1 and +25, the Start Level, Start Level AMS and Attack Time AMS, will change from their programmed values to 0. Over the same range, the Attack Level will change from its programmed value to 99. Decay (Filter/Amp EG Decay Time) [–99...+99 (Rel. CC#75)] This scales the decay and slope times of the Filter and Amp EGs. JS–Y [Off, On] Specifies whether CC#2 will be transmitted and received. ProgChange [Off, On] This specifies whether MIDI program change messages will be transmitted. Program change reception is always valid only for performances. Porta.Sw (Portamento Switch) [Off, On] This specifies whether portamento on/off messages (CC#65) will be transmitted and received. The portamento effect setting of the timbre itself (i.e., used by the internal sound generator) is specified by “Portamento” (p. 31). Ribbon #16 [Off, On] Sustain (Filter/Amp EG Sustain Level) [–99...+99 (Rel. CC#72)] This specifies whether ribbon messages (CC#16) will be received. This scales the sustain levels of the Filter and Amp EGs. Note: Use the Foot Pedal setting to control MIDI transmission if you’ve assigned Ribbon#16 as the function of the foot pedal. Release (Filter/Amp EG Release Time) [–99...+99 (Rel, CC#72)] This scales the release times of the Filter and Amp EGs. Other CC# [Off, On] This specifies whether MIDI control change messages not covered by the other MIDI Filter items will be transmitted and received. MIDI Filter: These settings allow you to turn on/off each type of MIDI message received or transmitted by the timbre. Types of message that have a check mark will be transmitted and received. This allows you to make individual settings for each timbre; for example if you want the damper pedal to affect only the A.PIANO, you can turn “Damper” On for A.PIANO and Off for BRASS. Damper [Off, On] This specifies whether damper pedal (CC#64) messages will be transmitted and received. Foot Sw (Foot Switch) [Off, On] This specifies whether the effect assigned to a foot switch connected to the PS60 will be transmitted and received. This setting is effective if the foot switch is assigned to a MIDI control change (p. 51). 32 Sub Timbres Here you can make settings for the sub timbres. The sub timbres are the sound generator that is used by the region not assigned to the main timbres when you’re playing split settings. These parameters are the same as the Main Timbres (p. 30). There are some limitations on the effects that can be used for the sub timbres (p. 14). Performance edit Quick parameter list Chain Level MFX1 (Mod.) About the master effects Send1 Modulation stereo Send2 stereo Tip: You can use the front panel MODULATION button and knobs to directly control the Effect Type and MFX Parameters. Return 1 MFX1(Mod) Chain Level [000...127] This specifies the level from master effect 1 to master effect 2 when “Chain On/Off” is On. stereo Chain On/Off MFX2(Rev/Dly) stereo Reverb/Delay Return 2 EQ EQ Master Level stereo AUDIO OUTPUT L/Mono, R L/R stereo The master effects do not output any direct sound (Dry). Use the return levels “Return1” and “Return2” to return the effect sound (Wet) to the L/R bus and mix it into the signal of the L/R bus. The master effects are stereo-in/stereo-out, but the output may be monaural depending on the type of effect that’s selected. Tip: You can use the front panel MODULATION button and knobs to directly control the Effect Type and MFX Parameters. Tip: You can use the Copy MFX/EQ command to copy the master effect and EQ settings from another performance or program. Effect Type [No Effect...St.Phaser] MFX2 (Rev/Dly) ( “About the master effects,” p. 33) Effect Type [No Effect...Delay] This selects the effect type for master effect 2. You can choose from No Effect, Hall, Plate, Room, or Delay. If you choose No Effect, the output from the master effect will be muted. MFX2 Parameters Here you can set the parameters of the effect selected by “Effect Type.” These are displayed if you press the button when selecting Effect Type. Hall Plate Room ( “Effect types,” p. 20) This selects the effect type for master effect 1. Time (sec) Choose from No Effect, St.Chorus, St.Flanger, Vntg.Cho/Flg, and St.Phaser. If you choose No Effect, the output from the master effect will be muted. [Hall, Plate: 0.1...10.0] [Room: 0.1...3.0] This specifies the reverb time. Level [0...100] MFX1 Parameters This adjusts the output level of the reverb. Here you can set the parameters of the effect selected by “Effect Type.” These are displayed if you press the button when selecting Effect Type. Feedback St.Chorus (Stereo Chorus) St.Flanger (Stereo Flanger) Vntg.Cho/Flg (Vintage Chorus/Flanger) St.Phaser (Stereo Phaser) ( “Effect types,” p. 20) Time (msec) [0.01...10.0] Depth Level [0...100] This adjusts the amount of feedback. [0...100] This adjusts the output level of the delay sound. Feedback [0...100] This adjusts the depth of LFO modulation. On/Off [0...549] This adjusts the delay time. This adjusts the speed of LFO modulation. Feedback This adjusts the amount of high-frequency attenuation. Delay ( “Effect types,” p. 20) Rate (Hz) [0...100] [0...100] This adjusts the feedback amount of the delay sound. On/Off [Off, On] This turns master effect 2 on/off. [Off, On] Return 2 [000...127] This turns master effect 1 on/off. When off, the output is muted. This specifies the return level from master effect 2 to the L/R bus. Return 1 Note: The actual level is determined by multiplying this value with the Level parameter value of Hall, Plate, Room, or Delay. Tip: You can use the front panel REVERB/DELAY button and knobs to directly control the Effect Type and the MFX Parameters. [000...127] This specifies the return level from master effect 1 to the L/R bus. Chain [Off, On] On: Master effects 1 and 2 will be series-connected in the order of master effect 1 → master effect 2. 33 Editing EQ Command Here you can control the center frequency and bandwidth of low-frequency (Bass), mid-frequency (Mid), and high-frequency (Treble) bands. These commands allow you to initialize a performance and copy effects. Trim Initialize [0...100] This specifies the input level to the EQ. BassGain [–18.0...+18.0] This specifies the gain of the low-frequency band. Bass [Peak, Shelf-Low] This selects the filter type. BassFreq [20...1.00k (10Hz step)] This specifies the center frequency. This command initializes the settings of the currently selected performance. • Single settings for A.Piano index 01. • Index 01 of each category is selected for the main timbres. • Index 02 of each category is selected for the sub timbres. Procedure Bass Q [0.5...10.0] 1. Access the Command page. This specifies the bandwidth. Higher values make the band narrower and steeper. Mid Gain [–18.0...+18.0] This specifies the gain of the mid-frequency band. Mid Freq (Frequency) [100–500 (10Hz step)– [1.0k (20Hz)–2.0K (50Hz)–10.0k (100Hz)] 2. Press the button, and then use the buttons to choose the Initialize command. This specifies the center frequency. Mid Q [0.5...10.0] 3. Press the button to get the OK? prompt. This specifies the bandwidth. Higher values make the band narrower and steeper. Treble G (Gain) [–18.0...+18.0] This specifies the gain of the high-frequency band. Treble [Peak, Shelf-high] This selects the filter type. Treble F (Frequency) [500...20.0k (100Hz step)] This specifies the center frequency. Treble Q [0.5...10.0] This specifies the bandwidth. Higher values make the band narrower and steeper. Tip: You can use the front panel EQ knobs to directly control BassGain, Mid Gain, and Treble G. EQ - Bass/Mid/Treble Mid Bass Treble 3dB +Gain Q Shelf Peak 0dB Shelf Peak -Gain 3dB Frequency Frequency Frequency Master Vol (Master Volume) Master Vol [000...127] This specifies the final level after the signal has passed through the EQ and immediately before it is sent to OUTPUT L/MONO and R. 34 4. Press the button to execute. Performance edit Quick parameter list Copy MFX/EQ This command copies the effect or EQ settings from a program or performance saved in the PS60’s memory to the performance that you’re currently operating. From Mode [Prog, Perf] This specifies whether the copy-source will be a program or a performance. Src (Source) [A000: name..., 000: name...] This selects the bank and number of the copy-source. FX [All, Mod. Rev/Dly, EQ] This selects whether you’ll be copying effect or EQ settings. Procedure 1. Access the Command page. 2. Press the button, and then use the buttons to choose the Copy MFX/EQ command. 3. Press the button, and then turn the VALUE knob to select the copy-source. Prog: programs, Performance: performances 4. Select the number whose settings you want to copy. Press the button, and turn the VALUE knob to make your selection. Use the program’s bank number (e.g. “A000”) if you’re selecting a program. Note: The bank number will appear if you press the CURSOR/VALUE buttons simultaneously when the program name is shown in the performance (p. 18). 5. Select the effect that you want to copy. Press the button, and then turn the VALUE knob to make your selection. 6. Press the to get the OK? prompt, and then press the button to execute. If you decide not to execute, press any other button. 35 Editing 36 Program edit A program’s structure and settings Program edit You can create original sounds by editing an existing program to your taste. Major program editing functions A program’s structure and settings Editing the pitch The PS60’s programs consist of Oscillator settings, Pitch settings, Filter settings, Amp settings, Effect settings, and various controllers such as EG and LFO ( “Program structure,” p. 37). You can edit the way in which the oscillator’s pitch will change. The pitch will vary over time according to the Pitch EG and LFO settings. • Use an EG to control the pitch. “Attack (Pitch EG Attack Time)” – “Release (Pitch EG Release Time)” (p. 42) The oscillator section produces the basic sound. It uses multisamples consisting of multiple PCM waveforms. There are two oscillators. • Use the LFO to apply vibrato. The depth of the effect produced by pitch LFO1 is specified by “LFO1 Int (Pitch LFO1 Intensity)” (p. 42). The pitch settings modify the oscillator’s pitch, and the filter settings modify the tonal character. The amp settings modify the volume. Controllers such as EG (envelope generator), LFO (low frequency oscillator), and keyboard tracking can be used to vary the sound in numerous ways according to the elapsed time, the keyboard position, and your performance expressions. The speed of the effect is specified by “LFO” (p. 42). • Apply portamento. “Portamento (Portamento Enable)” – “PortaTime (Portamento Time)” (p. 43) Each program can use one insert effect, you can also use the master effects (modulation and reverb/ delay) and EQ to shape the overall sound. • Use the keyboard position to vary the pitch. “PtchSlope (Pitch Slope)” (p. 43) Note: The STRINGS timbre does not have an insert effect. Take a look at the illustration below. Notice that the signal flows in the order of Oscillator/Pitch → Filter → Amp. The illustration also shows how EG and LFO affect the sound, and how the signal flows through the effects. This makes the pitch rise as you play toward the right of the keyboard, as on keyboard instruments such as piano and organ. • Specify the amount of pitch change that will occur when you move the joystick to left or right. “Pitch JS+X,” “Pitch JS–X” (p. 43) The three elements of sound Sound has three basic elements: pitch, tonal character, and volume. On the PS60, these elements are controlled by the “pitch,” “filter,” and “amp (amplifier)” sections respectively. Program structure Audition Riff Common LFO SEND1 MODULATION Chain On/Off OSC1 LFO2 OSC1 LFO1 SEND2 REVERB/DELAY Return2 Amp1 Filter1(A/B) OSC1 Basic Insert FX Amp1 Mod OSC1 Pitch Filter1 Mod Filter1 LFO Mod Filter1 EG Amp1 EG EQ AUDIO OUTPUT L/MONO, R * The STRINGS program does not have an insert effect. OSC 1 OSC 2 Pitch EG Oscillator / Pitch Return1 Filter Amplifier Effects 37 Editing LFO1 2 Editing the filter The filter modifies the tonal character by allowing just the high-frequency, low-frequency, or a specific frequency band of the sound to pass through. • Adjust the cutoff frequency to modify the tonal character. “Cutoff (Filter Cutoff)” (p. 41) In the case of a low pass filter, the filter will vary the brightness of the sound. Normally, lower settings will make the sound darker, and higher settings will make the sound brighter. Level LPF Low LFO1, LFO2, and the Common LFO control the filter’s cutoff frequency to create cyclic change in the tonal character. You can use this to create an auto-wah effect. The depth of the effect produced by the filter LFO is specified by the “FltLFO1toA (Filter LFO1 Intensity to A),” “FltLFO1toB (Filter LFO1 Intensity to B),” “FltLFO2toA (Filter LFO2 Intensity to A),” and “FltLFO2toB (Filter LFO2 Intensity to B)” settings (p. 44). The speed etc. of the effect is specified by the “LFO” (p. 42). Editing the amp Cutoff frequency Frequency High • You can produce a variety of changes in the amp volume by applying modulation to the amp. The amp EG and LFO are used to control the volume. In the case of a high-pass filter, sound will be removed from the low-frequency range, making the sound thinner. Amp EG Level For example, the volume of a piano note begins at a high volume the instant you play the note, and then decreases gradually. HPF Cutoff frequency Note: The way in which the effect occurs will depend on the program’s filter type and routing ( “Filter,” PG p.35). • Resonance emphasizes the region near the cutoff frequency (see diagram below) “Resonance (Filter Resonance)” (p. 41). This emphasis will not occur if the resonance is set to 0; the frequency region beyond the cutoff will be attenuated smoothly. With moderate settings, the resonance will modify the tonal character of the filter, producing a nasal character or possibly a more intense sound. With extremely high settings, an oscillation reminiscent of whistling will occur. Different sounds have characteristic shapes to their volume levels. The volume of an organ note, on the other hand, remains constant as long as you continue pressing the key. The volume of a note on a violin or wind instrument can be varied during the note by the musician (i.e., by regulating the amount of pressure on the bow or the force of the breath). Volume Piano Volume Volume decays gradually Organ Volume remains constant until note is released Time Time The amp EG applies time-varying change to the oscillator volume. Conversely, by changing the volume contour–for instance, applying a string-like Amp EG curve to an organ multisample– you can produce interesting and unusual sounds. The amp EG’s envelope is specified by the “Filter/Amp EG” (p. 41) and “Filter EG” (p. 41) settings. • You can use the EG and LFO to apply time-varying change to the filter’s cutoff frequency. Filter EG The filter EG controls the filter’s cutoff frequency to create time-varying change in the tonal character. The depth of the effect produced by the filter EG is specified by “Flt EG Int (Filter EG Intensity)” (p. 41). The filter EG’s envelope is specified by the “Filter/Amp EG” (p. 41) and “Filter EG” (p. 41) settings. 38 LFO1, 2 These LFOs produce cyclic change in the volume (tremolo effect). The depth by which the LFOs modulate the volume is specified by the “AMPLFO1Int (Amp LFO1 Intensity)” and “AmpLFO2Int (Amp LFO2 Intensity)” settings of OSC1 (or OSC2) (p. 44). Program edit Operating flow on the PS60 Velocity Many programs will vary their volume according to your keyboard playing dynamics (velocity). The “AmpVelInt (Amp Velocity Intensity)” setting (p. 41) specifies how velocity will affect the volume. Normally you’ll set the amp modulation value to a positive (+) setting. Increasing this value will produce a greater change between softly played and strongly played notes. Operating flow on the PS60 1. Press the front panel PROGRAM EDIT button to select Program Edit mode. If you’re using layer or split settings, all timbres that are on will blink. As necessary, press the LOWER or UPPER button, and then an ON button to select the timbre whose program you want to edit. Then select the desired edit page. 2. Use the CURSOR/VALUE buttons to select the parameter that you want to edit. Editing the insert effects The output of the entire program is sent to the insert effect. Here you can use effects such as distortion or compressor to add a distinctive character to the sound (p. 44, PG p.83). Note: The STRINGS programs do not have an insert effect. 3. Use the buttons or VALUE knob to edit the value or setting. 4. Use the Write command to save the edited settings (p. 25). 5. When you’ve finished editing the program, press the EXIT button. Editing the master effects and EQ (p. 28) About the EG and LFO EG (Envelope Generator) An envelope creates a modulation signal by moving from one level to another over a specified time, and then moving to another level over another period of time, and so on. The Program includes three EGs, for Pitch, Filter, and Amp. These produce time-varying changes in pitch, tone, and volume respectively. note-on Attack Level Break Level Level note-off Release Level Sustain Level Time Decay Time Attack Time Slope Time Release Time Start Level LFOs Each Oscillator has two LFOs: LFO1 and LFO2. There is also a single LFO (Common LFO), shared by both Oscillators. While LFO1 and LFO2 are separate for each voice, the Common LFO is shared by all voices in the Program. This makes it useful when you want all of the voices to have an identical LFO effect. You can use these LFOs to modulate many different Program parameters, including: • • • • Pitch (for vibrato) Filters (for wah effects) Volume (for tremolo) Pan (for auto-panning) 39 Editing The tree diagram on the left shows how the program edit parameters (quick parameters) are structured. These parameters are explained below. Quick parameter list Program Edit OSC Common VoiceMode VoiceLegato* Unison* NumOfVoices* Detune* Tickness* PtchStrtch Hold Reverse * VoiceMode: Mono Filter/Amp Cutoff Resonance Flt EG Int AmpVel Int Filter/Amp EG Attack Decay Sustain Release OSC2 Same as OSC1 parameters Audition Riff : 000: Off Transpose IFX Effect Select Wet/Dry FX Parameters : On/Off - STRINGS does not have IFX Send1(Mod) Send2(Rev) MFX1(Mod.) Effect Select Rate(Hz) Depth Feedback On/Off Return1 Chain ChainLevel Filter EG Attack Decay Sustain Release Amp EG Attack Decay Sustain Release MFX2(Rvb/Dly) Effect Select Time(sec) Level Feedback On/Off Return2 Pitch EG/LFO Attack Decay Release LFO1 Int EQ Trim BassGain Bass BassFreq Bass Q Mid Gain Mid Freq Mid Q Treble G Treble Treble F Treble Q LFO LF01 Speed LFO1 Fade LFO1 Delay LFO1 Stop LF02 Speed LFO2 Fade LFO2 Delay LFO2 Stop CmnLFO Spd OSC1 Play/Mute Volume Tune Transpose PtchSlope Pitch JS+X Pitch JS–X Portamento PortaFingr PortaMode PortaTime LFO1 LFO2 FltLFO1toA FltLFO1toB FltLFO2toA FltLFO2toB AmpLFO1Int AmpLFO2Int P.LFO1 AMS Int P.LFO2 AMS Int 40 Command Copy IFX Copy MFX/EQ Remove Prog Write OSC Common Here you can make common settings for oscillators 1 and 2 to specify how they will produce sound. VoiceMode (Voice Assign Mode) [Poly, Mono] This specifies whether multiple notes can be played simultaneously, or whether the program will play only one note at a time. Poly: The program will play polyphonically, allowing you play chords. Mono: The program will play monophonically. Only one note will be heard even if you hold down multiple keys. It’s effective to use the Mono setting when you want to play analog synthesizer-type bass or synth lead sounds. MonoLegato [Off, On] Legato means to play notes so that they are smooth and connected; the next note is played before the last note is released. This is the opposite of playing detached. This is available when the “Voice Mode” is set to Mono. When “Mono Legato” is On, the first note in a legato phrase will sound normally, and then subsequent notes will have a smoother sound, for more gentle transitions between the notes. On: When you play with legato phrasing, the notes within a legato phrase will sound smoother. Off: Legato phrasing will produce the same sound. Unison [On, Off] This is available if “Voice Mode” is set to Mono. On: When Unison is on, the Program uses two or more stacked, detuned voices to create a thick sound. Use the “NumOfVoices” and “Detune” parameters to set the number of voices and amount of detuning, and the “Thickness” parameter to control the character of the detuning. Off: The Program plays normally. NumOfVoices (Number of Voices) [2...6] This controls the number of detuned voices that will be played for each note when using “Unison”. It applies only when “Unison” is On. Detune [00...99 cents] This parameter sets the tuning spread for the Unison voices, in cents (1/100 of a semitone). Detune is available when “Unison” is On. The “Thickness” parameter, below, controls how the voices are distributed across the detune amount. When “Thickness” is Off, the voices are distributed evenly, centered around the basic pitch. Program edit Quick parameter list Thickness [Off, 01...09] This parameter controls the character of the detuning for the unison voices. Thickness is available when “Unison” is On. Off: Unison voices will be evenly distributed across the Detune range, as shown above. 01–09: Unison voices will be detuned in an asymmetric way, increasing the complexity of the detune, and changing the way in which the different pitches beat against one another. This creates an effect similar to vintage analog synthesizers, in which oscillators would frequently drift slightly out of tune. Higher numbers increase the effect. PtchStrtch (Pitch Stretch) [–12...0...+12 (Rel)] About the tone parameters The parameters from “Filter/Amp” to “LFO,” as well as the OSC1 and OSC2 parameters “Tune” and “Transpose,” make overall adjustments to the sound settings of the program. Parameters other than LFO1Stop and LFO2Stop are Relative parameters. They control an adjustment that is relative to the parameter’s actual value. Note: Relative parameters have an indication of “Rel” following the parameter value. Absolute parameters have an indication of “Abs” following the parameter value (PG p.21). Filter/Amp EG This special control increases the Oscillator Tune parameter while lowering the Transpose parameter. The result is that the pitch stays the same, but the mapping of the samples to the keys changes. You can use this to create interesting shifts in timbre. These parameters simultaneously adjust the filter EG and amp EG of oscillators 1 and 2. Hold This scales the attack times of the Filter and Amp EGs, along with other related parameters. [Off, On] This produces the same result as if you continued holding down the key. The notes will continue sounding indefinitely unless the oscillator’s amp EG parameter “Sustain” is set to 0. On: The Hold function will be enabled. Off: The Hold function will be disabled. Reverse [PROG, Off On (Rel)] If this is On, the multisample waveforms of all oscillators will play backward. With the PROG setting, the program’s original setting will be used. Decay (Filter/Amp EG Decay Time) [–99...+99 (Rel, CC#75)] This scales the decay and slope times of the Filter and Amp EGs. Sustain (Filter/Amp EG Sustain Level) [–99...+99 (Rel, CC#70)] This scales the sustain levels of the Filter and Amp EGs. Release (Filter/Amp EG Release Time) [–99...+99 (Rel, CC#72)] This scales the release times of the Filter and Amp EGs. Filter/Amp Here you can make filter and amp settings for oscillators 1 and 2. Cutoff (Filter Cutoff) Attack (Filter/Amp EG Attack Time) [–99...+99, (Rel, CC#73)] [–99...+99 (Rel, CC#74)] This scales the cutoff frequency of all of the filters at once. Resonance (Filter Resonance) [–99...+99 (Rel, CC#71)] Filter EG These parameters adjust the filter EG envelope for oscillators 1 and 2. Attack (Filter EG Attack Time) [–99...+99 (Rel)] This scales the attack times of the Filter EGs. This scales the resonance of all of the filters at once. Decay (Filter EG Decay Time) Flt EG Int (Filter EG Intensity) [–99...+99 (Rel, CC#79)] This scales the decay and slope times of the Filter EGs. This adjusts the filter EG intensity for the cutoff frequency of all filters. This scales the sustain levels of the Filter EGs. AmpVelInt (Amp Velocity Intensity) [–99...+99 (Rel)] Sustain (Filter EG Sustain Level) Release (Filter EG Release Time) [–99...+99 (Rel)] [–99...+99 (Rel)] [–99...+99 (Rel)] This scales the release times of the Filter EGs. This scales the effect of velocity on the Amp level. 41 Editing LFO1 Delay Amp EG These parameters adjust the amp EG for oscillators 1 and 2. Attack (Amp EG Attack Time) [–99...+99 (Rel)] This scales the attack times of the Amp EGs. Decay (Amp EG Decay Time) [–99...+99 (Rel)] This scales the decay and slope times of the Amp EGs. Sustain (Amp EG Sustain Level) [–99...+99 (Rel)] This scales the sustain levels of the Amp EGs. Release (Amp EG Release Time) [–99...+99 (Rel)] This scales the release times of the Amp EGs. [–99...+99 (Rel, CC#78)] This adjusts the time from note-on until when LFO1 will start ( “Delay [ms],” PG p.30). LFO1 Stop [PROG, Off, On (Abs)] This specifies whether LFO1 will stop or continue operating. If you choose PROG, the program’s “Stop” setting (PG p.52) will be used. For example if the full parameter settings are set so that the oscillator 1 LFO1 is stopped and the oscillator 2 LFO1 is not stopped, choosing the PROG setting here means that the full parameter settings are used without change. LFO2 Speed [–99...+99 (Rel)] This adjusts the LFO2 speed. LFO2 Fade Pitch EG/LFO These parameters adjust the depth of the effect produced by the pitch EG envelope and LFO1 for oscillators 1 and 2. Attack (Pitch EG Attack Time) [–99...+99 (Rel)] This scales the attack times of the Pitch EG. Decay (Pitch EG Decay Time) [–99...+99(Rel)] This scales the decay and slope times of the Pitch EG. Release (Pitch EG Release Time) [–99...+99 (Rel)] This scales the release times of the Pitch EG. LFO1 Int (Pitch LFO1 Intensity) [–99...+99 (Rel, CC#77)] This scales the effect of LFO1 on the Pitch. [–99...+99 (Rel)] This parameter lets you fade-in the LFO2 level starting at note-on ( “LFO1 Fade”). LFO2 Delay [–99...+99 (Rel)] This adjusts the time from note-on until when LFO2 will start. LFO2 Stop [PROG, Off, On (Abs)] This specifies whether LFO1 will stop or continue operating ( “LFO1 Stop”). CmnLFO Spd (Common LFO Speed) [–99...+99 (Rel)] This adjusts the speed of the common LFO. OSC1 These parameters make settings for oscillator 1. LFO Play/Mute These parameters adjust the LFO for oscillators 1 and 2 (p. 39). This specifies whether the oscillator will play or be muted. LFO1 Speed Play: Oscillator 1 will produce sound. [–99...+99 (Rel, CC#76)] Mute: Oscillator 1 will be muted (silent). This adjusts the LFO1 speed. LFO1 Fade [–99...+99 (Rel)] Volume [000...127] This parameter lets you fade-in the LFO1 level starting at note-on. This specifies the volume of oscillator 1. This parameter specifies the time from when the LFO begins to play until it reaches its maximum amplitude. This setting is added to or subtracted from the oscillator’s “Tune” setting. One cent is 1/100th of a semitone. If the “LFO1 Delay” parameter is being used, then the fade will begin after the delay is complete. When “Key Sync” is Off, the fade will apply only to the first note in the phrase. LFO Fade and Delay Delay Note-on 42 [Play, Mute] Fade Note-off Tune Transpose [–1200...+1200 (Rel)] [–60...+60 (Rel)] This setting is added to or subtracted from the oscillator’s “Transpose” setting. It lets you adjust the pitch in semitone steps over a +/–5 octave range. Program edit Quick parameter list PtchSlope (Pitch Slope) [–1.0...+2.0] Portamento (Portamento Enable) [Off, On] This specifies how the oscillator’s pitch will change relative to the note played on the keyboard. Portamento is a function that creates a smooth change in pitch from one note to the next. Normally, this should be set to the default of +1.0. On: Turns on Portamento, so that pitch glides smoothly between notes. Pitch Slope, pitch, and note Pitch Off: Turns off Portamento. +2 Tip: You can use an assignable switch to turn portamento on/off (p. 51). +1 PortaFingr (Portamento Fingered) 2oct 1oct 1oct [Off, On] This parameter allows you to control Portamento through your playing style. 0 This parameter is available if “Portamento” is On. -1 C4 C5 On: Turns on Fingered Portamento. Playing legato will turn off Portament. Note on keyboard Positive (+) values cause the pitch to rise as you play higher on the keyboard, and negative (–) values cause the pitch to fall as you play higher on the keyboard. When this is set to +0.0, playing different notes on the keyboard won’t change the pitch at all; it will be as if you’re always playing C4. This can be useful for special effects sounds, for instance. Pitch JS+X [–60...+12] Specify in semitones how the pitch will change when the joystick is moved to the right. For normal pitch bend, set this to a positive value. For example, if you set this to +12 and move the joystick all the way to the right, the pitch will rise one octave above the original pitch. Pitch JS–X [–60...+12] Specify in semitones how the pitch will change when the joystick is moved to the left. For normal pitch bend, set this to a negative value. For example, if you set this to –60 and move the joystick all the way to the left, the pitch will fall five octaves below the original pitch. You can use this to create guitar-style downward swoops. Off: Turns off Fingered Portamento. PortaMode (Portamento Mode) [Rate, Time] Rate means that Portamento will always take the same amount of time to glide a given distance in pitch - for instance, one second per octave. Put another way, gliding several octaves will take much longer than gliding a half-step. Time means that Portamento will always take the same amount of time to glide from one note to another, regardless of the difference in pitch. This is especially useful when playing chords, since it ensures that each note in the chord will end its glide at the same time. PortaTime (Portamento Time) [000...127] This controls the portamento time. Higher values mean longer times, for slower changes in pitch. If this is set to 0, the result will be the same as if “Portamento” is off; the pitch will instantly change to the pitch of the newly played note. This parameter is available if “Portamento” is On. LFO1 Type [Triangle...Rnd6 (Cnt)] This selects the basic waveform for LFO1 ( “LFO waveform (LFO Type) diagrams”). LFO2 Type [Triangle...Rnd6 (Cnt)] This selects the basic waveform for LFO2 ( “LFO waveform (LFO Type) diagrams”). LFO waveform (LFO Type) diagrams Triangle Saw Square Sine Guitar ExpTri (Exponential Triangle) ExpSawDwn (Exponential Saw Down) ExpSawUp (Exponential Saw Up) Step Tri4 (Step Triangle4) Rnd1(S/H) (Random1 -S/H) Rnd4(Cnt) (Random4 -Continuous) Step Tri6 (Step Triangle6) Rnd2(S/H) (Random2 -S/H) Rnd5(Cnt) (Random5 -Continuous) Step Saw4 Rnd3(S/H) (Random3 -S/H) Rnd6(Cnt) (Random6 -Continuous) Step Saw6 43 Editing FltLFO1toA (Filter LFO1 Intensity to A) [–99...+99] This specifies the depth and direction to which LFO1 will modulate the cutoff frequency of filter A. LFO modulation of Filter Cutoff Audition Riff Here you can specify the riff used by the Audition function (p. 16), and its pitch. Audition Riff Low setting High setting FltLFO1toB (Filter LFO1 Intensity to B) [–99...+99] This specifies the depth and direction to which LFO1 will modulate the cutoff frequency of filter B. FltLFO2toA (Filter LFO2 Intensity to A) [–99...+99] This specifies the depth and direction by which LFO2 will modulate the filter A cutoff frequency. FltLFO2toB (Filter LFO2 Intensity to B) [–99...+99] This specifies the depth and direction by which LFO2 will modulate the filter B cutoff frequency. AMPLFO1Int (Amp LFO1 Intensity) [000: Off...383: name] This selects the audition riff. The PS60 contains 383 audition riffs that are appropriate for a wide range of instruments and musical styles. An appropriate tempo is specified for each riff. [–99...+99] This controls the depth and direction of LFO1’s effect on the oscillator’s volume. Note: You can’t change the playback tempo of the audition riffs. With the 000: Off setting, no riff will play. Transpose [–24...+24] This adjusts the pitch of the audition riff in semitone steps. IFX For the total effect, the direct sound (Dry) is always stereo-in/out. The input/output configuration of the effect sound (Wet) will depend on the selected effect type (PG p.81). Negative (–) values will invert the LFO waveform. Note: The insert effect cannot be used with the STRINGS category. AmpLFO2Int (Amp LFO2 Intensity) IFX Type [–99...+99] This controls the depth and direction of LFO2’s effect on the oscillator’s volume. Negative (–) values will invert the LFO waveform. P.LFO1 AMS Int (Pitch LFO1 AMS Intensity) [–12.00...+12.00] This specifies the depth and direction of the pitch modulation applied by “AMS (LFO1)” (PG p.29). With a setting of 0, modulation will not be applied. With a setting of 12.00, the OSC1 LFO1 will apply a maximum of +/–1 octave of pitch modulation. P.LFO2 AMS Int (Pitch LFO2 AMS Intensity) [–12.00...+12.00] This specifies the depth and direction of the pitch modulation applied by “AMS (LFO2)”. OSC2 Here are the settings for oscillator 2. These parameters are available only for a program that uses two oscillators. The parameters are the same as for oscillator 1 ( “OSC1,” p. 42). [00...61 (62, 63)] This selects the effect type for the insert effect. The available range will differ depending on the category of the timbre. • Categories other than STRINGS and ORGAN: 00–61 • ORGAN category: 00–63 Effect types 62: Organ V/C and 63: Rotary SP are available only for programs of the Organ category. If you’re using 63: Rotary SP, you can use the ORGAN SLOW/FAST button to switch the rotary speaker simulator between slow/fast. Categories of the 63 effects Type Explanation Dynamics: 00–06 Dynamics effects such as compressor and limiter EQ/Filter: 07–19 Filter-type effects such as EQ, exciter, and wah Overdrive/Amp/Mic: 20–28 Overdrive-type effects, and guitar/bass amp and microphone modeling effects. Phaser/Modulation: 29–42 Modeling effects such as phaser, tremolo, and ring modulator Mono-Mono Serial (Dyn/EQ/Phs): 43–61 Effects that internally series-connect two mono effects. These combine effects such as dynamics, EQ, and phaser. Organ FX: 62–63 Standard effects for organ IFX Parameters Here you can edit the parameters of the effect selected in “IFX Select.” For details on the effect parameters, refer to “IFX (Insert effects) List” (PG p.83). You’ll be able to edit the most important parameters of the effect. To edit all of the parameters, you’ll need to use the editor. 44 Program edit Quick parameter list On/Off [Off, On] This turns the insert effect on/off. If this is off, the input will be output without change. (The Off setting is the same as if No Effect is on.) Command These commands let you copy effects or remove programs. Copy IFX Send1 (Mod), Send2 (Rev) Send1 (Mod) [000...127] Send2 (Rev) [000...127] These specify the send levels to master effects 1 and 2, taken from immediately after the insert effect. Tip: You can use the EASY SETUP settings MOD SEND and REV/DLY SEND to control these parameters directly. [No Effect...St.Phaser] MFX1 Parameters On/Off Return 1 • The settings of the entire insert effect (the IFX page contents and effect parameters) • The “Pan (Post”), “Send1,” and “Send2” settings following the insert effect Src (Source) [A000: name...D127: name...] Select the copy-source. To select a program, specify the program’s bank number (e.g., “A000”). MFX (Mod.) Effect Type This command copies the insert effect settings from a specified program. The following settings will be copied. Note: The bank number is displayed if you press the CURSOR/VALUE buttons simultaneously when the program name of the performance is shown (p. 18). [Off, On] [000...127] Copy MFX/EQ (p. 33) This command copies the effect or EQ settings from a program or performance stored in the PS60’s memory to the program that you’re currently editing ( “Procedure,” p. 35). MFX (Rvb/Dly) Note: If you’ve copied MFX/EQ settings to the program you’re editing, all of those settings will be carried over to the performance when you exit editing. Chain ChainLevel Effect Type [Off, On] [000...127] [No Effect...Delay] MFX Parameters On/Off Return 2 [Off, On] [000...127] (p. 33) From Mode Src (Source) Bass BassFreq Bass Q Mid Gain [0...100] [–18.0...+18.0] [Peak, Shelf-Low] [20...1.00 (10k step)] [0.5...10.0] [–18.0...+18.0] Mid Freq (Frequency) [100-500 (10Hz step) 1.0k (20Hz) - 2.0K (50Hz) - 10.0K (100Hz)] Mid Q Treble G (Gain) Treble Treble F (Frequency) Treble Q [All, Mod.Rev/Dly, EQ] Select effect and/or EQ settings to be copied. EQ BassGain [A000: name..., 000: name] Select the copy-source bank and number ( “Src (Source),” p. 45). FX Trim [Prog, Perf] Specify whether the copy-source will be a program or a performance. [0.5...10.0] Remove Prog (Remove Program from Category) This command deletes the currently selected program from the PS60’s internal memory, and moves it to the user area. When the deletion is completed, you will automatically return to Performance mode. You can use this to remove unwanted programs, or to obtain free space in the user area. OK Press the button to execute the deletion. [–18.0...+18.0] [Peak, Shelf-High] [500...20.0K (100Hz step)] [0.5...10.0] (p. 34) 45 Editing Write This command saves the edited program to the PS60’s internal memory ( “Writing a program (WRITE),” p. 25). You must save important programs. An edited program will be lost if you turn off the power or select a different program before saving it. Note: Before you can write a program, you must turn the memory protect settings off in Global mode. Name [space, !...~] Specify the name of the program. Use the buttons to select a character location, and use the buttons or the VALUE knob to specify the desired character at that location. You can enter up to 24 characters. Cat (Category) [A.Piano...Synth] Specify the category of the program you’re saving. The program you write will be assigned to one of the timbres (A.PIANO–SYNTH) according to the category you specify here. Note: The following restrictions apply when you change the category and save the program. • If you modify a Strings timbre and save it, the insert effect will be unavailable. • If you save from a String timbre to another timbre, the insert effect will be set to 00: No Effect. • If the insert effect 62: Organ V/C or 63: Rotary SP is assigned to an Organ timbre, saving it to a different timbre will change the insert effect setting to 00: No Effect. To [A000...D127: name] Specify the save-destination for the program. The PS60 allows you to save 512 programs. Use the program’s bank number (e.g., A000) to specify the save-destination. Note: We recommend that you save to a initial program. When the PS60 is shipped from the factory, D56– D127 are initial programs. These are indicated as INIT (Initial). When saving a program, use the “To” field to specify one of these programs as the save-destination, and then save it. The program will be assigned to a timbre, and can be selected. If you change the save-destination, the index number within the performance is automatically assigned in ascending order of the program’s bank number. This means that if you change the program’s category or save it in a different number, the program’s index number might move up or down. If you save your edited program to a user program that’s located after the preload programs, the index numbers of the preloaded programs won’t change. Note: The bank number is displayed if you press the CURSOR/VALUE buttons simultaneously when the program name of the performance is shown (p. 18). OK Press the button to execute the Write operation. 46 Global settings Major global settings Global settings Major global settings Global settings apply to the entire PS60. • Adjust the pitch of the entire PS60. “MTune (Master Tune),” “Transpose,” “Octave” (p. 48) Transpose (TRANSPOSE) and octave (OCTAVE) settings can also be made from the front panel (p. 18). • Adjust how the volume or tone will respond to your playing dynamics (velocity). “Vel Curve (Velocity Curve)” (p. 48) • Bypass the insert effect, master effects, and EQ. “Effect SW:” (p. 49) • Adjust the overall EQ settings of the PS60. “EQ Offset:” (p. 49) • Prevent performance or program settings from being overwritten. “Memory Protect” (p. 49) • Make MIDI-related settings such as the global MIDI channel, local control, and MIDI filtering. “Channel (Global MIDI Channel)” (p. 50), “Local Ctrl (Local Control)” (p. 50), “MIDI Filter” (p. 51) • Make settings for a foot controller (damper, pedal, switch) and calibrate it. “PEDAL/SW 1” (p. 51), “PEDAL/SW2” (p. 52), “HalfDmpr Calib (Half Damper Calibration)” (p. 53), “Pedal Calib (Pedal Calibration)” (p. 53) Note: Settings you change in Global mode will be lost when you turn off the power. If you want to keep the changes, you must write them (p. 26). The front panel keyboard settings OCTAVE and TRANSPOSE also affect the corresponding parameters of Global mode. You can save these settings in Global mode. 47 Editing Quick parameters The tree diagram on the left shows how the program edit parameters (quick parameters) are organized. These parameters are explained below. GLOBAL Basic Basic MTune Transpose Vel Curve AT Curve Octave Effect SW All IFXs MFX1&2 EQ EQ Offset Bass Mid Treble Scroll Text Memory Protect Program Perf MTune (Master Tune) Transpose Command Load All Demo Half Dmpr Calib Reset ARP CC# Pedal1 Calib Pedal2 Calib [–12...+00...+12] This adjusts the pitch in semitone steps over a ±1 octave range. This setting is applied at the location (PreMIDI or PostMIDI) specified by “Convt (Convert Position)” (p. 50). Note: You can use the front panel TRANSPOSE and MIDI Channel Local Ctrl Convt Note Recv MIDI Clock MIDI Filter Prog Chg Bank Chg Afer Touch Ctrl Chg SysEx Controllers JS Lock PEDAL/SW 1 Type Polarity PEDAL/SW 2 Type Sw Polarity [–50cents...+50cents] This adjusts the overall tuning of the entire PS60 in one-cent units (semitone = 100 cents), over a range of ±50 cents. With a setting of 0, the frequency of A4 will be 440 Hz. buttons to directly control this parameter. Vel Curve (Velocity Curve) [1...9] This specifies the way in which the volume and/or tone will change in response to variations in keyboard playing dynamics (velocity). Each curve has its own characteristics. As appropriate, select a curve that suits your particular playing style, use the curve that lets you obtain the desired result. Ex. Damper Ex. Switch If “Convt (Convert Position)” (p. 50) is set to PreMIDI, your keyboard playing dynamics will affect the velocity effect or the transmitted velocity as shown in the illustration on the lower right. With the PostMIDI setting, the velocity of the notes you play on the PS60’s keyboard or received via MIDI, will change as shown in the illustration on the lower left. For a setting of PreMIDI For a setting of PostMIDI Velocity (KBDMIDI Out) Velocity (MIDI InTG) 127 MAX Write Global 6 7 8 7 5 8 Velocity effect 4 3 2 6 5 4 1 Soft Strong 1 9 1 127 Received Table Transmitted Table KBD 3 2 9 1 Curve 1–9 Curve 4 Curve 4 Curve 1–9 TG MIDI PreMIDI PostMIDI Global Convert Position 1, 2, 3: Strongly played notes will be affected. 4 (Normal): The normal curve 5, 6: Produces an effect even if you do not play very strongly. 7: This curve produces a relatively consistent effect for softly played notes. 48 Global settings Quick parameters 8: This curve produces an even more consistent effect. ScrollText 9: Compared with the standard curve #4, this curve softens the response of gently-played notes. This allows velocity control with broader dynamics for sounds such as acoustic piano. This specifies whether program names or performance names will be scrolled if they are too long to be shown in the display. AT Curve (Aftertouch Curve) On: Scroll on [1...8] This specifies the way in which incoming aftertouch data will affect the volume or tone when “Convt (Convert Position)” (p. 50) is set to PostMIDI. [Off, On] Off: Scroll off (default setting) Memory Protect Program [Off, On] With the PreMIDI setting, this parameter is not used. This setting protects the internal program memory. Octave On: Internal program memory will be protected, and the following write operations cannot be performed. [–3...+0...+3] This shifts the pitch in steps of one octave, over a range of +/–3 octaves. Note: You can use the front panel OCTAVE UP and DOWN keyboard setting buttons to directly control this parameter. Note: Programs will sound correctly up to a maximum of G9. Each program has a different upper limit, and will not produce sound higher than this limit. Effect SW: ALL IFXs [Off, On] Off: All insert effects will be turned off. On: The insert effect “On/Off” setting of the program will be used. MFX1&2 [Off, On] Off: Master effects 1 and 2 (MFX1, 2) will be turned off. On: The master effect “On/Off” setting of the performance or program will be used. EQ • Writing a program • Loading preloaded program data • Receiving program data via MIDI data dump Off: Data can be written to internal program memory. Perf (Performance) [Off, On] This setting protects the internal performance memory. On: Internal performance memory will be protected, and the following write operations cannot be performed. • Writing a performance • Loading preloaded performance data • Receiving performance data via MIDI data dump Off: Data can be written to internal performance memory. [Off, On] Off: EQ will be turned off. On: The EQ “On/Off” setting of the performance or program will be used. EQ Offset: Bass [–18.0...+00.00...+18.0dB] Mid [–18.0...+00.00...+18.0dB] Treble [–18.0...+00.00...+18.0dB] These settings allow you to adjust the tonal character of the PS60’s entire output to compensate for the acoustics of a live performance venue or the speakers you’re using. For example you can quickly and easily reduce the high-frequency range to soften the sound, or boost the low-frequency to give the sound more depth, without having to modify the programs or performances you’ve created. Example: Offset value EQ setting Actual response Bass +7.5 –3.5 +4.0 dB Mid +1.0 0.0 +1.0 dB Treble –3.0 +8.5 +5.5 dB 49 Editing MIDI MIDI IN Velocity Curve Here, you can make MIDI-related settings that affect the entire PS60. Channel (Global MIDI Channel) [01...16] PS60 Tone generator Scale Transpose Note number change Transmitted Table MIDI OUT Sets the global MIDI channel. The global MIDI channel is used in the following cases. • When switching performances. • When controlling a timbre or effect that is set to the Gch. • When transmitting and receiving System Exclusive messages Regarding MIDI transmission when you operate the PS60’s keyboard or controllers For a performance, data is transmitted simultaneously on the global MIDI channel and on the MIDI channel of timbres whose “Status” (p. 30) is set to EXT or EX2. Local Ctrl (Local Control) Off: The PS60’s keyboard and joystick etc. will be internally disconnected from the tone generator section. This means that operating the keyboard or joystick will not cause the PS60 to produce sound. Use the Off setting to prevent duplicate notes from being sounded by echo-back from an external sequencer. OFF ON Tone generator MIDI IN MIDI OUT If Local Control is Off, MIDI transmission/reception will occur normally. Playing the keyboard will cause the corresponding note data to be transmitted, and received note data will play the PS60’s internal sounds. Convt (Convert Position) The data played on the PS60’s keyboard will not be affected. MIDI IN Velocity Curve Aftertouch Curve [PreMIDI, PostMIDI] Scale Transpose Tone generator Pitch change PS60 MIDI OUT Note Recv (Note Receive) Received Table [All, Even, Odd] This setting specifies whether even-numbered, oddnumbered, or all note numbers will be sounded when note data is received from the PS60’s keyboard or from an external MIDI device. By connecting the PS60 to another PS60 and setting one instrument to Even and the other to Odd, you can effectively double the polyphony by dividing the notes between the two instruments. Clock (MIDI Clock Source) [Internal, Ext.MIDI, Ext.USB, Auto] This specifies how the PS60’s LFOs or effects when using MIDI/Tempo Sync. will synchronize with an external MIDI device (e.g., sequencer or rhythm machine) or computer. This specifies the position at which transpose (p. 48) and velocity curve (p. 48) settings will be applied. This setting will affect how MIDI data is transmitted and received. Internal: The LFOs and effects will synchronize to the internal clock. Select the Internal setting when using the PS60 by itself, or when you want the PS60 to be the master (controlling device) so that connected external MIDI devices will synchronize to the PS60 MIDI Clock. If you’re playing the PS60’s sound generator from the keyboard, the transpose and velocity curve settings are always applied in the same way regardless of this Convert Position setting. Ext.MIDI: The LFOs and effects will synchronize to MIDI Clock messages from an external MIDI device connected to the MIDI IN connector. PreMIDI: The velocity curve and transpose settings will be applied to the data being sent from the PS60’s keyboard. The data affected by the velocity curve and transpose settings will be the data that is transmitted from MIDI OUT when you play the PS60’s keyboard. The MIDI data received from MIDI IN will not be affected. 50 The data affected by the velocity curve, aftertouch curve and transpose settings, will be the data that is sent to the PS60’s tone generator from the keyboard or received from MIDI IN. [Off, On] On: You can use the PS60’s keyboard and joystick etc. to control the PS60’s tone generator section. Use the On setting if you’re using the PS60 by itself. Local Control PostMIDI: The velocity curve, aftertouch curve and transpose settings, will be applied to the data before it enters the tone generator. Ext.USB: The LFOs and effects will synchronize to MIDI Clock messages from a computer (e.g., DAW application) connected to the USB connector. Auto: Normally the operation will be the same as the Internal setting. If external MIDI Clock messages are received from the MIDI IN or USB connector, the PS60 will automatically switch to Ext.MIDI and Ext.USB. Global settings Quick parameters MIDI Filter Prog Chg (Enable Program Change) Controllers [Off, On] On: Program changes will be transmitted and received. When a performance receives program data on a channel that matches the global MIDI channel, the performance will be switched. When you switch performances, a program change will be transmitted on the global MIDI channel and on the MIDI channel of each timbre whose “Status” (p. 30) is EXT or EX2. Note: The programs selected for each timbre cannot be switched by receiving MIDI data. Off: Program changes will not be transmitted or received. Bank Chg (Enable Bank Change) [Off, On] On: The Bank Select control change message will be transmitted together with program change messages. This is valid when “Prog Chg” is On. Off: Bank Select messages will not be transmitted or received. AfterTouch (Enable Aftertouch) [Off, On] On: MIDI aftertouch messages will be transmitted and received. Off: MIDI aftertouch messages will neither be transmitted nor received. The PS60’s keyboard is not able to transmit either channel aftertouch or polyphonic aftertouch. Since aftertouch is supported as an AMS, aftertouch messages can be received to control an assigned parameter. Ctrl Chg (Enable Control Change) [Off, On] On: Control change messages will be transmitted and received. Off: Control change messages will neither be transmitted nor received. SysEx (Enable System Exclusive) [Off, On] On: System Exclusive data will be transmitted and received. JS Lock [X, Y, +Y, –Y, XY] This specifies the range in which the joystick’s effect can be locked. Joystick lock will apply to the range you specify, as follows. X: the entire X-axis, Y: the entire Y-axis, +Y: the +Y direction, –Y: the -Y direction, XY: the entire range of the X-axis and Y-axis. X Y +Y -Y XY PEDAL/SW 1 Type [Damper, Switch, Pedal] Specify the type of the controller that is connected to the ASSIGNABLE PEDAL/SW1/DAMPER jack. Damper: Choose this if a damper pedal is connected. Switch: Choose this if a pedal switch is connected. Pedal: Choose this if a foot pedal is connected. Sw (Foot Switch function) [No Function...JS Lock] This is shown if “Type” is set to Switch. It specifies the function that will be controlled by a pedal switch (optional PS-1) connected to the DAMPER/ PEDAL/SW1 jack. No Function: No function Foot Switch: Foot switch on/off (CC#82) Porta.SW: Portamento switch on/off (CC#66) Sostenuto: Sostenuto pedal on/off (CC#66) Soft: Soft pedal on/off (CC#67) Damper: Damper pedal on/off (CC#64) Perf Up: Increment the performance number Perf Down: Decrement the performance number Value Inc: button Value Dec: button Choose the On setting if you want to edit the PS60 from a connected computer or vice versa. Tap Tempo: Tap tempo Off: System Exclusive data will not be transmitted. Normally you will leave this unchecked. JS-Y: Joystick –Y (CC#02) JS+Y: Joystick +Y (CC#01) CC#16 (Rbn): Control change (CC#16) JS Lock: Joystick lock on/off Note: If you specify a function that includes a CC#, that MIDI control change message will be transmitted each time the pedal switch turns on/off. ( “List of Foot Switch assignments,” PG p.128) 51 Editing Pdl (Foot Pedal function) [No Function...CC#16(Rbn)] Sw (Foot Switch function) This is shown if “Type” is set to Pedal. It specifies the function that will be controlled by a foot volume pedal (optional XVP-10 or EXP-2) connected to the DAMPER/PEDAL/SW1 jack. This specifies the function that will be controlled by a pedal switch (optional PS-1) connected to the ASSIGNABLE PEDAL/SW2 jack ( “List of Foot Switch assignments,” PG p.128). No Function: No function Pdl (Foot Pedal function) [No Function...CC#16(Rbn)] Master Vol: Master volume Foot Pedal: Foot pedal (CC#04) Porta.Time: Portamento time (CC#05) Volume: Volume (CC#07) PostIFXPan: Pan following the insert effect (CC#08) [No Function...JS Lock] This specifies the function that will be controlled by a foot volume pedal (optional XVP-10 or EXP-2) connected to the ASSIGNABLE PEDAL/SW2 jack ( “List of Foot Pedal assignments,” PG p.129). Pan: The timbre’s pan (CC#10) Polarity (Switch Polarity) Expression: Expression (CC#11) Set this to match the polarity of the damper pedal or pedal switch that’s connected to ASSIGNABLE PEDAL/SW2 ( “PEDAL/SW 1,” p. 51). FX Ctrl 1: Control change CC#12 [–Korg, +] FX Ctrl 2: Control change CC#13 MOD Send: The timbre’s send amount to master effect 1 (CC#93) Using a connected foot switch to select performances REV/D Send: The timbre’s send amount to master effect 1 (CC#93) A foot switch connected to ASSIGNABLE PEDAL/ SW2 can be used to switch performances. By assigning the desired function, you can use the switch to increment or decrement through the performance numbers. JS+Y: Effect of the joystick +Y (away) direction (CC#01) JS-Y: Effect of the joystick –Y (toward yourself) direction (CC#02) CC#16 (Rbn): Control change CC#16 Note: If you specify a function that includes a CC#, that MIDI control change message will be transmitted. ( “List of Foot Pedal assignments,” PG p.129) Polarity (Switch Polarity) [–Korg, +] Set this to match the polarity of the damper pedal or pedal switch that’s connected to the ASSIGNABLE PEDAL/SW1/DAMPER jack. If you’ve connected a Korg damper pedal (optional DS-1H) or a Korg pedal switch (optional PS-1), choose the –KORG setting, since this pedal and switch have negative “–” (↓) polarity. If you’ve connected a damper pedal or pedal switch that have positive “+” (↑) polarity, choose the “+” setting here (↓: open type, ↑: closed type). If the polarity setting is incorrect, operating the damper pedal or pedal switch will not produce the correct result. Choose the “–” setting if no damper pedal or pedal switch is connected. PEDAL/SW2 Type [Switch, Pedal] Set this to match the type of controller that’s connected to the ASSIGNABLE PEDAL/SW2 jack. Switch: Choose this setting if you’ve connected a pedal switch. Pedal: Choose this setting if you’ve connected a foot pedal. 52 In situations where your hands are not free, such as while you’re playing, it’s convenient to use a foot switch to change performances. 1. Connect a foot switch to the rear panel ASSIGNABLE PEDAL/SW2 jack. Use an optional PS-1 pedal switch. 2. Press the GLOBAL button to enter Global mode. 3. Set the GLOBAL - Ctrl/PEDAL SW2 “Type” to Switch. 4. Press the button to choose “Sw,” and select either Perf Up or Perf Down. With the Perf Up setting, the next higher-numbered performance will be selected each time you press the foot switch. With the Perf Down setting, the next lower-numbered performance will be selected each time you press the foot switch. 5. Press the button to choose “Polarity,” and specify the polarity of the pedal that’s connected. If you’ve connected an optional PS-1 pedal switch, use the -KORG setting. When you press the foot switch, the performance will increment or decrement. 6. If you want to keep this setting even after the power is turned off, be sure to Write the settings ( “Writing the global settings,” p. 26). 7. Press the EXIT button to return to Performance mode, and press the foot switch; the performance will change. Global settings Quick parameters Command Load Preload This command loads the performance and program data that is stored in internal memory ( “Restoring the factory settings,” p. 55). Note: Before you load this data, you must turn off the “Memory Protect” setting (p. 49) for the data that you intend to load. HalfDmpr Calib (Half Damper Calibration) If the half damper effect of the damper pedal connected to the ASSIGNABLE PEDAL/SW1/ DAMPER jack does not operate correctly, please execute this command to calibrate the half damper sensitivity. Note: You must use the optional DS-1H if you want to use the half damper function. If any other pedal is used, you might not obtain the correct effect, or there might be no effect at all. 1. Connect your half damper pedal to the ASSIGNABLE PEDAL/SW1/DAMPER jack. 2. Choose the “HalfDmpr Calib” command, and press the button to get the “Done?” prompt. 3. Slowly press the half damper pedal, and then release it. 4. Press the button to complete the pedal calibration. If calibration could not be performed correctly, the error message “Can’t Calibrate” will appear. Please perform the procedure again from step 2. Pedal Calib (Pedal Calibration) This command adjusts the sensitivity of a foot pedal connected to the ASSIGNABLE PEDAL/SW1/ DAMPER jack (or the ASSIGNABLE PEDAL/SW2 jack). The foot pedal sensitivity is adjusted to a standard setting when shipped from the factory. Please perform this calibration if your foot pedal does not function appropriately. 1. Connect your foot pedal to the ASSIGNABLE PEDAL/SW1/DAMPER jack (or the ASSIGNABLE PEDAL/SW2 jack). 2. Choose the “Pedal Calib” command, and press the button to get the “Done?” prompt. 3. Slowly advance the foot pedal all the way away from yourself, and then return it all the way toward yourself. 4. Press the button to complete the pedal calibration. If calibration could not be performed correctly, the error message “Can’t Calibrate” will appear. Please perform the procedure again from step 2. Note: The setting is stored in memory when you perform this calibration. You don’t need to save (Write) it. Write Global This saves the Global settings ( “Writing the global settings,” p. 26). Note: The state of the Effect SW is not saved. 53 Editing 54 Appendix Restoring the factory settings Loading the preload data Here’s how to return the performances, programs, and global settings to their factory-set state. You can do this in either of the following two ways. • Load only the preload data. (Recommended) Data other than the preload data (i.e., user performances and programs) will remain unchanged. ( “Data loaded by Load Preload All”) • Execute initialization. All data other than the preload programs (i.e., the user performances and programs) will be cleared. ( “Initialization”) Never turn off the power while data is being loaded. Loading the preload data will rewrite the data in the PS60’s internal memory. If you want to keep the data that’s in internal memory, use PS60 Editor/ Plug-In Editor to save the data before you proceed. Note: Before you load, you’ll need to turn the Global “Memory Protect” setting off for the data that will be loaded. You can’t load the data if the protect setting is On. Proceed as follows. 1. Press the GLOBAL button. 2. Press the CURSOR/VALUE button to move to the top level of the edit page tree. The page where no symbol is shown in the upper left of the display is the top level. 3. Use the buttons to select “Command.” Data loaded by Load Preload All The following data will be loaded when you execute the Load operation. Program • A.Piano: 01–30 (A000–A029) • E.Piano: 01–85 (A030–A114) • Organ: 01–67 (A115–B053) • Strings: 01–30 (B054–C002) • Brass: 01–30 (C003–C083) • Synth: 01–167 (C084–D055) Performance: Bank A-1...C-5 Global Setting Data not loaded by Load Preload All Program • (D056–D127) Performance: Bank D-1...D-5 Initialization If the PS60 begins operating in an unstable manner, please initialize it. 1. Power-off the PS60. 2. While holding down the four PERFORMANCE buttons and the OCTAVE DOWN button, poweron the PS60. The PS60 will be initialized, and the factory-set data will be written into internal memory. The display will indicate “Initializing...” while data is being written. Never turn off the power while this indication is shown. 4. Press the button to select Load Preload. 5. Press the button. A page will appear in which you can select the data to be loaded. 6. Press the button to get the “OK?” prompt. 7. Press the button to execute the Load operation. The display will indicate “Now Executing” while the data is being written. Never turn off the power while this indication is shown. 55 Appendix Troubleshooting If you experience problems, please see the relevant item and take the appropriate measures. Power supply Could the post-EQ “Master Vol” level be lowered? p. 34 Could the total polyphony be exceeding the maximum polyphony of 120 voices? Sound will not stop Power does not turn on Is the AC adapter connected to an outlet? p. 9 Is the rear panel POWER switch turned on? p. 9 Could “Hold” be on? p. 41 Is “Polarity (Switch Polarity)” set correctly? p. 52 Notes are sounded twice The power is turned on, but nothing is shown on the display. The PS60 functions normally when you play the keyboard or perform other operations. Use the rear panel Contrast adjustment knob to adjust the contrast of the display. p. 5 The power is turned on, but the display does not work normally, or an error message is displayed. There is no sound when you play the keyboard, and the PS60 does not function normally. This type of problem may occur if a data writing operation to internal memory was not completed correctly, for example, if the power of the PS60 was turned off while a program or other data was being written. If this occurs, use the following procedure to initialize the PS60’s internal memory. p. 55 Audio output Output sound is distorted or noisy If you’re playing a layered sound with multiple timbres turned on, the output sound might be distorted or noisy depending on the specific programs that are combined, or on settings such as volume and EQ. Adjust the timbre volume and EQ gain settings to lower the volume. Is Local Control turned Off? Turn “Local Ctrl (Local Control)” Off. p. 50 You hear noise or oscillation Some effects such as 019: St.Analog Record deliberately generate noise. It is also possible for a filter with resonance to oscillate. These are not malfunctions. Can’t play chords on the keyboard Could the timbre’s “OSC Mode” be set to Mono or Legt, or the program’s “VoiceMode” or “VoiceAssign” be set to Mono p. 31, 40 Pitch is incorrect Are “MTune (Master Tune)” and “Transpose” set correctly? p. 48 Is “PtchSlope (Pitch Slope)” set to +1.0? p. 43 In the performance, is each timbre’s “Transpose” and “Detune” set correctly? p. 31 In each timbre of the performance or program, could a scale other than Equal Temperament be selected as the scale type? p. 29, 31 Could JS Lock have been used to lock the joystick in the X-direction, so that pitch bend remains applied? p. 17 Performances and programs Program won’t sound No sound Are your powered monitor speakers, stereo set, or headphones connected correctly? p. 10 Are your powered monitor speakers or stereo set powered-on, and the volume raised? Is Local Control turned on? Turn “Local Ctrl (Local Control)” On. p. 50 Is the VOLUME knob set appropriately? p. 9 Could Master Volume be assigned to “Pdl (Foot Pedal function),” and that pedal be in a lowered position? p. 52 Is the “Status” set to INT? p. 30 Could the level of an oscillator or timbre be lowered? p. 19, 30, 42 56 Could the oscillator be muted, or its volume lowered? p. 42 Can’t save a performance or program Is the Memory Protect “Perf (Performance)” or “Program” setting Off? p. 49 Sound is different even though the same program is selected Since there are limitations on the effects that can be used for sub timbres or timbres that are used in layer settings, the effect settings that are actually used might differ from the effect settings saved in the program. “Effect priority order” (p. 59) Troubleshooting Audio output The same program might sound different because of differences in the performance’s tone parameters, timbre parameters, master effects, and EQ settings. Return the edited parameter to its original value, or change parameters of differing values to the same value. If a timbre’s tone parameters (p. 31) have been edited (this can happen by receiving certain CC#s), you can return to the saved settings by reselecting the program. If timbre parameters have been edited (this can happen by receiving certain CC#s), you can return to the saved settings by reselecting the performance. Alternatively, you can execute Initialize Performance to initialize the parameters of the performance. After doing either of the above steps, reselect the performance. * The timbre parameters include Volume, Pan (Pre), Pan (Post), OSC Select, OSC Mode, Portamento, Octave, Transpose, Detune, and UsePrgScl. In Performance Edit, can’t change the value of a timbre parameter such as “MIDI Channel” or “Status” Some parameters can’t be edited while notes are playing, either locally or from MIDI. If the damper pedal is held down, or if its calibration is incorrect, notes may be sustaining even if they aren’t audible. Are you using a damper pedal with a polarity that does not match the “Polarity (Switch Polarity)” setting? p. 52 Insert effect is not applied Could you have changed the program’s category when saving it? p. 46 The STRINGS timbre does not have an insert effect. Could the IFX “On/Off” setting be Off? p. 45 The blinking speed of the ORGAN FAST/ SLOW button does not match the speed of the rotary speaker simulator If you switched the speed of the rotary speaker simulator by operating the joystick in the +Y direction, the ORGAN SLOW/FAST button’s blinking speed will not change. Press the ORGAN SLOW/FAST button to change the blinking speed. Alternatively, operate the joystick once again in the +Y direction to switch the rotary speaker simulator’s speed. The ORGAN SLOW/FAST button does not blink The ORGAN SLOW/FAST button blinks only for ORGAN programs in which 63 Rotary SP is selected as the insert effect. MIDI The PS60 does not respond to incoming MIDI data In some cases, this problem can be solved be executing the command “HalfDmpr Calib (Half Damper Calibration)”. p. 53 Are all MIDI cables or USB cables connected correctly? p. 12, “PS60 USB-MIDI Setup Guide” Effects and EQ The PS60 does not respond correctly to incoming MIDI data Effects or EQ are not applied Could the Effect SW “ALL IFXs,” “MFX1&2,” or “EQ” be Off? p. 49 Could No Effect be selected as the effect type? On the front panel, press the MODULATION button or REVERB/DELAY button to select an effect. p. 20 In the edit page, select something other than No Effect for “IFX,” “MFX1(Mod),” and “MFX2(Rev).” p. 30, 44 Is the MIDI data being received on the channel on which it is being transmitted? p. 50, 30 Are the MIDI Filter settings “Prog Chg,” “Bank Chg,” “AfterTouch,” “Ctrl Chg,” and “SysEx” respectively turned On? p. 51, 32 Does the PS60 support the types of messages that are being sent to it? p. 63 Incorrect response to program change messages Is the “Bank Map” setting correct? PG p.134 Could the Effect SW settings “All IFXs,” “MFX1&2” or “EQ” be Off? p. 49 Program changes on the global MIDI channel correspond to performances. In a performance, if the master effect still does not apply even when you’ve raised the timbre’s “Send1(Mod)” and “Send2(Rev)” settings, are the “Return1” and “Return2” settings from the master effect raised? p. 49 Could the “Send1(Mod)” or “Send2(Rev)” settings for each program oscillator used by the timbre be lowered? p. 30 The programs of the timbres will not switch. Note: The actual send level is determined by multiplying the send of each of the program’s oscillators by the send setting of the timbre track. Pedal does not respond correctly Damper response is wrong Execute the “HalfDamper Calib” command (Global - Command) to correctly adjust the sensitivity of the half damper pedal. p. 53 57 Appendix Connections with a computer Accessory disc The PS60 does not respond to MIDI data sent from outside Can’t install the driver Is the USB cable connected correctly? “PS60 USBMIDI Setup Guide” Is the accessory disc inserted in your CD drive? Make sure that the accessory disc is inserted correctly. The computer does not detect the PS60 Are the USB cables connected correctly? “PS60 USB-MIDI Setup Guide” Is the Korg USB-MIDI driver installed correctly? “PS60 USB-MIDI Setup Guide” An error occurs when you disconnect from the computer Never disconnect the PS60 from the computer while your host application is in use. While connected, you are asked to install software or a device driver Does the operating system version of your computer support the PS60? p. 62 When using USB, sound processing is slow, or the tempo is unstable Is the KORG USB-MIDI driver installed for the USB port you’ve connected? The driver must be installed for each USB port you use. If you connect the PS60 to a USB port other than the port you used when installing the KORG USB-MIDI Driver for Windows, you’ll need to reinstall the KORG USB-MIDI Driver. Is the USB cable connected correctly? Is the lens of your CD drive dirty? Use a commercially-available lens cleaner to clean the lens. Are you able to use USB? If you are using Windows, go to [Control Panel] → [System], and select the [Hardware] tab. In [Device Manager], check the settings for Universal Serial Bus Controller and USB Root Hub. Has the PS60 been detected as an unknown device? If you are using Windows, go to [Control Panel] → [System], select the [Hardware] tab, and check [Device Manager]. If the PS60 has not been detected correctly, it will be displayed in “Other devices” or “Unknown devices.” Reconnect the USB cable; if the PS60 is again displayed as an “Unknown device,” the computer has failed to detect it correctly. Delete the “Unknown device” entry, and reinstall the driver. Your software does not respond to the PS60 Is the USB cable connected correctly? Did you install the driver? Has your computer detected the connected PS60? If you’re using Windows Vista or Windows 7, check the Device Manager control “Sound, Video, and Game Controllers.” If you are using Windows XP, go to Control Panel → “Sounds and Audio Devices Properties” and click the Hardware tab. If you are using Mac OS X, go to Macintosh HD → Application folder → Utility folder → “Audio MIDI Settings,” select the “MIDI Devices” tab, and check that the PS60 has been detected. Note: Some computer hardware configurations may not recognize the PS60. Check the PS60’s assignments and USB-MIDI port settings. The connected device or software may not support the messages you are transmitting. Refer to the manual of the connected device or software to verify that it responds to the messages you are transmitting. If you want to transmit and receive system exclusive data, the MIDI Filter “SysEx (Enable System Exclusive)” is set to On. This setting must be selected if you’ve connected the PS60 to your computer and want to edit the PS60 from your computer (or to edit bi-directionally). Select this if you’re using the PS60 Editor/Plug-In Editor. 58 Effect priority order Error and confirmation messages Effect priority order Insert effect When you’re using split settings, and the same category of timbre is used for the main timbres and the sub timbres (for example, if different E.PIANO programs are used for both), the sub timbre’s program will use the insert effect of the main timbre’s program. This is because only one insert effect can be used for each timbre category. Error messages Error and confirmation messages Can’t calibrate Meaning: Calibration could not be performed correctly. Action: Try again. Master effect and EQ Completed When you switch performances, the master effect and EQ settings saved in each performance will also be recalled. However when you switch programs for a timbre within a performance, the program’s master effect and EQ settings will be recalled subject to the following conditions. Meaning: The command was executed successfully. Single settings (i.e., other than split or layer) When you select a timbre (ON), and when you switch programs for that timbre, the master effect and EQ settings of the selected timbre will be recalled. When switching from single → layer settings When you switch from single settings to layer settings, the program settings of the timbre you turned on first will be recalled. These settings will not change even if you subsequently switch the timbre’s program. Memory Protected Meaning: The internal programs or performances are protected. Action: In Global mode, turn off memory protect, and then try the save (Write) operation again. MIDI recv error (MIDI receiving error) Meaning: While receiving MIDI System Exclusive data, the format of the received data was invalid, for example, because the size of the data was incorrect. Action: Check the MIDI connections and MIDI data. When you return from layer settings back to single settings, the “Single settings” described above will apply. If you hold down the EXIT button and switch from single to layer settings, the master effect and EQ settings of the first timbre added to the layer will be loaded. When switching from single or layer → split settings The master effect and EQ will not change when you switch to split settings. The master effect and EQ settings that had been recalled for the single or layer settings will continue to be used. 59 Appendix Specifications Operating temperature Keyboard System Sound Engine 0 – +40 °C (non-condensing conditions) 61-note natural touch keyboard (velocity sensitive; aftertouch not supported) Tone generator EDS-i (Enhanced Definition Synthesis - integrated) Mode Performance, Performance Edit, Program Edit, Global Maximum Polyphony 120 voices (120 ocillator) max, single mode 60 voices (60 ocillator) max, double mode * The actual maximum polyphony will vary depending on oscillator settings such as stereo multisamples and velocity crossfading. Preset PCM 49 Mbytes (when calculated as 16-bit linear data) 136 multisamples (including 6 stereo) Oscillator OSC1 (Single), OSC1+2 (Double): Stereo multisamples are supported 4 velocity zones per oscillator, with switching, crossfades and layers. Filters Four types of filter routing (single, serial, parallel, 24 dB) Two multi-mode filters per voice (low pass, high pass, band pass, band reject) Modulation For each voice, two envelope generators (Filter & Amp), two LFOs, two key tracking generators (Filter & Amp), and two AMS mixers In addition, pitch EG, common LFO, and two common key tracking generators Timbres 6 main timbres, 6 sub timbres, layer, split, and modifications to the program setting via the Tone parameter Master Keyboard functionality These allow you to control external MIDI devices Programs Performances The number of ... User Performances Performance User Programs programs Effects Audition Riff function 512 Programs/440 Preload Insert effects Five processors, stereo input/output Master effects Two processors, stereo input/output EQ One processor, stereo input/output (3 bands) Effects types Total of 71 types (select from 63 types for insert effects, 4 types for master effect 1, and four types for master effect 2) Modulation Dynamic modulation, tempo sync delay, LFO 383 audition riffs Joystick Joystick, LOCK button (Joystick lock function) Rotary speaker simulator ORGAN SLOW/FAST button Performances Controllers Performance controls Display User Interface 20 performances/15 Preload BANK, 1–5, STORE buttons Timbre selector Timber ON button x 6, variation button x 12 EASY SETUP 6 knobs, EASY SETUP buttons (Volum, Octave, MOD send, REV/DLY send) SPLIT SETTING SUB OFF/RECALL, LOWER, UPPER buttons MODULATION MODULATION button, RATE, DEPTH, FEEDBACK knobs REVERB/DELAY REVERB/DELAY button, RATE, DEPTH, FEEDBACK knobs EQ BASS, MID, TREBLE knobs 16 character x 2 line LCD (with backlight) Mode PERFORMANCE EDIT, PROGRAM EDIT, GLOBAL buttons Value Controllers Value knob, cursor/value buttons, EXIT button OCTAVE DOWN, UP buttons, TRANSPOSE , buttons, VOLUME knob, Other display contrast φ 6.3 mm monaural phone jack (unbalanced) OUTPUT L/MONO, R Audio Outputs Output impedance 1.1kΩ stereo; 550Ω mono (L/Mono only) Maximum level +10.0 dBu (Standard) Load impedance 10kΩ or greater φ 3.5 mm stereo mini-phone jack HEADPHONES Control Inputs 60 Output impedance 33Ω Maximum level 35 + 35 mW @33Ω load DAMPER/PEDAL/SW jack x 1 half-damper supported PEDAL/SW jack x 1 MIDI IN, OUT USB 1 USB (TYPE B) USB-MIDI interface Specifications Error and confirmation messages Power AC adapter power supply connector (DC 9V 1.7A Dimensions (W × D × H) 925 × 291 × 90 (mm) / 36.41"× 11.45" × 3.54" ), POWER switch Weight 4.6 kg / 10.14 lbs Power Consumption 6W Accessories AC adapter, Easy start guide Accessory disc (PS60 Editor/Plug-In Editor, KORG USB-MIDI driver, PS60 Owner’s Manual (PDF), PS60 Parameter Guide (PDF), PS60 USB-MIDI Setup Guide (PDF) etc.) Options XVP-10 Expression/Volume Pedal EXP-2 Foot Controller DS-1H Damper Pedal PS-1 Pedal Switch * Appearance and specifications are subject to change without notice. 61 Appendix Operating requirements KORG USB-MIDI driver Windows Computer: USB port required (a USB host controller made by Intel is recommended) Operating system: Microsoft Windows XP Home Edition / Professional / x64 Edition Service Pack 3 or later * Formats supported by PS60 Plug-In Editor: Windows: VST, RTAS Macintosh: VST, Audio Unit, RTAS * PS60 Plug-In Editor must also satisfy the operating requirements of the host application. Note: It is not possible to start up multiple instances of PS60 Editor or PS60 Plug-In Editor within an operating system. This means that it is not possible to use these editors to edit two or more PS60 units simultaneously. Microsoft Windows Vista Service Pack 2 or later (including 64-bit edition) Microsoft Windows 7 (including 64-bit edition) Macintosh Computer: USB port required Operating system: Mac OS X 10.3.9 or later PS60 Editor and PS60 Plug-In Editor Windows: Computer: A computer that meets the operating requirements of Windows XP, Windows Vista, or Windows 7, and is equipped with a USB port CPU: Intel Pentium III / 1 GHz or better, Pentium D or Core Duo or better is recommended Memory: 512 MB or more (1 GB or more is recommended) Monitor: 1,024 x 768 pixels, 16-bit color or better Operating system: Microsoft Windows XP Home Edition/Professional Service Pack 3 or later Windows Vista Service Pack 2 or later Windows 7 However, only the standalone version will work on 64bit editions of Windows 7 and Windows Vista Service Pack 2. Macintosh: Computer: CPU: Apple G4 800 MHz or better (Intel Mac is supported), G5 or Core Duo or better is recommended Memory: 512 MB or more (1 GB or more is recommended) Windows XP, Windows Vista, and Windows 7 are trademarks or registered trademarks of Microsoft Corporation in the U.S. and other counties. Monitor: 1,024 x 768 pixels, 32,000 colors or better Intel, Intel Core, and Pentium are trademarks of Intel Corporation in the U.S. and other countries. An Apple Macintosh computer that satisfies the operating requirements of Mac OS X and has a USB port VST is trademark of Steinberg Media Technologies GmbH. Operating system: Mac OS X version 10.4.11 or later 62 Apple, Mac, Macintosh and Audio Units are trademarks of Apple Inc., registered in the US. and other countries. RTAS is registered trademarks of Avid Technology, Inc., or its subsidiaries or divisions. All other product and company names are trademarks or registered trademarks of their respective holders. [Performance Synthesizer] PS60 Date : 2009.12.9 MIDI Implementation Chart MIDI Implementation Chart Function Basic Channel Default Changed Mode Memorized Messages Altered Note Number: Transmitted Recognized 1 – 16 1 – 16 1 – 16 1 – 16 0 – 127 Note On Note Off Aftertouch Polyphonic (Key) Monophonic (Channel) Memorized 3 True Voice Velocity Remarks 9n, V=1 – 127 0 – 127 0 – 127 All note numbers 0–127 can be transmitted by making octave and transpose settings 9n, V=1 – 127 *A (receive) *A (receive) Pitch Bend Control Change Program Change *C *P (when transmitted) Bank Select (MSB, LSB) *C Joystick (+Y, –Y) Pedal, Portamento Time, Volume, IFX pan, Pan *C *C Expression, Effect Control 1, 2 *C Controller Damper, Portamento Sw, Sostenuto, Soft *C *C Sound Control *C Controller *C Foot Switch, Controller Send 1, 2, Effect ON/OFF (IFXs, MFXs, EQ) *C *C Data Entry, Increment, Decrement *C, *2 RPN (LSB, MSB) *C All Sound Off, Reset All Controllers 0, 32 1, 2 4, 5, 7, 8, 10 11, 12, 13 17, 18, 19, 20, 21 64, 65, 66, 67 70–79 80, 81, 83, 84, 85, 86 82, 16 93, 91, 92, 94, 95 6, 38, 96, 97 100, 101 120, 121 0 – 127 Variable Range *P, *3 0 – 19 0 – 19 *E, *4 System Exclusive System Common Song Position Song Select Tune System Real Time Clock Command *1 Aux Messages 123 – 127 Notes *P, *A, *C, *E: Transmitted/received when Global MIDI Filter (Program Change, Aftertouch, Control Change, SysEx) is Enable, respectively. *1: When Global MIDI Clock is Internal, transmitted but not received. The opposite for Ext.MIDI/Ext.USB. *2: RPN (LSB,MSB)=00,00: Pitch bend range, 01,00: Fine tune, 02,00: Coarse tune *3: All program change numbers 0–127 can be transmitted by timbres whose MIDI channel is other than Gch and whose Status is either EXT or EX2. Reception is supported only for performance changes. *4: In addition to Korg exclusive messages, Inquiry, Master Volume, Master Balance, Master Fine Tune, and Master Coarse Tune are supported. Mode 1: OMNI ON, POLY Mode 2: OMNI ON, MONO : Yes Mode 3: OMNI OFF, POLY Mode 4: OMNI OFF, MONO : No Consult your local Korg distributor for more information on MIDI IMPLEMENTATION. IMPORTANT NOTICE TO CONSUMERS This product has been manufactured according to strict specifications and voltage requirements that are applicable in the country in which it is intended that this product should be used. If you have purchased this product via the internet, through mail order, and/or via a telephone sale, you must verify that this product is intended to be used in the country in which you reside. WARNING: Use of this product in any country other than that for which it is intended could be dangerous and could invalidate the manufacturer’s or distributor’s warranty. Please also retain your receipt as proof of purchase otherwise your product may be disqualified from the manufacturer’s or distributor’s warranty. 4015-2 Yanokuchi, Inagi-city, Tokyo 206-0812 Japan © 2010 KORG INC.