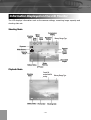
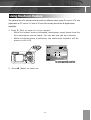
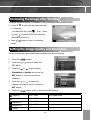
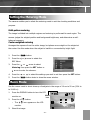
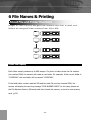
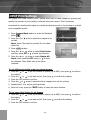
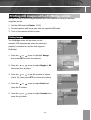
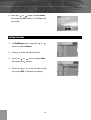
1
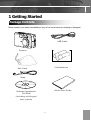
Ta b l e o f c o n t e n t s
1 Getting Started
Using the Zoom Feature.................................17
Package Contents............................................. 1
4 Taking Pictures
System Requirements ...................................... 2
Windows ....................................................... 2
Macintosh...................................................... 2
Basic Still Image Shooting .............................18
Safety Information........................................... 3
FCC Compliance and Advisory ..................... 4
Camera Components....................................... 5
Front.............................................................. 5
Rear ............................................................... 5
Top................................................................. 5
Side................................................................ 6
Using the Included Accessories ...................... 6
Attaching the Wrist Strap ............................. 6
Using the Soft Case ...................................... 6
Reviewing the Image after Shooting.............19
Setting the Image Quality and
Resolution ........................................................19
Using the Flash................................................20
Tips on Red-Eye Reduction feature ............20
Setting the Metering Mode ............................21
Macro Mode ....................................................21
Setting the Self-Timer and
Continuous Shooting ......................................22
Shooting in Long Shutter Mode....................23
Operating the Multi-controller ...................... 7
Adjusting the Exposure ---EV
2 Preparing the Camera
adjustment .......................................................23
Installing the Batteries .................................... 8
Battery Status Indications............................. 8
Adjusting Color Tones ---Setting the
Installing an SD Card...................................... 9
To remove the SD card ................................. 9
Using the Self-Portrait Mirror ......................24
Formatting Internal Memory Or
Card Memory ................................................... 9
Turning the Power On / Off.......................... 10
Using the Camera Mode Button ...................11
Setting the Date and Time..............................11
Date Stamp...................................................... 12
Setting the Language ..................................... 12
Selecting Menus and Settings ....................... 13
3 Basic Functions
Setting the LCD Display Mode .................... 15
Shooting Mode ........................................... 15
Playback Mode ........................................... 15
Information Displayed on the LCD
Monitor............................................................ 16
Shooting Mode ........................................... 16
Playback Mode ........................................... 16
White Balance .................................................24
Video Mode ......................................................25
5 Reviewing Photo & Video Clips
Reviewing Files................................................26
Magnifying Images .........................................26
Viewing the Files in Thumbnail Mode .........27
Erasing Files From Memory .........................27
Erasing Images Individually .......................27
Erasing files by using the Review
Menu ............................................................28
Protecting Photos and Video Clips ...............28
Playing a Slide Show (Auto Play) .................29
Copying Files from Internal
Computer with a USB Cable .....................47
Memoryto an SD Card .................................. 29
Understanding Camera Memory and
Setting USB Mode.......................................... 29
Storage..............................................................48
6 File Names & Printing
Using arcsoft
About File and Folder Numbers .................. 30
Folder File Capacity ................................... 30
File Number Reset ......................................... 31
DPOF Print Settings ...................................... 32
Printing still images with a PictBridge
printer.............................................................. 33
Printing images .............................................. 33
Setting Print Size............................................ 34
PictBridge Custom Menu.............................. 35
7 Software Installation Guide
Using the Installer Splash Screen................. 36
Identifying Your Operating System............. 37
Installing the Driver And Directx 9 –
Windows98/98se ............................................. 38
Installing Directx 9–Windows 2000 ............. 40
Installing Arcsoft Photoimpression –
Allwindowsusers............................................. 41
Installing Adobe Acrobat Reader 5All Windows Users (Optional)...................... 43
8 Making Connections
Downloading Images to a Computer........... 46
Downloading the Files by Using an
SD Card Reader ........................................ 46
Connecting the Camera to a
photoimpression(windows only)................... 49
9 Appendix
Troubleshooting ..............................................51
Specifications...................................................52
Getting Help ....................................................53
1 Getting Started
Package Contents
Please contact your dealer immediately if any of the items below are missing or damaged.
USB Cable
Camera
2 AA Batteries
Soft Case
Strap
Quick Start Guide
Software Installation
CD-ROM
(including multilingual
user ’s guide)
-1-
System Requirements
Windows:
PC with processor better than MMX Pentium 300 MHz
Windows XP/2000/ME/98
Minimum 128 MB RAM
USB port
CD-ROM drive
1024 x 768 monitor, 24-bit color (true color)
Macintosh:
Power Mac G3 or later
Mac OS 9.0, 9.1, 9.2 and OS X
Minimum 64 MB RAM
USB port
CD-ROM drive
640 x 480 monitor with thousands of color (millions of color recommended)
Specifications are subject to change without prior notice.
-2-
Safety Information
Before using the camera, please ensure that you read and understand the safety
precautions described below. Always ensure that the camera is operated correctly.
Do not aim the camera directly into the sun or other intense light sources which could
damage your eyesight.
Do not try to open the case of the camera or attempt to modify this camera in any
way. High-voltage internal components create the risk of electric shock when exposed.
Maintenance and repairs should be carried out only by authorized service providers.
Do not fire the flash too close to the eyes of animals or people, especially for young
children. Eye damage may result. In particular, remain at least one meter away from
infants when using flash.
Keep the camera away from water and other liquids. Do not use the camera with wet
hands. Never use the camera in the rain or snow. Moisture creates the danger of fire
and electric shock.
Keep the camera and its accessories out of the reach of children and animals to
prevent accidents or damage to the camera.
If you notice smoke or a strange odor coming from the camera, turn the power off
immediately. Take the camera to the nearest authorized service center for repair.
Never attempt to repair the camera on your own.
Use only the recommended power accessories. Use of power sources not expressly
recommended for this equipment may lead to overheating, distortion of the
equipment, fire, electrical shock or other hazards.
-3-
FCC Compliance and Advisory
This device complies with Part 15 of the FCC Rules. Operation is subject to the following
two conditions: 1.) This device may not cause harmful interference, and 2.) This device
must accept any interference received, including interference that may cause
unsatisfactory operation.
This equipment has been tested and found to comply with the limits for a Class B
peripheral, pursuant to Part 15 of the FCC Rules. These limits are designed to provide
reasonable protection against harmful interference in a residential installation. This
equipment generates, uses, and can radiate radio frequency energy and, if not installed
and used in accordance with the instructions, may cause harmful interference to radio
communication. However, there is no guarantee that interference will not occur in a
particular installation. If this equipment does cause harmful interference to radio or
television reception, which can be determined by turning the equipment off and on, the
user is encouraged to try to correct the interference by one or more of the following
measures.
Reorient or relocate the receiving antenna.
Increase the separation between the equipment and receiver.
Connect the equipment to an outlet on a circuit different from that to which the
receiver is connected.
Consult the dealer or an experienced radio/TV technician for help.
Any changes or modifications not expressly approved by the party responsible for
compliance could void the user’s authority to operate the equipment. When shielded
interface cables have been provided with the product or when specified additional
components or accessories have elsewhere been designated to be used with the
installation of the product, they must be used in order to ensure compliance with FCC
regulations.
-4-
Camera Components
Front
Viewfinder
Flash
Self-portrait mirror
Battery/Memory
Card Door
Self-Timer/Red-Eye
Reduction LED
Lens
Flash Ready LED
Auto Focus (AF) LED
Viewfinder
button
W (zoom out) button
T (zoom in) button
Up button/ Flash/
Rear
Erase
Right button/ Quick View
SET button
Left button/ Macro
Down button/
button
LCD screen
Camera mode button
Tripod Socket
Top
Shutter button
Power button
-5-
Drive mode
Side
DC IN terminal
USB port
Using the Included Accessories
Attaching the Wrist Strap
Attach the wrist strap as illustrated.
Don't swing the camera
when carrying it by the
wrist strap.
Using the Soft Case
Store the camera in the soft case when it is not
in use.
-6-
Operating the Multi-controller
The multi-controller is used to set shooting mode, to move cursor when the camera Menu
is shown, and to confirm the selection.
Up button
Right button
Up Button ( )
Left button
Down button
.
To set the Flash mode in Shooting Mode.
.
To delete files in Review Mode.
.
To move the cursor up when MENU screen is shown.
Right Button ( )
.
To enter Quick View mode.
.
To move the cursor to right when MENU screen is shown
.
To enter submenu.
Down Button ( )
.
To set Continuous Shot in Shooting Mode.
.
To set Self-Timer in Shooting Mode and Video Mode.
.
To move the cursor down when MENU screen is shown.
Left Arrow ( )
.
To set Macro shooting in Shooting Mode and Video Mode.
.
To move the cursor left when MENU screen is shown.
SET Button
.
To enter submenu.
.
To confirm the setting.
-7-
2 Preparing the Camera
Installing the Batteries
Insert two (2) AA-size alkaline batteries (included with the camera)
1.
Be sure that the camera power is off.
2.
Slide the Battery/Memory Card door in the
direction of the arrow, and lift it open.
3.
Insert two AA batteries with the positive (+)
and negative (-) poles matching the
directions indicated inside the battery cover.
4.
Close the Battery/Memory Card door.
Battery Status Indications
The battery power level indicator represents the level of power of the batteries. The
meaning of each icon is as follows:
Charge Level
High
Low
Indicator
When the battery is running out, the message “Replace Battery” will be displayed on the
LCD.
If POWER button is pressed for over 1 second but the camera still does not
power on, the batteries may be drained. Replace the batteries with new ones
and try again.
-8-
Installing an SD Card
1.
Turn off the camera.
2.
Slide the Battery/Memory Card door in the
direction of the arrow to open the door.
3.
Insert the SD card as shown in the diagram.
To remove the SD card
1.
Turn off the camera.
2.
Slide the Battery/Memory Card door in the
direction of the arrow to open the door.
3.
Gently press on the edge of the SD card,
the card will eject up. Pull the card out and
close the Battery/Memory Card door.
Formatting Internal Memory Or Card Memory
If you wish to delete all the images and video clips stored in the internal memory or
memory card, or when you use a brand new memory card, please follow the steps below
to format the internal memory or memory card:
1.
Insert the memory card if you want to
format the memory card instead of the
internal memory.
2.
Turn on the camera.
3.
Press the
4.
Press the
button.
arrow to select the Setup
Menu.
5.
press the
or
arrow to select Format then press the SET button or the
arrow to enter its sub-menu.
-9-
6.
Press the
7.
Press the SET button to confirm the selection.
1.
and
arrow to select Yes or No.
Formatting will erase all the data in the memory, including the protected
files. Please check the contents in the memory before formatting it.
2.
SD cards formatted in another camera, computer or peripheral device may
not operate correctly. When that happens, reformat the SD card with this
camera.
Turning the Power On / Off
Press and hold the POWER button for more
than 1 second to turn the camera on.
Note: You may also press and hold the
Camera Mode button for more than 1 second
Power button
to turn the camera on in Review mode and then
press the Camera Mode button repeatedly to
switch to Shooting Mode.
To turn off the camera
Press the power button to turn off the camera.
The camera will be powered off automatically after being idle for 3 minutes by
default. The Auto-Off timing can be changed in Set-Up menu.
-10-
Using the Camera Mode Button
Use the Camera Mode button to change shooting mode.
Shooting
Mode
For shooting still images
Review Mode
For viewing the recorded images and video clips.
Video Mode
For shooting video clips.
The camera mode changes as shown in the
following diagram when the Camera Mode
button is pressed.
Shooting Mode
Play Mode
Movie Mode
Setting the Date and Time
1.
Turn on the camera.
2.
Press the
3.
Press the
button.
arrow to select the Setup
Menu.
4.
Press the
or
arrow to select Date
& Time then press the SET button or the
arrow to enter its submenu.
and
arrow to select a field to change.
5.
Press the
6.
Press the
7.
After the Date, Time and Date/Time format is set, press the SET button repeatedly to
and
arrow to set the values.
confirm the settings and then to exit Date/Time submenu.
8.
Press the
button twice to close the menu window.
- 11 -
Date Stamp
By default the Date Stamp is set at OFF mode. If you want to have Date and Time shown
on the pictures, set the Date Stamp to ON mode.
1.
Press the
2.
Press the
button.
or
arrow to select Date
Stamp then press the SET button or the
arrow to enter its submenu.
3.
Press the
or
to set Date Stamp
on/off.
4.
Press the SET button to confirm the
selection.
5.
button twice to close the menu window.
Press the
Setting the Language
1.
Press the
2.
Press the
button.
arrow to select the Setup
Menu.
3.
Press the
or
arrow to select
Language then press the SET button or
the
arrow to enter its submenu.
or
to select a Language.
4.
Press the
5.
Press the SET button to confirm the
setting and to close the menu window.
-12-
Selecting Menus and Settings
Use the menus as shown below to activate the various shooting and reviewing settings.
1.
Set the camera to Shooting Mode, Review
Mode, or Video Mode.
2.
Press the
3.
Press the
button.
or
arrow to switch between
the REC/Playback menu and Setup Menu.
4.
Press the
or
arrow to select a
menu item then press the SET button or
the
5.
arrow to enter its submenu.
Press the
/
or
/
to select the
settings you wish to set then press the SET
button.
6.
Press the
button to close the menu
window.
This chart shows the options for each menu settings.
Menu Items Selectable with the MENU Button
Menu Item
Available Setting
Resolution
Default Setting
(2304 x 1728)
Quality
(Fine)
+2/+1.7/+1.3/+1.0/+0.7/+0.3/0.
Exposure
0/-0.3/-0.7/-1.0/-1.3/-1.7/-2.0
0 (Auto)
Shooting
White
Balance
Mode
Metering
Auto / Multi / Spot
Menu
Date Stamp
On / Off
Off
NO. On / Off
Off
File
Reset
(Auto)
Long Shutter
Off / 1 sec / 2 sec / 4 sec
/ 8 sec
-13-
Auto
Off
Setup
Menu
Playback
Mode
Menu
Movie
Mode
REC
Menu Item
Available Setting
Beep
On / Off
Power Save
Off / 1 min / 3 min / 5
min
Quick View
On/Off
Off
Date & Time
Sets the date and time
---
Language
English / Traditional Chinese /
Simplified Chinese / Japanese /
Korean / German / Franch / Portugese
/ Italian / Spanish / Dutch / Russian
Format
No / Yes
USB
Computer/Printer
Menu Item
Available Setting
Protect
Single / Protect All /
Unprotect All
---
Delete All
Single / All
---
Slide Show
Off / 5 sec / 10 sec
---
Print Order
Single / All / Reset
---
Copy To Card
No / Yes
---
Exposure
+2/+1.7/+1.3/+1.0/+0.7/+0.3/0.0/
White
Balance
File
Reset
Default Setting
Off
1 min.
English
---
-0.3/-0.7/-1.0/-1.3/-1.7/-2.0
Computer
Default Setting
Auto
Auto
NO.
On / Off
Off
Note: Every time the camera is powered off, the Exposure, White Balance,
Metering, Longer Shutter and USB setting will restore to its default
setting.
-14-
3 Basic Functions
Setting the LCD Display Mode
Press the DISP button to turn the LCD on or off.
The LCD display changes as indicated below:
Shooting Mode
On (with Information)On (No Information) LCD Off
Playback Mode
On (with Information) On (no Information)
-15-
Information Displayed on the LCD Monitor
The LCD displays information such as the camera settings, remaining image capacity and
shooting date etc.
Shooting Mode
Auto
Memory Storage Type
+0.3
Playback Mode
Current file
number/total file
number
-16-
Memory Storage Type
Using the Zoom Feature
The camera has a 3x optical zoom lens with an effective zoom range 5.8 mm to 17.4 mm
(equivalent to 37 mm to 111 mm in 35 mm film format) as well as 4x digital zoom
capability.
1. Press T (Tele) to zoom in to your subject.
. While the optical zoom is activated, mechanical sound come from the
lens movements can be heard. You can also see the lens retracts.
. While the digital zoom is activated, the zoom scale indicator will be
shown on the LCD.
2. Press W (Wide) to zoom out.
-17-
4 Taking Pictures
Basic Still Image Shooting
In this mode, all you have to do is press the shutter button and let the camera do
everything else.
AF Frame
.
1.
Set the Camera Mode button to
2.
Aim the camera at the subject.
3.
Press the T or W button to zoom in or out.
Aperture value
S h u t t e r Sp e e d
Mode
Focus Range
W mode
10 cm (3.94 inch) to infinity (∞)
T mode
50 cm (19.89 inch) to infinity (∞)
4. Press the Shutter button halfway down to activate the auto-focus until
AF LED stops blinking and the white AF Frame turned into green.
•
5.
The shutter speed and aperture values appear on the LCD monitor.
Press the Shutter button fully down to capture the image.
1. If the Shaking Warning indicator (
) is shown on the LCD, that means
the shutter speed is low, and you should place the camera on a tripod
or a steady place before shooting in order to ensure the image quality.
2. In the following conditions, the AF LED will continue to blink and the
AF Frame will remain in red:
• There are several subjects at different distances within the focus
lock area. Recompose the picture by moving the camera slightly.
• There is no color contrast. Recompose the picture with a subject
that contains more color.
• There is insufficient lighting. If possible, increase the lighting in the
surrounding area.
-18-
Reviewing the Image after Shooting
The quick playback function is available in both Shooting Mode and Video Mode.
to view the just captured photo
1. Press
or video clip.
• To delete the file, press
and
.
Then
press
to select YES or NO, and then
press SET to confirm.
2. Press
again to return to shooting
mode.
Setting the Image Quality and Resolution
You can change the image quality and resolution to suit your purpose.
1.
Press the
2.
Press the
button.
or
arrow to select the
REC Menu.
3.
Press the
or
arrow to select
Resolution or Quality then press the
SET button or
arrow to enter its
submenu.
4.
Press the
or
to select the
settings you wish to set then press the
640X480
SET button.
5.
Press the
(Large 1)
button twice to close the menu window.
Resolution
Purpose
2592¯1944
Print large prints
(Large 2)
2304¯1728
Print large prints
(Medium 1)
1600¯1200
Print on small size paper
(Medium 2)
1024¯768
Send images by e-mail
(Small)
640¯480
Shoot more images
-19-
Image Quality
Fine (5x compression rate)
Normal (8x compression rate)
Purpose
Shoot high quality images
Shoot normal quality images
Economy(12x compression rate)
Shoot more images.
Using the Flash
Use the flash according to the guidelines below.
Auto
Force On
The camera judges if a flash is required. If the
environment is too dark, the flash will fire.
The flash always fires.
Force Off
The flash does not fire.
Red-eye reduction, Auto
The camera will automatically detect when the flash is
needed and the flash will fire after a short delay to
prevent Red-Eye phenomenon.
Flash icon
1. Press the
button to switch between flash
modes.
. The selected flash mode icon appears on the
LCD monitor.
2. Shoot the image.
Tips on Red-Eye Reduction feature:
Shooting with flash in dark places, the subject's eyes may appear red in the picture. This
phenomenon is known as "Red-Eye" and occurs when flash reflects back from the retina.
With the Red-Eye Reduction feature, the camera can contract the pupils of the subject by
lighting for about 1 second before the flash is fired to reduce the chances of Red-Eye.
-20-
Setting the Metering Mode
The camera enables you to select the metering mode to suit the shooting conditions and
purpose.
Multi-pattern metering
The image is divided into multiple regions and metering is performed for each region. The
camera judges the subject position and background brightness, and determines a wellbalanced exposure.
Center-weighted metering
Averages the exposure from the entire image, but places more weight on the subject at
the center. Use this mode when the subject is backlit or surrounded by bright light.
1.
Press the
2.
Press the
button.
or
arrow to select the
REC Menu.
3.
Press the
or
arrow to select
Metering then press the SET button or
arrow to enter its submenu.
4.
Press the
5.
Press the
or
to select the settings you wish to set then press the SET button.
button twice to close the menu window.
Macro Mode
Use the macro mode to shoot close-up of subjects in the range of 10 cm to 50 cm (3.94 in.
to 19.89 in.).
1.
Press the DISPLAY button to turn the LCD
Macro
icon
monitor on.
2.
Press the
•
The
button.
icon appears on the LCD
monitor.
3.
Shoot the image.
-21-
1.
2.
3.
Focus range mentioned is the distance between the camera
lens surface and the subject.
Any flash setting can be used in macro mode.
Always use the LCD monitor to compose images in macro
mode. Shooting with the optical viewfinder is possible,
however, images composed with the optical viewfinder might
be off-center due to the parallax phenomenon.
Setting the Self-Timer and Continuous Shooting
1.
Press the
/ /
button to switch
between Drive modes until the selected
drive mode icon appears on the LCD
monitor.
2.
Shoot the image.
Setting
Description
Ten seconds
3 images at 1600 x 1200 resolution
Shooting with Self-Timer
•
If you selected Self-Timer (
), after the Shutter button is fully pressed down, the red
Self -Timer LED in the front of the camera will blink slowly for 7 seconds, faster for the
remaining 3 seconds, then the image will be captured.
•
The Self-Timer is automatically deactivated once the image is taken.
Continuous Shooting
•
The camera will automatically and continuously capture 3 consecutive images at
approximately 1 images per second in 1600 x 1200 resolution.
•
To exit the Continuous Shooting function, press the
from the LCD.
-22-
button until
disappears
Shooting in Long Shutter Mode
You can set the shutter speed to a slow setting to make dark subjects appear brighter.
Available Shutter Speeds are: 1 sec, 2 sec, 4 sec and 8 sec.
1.
Press the
2.
Press the
button.
or
arrow to select the
REC Menu.
3.
Press the
or
arrow to select
Long Shutter then press the SET
button or
4.
Press the
arrow to enter its submenu.
or
to select the
settings you wish to set then press the
SET button.
5.
button twice to close the menu window.
Press the
When slow shutter speed is selected, place the camera on a flat
surface or on a tripod before shooting to avoid shaking.
Adjusting the Exposure ---EV adjustment
The camera uses Auto Exposure to give well-exposed pictures under most lighting
conditions. If the captured picture of the main subject turns out to be too light or too dark,
use the Exposure Compensation feature to improve the exposure aspect.
button.
1.
Press the
2.
In the camera menu, press the
or
arrow to select Exposure then press the
SET button.
3.
Press the
and
to set the exposure
compensation value. Available settings
are:-2.0, -1.7, -1.3, -1.0, -0.7, -0.3, 0.0,
+0.3, +0.7, +1.0, +1.3, +1.7, +2.0 then
press the SET button.
-23-
Adjusting Color Tones ---Setting the White Balance
By default the camera uses Auto White Balance to reproduce colors under different
lighting conditions. For mixed lighting conditions, it is recommended to use the Auto White
Balance option. However, if the lighting condition is identical to one of the following White
Balance settings, set the White Balance to the corresponding mode to get pictures with
colors more accurately.
Auto
The camera will automatically choose the white balance
setting.
Day light
For recording outdoors on a bright day
Shade
For recording under overcast, shady or twilight skies
Tungsten
For recording under tungsten lighting
Fluorescent
For recording under fluorescent lighting
Black & white
For recording black & white photo
1.
Press the
button.
2.
In the camera menu, press the
or
arrow to select white balance then press
the SET button.
3.
Press the
and
to set the white balance value then press the SET button.
Using the Self-Portrait Mirror
Use the self-portrait mirror to help taking picture with Self-Timer.
1.
Press the
/
button until the Self-
Timer icon is shown on the LCD
2.
Look at the self-portrait mirror on the front of the
camera to confirm the framing.
3.
Press the Shutter button to take the picture.
-24-
Video Mode
The digital camera can shoot movie clips with audio (sound only playback on computer).
1. Press the Camera Mode button to movie
mode
.
Movie icon
• The LCD monitor displays the
maximum recording time (in minute).
2. Press the Shutter button to start record.
3. Press the shutter button again to stop
recording the movie.
Maximum
Recording Time
• The camera stops recording
automatically when the memory
capacity is reached.
1.
2.
3.
The Video resolution is set to 320×240 pixels and cannot be
changed.
The Self-Timer and Macro mode shooting can be activated in
Video Mode. (p. 22-23)
The Exposure compensation and White Balance can be
adjusted before recording video clip.
-25-
5 Reviewing Photo & Video Clips
Reviewing Files
You can view the recorded images and video clips on the LCD monitor.
1. Press Camera Mode button to enter the
Playback Mode (
). The last recorded
image or video clip appears on the LCD
monitor.
.
If it is a video clip, only the first frame of
the video clip will be shown. Press SET
button to start playing the video clip.
2. Use
to move to the previous file and
to move to the next file.
3. Press the Camera Mode button twice to
return to shooting mode.
You may turn the picture information such as file no. and date etc.
off by pressing the DISP button.
Magnifying Images
Still images can be magnified up from 1 times to 8 times.
1. When the desired image is shown on the
LCD, press T to magnify the image.
2. Press the
,
,
or
arrows to move
the magnified area around the image.
3. Press W to zoom out.
The zoom factor is shown
-26-
Viewing the Files in Thumbnail Mode
The Thumbnail mode allows you to view up to nine images at a time on the LCD monitor.
1. Press Camera Mode button to enter the
Playback Mode (
).
2. Press the W button to view thumbnail
images.
.
The last image is highlighted in red
border.
3. Press the
,
,
or
to select an
image.
4. Press the T button or the SET button to display the
selected image in full screen size.
Erasing Files From Memory
Erase files that you donít want to keep to make more memory space available. You can
erase individual files or all files in Playback Mode.
Erasing Images Individually
1. Press Camera Mode button to enter the
Playback Mode (
2. Use
or
).
to search for the file you
want to delete.
3. Press
4. Press
.
or
to select YES or NO.
5. Press SET to confirm.
Note: Do not press SET repeatedly. Otherwise you may delete other files.
6. Press MENU to exit
Please note that erased images cannot be recovered.
Exercise caution before erasing a file.
-27-
Erasing files by using the Review Menu
1. Press Camera Mode button to enter the
).
Playback Mode (
button.
2. Press the
arrow to highlight Delete
3. Press the
ALL and then press the SET button or the
arrow to enter its submenu.
4. Press
or
to select Single or All,
then press the SET button or the
arrow
to enter its submenu.
5. Press
or
to select Yes or No, then press the SET button to confirm.
6. Press Camera Mode button to exit the Playback Mode.
Protecting Photos and Video Clips
You can protect important images from being accidentally erased.
1. Press Camera Mode button to enter the
).
Playback Mode (
button.
2. Press the
arrow to select Protect then press
3. Press the
the SET button or the
arrow to enter its
submenu.
4. Press
and
to select Single or Protect All, then press
or the SET button to
enter its submenu.
5. Press
and
to select Yes or No and then press the SET button to confirm the
choice.
Note: After pressing the SET button to protect one image, the protect icon will be shown
on the right top corner of the LCD. Press the
button to close the menu window. If
you pressed the SET button again before exiting, the file will be unprotected.
To unprotect all the files, follow steps above but select “Unprotect All “ when protect Menu
is shown on the LCD.
-28-
Playing a Slide Show (Auto Play)
Use the slide show feature to automatically display your pictures and videos on the LCD
screen at a selectable interval.
1. Press Camera Mode button to enter the
).
Playback Mode (
2. Press
button.
3. Press the
arrow to select SLIDE SHOW then press the SET button or the
arrow
to enter its submenu.
or
4. Press the
to select 5 sec or 10 sec and then press SET. The slide show starts
at once from the last displayed image. For Video clips, only the first frame will be shown.
5. Press the SET button to stop the slide show.
Copying Files from Internal Memory to an SD Card
The camera allows you to copy all files that are stored in the camera’s internal memory to
an SD memory card.
1. Insert an SD card and press the Camera Mode
button to enter the Playback Mode (
).
button.
2. Press the
arrow to select Copy to card then press the SET button or the
3. Press the
arrow
to enter its submenu.
4. Press
and
to select YES or NO, then press SET to confirm.
Setting USB Mode
You can set USB mode to connect the camera with a printer or computer.
1. Press the Camera Mode button to enter
the Playback Mode (
button.
2. Press the
3. Press the
).
arrow to select the Setup Menu.
4. Press the
or
arrow to select USB then press the SET button.
5. Press the
or
to select Computer or Printer and then press the SET button.
-29-
6 File Names & Printing
About File and Folder Numbers
Images or video clips are assigned file numbers from 0001 to 9999, and
folders are assigned folder numbers from 100 to 999
9998 9999
9998 9999
9998 9999
998
9998 9999
999
Folder File Capacity
Each folder usually contains up to 999 images. If a photo is taken when the file number
has reached 0999, the camera will create a new folder. For example, if the current folder is
“100DICAM”, the new folder will be named “101DICAM.”
If the total folder number reached 999 and the total file number exceeds 9999, the
camera will display the warning message “FILE NUMBER OVER.” In this case, please set
the File Number Reset to ON mode and then format the memory or insert a new memory
card. (p.32)
-30-
File Number Reset
Setting the File No. Reset to OFF is useful for avoiding file name duplication when files are
downloaded to a computer. However, if you want to start numbering files from 0001 after
a new SD card is inserted, or after the memory is formatted, or when you experience a
““FILE NUMBER OVER” warning (p. 31), set the File Number Reset mode to ON.
Mode
Off (Default)
On
Situations
1. A new SD card is
inserted.
2. The internal memory or
File number will start from
File numbers will reset to
the previous number. For
0001. For example:
example:
the memory card is
0065
0066
0065
formatted
To numbering the files from 0001 when a new SD card is inserted:
1. Insert a new SD card.
button.
2. Turn the camera on and press the
3. Press the
or
arrow to select the REC
Menu.
4. Press the
or
arrow to select File
NO. Reset then press the SET button or
arrow to enter its submenu.
5. Press the
or
to select On and then
press the SET button.
6. Press the
button twice to close the
menu window.
To number the files from 0001 when memory is formatted:
1. Follow steps 2-6 above to set the File No. Reset to ON mode.
2. Format the memory. (Refer to p. 9)
-31-
0001
DPOF Print Settings
The Digital Print Order Format (DPOF) setting allows you to select images for printing and
specify the number of print copies in advance using the camera. This is extremely
convenient for sending the images to a photo developing service or for printing on a direct
print compatible printer.
1. Press Camera Mode button to enter the Playback
).
Mode (
2. Press the
or
arrow to select the images to be
printed.
Note: Video Clips can’t be printed. Do not select
Video file.
3. Press
button.
4. Press the
or
arrow to select Print Order,
and then press SET or
to enter its submenu.
5. Press the
or
arrow to select Single, All,
Reset, then press the SET button or
to enter
its submenu. Then follow one of the below
methods:
To set different printing order for single images
1. Press the
or
to set the number of copies (up to 999), then press to confirm
the setting.
2. Press the
or
to set date on/off, then press to confirm the setting.
3. Press the SET button to confirm.
4. Press the
or
arrow to select the other images to be set for printing.
5. Repeat step 1-3 to set the printing format.
6. When all is set, press the
button to close the menu window.
To set same Print Order for all images
1. Press the
or
to set the number of copies (up to 999), then press to confirm
the setting.
or
to set date on/off, then press to confirm the setting.
2. Press the
3. Press the SET button to confirm.
-32-
Printing still images with a PictBridge printer
You can directly print the images captured with your camera by using a PictBridgecompliant printer.
1. Set the USB mode to Printer. (P.29)
2. Connect camera with the printer with the supplied USB cable.
3. Turn on the camera and the printer.
Printing images
The PictBridge menu will be shown on the
camera’s LCD automatically when the camera is
properly connected to a printer that supports
PictBridge.
1. Press the
or
arrow to highlight Image,
then press SET to enter its submenu.
2. Press the
or
then press the
3. Press the
arrow to select Single or All
button.
or
to set the number of copies
(up to 30), then press SET to confirm the setting.
4. Press the
press the
5. Press the
press the
or
arrow to select Print then
button.
or
arrow to select Custom then
button.
-33-
6. Press the
or
arrow to select Start
then press the SET button. The images will
be printed.
Setting Print Size
1.
In PictBridge menu, press the
or
arrow to select Custom.
to enter the setting menu.
2.
Press
3.
Press the
or
then press the
4.
Press the
or
arrow to select Size
button.
to set the size of print,
then press SET to confirm the setting.
-34-
PictBridge Custom Menu
Item
Size
Type
Layout
Quality
Date
Menu Screen
Settings Content
Au t o
Po s t c a rd
4 × 6
8 × 10
A6
A4
B5
Auto
Plain
Photo
Fast
Auto
1
2
4
6
8
Index
Full
Auto
Draft
Normal
Fine
Auto
On
Off
Auto
On
Off
File
-35-
7 SOFTWARE INSTALLATION GUIDE
The software that comes with your Concord 4340z includes driver, reader, and photo
editing programs. These programs transfer the pictures or video clips from your camera to
your computer, and enable you to view them on your computer monitor. Refer to the
following list of computer system requirements for installation of the programs.
Computer System Requirements
Windows
• 300MHz Pentium II processor or equivalent.
• Microsoft Windows 98/98SE, Windows Me, Windows 2000 Professional, Windows XP
Home / Professional / Media Center
• 360MB free hard disk space .
• 128MB of RAM
• Minimum 800 x 600 display with 16-bit color (1024 x 768 with 24-bit color or better is
recommended)
• USB Port
• 4x CD-ROM Drive
Macintosh
• Mac OS 9.0, 9.1, 9.2 and X 10.1 or later
• Power PC-based
• 32MB of RAM
• 640 x 480 display with Thousands of colors (Millions of colors recommended)
• Built-In USB Port
USING THE INSTALLER SPLASH SCREEN
The installer will automatically detect which software applications need to be installed or if
they are not necessary. This will be indicated by the buttons on the splash screen that
appears when the CD-ROM is inserted into the computer:
Color
Description
Yellow(
Gray (
)
)
Required or highly recommended
to install.
Already installed or not necessary
to install.
-36-
Description
Option
Camera Drivers
Microsoft DirectX 9
The USB Mass Storage camera drivers enable the camera to become
an external drive on your computer.
DirectX 9 enables the movie playback applications on your computer
to playback video clips that are captured with the camera.
ArcSoft PhotoImpression 2000
This photo software enables you to edit and enhance pictures.
Adobe Acrobat Reader 5
Adobe Acrobat Reader enables you to view the electronic version of
the User’s Guide.
User’s Guide
Direct link to our camera support website. Ensure that an internet
connection is established before clicking on the link.
IDENTIFYING YOUR OPERATING SYSTEM
Windows
1. Right click the My Computer icon on your desktop,
and go to Properties.
2. The System Properties Box will appear.(fig.1.1)
The information about your computer is listed
under the system area.
3. Confirm that your computer is running one of the
following operating systems and proceed to the
page in the chart for installation instructions:
System
Proceed to page
Windows 98, Windows 98 Second Edition
Windows 2000
Windows
Windows
Windows
Windows
Millennium Edition,
XP Home Edition,
XP Professional Edition,
XP Media Center Edition
Page 38
Page 40
Page 41
4. Press OK to close the window
For Windows 98/98SE/Me/2000, if the My Computer icon is not on your desktop, click
Start > Settings > Control Panel to display the Control Panel window (fig. 1.2).
Double click on System icon to open the System Properties Box (fig. 1.2).
For Windows XP, if the My Computer icon is not on your desktop, click Start > Control
Panel > Performance and Maintenance, then click on the System icon to open the
System Properties Box (fig.1.1).
-37-
Macintosh
1. In the Apple Menu on the Menu bar, select About this Computer.
2. A window will appear with the computer’s operating system version. Confirm that your
computer is version 9 or higher.
No installation of software is necessary for Macintosh users, please go to Page 47 for
connecting your camera to the computer.
INSTALLING THE DRIVER AND DIRECTX 9 –
WINDOWS 98/98SE
Do not connect the camera to your computer BEFORE the camera drivers and
Microsoft DirectX 9 installation is completed.
Step 1
Make sure your camera is powered off and not connected to the computer.
Step 2
Make sure the computer is powered on and Windows 98 or 98SE is running.
Step 3
Close any other applications or software you may be running.
Step 4
Insert the supplied CD-ROM into your computer’s CD-ROM Drive.
NOTE: If the installer does not start automatically within 30 seconds after
the CD-ROM has been inserted, click on “My Computer” either on the
Desktop or in the Start Menu and locate the CD-ROM Drive. Double click on
the CD-ROM Drive icon for installation and proceed to Step 5.
Step 5
Select the language. Click [OK]. (fig. 1.1)
Step 6
The installation screen will appear. Click on Install Camera Drivers. (fig. 1.2)
fig. 1.2
f ig. 1.1
Step 7
Click [Next
>]. (fig. 1.3)
-38-
Step 8
The next dialog will prompt you to select the components that will be
installed. USB Mass Storage Driver and DirectX 9 will be pre-selected.
The files will be saved in the Concord Camera directory automatically.
OR
You may change the default folder by clicking [Browse…] and selecting a
different folder in your computer. Click [Next >]. (fig. 1.4)
Fig. 1.3
Step 9
Fig. 1.4
Click [Install]. (fig. 1.5)
Step 10 Install progress bar.
Step 11 The next screen will begin the DirectX setup.
Select “ I accept the agreement “ then click [Next >]. (fig. 1.6)
Fig. 1.6
Fig. 1.5
Step 12 Click [Next >]. (fig. 1.7)
Step 13 Click [Finish]. Your computer will automatically restart. (fig. 1.8)
-39-
Fig. 1.7
Fig. 1.8
INSTALLING DIRECTX 9– WINDOWS 2000
Step 1
Step 2
Make sure your camera is powered off and not connected to the computer.
Make sure the computer is powered on and Windows 2000 is running.
Step 3
Close any other applications or software you may be running.
Step 4
Insert the supplied CD-ROM into your computer’s CD-ROM Drive.
NOTE: If the installer does not start automatically within 30 seconds after the
CD-ROM has been inserted, click on “My Computer” either on the Desktop or
in the Start Menu and locate the CD-ROM Drive. Double click on the CD-ROM
Drive icon for installation and proceed to Step 5.
Step 5
Select the language. Click [OK]. (fig. 2.1)
Step 6
The installation screen will appear, click on Install Microsoft DirectX 9.0.
(fig. 2.2)
Fig. 2.2
Fig. 2.1
-40-
Step 7
The next screen will begin the DirectX setup.
Select “ I accept the agreement “ then click [Next >]. (fig. 2.3)
Step 8
Click [Next >]. (fig. 2.4)
Step 9
Click [Finish]. Your computer will automatically restart. (fig. 2.5)
Fig. 2.3
Fig. 2.4
Fig. 2.5
INSTALLING ARCSOFT PHOTOIMPRESSION – ALL
WINDOWS USERS
Step 1
Make sure your camera is powered off and not connected to the computer.
Step 2
Make sure the computer is powered on and Windows is running.
Step 3
Close any other applications or software you may be running.
Step 4
Insert the supplied CD-ROM into your computer’s CD-ROM Drive.
NOTE: If the installer does not start automatically within 30 seconds after the
CD-ROM has been inserted, click on “My Computer” either on the Desktop or in
the Start Menu and locate the CD-ROM Drive. Double click on the CD-ROM Drive
icon for installation and proceed to Step 5.
Step 5
Select the language. Click [OK]. (fig. 3.1)
Step 6
The installation screen will appear, Click on Install ArcSoft PhotoImpression
2000. (fig. 3.2)
-41-
Fig. 3.1
Step 7
Click [Next >]. (fig. 3.3)
Step 8
Click [Yes]. (fig. 3.4)
Fig. 3.2
Fig. 3.4
Fig. 3.3
Step 9
Click [Next >]. (fig. 3.5)
Step 10 Make sure the two applications are checked and then
click [Next >]. (fig. 3.6)
Fig. 3.5
Fig. 3.6
-42-
Step 11 Click [Next >]. (fig. 3.7)
Step 12 The screen will show the status of the installation. (fig. 3.8)
Fig. 3.7
Fig. 3.8
Step 13 Click [Finish]. Win98 will request for restart.
Win 2000 /ME/XP
Win 98 FE/SE
INSTALLING ADOBE ACROBAT READER 5- ALL
WINDOWS USERS (OPTIONAL)
Step 1
Make sure your camera is powered off and not connected to the computer.
Step 2
Make sure the computer is powered on and Windows is running.
Step 3
Close any other applications or software you may be running.
Step 4
Insert the supplied CD-ROM into your computer’s CD-ROM Drive.
NOTE: If the installer does not start automatically within 30 seconds after the
CD-ROM has been inserted, click on “My Computer” either on the Desktop or in
-43-
the Start Menu and locate the CD-ROM Drive. Double click on the CD-ROM Drive
icon for installation and proceed to Step 5.
Step 5
Select the language. Click [OK]. (Fig. 4.1)
Step 6
The installation screen will appear, Click on Install Adobe Acrobat Reader 5. (Fig.
4.2)
Fig. 4.1
Fig. 4.2
Step 7
Status bar
Step 8
Click [Next >]. (Fig. 4.3)
Step 9
The files will be saved into C:\Program Files\Adobe\Acrobat 5 automatically.
OR
You may change the default folder by clicking [Browse…] and selecting a
different folder in your computer.
Click [Next >]. (Fig. 4.4)
Step 10
Installation progress
Fig. 4.3
Fig. 4.4
-44-
Step 11
Select Yes, to restart the computer or No, to restart the computer later.
Click [Finish >].
Win 98SE/2000/ME/XP
Win 98 FE
-45-
8 Making Connections
Downloading Images to a Computer
Download images taken with the camera to a computer in one of the following ways:
1.
Using an SD card reader.
2.
Connect the camera to a computer with the USB cable.
Note for Windows 98 users: You must install the camera driver supplied in the supplied
CD-ROM before connecting the camera to the computer.
Downloading the Files by Using an SD Card Reader
1.
Take the SD card out from the camera (p.9), and insert it into an SD card reader.
2.
Connect the SD card reader to the computer.
3.
Double-click the driver icon representing the SD card.
4.
Copy the images from the card into a folder on the hard disk of your computer.
-46-
Connecting the Camera to a Computer with a USB Cable
Note for Windows 98 users: You must install the camera driver supplied in the
CD-ROM before connecting the camera to the computer.
Connect the supplied USB interface cable to the computer’s USB port and the camera’s
DIGITAL terminal.
1.
You do not need to turn off the computer or camera when making this
connection.
2.
Please refer to your computer manual for information regarding the
location of the USB port.
The LCD monitor turns off when the connection to the computer has been successfully
completed.
1.
The camera will turn off automatically if the USB cable is disconnected.
2.
Use an optional AC power adapter when connected to a computer to save
battery power.
3.
Windows 98 user: If this is the first time the camera has been connected
to the computer, Windows detects the camera as an “Unknown device”
and automatically completes the required software installation.
-47-
FOR WINDOWS USERS
1 . D o u b l e - c l i c k o n M y C o m p u t e r.
2. Double-click Removable Disk.
3. Double-click DCIM.
4 . D o u b l e - c l i c k t h e f o l d e r t h a t c o n ta i n s t h e d e s i r e d i m a g e s t o v i e w.
. T h e s t o r e d p i c t u r e s ( J P G ) a n d v i d e o c l i ps ( AV I ) s t o r e d i n t h e m e m o r y c a r d w i l l b e
displayed
FOR MACINTOSH USERS
1. Double-click the “ untitled” removable drive that is on your desktop.
2. Double-click DCIM.
3 . D o u b l e - c l i c k t h e f o l d e r t h a t c o n ta i n s t h e d e s i r e d i m a g e s t o v i e w.
Understanding Camera Memory and Storage
Internal Memory
The digital camera is equipped with internal memory. If an SD card is not installed in the
camera, all photos recorded by the camera will be stored in the internal memory. If an SD
card is installed, photos and video clips are stored on the SD card.
Optional SD Memory Card
Photos, video clips, and other information recorded by the camera are stored on the SD
card using the Design Rule for Camera File System (DCF) protocol. The DCF protocol is
designed to accommodate file and data exchange between digital cameras and other
devices.
DCF Protocol
The DCF protocol defines the format for image file data as well as the directory for the
memory card. Photos that are taken by a DCF camera can be viewed on DCF-compatible
cameras from other manufacturers.
-48-
USING ARCSOFT PHOTOIMPRESSION (WINDOWS
ONLY)
1. Connect the camera to the computer.
2. Launch ArcSoft PhotoImpression software by clicking on Start-Programs-ArcSoft
Camera Suite and choosing PhotoImpression from the application list on your
screen. (fig. 1.1)
fig. 1.2
fig. 1.1
3. When the Application opens, click on the
Camera/Scanner button.(fig. 1.2)
4. Click on the drop-down list under Select
Source and choose Concord 4340z.
5. Click on the Camera/ Scanner Icon (
).
• A second window will appear showing the
contents (pictures) in the memory, and
6.
7.
fig. 1.3
options on how to handle them. (fig. 1.3)
Select the desired picture to view, edit or save by clicking on it. The selected image
will be highlighted by a border. To choose all pictures, click on Select All.
Click on Get Photos.
The pictures will then be added to your album at the bottom of the application
(fig 1.4).
f ig. 1.4
f ig. 1.5
-49-
8. Click on Close to close the Camera Controls windows (as shown in fig. 1.3).
9. Double-click on the thumbnail or click on OK to open the photo.
10. Click on Edit to edit the photo. You may, for example,
• Resize the photo by using the “Crop/Resize” tools.
• Modify the photo by using the “Retouch” tools. For example, to
remove red-eyes.
• Add some text onto the photo by using the “Text” tools.
11. Click on Save to save the photo. Two options are available: “Save” and “Save As”.
12. Click on Print to print the photo. The options available include: Standard Printing,
Greeting Card/Multiple Printing or Thumbnail Printing.
-50-
9 Appendix
Troubleshooting
Problem
Cause
Solution
Batteries are inserted in the wrong
direction
Reload the batteries properly (p.8).
Batteries are dead
Replace or recharge the batteries
The battery compartment door is open
Make sure the battery compartment
door is securely closed.
The flash is charging
Wait until the flash is fully charged.
Memory is full
Insert a new SD card.
SD card is not formatted correctly
The card may be defective, use a new
card.
Maximum file number is exceeded
Turn “File No. Reset” on, then format
the card or insert a new card.
Flash is set to OFF
Set the flash to any mode except off.
The camera was moving when the
image was captured
Hold the camera
shooting picture.
The subject was beyond the range
within which the camera can focus
Turn the Macro mode on if the subject
is within 10 cm (zoomed out) or 50 cm
(zoom in) / don’t use Macro mode
when shooting distant subjects.
Image is not displayed on
the LCD monitor
An SD Card with non-DCIF images
(recorded with another camera) is
loaded
This camera cannot display non-DCIF
images.
Recorded images are not
saved in memory
The camera was turned off/powered
down before the image was stored in
memory
If the Battery Low indicator appears
on the LCD monitor, replace the
battery immediately.
Cannot transfer images to a
computer after connecting
the USB cable
USB driver is not installed
Install the USB driver before you
connect the camera to a computer /
turn the camera on.
The camera cannot be
turned on.
The camera cannot take
pictures
The flash doesn’t fire
Image is blurry or out of
focus
-51-
steady
when
Specifications
Sensor
4.24 Mega Pixels CCD
Size : 1/2.5 inch
Lens
Olympus 3× zoom lens
View Finder
Optical with real image
Color LCD Display
Focus Range
ISO/ASA Sensitivity
Still Image Resolution
Video Resolution
1.5” TFT LCD Panel
10 cm (3.94”) ~ infinity (W ) 50 cm (19.89”) ~ infinity (T),10cm(3.94”)~50cm(19.89”)
(Macro)
100
2592 × 1944, 2304 x 1728, 1600 × 1200, 1024 × 768, 640 × 480,
MJPEG, (320 × 240) up to 20 fps, with audio (sound playback on computer only)
Still Image quality
Fine : 5 × compression rate
Normal : 8 × compression rate
Economy: 12 x compression rate
Exposure Control
Auto & Manual
Exposure Compensation
Exposure Meter
Shutter
-2EV to +2EV in 1/3 step.
Center-weighted average, Multi-pattern TTL AE
Mechanical shutter, 1/2000 ~ 8 sec. with CCD variable electronic shutter
Optical Zoom
Effective 3x, continuous
Digital Zoom
Shooting mode : 4×, continuous
Playback mode : 8 ×, scrollable
Image File Format
Still : EXIF 2.2 compatible format (JPEG compression)
DCF compatible. Support DPOF, PIM II, Pictbridge
White Balance
Auto, Day light, Cloudy, tungsten, fluorescent, Black & white
Start-up Time
Less than 3 sec.
Picture Storage
Microphone
Communication Interface
Self-Timer
Internal : 16 MB embedded flash memory
External : SD memory card up to 512 MB
Built-in
USB 1.1, Compliance with USB2.0
10 sec. with beep sound
Playback Mode
Single / 9 thumbnails / slide show
Power Supply
Battery : AA Size x 2
DC input : 3.3V 2.0A DC adapter
Dimensions
Weight
Ambient temperature
105 × 55 ×37 (mm) ,4.1x2.2x1.5 (inches)
Camera body w/o batteries: 150g ,5.25 (oz)
Operating : -5 to 40 ˚ C
Storage : -20 to 60 ˚ C
-52-
GETTING HELP
Troubleshooting Section in this User’s Guide
Please refer to the Troubleshooting section (page 61) first, as it contains some of the most
common problems that users encounter. The section lists a number of possible quick-andeasy solutions, which might solve the problem, allowing you to continue enjoying your
new Concord 3-Megapixel 3x Optical Zoom Digital Camera
Website Customer Support/FAQ
For problems that are not listed in the Troubleshooting section, please visit our customer
support website at www.concord-camera.com to view the Frequently Asked Questions
(FAQ) by clicking the appropriate camera model picture in the “Camera Support” Section.
Most of the latest support issues are posted and answered in the FAQ section. If the
problem you are encountering is not listed either in the troubleshooting section of this
User’s Guide or the FAQ section on our website, you can also E-mail us by clicking the Email address link to the customer support center in the ”Camera Support” Section.
Customer Support
Before You E-mail or Call us
If you have questions concerning the operation of the camera or software installation that
are not listed either in the troubleshooting section of this User’s Guide or the FAQ section
on our website, feel free to speak to or email a customer service representative. Before
emailing or calling us, please have the following information ready:
Camera Information:
Name of camera model
Camera Serial Number
Computer Information:
Operating System
Processor Speed (MHz)
Computer Make and Model
Amount of memory
Exact Error message received
Part Number
For Camera Support please contact:
Toll Free in Europe:
UK: 0800-1696482
Spain: 900-973195
Germany: 0800-1800563
Italy: 800-781883
France: 0800-917599
Toll Free in the US and Canada:
• (866) 522-6372
Web: www.concord-camera.com
Toll in Europe:
• +31-53-4829779
-53-
For ArcSoft Technical Support on Photo Editing Software, please contact:
In the USA and Canada
ArcSoft, Inc.
46601 Fremont Blvd.
Fremont, CA 94538
Tel: (510) 440-9901
Fax: (510) 440-1270
E-mail: [email protected]
Japan
ArcSoft Japan
9F, 1-21-9, Higashi-Gotanda,
Shinagawa-ku,
Tokyo 141-0022, Japan
Tel: +81-3-5795-1392
Fax: +81-3-5795-1397
E-Mail: [email protected]
Latin America (local call only)
Tel (Brazil): 00817-200-0709
Tel (Chile): 800-202-797
E-Mail:
[email protected]
China
ArcSoft Beijing Co., Ltd.
No. 6 South Capital Gym Road
Beijing New Century Hotel Office Building, #1060
Beijing 100044, China
Tel: 8610-6849-1368
Fax: 8610-6849-1367
E-Mail:[email protected]
Europe
Unit 14, Shannon Industrial Estate
Shannon, Co. Clare, Ireland
Tel: +353 (0) 61-702087
Fax: +353 (0) 61-702001
E-Mail: [email protected]
Taiwan
ArcSoft Inc. Taiwan Branch
Tel: +886 (0) 2-2506-9355
Fax: +886 (0) 2-2506-8922
E-Mail: [email protected]
Concord and Concord logo are registered trademarks or trademarks of Concord Camera Corp., in the United
States and/or other countries. Microsoft and Windows are either registered trademarks or trademarks of
Microsoft Corporation in the United States and/or other countries. Mac and Macintosh are registered
trademarks or trademarks of Apple Computer, Inc. in the U.S. and other countries. All other brands and
product names are either registered trademarks or trademarks of their respective owners.
-54-