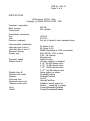
1
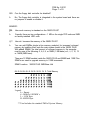
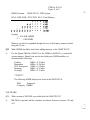
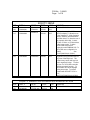
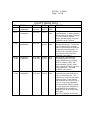
EPSON
Product Support Bulletin
Subject: Proper Method for Running Benchmark and Diagnostics Programs
Date: 06/04/93
Page(s): 1 of 1
PSB No: S-0158
Originator: MWT
This bulletin describes the proper method for running any benchmark or diagnostics
programs. This applies to any computer system.
In most cases, the computer should be started using an MS-DOS boot diskette
that’s ‘clean’ - in other words, one with no CONFIG.SYS or AUTOEXEC.BAT files.
The appropriate executable can then be run, either from diskette or hard drive.
There will be some exceptions to the above rule. In attempting to benchmark or
troubleshoot any add-on that requires a device driver (CD-ROM, local area network,
etc.), obviously the necessary device driver(s) must be loaded. Also, some
programs will require a minimum number of FILES or BUFFERS to be defined in
the CONFIG.SYS file. Such programs will usually display this requirement if they
are run without the necessary CONFIG.SYS file.
For the most consistent results, use the absolute minimal boot configuration that’s
allowed by the hardware being tested.
EPSON
Product Support Bulletin
Subject: Equity Series SIMM Compatibility
Date: 12/4/91
Page(s): 1 of 1
PSB No: S-0136
Originator: JAD
Due to the influx of third party SlMMs on the market, there are some that are not
compatible with Epson products. This bulletin is intended to be an aid in ensuring
that only compatible SlMMs are chosen for use in Epson’s Equity Series of
computers.
The SlMMs in question were SEIMENS, CUMULUS and KINGSTON. Installing these
SlMMs in Epson products may cause the following errors:
Parity Check 1
18FFFE 0000 202 Memory Address Error
164 System Options Not Set
1500 E000 201” DOS RAM Address Error
It was thought that the chips used in these SlMMs were of poor quality.
Epson Portland evaluated the SlMMs in question and found that this was not true.
The problem is caused by the SIMM circuit boards (ITE and TECAP circuit boards)
used to manufacture the SIMM modules. The dimensions of these boards are not
compatible with industry standard SIMM sockets. This may result in incomplete
contact between the SIMM assembly and it’s socket. This is caused by insufficient
size of the contact surfaces in these products. Also enlarged holes in the TECAP
product allow the component pin to pass entirely through the hole without making
contact.
It is recommended that only SIMMS meeting industry standard contact surface
specifications be used in Epson Equity computer products.
Some recommended SlMMs that were tested and found Compatible are:
Toshiba
Matsushita
CDC Enterprises
Samsung
Aculogic
For more information contact Technical Support.
EPSON
Product Support Bulletin
Subject:
The Equity 386SX PLUS Diskless Workstation - lnstalling Optional
Equipment
Date: 3/7/91
Page(s): 1 of 3
PSB No: S-0134
Originator: APA
WORKSTATION INSTALLATION SUMMARY
Install an 3 or 16-bit network interface card (NIC) with a auto-boot ROM in an
option slot.
Load the remote workstation boot files onto the file server. Typically, this is
done at another attached workstation, using a floppy drive to load the
necessary boot files. Instructions for this procedure can be found in the
section of your network documentation that addresses this type of installation.
Attach the diskless workstation NIC to the network using the appropriate
cable.
When the workstation is booting, and a local hard drive with a bootable
partition is present, the system will ask if you want to boot from the network. If
“N” is selected, the local hard drive will be used to boot. If ‘Y’ is selected, the
system will look for a file server. If no file server can be found, it will display
an “Error finding server” message, and will make additional attempts every few
seconds until a server is found.
FLOPPY DRIVE INSTALLATION
Floppy disk drives are inserted into the drive bays, without FDD guide rails,
using four screws to secure each drive.
Two floppy drive cables are included. A read/write cable (standard seven wire
twist) and a read-only cable (identified by heat shrink tubing located near the
connector that connects to the main board).
Install the standard diskette drive cable, if you want the system to be able to
both read and write data to a diskette inserted in the drive.
PSB No: S-0134
Page: 2 of 3
FLOPPY DRIVE INSTALLATION (continued)
Use the write-protected cable if you do not want users to be able to write data
to any diskette inserted in the drive. This cable prevents users from copying
data from the network server (or any other drive they can access) onto a
diskette in either the A or B drive. If an attempt is made to write to a floppy
diskette, a ‘Write protect error” will occur. However, data can still be read
from a diskette and copied to a local hard drive or other network drive.
HARD DRIVE INSTALLATION
One IDE drive cable, with two drive connectors, is supplied with the system.
Only standard drive types 0-63 can be specified in the ROM setup program
(refer to drive table on pages 2-24 & 2-25 of the user’s manual). The drive
types are identical with the standard Equity 386SX Plus).
If the standard Equity 386SX PLUS SETUP program is used to specify a userdefined drive type (or modify other settings), the “Diskette boot control” option
will be disabled upon exiting and updating..
If the ROM setup program is used to re-enable the boot control, the standard
drive type specified by the ROM SETUP program will also be saved, thus
overriding the user-defined settings.
The ROM SETUP program allows an incorrect drive type (for example: 37) to
be set and saved. Therefore, care must be taken to use a correct drive type.
The following is a list of some common IDE drives and the drive types that
should be used:
DRIVE
TYPE
SIZE
(to nearest MB)
TOTAL BYTES
(per CHKDSK)
Conner CP-344
59
41 MB
42,496,000
Conner CP-3104
60
100 MB
104,515,584
Seagate ST-157A-1
14
42 MB
4u=,=
Seagate ST-1201A
or Imprimis/CDC
94354-200
54
153 MB
160,055,296
MODEL
PSB No: S-0134
Page: 3 of 3
OTHER CONSIDERATIONS
If you desire access to the local hard drive while using the network, ensure
that the DOS downloaded from the file server can support the local hard drive
partition(s). For example, if a large 4.01 MS-DOS primary partition (>32MB) is
present on the local hard drive, and 3.30 DOS is used to boot from the file
server, the local hard drive will be inaccessible. (An error similar to “Invalid
drive specification” will occur when attempting to access the drive).
The DOS versions used should also be matched to allow the use of versiondependent DOS utilities from the local hard drive.
EPSON
EPSON AMERICA, INC.
Product Support Bulletin
Subject: Introducing the Equity 386SX PLUS Diskless Workstation
PSB No: S-0133
Originator: APA
Date: 8/7/91
Page(s): 1 of 4
INTRODUCTION
This system has been designed to be a diskless workstation node on a local area
network. There are no disk drives supplied with this model. Cables are included to
install floppy drives and/or hard drives as the need arises. Standard procedures for
installing a diskless workstation are used and can be found in your network
installation documentation.
The user’s manual is the same as the one supplied with the standard Equity 386SX
PLUS, and contains a user’s guide update “slip-sheer that describes the
differences between the standard and the diskless models.
Differences between the standard model and the diskless model are summarized
as follows:
0
Does not include disk drives, DOS, video drivers or other software.
Includes drive cables for installing optional drives.
0
Setup utility is modified and is contained in ROM. New options include
extended memory and boot control.
0
User or Administrator mode is set by jumper J1 on the main board. The
control of this mode along with the system key lock protect the system
configuration resulting in added security.
0
Only supplied in a 1 MB configuration. Use instructions in the user’s
manual that pertain to the 1 MB model only.
IDENTIFICATION
Both the standard and diskless models have the same logo plate on the front of the
CPU; “Equity 386SX PLUS”. The “CODE" number can be used to identify the
diskless model, and is located on or near the serial number label attached to back
of the CPU:
CODE: A038590
PSB No: S-0133
Page: 2 of 4
ITEMS INCLUDED
Equity 386SX PLUS CPU with 1MB (soldered), power cord.
101 key enhanced keyboard (6-pin mini DIN).
User’s manual, slip-sheet and warranty card.
One key, used for locking the top cover of the CPU.
Three drive cables:
0
Read/write floppy cable.
Read-only floppy cable, identified by heat shrink tubing located near the
0
connector that connects to the main board.
IDE Hard drive cable with connectors for two drives.
0
SETUP NOTES
Setup is only available on boot-up (RESET or warm boot), and only when in
‘Administrator” mode (jumper J1 is set to “B”). When the computer completes
its power-on diagnostics, two beeps will occur (this is not a SETUP error) and
the following prompt will appear:
Press F10 to run Setup
After 5 to 8 seconds if F10 is not pressed, the computer will continue to boot.
If F10 is pressed, the Setup screen will appear. Press the F7 key twice to save
and reboot. Refer to page 3 of this document for a listing of the setup options.
If in “User” mode (J1 set to “A”), one beep will occur, no F10 option will
appear, and the system will continue booting.
Differences in Setup between the standard Equity 386SX PLUS and the
diskless version include the following:
0
0
Extended memory size can be specified (in 128K increments).
Diskette boot control. Choose “Disabled” to use the system as a
dedicated workstation network node. Choose “Enabled” if a diskette
drive is installed and you want to be able to boot the system from that
drive.
After Setup is run you may want to change jumper J1 to position A and lock
the computer cover with the key lock. This changes the operating mode to
user mode and protects the computer’s configuration.
PSB No: S-0133
Page: 3 of 4
SPECIFICATIONS
ROM-resident SETUP Utility
Copyright (c) SEIKO EPSON CORP. 1990
Permanent parameters:
Base memory
Coprocessor
640 KB
Not installed
User-defined parameters:
lime
Date
Power-on password
14:59:19
07-26-91
Not set (If desired, enter password here)
User-selectable parameters:
Hard disk type of drive 1
Hard disk type of drive 2
Extended memory
Display type
Processor speed
Diskette drive A
Diskette drive B
Diskette boot control
Speaker
Initial num lock
Keyboard repeat rate
Network server mode
Serial
Parallel
00 (Select 0-63)
00 (Select 0-63)
384KB (Selectable in 128K increments)
EGA, MCGA, VGA, or other
CGA - 49 columns
Monochrome
High/Auto/Low
No drive installed or disabled
5 1/4” 360 KB diskette drive
5 1/4” 1.2 MB diskette drive
3 1/2” 729 KB diskette drive
3 1/2" 1.44 MB diskette drive
Same options as above
Enabled/Disabled
Enabled/Disabled
On/Off
Normal/Fast/Slow
Disabled (needs power-on
password to enable)
Enable
Primary/Secondary/Disabled
Primary/Secondary/Disabled
PSB No: S-0133
Page: 4 of 4
COMPATIBILITY WITH NIC CARDS
System configuration:
BIOS: CTRTD-1, CTRT-2 (version 1.57)
DOS: MS-DOS 3.30
Video: built-in
The following cards have been tested successfully with the system used as a
workstation:
MANUFACTURER/CARD NOVELL NETWORK
VERSION
CARD SETTINGS
Standard Microsystems Corp. 3.11
ARCNET PC110
8 bit, with Novell boot
S1: 2,3 off
S2: 2,6 & 9 on
JP3 on, JP1 & JP2 off
ROM (driver v2.11)
#881012 (IRQ2, I/O 2E0,
RAM D000:0)
Novell Inc.
Ethernet NE-1000A 8 bit
2.2
W1-W8: 2-3 (thin cable)
W9, W10 jumpered (l/O
300)/no boot ROM (IRQ3,
l/O 300, no DMA/RAM)
EPSON
Product Support Bulletin
Subject:
Equity 386SX PLUS Questions and Answers
Date: 4/3/91
Page(s): 1 of 9
PSB No: S-0131
Originator: DS/MT
GENERAL:
Q1.
What microprocessor does the Equity 386SX PLUS use?
A.
The Equity 386SX PLUS utilizes the Intel 80386SX-16 microprocessor. Use of
this CPU gives you 386 performance and compatibility in a 16-bit based
computer architecture.
Q2.
At what speed does the Equity 386SX PLUS operate?
A.
The Equity 386SX PLUS operates at either 16MHz or 8MHz. The speed can
be set by using the following keyboard commands:
CTRL ALT + = 16 MHz (High Speed)
CTRL ALT - = 8 MHz (Low Speed)
CTRL ALT * = Automatic speed mode set (This is when the floppy
disk drive is accessed.)
There is also an ESPEED utility that can be run at the command prompt as
follows:
ESPEED /H = Switch to high speed.
ESPEED /L = Switch to low speed.
ESPEED /A = Enables Automatic speed switching.
lf you run ESPEED with no parameters the following message is displayed:
Epson Speed control utility Version X.XX
Copyright (c) SEIKO EPSON CORP. 1990
Usage: ESPEED [/H] [/L] [/A]
/H = set high speed (no auto speed)
/L = set low speed (no auto speed)
/A = set auto speed
PSB No: S-0131
Page: 2 of 9
Q3.
What is the Auto Speed function?
A.
The Equity 386SX PLUS is capable of operating at 16MHz or 8MHz. Some
copy-protected applications require the computer to run at 8MHz while
accessing the program diskette. By enabling the Auto Speed function, the
computer automatically switches to 8MHz when accessing the diskette drive.
It then switches back to 16MHz for optimal performance. See above
procedure for setting the Auto Speed function.
Q4.
What BIOS does the Equity 386SX PLUS use?
A.
The Equity 386SX PLUS BIOS is written specifically for the computer by SeikoEpson Corp.
Q5.
Can the Equity 386SX PLUS support an 80387 co-processor?
A.
Yes, 80387SX support is available. The Equity 386SX PLUS has a socket for
an optional 80387SX-16 math co-processor which operates at 16MHz. This
allows extra processing power for math intensive programs like Lotus 1-2-3 or
AUTOCAD.
Q6.
Can the Equity 386SX PLUS use option cards that are available for the IBM
PC/AT?
A.
The Equity 386SX PLUS uses an AT-compatible ISA (Industry Standard
Architecture) bus that enables you to install any of the various add-on
products designed for IBM PC, XT or AT computer, such as: expanded
memory, EGA or VGA video, internal modems and many more. lt also
supports all of the option boards manufactured by Epson for the EQUITY
series. There are 4 standard l/O expansion slots (one with 8-bit bus and 3
with 16-bit bus). The 16-bit slots will also accept most 8-bit compatible cards.
The Equity 386SX PLUS offers flexibility in tailoring the system to your needs.
Q7.
Are there any tested internal modems that can be used?
A.
The Epson Link PC and the Hayes 2400 baud internal modems have been
approved.
Q8.
Does the Equity 386SX PLUS have a built-in mouse port?
A.
Yes, it has a PS/2 compatible mouse port on the rear panel of the computer.
The connector is a 6 pin mini DIN for an IRQ12 mouse or other device.
PSB No: S-0131
Page: 3 of 9
Q9.
Can any other Equity keyboards be used on this machine?
A.
Only the Equity le. Both the Equity le and the Equity 386SX PLUS use the
PS/24-type mini-DIN connector. All other Equity keyboards use the AT-type fullsize DIN connector.
Q10. What is the logical assignment of Diskette Drives?
A.
When the Equity 386SX PLUS is configured with two diskette drives, it will boot
from either diskette drive. If you boot the system from a diskette in the second
diskette drive, normally the 6 drive, that drive becomes drive A and the first
diskette drive, normally drive A, becomes drive B. This assignment remains in
affect until the system is reset with the reset switch, turned off, or is rebooted
from the drive currently designated as drive B or the AFDD.EXE utility on the
Reference Diskette is run (the use of AFDD is described later). Therefore, the
drive assignments can be controlled in two ways:
1. Boot the computer from a diskette in the drive you want
assigned as drive A.
2. Run the AFDD program to reverse the current drive
letter assignment.
The current logical drive assignments remain in effect when the system is
rebooted from the hard disk by pressing CTRL- ALT-DEL. The drive
assignments are lost if the system is turned off or reset with the reset button.
To use the AFDD utility, type AFDD at the command prompt and the following
message appears on the screen:
Reassign FDD utility Version XXX
Copyright (c) SEIKO EPSON CORP. 1989
New Assign
Present
Drive A: 1.2MB <== 1.44MB
Drive B: 1.44MB <== 1.2MB
(S)et and Reboot, Any other key to Abort ? _
if you press S, the drive letters are switched and the system reboots with the
new assignments in effect. Pressing any other key aborts the operation and
returns to the command prompt.
PSB No: S-0131
Page: 4 of 9
NOTE: The diskette drive types shown in AFDD message vary with the types
of drives installed. If another type of diskette drive is installed (360 KB or 720
KB), the message is adjusted accordingly.
Q11. What terminal emulation boards are compatible with the 386SX PLUS?
A.
The following products have been tested and approved:
3278/79 Emulation Adaptor
IBM 5250 Board
IRMA/2
SDLC
IBM
IBM
DCA inc.
IBM
Q12. Does the 386SX PLUS have a battery for the Real Time Clock?
A.
The 386SX PLUS uses the Dallas DS1287 RTC which incorporates an
HD146818 compatible real-time clock with an internal battery.
Q13. What video adapter comes with the 386SX PLUS?
A.
The 386SX PLUS has built in VGA support that offers resolutions up to
800x600 when used with a multi-frequency monitor.
Q14. Can the serial and parallel ports be disabled?
A.
Yes, the parallel and serial ports can be disabled by running the setup
program on the reference diskette and choosing DISABLE.
Q15. How many internal device bays does the 386SX PLUS have, and will it support
a full-height device?
A.
The 386SX PLUS has 3 half-height bays to support up to 3 half-height devices.
There is no capability for a full-height device.
Q16. How many wait states does the 386SX PLUS have?
A.
At 16MHz, the system utilizes a “1/4 wait state” architecture for memory access
and 0 wait states for ROM BIOS access on the motherboard. At 8MHz,
memory and ROM BIOS access require 1 wait state; on the expansion bus, all
memory or device requests are 1 wait state. lf additional waft states are
required, devices on the l/O channel hold the READY signal low, thus wait
states are generated until the device can respond to the CPU.
PSB No: S-0131
Page: 5 of 9
Q17. Are the wait states user selectable?
A.
No, the 386SX PLUS automatically inserts them when needed after the
command phase of the processor clock cycle.
Q18. How many jumpers are on the system board?
A.
There are six (6) jumpers on the system board:
System Board:
Jumper 1: Password security enable/disable.
A: Disabled
B: Enabled
Jumper 2: Onboard HDD interface enable/disable.
A: Enabled
B: Disabled
Jumper 3: internal Mouse port IRQ12.
A: Assigned to on board mouse port
B: IRQ12 assigned to bus expansion slot
Jumper 4: Monitor type color/monochrome.
A: Color monitor
B: Mono monitor
Jumper 5: Auto IOCHRDY enable/disable.
A: Disabled
B: Enabled
Jumper 6: Onboard video enable/disable.
A: Enabled
B: Disabled
NOTE: J6 is not present on early production units.
HARD DISK DRIVES:
Q19. What kind of hard disk drives are available for the 386SX PLUS?
A.
As a factory configuration, the 386SX PLUS is available with a 40MB, 3.5" hard
disk (Conner CP-3044,27ms access time). This HDD offers a 1:1 interleave
and uses an embedded controller with an IDE interface. When installing the
40MB drive, use type 17. A 100MB option kit is also available.
PSB No: S-0131
Page: 6 of 9
What hard drive controller is used in the 386SX PLUS?
The 386SX PLUS uses a controller embedded on the hard drive. This
controller connects to a Task File Host interface (IDE) that is integrated in the
system board.
Can the 386SX PLUS use other hard disk drives and controllers?
Yes, the Host Interface on the system board can be disabled and other third
party hard drive controllers and drives can be used. The interface can be
disabled by setting Jumper J2 to position A. Other embedded controller ATtype drives can also be used with the Host Interface.
What extended hard drive support is available in the ROM BIOS that comes
with the Epson 386SX PLUS?
The Seiko-Epson BIOS will directly support hard drives that range in size from
10MB to 153MB. There is direct support for the Seagate ST-251 as well as
several ESDI drives. By providing this support for 3rd party hard disk drives,
the Equity SX PLUS has the capability to use most 3rd party &bit and 16-bit
hard disk controllers. SCSI drives have their own controllers attached to the
drive and should work correctly when attached to the bus with a host adapter.
The 386SX PLUS also has a User Definable setting that allows you to set up
hard disk drives that are not supported by the 386SX PLUS Drive Type Table.
in SETUP, a sub-menu lists the settings you can change for each drive: the
number of cylinders (tracks), the number of read/write heads, the number of
sectors, the precompensation cylinder, the landing zone (the cylinder on
which you want to park the heads when moving the computer), and the total
storage capacity in megabytes. This allows you to use hard drives much
larger than 153MB.
FLOPPY DRIVES:
Q23. What types of floppy disk drives will work on the 386SX PLUS?
A
The 386SX PLUS comes standard with either a 5.25” 1.2MB or 3.5” 1.44MB
floppy disk drive. There is built-in BIOS support for industry standard 360KB
and 1.44MB, 3.5” half-height floppy disk drives as well as the 720KB, 3.5”
floppy drive. All four drive sizes are available from Epson.
Q24. Will the 386SX PLUS support 3 floppy disk drives?
A
No, not directly. The Epson controller and ROM BIOS supports a maximum of
two floppy drives.
PSB No: S-0131
Page: 7 of 9
Q25. Can the floppy disk controller be disabled?
A.
No. The floppy disk controller is integrated in the system board and there are
no jumpers to enable or disable it.
MEMORY:
Q26.
How much memory is standard on the 386SX PLUS?
A.
Currently there are two configurations - 1 MB on the single FDD units and 2MB
on factory-installed HDD units.
Q27. How do I increase the memory of the 386SX PLUS?
A.
You can add SlMMs (single in-line memory modules) for increased on-board
memory by installing them onto the main system board in the 386SX PLUS.
With added SIMMs, the total amount of on-board memory in the computer
must be one of the following: 2, 4,6, 8, or 10MB (1 MB base) or 4, 6, 8, 10, 12
or 14MB (2MB base).
There are 12 SIMM sockets inside the 386SX PLUS and 256KB and 1 MB 70ns
SIMM’s are used to upgrade memory in 2 MB increments:
SIMM Location: 386SX PLUS 2MB Base Unit
6H 6L 5H 5L 4H 4L 3H 3L 2H 2L 1H 1L Total Memory
Legend:
b = Empty
#=lMbxlx9SIMM’s
L = LOW Byte.
H =HIGH Byte.
** Total includes the standard 2MB of System Memory
PSB No: S-0131
Page: 8 of 9
SIMM Location:
386SX PLUS 1 FDD System
6H 6L 5HSL 4H4L 3H3L 2H2L 1H 1L Total Memory
Legend:
*= 256 KB SIMM
# = 1 MB SIMM
Memory can also be expanded through the use of third party memory boards
using an I/O slot.
Q28. What SIMMs should be used when adding memory to the 386SX PLUS?
A.
Use the Epson 1MB kit (A808231) or the 2MB kit (A808101), to extend the
system memory. Should you need to use third party SIMM modules we
recommend the following:
Toshiba
Matsushita
CDC Enterprises
Samsung
Acculogic
1MBit x 9 70 nSec
1MBit x 9 70n Sec
1 MBit x 9 70 nSec
1MBit x 9 70 nSec
1MBit x 9 70 nSec
**NOTE**
The following SIMM chips do not work in the 386SX PLUS:
Panasonic
IBM
Compaq NMBS
SOFTWARE:
Q29. What version of MS-DOS is provided with the 386SX PLUS?
A
MS-DOS is optional and the customer can choose between versions 3.30 and
4.01.
PSB No: S-0131
Page: 9 of 9
Q30. Is the 386SX PLUS compatible with OS/2?
A.
Yes, Epson OS/2 1.0 and IBM OS/2 1.2 have been tested on the 386SX PLUS.
Q31. Will it support Unix and/or Xenix? Which versions?
A.
The Equity SX PLUS has been tested with Santa Cruz Operations Xenix 386
Rel. 2.3.2 and IBM PC Xenix Vers. 1.
EPSON
EPSON AMERICA, INC.
Product Support Bulletin
Subject:
Jumper Change on the Equity 386SX Plus Main Board
Date: 4/3/91
Page(s): 1 of 1
PSB No: S-0129
Originator: MWT
This bulletin is to inform you that, as of August 1990, an additional jumper (J6) has
been added to the Equity 386SX Plus system board. This was effective with factory
hard disk models of serial number 20B10020000 and higher.
The added jumper allows positive hardware enable/disable of the built-in VGA video
controller. This change makes it more convenient to use third-party add-in video
adapters.
Note that all factory single floppy disk drive models use the 6-jumper board and are
not affected by this change.
For additional Service information, please refer to Technical Information Bulletin
number EQ386SX+-001, dated 10/10/90, for more details.
EPSON
EPSON AMERICA, INC.
INFORMATION
Product Support Bulletin
Subject:
Maximum Number of Printers Supported by Current Equity Computers
Date: 02/06/91
Page(s): 1 of 1
PSB No: S-0128
Originator: KAS
As computing environments increase in complexity, there has been an increasing
number of instances that require the support of several printers by one computer.
One common example is that of using Novell Netware’s print server capabilities to
provide printer access to a large group of users with differing printer requirements.
Netware is capable of supporting three (3) parallel and two (2) serial printers on one
server. Recent testing has shown that the Equity 386/25 Plus, Equity 386/25, Equity
386/20 and the Equity 386SX Plus will support three (3) parallel ports along with two
(2) serial ports. The key factor in providing support for a third parallel port is the
need for a parallel interface card that can be set to the IBM Monochrome
Graphics/Parallel printer I/O address at 3BCh. The computer looks for this address
first and, if present, will assign the parallel port on that card as LPT1. The built-in
parallel port (I/O address 378h) will then be addressed as LPT2. We also had an
AST I/O Mini serial/parallel card addressed at l/O address 278h, which was then
reassigned to LPT3. Each of the three parallel ports was attached to a printer. There
was also a printer attached to each of the two serial ports. All five printers were then
set to print simultaneously under Netware Version 2.15 Rev. C using PCONSOLE. All
five printers were able to print the documents assigned to them, simultaneously. The
units were then tested using WordPerfect 5.1 on the network and again were
successful in printing to the five (5) printers at the same time. The last tests were run
with the units booting under DOS 4.01 and screen prints being directed to each of
the printers. WordPerfect 5.1 was also used to direct documents to each of the
printers. Again all five (5) printers were able to print the files that were sent to them.
Although not all Equity computer models were tested in this situation, the Equity
models 386SX, lIe, Ill+ and II+ should work in a similar manner if the instructions
above are used as a guide. There is one item of which to be aware when using the
this setup and that is the system will complete the RAM count and lock up if using a
monochrome monitor. If you need to use three parallel ports, USE A COLOR
MONITOR.
EPSON
EPSON AMERICA, INC.
INFORMATION
Product Support Bulletin
Subject:
Equity 386SX Plus HDD Interface Cable
Date: 12/5/90
Page(s): 1 of 2
PSB No: S-0127
Originator: DS
The purpose of this bulletin is to provide information on installing the hard disk
interface cable, if and when an IDE hard disk is installed.
This procedure is not for systems that came with a hard disk drive already installed.
The cable will come packaged in the computers shipping container.
FOLDING THE INTERFACE CABLE
1:
Lay the cable out with the circuit board connector to the left and line 1 (RED)
along the bottom.
2:
Fold the cable down about 3.75” from the right, along the top of the cable,
making a 90 degree angle at that point. Press down firmly to crease the cable.
3:
Fold the cable in half at the center connector, so the circuit board connector is
now on the right.
4:
Fold the cable back to the left making a straight crease that aligns along the right
edge of the first fold. The cable is now lying over the center connector.
5:
With that same part of the cable, fold the cable at a 90 degree angle at the right
edge of the previous fold so the circuit board connector is facing down and the
cable is lying over the other connector. Crease the fold.
6:
Take the center connector, now on the left side, and make a fold about 2” in from
the center connector. Fold it down, making a 90 degree angle. Crease the fold.
PSB No: S-0127
Page: 2 of 2
INSTALLING THE INTERFACE CABLE
1:
Remove the sub-assembly chassis from the computer and turn it over. Position it
so the hard disk drive is on the left.
2:
Lay the interface cable on the sub-assembly so the drive connector is on the left
and the board connector is facing downward.
3:
Connect the cable to the HDD.
4:
Place a tie wrap fastener around the folded cables near the 90 degree fold.
5:
Peel the backing off of the tie wrap fastener, and stick it to the bottom of the subassembly chassis.
6:
Re-install the sub-assembly.
EPSON AMERICA, INC.
INFORMATION
Product Support Bulletin
Subject:
800 X 600 Super VGA Driver for the Equity 386SX Plus and Microsoft
Windows 3.0
Date: 12/5/90
Page(s): 1 of 1
PSB No: S-0126
Originator: MWT
The super VGA (SVGA) driver for Microsoft Windows 3.0 for the Equity 386SX Plus is
now available for downloading from the Epson Product Support Bulletin Board
System (BBS). Please refer to PSB S-0067B for an overview on using the BBS. Also
note the new telephone numbers for the BBS: (800) 234-1445 extension 8777 and
(213) 782-4531.
The file name is WIN30C&T.EXE, located in the DRIVERS file library. It is a selfextracting file and must be downloaded with a binary protocol, such as XMODEM.
Once the file has been downloaded, use the following steps to make it operational:
1) Copy the file to the hard disk subdirectory that contains the current .DRV files
(typically C:\WINDOWS\SYSTEM).
2) Execute the file; this will produce four files named VDDVGA.386, VGAP45X.GR3,
SETUP.INF and W3L600.DRV.
3) Copy the file W3L600.DRV to VGA.DRV (you may want to rename the original
VGA.DRV file so it doesn’t get overwritten).
4) Log into the C:\WINDOWS subdirectory and run Windows SETUP. From the
System information screen select Display and press ENTER. From the list of
available drivers, choose “800x600x16 for CHIPS Super VGA 82C452” and press
ENTER. Then follow the screen instructions to save your choices and exit.
5) Re-boot the computer and start Windows. You should now be using the Super
VGA resolution.
NOTE:
You must be using a multi-frequency, auto-synching analog monitor (such
as the NEC MultSync 3D). Also, you may experience memory conflicts
with advanced memory management utilities, such as Quarterdeck’s
QEMM386 version 5.11. If this occurs, you will need to experiment to
determine which portions of memory need to be excluded from use by
the memory manager.
PSB No.: S-0062I
Page: 1 of 18
EQUITY 386SX
VER
1.03
1.03
1.15
1.15
1.16
1.16
PART #
DESC
TYPE
LOC
Y192804001
Y192805001
Y192805002
Y192804002
CPAN-A2
CPAN-B2
CPAN-BO3
CPAN-AO3
27C256
27C256
27C256
27C256
U25
U37
U25
U37
Y192590801
Y192590802
CPAN-A04
CPAN-B04
27C256
27C256
U25
U37
REASON
INITIAL RELEASE
To allow the use of the DEC
DEPCA adapter. To allow the use
of the Seagate ST-157A, Quantum,
Maxtor, Rodime, and WD93044-A
hard disk drives. To allow the use of
two Imprimis 9244-383 , Conner
CP344, CP3104, or CP3204 drives
in the same system. To allow
KEYB.COM to be used in
conjunction with EMM386.SYS. To
allow FDD auto-configuration in
CMOS.
See
ECN EQ386SX-001 (2/6/91).
To resolve a problem with rapid
keystrokes using the enhanced 10key area of the keyboard. This
problem may cause shift key lock
and/or keyboard lockup. To allow
the use of a SCSI HDD controller
with the password function. To
allow CMOS to indicate daylight
saving time mode. To resolve
problem with DECNET PCSA v.
3.01.
See ECN EQ386SX-004 (4/3/92).
EQUITY 386SX PLUS DISKLESS WORKSTATION
VER
1.57
1.57
PART #
Y705809001
Y705808001
DESC
CTRTD-B02
CTRTD-A02
TYPE
27C512
27C512
LOC
U73
U96
REASON
INITIAL RELEASE
PSB No.: S-0062I
Page: 1 of 18
EQUITY 386SX PLUS
VER
PART #
DESC
TYPE
CTRT-BO3
CTRT-AO3
1.08.02
1.08.02
Y705805002
Y705804002
Y705805004
Y705804004
CTRT-BO5
CTRT-AO5
27C512
27C512
U73
U96
U73
U96
1.15.08
1.15.08
Y705805006
Y705804006
CTRT-BO7
CTRT-AO7
27C512
27C512
U73
U96
1.16.8A
1.16.8A
Y705805007
Y705804007
CTRT-B08
CTRT-A08
27C512
27C512
U73
U96
1.17.8A
1.17.8A
Y705805008
Y705804008
CTRT-B09
CTRT-A09
27C512
27C512
U73
U96
1.04.02
1.04.02
27C512
27C512
LOC
REASON
INITIAL RELEASE
To allow remote boot from DEPCA
network adapter. To allow expanded
IDE hard disk drive support (Seagate
ST-157A, Quantum, Rodime,
Maxtor, Western Digital). See ECN
EQ386SX+-001A (11/29/90).
To allow the use of dual monitors
with Microsoft Quick C. To allow the
use of a Seagate SCSI controller
and/or a NIC remote boot ROM with
the password function enabled. To
allow the use of ARCNET NICs at
base address 2E0H. See ECN
EQ386SX+-002 (2/6/91).
Implemented in manufacturing.
Resolved problems with video
quality, QEMM memory mapping,
2E0h I/O address conflict with
Novell networks and C&T drivers.
BIOS overwrite of CMOS, and clock
timing malfunction. See ECN
EQ386SX+-003 (8/7/91).
Resolve a problem with rapid
keystrokes using the enhanced 10key area of the keyboard. This
problem may cause shift key and/or
keyboard lockup. Fixes problem
with installation of DECnet PCSA v.
3.0 or 3.1 may cause intermittent
terminal emulation failures, inability
to create remote boot workstations
using NWSETUP and inability to
download DOS to the server using
DOSLOAD.
See ECN EQ386SX+-004 (2/7/92).