1
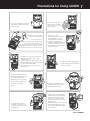
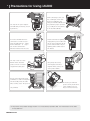
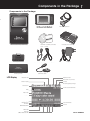
User’s Guide
2
COPYRIGHT NOTICE
General
• iAUDIO is a registered trademark of Cowon Systems.
• This product is for home use only and cannot be used for commercial purposes.
• The copyright for this manual belongs exclusively to Cowon Systems, and it is strictly prohibited to distribute
this manual in whole or in part without prior written premission.
• The copyrights for JetShell and JetAudio belong to Cowon Systems, and it is strictly prohibited to distribute
them without prior written permission by Cowon Systems or to use them commercially.
• The MP3 files created using the MP3 conversion feature of JetShell or JetAudio must be used for personal
purpose only. It is against the copyright laws to use them for commercial purposes or services.
• Cowon Systems abides by the regulations on phonograph records, videos, and games. It is the responsibility
of user to comply with the all other related codified laws.
• We recommend that you to go to http://www.iAUDIO.com and register as an official customer as soon as you
purchase this product. You then will be eligible to receive special benefits only available to official customers
who have completed the customer registration form.
• If those users who did not complete the official customer registration form. Certain issues will be considered the
responsibility of the user and may not be covered in the same way as those users who have completed the
registration.
• The examples, texts, drawings, and pictures contained in this manual are subject to change without prior
notice according to improvements of the product.
Information on BBE
• iAUDIO is produced under license from BBE Sound, Inc.
• BBE Sound, Inc. retains licensing rights pursuant to USP4638258, 5510752, and 5736897.
• BBE and the BBE symbols are registered trademarks of BBE Sound, Inc.
All rights reserved by COWON SYSTEMS, Inc. 2005
iAUDIOX5 ENGLISH
Precautions for Using iAUDIO
Do not use iAUDIO for purposes
other than specified here in the
User’s Guide.
Do not let the unit get wet or
leave it in a damp place for prolonged
periods. If the product
is damaged from moisture
as described above,
product failure is then classified as
failure by submersion, and no longer
covered by warranty. Moreover,
it may not be even be possible to repair
the unit with charged for service, and you
may no longer be able to use the product.
Pay attention to the directions when
connecting the USB cable to your
iAUDIO or a PC.
Connecting the unit or PC incorrectly
with the USB cable may damage them.
Do not bend the USB cable
excessively or leave it pressed by
heavy objects.
Touching iAUDIO with wet
hands may damage the unit
and cause malfunctions.
Handle the power plug only
with dry hands. (Otherwise
an electric shock may
occur.)
Using iAUDIO in places
with high occurrences of
static electricity may cause
malfunctions.
3
Be careful not to cut your
hands when unpacking
the box, User’s Guide,
or accessories.
There are no user
serviceable parts in the unit,
and any attempt to open,
disassemble or reconstruct
the product will void any
warranty, disqualify it for free
service, and the unit may be
permanently disqualified from
any after service.
Contact our reseller representative
in your country if you notice that the
device over-heats.
Listening to iAUDIO at high
volumes for extended periods
may harm your hearing.
Always backup important files.
All data stored in iAUDIO may
become deleted when being
serviced. Our after-service
center does not backup files in
iAUDIO units.
Please note that Cowon Systems
is not responsible for any data
loss from products entrusted to
us for service.
ENGLISH iAUDIOX5
4
Precautions for Using iAUDIO
Use only the AC power adaptor
and USB cable provided by Cowon
Systems Inc..
To remove iAUDIO when it is
connected to a cradle or a subpack via USB cable, the “Safely
remove hardware” or “Separate or take out hardware”
Windows features must be used.
Use only a soft, dry cotton
flannel cloth to clean the
product. (Never use water/
soap/benzene/detergent.)
Do not connect line input/output
terminals to a cradle (or Subpack)
and a PC USB port at the same
time, as it may cause the power to
turn off. Connect only the necessary terminal.
When connecting to a PC, use
only a USB port on the main
board or a USB Host card.
Using an external USB hub does
not guarantee proper operation.
(e.g. USB port on a keyboard,
or an external USB hub)
If there is thunder or lightning,
unplug the PC power cables and
the AC power adaptor from the
power outlet for there may be
lightning strikes which cause a
fire hazard.
Keep the product away
from magnets and direct
magnetic fields, as they can
cause product failure.
Do not drop or strike the
product. It may be the direct
cause of failure, and you
may not receive free A/S.
※ The product is a portable storage medium. You must backup important data. The manufacturer is not liable
for any data loss.
iAUDIOX5 ENGLISH
Components in the Package
5
Components in the Package
LCD Remote Control(Optional)
iAUDIO (MP3 Player Main Body)
Subpack
USB 2.0 Cable, Line-in Recording Cable
Cradle(Optional)
LCD Display
Install CD (JetShell, JetAudio)
User’s Guide
Bundled Earphones
Carrying Case(Optional)
AC Adapter
USB Host Cable
Playback field
Playback mode
Hold (main unit, remote
Section repeat
control)
Remaining battery charge
Current time
Current track/Total tracks
Artist
Album title
Song title
Proceeding bar
Playback time
BIT RATE
SAMPLING RATE
Total timel tracks
Volume
5 Band EQ
JetEffect
(BBE, M3B, 3D, MP)
ENGLISH iAUDIOX5
6
Features & Specifications
Features
MP3, OGG, WMA, ASF, FLAC, WAV, MPEG4(video) playback, FM Radio Receiver and Recording,
Voice Recording, Line-In Recording
■ TXT(Text), JPEG(Image) File Viewer(Image Enlargement, Background Screen Designation)
■ Built-In HDD(20GB/30GB), USB Host, File Copy/Delete
■ USB 2.0 Interface
■ 260,000 Colors TFT-LCD, Resolution 160x128
■ Long Playback Time : Maximum 14 hour playback (35 hours for iAUDIO X5L)
(Based on the company test standards, the playback time may be reduced when using the LCD.)
■ Multi language support
■ Enhanced Integrated Navigator
■ Play/Pause, Recording/Pause While Recording
■ Next Song/Previous Song, Fast Forward/Rewind, Infinite Loop, Infinite Loop
■ Resume, Fade-In, AutoPlay Features
■ Search Speed, Skip Speed Setup
■ Volume (Digital 40 Levels)
■ Various EQ and Sound Field Effects
■
-User-Adjustable 5-Band EQ
-Normal, Rock, Pop, Jazz, Classic, Vocal, User
-Supports BBE, Mach3Bass, MP Enhance, and 3D Surround.
Clock, Alarm, Timer Recording, Sleep Function, Power Saving Exit
Power, LCD On/Off, Hold Combined Switch
■ LCD Auto Off Time Adjustment, Brightness, and Contrast Adjustments
■ Easy Downloading and Uploading of Firmware
■ Supports ID3V2, ID3V1, FileName
■ Device Information Verification
(Firmware version, HDD capacity, HDD volume, total folder number, total file number)
■ Supports MAC OS (Only data transfer is supported)
■ Supports Linux v 2.2 or higher (Only data transfer is supported)
■ Software
■
■
-JetShell (File transfer, MP3/WMA/WAV/AUDIO CD PLAY, MP3 ENCODING)
-JetAudio (Integrated multimedia player software, music/video conversion feature)
Specifications
Supported Files MP3 : MPEG 1/2/2.5 Layer 3, ~320kbps, ~48khz, mono/stereo WMA(ASF) : ~256kbps, ~48khz,
mono/stereo OGG : ~q10, ~44.1khz, mono/stereo FLAC : compression level 0/1/2, ~44.1khz,
mono/stereo WAV : ~48khz, 16bit, mono/stereoXviD MPEG-4, CBR ~256kbps, up to 160x128, 15 fps JPEG
Hard Disc
Hard disc (20GB/30GB)
PC Interface
USB 2.0 (Max. 480M bps)
Battery
Built-in Rechargeable Lithium Ion battery(Max. 14 Hours Continuous Playback)
Power
AC adapter DC 5.0V, 2A
Charge Time
Approximately 3 hours when using the AC power adaptor (6 hours for iAUDIO X5L)
Buttons
Main unit: 5-way Jog(NAVI/MENU, VOL+, VOL-, REW, FF), PLAY, REC, POWER & HOLD switch
Remote Control: PLAY/PAUSE, FF, REW, MENU, VOL+, VOL-, MODE, REC
Display
160 x 128 dot, 260,000 color TFT-LCD
SNR
95dB
Frequency Range 20Hz~20KHz
Output
16 Ohm Earphone: 20mW + 20mW
Size
iAUDIO X5 : 4.08 X 2.39 X 0.56 inches (103.7 X 60.8 X 14.3 mm) excluding the LCD
iAUDIO X5L : 4.08 X 2.39 X 0.72 inches (103.7 X 60.8 X 18.3 mm) excluding the LCD
Weight
iAUDIO X5 : 5.11 oz (145g) iAUDIO X5L : 6.35 oz (180g) including the built-in battery
iAUDIOX5 ENGLISH
Basic Operations
7
1. Simple Operations
Different Song
Playback and Volume Adjustment
Power Off
1. Connect the earphone to main unit (when using the remote control, connect it to the main unit, and connect the earphone to remote control).
2. A long upward push of the power switch will turn the power ON.
3. The initial screen and the stand-by screen (after logo setup) will appear (you may make it automatically playback according to the setup).
4. Pressing the “PLAY” button will playback the music.
5. Move the lever left and right to playback different songs. Move the lever up and down to adjust the volume.
6. A long upward push of the power switch will turn the power OFF.
- You may not turn the power OFF while recording.
- Turning the power ON while the adapter is connected will activate the charging mode and the stand by screen will appear.
- Turning the power OFF while the USB is connected will activate the charging mode using USB power.
- However, when a USB hub is used, the USB charging mode is not supported.
2. Basic Operations for Switching Modes
e.g. Switching from Digital AV Mode to FM Radio Mode:
Enter the Menu
Press the lever for a long
time to enter the menu.
Mode Selection
Push lever in the +, - direction to move up and down to different menu items. Press the
lever or push the lever to the ▶▶ direction to select a menu.
Push the lever to the ◀◀ direction to move to the previous step.
There are 6 modes (Digital AV, FM Radio, Voice Rec, Line-In Rec, Picture, USB Host).
To enter the desired mode, press and hold the lever for approximately 2 seconds. When the Menu screen
appears, push the lever in the +,- direction to switch to a desired menu item. After moving the cursor to
the desired menu, you may press the lever, playback button, or push the lever in the ▶▶ direction to display
the selected menu screen. To exit the mode menu, simply press the “REC” button or push the lever in◀
◀◀
direction to return to previous screen.
Press the “REC” button if you want to cancel the action on the mode switch screen and return to the original
mode.
ENGLISH iAUDIOX5
Basic Operations
8
3. Basic Operations for Using Menu
e.g. Changing JetEffect EQ from NOR (Normal) to ROC (Rock):
JetEffect
PlayMode
Display
Timer
General
Recording
FM Radio
Digital AV Mode
JetEffect
PlayMode
Display
Timer
General
Recording
FM Radio
Menu Item Selection
Press the lever or push the lever toward the
▶▶ direction to enter the submenu of the
selected menu.
Enter the Menu
Hold and press the lever for 2
seconds to enter the menu.
Entering the Settings
Highlight settings and press the
lever to enter the settings menu.
JetEffect
Equalizer
BBE
Mach3BA/Ss
MP Enhance
3D Surround
Pan
Equalizer
JetEffect
Equalizer
BBE
Mach3Bass
MP Enhance
3D Surround
Pan
6
8
ON
6
0
Menu Item Selection
Select the Equalizer menu using the same
method.
Moving up and Down the menu items
Push the lever toward the +, - direction.
EQ Item Movement
Push the lever toward the +, - direction.
You may select ROC EQ by pushing the lever
toward the - direction when in NOR mode.
6
8
ON
6
0
Exit after selecting ROC EQ
Move the lever toward the ◀◀ direction or press
the playback button.
5Band dB Level Adjustment
You may adjust the 5Band dB level by a short
■
■
tap on the lever or by pushing the lever toward
Menu Item Value Adjustment
the ▶▶ direction.
For the lowest item, enter the setup screen of the item.
Push the lever toward the +, - direction to adjust the value to the desired level.
Press the lever to select the item. The adjusted value will be reflected immediately.
Press the “PLAY” button and return to the mode screen after setup is complete.
Canceling Menu Item Setup, Closing the Menu Screen
Pressing the “REC” button will return the item value that is being setup to its previous status and close
the menu screen.
4. Basic Operations for Using the Navigator
Expand
Playnow
Addto List
iAUDIO Folder structure
■
■
Entering
the Navigator
A short-tap on the lever
allows you to enter the
Navigator screen.
Moving up and
down through the
Navigator items
Push the lever toward
the +, - direction.
Navigator Item Selection
If you select and open a folder, press the
lever to launch the popup window and then
select Expand.
Or you may enter the folder without the popup
window by pushing the lever toward the ▶▶
direction.
Playnow
Addto List
Selected File Playback
When you select “Play now” after pressing
the “PLAY” button or by pressing the lever to
launch the popup window, the device returns
to MP3 Player mode and the selected file is
played back.
Lightly tap the lever toward the ▶▶ direction and
the selected file will be played back in Navigator.
Opening the Navigator Screen
When in Digital Av, Voice Rec, LineIn Rec, or Picture mode, the Navigator opens to search folders
and files inside
In FM Tuner mode, the Navigator for searching and setting frequency values opens.
USB Host mode is in the Navigator screen by default.
Navigator Item Selection
For the selected file item, you may playback the file by pressing the “PLAY” button or moving the
lever toward the ▶▶ direction.
For the selected folder item, you may enter the folder by pressing the “PLAY” button or moving the
lever toward the ▶▶ direction.
iAUDIOX5 ENGLISH
Basic Operations
■
■
9
Navigator Popup Window
When you press the lever, the appropriate popup window opens according to the Folder, File, Dynamic
PlayList File, or Radio Mode.
Push the lever toward the +, - direction to select the desired popup item.
Press the “PLAY” button or push the lever toward the ▶▶ direction to select a popup item.
Press the “REC” button to cancel and close the popup window.
Closing Navigator
Pressing the “REC” button will close the Navigator screen and return to the original screen.
1. Digital AV Mode (Multi-Media File and TextViewer Operation)
Digital AV mode is the mode for playback of audio files and video files or viewing text files saved in hard disk.
■
Multi-Media File Playback
1. Turn the power ON, after both the initial screen and the logo screen appear, the stand-by screen
with basic information appears.
2. Press the “PLAY” button to playback audio files or encoded video files.
3. Pressing the “PLAY” button during playback will pause the file.
4. Lightly tapping the lever in one direction (left or right) during playback will playback a different song.
5. Pushing and holding the lever in one direction (left or right) during playback will search songs.
- When AutoPlay is On, the file plays back while the screen appears at the same time.
- When Resume is On, playback starts from the section last played.
- Move the lever toward the +, - direction to adjust the volume.
- Song information displayed during playback depends on the Song Title setting.
- It may take several seconds to playback a selected song due to characteristics of the hard disk. This is not a product failure.
- If there are many files saved, it may take time to display the screen, and is not a product failure.
- The maximum recognizable number of folders is 1999, and the maximum number of files is 9999 (only audio and video files that
can be played back, no limitation for other files.) in Digital AV mode. Maximum allowable characters for a file name is 52, any
letters after those 52 will be cut off.
- Normal operation is not guaranteed for video files that have not gone through the encoding process via JetAudio.
ENGLISH iAUDIOX5
Instructions for Different Modes
10
■
TextViewer Operation
1. Connect iAUDIO to a PC with the USB cable.
2. Save the text file you want to see in iAUDIO to the “TEXTFILE” folder in iAUDIO.
3. Disconnect iAUDIO and the PC.
4. Turn the power ON and select a text file saved in the “TEXTFILE” folder with the Navigator.
This will enable text file viewing.
5. Moving the lever +, - will move the text line by line, and moving the lever with ◀◀ ,▶▶ will move
the text page by page.
6. Press the lever to launch a separate window and move directly to a specified location.
7. Press the “REC” button to exit TextViewer mode.
- You may view the text file while listening to music.
- Save text files only in the “TEXTFILE” folder.
- Image files will be recognized up to 128KB, and the maximum number of folders that files can be saved in is 49, and the maximum
number of files is 99 (total file number under “PICTURE”).
■
Section Repeat Setup
Section Repeat is a feature that allows the user to setup a section he/she wants to listen to and playback in the
selected range.
1. In Digital AV mode, press the REC (A◀▶B) button at the starting point of the section you wish to repeat during
audio file playback, the (A◀▶) icon will appear in the upper status bar.
2. Press the REC(A◀▶B) button at the end point of the section you wish to repeat, the icon changes to (A◀▶B),
and the selected section will playback repeatedly.
3. Press the “REC” button again to cancel section repeat.
- You must select a section that is longer than 1 second.
- Selecting or searching different songs during section repeat setup will also cancel the section repeat operation.
- This function only applies to audio files. Section Repeat does not apply to encoded video files.
■
Dynamic Play-List (Referred to hereafter as DPL) Setup
■ Adding songs to the DPL
iAUDIOX5 ENGLISH
Instructions for Different Modes
11
■ Removing songs from the DPL
It is a feature that allows the user to easily edit the songs he/she wants in a List and listen to them.
There is a special folder called “D-PLAYLIST” already on the hard disk, and this folder will not be recognized
by the computer.
The user may add/delete songs he/she wants and enter the “D-PLAYLIST” folder to listen to those songs.
1. To add songs to the DPL, launch the popup of a song or folder in Navigator, and select “Add To List.”
2. To remove songs from the DPL, launch the popup of songs you want to remove
in the “D-PLAYLIST” folder, and select “Remove.”
- If you add an entire folder to “Add To List,” all of the songs in the folder will be added to the DPL.
- To remove all songs from “BOOKMARK,” select “Remove All” from the popup window.
- Removing songs from “BOOKMARK” is simply removing the link not the files. If you want to remove the files, you need to
delete the files while in USB Host mode or when the device is connected to a PC.
- The maximum number of files that can be added to the DPL is 200.
■
Bookmark Setup
■ Adding songs to BOOKMARK
g
■ Removing songs from BOOKMARK
Bookmark is a feature to setup a desired starting point for each song.
A special folder called “BOOKMARK” is already on the hard disk, and the folder will not be recognized
by the computer.
When you setup a bookmark at the desired location for a certain file, you may playback the file at that location
any time you want.
1. Move to the “BOOKMARK” folder (the upper most folder using the Navigator) during file playback.
2. Press “Add Current” in the folder at the place where you want to setup a bookmark and the bookmark
is setup at that place.
3. Select the file under “BOOKMARK” to playback the file for which a bookmark has been setup.
4. To remove songs that have been bookmarked, launch the popup window for the songs you want to remove
in the “BOOKMARK” folder, and select “Remove.”
ENGLISH iAUDIOX5
12
Instructions for Different Modes
- If a file has already been setup for a bookmark, selecting “Add Current” will change the bookmark location to a new starting point.
- To remove all the songs from the “D-PLAYLIST,” select “Remove All” from the popup.
- Removing songs from “D-PLAYLIST” is simply removing the link not the files. If you want to remove the files, you need
to delete the files while in USB Host mode or with the device connected to a PC.
- The maximum number of files that can be added to BMK is 20.
- BMK does not support video files.
■
Playlist (M3U Playlist) Setup
A folder called “PLAYLIST” already exists in the upper most folder of the hard disk, and the user may create
a Playlist (M3U) as he/she prefers. (An M3U file is a list file in which the sequence of audio files is entered.)
1. To create an M3U file, connect iAUDIO to a PC with the USB cable.
2. Run the program (JetAudio, WinAmp) that can create M3U files.
3. Move the files in iAUDIO to each program’s Playlist to edit and save them as M3U files.
4. Save the created M3U files in the “PLAYLIST” folder in iAUDIO.
5. Disconnect iAUDIO and the PC.
6. Turn iAUDIO ON, and then you may playback the M3U files that have been saved in the “PLAYLIST”
folder using the Navigator.
- An M3U file is not an audio file. It is only a playlist of audio files. Therefore, deleting an M3U file will not delete the audio file.
- Be sure to save M3U files only in the “PLAYLIST” folder.
- You must create an M3U file for the files saved in iAUDIO while iAUDIO is connected to a PC. If you create an M3U file in the PC,
or create one containing files saved in the PC after the device has been connected to the PC, the M3U file will not playback properly.
- M3U files will be recognized up to 128KB, and the maximum number of folders that files can be saved in is 99, and the maximum
number of songs that can be supported in an M3U file is 999.
2. FM Radio Mode(Listening to FM Radio)
FM Radio mode is a mode that allows you to choose the frequency of and listen to radio stations.
■
Listening to FM Radio
1. Turn the product ON and move to FM Radio mode.
[Please refer to “2) Basic Instructions → 2. Basic Operations for Switching Modes.”]
2. A Short-tap of the lever toward the ◀◀, ▶▶ direction will move 0.1Khz each time.
3. Pushing and holding the lever toward the ◀◀, ▶▶ direction will automatically search for channels that
have better reception.
- If you were listening to the radio before turning the product off, it will resume radio mode when the power is turned on again.
iAUDIOX5 ENGLISH
Instructions for Different Modes
■
13
FM Radio Recording
1. Turn the product ON and move to FM Radio mode.
[Please refer to “2) Basic Instructions → 2. Basic Operations for Switching Modes.”]
2. Move to the desired frequency for recording.
3. Recording will start when you press and hold the “REC” button at the point at which you want
to start recording.
4. Pressing the “REC” button again will stop the recording.
3. Voice Record Mode (Recording Voice with Built-In Mic)
Voice Record mode is a feature that can record voice with the built-in microphone.
1. Turn the product ON and move to Voice Record mode.
2. Press the “REC” button to start recording.
3. Pressing the “REC” button again will stop the recording.
4. Press the “PLAY” button to playback recorded files.
- To playback recorded files using features such as search, you may run the files in Navigator using Digital AV mode.
- If you were running Voice Record before turning the product off, it will resume in Voice Record mode when the power is turned on again.
- Recording consumes more battery power than usual. Be sure to fully charge the battery before recording.
- The recorded file can be verified in “VOICE” of the upper most folder.
- The quality and capacity of the recording depends on the recording quality setup in addition to the reception. Please refer to
“4. Detailed Description of Features by Menu → 8. Recording.”
- Maximum capacity for a single recording is 268MB. A new file will be created and start recording if the capacity is exceeded.
- If there is less than 128MB space available on the hard disk, the recording will not start. If the available space becomes less than
128MB during recording, the recording will end.
- Up to 999 files can be recorded.
ENGLISH iAUDIOX5
14
Instructions for Different Modes
4. LineIn Record Mode(Recording Using a Stereo Cable)
Line-In Record mode is a feature which allows the user to record sound from another audio device to
iAUDIO using the stereo cable shipped with the product.
CDP Playback
1. Connect the headphone terminal of the CDP to Line-In terminal of iAUDIO with the stereo cable.
2. Turn the product ON and move to Line-In Record mode.
3. Pressing the “PLAY” button on the CDP will start the recording from iAUDIO.
4. Pressing the “REC” button again will stop recording.
5. To listen to the recorded files, press the “PLAY” button after the earphone is connected.
- To playback recorded files using features such as search, you may run the files in Navigator using Digital AV mode.
- If you were running Voice Record before turning off the product, it will resume in Voice Record mode when the power is turned
on again.
- Recording consumes more battery power than usual. Be sure to fully charge the battery before recording.
- The recorded file can be verified in “VOICE” of the upper most folder.
- The quality and capacity of the recording depends on the recording quality setup in addition to the reception.
- Maximum capacity for a single recording is 268MB. A new file will be created and start recording if the capacity is exceeded.
- If there is less than 128MB space available on the hard disk, the recording will not start. If the available space becomes less than
128MB during recording, the recording will end.
- Up to 999 files can be recorded.
5. Picture mode(Image Viewing)
View
Wallpaper
1. Connect iAUDIO to a PC with the USB cable.
2. Save the image file you want to see in iAUDIO to the “PICTURE” folder in iAUDIO.
3. Disconnect iAUDIO and the PC.
4. Turn the product ON and move to Picture mode.
5. You can see the image files that are saved in the ‘PICTURE” folder.
6. Moving the lever +, - will enlarge and reduce the image size, and moving the lever ◀◀ ,▶▶ will allow
you to see the Previous/Next image in sequence.
7. Pressing the “PLAY” button will show the Thumbnail image and Fast Search is available.
iAUDIOX5 ENGLISH
Instructions for Different Modes
15
8. A short-press of the lever will show the Navigator. A short-press on the lever after selecting a desired
file name will launch a popup window.
9. You may see the image by selecting “View,” and set the image as the desktop wallpaper by selecting
“Wallpaper.”
10 . If you turn the product off or enter a different mode by pressing and holding the lever while viewing
an image, you can exit Picture mode.
- Image formats other than JPG (excluding Progressive Type) are not supported.
- Be sure to save image files only in the “PICTURE” folder.
- Subfolders in the “PICTURE” folder are not supported.
- Image files will be recognized up to 2.5MB, and the maximum number of folders that files can be saved in is 999, and the maximum
number of files is 4999 (total file number under “PICTURE”).
6. USB Host Mode (Sending and Receiving Files Using Compatible Devices)
USB Host Mode can copy and delete files and folders from iAUDIO or USB compatible devices such as digital
cameras and readers.
■
Managing iAUDIO
Copy
Paste
Pase In
Delete
Copy
Paste
Delete
1. Turn the power ON, then go to USB Host mode.
2. You can view folders and files in iAUDIO like you can in the Navigator.
3. Moving and going into folders in USB Host mode is the same as in Navigator mode.
4. When selecting a folder, a pop-up window appears with four menus.
Copy : Saves the selected folder to the clipboard.
Paste : Copies the content from the clipboard to the currently open folder.
Paste In : Copies the content from the clipboard to the currently selected folder.
Delete : Deletes the selected folder.
5. When selecting a folder, a pop-up window appears with three menus.
Copy : Saves the selected file to the clipboard.
Paste : Copies the content from the clipboard to the currently open folder.
Delete : Deletes the selected file.
6. You can move out of USB Host mode by turning off the power or go into another mode by holding down
the menu button in USB Host mode.
●
●
●
●
●
●
●
- The top folders of iAUDIO and USB compatible devices are “HOST” and “DEVICE” respectively.
- iAUDIO doesn’t support multiple file selections. If you wish to copy multiple files at once, you must divide them by folder.
- The clipboard is a virtual space where files and folders are saved when copying them.
- When copying, the total length of the path that indicates files or folders is limited. Therefore try to avoid copying a folder
from a deep path.
- In USB Host mode, the highest number of recognizable folders and files is 1499 and 2999 respectively.
ENGLISH iAUDIOX5
16
Instructions for Different Modes
■
Using USB Compatible Devices
ooooMBFree
DEVICE XXXXMBFree
COWON
iAUDIO
1. Use a USB Host cable to connect the iAUDIO USB Host port to the USB jack of a compatible device.
2. Turn the power ON, then go to USB Host mode.
3. When the “HOST” mode is displayed, hold down the “REC” button until it changes to “DEVICE”
mode.
4. Copying and deleting folders and files is the same. However, if you want to copy a file or folder from
a compatible device to iAUDIO, select the desired folder or file to copy and change the mode by holding
down the “REC” button then choose “Paste” or “Paste In”.
5. After completing copying or deleting, unplug the USB Host cables.
6. You can move out of USB Host mode when turning the power off or go into another mode by holding down
the menu button in USB mode.
- It can take some time if you are connecting USB compatible devices for the first time.
- The mode changes whenever you hold down the “REC” button, and therefore it may take some time.
- If the device is not recognized, the mode doesn’t change.
- When copying, the total length of the path that indicates files or folders is limited. Therefore try to avoid copying a folder
from a deep path.
- In USB Host mode, the highest number of recognizable folders and files of the device is 1499 and 2999 respectively.
iAUDIOX5 ENGLISH
Using the Buttons
17
1. Using the Buttons (Summary Table of Button User Guide for Each Mode)
■
Navigator Mode
Key
Operation
When Selecting a File
Changes into play mode after playing
Play
When Selecting a Folder
Goes to the selected folder
back the selected file
Plays back the selected file and stays in
FF
Goes to the selected folder
Navigator mode
REW
Moves to the parent folder
Moves to the parent folder
MENU
Pop-up menu
Pop-up menu
+
Moves the focus upward
Moves the focus upward
-
Moves the focus downward
Moves the focus downward
Changes into play mode
Changes into play mode
REC/A B
■
Digital AV mode
Key
Play
FF
Operation
While Stopped
During Playback
Plays back the current file
Stops the playback of the current file
Operates the setting
Operates the setting
Goes to the next file
Skips 5 sec or 10 sec, or skips tracks
according to the SKIP setup
REW
Goes to the next file
Fast forward
Goes to the previous file
Skips 5 sec or 10 sec, or skips tracks
according to the SKIP setup
Goes to the previous file
Fast rewind
Navigator Mode
Navigator Mode
Setup Menu
Setup Menu
+
Volume up
Volume up
-
Volume down
Volume down
MENU
Set/Reset section repeat
REC/A B
Operates the setting
In the key operation,
indicates to press once and
Operates the setting
indicates to hold down longer than 1 second.
ENGLISH iAUDIOX5
18
Button User Guide for Each Mode
■
FM Radio Mode
Key
Operation
In Preset Mode
Changes to regular mode
Increases the frequency
Moves to the next preset
Auto searches for the next station
Moves to the next preset
Decreases the frequency
Moves to the previous preset
Auto searches for the previous stations
Moves to the previous preset
Sets up the preset mode
Sets up the preset mode
Setup Menu
Setup Menu
+
Volume up
Volume up
-
Volume down
Volume down
Start/Stop Recording
Start/Stop Recording
FF
REW
MENU
REC/A B
■
While Stopped
Changes to the preset mode
Play
Voice Record/LineIn Record Mode
Key
Play
MENU
Operation
While Stopped
Plays back the recorded file
During Recording
Pause or records continuously
Navigator Mode
Setup Menu
+
Volume up
-
Volume down
REC/A B
Start recording
In the key operation,
iAUDIOX5 ENGLISH
indicates to press once and
Stop recording
indicates to hold down longer than 1 second.
Detailed Specifications for Each Menu Function
1. Menu Index
Menu
Digital AV
General
19
Skip Length
FM Radio
Scan Speed
Voice Record
Resume
LineIn Record
AutoPlay
Picture
FadeIn
USB Host
Controls
Settings
USB Mode
Load Default
Settings
JetEffect
Recording
Line-in bps
BBE
Voice bps
Mach3Bass
Line Volume
MP Enhance
Mic Volume
3D Surround
Auto Sync
Voice Active
Pan
PlayMode
Boundary
FM Radio
Shuffle
Streo
FM Region
Repeat
Display
FM Radio bps
Equalizer
Information
Language
Song Title
Play Time
Album Scroll
Title Scroll
WallPaper
Status Bar
Lyrics
Scroll Speed
Contrast(M)
Contrast(R)
Brightness(M)
Backlight Time(M)
Backlight Time(R)
Timer
Clock
Alarm
Sleep
AutoOff
- The setup menu is subject to change if there are
any future firmware upgrades.
- The language for the setup menu can be changed in
5) Display → 1. The language default setting is English.
- For setup menu operations, please refer to 2. Basic
Operations → 3. Basic operations for the menu use.
ENGLISH iAUDIOX5
20
iAUDIOX5 ENGLISH