1
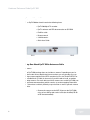
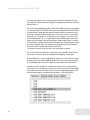
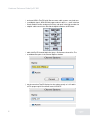
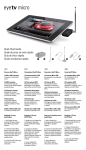
Elgato Systems
Hardware Reference
Guide EyeTV 500
2.5
© 2005
Elgato Systems LLC
900 Kearny Street • Suite 750
San Francisco, CA 94133
United States of America
Elgato Systems GmbH
Nymphenburgerstr. 86
80636 München
[email protected]
Hardware Reference Guide EyeTV 500
EyeTV 500 HDTV digital TV recorder
for free over-to-air (ATSC)
and digital cable (Clear QAM)
television
This hardware reference guide describes the particulars of your EyeTV hardware.
EyeTV 500 System Requirements
EyeTV 500 requires the following minimum system configuration:
• Macintosh computer with minimum PowerPC® G4 500Mhz or
G5 processor. Dual G5 processor required for HDTV playback
at full frame rate at full 1080i resolution
• A built-in FireWire port or independently powered FireWire
hub
• Mac OS X 10.3 or later (Mac OS X v10.3.7 recommended), with
256 MB RAM (512 MB recommended)
• Minimum 20 MB free hard disk space
• Approximately 8 GB of free hard disk space for each hour of
video to be recorded
• QuickTime 6.5
• Off-the-air antenna (optimized for HDTV reception) for broadcast over-the-air TV reception (not included) or
• Basic digital cable subscription from your local cable provider for broadcast digital cable TV reception (Clear QAM)
• An Internet connection to use EyeTV’s Electronic Program
Guide (EPG) (Optional)
• A CD or DVD burner and Toast 6 Titanium CD recording software to create Video CDs, Super Video CDs or DVDs
(optional)
2
Hardware Reference Guide EyeTV 500
Open and Unpack Box
Your EyeTV 500 box should contain the following items:
• EyeTV 500 digital TV recorder
• EyeTV software and PDF documentation on CD-ROM
• FireWire cable
• Remote control
• 2 AAA batteries
• Quick Start Guide
Step One: Attach EyeTV 500 to Antenna or Cable
Antenna
The EyeTV 500 package does not include an antenna. Depending on your location to the nearest digital television transmitter, you may be able to use an
indoor antenna optimized for HDTV reception (such as the Zenith ZHDTV1Z or
the Radio Shack 15-1868, for instance) or you will need to install an outdoor
rooftop antenna. For more advice on which antenna to use with EyeTV 500, see
http://www.antennaweb.org, which contains up-to-date mapping information
for transmitters and their proximity to your location as well as general antenna
advice.
• Connect the antenna to the ANT. IN port on the EyeTV 500
using at least UHF-grade coaxial cable (not included, RG-59
or RG-6 recommended).
3
Hardware Reference Guide EyeTV 500
Cable
• Using at least UHF-grade coaxial cable (not included, RG-59
or RG-6 recommended), connect EyeTV 500’s other port (may
be labeled as ANT.OUT and capped with a rubber cap) to your
digital cable. Do not attach it to your cable box’s out port if at
all possible to avoid signal degradation.
Step Two: Attach EyeTV 500 to your Computer
To attach the EyeTV 500 to your Macintosh:
• Connect one end of the FireWire cable to port 1 or 2 of your
EyeTV 500.
• Connect the other end of the FireWire cable to a port on your
Macintosh.
Note: The EyeTV 500 receives power over the FireWire cable. A DC-12V Power
Adapter is optional. Do not daisy-chain other bus-powered FireWire devices to
the EyeTV 500. Next, install the provided AAA batteries into the remote control.
Step Three: Install EyeTV Software
• Insert the EyeTV CD-ROM.
• Drag the EyeTV application to the Applications folder on your
hard disk.
Step Four: Start Using EyeTV
• Launch the EyeTV software.
• The EyeTV Setup Assistant will start automatically. Please follow the on-screen instructions.
• During this process, you will be asked to select your country.
EyeTV needs this information to properly tune to your channels. Generally EyeTV will be able to automatically detect all
the stations available in your area.
• After the Setup Assistant has completed, you will be able to
launch the EyeTV software by pressing the red power button
4
Hardware Reference Guide EyeTV 500
on the remote control.
Once setup is complete, you can view your programs via the Live TV window.
Use the on-screen remote control to pause or skip through video, or to start a
manual recording. Refer to the EyeTV Manual for more details on the Internet
programming via the Electronic Program Guide (EPG) from TitanTV (Chapter 7)
and scheduling automated recordings (Chapter 5).
Registering EyeTV Online
Registering EyeTV entitles you to the following benefits:
• Notification of product updates
• Technical support
• Special offers
To register:
• Open your web browser and go to www.elgato.com/registration.html
• Enter the requested information and click the “Submit” button.
Preferences
The setup preferences are initially set through the EyeTV Setup Assistant. You
can customize your channel lineup or modify your hardware setup here.
EyeTV can build a list of available channels by automatically tuning through all
available services.
If you receive free over-the-air TV signals (ATSC), select ... from the service
popup menu. Then click Auto Tune. EyeTV will find all ATSC HDTV and SDTV
channels.
After EyeTV has built a list of available channels you may customize this list
by adding descriptive names for each channel. Select a channel and click Options... to edit its name. You can also choose to ignore a channel by unchecking
5
Hardware Reference Guide EyeTV 500
the Active box, or by Option-clicking on the channel in the channel list. Only
active channels appear in the channel popup in the EyeTV Controller. You can
also change the channel order by dragging and dropping channels to a different
position in the list.
If you have unencrypted digital cable, select Clear QAM from the Service popup
menu, and click Auto Tune. EyeTV will find all unencrypted HDTV and SDTV digital cable channels. Note that the channel numbers do not correspond at all to
the channels you know a given broadcaster is using: for instance, a local ABC
affiliate may use “Channel 7” in its identity, but it can appear as channel 85-17
in EyeTV. And channel “85-17” is generally not how cable providers refer to the
broadcaster in their own channel listings either. Unfortunately, there is no common and publicly available standard in the United States that describes channel
information for digital cable. This complicates things, because EyeTV cannot
automatically fetch channel information from TitanTV.
To set up your channel list for use with TitanTV, proceed as follows:
Log in to the TitanTV.com web site and add your cable provider’s Digital Cable
lineup to your account, then go to the Digital Cable program listings grid.
With the Preferences > Setup window open, click the on-screen remote control
and select the first new Clear QAM channel in the list (usually channel number
100, if EyeTV 500 is the only EyeTV hardware connected to your Macintosh.)
Watch this channel’s content for a while until you know for sure which channel it actually is. For example: In our particular cable system, EyeTV Clear QAM
channel 103 carries the local CBS affiliate, station call sign KPIX. However, the
name the cable company assigned to this channel is “EVA-210-PROG-2”:
6
Hardware Reference Guide EyeTV 500
Now locate KPIX in TitanTV’s grid. Because most cable systems carry both analog and digital signals, KPIX will likely appear twice in the list — once in the low
channel numbers for the analog transmission, and again in the high numbers for
the digital cable transmission. We find the digital broadcast of KPIX here:
Double click EyeTV channel 100 in the Setup > Preferences channel list. The
next window that opens is the Channel Options window:
Enter the name that TitanTV displays for the station, exactly as it is listed in
TitanTV’s program grid. Our channel name is KPIX-DT:
7
Hardware Reference Guide EyeTV 500
Then click OK — and repeat this procedure for all the Clear QAM channels that
you are able to receive.
EyeTV saves these custom channel names. They are retained even if you autotune another time — so this channel name customization step should not be
necessary after the initial setup effort.
Device Settings
To access EyeTV 500’s device specific settings, select Device Settings from the
EyeTV Menu. Here you can adjust all aspects of the encoding process.
Encoding
EyeTV 500 has one Quality setting, Lossless. The DVB stream is recorded unaltered, and so you’re getting the full quality MPEG-2 file.
Signal Tab
This tab will display Signal Quality and Signal Strength, which can help when
orienting your antenna.
Announce Signal Quality will speak the value of the graphs numerically, which
can help you if your Macintosh screen is not viewable from where your antenna
or dish is located.
Info
Various information about the specific EyeTV 500 unit is presented here.
Troubleshooting
Resetting EyeTV
EyeTV’s hardware may become confused if the television or video signal it is
receiving is lost. In this case, Elgato recommends that you reset the EyeTV unit.
This is most easily accomplished as follows:
8
Hardware Reference Guide EyeTV 500
• Quit the EyeTV application.
• Unplug the FireWire cable.
• If your EyeTV model has an external power adapter, disconnect it from the EyeTV hardware.
• Wait 10 seconds.
• Reconnect the power adapter, if your EyeTV model has one.
• Restart by plugging in the FireWire cable and launching the
EyeTV software application if it does not start automatically.
EyeTV 500 Hardware Lights
The LED on the front of the EyeTV hardware has three colors, each of which
indicates the current state of operation:
• Red Light - EyeTV is powered on, but not fully operational yet.
• Yellow Light - EyeTV is activating, but not yet ready to capture
video.
• Green Light - EyeTV is ready to display or record video.
If the light is always red, then something may be wrong. In that case, quit the
EyeTV application, unplug the FireWire cable from your hardware for at least
10 seconds, then connect the cable back to your EyeTV hardware. The EyeTV
application should launch automatically. If it does not, then find the application
and launch it manually.
If the red light persists, then try EyeTV on all of your other FireWire ports, with
another FireWire cable, and try it with other FireWire devices detached. There
might be a fault with the FireWire connection, or some sort of conflict with
another device. If you’re using a portable, then also try it while plugged into a
wall outlet, instead of using battery power. This will ensure that EyeTV is getting enough power over the FireWire. If you’re using a FireWire hub, make sure
that it’s self-powered by an AC adaptor.
9
Hardware Reference Guide EyeTV 500
Limited Warranty for EyeTV
Elgato warrants that EyeTV, if properly used and installed, will be free from defects in
material and workmanship and will substantially conform to Elgato’s publicly available
specifications for a period of one (1) year after the date EyeTV was purchased from an
elgato authorized distributor. Software of any kind delivered with or as part of EyeTV is
expressly provided “as is” unless specifically provided for otherwise in any software
license accompanying the software.
If any EyeTV furnished by Elgato which is the subject of this Limited Warranty fails
during the warranty period for reasons covered by this Limited Warranty, elgato, at its
option, will:
• REPAIR EyeTV by means of hardware and/or software; OR
• REPLACE EyeTV with another EyeTV, OR, if Elgato is unable to repair or replace
EyeTV,
• REFUND the then-current value of EyeTV.
If such EyeTV is defective, transportation charges for the return of EyeTV to Buyer
within the USA will be paid by elgato. For all other locations, the warranty excludes all
costs of shipping, customs clearance and other related charges. Elgato will have a reasonable time to make repairs or to replace EyeTV or to refund the then-current value of
EyeTV. In no event will Elgato be liable for any other costs associated with the replacement or repair of EyeTV, including labor, installation or other costs incurred by buyer.
THIS LIMITED WARRANTY, AND ANY IMPLIED WARRANTIES THAT MAY EXIST UNDER
STATE LAW, APPLY ONLY TO THE ORIGINAL PURCHASER OF EYETV.
Extent of Limited Warranty
Elgato does not warrant that EyeTV will be free from design defects or errors known as
“errata.” Current characterized errata are available upon request. This limited warranty
does not cover damages due to external causes, including accident, problems with
electrical power, usage not in accordance with EyeTV instructions, misuse, neglect,
alteration, repair, improper installation, or improper testing.
Warranty Limitations and Exclusions
These warranties replace all other warranties, expressed or implied including, but
not limited to, the implied warranties of merchantability and fitness for a particular
purpose. Elgato makes no expressed warranties beyond those stated here. Elgato disclaims all other warranties, expressed or implied including, without limitation, implied
warranties of merchantability and fitness for a particular purpose. Some jurisdictions
do not allow the exclusion of implied warranties so this limitation may not apply. All
10
Version 2.5 DR 050217