1
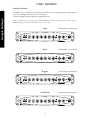
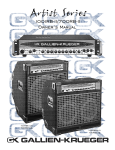
MB2 500
OWNER’S MANUAL
MB² SERIES
Introduction
Congratulations!
Your purchase of a new Gallien-Krueger MB²
Series amplifier is surely the result of much careful consideration on your part. For our part, we
at Gallien-Krueger are pleased that you chose us,
and are determined that you will be a satisfied
customer. In choosing a MB² Series amplifier,
you now own an amplifier with many unique
features which will allow you to create your own
distinct sound.
GK Philosophy
To get the most out of your new purchase, please
take a few minutes to read through this manual.
If you are in a hurry, we suggest you at least read
through the Quick Start section before setting up
your new rig. This will help get you started and
give you a few quick tips, but is not a substitute
for reading the rest of the manual.
I have never seen the point in doing things the
way others have done them. I also have not been
very interested in following the latest fad. I’m a
Stanford educated engineer who worked my
way through school as a musician. Like all
musicians, I have lugged amplifiers up stairways
and into car trunks, always wondering why these
things had to be so heavy, bulky, and hard to
handle.
Your amplifier should have come with the following items, please check the contents of the box to
ensure that you have everything.
As the principal innovator at GK, our products
reflect my attitudes and life experiences. I
don’t model my designs after other manufacturers’ products. Instead, I believe new and
old problems are best solved with new solutions.
Having taken our own path, GK products enjoy a
unique, unmatched sound, allowing you every
opportunity to make an original statement.
Included with your MB² Series Amplifier:
Power cord
Owner’s manual
Warranty card
Safety instructions sheet
One button foot switch
1
1
1
1
1
If your MB² Series amplifier did not come with all the
items listed, or if you encounter problems while
setting up your new equipment, please contact
your local dealer or GK as soon as possible.
Having supported my products for over thirty
years, I have learned from the story they tell.
Gallien-Krueger is a reflection of that story, and
has a commitment to support that legacy. Just as
the products I created over thirty five years ago
are still telling their story, the products we create
today will be talking to us tomorrow.
Gallien-Krueger, Inc.
2234 Industrial Drive
Stockton, CA 95206
phone: (209) 234-7300
fax:
(209) 234-8420
Internet: www.gallien-krueger.com
Email: [email protected]
We’ll be listening,
We wish you a lifetime of good playing and
remember to always have fun!
Robert Gallien
Founder and President
2
MB² SERIES
Table Of Contents
*All Features and specifications are subject to change without notice
Please read the Safety Information section on page 4 and installation
instructions on page 12 before continuing.
Gallien-Krueger
2234 Industrial Drive
Stockton, CA 95206
phone: 209.234.7300
fax: 209.234.8420
email: [email protected]
internet: www.gallien-krueger.com
Warning!
This amplifier is capable of producing high sound
pressure levels. Continued exposure to high SPL’s
can cause dameage to your hearing. Always set
the volume at a safe listening level or use hearing
protection if the unit is operated at higher levels.
!
CAUTION
RISK OF ELECTRIC SHOCK
DO NOT OPEN
CAUTION:
TO R E D U C E T H E R I S K O F E L E C T R I C S H O C K , D O N O T
R E M O V E TO P C O V E R . N O U S E R - S E RV I C E A B L E PA RT S
I N S I D E . R E F E R S E RV I C I N G TO Q U A L I F I E D S E RV I C E
PERSONNEL.
The exclamation point within an
equilateral triangle, is intended
to alert the user to the presence
of important operating and
maintenance (servicing) instructions in the
literature accompanying the appliance.
The lightning flash with arrow
head symbol, within the
equilateral triangle, is
intended to alert the user to the
presence of uninsulated “dangerous voltage”
within the product inclosure that may be of
s u ff i c i e n t m a g n i t u d e t o c o n s t i t u t e
a risk of electitric shock to persons
!
WA R N I N G : TO R E D U C E T H E R I S K O F F I R E O R E L E C T R I C S H O C K ,
D O N O T E X P O S E T H I S A P P L I A N C E TO R A I N O R M O I S T U R E
C A U T I O N : TO P R E V E N T E L E C T R I C S H O C K , M AT C H W I D E B L A D E O F P L U G TO
W I D E S L O T, F U L LY I N S E RT E D .
ATTENTION: P O U R E V I T E R L E S C H O C S E L E C T R I Q U E S , I N R O D U I R E L A L A M E L A
PLUS LARGE DE LA FICHE DANS LA BORNE CORRESPONDANTE
DE LA PRISE ET POUSER JUSQU’AU FOND.
3
Table of Contents
Safety Information __________________________ 4
Quick Start ________________________________ 5
Front Panel Controls ________________________6
Rear Panel Features _________________________7
Sample Settings ____________________________8
Sound Tips ________________________________9
Installation and Maintenance _________________10
Tech Talk _______________________________ 11
Specifications _____________________________12
MB² SERIES
Safety Information
Safety Information
AC Power Cord:
To avoid safety hazards, use only the power cord
supplied with your unit. If a replacement cord is
needed, make certain to use a standard IEC
compliant cord. Damaged power cords should
be replaced immediately. When setting up, make
certain that the AC plug is easily accessible. If you
do not intend to use the amplifier for a considerable
length of time, disconnect the plug from the AC
Mains Socket. Do not use an extention cord.
Please read all enclosed safety precautions before
connecting or operating this product.
Verify Line Voltage and Amperage: Your new
MB² Series Bass amplifier has been factory configured for use with the specific line voltage for
your location:
120 Volt/60Hz 15 A circuit for USA/Canada.
240 Volt/(50/60Hz) 10 A circuit for
UK/Australia.
230 Volt/(50/60Hz) 10 A circuit for Europe.
100 Volt/50Hz 15 A circuit for Japan.
220 Volt/50Hz 10 A circuit for Korea.
Proper AC circuit for all other countries.
Earth Grounding Connection:
To prevent electric shock, do not remove the
grounding plug on the power cord, or use any plug
or extension cord that does not have a grounding
plug provided. Make certain that the AC outlet
is properly grounded as well. Do not use an
adapter plug with this product.
Connecting the amplifier to a line with specifications other than indicated above can create safety
and fire hazard, and may damage the amplifier.
If you have any questions about the voltage
requirements for your specific model, or about the
line voltage in your area, contact your dealer
before plugging the unit into a wall outlet.
Do Not Open the Amplifier Enclosure:
There are no user serviceable parts inside this
product. Opening the amplifier enclosure may
present a shock hazard. Modification to the
product will void your warranty. If liquid
enters the unit, or any metal object such as a
paper clip accidentally falls inside the enclosure, disconnect the unit from the AC power
source immediately and consult an authorized
service station.
Verify AC Circuit Capacity Before Use:
The high power output of your amplifier may
require heavy current draw under full-load conditions. To insure proper performance and avoid
potential safety hazards, we recommend connection to line circuits with amperage specified “as
above”. Connecting to the same circuit used by
other heavy-power devices, such as high-wattage
lights, may cause circuit breakers to trip. It is
always a good idea to avoid using any audio equipment on the same AC circuit as equipment with
motors, such as air conditioners or refrigerators.
This will lessen the possibility of power variation
and electrical start-up noise affecting your sound.
Setup:
To insure proper operation and to avoid
potential safety hazards, place the unit on a firm,
level surface. Do not plug or unplug the
instrument or speaker cable while the amplifier
power is on.
Heat & Ventilation:
Make sure there is space provided for proper
ventilation. Avoid using in extremely hot or
cold locations and areas that are exposed to
direct sunlight or near heating equipment. Avoid
using in moist or high humidity areas. NEVER
BLOCK THE FAN VENT HOLES ON
THE SIDES OF THE UNIT.
Please refer to page 10 for more instructions concerning installation.
4
MB² SERIES
Quick Start
The MB² Series amplifier is designed to be simple to operate. All controls have a well defined purpose.
These directions will take you through the basics and give you a good start for setting up your sound.
2. Connect your cabinets:
Connect your speaker cabinets to the amplifier outputs marked Speaker. The MB² features dual use
speaker connections. These unique jacks allow for Speakon or 1/4” plugs to be used. Be sure not to
exceed the recommended speaker load as noted below.
Maximum Recommended Speaker Loads:
One 4 Ohm, or two 8 Ohm cabinets.
3. Initial front panel control settings:
Set all EQ controls and contour knob to 12 o’clock. Set the Input Volume, Master and Master B
controls at 0. The Boost knob should be set to 12 o' clock and the boost button (between Boost and
Master B konbs) in the out position.
4. Plug in your bass:
Using an instrument (shielded) cable, connect your bass to the Input jack and press the power switch
on. If you have active tone controls on your bass, turn all of the controls to the middle or flat position
and turn the volume all the way up. If you have conventional, passive tone controls, turn all tone and
volume controls all the way up.
5. Level and Master Volume settings:
Set the Master Volume to 3 o’clock. Turn the Input Volume knob up as you play to the desired output
level. If the clip light (pad button) flashes more than occasionally, press the -10db pad button in and
turn the Input Volume knob up. If it is still lighting often, try turning the volume down on your bass.
6. Boost/Master B:
Engage the button located between the Boost and Master B knobs. This will activate the Boost section
of the pre amp. This can also be done with the included foot switch. Turn up the Master B knob to the
desired volume level.
You should be hearing your bass quite well through the Master and Master B channels. At this point
you can experiment with different EQ, Contour and Boost settings. Various sample settings can also be
found on page 8.
5
Quick Start
1. Plug it in:
Set the power switch to Off and connect the supplied power cord, from the amplifier AC receptacle, to
an AC power outlet of proper voltage and power rating (see safety information on page 4 for details).
MB² SERIES
INPUT
POWER
Front Panel Features
-10dB
OFF
ON
MUTE
GAIN
CONTOUR
TREBLE
HI-MID
LOW-MID
BASS
BOOST
OFF
ON
MASTER-B
MASTER
OFF
ON
OFF
ON
CLIP
G.I.V.E
MB
1
2
3
4
5
6
8
7
9
10
11
12
13
2
500
14
Front Panel Features
1
Input: A standard ¼” input jack to connect active or passive basses using a shielded cord.
2
-10 dB Pad/Clip indicator: Input attenuator button. This button is generally set to the out
position except in cases where the clip LED flashes more than occasionally. It may be necessary to “pad” the input if you are using a bass with active electronics or very high output. The
pad button light flashes red when the input is being overdriven. If the -10dB is pressed and the
clip indicator still flashes frequently, reduce the volume on your bass.
3
Mute: Set this switch to “on” when tuning or unplugging your bass. No signal will be sent to
the speakers or the P.A. system. When muted this button turns red.
4
Gain: Sets the preamp gain after the input stage. It is used in conjunction with the input pad to
optimize the amplifier’s headroom.
5
Contour: As part of the amps active equalization the contour control decreases the mid-range
frequencies while boosting low and high frequencies.
6
Treble: Boost and cut at 7 kHz +14 dB shelving type. Use this control to add or remove edge
and definition.
Hi-Mid: Boost and cut at 1 kHz +6 dB. A “Q Optimized,” band pass type, this works on lower
string harmonics and effects the punch of your sound.
Low-Mid: Boost and cut at 250Hz +6dB/-10 dB. A “Q optimized” band pass type, this works
for main body of your sound.
Bass: Boost and cut a 60Hz +10 dB, shelving type. This is used to control the low end push.
7
8
9
12
Boost: This is a post E.Q. gain stage using G.I.V.E. technology which adds “growl” as it is
turned up.
GIVE: This button activates the Boost and Master B volume control.. This can also be
activated using the foot switch (included).
Master B: This is the master volume control when boost is activated.
13
Master: This is the master volume control when the boost is inactive.
14
Power Switch: Turns the amplifier on and off. In the on position, the ring surrounding the
button will light red during power up then changes to blue, indicating the amp is ready for
normal operation. Should the amp experience a fault (over heat or over current) the amp will
mute and the ring will light red until the condition is corrected. This LED turns off when the
power is switched off. This turns the amp off but it does not completely disconnect the power
from the AC mains.
10
11
6
MB² SERIES
FULL POWER
580W
PAT C H B AY
DIRECT OUT
EQ
GND
PRE
LIFT
POST
F T. S W I TC H
TUNER
RETURN
FX
SEND
HEADPHONES (1)
LINE OUT (2)
1
2
AC INPUT
500 WAT TS @ 4 OHMS
SPEAKER
120V/60Hz
CLASS 2 WIRING
1
2
3
4
5
6
7
8
9
10
11
Rear Panel Features
1
AC Receptacle: The detachable power cord plugs in here.
2
Ground Lift: This switch disconnects the ground of the balanced, XLR output to eliminate hum
and buzz when connecting to equipment that is running on a different ground system.
3
Balanced Direct Out: This electronically balanced output allows a direct connection to a P.A.
system.
4
Pre/Post EQ Button: This button switches the direct out signal to be before or after the EQ.
5
Foot switch Input: A foot switch is provided to engage Boost and Master B modes.
6
Tuner Output: This output comes directly off of the input stage and can be patched to a tuner
using a shielded patch cord. This output is unaffected by the Tuning Mute Feature.
7
Return: This input allows the signal from outboard effects devices to be inserted before the boost
section.
8
Send: This output allows signal from the preamp to be fed to outboard effects devices from a point
after the EQ section.
9
Headphone/Line out: When switched, this output allows the user to send a direct (unbalanced) line
out to devices with unbalanced inputs such as personal multitrack recorders. This connection requires
a shielded patch cord. Unswitched, this headphone jack can be used to monitor your playing with
headphones.
Headphone/Line out switch: This switch toggles the output from headphone to line out.
10
11
Speaker: Power amp output to speaker cabinet. Delivers 500w into 4 Ohm loads. Lower
impedances such as 8 Ohms or 16 Ohms and no load are acceptable. One 4 Ohm speaker and
one 8 Ohm speaker is not recommended. This unique speaker output allows you to use a ¼”
plug or the high current, twist-lock Speakon connector.
7
Rear Panel Features
GND
MB² SERIES
Settings & Sounds :
Sample Settings
The MB² Series is versatile in its sound and tone. Below are a few suggested amp settings that can
be used as starting points to define your own sound.
*Volume settings should be adjusted to appropriate level.
Note: At higher playing levels the contourshould be set lower for mid-range clarity. To get
800RB voicing, the contour should be set to 0 or 10 only.
Slap:
Both pickups recommended.
INPUT
POWER
-10dB
OFF
ON
MUTE
GAIN
CONTOUR
TREBLE
HI-MID
LOW-MID
BASS
BOOST
OFF
ON
MASTER-B
MASTER
OFF
ON
OFF
ON
CLIP
G.I.V.E
MB
Rock:
2
500
Both pickups recommended.
INPUT
POWER
-10dB
OFF
ON
MUTE
GAIN
CONTOUR
TREBLE
HI-MID
LOW-MID
BASS
BOOST
OFF
ON
MASTER-B
MASTER
OFF
ON
OFF
ON
CLIP
G.I.V.E
MB
Reggae:
2
500
Front pickup recommended.
INPUT
POWER
-10dB
OFF
ON
MUTE
GAIN
CONTOUR
TREBLE
HI-MID
LOW-MID
BASS
BOOST
OFF
ON
MASTER-B
MASTER
OFF
ON
OFF
ON
CLIP
G.I.V.E
MB
Jazz/Fusion:
2
500
Both pickups recommended.
INPUT
POWER
-10dB
OFF
ON
MUTE
GAIN
CONTOUR
TREBLE
HI-MID
LOW-MID
OFF
ON
BASS
BOOST
MASTER-B
MASTER
OFF
ON
OFF
ON
CLIP
G.I.V.E
MB
8
2
500
MB² SERIE S
Sound Tips
The Equalizer:
The Equalizer is used to fine tune your sound. When
adjusting making adjustments, do it just a little at a
time. These are active circuits and small changes can
make a big difference in your sound. With a little
experimentation you will find that this equalizer is
very easy to use and provides you with a large variety of great sounds unique to GK.
With the Pre/Post EQ switch set to “Pre” (Out), the
direct output signal is fed directly from the input
stage providing a low noise output superior to external direct boxes and impedance transformers. In the
"Pre" position, the direct output signal is only
effected by the Input Volume, -10db Pad and Mute.
This allows you to adjust your tone and volume on
stage without changing the Direct Output signal
level and confusing your sound man.
Contour:
Increasing the Contour level will scoop out midrange frequencies while boosting the highs and lows.
The sound, once again, is unique to GK and available on any other Bass amp. Lower contour settings
are recommended for midrange clarity at higher
playing levels.
Changing the Pre/Post EQ switch to “Post” ( In),
sends the "GK Sound" (EQ settings etc.) and
preamp response to the Direct Out jack. This gives
you complete control over the Direct Out’s tone and
volume.
Boost/Master B:
Turning up the Boost control will add a little growl
to your tone by adding a small amount of ever order
harmonic distortion. This is an unmistakable GK
trade mark sound that you will surely grow to appreciate. Raising the Boost while lowering Master B
will add more growl while keeping the sound level
the same. You can use Master B to increase or lower
the overall output volume when switching the Boost
on via the front panel or from the included foot
switch. In either normal or boost mode, the cleanest
sound is obtained with Master Volume settings at 3
o'clock.
9
Sound Tips
Direct Out:
The MB² Series provides a low noise, high quality
balanced direct output for connection to PA and
recording consoles. A Ground Lift switch is
included to remove hum and buzz when connecting
to equipment powered by a different ground system.
The MB² Series has several unique features which, if
used properly, will obtain the sound you have been
searching for.
MB² SERIES
Installation
Installation:
To insure proper operation and to avoid potential
safety hazards, place the unit on a firm, level
surface.
Moving the Unit:
Before moving the unit, be certain to disconnect
any interconnection cords with other components,
and make sure that you disconnect the unit from
the AC outlet.
Ventilation:
Make certain that proper space is provided for ventilation. Never block the fan vent holes located on
the sides of the amplifier. If the amplifier will be
installed in a rack or other enclosed area, make
sure that there is sufficient air movement within
the enclosure to allow proper cooling. Consult
your dealer for more information. Avoid installation in extremely hot or cold locations, and areas
that are exposed to direct sunlight, or near heating
equipment. Avoid moist or humid locations.
Cleaning:
When the unit gets dirty, clean only with a dry
cloth. Never use benzene, thinner, alcohol, or
other volatile cleaning agents. Do not use abrasive
cleaners, as they may damage the finish of metal
parts. Avoid spraying insecticides near the unit.
Maintenance:
Your new amplifier is rugged. It was built to give
you a lifetime of trouble-free operation, if it is
operated in accordance with the instructions contained in this manual. The only maintenance
required is cleaning. If you are going to move your
amplifier around frequently, we recommend a road
case to protect it from scratches and road wear.
Remember, power amplifiers generate heat. The
ventilation slots on the enclosure are specifically
designed to remove this heat. Blocking or placing
other electronic equipment near the heatdissipation system may possibly affect the longterm reliability of both your amplifier and the
other equipment.
Packaging:
The carton and packing materials used in shipping
your new amplifier were specifically designed to
cushion it from the shocks and vibration that occur
during transport. We suggest that you save the
carton and packing materials for use in shipping, in
the event you move, or the amplifier needs repair.
10
MB² SERIES
Tech Talk
Characteristics of the MB² Series:
The MB² Series is a flexible, state-of-the-art
amplifier designed to deliver maximum performance while remaining small, lightweight and
simple to operate. This is accomplished through a
few, very important features:
· Class D power supply and power amp.
· Four, Bass specific bands of active equalization for precise tone control.
Cool Running = Reliability:
To cool the amp when its being driven hard, we’ve
designed a temperature sensitive fan cooling system. When
the amp is under a light load, the fan is off or running at a
low speed, reducing fan noise. As the amp works harder,
the fan speed increases to keep everything cool.
.
· Balanced direct output eliminates the need for
a direct box.
· Continuously variable fan cooling.
Equalization:
Standard tone controls and graphic equalizers give
you plenty of variation, but they don’t provide
what the instrument really needs. The fact is,
graphic equalizers are intended for room equalization. The equalization in Gallien-Krueger amplifiers reflects 40 years of continuous development
and refinement.
Smart Protection Circuitry:
The MB² Series protection circuitry constantly monitors
for unsafe operating conditions such as short circuits,
miss-wired speaker cables, blown speakers, improper
ventilation, and incorrect speaker configurations. In
addition, protection is provided during power up/down. If
the MB² Series senses any unsafe operating conditions, the
output signal is immediately muted and the power light
changes from Blue to Red. The amplifier will remain
muted until the fault is removed. If the protection circuit
activates while playing, turn the amplifier off and check
the amplifier speaker output connections. Be sure that you
are not exceeding the maximum recommend load
described in this manual. If the problem persists, contact
GK directly for technical advice.
The GK equalizer is unique to the industry, it’s not
just a normal four band equalizer, each section is a
special circuit optimized to perform a Bass
specific job in its range of operation.
These sections are wired in series, so they add to
one another creating a tremendously flexible
equalizer, that sounds natural at any setting. Now
it is possible to obtain the sound you desire.
In Closing:
You should now have a thorough understanding of how
your new MB² Series amplifier works and what advantages it can offer you in getting “your” sound. We thank
you for reading the Owner’s Manual and wish you the best
of times! Please send us your comments via www.gallienkrueger.com or email us at [email protected].
Contour:
The Contour is used to completely revoice the amplifier.
The Contour control tunes between two different shaping
circuits, with greatly different responses. With the control
all the way up, the low end is slightly boosted, the mids are
dropped and the high end is pushed up. This is only found
in GK amplifiers.
11
Tech Talk
“G.I.V.E.” Technology:
As in all GK pre-amps, the MB² Series pre-amp incorporates what we call G.I.V.E (Gate Induced Valve Effect)
Technology. We use field effect devices with the gate
biased in a way that emphasizes the optimum harmonic
content of the signal. Working in concert with our unique
Four Band Active Equalizer, and three stage Voicing Filter
Section, G.I.V.E. technology produces a consistently pleasing bass tone.
MB2 SERIES
Block Diagram
G.I.V.E.
GAIN
MB2 500 SPECS
Output Power:
350W @ 8 Ohms
500W @ 4 Ohms
Noise:
Input Section:
Maximum Input Level
With -10dB pad
Input Impedance
Send Output Impedance
Return Input Impedance
Tuner Output Impedance
Direct Output Impedance
0.6V Rms
1.6V Rms
1M Ohms
220 Ohms
50K Ohms
10K Ohms
500 Ohms
Amplifier Protection:
Full short circuit, thermal and RF protection.
Stable into reactive and mismatch loads.
Five second muted warm-up.
Equalizer:
Bass
Lo-Mid
Hi-Mid
Treble
+/-10dB @ 60Hz
+6dB/-10dB @ 250Hz
+6dB/-10dB @ 1KHz
+/-14dB @ 7KHz
Weight:
Voicing Filters:
Contour
-90 dB reference to 500W/350W, “A” Weighted
Cooling: Variable Speed Fan
Dimensions (HxWxD):
1.75”[44.45mm] x 11”[279.4mm] x 9”[228.67mm].
1 Rack spaces.
3 lbs. 12 oz. 1.7 Kg.
Power requirements:
U.S.A./Canada 120V/60Hz.
580W(full power), 75.6W(average power)
Europe 230V/50Hz/60Hz
580W(full power), 75.6W(average power)
Japan 100V/50Hz
580W(full power), 75.6(average power)
+2dB @ 50Hz/
-10dB @ 500Hz/
+3dB @ 7 KHz
12
Specifications
G.I.V.E.
MB2 500
Owner’s Manual
Part # 160-05100-A
13