1
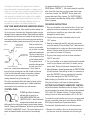
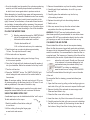
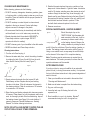
WARM MOISTURE humidifier
MODEL
CP0260
Read instructions before operating. Retain for future reference.
Instruction Leaflet
☎
INFO-LINE
If after having read this leaflet, you have any
questions or comments on your humidifier,
call 1-800-788-5350 in North America.
428-863
HUMIDIFIER SAFETY
PLEASE READ AND SAVE
THESE IMPORTANT
SAFEGUARDS.
IMPORTANT INSTRUCTIONS
When using electrical appliances, basic safety precautions
should always be followed to reduce the risk of fire, electric
shock, and injury to persons, including the following:
1. Read all instructions before using the appliance.
2. To avoid fire or shock hazard, plug the
appliance directly into a 120 V AC electrical outlet.
3. Keep the cord out of heavy traffic areas. To avoid fire
hazard, NEVER put the cord under rugs, near heat
registers, radiator, stoves, or heaters.
4. DO NOT place humidifier near heat sources such as
stoves, radiators, and heaters. Do locate your humidifier
on an inside wall near an electrical outlet. The humidifier
should be at least 4” away from the wall for best results.
5. NEVER place humidifier in an area where it is accessible
to children. NEVER use humidifier in a closed room,
particularly where a child may be sleeping, resting, or
playing (a closed room may result in excessive humidity).
6. WARNING: Do not attempt to refill humidifier without
first unplugging the unit from its electrical outlet. Failure
to heed this warning may cause personal injury. Be sure
to pull by the plug and not the cord.
7. NEVER drop or insert any object into any openings. DO NOT
place hands, face, or body directly over or near Outlet
Grill while unit is in operation. DO NOT cover Outlet Grill
or place anything over it while the unit is operating.
8. DO NOT operate any appliance with a damaged cord
or plug, after the appliance malfunctions, or if it has been
dropped or damaged in any manner. Return appliance to
manufacturer for examination, electrical or mechanical
adjustment, or repair.
9. Use appliance only for intended household use as
described in this manual. Any other use not recommended
by the manufacturer may cause fire, electric shock,
or injury to persons. The use of attachments not
recommended or sold by Bionaire® may cause hazards.
11. Always place humidifier on a firm, flat, level surface. A
waterproof mat or pad is recommended for under the
humidifier. NEVER place it on a rug or carpet, or on a
finished floor that may be damaged by exposure to
water or moisture.
12. DO NOT allow the Outlet Grill to directly face the wall.
Moisture could cause damage, particularly to wallpaper.
13. Humidifier should be unplugged when not in use.
14. NEVER tilt, move, or attempt to empty unit while it is
operating. Shut off and unplug before removing the water
tank and moving the unit. DO NOT attempt to remove the
water tank within 15 minutes after the humidifier is turned
off and unplugged. Serious injury may result.
15. This humidifier requires daily and weekly maintenance.
Refer to daily and weekly cleaning procedures.
16. NEVER use detergents, gasoline, glass cleaner, furniture
polish, paint thinner, or other household solvents to clean
any part of the humidifier.
17. Excessive humidity in a room can cause water condensation
on windows and some furniture. If this happens, turn the
humidifier OFF.
18. DO NOT attempt to repair or adjust any electrical or
mechanical functions on this unit. Doing so will void your
warranty. The inside of the unit contains no user serviceable
parts. All servicing should be performed by qualified
personnel only.
PLEASE SAVE THESE
INSTRUCTIONS.
CONSUMER SAFETY INFORMATION
This product is for use on 120 volts.
The cord has a plug (A) as shown. An
adapter (C) is available for connecting
three-blade grounding-type plugs
to two-slot receptacles (B). The
green grounding plug extending from the adapter must
be connected to a permanent ground such as a properly
grounded outlet box. The adapter should not be used if
a three-slot grounded receptacle is available.
DO NOT DEFEAT THE SAFETY PURPOSE OF THIS
GROUNDED PLUG IN ANY WAY.
10.DO NOT use outdoors.
1
2
The length of cord used on this appliance was selected to
reduce the hazards of becoming tangled in, or tripping over a
longer cord. If a longer cord is necessary an approved extension
cord may be used. The electrical rating of the extension cord
must be equal to or greater than the rating of the humidifier.
Care must be taken to arrange the extension cord so that it
will not drape over the countertop or tabletop where it can
be pulled on by children or accidentally tripped over.
HOW YOUR WARM MOISTURE HUMIDIFIER WORKS
Lack of humidity in the air, often caused by winter heating, can
dry out your nose, throat and skin. Excessive dryness can also
damage furniture, carpets and fabrics. Warm Moisture humidifiers
put moisture back into the air you breathe to help relieve sinus
and respiratory discomforts, reduce annoying static electricity
and provide a healthy growing environment for your indoor plants.
Figure 1
Removable Outlet
Grill - Access to
Medication Cup
Water is fed from the
tank into a removable
Control Panel
tray in which a constant
water level is maintained.
Removable and
This tray collects some
Transparent Tank
Air Filter
of the minerals that form
on the heating element.
Misting
The minerals can be
Chamber
rinsed from the tray when
Tank Cap
Lift-Out-And-Rinse Tray
the tank runs out of
water (See “Cleaning and Maintenance”). Air is drawn in
through the grill openings and air filter located on the side
of the unit and mixes with steam in the misting chamber.
The warm mist is then dispersed out of the top of the
misting chamber through the outlet grill.
The unit is conveniently refilled with water by taking only the
removable water tank to a water tap. A suitable medication
can be placed in the medication cup and warmed.
CONTROL PANEL
Figure 2
POWER Light-When illuminated,
indicates that the power is on.
LOW WATER INDICATOR Light
(“EMPTY/CLEAN”) - When illuminated,
indicates that the water tank needs
refilling and/or that the tray and heating element need cleaning.
See the “Cleaning and Maintenance” section for more information.
AUTOMATIC HUMIDISTAT Control - This control allows you to
select the desired humidity level which will automatically
3
be maintained while the unit is in operation.
RESET Button (“RESTART”) - This control resets the humidifier
after it has shut down due to an empty water tank or after
it has been cleaned. The “RESTART” button needs to be
pressed after each filling/ cleaning. The “EMPTY/CLEAN”
light will remain illuminated after refilling until the “RESTART”
button is pressed.
OPERATING INSTRUCTIONS
1. Place your humidifier in the desired location. A hard, level,
waterproof surface is necessary for proper operation. Do
not place your humidifier on any surface that could be
damaged by water droplets.
2. Check that the Automatic Humidistat control is in the
“OFF” position.
3. Remove the water tank and fill it with water as directed
under the heading “Filling the Water Tank.” Make sure that
the removable tray is in place and the misting chamber is
latched. Place the water tank back in the unit and allow
one minute for the water to fill the tray.
4. Plug the power supply cord into the most convenient
120V AC wall outlet.
5. Turn your humidifier on by rotating the Automatic Humidistat
control to your desired comfort level. For details, see the
section titled “Setting the Automatic Humidistat Control.”
6. When all the water in the tank has been used, the “EMPTY/CLEAN”
light will illuminate. After refilling the tank, it is necessary to
press the “RESTART” button to reactivate the humidifier;
this will also extinguish the “EMPTY/CLEAN” light.
Note: Allowing your humidifier to run out of water before
filling the tank helps to self-clean the heating element.
SETTING THE AUTOMATIC HUMIDISTAT CONTROL
Adjust the Automatic Humidistat control as desired. The unit
has been designed to operate within a range of approximately
20% to 80% R.H. (Relative Humidity). The most favorable
setting for home or office environments is 40% to 45% R.H.
To monitor the actual humidity level in a room, we recommend
the use of a humidity meter such as the Bionaire® BT400 or
BT254 Digital Humidity and Temperature Monitor.
The Automatic Humidistat works in the following manner:
• Whenever the humidity in the room is less than the level
you have set, moist air is dispersed from the outlet grill.
4
• Once the humidity level is reached, the unit stops producing
moist air, until the humidity drops below the preset level,
at which time it once again starts to produce moist air.
3. Remove the medication cup from the misting chamber.
When attempting to humidify large areas with large amounts
of air circulation, the Automatic Humidistat control can normally
be left in the high position (control turned completely to the
right). However, in small areas, or those which have minimal
air circulation, a lower setting will be necessary. Your personal
comfort will determine the best setting for you. If moisture forms
on walls or windows, lower the setting or turn off the humidifier.
5. Carefully place the medication cup into the top
of the misting chamber.
FILLING THE WATER TANK
When the water tank is empty, the “EMPTY/CLEAN”
light will illuminate and no moist air will be
produced until the water tank is refilled.
WARNING: DO NOT use any liquid medication other
than those specifically recommended for use with a steam
vaporizer. DO NOT pour medication directly into the outlet
grill openings nor add it to the water in the tank or tray.
1. Switch the humidifier off.
CLEANING THE AIR FILTER
2. Lift out the tank and carry it to a water tap.
The air intake filter will from time to time require cleaning.
When the filter becomes clogged with particulate pollutants,
the amount of air that passes through it is reduced. In order to
avoid this condition, it is recommended to clean the filter on
a regular basis. The frequency of cleaning of the filter will be
determined by the amount of particulates in the environment
where the unit is used. Should your filter need
Figure 5
to be replaced, or become damaged or lost,
replacements may be ordered directly from
®
BIONAIRE by visiting our website at
www.bionaire.com or calling 1-800-253-2764.
Figure 3
3. Twist the tank cap counter-clockwise approximately
1/4 turn. The cap should now lift away.
4. Fill the tank with cool tap water.
5. Replace the tank cap, making sure the large O-ring
is in its correct position.
6. Carry the full tank with both hands and carefully replace it
into your humidifier. Wait a few minutes for the tray to refill.
7. Turn the unit back on.
8. Press the “RESTART” button. The “EMPTY/CLEAN” light
should extinguish and moist air will be emitted within a
few minutes.
Note: At maximum setting, the tank may last up to 25 hours.
At minimum setting, the tank may last up to 50 hours. Do not
add any additives to the water in the tank or tray.
WARNING: All cleaning agents must be thoroughly rinsed
away after use and before the unit is returned to service.
USING THE MEDICATION CUP
1. Switch humidifier off and allow outlet grill
to cool down.
6. Replace the outlet grill onto the misting chamber.
7. Switch unit on.
8. After use, remove the cup from the unit and clean
any residue from the cup with warm water.
The filter is located behind the inlet grill cover on the side
of the unit.
To remove the filter for cleaning, proceed as follows (see
Figure 5):
1. Open the filter cover by pulling on the two finger grips on
each side of the grill, then remove to expose the filter pad.
2. Remove the dirty filter and wash in warm soapy water.
Rinse well and allow to dry.
3. Clean the filter cover with a damp cloth.
A medicated vapor can be distributed with the “mist” output.
To add medication to the vapor:
4. Carefully add liquid medication; do not fill cup more
than half full.
Figure 4
4. Insert the clean, dry filter in the recess of the inner grill.
5. Carefully replace the inlet grill cover so as not to dislodge
the filter from its position by first inserting the two tabs at
the bottom of the grill and then closing the top edge.
2. Lift the outlet grill using the finger grips
on each side and remove.
5
6
• Once the humidity level is reached, the unit stops producing
moist air, until the humidity drops below the preset level,
at which time it once again starts to produce moist air.
3. Remove the medication cup from the misting chamber.
When attempting to humidify large areas with large amounts
of air circulation, the Automatic Humidistat control can normally
be left in the high position (control turned completely to the
right). However, in small areas, or those which have minimal
air circulation, a lower setting will be necessary. Your personal
comfort will determine the best setting for you. If moisture forms
on walls or windows, lower the setting or turn off the humidifier.
5. Carefully place the medication cup into the top
of the misting chamber.
FILLING THE WATER TANK
When the water tank is empty, the “EMPTY/CLEAN”
light will illuminate and no moist air will be
produced until the water tank is refilled.
WARNING: DO NOT use any liquid medication other
than those specifically recommended for use with a steam
vaporizer. DO NOT pour medication directly into the outlet
grill openings nor add it to the water in the tank or tray.
1. Switch the humidifier off.
CLEANING THE AIR FILTER
2. Lift out the tank and carry it to a water tap.
The air intake filter will from time to time require cleaning.
When the filter becomes clogged with particulate pollutants,
the amount of air that passes through it is reduced. In order to
avoid this condition, it is recommended to clean the filter on
a regular basis. The frequency of cleaning of the filter will be
determined by the amount of particulates in the environment
where the unit is used. Should your filter need
Figure 5
to be replaced, or become damaged or lost,
replacements may be ordered directly from
®
BIONAIRE by visiting our website at
www.bionaire.com or calling 1-800-788-5350.
Figure 3
3. Twist the tank cap counter-clockwise approximately
1/4 turn. The cap should now lift away.
4. Fill the tank with cool tap water.
5. Replace the tank cap, making sure the large O-ring
is in its correct position.
6. Carry the full tank with both hands and carefully replace it
into your humidifier. Wait a few minutes for the tray to refill.
7. Turn the unit back on.
8. Press the “RESTART” button. The “EMPTY/CLEAN” light
should extinguish and moist air will be emitted within a
few minutes.
Note: At maximum setting, the tank may last up to 25 hours.
At minimum setting, the tank may last up to 50 hours. Do not
add any additives to the water in the tank or tray.
WARNING: All cleaning agents must be thoroughly rinsed
away after use and before the unit is returned to service.
USING THE MEDICATION CUP
1. Switch humidifier off and allow outlet grill
to cool down.
6. Replace the outlet grill onto the misting chamber.
7. Switch unit on.
8. After use, remove the cup from the unit and clean
any residue from the cup with warm water.
The filter is located behind the inlet grill cover on the side
of the unit.
To remove the filter for cleaning, proceed as follows (see
Figure 5):
1. Open the filter cover by pulling on the two finger grips on
each side of the grill, then remove to expose the filter pad.
2. Remove the dirty filter and wash in warm soapy water.
Rinse well and allow to dry.
3. Clean the filter cover with a damp cloth.
A medicated vapor can be distributed with the “mist” output.
To add medication to the vapor:
4. Carefully add liquid medication; do not fill cup more
than half full.
Figure 4
4. Insert the clean, dry filter in the recess of the inner grill.
5. Carefully replace the inlet grill cover so as not to dislodge
the filter from its position by first inserting the two tabs at
the bottom of the grill and then closing the top edge.
2. Lift the outlet grill using the finger grips
on each side and remove.
5
6
CLEANING AND MAINTENANCE
Before cleaning, please note the following:
• DO NOT use soap, detergents, abrasives, gasoline, glass
or furniture polish, or boiling water to clean any part of your
humidifier. These will interfere with the proper operation of
your humidifier.
• DO NOT use sharp or metal objects to clean mineral
deposits in the tray or element. Contact with sharp
objects can result in damage to the plastic.
• We recommend that the tray be rinsed daily and that the
unit be allowed to run out of water every second day.
5. Disinfect the water tank and tray using a solution of one
teaspoon of chlorine bleach in 1 gallon of water. Let solution
soak for 20 minutes, swishing every few minutes to wet all
surfaces. Empty the tank and tray; rinse thoroughly until
bleach smell is gone. Replace the tray in the base (Figure 7),
then replace the misting chamber in the unit, making sure
that the latch has been locked in position. Fill the
tank with fresh water and replace it into the unit.
6. Resume normal use.
SPECIAL MAINTENANCE - HEATING ELEMENT
1. Turn the unit off and unplug it.
Should the output drop or the
“EMPTY/CLEAN” light illuminate with
water remaining in the tank, it will be
necessary to remove scale buildup
Heating Element
on the heating element. Remove the
misting chamber by rotating the latch
and lift it from the unit’s base. Place the misting chamber on
its side. The heating element will now be visible (Figure 8).
Using a non-metallic brush, scrape away the scale buildup
on the element. Follow steps 3-6 to complete cleaning.
2. Remove the water tank; then, unlock the misting chamber
by rotating the latch (Figure 6) and lift it from the unit’s
base. Now lift the tray from the base (Figure 7).
Note: The above special maintenance is required due to
water hardness. The harder your water, the more often this
special maintenance will be needed.
®
• Mineral deposits should be soaked in BIONAIRE ’s
Clean-Away® solution or plain vinegar. DO NOT
operate unit while it is soaking!
• DO NOT clean any part of your humidifier in the dish washer.
• NEVER mix bleach and Clean-Away® solution.
Cleaning instructions:
Figure 6
Figure 7
Latch
Misting Chamber
Tray
3. Empty water and minerals from the tray and fill with
Clean-Away® solution. Replace the tray and misting
chamber in the base. (This will submerse the element in
the cleaning solution). Soak for a minimum of 20 minutes
to a maximum of 30 minutes.
4. Rinse the tray and heating element with clean warm water.
All traces of Clean-Away® on both the element and the tray
must be thoroughly rinsed off before disinfecting. Inspect
the heating element (see Figure 8) for scale buildup. If
present, please see “Special Maintenance - Heating
Element” for further cleaning instructions.
Figure 8
AFTER SEASON CARE
If you do not plan to use your humidifier for an extended
period of time (i.e. during the summer months), it is important
that you follow these instructions to help prevent stagnation of
water in the unit.
1. Clean your humidifier as instructed in the section titled
“Cleaning and Maintenance”.
2. Make sure all water is emptied from the tank and tray.
3. Dry your unit thoroughly.
4. Leave the tank cap off allowing the tank to be
exposed to air.
5. Store humidifier in a cool, dry location. Bionaire®
recommends storing the unit in its original box.
NOTE: DO NOT ALLOW WATER TO ENTER THE AIR
OUTLET GRILL OR ANY OTHER OPENINGS.
7
8
TROUBLESHOOTING
TROUBLE
Power light
not illuminated.
“EMPTY/CLEAN”
light illuminated.
PROBABLE CAUSE
SOLUTION
not plugged in.
☛ ☛☛ Unit
Power failure.
✔ Plug in unit.
✔ Check circuit
breaker or fuse.
buildup in tray.
☛ ☛☛ Scale
Water tank empty.
✔ Remove and refill.
✔ Remove tray and
flush out scale
residue.
✔ Press “RESTART”
button.
✔ Remove scale
from heating
element.
✔ Allow unit to run
out of water
before refilling
tank.
Unit not reset after
refilling tank.
☛ Scale buildup on
heating element.
☛
Moist air output
low.
Scale buildup in tray.
☛ ☛☛ Scale
buildup on
Water leaks
from unit.
O-ring missing
☛ ☛ Tank
or improperly placed.
heating element.
✔ Remove tray and
flush out scale
residue.
✔ Remove scale
from heating
element.
✔ Remove tank cap
and replace or
reposition O-ring.
SERVICE INSTRUCTIONS
1. Do NOT attempt to repair or adjust any electrical or
mechanical functions on this unit. Doing so will void the
warranty. The inside of the unit contains no user serviceable
parts. All servicing should be performed by qualified
personnel only.
2. If you need to exchange the unit, please return it in its
original carton, with a sales receipt, to the store where
you purchased it. If you are returning the unit more than
30 days after the date of purchase, please see the
enclosed warranty.
3. Should your humidifier require service, please call
1-800-788-5350 in North America for further assistance.
4. If you have any other questions or comments, feel free
to write to us:
PO Box 400
Milford, MA 01757
USA
Canada
6385 Shawson Drive
Mississauga, Ontario
Canada, L5T 1S7
Visit our website at www.bionaire.com
9
WARRANTY
Bionaire® warrants to the first retail purchaser, for TWO (2)
YEARS from the date of original purchase, either to repair or
replace at its option, without charge (parts and labor), any
supplied or manufactured part of this humidifier which, upon
inspection by an authorized service center, proves to have failed
in normal use due to defects in material or workmanship, or, at
its option, to replace the unit.
Operation under conditions other than those recommended or
at voltages other than the voltage indicated on the unit, or any
attempts by unauthorized personnel to service the unit or modify
it, will render the guarantee void.
Bionaire® shall not be liable for any personal injury, property
damage or any incidental or consequential damages of any kind
(including water damage), resulting from defects, malfunctions,
misuse, improper installation or alteration of the product.
BIONAIRE® EXPRESSLY DISCLAIMS ALL
RESPONSIBILITY FOR CONSEQUENTIAL
DAMAGES OR INCIDENTAL LOSSES
CAUSED BY USE OF THIS PRODUCT.
The provisions of this warranty are in addition to, and not a
modification of, or subtraction from the statutory warranties
and other rights and remedies contained in any applicable
legislation and to the extent that any such provision purports
to disclaim, exclude or limit any such statutory warranties or
other rights or remedies, such provisions shall be deemed to
be amended to the extent necessary to comply therewith.
For Warranty Service, please call 1-800-253-2764
in North America.
A Bionaire® consumer service representative will help
determine which is the best procedure in order for your
humidifier to be repaired.
KEEP THIS NUMBER FOR FUTURE REFERENCE.
10
TROUBLESHOOTING
TROUBLE
Power light
not illuminated.
“EMPTY/CLEAN”
light illuminated.
PROBABLE CAUSE
SOLUTION
not plugged in.
☛ ☛☛ Unit
Power failure.
✔ Plug in unit.
✔ Check circuit
breaker or fuse.
buildup in tray.
☛ ☛☛ Scale
Water tank empty.
✔ Remove and refill.
✔ Remove tray and
flush out scale
residue.
✔ Press “RESTART”
button.
✔ Remove scale
from heating
element.
✔ Allow unit to run
out of water
before refilling
tank.
Unit not reset after
refilling tank.
☛ Scale buildup on
heating element.
☛
Moist air output
low.
Scale buildup in tray.
☛ ☛☛ Scale
buildup on
Water leaks
from unit.
O-ring missing
☛ ☛ Tank
or improperly placed.
heating element.
✔ Remove tray and
flush out scale
residue.
✔ Remove scale
from heating
element.
✔ Remove tank cap
and replace or
reposition O-ring.
SERVICE INSTRUCTIONS
1. Do NOT attempt to repair or adjust any electrical or
mechanical functions on this unit. Doing so will void the
warranty. The inside of the unit contains no user serviceable
parts. All servicing should be performed by qualified
personnel only.
2. If you need to exchange the unit, please return it in its
original carton, with a sales receipt, to the store where
you purchased it. If you are returning the unit more than
30 days after the date of purchase, please see the
enclosed warranty.
3. Should your humidifier require service, please call
1-800-253-2764 in North America for further assistance.
4. If you have any other questions or comments, feel free
to write to us:
PO Box 400
Milford, MA 01757
USA
Canada
6385 Shawson Drive
Mississauga, Ontario
Canada, L5T 1S7
Visit our website at www.bionaire.com
9
WARRANTY
Bionaire® warrants to the first retail purchaser, for TWO (2)
YEARS from the date of original purchase, either to repair or
replace at its option, without charge (parts and labor), any
supplied or manufactured part of this humidifier which, upon
inspection by an authorized service center, proves to have failed
in normal use due to defects in material or workmanship, or, at
its option, to replace the unit.
Operation under conditions other than those recommended or
at voltages other than the voltage indicated on the unit, or any
attempts by unauthorized personnel to service the unit or modify
it, will render the guarantee void.
Bionaire® shall not be liable for any personal injury, property
damage or any incidental or consequential damages of any kind
(including water damage), resulting from defects, malfunctions,
misuse, improper installation or alteration of the product.
BIONAIRE® EXPRESSLY DISCLAIMS ALL
RESPONSIBILITY FOR CONSEQUENTIAL
DAMAGES OR INCIDENTAL LOSSES
CAUSED BY USE OF THIS PRODUCT.
The provisions of this warranty are in addition to, and not a
modification of, or subtraction from the statutory warranties
and other rights and remedies contained in any applicable
legislation and to the extent that any such provision purports
to disclaim, exclude or limit any such statutory warranties or
other rights or remedies, such provisions shall be deemed to
be amended to the extent necessary to comply therewith.
For Warranty Service, please call 1-800-788-5350
in North America.
A Bionaire® consumer service representative will help
determine which is the best procedure in order for your
humidifier to be repaired.
KEEP THIS NUMBER FOR FUTURE REFERENCE.
10