1
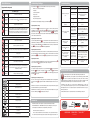
Quick Start Guide
Step 1
Step 3
Powering the CS10
Reviewing Images and Video
The CS10 can either be powered with one or two Li-Ion rechargeable batteries or with the
external power cord. To reduce the risk of electrical shock, use battery power as the preferred
powering method.
To review the files stored on the USB thumb drive, access the Media List from the Job Manager screen . In the Media List use the Arrow Keys
and the Select Key
to select
media files. Alternatively, access the Job Manager screen from the Main Menu .
Operating Instructions
Use the Right and Left Arrow Keys
ings.
TM
1. Tilt the CS10 back slightly and pull forward on the tilt stand until it locks in place.
2. Raise the front cover by depressing the orange cover release buttons on each side of
the unit and lift up on the cover until it locks securely into place.
3. Insert at least one battery into the CS10 battery dock or plug the external power cord
into a standard outlet.
Locating the Camera Using the Sonde
If using a SeeSnake pipe inspection system with a built-in Sonde, detect the camera’s location
underground by using a locator such as the RIDGID SR-20, SR-60, Scout™ or NaviTrack® II.
1. Press the Sonde Key
on the CS10 to turn the Sonde ON and OFF.
4. Connect the CS10 to a SeeSnake camera inspection system.
2. Run the SeeSnake push cable from 5 ft to 10 ft [1.5 m to 3 m] into the pipe.
5. Press the Power Key
3. Use the locator to find the Sonde’s position by setting it to Sonde mode and by scanning
in the direction of the Sonde’s probable location until the locator detects the Sonde.
to turn ON the CS10 and the camera.
6. If desired, press and hold the Zero Key
to zero the counter.
7. Push the camera head through the line. Proceed with pipe inspection in accordance with
the SeeSnake Reel’s operator’s manual.
USB Port
Insert a thumb drive into the USB port to store images and video captured by the CS10. The
CS10 cannot capture video, Autolog video, or photos until a thumb drive is inserted into the
USB port. The USB LED will be ON steadily when ready for use.
Printed in U.S.A.
August 2011
to fast forward and rewind video and Autolog record-
4. If desired, extend the SeeSnake push cable further down‑pipe and locate the Sonde
again starting from the previous located position.
5. Once you have detected the Sonde, use the locator indications to zero in on its location
precisely. For detailed instructions on Sonde locating, consult the operator’s manual for
the locator model you are using.
742-042-612-0A-P3
English: Rev G
WARNING!
Read the safety information in the beginning of the CS10 Operator’s Manual carefully before
using the CS10. Failure to understand and follow the contents of the safety sections may
result in electrical shock, fire, property damage, and/or serious personal injury.
Start Here
This CS10 Quick Start Guide provides an overview of function and operation. For more details,
see the Operator’s Manual that accompanies the CS10.
CS10 Components
Step 2
Step 4
Jobs
Completing an Inspection
The CS10 automatically saves photos, videos, and Autolog videos to the latest Job on the
thumb drive. The CS10 will open a new Job if there is not already one on the thumb drive.
The CS10 will save media files to a new session on the thumb drive when the thumb drive is
ejected and when the CS10 shuts down.
Close current Jobs to make a Report. Making a Report will allow images and video to be
viewed on any web browser.
Recording Autolog Video
to turn OFF the microphone and to record Autolog video
Press the Photo Key
or the Video Key
to capture additional photos or higher frame rate
video clips while recording an Autolog video.
LCD Screen
Recording Video
Mini Keypad
Press the Video Key
to start and stop recording a video. The Video LED on the Main
Keypad will be lit during video recording.
Main Keypad
Taking Photos
Cover Release Button
SeeSnake System Connector
Video and Autolog video can be recorded simultaneously and independent of each other. Both
video recording types can be started and stopped without affecting the other.
Press the Photo Key
Tilt Stand
to take a photo.
.
2. Navigate to the “Eject USB.”
3. Press the Select Key
Autolog video captures a highly compressed video of an inspection, but uses a smaller file
size than standard video. Press the Autolog Key
to start and stop recording an Autolog
video. The Autolog LED will be lit during Autolog recording.
Press the Microphone Mute Key
without audio.
Front Cover
1. Press the Job Manager Key
.
4. When the USB LED light turns OFF, remove the thumb drive before shutting down the
CS10.
Delivering Reports from the Thumb Drive
After closing current Jobs and finalizing a Report, remove the thumb drive from the CS10 and
insert it into a USB port on a computer to view the list of files.
Double-click the file named “report.html” to view the media in a web browser. Click on the
preview of each media item in the web browser to view full size photos and to playback video
and Autolog video. Use the browser’s “back” button to return to the initial page.
Quick Reference
Customizing Settings
Keypad and Icon Legends
Press the Menu Key
CS10 Mini Keypad
Power Key
Turns the CS10 ON or OFF.
LED
Brightness
Key
Press to step up or down through various brightness levels or press
once and then use the arrow keys to step through the brightness
levels.
Sonde Key
Toggles the Sonde ON or OFF.
Zero Key
Press the Zero Key once to reset a temporary relative zero point for
intermediate measurement. Relative zero will appear in brackets.
Press the Zero Key a second time to stop relative zero and return to
your actual count. Press and hold the Zero Key to do a hard reset.
CS10 Main Keypad
Select Key
Used to select menu items.
Arrow Keys
Used to navigate menus and screens.
Menu Key
Allows access to the Settings, Display, Language, and Media Menus.
Photo Key
Takes a photo.
Autolog Key
Starts and stops Autolog video recording.
Video Key
Starts and stops video recording.
Job Manager
Key
Opens a menu to allow the manual ejection of the thumb drive, the
manual creation of a Report, and access to the list of files on the
thumb drive for viewing.
Microphone
Mute Key
Toggles the microphone ON or OFF. When ON, the LED on the
Microphone Mute Key will be gold.
CS10 Screen Icons
Job Saving Icon
Saving to USB Icon
Troubleshooting
to access the Main Menu to make changes to the following:
• Monitor color, contrast, and brightness
• Time/date
• Unit of measurement
• Video format
• Language preference
• Report creating preference
To exit the menu after changing the settings, press the Menu Key
Problem
Probable Fault
Solution
No power to SeeSnake
Check power is correctly plugged in.
Connections faulty
Check alignment and pins of
connection from CS10 to the
SeeSnake Reel.
18 V Li-Ion batteries
low
Recharge batteries. Switch to AC
power.
18 V Li-Ion batteries
low
Recharge batteries. Switch to AC
power.
CountPlus settings
incorrect for Reel or
cable being used
Verify the settings are correct for
the SeeSnake cable length, cable
diameter, and SeeSnake Reel being
used.
Counting from the
wrong zero‑point
Confirm measurement from the
intended zero‑point. Reset zero‑point
using the Zero Key.
Low battery warning
appears on screen
(CountPlus)
CountPlus battery
dead or near‑dead
Replace 3 V battery in the CountPlus
(CR2450).
Low battery buzzer sounds
or both battery LEDs turn
red
18 V Li-Ion batteries
low
Recharge batteries. Switch to AC
power.
The “+” symbol appears
after the on‑screen
distance measurement
(CountPlus)
Physical cable
measurement has
exceeded the cable
parameter in settings
Verify the actual length of installed
cable and reset the SeeSnake Reel
and cable settings in accordance
with the CountPlus Operator’s
Manual.
SOS blinking on Power Key
LED
No video signal
Reseat SeeSnake system cable
connection.
Camera video image not
seen
.
Flashing battery warning
appears
Adjusting Monitor Settings
Press the Menu Key
to make changes to the monitor color, monitor contrast, and monitor brightness. Use the up and down Arrow Keys
to navigate to the setting you want to
adjust and the Select Key
to choose it. Then use the Arrow Keys
to increase or
decrease the selected settings preference levels. View the increasing and decreasing settings
on the slider bar below the menu.
Adjusting Time and Date Format
Use the left and right Arrow Keys
to scroll between the various fields. Fields that can be
edited will have a blinking red outline. To change the time and date format between 12 hour
to 24 hour and between MM/DD/YYYY to DD/MM/YYYY, either use the up and down Arrow
Keys
or push the Select Key
within the highlighted field.
Adjusting Measurement Units
If connected to a SeeSnake Reel that contains the CountPlus cable‑measurement system,
the CS10 will display the cable measurement in either feet or meters. Either use the left and
right Arrow Keys
or press the Select Key
to toggle between “feet,” “meters,” and “auto.”
Count accuracy unreliable
(CountPlus)
Adjusting Video Format
Choose from either MJPEG or MPEG4 video formats. Use the left and right Arrow Keys
or press the Select Key
to toggle between the video format options.
Adjusting Language Preference
To change the language used by the CS10, press the Menu Key , use the Up and Down
Arrow Keys
to navigate to “Language” and press the Select Key . From within the
Language Menu, use Up and Down Arrow Keys
to select a new language and press the
Select Key
to choose it.
Adjusting Report Creating Preferences
The CS10 offers two Report creating options: Auto and Manual. From the Settings Menu,
press the Select Key
to toggle between “Auto” and “Manual.” By default, the CS10 is set to
“Auto.”
Insert Thumb Drive Icon
When “Auto” is selected, the CS10 will automatically create a Report after media is captured
and after the thumb drive is ejected from the USB port.
Thumb Drive Error
When “Manual” is selected, the CS10 will not create a Report if the thumb drive is ejected.
Press the Job Manager Key
to manually create a Report.
SeeSnake HQ Software
Software updates for the CS10 will be released through SeeSnake HQ.
With SeeSnake HQ, you can organize Jobs, customize Reports, generate CD/DVD
versions for customers, and put Reports into a variety of file formats for various
distribution methods. The printable version of the report can be printed or emailed as a PDF
file. Alternatively, a multimedia report can be viewed in a web browser or on a DVD.
SeeSnake HQ also allows you to upload reports to RIDGIDConnect, an online service for storing and sharing inspection reports. To learn more about RIDGIDConnect, visit
www.ridgidconnect.com. For a complete description of SeeSnake HQ and how to use it go to
www.hq.seesnake.com.
Download the latest version of SeeSnake HQ for free from www.hq.seesnake.com.
Thumb Drive Full Icon
Autolog Icon
Autolog Saving Icon
Video Icon
Video Saving Icon
Photo Icon
Photo Saving Icon
Contact Us
• Visit www.seesnake.com for updates on products, documentation, and videos.
• Visit www.RIDGID.com or www.RIDGID.eu to find your local Ridge Tool contact point.
We
Build
Reputations
TM
• Contact Ridge Tool Technical Service Department by email or phone:
• Email: [email protected]
• Phone: +1-800-519-3456 in the U.S.A. and Canada, or +32 (0) 16 380 280 in Europe.
• To contact the SeeSnake HQ support team send an email to [email protected].
E M E R S O N . C O N S I D E R I T S O L V E D .TM
©
2011 RIDGID, Inc.