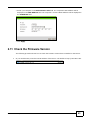
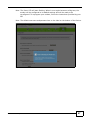
1
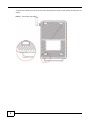
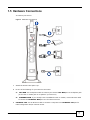
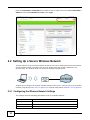
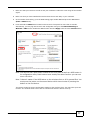
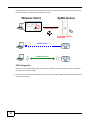
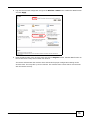
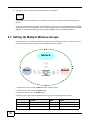
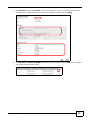
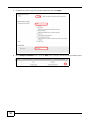
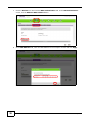
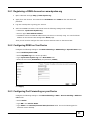
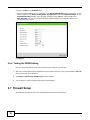
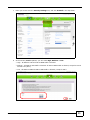
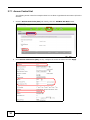
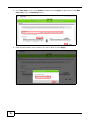
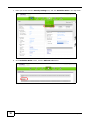
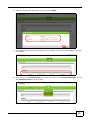
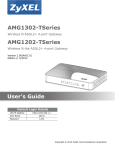
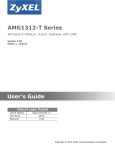
VSG1432
User Setup Guide
802.11n Wireless VDSL2 4-port Gateway
Default Login Details
IP Address
http://192.168.1.254
Username
admin
Password
telus
Firmware Version 1.10
Edition 1, 10/2011
www.zyxel.com
www.zyxel.com
Copyright © 2011
ZyXEL Communications Corporation
Contents Overview
Contents Overview
Introducing the VSG1432 ..........................................................................................................................5
User Setup Guide ....................................................................................................................................13
Troubleshooting ......................................................................................................................................49
Technical Specifications ..........................................................................................................................55
VSG1432 User Setup Guide
3
Contents Overview
4
VSG1432 User Setup Guide
C HAPTER
1
Introducing the VSG1432
1.1 Overview
The VSG1432 is a VDSL2 router and Gigabit Ethernet gateway with a four-port built-in Ethernet
switch and IEEE 802.11n wireless. The VSG1432 allows wired and wireless clients to safely access
the Internet. The built-in firewall blocks unauthorized access to your network.
Only use firmware for your Device’s specific model. Refer to the label on
the bottom of your Device.
1.2 Managing the Device
Use the Web Configurator for management of the Device using a (supported) web browser. See
Section 2.1.1 on page 13 for information on accessing the Web Configurator.
1.3 Good Habits for Managing the Device
Do the following things regularly to make the Device more secure and to manage the Device more
effectively.
• Change the password. Use a password that’s not easy to guess and that consists of different
types of characters, such as numbers and letters.
• Write down the password and put it in a safe place.
1.4 Hardware Setup
Place the Device flat on a desk or table or on the stand for a vertical installation.
Remove the Device’s clear plastic covers before using it.
VSG1432 User Setup Guide
5
To connect the stand, line up the arrow on the stand with the arrow on the bottom of the device as
shown.
Figure 1 Connecting the Stand
6
VSG1432 User Setup Guide
1.5 Hardware Connections
To connect your Device:
Figure 2 Hardware Connections
1
4
2b
3
2a
1
Attach the antenna and point it up.
2
Do one of the following for your Internet connection:
3
2a
DSL WAN: Use a telephone cable to connect your Device’s DSL WAN port to a telephone jack
(or the DSL or modem jack on a splitter if you have one).
2b
ETHERNET WAN: If you already have a broadband router or modem, use an Ethernet cable
to connect the ETHERNET WAN port to it for Internet access.
ETHERNET LAN: Use an Ethernet cable to connect a computer to an ETHERNET LAN port for
initial configuration and/or Internet access.
VSG1432 User Setup Guide
7
4
POWER: Use the provided power adaptor to connect the POWER socket to an appropriate power
source. Make sure the power at the outlet is on. After connecting the power adaptor, look at the
lights on the front panel.
1.6 LEDs (Lights)
The following graphic displays the labels of the LEDs.
Figure 3 LEDs on the Device
8
VSG1432 User Setup Guide
None of the LEDs are on if the Device is not receiving power.
Table 1 LED Descriptions
LED
COLOR
STATUS
DESCRIPTION
POWER
Green
On
The Device is receiving power and ready for use.
Blinking
The Device is self-testing.
On
The Device detected an error while self-testing, or there is a
device malfunction.
Off
The Device is not receiving power.
Blinking
Firmware upgrade is in progress.
On
The Device has a successful 100 Mbps Ethernet connection with
a device on the Local Area Network (LAN).
Blinking
The Device is sending or receiving data to/from the LAN at 100
Mbps.
Off
The Device does not have an Ethernet connection with the LAN.
On
The Gigabit Ethernet connection is working.
Blinking
The Device is sending or receiving data to/from the Gigabit
Ethernet link.
Off
There is no Gigabit Ethernet link.
On
The Device recognizes a USB connection.
Blinking
The Device is sending/receiving data to /from the USB device
connected to it.
Off
The Device does not detect a USB connection.
Red
ETHERNET
LAN 1-4
ETHERNET
WAN
USB
DSL WAN
INTERNET
Green
Green
Green
Green
Green
On
The DSL line is up.
Blinking
The Device is initializing the DSL line.
Off
The DSL line is down.
On
The Device has an IP connection but no traffic.
Your device has a WAN IP address and the DSL connection is
up.
WLAN/WPS
Green
Green
and
Orange
Blinking
The Device is sending or receiving IP traffic.
Off
There is no Internet connection or the gateway is in bridged
mode.
On
The wireless network is activated.
Blinking
The Device is communicating with other wireless clients.
Blinking
The Device is setting up a WPS connection.
Off
The wireless network is not activated.
1.7 The RESET Button
If you forget your password or cannot access the web configurator, you will need to use the RESET
button at the back of the device to reload the factory-default configuration file. This means that you
will lose all configurations that you had previously and the password will be reset to the default.
1
Make sure the POWER LED is on (not blinking and not red or flashing red).
VSG1432 User Setup Guide
9
2
To set the device back to the factory default settings, press the RESET button for ten seconds or
until the POWER LED begins to blink and then release it. When the POWER LED begins to blink,
the defaults have been restored and the device restarts.
Note: The default username and password are on the label on the bottom of the Device.
1.8 Wireless Access
The Device is a wireless Access Point (AP) for wireless clients, such as notebook computers,
smartphones or tablets. It allows them to connect to the Internet without having to rely on
inconvenient Ethernet cables.
You can connect to your wireless network using the WPS button, without having to access the Web
Configurator.
Figure 4 Wireless Access Example
1.8.1 Using the WLAN/WPS Button
Note: The wireless client must be a WPS-aware device (for example, a WPS USB adapter
or PCMCIA card), which can be identified by the WPS logo:
.
If the wireless network is turned off, enable wireless in the Wireless section of the Web
Configurator. The WLAN/WPS LED will be green when wireless is enabled.
You can use the WLAN/WPS button to quickly set up a secure wireless connection between the
Device and a WPS-compatible client device by adding one device at a time.
To activate WPS:
1
10
Make sure the POWER LED is green and not blinking.
VSG1432 User Setup Guide
2
Press the WLAN/WPS button for five seconds and release it.
3
Enable WPS on another WPS-enabled client device within range of the Device. If you do not know
how to enable WPS on that client device, refer to its manual. The WLAN/WPS LED flashes green
and orange while the Device sets up a WPS connection with the other WPS enabled client device.
4
Once the connection is successfully made, the WLAN/WPS LED shines green.
VSG1432 User Setup Guide
11
12
VSG1432 User Setup Guide
C HAPTER
2
User Setup Guide
2.1 Overview
This guide shows you how to use the Device’s various features.
• Setting Up a Secure Wireless Network, see page 14
• Setting Up Multiple Wireless Groups, see page 22
• Wireless MAC Authentication for Blocking a Computer’s Access to the Wireless Network, see
page 25
• Setting Up NAT Forwarding for a Game Server, see page 27
• Access Your Home Computer from the Internet Using DDNS, see page 30
• Firewall Setup, see page 32
• MAC Filter Setup for Blocking LAN Computers, see page 35
• Scheduler Rules and Parental Control, see page 37
• LAN DHCP for IP Addressing Assignment, see page 40
• Check the Firmware Version, see page 43
• Restore to Factory Default, see page 44
2.1.1 Access the Web Configurator for Setting Up the Device
You will need to log in to the Web Configurator to configure the Device. Enter the LAN IP address of
the Device in your web browser. This is http://192.168.1.254 by default.
Note: The default LAN IP address, username and password are on the label on the
bottom of the Device.
VSG1432 User Setup Guide
13
Enter the Username and Password in the fields in the top right corner. The default Username is
admin and the default Password is telus. Click Login.
2.2 Setting Up a Secure Wireless Network
Thomas wants to set up a wireless network so that he can use his notebook to access the Internet.
In this wireless network, the Device serves as an access point (AP), and the notebook is the
wireless client. The wireless client can access the Internet through the AP.
Thomas has to configure the wireless network settings on the Device. Then he can set up a wireless
network using WPS (Section 2.2.2 on page 16) or manual configuration (Section 2.2.3 on page 20).
2.2.1 Configuring the Wireless Network Settings
This example uses the following parameters to set up a wireless network.
14
SSID
Example
Security Mode
Mixed WPA2-PSK/WPA-PSK
Pre-Shared Key
DoNotStealMyWirelessNetwork
802.11 Mode
802.11b/g/n Mixed
VSG1432 User Setup Guide
1
Click Wireless to open the Basic Wireless Setup screen.
VSG1432 User Setup Guide
15
1
Select Mixed WPA2-PSK/WPA-PSK as the security mode. Deselect Generate password
automatically and enter the Pre-Shared Key in the Password field. Select Enable in the
Wireless field. Select 802.11b/g/n Mixed in the 802.11 Mode field. Click Apply.
Thomas can now use the WPS feature to establish a wireless connection between his notebook and
the Device (see Section 2.2.2 on page 16). He can also use the notebook’s wireless client to search
for the Device (see Section 2.2.3 on page 20).
2.2.2 Using WPS
This section shows you how to set up a wireless network using WPS. It uses the Device as the AP
and ZyXEL NWD210N as the wireless client which connects to the notebook.
Note: The wireless client must be a WPS-aware device (for example, a WPS USB adapter
or PCMCIA card), which can be identified by the WPS logo:
.
There are two WPS methods to set up the wireless client settings:
• Push Button Configuration (PBC) - simply press a button. This is the easier of the two
methods.
• PIN Configuration - configure a Personal Identification Number (PIN) on the Device. A wireless
client must also use the same PIN in order to download the wireless network settings from the
Device.
Push Button Configuration (PBC)
16
VSG1432 User Setup Guide
1
Make sure that your Device is turned on and your notebook is within the cover range of the wireless
signal.
2
Make sure that you have installed the wireless client driver and utility in your notebook.
3
In the wireless client utility, go to the WPS setting page. Enable WPS and press the WPS button
(Start or WPS button).
4
Push and hold the WPS button located on the Device’s front panel for more than 5 seconds.
Alternatively, you may log into Device’s web configurator and go to the Network Settings >
Wireless > WPS screen. Enable the WPS function and click Apply. Then click the Connect button.
Note: Your Device has a WPS button located on its front panel as well as a WPS button in
its configuration utility. Both buttons have exactly the same function: you can use
one or the other.
Note: It doesn’t matter if the WPS button on the wireless client or AP is pressed first. You
must press the button on the second device within two minutes of pressing the
button on the first device.
The Device sends the proper configuration settings to the wireless client. This may take up to two
minutes. The wireless client is then able to communicate with the Device securely.
VSG1432 User Setup Guide
17
The following figure shows you an example of how to set up a wireless network and its security by
pressing a button on both Device and wireless client.
Example WPS Process: PBC Method
ZyXEL Device
Wireless Client
WITHIN 2 MINUTES
Press and hold for
5 seconds
SECURITY INFO
COMMUNICATION
PIN Configuration
When you use the PIN configuration method, you need to use both the Device’s web configurator
and the wireless client’s utility.
1
18
Launch your wireless client’s configuration utility. Go to the WPS settings and select the PIN method
to get a PIN number.
VSG1432 User Setup Guide
2
Log into Device’s web configurator and go to the Wireless > WPS screen. Enable the WPS function
and click Apply.
3
Enter the PIN number of the wireless client and click the Register button. Activate WPS function on
the wireless client utility screen within two minutes.
The Device authenticates the wireless client and sends the proper configuration settings to the
wireless client. This may take up to two minutes. The wireless client is then able to communicate
with the Device securely.
VSG1432 User Setup Guide
19
The following figure shows you how to set up a wireless network and its security on a Device and a
wireless client by using PIN method.
Example WPS Process: PIN Method
Wireless Client
ZyXEL Device
WITHIN 2 MINUTES
Authentication by PIN
SECURITY INFO
COMMUNICATION
2.2.3 Without WPS
This section describes how to connect wirelessly to your Device. The connection procedure is shown
here using Windows XP as an example.
20
VSG1432 User Setup Guide
1
Right-click the wireless adapter icon which appears in the bottom right of your computer monitor.
Click View Available Wireless Networks.
Tutorial: Network > Wireless LAN > SecuritOpen the Status screen. Verify your wireless and wireless security settings under Device Information and check if the WLAN connection is up under Interface Status
Tutorial: Status
2
Select the Device’s SSID name and click Connect (A). The SSID “SecureWirelessNetwork” is given
here as an example.
Tutorial: Network > Wireless LAN > SecuritOpen the Status screen. Verify your wireless and wireless security settings under Device Information and check if the WLAN connection is up under Interface Status
Tutorial: Status
A
3
You are prompted to enter a password. Enter it and click Connect.
Tutorial: Network > Wireless LAN > SecuritOpen the Status screen. Verify your wireless and wireless security settings under Device Information and check if the WLAN connection is up under Interface Status
Tutorial: Status
4
You may have to wait several minutes while your computer connects to the wireless network.
VSG1432 User Setup Guide
21
5
You should now be securely connected wirelessly to the Device.
Tutorial: Network > Wireless LAN > SecuritOpen the Status screen. Verify your wireless and wireless security settings under Device Information and check if the WLAN connection is up under Interface Status
Tutorial: Status
Congratulations! Your computer is now ready to connect to the Internet wirelessly through your
Device.
If you cannot connect wirelessly to the Device, check you have selected the correct SSID
and entered the correct security key. If that does not work, ensure your wireless network
adapter is enabled by clicking on the wireless adapter icon and clicking Enable.
2.3 Setting Up Multiple Wireless Groups
Thomas wants to create different wireless network groups for different types of users as shown in
the following figure. Each group has its own SSID and security mode.
Secure
Open
Guest
• Thomas will use the secured Secure wireless network group.
• Visitors will use the unsecured Open group.
• Guests will use the secured Guest group.
Company A will use the following parameters to set up the wireless network groups.
22
SECURE
OPEN
GUEST
SSID
Secure
Open
Guest
Security Mode
Mixed WPA2-PSK/WPA-PSK
No Security
Mixed WPA2-PSK/WPA-PSK
Pre-Shared Key
DoNotStealMyWirelessNetwork
12345678
VSG1432 User Setup Guide
1
Click Wireless to open the General screen. Use this screen to set up a secure general wireless
network group. Configure the screen using the provided parameters and click Apply.
2
Click Wireless > Additional WLANs to open the following screen. Click the Edit icon to configure
the second wireless network group.
VSG1432 User Setup Guide
23
24
3
Configure the screen using the provided parameters and click Apply.
4
In the Additional WLANs screen, click the Edit icon to configure the third wireless network group.
VSG1432 User Setup Guide
5
Configure the screen using the provided parameters and click Apply.
6
Check the status of Open and Guest in the Additional WLANs screen. The yellow bulbs signify
that the SSIDs are active and ready for wireless access.
2.4 Wireless MAC Authentication for Blocking a
Computer’s Access to the Wireless Network
This example shows how to configure MAC Authentication to use a computer’s MAC address to
block it from accessing the wireless network.
Note: MAC Authentication is not a highly secure method of security.
VSG1432 User Setup Guide
25
26
1
Click the Wireless icon and click the MAC Authentication tab. In the MAC Authentication
screen, click the Add new MAC address button.
2
In the MAC Address field, enter the MAC Address of the computer to block and click Apply.
VSG1432 User Setup Guide
3
The MAC Address will appear in the MAC List. In the MAC Restrict Mode field select Deny. Then,
click Apply.
2.5 Setting Up NAT Forwarding for a Game Server
Thomas manages a Civilization IV server on a computer behind the Device. In order for players on
the Internet (like A in the figure below) to communicate with the server, Thomas can use port
forwarding or application forwarding. Application forwarding can be easier to set up since you do
not need to specify port numbers manually.
Note: You cannot configure an application forwarding rule that uses the same ports as a
configured port forwarding rule.
Note: If firewall is enabled, you may also need to configure an Access Control List rule for
the relevant ports. See Access Control List.
Tutorial: NAT Port Forwarding Setup
D=192.168.1.34
LAN
WAN
TCP/UDP port 6500
UDP ports 2302 and 13139
A
VSG1432 User Setup Guide
27
2.5.1 Port Forwarding
Thomas needs to configure the port settings and IP address on the Device. Traffic should be
forwarded to TCP/UDP port 6500, and UDP ports 2302 and 13139 of the server computer which has
an IP address of 192.168.1.34.
Thomas may set up the port settings by configuring the port settings for the server computer.
1
Click Network Settings > NAT > Add new rule and configure the screen with the following
values:
Service Name
CivIV
External Port/s
Enter 6500 as the Start and End port.
Server IP Address
Enter the IP address of the server. This is 192.168.1.34 for this example.
Protocol
Select TCP/UDP. This should be the protocol supported by the server.
2
The screen should look as follows. Click Apply.
3
Repeat steps 1 and 2 for UDP ports 2302 and 13139. The port forwarding settings you configured
appear in the table.
Players on the Internet then can have access to Thomas’ server.
28
VSG1432 User Setup Guide
2.5.2 Application Forwarding
Application forwarding can be used instead of port forwarding for forwarding traffic to the server.
1
Click Network Settings > NAT > Add new rule. Select Active and in the Application Category
dropdown menu, select Games.
1
The following screen appears. Enter the Server IP Address as 192.168.1.34 and in the
Application Forwarded dropdown menu, select Civilization IV. Click Apply.
VSG1432 User Setup Guide
29
2
The application forwarding settings you configured appear in the table.
2.6 Access Your Home Computer from the Internet Using
DDNS
If you connect your Device to the Internet and it uses a dynamic WAN IP address, it is inconvenient
for you to access your home computer from the Internet. The Device’s WAN IP address changes
dynamically. Dynamic DNS (DDNS) allows you to access your home computer using a domain
name.
Note: You will need to enable remote desktop server service on your home computer. The
remote desktop server feature is only included in Windows Professional, Business
and Ultimate versions.
Note: If firewall is enabled, you may also need to configure an Access Control List rule for
the relevant ports. See Access Control List.
http://zyxelrouter.dyndns.org
A
a.b.c.d
w.x.y.z
To use this feature, you have to apply for DDNS service at www.dyndns.org.
This tutorial covers:
• Registering a DDNS Account on www.dyndns.org
• Configuring DDNS on Your Device
• Configuring Port Forwarding on your Device
• Testing the DDNS Setting
Note: If you have a private WAN IP address, then you cannot use DDNS.
30
VSG1432 User Setup Guide
2.6.1 Registering a DDNS Account on www.dyndns.org
1
Open a browser and type http://www.dyndns.org.
2
Apply for a user account. This tutorial uses UserName1 and 12345 as the username and
password.
3
Log into www.dyndns.org using your account.
4
Add a new DDNS host name. This tutorial uses the following settings as an example.
• Hostname: zyxelrouter.dyndns.org
• Service Type: Host with IP address
• IP Address: Enter the WAN IP address that your Device is currently using. You can find the IP
address on the Device’s Web Configurator Status page.
Then you will need to configure the same account and host name on the Device later.
2.6.2 Configuring DDNS on Your Device
Configure the following settings in the Network Setting > DNS Setting > Dynamic DNS screen.
• Select Enable Dynamic DNS.
• Select DynDNS.org as the service provider.
• Type zyxelrouter.dyndns.org in the Host Name field.
• Enter the user name (UserName1) and password (12345).
Click Apply.
2.6.3 Configuring Port Forwarding on your Device
Configure the following settings in the Network Setting > NAT > Port Forwarding > Add new
rule screen.
• Select Active.
• Type RD in the Service Name.
• Type 3389 in the External/Internal Start/End Port fields. This is the listening port for
Windows remote desktop.
VSG1432 User Setup Guide
31
• Select the TCP in the Protocol field.
• Type the LAN IP address of your computer in the Server IP Address field. To check this on your
home computer, click Start, All Programs, Accessories and then Command Prompt. In the
Command Prompt window, type "ipconfig" and then press [ENTER]. This example uses
192.168.1.64. You will also need to configure a Static DHCP rule for this IP address. See
Configuring Static DHCP.
Click Apply.
2.6.4 Testing the DDNS Setting
Now you should be able to access the Device from the Internet. To test this:
1
Open the remote desktop client application on the remote computer (using the IP address a.b.c.d)
that is connected to the Internet.
2
Type http://zyxelrouter.dyndns.org and press [Enter].
3
Your computer’s remote desktop login page should appear.
2.7 Firewall Setup
The following example shows how to change firewall security level settings.
32
VSG1432 User Setup Guide
1
Place your mouse over the Security Settings icon, and click Firewall in the drop down.
Firewall Example: Edit Rule: Destination Address
2
In the security Level dropdown, you can select High, Medium or Low:
• High - All WAN-to-LAN and LAN-to-WAN traffic is blocked.
• Medium - All WAN-to-LAN traffic is blocked. All LAN-to-WAN traffic is allowed, except for Access
Control Lists (ACL's).
• Low - All WAN-to-LAN and LAN-to-WAN traffic is allowed, except for ACL's.
Firewall Example: Edit Rule: Destination Address
VSG1432 User Setup Guide
33
2.7.1 Access Control List
The following access control list example shows how to allow a hypothetical connection to/from the
Internet.
1
Click the Access Control List (ACL) tab. Finally, click the Add New ACL Rule button.
Firewall Example: Edit Rule: Destination Address
2
In the Access Control List (ACL) screen, configure the screen as follows and click Apply.
Firewall Example: Edit Rule: Destination Address
Firewall Example: Edit Rule: Select Customized Services
34
VSG1432 User Setup Guide
3
On completing the configuration procedure for this Internet firewall rule, the Rules screen should
look like the following.
Firewall Example: Edit Rule: Destination Address
2.8 MAC Filter Setup for Blocking LAN Computers
The following example shows how to create a MAC filter rule to block a computer from accessing
the Device.
1
Place your mouse over the Security Settings icon, and click MAC Filter in the drop down.
Firewall Example: Edit Rule: Destination Address
VSG1432 User Setup Guide
35
2
In the MAC Filter screen, select Enable as follows and click Apply. To add a device to the MAC
Filter Lists, click the Add Device button.
Firewall Example: Edit Rule: Destination Address
Firewall Example: Edit Rule: Select Customized Services
3
Enter the MAC address of the computer you want to block and cilck Apply.
Firewall Example: Edit Rule: Destination Address
36
VSG1432 User Setup Guide
4
The new entry will appear in the Allow List. Select the check box next to the entry and click the
right hand arrow to move it to the Block List.
Firewall Example: Edit Rule: Destination Address
5
The entry will now appear in the Block List. Click Apply.
Firewall Example: Edit Rule: Destination Address
2.9 Scheduler Rules and Parental Control
The following example creates a Parental Control to block web access from a selected computer
during a specified time period. You will first configure a Scheduler Rule.
VSG1432 User Setup Guide
37
1
Place your mouse over the Security Settings icon, and click Scheduler Rules in the drop down.
Firewall Example: Edit Rule: Destination Address
2
In the Scheduler Rules screen, click the Add new rule button.
Firewall Example: Edit Rule: Destination Address
Firewall Example: Edit Rule: Select Customized Services
38
VSG1432 User Setup Guide
3
Enter the configuration information as below and click Apply.
Firewall Example: Edit Rule: Destination Address
4
On completing the configuration procedure for this schedule rule, the rule should appear in the rule
list as below.
Firewall Example: Edit Rule: Destination Address
5
Now, configure the Parental Control rule. Place your mouse over the Security Settings icon, and
click Parental Control in the drop down.
Firewall Example: Edit Rule: Destination Address
VSG1432 User Setup Guide
39
6
Select Enabled then click Apply. Then click Add new Rule.
Firewall Example: Edit Rule: Destination Address
7
Select the desired computer in the PC Name/IP/MAC field and select Block All. In the
Scheduler Rules menu, select WeekdayNight. Click Apply.
Firewall Example: Edit Rule: Destination Address
2.10 LAN DHCP for IP Addressing Assignment
The following example shows how to configure LAN DHCP settings.
40
VSG1432 User Setup Guide
1
Place your mouse over the Networking Settings icon, and click Home Networking in the drop
down.
Firewall Example: Edit Rule: Destination Address
VSG1432 User Setup Guide
41
2
In the IP Addressing Values section, you can change the DHCP server IP address range. In the
DHCP Server Lease Time section you can specify how long an IP address is leased to a LAN
computer. Click Apply.
Firewall Example: Edit Rule: Destination Address
2.10.1 Configuring Static DHCP
Configure the following settings in the Network Setting > Home Networking > Static DHCP >
Add screen.
• Select Active.
42
VSG1432 User Setup Guide
• Select your computer in the Select Device Info field. The computer’s MAC Address will be
displayed in the MAC Address field. The computer’s current LAN IP Address will be displayed in
the IP Address field.
• Click Apply.
Firewall Example: Edit Rule: Select Customized Services
2.11 Check the Firmware Version
The following procedure shows how to check the firmware version that is installed on the Device.
1
In your web browser, enter the LAN IP address of the Device. The default is http://192.168.1.254.
Firewall Example: Edit Rule: Destination Address
VSG1432 User Setup Guide
43
2
The Status screen will display. The Firmware Version field displays the current firmware version.
Firewall Example: Edit Rule: Destination Address
2.12 Restore to Factory Default
The following procedure shows how to restore the factory default settings to the Device.
44
VSG1432 User Setup Guide
1
Place your mouse over the Maintenance icon, and click Configuration in the drop down.
Firewall Example: Edit Rule: Destination Address
VSG1432 User Setup Guide
45
2
In the Back to Factory Defaults section, click the Reset button.
Firewall Example: Edit Rule: Destination Address
3
Click Confirm.
Firewall Example: Edit Rule: Destination Address
4
46
The Reboot screen will display.
VSG1432 User Setup Guide
Note: The Power LED will start flashing. When it once again becomes solid green, the
modem will be configured to its default settings and will be ready to be
reconfigured. To reprogram your modem, follow the instructions provided by your
ISP.
Note: The default username and password are on the label on the bottom of the Device.
Firewall Example: Edit Rule: Destination Address
VSG1432 User Setup Guide
47
48
VSG1432 User Setup Guide
C HAPTER
3
Troubleshooting
3.1 Overview
This section offers some suggestions to solve problems you might encounter. The potential
problems are divided into the following categories.
• Power, Hardware Connections, and LEDs
• Device Access and Login
• Internet Access
3.2 Power, Hardware Connections, and LEDs
None of the LEDs turn on.
1
Make sure the Device is plugged in.
2
Make sure you are using the power adaptor or cord included with the Device.
3
Make sure the power adaptor or cord is connected to the Device and plugged in to an appropriate
power source. Make sure the power source is turned on.
4
Unplug the the Device’s power adapter, and plug it back in.
5
Try plugging the power adaptor into a different power outlet.
6
If the problem continues, contact the vendor.
One of the LEDs does not behave as expected.
1
Make sure you understand the normal behavior of the LED. See Section 1.6 on page 8.
2
Check the hardware connections.
3
Inspect your cables for damage. Contact the vendor to replace any damaged cables.
4
Unplug the the Device’s power adapter, and plug it back in.
5
If the problem continues, contact the vendor.
VSG1432 User Setup Guide
49
3.3 Device Access and Login
I forgot the IP address for the Device.
1
The default LAN IP address is 192.168.1.254.
2
If you changed the IP address and have forgotten it, you might get the IP address of the Device by
looking up the IP address of the default gateway for your computer. To do this in most Windows
computers, click Start > Run, enter cmd, and then enter ipconfig. The IP address of the Default
Gateway might be the IP address of the Device (it depends on the network), so enter this IP
address in your Internet browser.
3
If this does not work, you have to reset the device to its factory defaults. See Section 2.12 on page
44.
I forgot the password.
1
The default username and password is on the cover of this guide and on the label on the bottom of
the Device.
2
If this does not work, you have to reset the device to its factory defaults. See Section 2.12 on page
44.
I cannot see or access the Login screen in the web configurator.
1
Make sure you are using the correct IP address.
• The default IP address is 192.168.1.254.
• If you changed the IP address, use the new IP address.
• If you changed the IP address and have forgotten it, see the troubleshooting suggestions for I
forgot the IP address for the Device.
50
2
Check the hardware connections, and make sure the LEDs are behaving as expected. See Section
1.6 on page 8.
3
Make sure your Internet browser does not block pop-up windows and has JavaScripts and Java
enabled.
4
Reset the device to its factory defaults, and try to access the Device with the default IP address.
See Section 2.12 on page 44.
5
If the problem continues, contact the network administrator or vendor, or try one of the advanced
suggestions.
VSG1432 User Setup Guide
Advanced Suggestions
• Make sure you have logged out of any earlier management sessions using the same user account
even if they were through a different interface or using a different browser.
• If your computer is connected to the WAN port or is connected wirelessly, use a computer that is
connected to an ETHERNET port.
I can see the Login screen, but I cannot log in to the Device.
1
Make sure you have entered the password correctly. The default username and password is on the
cover of this User’s Guide. The field is case-sensitive, so make sure [Caps Lock] is not on.
2
Unplug the the Device’s power adapter, and plug it back in.
3
If this does not work, you have to reset the device to its factory defaults. See Section 2.12 on page
44.
3.4 Internet Access
I cannot access the Internet.
1
Check the hardware connections, and make sure the LEDs are behaving as expected. See Section
1.6 on page 8.
2
If you are trying to access the Internet wirelessly, make sure that you enabled the wireless LAN in
the Device and your wireless client and that the wireless settings in the wireless client are the same
as the settings in the Device.
3
Disconnect all the cables from your device, and follow the directions in Section 1.5 on page 7 again.
4
If you are connecting through a DSL conection, make sure you have the DSL WAN port connected
to a telephone jack (or the DSL or modem jack on a splitter if you have one).
5
If you are connecting through an Ethernet WAN connection, make sure you have the ETHERNET
WAN port connected to a broadband modem or router in your network.
6
If the problem continues, contact your ISP.
I cannot access the Internet anymore. I had access to the Internet (with the Device), but my
Internet connection is not available anymore.
1
Your session with the Device may have expired. Try logging into the Device again.
VSG1432 User Setup Guide
51
2
Check the hardware connections, and make sure the LEDs are behaving as expected. See Section
1.6 on page 8.
3
Unplug the the Device’s power adapter, and plug it back in.
4
If the problem continues, contact your ISP.
3.5 Wireless Internet Access
What factors may cause intermittent or unstable wireless connection? How can I solve this
problem?
The following factors may cause interference:
• Obstacles: walls, ceilings, furniture, and so on.
• Building Materials: metal doors, aluminum studs.
• Electrical devices: microwaves, monitors, electric motors, cordless phones, and other wireless
devices.
To optimize the speed and quality of your wireless connection, you can:
• Move your wireless device closer to the AP if the signal strength is low.
• Reduce wireless interference that may be caused by other wireless networks or surrounding
wireless electronics such as cordless phones.
• Place the AP where there are minimum obstacles (such as walls and ceilings) between the AP and
the wireless client.
• Reduce the number of wireless clients connecting to the same AP simultaneously, or add
additional APs if necessary.
• Try closing some programs that use the Internet, especially peer-to-peer applications. If the
wireless client is sending or receiving a lot of information, it may have too many programs open
that use the Internet.
What is a Server Set ID (SSID)?
An SSID is a name that uniquely identifies a wireless network. The AP and all the clients within a
wireless network must use the same SSID.
What wireless security modes does my Device support?
Wireless security is vital to your network. It protects communications between wireless stations,
access points and the wired network.
52
VSG1432 User Setup Guide
The available security modes in your ZyXEL device are as follows:
• WPA2-PSK: (recommended) This uses a pre-shared key with the WPA2 standard.
• WPA-PSK: This has the device use either WPA-PSK or WPA2-PSK depending on which security
mode the wireless client uses.
• WEP: Wired Equivalent Privacy (WEP) encryption scrambles the data transmitted between the
wireless stations and the access points to keep network communications private.
VSG1432 User Setup Guide
53
54
VSG1432 User Setup Guide
Technical Specifications
Technical Specifications
The following table summarize the Device’s hardware and firmware features.
Hardware Specifications
Gigabit Ethernet WAN
Port
One RJ-45 connector for GBE WAN
Built-in Switch
Four auto-negotiating, auto MDI/MDI-X 10/100 Mbps RJ-45 Ethernet ports
Wireless Functionality
Allow the IEEE 802.11b, IEEE 802.11g and/or IEEE 802.11n wireless
clients to connect to the Device wirelessly. Enable wireless security (WEP,
WPA-PSK, WPA2-PSK, Mixed WPA2-PSK/WPA-PSK) and/or MAC filtering to
protect your wireless network.
DSL Port
One RJ-11 connector for DSL over POTS
Power Adaptor Output
12 V 1.5 A
Power Adaptor Input
100 ~ 240 VAC 50~60HZ
VSG1432 User Setup Guide
55
Technical Specifications
56
VSG1432 User Setup Guide