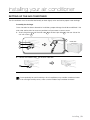
1
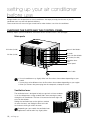
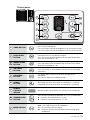
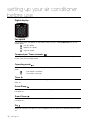
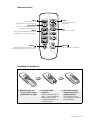
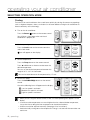
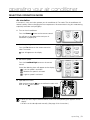
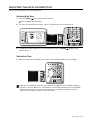
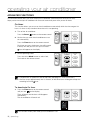
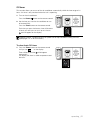
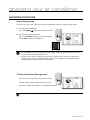
AW07LH Series AW09LH Series Air Conditioner user manual imagine the possibilities Thank you for purchasing this Samsung product. To receive more complete service, please register your product at www.samsung.com/global/register E DB98-30412A features of your new air conditioner • Cool Summer Offer On those hot sweltering summer days and long restless nights, there is no better escape from the heat than the cool comforts of home. Your new air conditioner brings an end to exhausting hot summer days and lets you rest. This summer, beat the heat with your own air conditioner. • Easy Maintenance Cleaning and maintenance are no longer a chore. Simply remove the air filter inside the air conditioner, rinse, and dry for clean fresh air. Breathe a sigh of relief at knowing how easy it is to keep the air clean. • A Look for Everywhere The elegant and harmonious design gives priority to the esthetics of your space and complements any of your existing interior decor. With its soft-white color and rounded-edge shape, the new air conditioner adds class to any room. Enjoy what your air conditioner offers both functionally and esthetically. • Advanced Timer Function Imagine your home filled with cool air from long day of work or school. You can set the timer to automatically turn on and off the air conditioner even when you are not home. For easy future reference write the model and serial number down. You will find your model number on the bottom side of the air conditioner. 02_ features Model # Serial # safety information To prevent electric shock, disconnect the power before servicing, cleaning, and installing the unit. SAFETY INFORMATION Before using your new air conditioner, please read this manual thoroughly to ensure that you know how to safely and efficiently operate the extensive features and functions of your new appliance. Because the following operating instructions cover various models, the characteristics of your air conditioner may differ slightly from those described in this manual. If you have questions, call your nearest contact center or find help and information online at www.samsung.com. What the icons and signs in this user manual mean: WARNING CAUTION CAUTION Risk of death or serious personal injury. Potential risk of personal injury or material damage. To reduce the risk of fire, explosion, electric shock, or personal injury when using your air conditioner, follow these basic safety instructions: Do NOT attempt. Do NOT disassemble. Do NOT touch. Follow directions carefully. Unplug the power plug from the wall socket. Make sure the machine is grounded to prevent electric shock. Call the contact center for help. Recommended instructions or useful information for use. These warning signs are here to prevent injury to you and others. Please follow them carefully. After reading this section, keep it in a safe place for future reference. SEVERE WARNING SIGNS Do not cut the power plug and connect to a different power cable. Never attempt to lengthen the power cable. • Potential risk of fire or electric shock. Do not yank the power cable and touch the power plug with wet hands. • Potential risk of fire or electric shock. Never use a damaged power plug, power cable, or loosened power receptacle. • Potential risk of fire or electric shock. safety information _03 safety information Do not place the air conditioner near hazardous substances or equipment that releases free flames to avoid fires, explosions or injuries. Do not spray flammable gases such as insecticide near the air conditioner. • Potential electric shock, fire or unit malfunction. Do not block or place items in front of the air conditioner. Do not step, hang onto, or place heavy items on the air conditioner. • Potential risk of personal injury. Do not insert anything such as fingers or branches into the air conditioner vents. • Keep children away from the air conditioner. • Potential risk of personal injury. Consult the place of purchase or a contact center to disassemble or reinstall the air conditioner. • Potential risk of unit malfunction, water leakage, electric shock, or fire. Consult the place of purchase or a contact center to install the air conditioner. • Improper installation carries a risk of unit malfunction, water leakage, electric shock or fire. • If installing in specialty areas, such as a factory complex or saline coastal area, consult the place of purchase or contact center for specific installation details. Install the air conditioner with the support bracket securely fastened to use for an extended period of time. • If the air conditioner falls, it may cause personal injury or loss of property. Ensure the air conditioner is installed in compliance with current national safety standards. Use a rated circuit breaker only. • Never use steel wires or copper wires as a circuit breaker. It may cause fire or unit malfunction. Use an exclusive power source for the air conditioner. • Potential risk of electric shock or fire. Do not put undue stress on the power cable or place heavy objects on it. Do not bend the power cable excessively. • Potential risk of fire or electric shock. If the air conditioner becomes wet, turn off immediately and call your nearest contact center. • Potential risk of fire or electric shock. Disconnect the air conditioner from power supply before it is repaired or disassembled. Use a receptacle that has a ground terminal. The receptacle must be used exclusively for the air conditioner. • Improper electrical grounding may cause electric shock or fire. 04_ safety information CAUTION SIGNS Ensure no water gets into the air conditioner. • Potential risk of fire or electric shock. Do not install the air conditioner close to heating appliances to avoid damage. Turn off the air conditioner using the provided remote control or control accessory (if provided). Do not unplug to turn the unit off (unless there is an immediate danger). Cool air should not flow directly towards people, pets, and plants. • It is harmful to your health, pets, and plants. Do not run the air conditioner for an extended period of time in a room with the door closed or with babies, elderly or disabled people. • Open the door or windows to ventilate your room at least once an hour to prevent oxygen shortage. Do not use the air conditioner as a cooling precision instrument for food, pets, plants, cosmetics or machinery. • Potential risk of property loss. Do not drink water from the air conditioner. • Potential risk of health hazard. Do not give excessive shock to the air conditioner. • Potential risk of fire or unit malfunction. Do not expose the dust filter to direct sunlight while drying. • Strong direct sunlight may deform the dust filter. Do not spray water directly on the air conditioner or use benzene, thinner, or alcohol to clean the surface of the unit. • Potential risk of electric shock or fire. • Potential risk of damage to the air conditioner. Do not place containers with liquid or other objects on the unit. Do not throw the remote control. • It may break and plastic piece can be dangerous. You may get a cut or greater injury. The air conditioner is composed of moving parts. Keep children away from the unit to avoid physical injury. Check for damage on delivery. If damaged, do not install the air conditioner and call the place of purchase immediately. Make sure the voltage and frequency of the electric system are compatible with the air conditioner. Insert the dust filter before operating the air conditioner. • If there is no dust filter inside the air conditioner, accumulated dust may shorten the life of the air conditioner and cause electricity waste. Keep indoor temperatures stable and not extremely cold, especially where there are children, elderly or disabled people. Clean the air conditioner after the inner fan stops operating. • Potential risk of injury or electric shock. Clean the dust filter every 2 weeks. Clean the filter more frequently if the air conditioner is operated in dusty areas. safety information _05 safety information Inspect the condition, electric connections, pipes and external case of the air conditioner regularly by a qualified service technician. Do not open doors and windows in the room being cooled during operation unless necessary. Do not block the air conditioner vents. • If objects block the air flow, it may cause unit malfunction or poor performance. The packaging material and used batteries of the remote control (optional) must be disposed of in accordance with the national standards. The refrigerant used in the air conditioner must be treated as chemical waste. Dispose the refrigerant following national standards. Have a qualified service technician install the air conditioner and perform a trial operation. Ensure the off-on and protection switches are properly installed. Do not use the air conditioner if damaged. If problems occur, immediately stop operation and disconnect the plug from the power supply. If the air conditioner will not be used for an extended period of time (for example, over several months), unplug the power from the wall. Call the place of purchase or a contact center if repairs are needed. • Potential risk of fire or electric shock if disassembly or repairs are attempted by a non-qualified service technician. If you smell burning plastic, hear strange sounds, or see smoke coming from the unit, unplug the air conditioner immediately and call a contact center. • Potential risk of fire or electric shock. 06_ safety information contents SETTING UP YOUR AIR CONDITIONER BEFORE USE 08 Checking the parts and the control panel 08 Main parts 08 Ventilation lever 09 Control panel 10 Digital display 11 Remote control 11 Installing the batteries OPERATING YOUR AIR CONDITIONER 12 Selecting operation mode 12 Cooling 13 Air circulation 14 Dry 15 Adjusting air flow direction 15 Horizontal air flow 15 Vertical air flow 16 Advanced functions 16 On timer 17 Off timer 18 Good Sleep mode 19 Smart Saving mode 08 12 CLEANING AND MAINTAINING YOUR AIR CONDITIONER 20 APPENDIX 21 22 INSTALLING YOUR AIR CONDITIONER 20 Cleaning the exterior 20 Cleaning the air filter 20 Maintaining the air conditioner 21 Troubleshooting 21 Operation ranges 22 Getting ready to install the air conditioner 22 Checking included parts 22 Selecting the best location 23 Setting up the air conditioner 23 Assembly for drainage contents _07 setting up your air conditioner before use Congratulations on the purchase of the air conditioner. We hope you enjoy the features of your air conditioner and stay cool with optimal efficiency. Please read the user manual to get started and to make the best use of the air conditioner. CHECKING THE PARTS AND THE CONTROL PANEL Carefully unpack your air conditioner, and check the unit to make sure it is not damaged. Main parts Air intake (Inside) Inner air flow blades Air outlet Vertical air flow blades Air intake (Outside) Air filter (Inside) Ventilation lever Door Control panel Power Cable • Your air conditioner may slightly differ from illustration shown above depending on your model. • Power plug can be different from the illustration shown above depending on your region. • When you connect the power plug into the receptacle, a beep will sound. Ventilation lever The ventilation lever is designed to help you get fresh air from outdoors. It can also help prevent strong outdoor odors from entering the room through the air conditioner. The lever is located on the lower right side of the air flow blades. Sliding the ventilation lever to the right lets outdoor air enter the room, and sliding the lever to the left re-circulates existing air within the room. Depending on your model, the ventilation lever appearance and location may slightly differ. 08_ setting up Control panel 1 9 2 8 3 7 6 4 5 1 TIMER BUTTON Sets the timer to turn on/off the air conditioner after elapsing a pre-set time automatically. Press this button while the air conditioner is off to activate On timer. Press this button while the air conditioner is on to activate Off timer. 2 GOOD SLEEP BUTTON In Good Sleep mode, the air conditioner will run for 8 hours at the temperature you set before turning off. Press this button to activate/deactivate the Good Sleep mode when the air conditioner is on. 3 SMART SAVER BUTTON This button can bring your air conditioner to energy saving mode. Press the button to activate/deactivate the Smart Saver mode when the air conditioner is on. 4 AIR SWING BUTTON This button adjusts the horizontal air flow direction. Press this button to activate/deactivate the inner air flow blade movements. 5 FAN SPEED BUTTON This button adjusts how much air flows through the air conditioner. Sets the fan speed to Low/Medium/High. 6 POWER BUTTON Turns the air conditioner on and off. Short beep will sound twice when air conditioner is turned on. Long beep will sound once when air conditioner is turned off. 7 REMOTE CONTROL SENSOR Aim the remote control toward this spot on the air conditioner. TEMPERATURE You can adjust temperature between 18˚C~30˚C in Cool mode. - Increases the temperature by 1˚C unit. - Decreases the temperature by 1˚C unit. 8 9 BUTTON MODE BUTTON Sets the operation mode to Cool or Fan . Cool - Gets cool air from the air conditioner. Fan - Air circulation with no cooling. Dry - Removes humidity from the room without changing the temperature. setting up _09 setting up your air conditioner before use Digital display Fan speed One of these icons will appear on the display when you press the Fan Speed button on the control panel. Low fan speed. Medium fan speed. High fan speed. Temperature/Timer reminder Temperature / Timer reminder indicates the temperature you have set or the remaining hours left in your Timer and the Sleep mode. Operating mode One of these icons will appear on the display when you press the Mode button on the control panel. Cool mode is activated. Fan mode is activated. Timer When you activate Timer mode, this icon will appear to let you know that selected mode has been set . Good Sleep When you activate Good Sleep mode, this icon will appear to let you know that selected mode has been set . Smart Saver When you activate Smart Saver mode, this icon will appear to let you know that selected mode has been set . Dry When you activate Dry mode, this icon will appear to let you know that selected mode has been set . 10_ setting up Remote control Timer Temp Sets the timer on/off. (See pages 16~17 for instructions.) Increases/decreases the temperature. Good Sleep Sets the Good Sleep mode on/off. (See page 18 for instructions.) Fan Mode Adjusts the fan speed. Sets the Fan/Cool/Dry/S.Saver mode. (See pages 12~14,19 for instructions.) Swing Power Activates/deactivates inner air flow blade movements. (See page 15 for instructions.) Turns on/off the air conditioner. Installing the batteries 1. Slide the cover, on the rear of the remote control, down to open. 2. Install two AAA batteries. Check and match the “+” and “-” signs accordingly. Make sure you have installed the batteries in correct position. 3. Close the cover by sliding it back to its original position. You should hear click sound when the cover is locked properly. setting up _11 operating your air conditioner SELECTING operation MODE Cooling Transform a hot and humid room into a cool haven quickly by closing all unnecessary openings such as fireplace dampers, doors, or windows in the room before running the air conditioner to increase efficiency and save energy. 1. Turn on the air conditioner. Press the Power You will hear a short beep twice and the air conditioner is properly on. button on the remote control. 2. Set the operating mode. Press the Cool button on the remote control to select Cool mode. icon will appear on the display. 3. Set the temperature. Press the Temp button on the remote control. Press or button to increase or decrease the desired temperature. You can set the desired temperature between the range of 18 ˚C~ 30 ˚C in Cool mode. You can increase/decrease the temperature by 1˚C unit. 4. Set the fan speed. Press the Low/Med/High button on the remote control. One of the following icons will appear on the display. Low fan speed is activated. Medium fan speed is activated. High fan speed is activated. • When you are using the remote control, make sure corresponding icon appears on the display. • If current outside temperatures are much higher than the selected indoor temperature, it may take time to bring the inner temperature to the desired coolness. • Air flow can also be adjusted manually. (See page 15 for instructions.) • Avoid drastically turning down the temperature. Energy is wasted and the room does not cool faster. 12_ operating operating your air conditioner SELECTING operation MODE Air circulation If the room is stuffy and stale, operate your air conditioner in Fan mode. The air conditioner will reduce humidity without changing the inner temperature. We recommend using this mode during especially humid but cool springdays. 1. Turn on the air conditioner. Press the Power You will hear a short beep twice and your air conditioner is properly on. button on the remote control. 2. Set the operating mode. Press the Fan button on the remote control to select Fan mode. icon will appear on the display. 3. Set the fan speed. Press the Low/Med/High button on the remote control. One of the following icons will appear on the display. Low fan speed is activated. Medium fan speed is activated. High fan speed is activated. 4. Open/block the vents. Slide the lever towards icon to ventilate the room with fresh air and icon to block. • When you are using the remote control, make sure corresponding icon appears on the display. • Air flow can also be adjusted manually. (See page 15 for instructions.) operating _13 operating your air conditioner SELECTING operation MODE Dry If the atmosphere in your room is very humid or damp,you can remove excess humidity without lowering the room temperature too much. 1. Turn on the air conditioner. Press the Power You will hear two short beeps and the air conditioner will turn on. button on the remote control. 2. Set the operating mode. Press the Dry button on the remote control to select Dry mode. icon will appear on the display. 3. Set the temperature. Press the Temp button on the remote control. Press or button to increase or decrease the desired temperature. You can set the desired temperature within the range of 18˚C~ 30˚C in Cool mode. You can increase/decrease the temperature in 1˚C units. • When you are using the remote control, make sure corresponding icon appears on the display. • Air flow can also be adjusted manually. (See page 15 for instructions.) 14_ operating ADJUSTING THE AIR FLOW DIRECTION Air flow can be directed to your desired position. Horizontal air flow 1. Press the Swing button on the remote control. icon will appear on the display. 2. The inner air flow blades move from side to side continuously to circulate the air. 3. To keep the air flow direction in a constant position, press the Swing remote control. button on the Vertical air flow 1. Move the vertical air flow blades up or down to the desired direction with your fingers. While the air conditioner cools the room, operate the appliance with the blades pointing upwards. If the unit operates in Cool mode for an extended period of time with the blades pointing downward, moisture may generate from the temperature difference and thus carries the risk of electric shock or unit malfunction. operating _15 operating your air conditioner ADVANCED FUNCTIONS This advanced function allows you to turn on/off your air conditioner automatically even when you are away. Simply set the time and your air conditioner will turn on/off automatically even when you are not home. On timer This function allows you to turn on the air conditioner automatically within the time range of 24 hours. On timer is only functional when the unit is not operating. 1. Turn off the air conditioner. Press the Power button on the remote control. 2. Set the time you want the air conditioner to turn on automatically. Press the Timer button on the remote control. Each time you press the button, time will increase in hourly unit and you can set it up to 24 hours. icon will appear on the display. 3. Set the operating mode. Press one of the Mode button to select Cool, Fan mode on the remote control. • Temperature/Fan speed can also be adjusted. (See page 12~13 for instructions.) • After the setup, approximately after 5 seconds, all the other icons will be gone except the remaining hour and icon. To deactivate On timer 1. Press the Timer button on the remote control until you see on the display. Timer will be off and the icons will disappear momentarily. The air conditioner will remain off. This function will only work while your air conditioner is off. 16_ operating Off timer This function allows you to turn off the air conditioner automatically within the time range of 24 hours. Off timer is only functional when the unit is operating. 1. Turn on the air conditioner. Press the Power button on the remote control. 2. Set the time you want the air conditioner to turn off automatically. Press the Timer button on the remote control. Each time you press the button, time will increase in hourly unit and you can set it up to 24 hours. icon will appear on the display. Operating mode, Temperature and Fan speed can be adjusted before setting Off timer. (See pages 12~13 for instructions.) To deactivate Off timer 1. Press the Timer button on the remote control until you see on the display. Timer will be off and the will disappear momentarily. The display will show its earlier temperature and the icons. operating _17 operating your air conditioner ADVANCED FUNCTIONS Good Sleep mode This function will be helpful to enjoy your sleep. Air conditioner will automatically turn off in 8 hours while the temperature will be set to give you maximum comfort during your sleep. 1. Turn on the air conditioner. Press the Power button on the remote control. 2. Set the Good Sleep mode on. Press the Good Sleep button on the remote control. The air conditioner will turn off automatically in 8 hours. will pass through the display then, remaining hours will appear on the display. icon will appear on the display. Operating mode, Temperature and Fan speed can be adjusted before setting Good Sleep mode.(See pages 12~13 for instructions.) Temperature changes in Good Sleep mode Cool mode If Good Sleep is selected after switching on the unit ,the air conditioner will run in Cool mode. During this period, the temperature displayed is one you set for the Cool mode.If the Good Sleep is selected before switch on the unit,the air conditioner starts running in Cool mode and the temperature is set to 26 °C. To deactivate Good Sleep mode 1. Press the Good Sleep button on the remote control. Good Sleep mode will be canceled. The display will show its earlier temperature and icons. • Good Sleep mode is only available in Cool mode. • Air flow can also be adjusted manually. (See page 15 for instructions.) 18_ operating operating your air conditioner ADVANCED FUNCTIONS Smart Saving mode If you wish to save smart when using your Air Conditioner,select the Smart Saving mode. 1. Turn on the air conditioner. Press the Power button on the remote control. 2. Set the Smart Saving mode on. Press the S. Saver button on the remote control. The S. Saver indicator will light up.. • S.Saver Mode can only be selected in Cool mode. When selecting S.Saver,You can not set the desired temperature below 24˚C. • The fan will run always, while the compressor cycle on and off. When the compressor off,the fan will run in low RPM,otherwise the fan will run in previously selecting mode. Energy Saving will be more than normal mode. To deactivate Smart Saving mode Press the S.Saver button on the remote control; S.Saver mode will be cancelled and the unit will return to the mode you previously selecting(Cool mode). • Air flow can also be adjusted manually. (See page 15 for instructions.) operating _19 cleaning and maintaining your air conditioner Keeping your air conditioner clean improves its performance, wards off unnecessary repairs, and lengthens its life. CLEANING THE EXTERIOR 1. Wipe the surface of the appliance with a slightly wet or dry cloth when needed. CAUTION Do not use Benzene, Thinner or CloroxTM. They may damage the surface of the unit and can create a risk of fire. CLEANING THE AIR FILTER 1. Hold the air filter handle, pull it right and out. • If lift it forward when pull right,the air filter out will be easier. 2. Vacuum the air filter completely. 3. Push the air filter back into place. Air filter • For best conditions, repeat every two weeks. • If the air filter dries in a confined (or humid) area, odors may generate. If this occurs, re-clean and dry in a well-ventilated area. MAINTAINING THE AIR CONDITIONER If the air conditioner will not be used for an extended period of time, dry it thoroughly and disconnect from the wall. There may be internal damage if moisture is left in its components. 1. Before storing the appliance, operate the air conditioner in Fan mode for three to four hours to dry the air conditioner completely. 2. Upon removing from storage, dry the inner components of the air conditioner again by running in Fan mode for three to four hours. This helps remove odors which may have generated from dampness. 20_ cleaning and maintaining appendix TROUBLESHOOTING Refer to the following chart if the air conditioner operates abnormally. This may save time and unnecessary expenses. PROBLEM SOLUTION The air conditioner does not start operating immediately after it has been restarted. • Because of the protective mechanism, the appliance does not start operating immediately to keep the unit from overloading. The air conditioner will start in 3 minutes. The air conditioner does not work at all. • Check that the power plug is properly connected. Insert the power plug into the wall socket correctly. • Check if the circuit breaker is switched off. • Check if there is a power failure. • Check your fuse. Make sure it is not blown out. • Check if your air conditioner to make sure it is not operating in Fan mode. The temperature does not change. The cool air does not come out of the air conditioner. Odors permeate in the room during operation. • Check if the set temperature is higher than the current temperature. Press the Temp button on the remote control or Temp. button on the control panel to change the set temperature. Press to decrease the temperature. • Check if the air filter is blocked by dirt. Clean the air filter every two weeks. • Check if the air conditioner has just been turned on. If so wait 3 minutes. • Check if the appliance is running in a smoky area or if there is a smell entering from outside. Operate the air conditioner in Fan mode or open the windows to air out the room. • Check your ventilation lever and make sure it is in position. Outside smell might come in when your ventilation lever is in position. The air conditioner • A bubbling sound may be heard when the refrigerant is circulating through makes a bubbling sound. the compressor. Let the air conditioner operate in a selected mode. The air conditioner • Check if there is a gap between the air conditioner and the wall. Insulate vibrates excessively the crack securely. or makes a lot of noise during operation. Water is dripping from the air flow blades. Remote control is not working. • Check if the air conditioner has been cooling for an extended period of time with the air flow blades pointed downwards. Condensation may generate due to the difference in temperature. Push the vertical air flow blades upward and run the appliance. • Check if your batteries are depleted. • Make sure batteries are correctly installed. • Make sure nothing is blocking the remote control sensor. OPERATION RANGES The table below indicates the temperature and humidity ranges the air conditioner can be operated within. Refer to the table for efficient use. MODE COOLING OPERATIONAL TEMPERATURE INDOOR OUTDOOR Approximately 21˚C~32˚C Approximately 21˚C~43˚C INDOOR HUMIDITY - appendix _21 installing your air conditioner GETTING READY TO INSTALL THE AIR CONDITIONER First select a room and check conditions prior to installation. Checking included parts Check that all necessary parts are included. Actual accessories may slightly differ from the illustration shown below. Gasket Drain tube Rubber cap Screws Selecting the best location The unit should be level when installed, so that the drainage system and other mechanisms operate efficiently. If possible, install the unit in a shaded area on the home’s north or east side. Before installation, select a location that fulfills these requirements: • easy access to control panel. • away from direct exposure to sunlight. • adequate ventilation. • can easily connect to a power source. • can support the weight of the air conditioner and will not cause increased operating noise and vibration. • where there is no obstacles near the air inlet and outlet. • the bottom of the unit clears at least 750 mm above ground level. Indoor side awning Outdoor side 75mm min. 300mm 145mm 500mm 500mm 500 mm about 3˚ 750mm <Fence, wall or other obstacles> 150mm min. Outdoor side 45˚ Indoor side 100mm or more 22_ installing 45˚ If the wall is thicker than 150mm, cut the back of the wall at 45°. installing your air conditioner SETTING UP THE AIR CONDITINER The air conditioner must be installed horizontally or tilted slightly to the outside for proper water drainage. Assembly for drainage Once a location has been selected for installation, proper drainage should be established. If the drain tube and/or drain hose are not provided, call your nearest contact center. 1. Attach the gasket unit with screws 4 1 and the drain tube 2 to the base pan hole 3 in the rear side of the 4 1 REAR SIDE 3 2 2. Connect the Rubber Cap 5 to the drain tube hole. 5 On exceptionally hot and humid days the air conditioner may overflow condensed water. In hot and high humidity zones, make sure the Rubber Cap have been removed . installing _23 QUESTIONS OR COMMENTS? COUNTRY CALL OR VISIT US ONLINE AT PHILIPPINES 1-800-10-SAMSUNG(726-7864) 1-800-3-SAMSUNG(726-7864) 02-5805777 www.samsung.com/ph