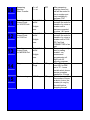
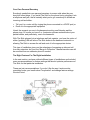
1
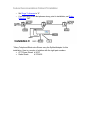
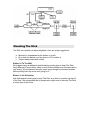
H I G G I N S
I N T E R N A T I O N A L
Call Toll Free:
The Stick Manual
Sales & Help: 866-337-0965
Tech Support: 800-535-4651
FaxSwitch.com
RELAX. This is NOT rocket science.
About This Manual
We are serious about making the finest products on the market. And we are
serious about the information you need to make the product function correctly....
but we can't get real serious about writing product manuals.
There are enough bad product manuals out there to sink an aircraft carrier.
You've probably seen them -the ones that take a degree in Electrical Engineering
to figure out, or they are written in every language except English or... they are
just plain boring.
Our humor or wit (or lack of either) in the rhetoric of this manual is not put here to
lessen any aspect of the product except maybe the painful task of getting through
some very dry material.
Thanks
Something you should know now that you have
purchased our productYou are the most important person in the world and we at Multi-Link want to
THANK YOU for your business. We can't say it enough! At one time in America,
business was conducted face to face where a word and a handshake were good
enough.
While we seldom get the opportunity to personally meet and thank the people
who buy our products, we realize your purchase of The Stick™ is a vote of
confidence and trust in our product and our company. We will not betray this
confidence or trust-that is our word and handshake to you.
You are the backbone of our business. The ultimate goal we, as a company,
have targeted is your satisfaction. We want you as a customer and a
commitment to your complete satisfaction AFTER THE SALE is our pledge.
If at any time you have a problem, comment or question
About The Stick™, its operation, functions or features call toll free:
•
•
Tech Support: (800) 535 4651
Sales or Help: (866) 337-0965
We want to hear from you. And again, THANKS for the opportunity to do
business with you. You are important to us.
THE STICK OPERATING MANUAL Table of Contents
SAFETY INSTRUCTIONS
1. HOW THE STICK WORKS
1.1. Programmable Features
1.2. Standard Features
page 5
page 6
page 9
2. PROGRAMMING THE STICK
2.1. Programming and Quick Reference Guide
2.2. Initial Check, Power Up, Connect To The Phone Line
page 10
page 11
page 13
3. THE “HOW TO” OF PROGRAMMING
3.1. Tones / Programming Commands
3.2. Audible “Read Back” of Programming
page 14
page 15
page 17
4. POINTERS FOR HOOK-UP
4.1. Voice Data Equipment
4.2. FAX / PC Fax Cards
4.3. Answering Machines
4.4. Computer Modems
4.5. Other Stuff
page 19
page 19
page 19
page 20
page 21
page 22
5. INSTALLATION- Introduction
5.1. On Single Phone Line
5.1.1. Simple Plug-In
5.1.2. Simple Plug-In W/Extensions
5.1.3. “Barge-In Protection” For Simple Plug-In W/Extensions
5.1.4. Not-So-Simple In Line Installation
page 23
page 25
page 25
page 26
page 27
page 29
5.2. On Multiple Phone Line System
5.2.1. Key System or PBX
5.2.2. RJ-14 Two Line Phone System
page 30
page 30
page 31
6. MOUNTING THE STICK
page 32
7. TECHNICAL SPECIFICATIONS
page 33
8. FCC/DOC/LIMITED WARRENTY
page 34
9. SERVICE AND INSTALLATION ASSISTANCE
page 37
10. HOW TO PURCHASE A STICK
page 38
Important Safety Instructions
When using your telephone equipment, basic safety precautions should always be
followed to reduce the risk of fire, electric shock and injury to persons, including the
following:
1. Read and understand all instructions.
2. Follow all warnings and instructions marked on the product.
3. Unplug this product from the wall outlet before cleaning. Do not use liquid cleaners or
aerosol cleaners. Use a damp cloth for cleaning.
4. Do not use this product near water, for example, near a bathtub, washbowl, kitchen sink
or laundry tub, in a wet basement, or near a swimming pool.
5. Do not place this product on an unstable cart, stand, or table. The product may fall
causing serious damage to the product.
6. This product should never be placed near or over a radiator or heat register. This product
should not be placed in a built-in installation unless proper ventilation is provided.
7. This product should be operated only from the type of power source indicated on the
marking label. If you are not sure of the type of power supply to your home, consult your
dealer or local power company.
8. Do not allow anything to rest on the power cord. Do not locate this product where the
cord will be abused by persons walking on it.
9. Do not overload wall outlets and extension cords as this can result in the risk of fire or
electric shock.
10. Never push objects of any kind into this product through slots in cabinet as they may
touch dangerous voltage points or short out parts that could result in a risk of fire or
electric shock. Never spill liquid of any kind on the product
11. To reduce the risk of electric shock, do not disassemble this product, but take it to a
qualified serviceman when some service or repair work is required. Opening or removing
covers may expose you to dangerous voltages or other risks. Incorrect reassembly can
cause electric shock when the appliance is subsequently used.
12. Unplug this product from the wall outlet and refer servicing to qualified service personnel
under the following conditions:
a. When the power supply cord or plug is damaged or frayed.
b. If liquid has been spilled into the product.
c. If the product has been exposed to rain or water.
d. If the product does not operate normally by following the operating instructions.
Adjust only those controls that are covered by the operating instructions because
improper adjustment of other controls may result in damage and will often require
extensive work by a qualified technician to restore the product to normal
operation.
e. If the product has been dropped or the cabinet has been damaged.
f. If the product exhibits a distinct change in performance.
13. Avoid using a telephone (other than a cordless type) during an electrical storm. There
may be a remote risk of electric shock from lightning.
14. Do not use the telephone to report a gas leak in the vicinity of the leak.
INSTALLATION INSTRUCTIONS
1. Never install telephone wiring during a lightning storm.
2. Never install telephone jacks in wet locations unless the jack is specially designed for wet
locations.
3. Never touch uninsulated telephone wires or terminals unless the telephone line has been
disconnected at the network interface.
4. Use caution when installing or modifying telephone lines.
"SAVE THESE INSTRUCTIONS!"
1. Introduction
Congratulations! You have purchased the highest quality voice/fax/modem call
processor in the industry-The Stick! This manual has been designed to get you,
your communications devices and The Stick operating on the phone line with a
minimal amount of work.
Please read this manual carefully and BE SURE TO FILL OUT AND MAIL YOUR
WARRANTY CARD!
How The Stick Works
When installed on a phone line, The Stick automatically answers all inbound calls
and "screens” for one of three things.
1. Fax tones (CNG - CalliNG tones)
2. Security Access Codes (in the form of DTMF/touch tones)
3. Nothing - No tones (normally voice calls)
While performing the "screening" function for fax tones, security access codes or
the absence of tones, The Stick transmits phone company-simulated "ring back"
tones to the calling party so they are “fooled” into thinking that the phone is
ringing but what is really happening is The Stick is “listening” for these tones.
After the screening function is performed, the call is routed to the proper device
leaving other phones/devices undisturbed over a single phone line.
Eliminating dedicated fax lines and
incorporating the line sharing technology
of The Stick adds up to giant savings.
Remote diagnostics and programming
capabilities make it easy for our factorytrained technicians to make any
programming changes right over the
phone for you. Call 800-535-4651 if you
need any assistance with installation or
configuration of your Stick.
The Stick's performance is dependent on how it is installed on a home or
business phone line and what programmable features are activated. The next
section explains the different features, which optimize performance in particular
installations.
Programmable Features
Read This First!!!!!
•
Fax Tone Detection-This feature, when activated, tells The Stick to detect
the presence of CNG/fax tones which may be transmitted by a calling fax
machine or PC Fax card.
All calls accompanied by CNG tones, whether they be from a fax machine
or PC Fax card, are routed through to equipment connected to the device
port labeled FAX.
If no fax-type equipment is used on The Stick, simply deactivate this
feature.
Factory preset is "on".
•
Protected Hook Flash-This feature allows The Stick to be compatible
with certain multi-line KSU phone systems.
Some KSU systems do not allow touch tones (DTMF tones) to be
generated from a telephone keypad after an inbound call has arrived.
With Protected Hook flash "on" the phone system can be "fooled" into
generating touch-tones by striking the flash key Calls can then be
manually transferred between devices by dialing the proper security
access code.
Factory preset is "off."
•
Unanswered Call Silent Transfer-This feature was engineered for those
of you who may receive manual fax or modem calls after normal business
hours but do not use an answering machine.
Manual fax calls (not accompanied by CNG fax tones) and modem calls
usually wind up routed to the phone when the caller cannot execute the
proper access code.
With Unanswered Call Silent Transfer "on", the inbound call (routed to the
phone) will be switched over to a designated port (see Silent Transfer
Destination) after the unanswered phone has been rung the maximum
number of rings.
Factory preset is "off."
Programmable Features Continued
•
Answering Machine Silent Transfer-This feature works like Unanswered
Call Silent Transfer except that it is designed for calls of 45 seconds or
less.
It should only be activated when you are using an answering machine to
field after-hours calls. When a manual fax or modem call arrives and the
answering machine has answered, the caller will still be able to get to a
destination device by staying on the line after the answering machine
"times out".
If you answer a call and hang up before 45 seconds, The Stick will transfer
the call to the designated device.
Factory preset is "off."
•
Silent Transfer Destination- After activating either Silent Transfer
feature, you will want to tell The Stick where to route the call.
The "Destination" program feature gives you the option of routing all afterhours calls to either the fax or modem.
Factory preset is to the port labeled "FAX".
•
Programmable Security Access Codes (SAC's)-Transfer of a call is
executed by dialing the programmed SAC for each voice/data device
connected to The Stick.
SAC's are programmable (using a touch tone phone only) up to 4
characters long -digits 0 through 9 and symbols * (star) and # (pound).
The Stick will not detect SAC's dialed from "calling" pulse phones - only
from touch-tone phones.
Call transfers dialed by a pulse phone are limited to phones hooked to or
on the same line as The Stick and are limited to transfer to the "FAX" port
only.
The pulse dial SAC for this is fixed at "2" You must also have the "Pulse
Detect" feature on if you use a pulse dial phone to transfer a call.
Programmable Features Continued
Do’s and Don’t Of SAC Programming
•
1 Digit Security Access Codes ARE NOT recommended. (refer to
“Programming” Section, page 9).
•
DO NOT use the codes “9”, “#”, “##”, or anything beginning with “9”
or “##”. These codes are reserved of the “Call Grab” feature and
the programming access to The Stick, respectively.
•
DO NOT select an access code that may be the first part of a dialed
number or control code of your answering machine.
Factory preset Security Access Codes are as follows:
Voice 1 and Voice 2 Ports FAX Port MODEM Port •
Touch Tone
*1
*2
*3
Pulse Dial
None
2
None
Pulse Detection-The Pulse Detection feature, when activated, allows The
Stick to detect the factory-preset code "2" and "Call Grab" preset code "9"
when dialed from a pulse dial phone.
The factory preset for this feature is "off."
•
Rings To Answer- This feature directs The Stick to answer an inbound
call after a programmed number of phone company rings (0 to 10 rings)
from the phone company.
If RTA is programmed to "0", The Stick will answer the call during the first
ring. Extension phones elsewhere in your location will only "chirp" the first
ring before going quiet.
If the RTA is greater than "0", The Stick will allow all incoming calls to ring
extensions and devices connected to the ports labeled VOICE 1 and
VOICE 2 for the programmed number of rings.
Factory preset is 0 rings.
Programmable Features Continued
•
Call Override- With Call Override "on"-when The Stick "answers" a call
and you pick up an extension more than one second later, The Stick will
recognize the lifting of the handset and stop transmitting ring back tone to
the caller. You can immediately begin to talk or (within 15 seconds)
transfer the call to another device.
In some areas of the country, your local telephone company's lines and
switching equipment may cause this feature to not function properly. Just
deactivate the feature. (See the "Call Grab" feature explanation in the
Standard Features section for another option to Call Override.)
Factory preset is "off."
•
Maximum Rings-This feature allows you to program the number of rings
transmitted to your phones/answering machine, fax and modem by The
Stick. Maximum Rings can be programmed anywhere from 4 rings
(minimum) to up to 30 rings.
Factory preset is 8 rings to all equipment.
•
Unrestricted Manual Transfer- With the UMT feature "off," The Stick will
only allow a manual transfer to be done during the first 15 seconds of an
inbound call when answered from an extension.
The UMT feature, when activated, enables a transfer to be executed from
an extension phone and by either party at any time during the call, no
matter if the call is inbound or outbound.
Of course, inbound calls answered by equipment through the VOICE 1 or
2 ports may be transferred at any time using the appropriate SAC,
regardless of the setting for this feature.
Factory preset is "on."
Standard Features
- No Programming Needed!
•
Barge-In Protection- When installed on an incoming telephone line
before ALL telephone equipment (extension wall jacks or multi-line phone
systems), The Stick will protect any voice or data call from being accessed
by other telephone equipment on the same line. Any phone device that
goes "off-hook" during a conversation or data transmission will receive a
silent line.
Note: The Barge-In Protection feature will control only those phone/data
devices connected directly to The Stick. For optimum performance and
protection, it is recommended that all premise extension phones be wired
into The Stick at either the Voice 1 or Voice 2 ports. Relax! This is not a
difficult operation to perform.
See the section titled "Installation Procedures" for the easiest way to get
the job done.
•
Call Grab- If the Call Override feature does not perform due to any line
problems with your local phone service provider, this standard feature will
allow you to override The Stick's tone detect and call routing operation.
Call Grab can be initiated from any touch-tone or pulse extension phone
by dialing "9" on the telephone keypad. When "9" is dialed, The Stick will
immediately cease its call routing function. This feature is standard and
will work regardless of the status of the "Call Override" feature.
Note: YOU must enable the "Pulse Detect" feature if you want to grab a
call from a pulse dial phone.
•
Power/Call Status Light-The LED on the front of The Stick demonstrates
two functions-when lit, it tells you the unit is powered up and while
processing inbound and outbound calls,
the LED signals which port is being used.
A "one blink" pattern tells you a voice call
is being processed, a repeating "two blink"
pattern says The Stick has either detected
CNG tones and is routing the call to your
fax machine or a fax is outbound.
A repeating "three blink" pattern denotes the proper security access code
has been monitored and a caller has been monitored and a caller has
been routed to your computer modem or data is being transmitted
outbound from your computer modem.
The “How To” of Programming
Programming The Stick
The average consumer usually starts to freak when they open up any product
manual and see the word "PROGRAMMING". We have all experienced
"programming" anxiety with VCR's, computers, fax machines. . ...whatever.
Relax. This is relatively painless.
All you have to do is understand each programmable feature and how you want
The Stick to operate in your chosen installation.
On the next page is the Programming and Quick Reference Guide. This table
was developed as an easy reference/record for program features with
corresponding Register Number, programming range of each feature, the factory
preset of each feature (how The Stick works "out of the box" if you don't bother to
program anything), program recommendations for certain types of installations
and finally, a space for writing down what you've done (or what you want The
Stick to do).
Please use the Programming and Quick Reference Guide. Mark on it. Highlight it.
If you can't remember which Register Number controls which feature. . . .refer
back to it. And take a tip from us, pencil in how you have programmed all the
features. It will save you some time and frustration.
We advise you to read through the Programmable Features section again if you
are not quite sure of how you want The Stick to operate.
Tones / Programming Commands
THE STICK PROGRAMMING AND QUICK REFERENCE GUIDE
Register
Number
Programmable
Feature
Program
Range
Factory
Preset
01
FAX Tone
Detection
0 = off
1 = on
ON
02
Protected
Hook Flash
0 = off
1 = on
OFF
03
Unanswered Call
Silent Transfer
0 = off
1 = on
OFF
04
Silent Transfer
Destination
0 = fax
1 = modem
FAX
05
Pulse Detection
0 = off
1 = on
OFF
06
Call Override
0 = off
1 = on
OFF
07
Unrestricted
Manual Transfer
0 = off
1 = on
ON
Programming
and Installation
Recommendations
Regardless of how
you install the Stick,
if a FAX/PC Fax
Card is usedProgram this feature
"ON"
With older KEY and
PBX systems, you
may need to
program this feature
"ON"
"UCST" routes all
unanswered afterhours calls to
fax or modem ports
(on any installation) program "ON"
This feature
determines what
device will receive a
call after it has been
"silently transferred"
If you have pulsedial phones and
wish to transfer or
"grab" a call program this feature
"ON"
If The Stick is
installed at a wall
jack and you want to
answer a call from
any extension phone
- program "ON"
Gives transfer ability
at any time, from
either party from any
phone,
recommended
programming "ON"
Your
Program
08
Answering
Machine
Silent Transfer
0 = off
1 = on
OFF
11
Security
Access Code
for VOICE Ports
Digits 0-9 *
and #
*1
4 digits
max.
12
Security
Access Code
for FAX Port
Digits 0-9 *
and #
*2
4 digits
max.
13
Security
Access Code
for MODEM Port
Digits 0-9 *
and #
*3
4 digits
max.
14
Rings to answer
0 to 10
Rings
0 Rings
15
Maximum rings
4-30 Rings
8 Rings
After answering
machine times out,
call will be routed to
fax or modem port
(any installation) program "ON"
This register
contains the code for
transfer of a voice or
modem call to
devices connected
to voice 1 & 2 ports
This register
contains the code for
transfer of a voice or
modem call to FAX /
PC Fax Card
CONNECTED to fax
port
This code is usually
sent by calling
modem - we
recommend
programming a 4
digit code for
security purposes
If The Stick is used
on a KSU or PBX
set to "0" - home
installs w/ext. phone
access, program
needed no. of rings
This feature controls
the number of times
a device (voice, fax,
modem) is rung by
the stick before
dropping the call
Initial Check
Included with The Stick are additional items that make life a whole lot easier.
Please check the box and make sure you have:
•
•
•
The Stick™ Voice/Fax/Modem Call Processor
One 12 Volt Class 2 Power Source
One Silver Modular Line Cord
If any of these items are missing,
please alert the Sales
Department toll free at 866-3370965 and also Technical Support
at 800-535-4651
POWER UP
The first thing you must do before programming The Stick is to "power up" the
unit. It is recommended that you choose a power outlet close to a telephone wall
jack. Plug the power supply (supplied) into the 110 volt outlet and insert the
barrel plug into the port labeled:
USE ONLY WITH
12 VAC 0.8-1.0A
CLASS 2
POWER SOURCE
At the rear of the unit. The red light beside "The Stick" logo should be lit at this
time.
CONNECTING TO THE PHONE LINE
Before programming The Stick, you will need to
install it on your existing telephone line and connect
a touch-tone (DTMF) telephone to the port labeled
"VOICE 1" at the bottom of the unit.
A silver Modular Line Cord has been supplied for
connecting The Stick to a phone line. Plug one end of the line cord into the port
labeled "LINE". Plug the other end into a telephone wall jack. At this time you
should hear dial tone when the handset on your touch-tone phone is lifted
off-hook.
Overview of Programming
The "How To" of Programming
Now that you've gotten everything hooked up and in place, the fun begins! We
advise that you read through this section once or twice for familiarity with the
process. You may also want to refer back to the Programming and Quick
Reference Guide table to pencil in selected programming values for each feature
you wish to control.
The first thing you should do is to place a local call to your best buddy. Ask him
or her to lay their phone receiver down for a moment.... but don't hang it up. This
will keep you from incurring any long distance phone charges or "freaking out"
the local phone company with all the numbers you will dial to program The Stick.
After placing a call to your friend, wait at least five seconds before proceeding.
First, DIAL "# # 7 7" on your telephone keypad. The LED light will begin blinking
rapidly. Immediately listen for three rapid high - pitch beeps in your handset.
Three high-pitched tones indicate that you have entered the programming mode
and may "PROCEED".
At this time, you should enter the Register Number of the feature you wish to
program and proper value(s). If the proper register number and programming
value(s) are entered, The Stick will answer with a high-pitch tone immediately
followed by a mid-pitch tone. It kind of sounds like "bee-blip". This means "OK".
If the numbers you enter are invalid (either for the Feature Register or program
value), The Stick will respond with a single low-pitch "ERROR" tone. This tone
might remind you of the sound you hear when you "blow it" on your favorite video
game.
In either case, three rapid high-pitch tones will immediately follow telling you to
"PROCEED". At this time you may either access and program a new feature
register or correct the previous attempt by entering new numbers.
Summary of the types of tones you will hear.
"PROCEED''-Three high-pitch tones in rapid succession tell you The Stick is
ready to program a register or receive more commands in the form of touch
tones. "Bee-Bee-Beep"
"OK"- (or "Okay" for you purists)- One high-pitch tone immediately followed by a
mid-pitch tone means that the numbers that you have entered are acceptable
and within range for the Register Number and feature value. "Bee-Bip"
“ERROR’‘- A single low-pitch tone indicates that the Register Number, feature
value or program commands (we talk about those next) you have entered are
invalid. Common errors committed when programming could be:
The "How To" of Programming Continued
•
•
Entering the Register Number for a feature, let’s say it’s “Protected Hook
Flash”, and you enter only part of the number. The Register Number for
“Protected Hook Flash” is “02”. If you enter "2" The Stick will give you an
“ERROR” tone.
Entering a feature value that is outside of the program range. As an
example, we will use “Protected Hook Flash” again. You are only allowed
to program this feature value as “0” (off) or " 1” (on). If you enter the
number “2” after the correct Register Number, The Stick will give you an
“ERROR” tone.
Programming Commands
Save To Memory/Exit- After programming all feature values you wish to
manipulate, you will need to save the program to memory and exit the
programming mode. This can be done by dialing “80”. At that time you will hear
the “OK” tone twice. The LED will go back to normal operation. Even if there is a
power loss to The Stick, all programming is saved.
No Save/Exit- If you wish to “dump” any programming you’ve done and exit the
programming mode, dial "90" At that time you will only hear the “OK” tone once.
The LED will go back to normal operation.
Set Registers To Factory Preset- This command sets all program registers to
the factory presets (refer to the Programming and Quick Reference Guide).
When you dial "60" all registers automatically revert to factory preset. The Stick
will answer with an “OK” tone followed immediately by a “PROCEED” tone. Dial
“80” to save and exit.
A Overview of Programming
This is “the big picture” for how to program The Stick.
Being the good consumer you are, you’ve read the manual thoroughly (NOT!),
penciling in the feature changes on your Programming and Quick Reference
Guide. You call your mom (a local call) and ask her to lay the phone down for a
moment while you program this neat new call processor you’ve just purchased.
She says OK.
You’ve decided to reprogram the Security Access Code for the MODEM port,
turn the “Unrestricted Manual Transfer” feature off and turn the “Pulse Detect”
feature on.
Programming Commands continued
1. Since five seconds has more than elapsed since you initiated the your
mom, you can enter the programming mode. You dial " # # 7 7” on your
touch-tone phone connected to the “VOICE 1"' port.
The Stick Response: Answers with a “PROCEED” tone. The LED is
blinking very rapidly. You have 30 seconds to begin the next command.
2. You change the SAC for the MODEM port to “007”, by dialing 13007, “13”
selects Register 13 (Security Access Code for MODEM port) and 007 is
the new SAC.
The Stick Response: Answers with an “OK” tone, then a “PROCEED”
tone. You have 30 seconds to begin the next command.
3. You change the “Unrestricted Manual Transfer” feature to “OFF” (factory
preset “ON”) by dialing 070. “07” selects Register 7 and "0" turns the
feature off.
The Stick Response: Answers with an “OK” tone, then a “PROCEED”
tone. You have 30 seconds to begin the next command.
4. You change the “Pulse Detect” feature to “ON” (factory preset “OFF”) by
dialing 051. "05" selects Register 5 and "1" turns the feature on.
The Stick Response: Answers with an “OK” tone, then a “PROCEED”
tone. You have 30 seconds to begin the next command.
5. You have finished programming the desired feature changes and wish to
save them to nonvolatile memory and exit the programming mode. You
dial “80”.
The Stick Response: Answers with the “OK” tone twice. The LED returns
to normal blinking which demonstrates that your touch-tone phone
connected to the “VOICE 1" port is off-hook.
Check and see if your mom is on the other end of the line.
If not, hang up the phone.
NOTE: If The Stick does not receive a command within 30 seconds, it will give
you an “OK” tone and exit the programming mode without saving any
programming. Basically it is acting as if you have dialed "90".
(See section titled Programming Commands.)
Audible "Read Back" of Programming
PROGRAMMING-BEEP BEEP BEEP-BOOOOOOOP!
There is a programming command that allows The Stick to audibly “read back”
(via the phone) the values of any program register.
This feature is handy when you forget what you have just programmed and want
a quick read back or checking to see if a feature is (de)activated before leaving
your home or office.
There are two types of tones that The Stick will transmit through your receiver on
the audible “read -back”:
•
•
A clipped, high-pitched “bip” which has a numerical value of one.
A long low-pitched “beep” which has the numerical value of five.
The chart below describes the audible tones, which coincide with each number or
symbol in a register.
Number / Symbol
Audible Tones
1
2
3
4
5
6
7
8
9
0
*
#
"BIP"
"BIP BIP”
“BIP BIP BIP”
“BIP BIP BIP BIP”
“BEEP”
“BEEP BIP”
“BEEP BIP BIP”
“BEEP BIP BIP BIP”
“BEEP BIP BIP BIP BIP”
“BEEP BEEP”
“BEEP BEEP BIP"
“BEEP BEEP BIP BIP”
Executing Audible “Read Back” With The Stick:
First, you must enter the programming mode by
dialing "# # 7 7”. Then press "*" and the Register
Number you wish to read back.
Audible "Read Back" of Programming continued
An example:
•
First, you press "# # 7 7” on your touch-tone phone to enter the
programming mode.
•
The Stick responds with a “PROCEED” tone.
•
You press "* 0 5”
(telling The Stick to audibly read back the value in Register 5).
•
The Stick transmits 2 ‘Beeps” signifying the value “0”
(the feature is turned off).
•
After a short pause, The Stick will transmit an “OK” tone followed by a
“PROCEED” tone.
•
At that time you may either “read back” or program any register.
For Registers Containing More Than A Single Value
Some registers can (or are required to) contain more than .a single value, i.e.,
Registers 11 to 15. Here’s a short example of what a “read back” would sound
like where more than 2 digits or symbols are programmed in the register.
Let’s say the register you want to “read back” is number 13, the Security Access
Code for the MODEM port, and it is programmed as "* 7 5”:
•
You first enter programming (# # 7 7).
•
Press "* 1 3" to “read back” Register 13.
•
The Stick transmits "Beep Beep Bip (pause) Beep Bip Bip (pause) Beep”.
(Equivalent to * 75).
Stick immediately transmits the “OK” and “PROCEED” tones.
Note: You will receive an “Error” tone when entering an incorrect Register
Number on audible “read back”. Never fear-try again!
Pointers for hook-up of voice/data equipment
Voice / Data Equipment
This section involves the connection of communications equipment to The Stick.
You may configure the “hook up” of different types equipment in a number of
ways. Whatever suits your operational needs and your installation requirements!
Although each device port is labeled with generic titles designating what
equipment would connect to what port, YOU CAN CONFIGURE IT ANY WAY
YOU LIKE! Just be sure to read this section thoroughly before trying anything
weird (that might not work).
FAX / PC Fax Cards
The Stick has special features that make it work extremely well with either a PC
FAX Card or a FAX machine. The feature that enables The Stick to route an
incoming FAX call to your “FAX” type device is “FAX Tone Detection”.
What’s a “FAX Tone”?
In a nutshell, most FAX machines generate a tone when they are operated
“automatically”. Automatic generally means you just drop the paper(s) to be
faxed in the document carriage, the machine loads it, the desired phone number
is entered, you hit the “START” button and you’re done.
The machine automatically dials the
number and begins emitting the tone
(commonly known as CNG or AUTO-FAX
tone) to identify itself as a FAX-type device.
This tone is continuously transmitted until
the called FAX machine answers the call
and “handshakes” with the sending FAX.
With The Stick at the receiving end, the call is “answered” and the FAX Tone is
detected. At that time the call is routed to the port labeled “FAX”. Hence, we
suggest if you use either a FAX machine or PC FAX Card connect it to the port
labeled “FAX”.
From The "...... .And Here’s Another Curve Ball” File.
Sometimes people pick up the handset on their FAX machine and dial the phone
number of the fax machine they want to connect with. By doing this they have
told their FAX machine they want to use it for voice purposes only.
Pointers for hook-up of voice/data equipment continued
No problem for the FAX machine.....but now it will not transmit any AUTO-FAX
tones after dialing a phone number. If The Stick is at the receiving end, it will
answer the call and detect the absence of FAX tones, assume it is a voice call
and route it to the VOICE 1 & 2 ports.
When you answer the phone, the person at the other end will say, “I am trying to
send you a FAX!” Of course you can manually transfer the call to your FAX by
pressing *2 (or another code if reprogrammed).
But before you do, we suggest you share the nugget of brilliant information found
in the preceding paragraph with your misguided (no pun intended) caller and
suggest the next time they fax you, try calling without lifting the FAX machine
handset. It will make everything a whole lot easier at both ends of the
conversation.
PC FAX Cards And The Meaning of Life...
If a PC FAX Card is connected to The Stick at the port labeled “FAX”, you should
have no operational problems when a call is routed. There are about a half-amillion different types of PC FAX Cards on the market today and each has its
own operational idiosyncrasies.
If you do experience a problem, check the operations manual included with the
PC FAX Card. If you can’t figure the problem out on your own - call our Tech
Support gurus at 1-800-535-4651, they’re pretty sharp about stuff like that.
Answering Machines
An answering machine is an effective tool when used with The Stick. When
connected to either “VOICE” port, the answering machine will field any
unanswered voice calls, and via a message, provide instructions on how to
access other equipment.
A sample message might go something like this:
Hi! You have reached (Name/Company/Phone
Number). We are not in right now, but if you wish to
leave a message, wait for the beep.
If you want to send us a FAX, press * 2 (or reprogrammed code). If you
can’t dial * 2 on your phone, just stay silent after the beep and wait until the
answering machine stops.
You will then be transferred to the FAX automatically. Start transmission
when you hear our FAX signal. Thanks and have a nice day!
This message reflects the use of three programmable features-the SAC for the
FAX port, Answering Machine Silent Transfer and Silent Transfer Destination.
The SAC for transfer to the FAX machine is factory preset at *2 “Answering
Machine Silent Transfer” has been programmed “on” and the ‘Silent Transfer
Destination” used is factory preset to the “FAX” port.
Retrieving An Answering Machine Message- Most answering machines on the
market today have factory preset “retrieval codes” for accessing a message from
a remote phone. There is no special feature on The Stick for accessing your
answering machine: just call your phone number, let the machine answer the
line, and dial your “retrieval code”.
Again, we remind you to program all SAC’s used for voice/data equipment
differently from your answering machine “retrieval code”.
Computer Modems
The Stick is compatible with all dial-up modems that use a “single pair” RJ-11 line
cord to connect to a phone line. We suggest connecting the modem to the port
labeled “MODEM” (we bet you’ve already figured that one out!). Most incoming
calls to your modem are from remote (off location) computer modems. The Stick
will route calls to your computer modem when the calling modem dials the proper
SAC after The Stick has answered the call.
The “How To” Of Calling Your Modem- For any person to
access your modem through The Stick, they must know your
programmed Security Access Code for the “MODEM” port.
Dialing your telephone number and SAC is done on the remote
computer communications software. It should look something
like this (for a HAYES-compatible modem):
ATDT 1606 555 1234,,*3
The commas after the phone number are commands telling the modem to wait
two seconds per comma before dialing the SAC * 3. You should instruct your
friends to “time” a call to your residence. Tell them to count the seconds between
the last digit dialed and the last ring to the phone before The Stick answers the
call (how many rings before The Stick answers). Divide that amount of seconds
by two and you have the needed number of commas between the phone number
and SAC.
It is safe to repeat the SAC twice in the dialing string like so:
ATDT 1 606 555 1234,,*3,,*3
Note that additional commas will need to be inserted between the SACs at the
end of the dialing string. A minimum of 2 seconds between SACs is needed for
The Stick to recognize and register the proper sequence of digits and symbols.
Some modems cannot dial the * and # symbols. You may want reprogram a
specific code for one time access by an outside caller.
Again, if you have any questions, call our Tech Support line at 1-800-535-4651.
Our factory-trained technicians can help you out on timing or SACS.
Other Stuff That Works
The Stick can operate on virtually all multi-line Key and PBX phone systems. We
do recommend a specific type of installation for The Stick on either system. Refer
to the section on Installation.
The Stick is also compatible with virtually all Credit Card Authorization Terminals,
Point of Sale Terminals, Loop-Start dial-up TELEX machines, dictation machines,
Answering Machines, cordless telephones, CALLER ID Display equipmentanything that requires a phone line to communicate.
If you have a CALLER ID Display device, we do recommend that it be installed
on the telephone line BEFORE The Stick and the “Rings To Answer” feature be
set for 2 or more rings. The data transmitted by the local Telco, which identifies
the calling party’s phone number, arrives between the first and second ring so it
should register on the display device without a problem.
Services Offered by Your Local Telco- Most telephone companies are now
marketing “Call Packages” that allow subscribers to customize their phone
service in a multitude of ways. Most of the different services available are
compatible with The Stick, but some may impede performance. Here are a few:
•
•
Call Waiting-The “beep” heard during a phone conversation, alerting you
of another call, will not affect the performance of The Stick. However,
pressing the hook switch to field a call will cause The Stick to do strange
things....like inadvertently transferring a call to your fax machine. We do
not advise having call waiting on the same line with The Stick.
Call Forwarding-The Stick’s automatic answering function (answer after a
programmed number of rings) will not allow calls to be forwarded to
another phone number. You may want to weigh the pros and cons of
using The Stick versus the Call Forwarding service.
Installation
Introduction
This next section covers installation for The Stick in various configurations and
applications. We have tried to cover virtually all installation, scenarios that may
be found in the home and business. If we missed yours or you have something
weird in mind for an installation - please call tech support at 1-800-535-4651.
Maybe we can help you out or save you some time and unneeded expense.
Where You Gonna Put It?
It really makes no difference if you are installing The Stick in a business or a
home- the main considerations for installation really have to do with how you
require The Stick to perform and what you are willing to do with it as far as
installation requirements go. Below are the three main questions you should ask
yourself:
1. Do You Require “Barge-In” Protection or Call Access From All Extensions?
2. Is There A Multi-line Phone System Present?
3. How Much Hassle and Expense Do I Want To Incur Installing The Stick?
How Do You Want It To Work?
To better understand the type of installation/placement that may be right for you,
think of The Stick as either a “traffic cop” or a “personal secretary”.
!@&?)+!! Traffic Cops!
“Traffic cops” aren’t the most popular people in the world so we’ll keep this
analogy short and sweet. If installed into the phone-line BEFORE all phone
extensions, wall jacks, multi-line phone systems, etc., The Stick acts like a “traffic
cop” at an intersection. All inbound call “traffic” is intercepted by The Stick via its
automatic answer feature and routed to its proper destination (i.e. phone, fax,
modem).
The standard feature that makes this type of installation attractive is “Barge-In
Protection” and The Stick’s ability to transfer a call between devices. If a voice
call is answered and routed, only the phones will ring. If a call, accompanied by
CNG, is answered and routed, only the fax machine will receive the call. Once a
call is directed to its intended device, our “traffic cop” also keeps equipment
connected to The Stick from “Barging-In” on the existing call.
Once again, for The Stick to perform in this manner, it must be installed on the
phone line BEFORE all phone extensions, wall jacks or phone systems.
Your Own Personal Secretary
Everybody needs their own personal secretary to screen calls when they are
busy with other things. If you install The Stick on the phone line by plugging it into
a telephone wall jack, that is basically what you've got- somebody to answer an
incoming call and either:
A.
B.
Tell you it is a voice call (by ringing the phone connected to a VOICE port) or
Route it to the appropriate equipment
Here’s the scenario-you are in the basement working one Saturday and the
phone rings. Of course you have 3 or 4 extension phones scattered about your
palatial estate, and particularly, one in the basement.
With The Stick plugged into a telephone wall jack upstairs, you have the option of
either “grabbing” the call before The Stick does via the basement extension or
allowing The Stick to answer the call and route it to the appropriate device.
This type of installation gives you the advantage of accessing an inbound call
from any extension- but you lose “Barge-In Protection”. Manual transfers can still
be executed from an extension phone if needed.
The Right Features For The Right Installation
In the next section, we have outlined different types of installations and included
some recommendations for feature settings that should optimize performance of
The Stick for that particular installation.
These are just recommendations. If you don’t like the way it works-mutter
something under your breath about “busybodies” and change feature settings.
We don’t mind.
On Single Phone Line
INSTALLING THE STICK ON A SINGLE PHONE LINE
Single line installation is pretty much a no-brainer. If this is how your home or
office is wired, then you should browse through each wiring configuration to find
out the best one for your needs.
SIMPLE PLUG-IN (ONE WALL JACK, NO EXTENSIONS)
Pros:
•
Great Barge-In Protection!
•
Easy Installation!
Cons:
•
Fat Chance You’ll Be Lucky Enough To Have This Wiring Configuration
Installation:
•
Simply unplug whatever is in the wall jack and connect the “LINE” input of
The Stick to the wall jack with the supplied line cord.
•
Reattach your phone to the VOICE 1 port and connect your answering
machine and data equipment to their respective ports.
Feature Recommendations Pertinent To This Installation:
•
Rings To Answer - Set To “0”. The Stick will answer the call immediately.
•
If You Have A Pulse Dial Phone, Set Pulse Detection ON.
SIMPLE PLUG-IN WITH MULTIPLE EXTENSIONS
Pros:
•
Can Access Calls From Extension Phones!
•
Easy Installation!
•
Installation Can Occur At Any Wall Jack.
Cons:
•
No Barge-In Protection-Sorry!
Note: This installation is the same as the “Simple Plug-In, No Extensions”.
Connection to a telephone wall jack is the same.
Feature Recommendations Pertinent To This Installation
•
If any phones are pulse dial, program Pulse Detect ON.
•
If you wish to access a call from an extension phone prior to The Sticks
answering, program the needed amount of rings in the “Rings To Answer”
feature.
•
Program “Call Override” to ON for call access AFTER The Stick has
answered a call.
SIMPLE PLUG-IN WITH EXTENSIONS
AND TOTAL BARGE-IN PROTECTION
Pros:
•
Provides Total Barge-In Protection.
•
Only voice calls will ring phone extensions.
•
The best installation for total control of inbound calls.
Cons:
•
Calls cannot be accessed from an extension phone before The Stick
answers.
•
Installation requires splitter/adapters (not included) and an extra line cord.
•
May need to do a little rewiring at each wall jack. (but probably not)
Most homes and businesses are wired with either 2-pair or 3-pair telephone
cable from extension to extension. This installation splitter/adapters utilizes the
unused pair of wires in the cable to connect all phones to the VOICE 1 port.
1. The point of connection to the telephone line for The Stick can be at any
extension wall jack. Unplug anything connected to this wall jack and plug a
splitter/adapter into the wall jack.
2. Plug one end of the supplied line cord into the port labeled “LINE” on The
Stick and the other end in the “Line 1” port of the splitter/adapter.
3. Connect the “VOICE 1” port of The Stick to the “Line 2” side of the
splitter/adapter using an additional line cord (not supplied).
4. At extension wall jacks located away from The Stick, unplug any phones
from these jacks. Plug splitter/adapters in all wall jacks. Reconnect
phones to the “Line 2” side of the splitter/adapters.
At any point “down line” from The Stick where it is impractical to insert a
splitter/adapter (for example: a wall mount telephone), this type of jack may be
converted by:
a. Swapping the GREEN wire with the BLACK wire
b. Swapping the RED wire with the YELLOW wire
The phone can then be plugged into the converted jack.
Feature Recommendations Pertinent To Installation
•
•
Set Rings To Answer to “0”.
If you are using Pulse dial phones at any point in installation, set Pulse
Detection “ON”.
* Many Telephone/Electronics Stores carry the Splitter/Adapter for this
installation. Here is a couple of retailers with the right part numbers:
• ATT Phone Stores # 267C
• Radio Shack
# 279-402
NOT-SO-SIMPLE IN LINE INSTALLATION
Pros:
•
Total Barge-In Protection!
Cons:
•
You may require the services of a telephone installation guru. Requires
severing the phone line before all existing wall jacks and installing either
modular jacks or RJ-11 modular plugs and an extra modular line cord.
This one can be real difficult due to the materials required and the point of
installation for The Stick. Remember, what we are trying to achieve in this
scenario is “Barge-In Protection." All voice calls are routed to all phones and fax
and modem calls go to their respective devices-without one being able to access
the other.
1. Find a point on the incoming phone line before all wall jacks or telephone
equipment. Sever the phone line.
2. Install two modular wall jacks on each end of the severed phone line.
Make sure you are using the correct pair of wires when connecting the
severed phone line to the modular jacks.
3. Plug one end of the supplied line cord into the port labeled “LINE” on The
Stick and the other end into the first modular wall jack. An additional line
cord will be needed to connect the port labeled “VOICE 1” to the second
modular wall jack.
4. From this location, additional wiring may need to be run to your fax
machine and computer modem (if located in another room).
Feature Recommendations Pertinent To Installation
•
•
Set Rings To Answer to "0"
*If you are using Pulse dial phones at any point, set Pulse Detection to
ON.
On Multiple Phone Line System
INSTALLING THE STICK
ON A MULTIPLE PHONE LINE SYSTEM
The Stick can be installed in a multiple line application where either an electronic
phone system (KSU or PBX) or a 2-line phone configuration exists. Installing The
Stick in these types of situations is a little bit more involved than the single line
installations previously outlined. Review this section and if things get a little too
hairy...call a telephone installer, show him this section and save yourself a lot of
time and hassle.
INSTALLING ON A KEY SYSTEM OR PBX
Pros:
•
Great Barge-In Protection!
Cons:
•
Installation is not for amateurs. Requires you to run station wiring from
The Stick to the fax machine and computer modem location.
Installation of The Stick on a multi-line phone system should always occur at the
“Trunk” side. “Trunk” is telephone nerd-speak for the side closest to the
telephone company where incoming lines connect to the phone system.
Confused... just look at the picture below.
We recommend that if you have rollover from your phone company, install The
Stick on the last line of the rollover sequence.
1. Unplug the chosen line from your KSU or PBX. A modular wall jack will
need to be installed on that line close to the KSU or PBX if the plug is not
RJ-11 modular. If the plug is RJ-11 modular, then it can be plugged
directly into the “LINE” port of The Stick.
2. If a modular wall jack is installed, plug one end of the supplied line cord
into the modular wall jack and plug the other end into the port labeled
“LINE”. An additional line cord will be needed for connection from the
“VOICE 1” port to the KSU/PBX. From this point phone wire is run to the
fax machine and modem.
Feature Recommendations Pertinent To This Installation
•
•
•
Set Rings To Answer to "0"
Set Protected Hook Flash to ON.
If Pulse dial phones are used, set Pulse Detection to ON.
RJ-14 TWO LINE SYSTEM (NO KSU)
Pros:
•
Great Barge-In Protection For One Line
Cons:
•
This installation is not recommended for even the gutsiest do-it-yourselfer!
The standard RJ-14 two-line phone system utilizes “two pair” phone line. To
install The Stick in this scenario, you will have to access the pair that controls the
chosen phone line and install modular wall jacks for connection to the line.
This can get really involved. Standard color pairings for telephone wiring are Red
with Green, Black with Yellow and Blue with White. To physically see what pairs
coincide with each phone number, you may need to chase the wiring back to the
“demarcation” point (where Telco wiring ends and residence wiring begins).
Before you undertake such a sincere and monumental task, consider this . . .
This wiring scheme has been the Waterloo of many an armchair telephone dude
(or dudette). Either you or the wiring is going to win and odds are not in your
favor. We strongly recommend- no, we beg of you- call a telephone installer for
this one. Show your installer the picture on page 33 and/or ask him if he’s got a
better idea. He might.
Feature Recommendations Pertinent To Installation
•
•
Set Rings To Answer to “0”.
Most two-line phones are not pulse dial, but if you happen to own the only
pulse dial two-line phone system in America, set Pulse Detect ON.
Mounting The Stick
The Stick can operate just about anywhere. Here are a few suggestions:
a. Mounted to a baseboard at the bottom of a wall,
b. On a desk top beside your fax, phone or PC modem or
c. Tucked away underneath a desk.
Sticken' It To The Wall
We suggest using an adhesive double-sided mounting tape to keep The Stick
firmly attached to any surface. Keep in mind that the adhesive on the tape can be
very strong. We recommend that you invest some thought into the best location
before peeling back the cover and “going for it”.
Sticken' It On A Desktop
Anti-skid material works great to keep The Stick on a desk or counter top and off
of the floor. We recommend this for people who might need to relocate The Stick
at some time in the future.
Technical Specifications
INPUT POWER REQUIREMENTSAt AC Transformer:
110-125 Volts AC Only, 50-60 Hz
At Power Jack On Stick:
12-14 Volts AC and DC
POWER CONSUMPTION-
6.2 Watts
CO INTERFACERinger Equivalence Number:
Input Ring Detection:
0.5 B
40-150 Volts AC, 15-68 Hz
DEVICE INTERFACEBattery:
Off-Hook Detection:
48 Volts Nominal DC To All Devices
3-80 mA
Ring Generator Frequency:
30 Hz (+/- ..1) Hz Voltage Regulated and Current Limited
Waveform:
True Sinusoidal
Ringing:
No Load: Approx. 82.8 Volts RMS AC
8000 Ohm Impedance (REN 1.0): Approx. 81.6 Volts RMS AC
4000 Ohm Impedance (REN 2.0): Approx. 73.0 Volts RMS AC
2667 Ohm Impedance (REN 3.0): Approx. 64.5 Volts RMS AC
2000 Ohm Impedance (REN 4.0): Approx. 55.0 Volts RMS AC
1800 Ohm Impedance (REN 5.0): Approx. 49.5 Volts RMS AC
FCC Registration
This equipment complies with Part 68 of the FCC rules. On the bottom of this
equipment is a label that contains, among other information, the FCC
Registration Number and Ringer Equivalence Number (REN) for this equipment.
You must, upon request, provide this information to your telephone company.
The REN is used to determine the quantity of devices you may connect to the
telephone line and still have all those devices ring when your telephone number
is called. In most, but not all areas, the sum of the RENs of all devices connected
to one line should not exceed five (5.0). To be certain of the number of devices
you may connect to your line, as determined by the REN, you should contact
your local telephone company to determine the maximum REN for your calling
area.
If your telephone equipment causes harm to the telephone network, the
telephone company may discontinue your service temporarily. If possible, they
will notify you in advance. But if advance notice is not practical, you will be
notified as soon as possible. You will be informed of your right to file a complaint
with the FCC.
Your telephone company may make changes in its facilities, equipment,
operations or procedures that could affect the proper functioning of your
equipment. If they do, you will be notified in advance to give you an opportunity
to maintain uninterrupted telephone service.
If you experience trouble with The Stick, please contact your retailer or
Multi-Link, Inc., for information on obtaining service and repairs. The telephone
company may ask that you disconnect this equipment from the network until the
problem has been corrected or until you are sure that the equipment is not
malfunctioning.
This equipment may not be used on coin service provided by the telephone
company, and is not intended for use with a party line service. This equipment is
intended for use only on loop start service, and will not operate on a ground start
central office line.
Doc Registration
DOC REGISTRATION
The Department of Communications label identifies certified equipment. This
certification means that the equipment meets certain telecommunications
network protective, operational and safety requirements. The Department does
not guarantee the equipment will operate to the user’s satisfaction. Before
installing this equipment, users should ensure that it is permissible to be
connected to the facilities of the local telecommunications company. The
equipment must also be installed using an accepted method of connection. In
some cases, the company’s inside wiring associated with a single line individual
service may be extended by means of a certified connector assembly (telephone
extension cord). The customer should be aware that compliance with the above
conditions may not prevent degradation of service in some situations.
Repairs to certified equipment should be made by an authorized Canadian
maintenance facility designated by the supplier. Any repairs or alterations made
by the user to this equipment, or equipment malfunctions, may give the
telecommunications company cause to request the user to disconnect the
equipment.
Users should ensure, for their own protection, that the electrical ground
connections of the power utility, telephone lines and internal metallic water pipe
system, if present, are connected together. This precaution may be particularly
important in rural areas.
Caution: Users should not attempt to make such connections themselves,
but should contact the appropriate electric inspection authority, or
electrician, as appropriate.
The Load Number (LN) assigned to each terminal device denotes the percentage
of the total load to be connected to a telephone loop, which is used by the
device, to prevent overloading. The termination on a loop may consist of any
combination of devices subject only to the requirement that the total of the Load
Numbers of all devices does not exceed 100.
Notice: This product has been tested and meets the Class B limits for radio noise
emissions set out by the Radio Interference Regulations of the Canadian
Department Of Communications.
Warranty Information
To register your purchase, please fill out the warranty card and mail it.
We warrant that if The Stick Voice/Fax/Modem Call Processor, manufactured by
Multi-Link, Inc. and purchased by you, proves to be defective in material or
workmanship, we will provide without charge, for a period of one year (USA
only), the labor and parts necessary to remedy any such defect. Warranty
commences on the date of purchase by the original retail consumer.
The duration of any implied warranty of merchantability, fitness for a particular
purpose, or otherwise, on this product shall be limited to the duration of the
applicable express warranty set forth above. In no event shall we be liable for
any loss, inconvenience or damage whether direct, incidental, consequential or
otherwise resulting from breach of any express or implied warranty, of
merchantability, fitness for a particular purpose, or otherwise with respect to this
product, except as set forth herein.
Some states do not allow limitations on how long an implied warranty lasts and
some states do not allow the exclusion or limitation of incidental or consequential
damages, so the above limitations or exclusions may not apply to you.
To obtain service under this warranty, you must first request a RMA number from
our technical support department. Present The Stick product with the RMA
number and copy of a sales receipt (or credit card receipt) or other satisfactory
proof of the date of the original retail purchase of the product to Multi-Link, Inc. or
an authorized service repair center.
The AC power supply used with this product is covered under this warranty. This
warranty does not cover damage, which results from accident, misuse, abuse,
improper line voltage, lightning strike, fire, flood, or damage resulting from
unauthorized repairs or alterations performed by an unauthorized service center.
This warranty gives you specific legal rights, and you may also have other rights,
which vary from state to state.
Service Information
SERVICE INFORMATION FOR THE U.S. AND CANADA
Your machine has been registered with the Federal Communications
Commission, and under this program, in the event of equipment malfunction, all
repairs will be performed by Multi-Link, Inc. or a repair center we have
authorized. The owner is restricted from performing any maintenance operation
other than those specified within this instruction manual.
If you require service, please contact Multi-Link, Incorporated at:
In The US:
225 Industry Parkway
Nicholasville, Kentucky 40356
1-800-535-4651
1-859-885-6363
In Canada:
Unit Al, 6120 - 2nd Street S.E.
Calgary, AB T2H 2L8
l-403-258-1646
SERVICE INFORMATION OUTSIDE THE U.S. AND CANADA
For units installed outside the U.S. and Canada, please contact your original
point of purchase dealer for information regarding warranty and service.
For more information and technical support visit our website at
http://faxswitch.com
How to Buy Your Stick
Purchasing Information
Multi-Link products can be purchased securely online from:
faxswitch.com
Or by phone at (217) 337 -0965
Toll Free at (866) 337-0965 within US and Canada.
We look forward to serving you now and in the future.
Thank you.