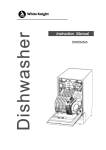
1
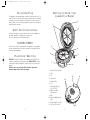
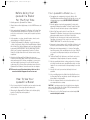
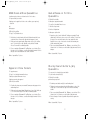
Sante Fe_QM2SFR_IB_30-6-04
6/30/04
6:36 PM
Page 1
LIMITED ONE YEAR WARRANTY
Warranty: This product is warranted by Salton, Inc. to be free from defects in materials or workmanship for
a period of (1) year from the original purchase date. This product warranty covers only the original
consumer purchaser of the product.
Warranty Coverage: This warranty is void if the product has been damaged by accident in shipment,
unreasonable use, misuse, neglect, improper service, commercial use, repairs by unauthorized personnel,
normal wear and tear, improper assembly, installation or maintenance abuse or other causes not arising out
of defects in materials or workmanship. This warranty is effective only if the product is purchased and
operated in the USA, and does not extend to any units which have been used in violation of written
instructions furnished with the product or to units which have been altered or modified or to damage to
products or parts thereof which have had the serial number removed, altered, defaced or rendered illegible.
Implied Warranties: ANY IMPLIED WARRANTIES WHICH THE PURCHASER MAY HAVE ARE LIMITED IN
DURATION TO ONE (1) YEAR FROM THE DATE OF PURCHASE. Some states do not allow limitations on how
long an implied warranty lasts, so the above limitation may not apply to you.
Warranty Performance: During the above one-year warranty period, a product with a defect will be
either repaired or replaced with a reconditioned comparable model (at our option) when the product is
returned to the Repair Center, or the purchase price refunded. The repaired or replacement product will be
in warranty for the balance of the one-year warranty period and an additional one-month period. No charge
will be made for such repair or replacement.
Service and Repair: Should the appliance malfunction, you should first call toll-free 1 (800) 233-9054
between the hours of 9:00 am and 5:00 pm Central Standard Time and ask for CONSUMER SERVICE stating
that you are a consumer with a problem. Please refer to model number QM2SFR when you call.
In-Warranty Service (USA): For an appliance covered under the warranty period, no charge is made for
service or postage. Call for return authorization 1 (800) 233-9054.
Out-of Warranty Service: A flat rate charge by model is made for out-of-warranty service. Include $8.00
(U.S.) for return shipping and handling. We will notify you by mail of the amount of the charge for service
and require you to pay in advance for the repair or replacement.
For Products Purchased in the USA, but Used in Canada: You may return the product insured,
packaged with sufficient protection, and postage and insurance prepaid to the USA address listed below.
Please note that all customs duty / brokerage fees, if any, must be paid by you and we will require you to
pay the cost of customs duty / brokerage fees to us in advance of our performing any service.
Risk During Shipment: We cannot assume responsibility for loss or damage during incoming shipment.
For your protection, carefully package the product for shipment and insure it with the carrier. Be sure to
enclose the following items with your appliance: any accessories related to your problem, your full return
address and daytime phone number, a note describing the problem you experienced, a copy of your sales
receipt or other proof of purchase to determine warranty status. C.O.D. shipments cannot be accepted.
To return the appliance, ship to:
ATTN: Repair Center
Salton, Inc.
708 South Missouri Street
Macon, MO 63552
To contact us, please write to, call, or email:
Salton, Inc.
P.O. Box 7366
Columbia, MO 65205-7366
1-800-233-9054
E-mail: [email protected]
Limitation of Remedies: No representative or person is authorized to assume for Salton, Inc. any other
liability in connection with the sale of our products. There shall be no claims for defects or failure of
performance or product failure under any theory of tort, contract or commercial law including, but not
limited to negligence, gross negligence, strict liability, breach of warranty and breach of contract. Repair,
replacement or refund shall be the sole remedy of the purchaser under this warranty, and in no event
shall Salton be liable for any incidental or consequential damages, losses or expenses.
Some states do not allow the exclusion or limitation of incidental or consequential damages, so the above
limitation or exclusion may not apply to you.
Legal Rights: This warranty gives you specific legal rights, and you may also have other rights which vary
from state to state.
For more information on Salton products: visit our website: www.salton-maxim.com
©2004 Salton, Inc. All rights reserved.
P/N 60945
Made in China
Rev. 1
6/04
OW N E R S M A N U A L
& RECIPE BOOKLET
QM2sFR
Sante Fe_QM2SFR_IB_30-6-04
6/30/04
6:36 PM
Page 3
IMPORTANT SAFEGUARDS
When using electrical appliances, basic safety precautions should
always be followed including the following:
1. Read all instructions.
2. Do not touch hot surfaces. Use handles or knobs. Use oven
mitts or potholders.
3. To protect against electric shock do not immerse cord, plugs,
or appliance in water or other liquid.
4. Close supervision is necessary when any appliance is used by
or near children.
5. Unplug from outlet when not in use and before cleaning. Allow
to cool before putting on or taking off parts, and before
cleaning the appliance.
6. Do not operate any appliance with a damaged cord or plug or
after the appliance malfunctions, or has been damaged in any
manner. Contact Consumer Service for examination, repair or
adjustment.
7. The use of accessory attachments not recommended by the
appliance manufacturer may cause injuries.
8. Do not use outdoors.
9. Do not let cord hang over edge of table or counter, or touch
hot surfaces.
10. Do not place on or near a hot gas or electric burner, or in a
heated oven.
11. Extreme caution must be used when moving an appliance
containing hot oil or other hot liquids.
12. To disconnect, remove plug from wall outlet.
13. Do not use appliance for other than intended use.
ADDITIONAL IMPORTANT SAFEGUARDS
CAUTION HOT SURFACES: This appliance generates heat and
escaping steam during use. Proper precautions must be taken to
prevent the risk of burns, fires, or other injury to persons or
damage to property.
CAUTION: This appliance is hot during operation and retains heat
for some time after turning off. Always use oven mitts when
handling hot materials and allow metal parts to cool before
cleaning. Do not place anything on top of the appliance while it is
operating or while it is hot.
1. All users of this appliance must read and understand this Owner’s
Manual before operating or cleaning this appliance.
2. The cord to this appliance should be plugged into a 120V AC
electrical outlet only.
3. If this appliance begins to malfunction during use, immediately unplug
the cord. Do not use or attempt to repair the malfunctioning
appliance.
4. Do not leave this appliance unattended during use.
SAVE THESE INSTRUCTIONS
For Household Use Only
2
3
Sante Fe_QM2SFR_IB_30-6-04
6/30/04
6:36 PM
Page 5
Polarized Plug
Getting to Know Yo u r
quesadilla Maker
This appliance has a polarized plug (one blade is wider than the other). To
reduce the risk of electric shock, this plug is intended to fit into a polarized
outlet only one way. If the plug does not fit fully in the outlet, reverse the
plug. If it still does not fit, contact a qualified electrician. Do not attempt to
modify the plug in any way.
2.
1.
3.
Short Cord Instructions
A short power-supply cord is provided to reduce the risk resulting from
becoming entangled in or tripping over a longer cord.
Do not use an extension cord with this product.
ELECTRIC POW E R
If the electrical circuit is overloaded with other appliances, your appliance
may not operate properly. It should be operated on a separate electrical
circuit from other appliances.
8.
4.
9.
5.
Plasticizer Warning
CAUTION: To prevent Plasticizers from migrating from the finish of the
countertop or tabletop or other furniture, place NON-PLASTIC coasters
or placemats between the appliance and the finish of the countertop or
tabletop.
Failure to do so may cause the finish to darken, permanent
blemishes may occur or stains can appear.
7.
6.
1.
2.
3.
4.
5.
6.
7.
8.
9.
10.
11.
12.
4
Non-Stick Cooking Plates
Latch
Lid
Power Cord
Polarized Plug
Foot
Removable Drip Tray
(P/N 21512W)
Built-In Non-Stick
Drip Reservoir
Base
Red Power/ON Indicator
Light
Green Ready (Cook) Light
Soft Touch Cool Pads
10.
12.
5
11.
Sante Fe_QM2SFR_IB_30-6-04
6/30/04
6:36 PM
Page 7
Before Using Yo u r
quesadilla Maker
For The First Time
1. Carefully unpack the Quesadilla Maker.
2. Wipe all surfaces with a slightly damp, soft cloth. NEVER immerse unit
in water.
3. Before preheating the Quesadilla Maker, the Cooking Plates
may be brushed with a small amount of vegetable oil. This helps to
protect the non-stick surface. You may wish to repeat this procedure
periodically.
4. Set the appliance on a clean, dry and flat surface, where it can be
easily plugged into a 120V AC electrical outlet.
5. To preheat the Quesadilla Maker: close the Lid and plug
cord into electrical outlet. Both the Red Power/ON Indicator Light and
Green Ready (Cook) Light will illuminate, and the unit will immediately
begin heating. NEVER OPERATE THE APPLIANCE UNATTENDED.
Allow the unit to preheat for approximately 5 minutes. The Green
Ready (Cook) Light will turn off when the unit has reached cooking
temperature.
6. Gently raise the Quesadilla Maker Lid using a pot
holder/oven mitt. Always grasp Lid with a pot holder/oven mitt when
raising and lowering Lid. As with any new appliance, you may notice
smoke and a slight odor when unit is used for the first time while
residues burn off the Cooking Plates and heating element. Allow the
Quesadilla Maker to heat until smoke and odor dissipate.
NOTE: Some odor may still be detected during initial use; this is
normal and should disappear after one or two uses.
H ow To Use Yo u r
quesadilla Maker
1. Check to ensure that the Cooking Plates are clean and free from dust
and food particles. If necessary, wipe with a damp cloth.
2. When using the Quesadilla Maker for the first time, lightly
brush the Cooking Plates with vegetable oil.
3. Close the Lid.
6
Y our quesadilla Maker
( C o n t.)
4. Plug appliance into a standard electrical outlet. Both the Red
Power/ON Indicator and Green Ready (Cook) Light will come on; unit
will immediately begin heating. NEVER OPERATE APPLIANCE
UNATTENDED.
5. Allow the appliance to preheat for approximately 5 minutes while
preparing the fillings and quesadillas. The Green Ready (Cook) Light
will turn off when unit has reached proper cooking temperature.
6. Slide the Drip Tray under the front of the unit. Raise the
Quesadilla Maker Lid using a pot holder/oven mitt and place
prepared quesadilla centered on the bottom Cooking Plate.
7. Carefully lower the Lid using a pot holder/oven mitt and latch shut.
Depending on the amount of food contents, the Latch may not catch.
DO NOT FORCE SHUT. The unit will still cook properly.
8. Steam may be released between the Cooking Plates. Caution should
be taken to prevent hands from coming in contact with the steam.
9. Grilling time should be approximately 3 to 5 minutes. Exact grilling
time will be a matter of taste and will depend on the type of filling. Do
not over-grill, since filling may melt and pour out from between the
tortillas.
10. The Green Ready (Cook) Light turns on and off as the unit cycles to
maintain ideal cooking temperature; this prevents overheating.
11. After the quesadilla has finished cooking, gently raise the Lid using a
pot holder/oven mitt and remove quesadilla with a plastic or wooden
spatula. Do not use metal utensils as this may damage the non-stick
coating.
12. Keep the Lid closed to preserve heat until ready for the next
quesadilla.
13. In the event filling leaks into the Built-In Non-Stick Drip Reservoir or
the Removable Drip Tray, carefully wipe out with folded paper towel
before grilling the next quesadilla.
14. After use, unplug unit from the electrical outlet and allow to cool to
room temperature before cleaning.
CAUTION: To avoid any sparks at the outlet while disconnecting plug,
make sure the Green Ready (Cook) Light is OFF (not illuminated) before
disconnecting the plug from the outlet.
15. When unit is cool, the Drip Tray may be removed and emptied. Be
sure that the liquid is cooled.
7
Sante Fe_QM2SFR_IB_30-6-04
6/30/04
6:36 PM
Page 9
Hints For Best Result s
1. NEVER OPERATE THE APPLIANCE UNATTENDED.
2. Only use 10-inch flour tortillas when making quesadillas with the
Santa Fe Quesadilla Maker. Tortillas should be fresh and
pliable, not dried out or stiff.
3. Only use soft filling ingredients like shredded cheese, salsa, shredded
or thinly sliced pieces of cooked meat, poultry or vegetables. Do not
use with any foods that have bones or pits since they could damage
the Cooking Plates.
4. Do not overfill the quesadilla, as the filling may leak out into the BuiltIn Non-Stick Drip Reservoir.
5. Do not fill the tortilla with more than 1/4 cup shredded cheese and/or
1/2 cup liquid ingredients like salsa, as they may leak out when
heated. Do not use processed cheese, because it turns into liquid
when heated and will leak out into the Built-In Non-Stick Drip
Reservoir and Removable Drip Tray.
6. For best results, fillings should be spread as evenly as possible, up to
1/2-inch from the edge of the tortilla so that the edges can seal
together.
7. Cooked quesadillas should only be slightly crisp with some light
browning. Do not grill quesadillas longer than 5 minutes, as the filling
may get too hot and start to leak. The average grilling time for a
quesadilla on the preheated Quesadilla Maker is 3 to 4
minutes.
8. Do not force the Lid closed, as you may damage the hinge or latch
mechanism. ALWAYS GENTLY RAISE OR LOWER THE LID
USING A POTHOLDER/OVEN MITT.
9. Always use Quesadilla Maker with the Removable Drip Tray
in place.
10. In the event filling leaks into the Built-In Non-Stick Drip Reservoir or
the Removable Drip Tray, carefully wipe out with folded paper towel
before grilling the next quesadilla.
11. Previously grilled quesadillas can be reheated on the Quesadilla
M a k e r. Place on preheated appliance, matching up the triangle
shape of the quesadilla with that of the Cooking Plates. Lower the Lid
and reheat 1 to 2 minutes.
8
User Maintenance
Instructions
This appliance requires little maintenance. It contains no user serviceable
parts. Do not try to repair it yourself. Any servicing requiring disassembly
other than cleaning must be performed by a qualified appliance repair
technician.
1. UNPLUG AND ALLOW TO COOL BEFORE CLEANING. NEVER
IMMERSE APPLIANCE IN WATER.
2. Wipe Lid, Base, and Cooking Plates with absorbent paper toweling or
a soft cloth. Soiled components can also be cleaned with a damp
cloth and a little non-abrasive soap or dish washing detergent. Wipe
with a clean, soft, damp cloth and towel dry.
3. Empty the Drip Tray and clean with warm, soapy water and wipe dry.
4. Store cleaned Quesadilla Maker in its box or in a clean, dry
place. Never store it while it is still hot or still plugged in. Never wrap
cord tightly around the appliance. Do not put any stress on cord
where it enters unit, as this could cause it to fray and break.
5. The Quesadilla Maker may be stored in a vertical position
(handles pointed up). Latch the Cooking Plates together, loosely
winding the cord around the base of the unit, and stand for neat and
compact storage.
9
Sante Fe_QM2SFR_IB_30-6-04
6/30/04
6:36 PM
Page 11
Recipes
The following recipes have been especially developed by cookbook author,
Tom Lacalamita for preparing delicious, traditional and unique quesadillas
in your Santa Fe Quesadilla Maker.
Speedy Quesadillas
1/2 cup (4 oz.) finely shredded Cheddar or Monterey Jack cheese
4 (10-inch) flour tortillas
1/2 cup Chunky Salsa
1/4 cup chopped cilantro
real dairy sour cream
guacamole, optional
1. Sprinkle half of the cheese on two of the tortillas. Divide and evenly
spread the salsa over the cheese. Sprinkle evenly with the cilantro and
remaining Cheddar cheese. Cover with the remaining tortillas.
2. Place on preheated Quesadilla Maker, one at a time. Close
Lid and cook 3 to 4 minutes, or until tortilla is lightly browned. Cut into
triangles. Serve with additional salsa, sour cream, or optional
guacamole, if desired.
Makes 2 quesadillas, 12 pieces
South-of-the-Border Breakfa s t
Pocket Quesadilla
1/4 cup (2 oz.) shredded Cheddar or Monterey Jack cheese
2 (10-inch) flour tortillas
2 large eggs
1 tablespoon chopped chives, or one scallion, white and green part, sliced
thin
salt
black pepper
1/2 cup salsa
1. Sprinkle 1/4 cup of cheese on one of the tortillas. Set aside.
2. Lightly beat eggs in small bowl with chives, and salt and pepper to
taste.
3. Lightly coat Cooking Plates with vegetable spray. Pour egg mixture in
center of the preheated Quesadilla Maker. Close Lid and
cook 2 to 3 minutes, or until the egg is set. Carefully remove with a
plastic spatula. Place cooked egg on the tortilla with the cheese.
4. Evenly spread the salsa on the egg. Sprinkle with the remaining
cheese and cover with the tortilla.
5. Place on the preheated Quesadilla Maker. Close Lid and
cook 3 to 4 minutes, or until the tortilla is lightly browned. Cut into
triangles. Serve with additional salsa, if desired.
Makes 1 quesadilla, 6 pieces
10
11
Sante Fe_QM2SFR_IB_30-6-04
6/30/04
6:36 PM
Page 13
Cheesy Quesadillas
V e g e table Quesadillas
1/2 cup sour cream
1/2 cup (4 oz.) shredded Monterey Jack cheese
2 scallions, white and green parts, sliced thin
1 teaspoon chili powder
1 tablespoon pickled jalapeño slices, drained and patted dry on paper
towel
1 tablespoon minced cilantro
4 (10-inch) flour tortillas
1/2 cup (4 oz.) thawed and drained frozen bell pepper and onion strips
1 teaspoon Mexican or fajita seasonings
4 (10-inch) flour tortillas
1/2 cup (4 oz.) shredded Cheddar or Monterey Jack cheese
salsa or picante sauce
sour cream
1. Combine sour cream, Monterey Jack cheese, scallions, chili powder,
jalapeño peppers, and cilantro in a small mixing bowl.
2. Divide and evenly spread cheese filling mixture on two of the tortillas,
up to 1/2-inch from the edge. Cover with the remaining tortillas.
3. Place on preheated Quesadilla Maker, one at a time. Close
Lid and cook 3 to 4 minutes, or until tortilla is lightly browned. Cut into
triangles. Serve with Fresh Tomato Salsa, page 19, or sour cream, if
desired.
1. In a small bowl combine pepper and onion strips and seasonings.
2. Divide and evenly spread pepper mixture on two tortillas, up to 1/2inch from the edge. Sprinkle evenly with the cheese. Cover with the
remaining tortillas.
3. Place on preheated Quesadilla Maker, one at a time. Close
Lid and cook 3 to 4 minutes, or until tortilla is lightly browned. Cut into
triangles. Serve with salsa or picante sauce and sour cream.
Makes 2 quesadillas, 12 pieces
Makes 2 quesadillas, 12 pieces
Herby Ricotta & Red Pepper
Quesadillas
Bean & Cheese Quesadillas
1 can (16 oz.) refried beans
1/4 cup (2 oz.) shredded Cheddar cheese
1 small onion, minced
3 teaspoons minced pickled jalapeño pepper, optional
6 (10-inch) flour tortillas
1. Divide and evenly spread refried beans on three of the tortillas, up to
1/2-inch from the edge. Sprinkle evenly with the Cheddar cheese,
minced onion, and jalapeño pepper, if desired. Cover with the
remaining tortillas.
2. Place on preheated Quesadilla Maker, one at a time. Close
Lid and cook 3 to 4 minutes, or until tortilla is lightly browned. Cut into
triangles. Serve with Fresh Tomato Salsa, page 19, or sour cream, if
desired.
Makes 3 quesadillas, 18 pieces
1 cup ricotta cheese
1 jar (4 oz.) chopped roasted red peppers, drained
1 tablespoon minced fresh herbs like: parsley, cilantro, thyme, or basil
1 clove garlic, peeled and minced
1/4 teaspoon salt
1/8 teaspoon black pepper
4 (10-inch) flour tortillas
1. Combine the ricotta, roasted peppers, herbs, garlic, salt, and black
pepper together in a small mixing bowl.
2. Divide and evenly spread ricotta filling mixture on two of the tortillas,
up to 1/2-inch from the edge. Cover with the remaining tortillas. Press
down gently.
3. Place on preheated Quesadilla Maker, one at a time. Close
Lid and cook 3 to 4 minutes, or until tortilla is lightly browned. Cut into
triangles. Serve with Fresh Tomato Salsa, page 19, if desired.
Makes 2 quesadillas, 12 pieces
12
13
Sante Fe_QM2SFR_IB_30-6-04
6/30/04
6:36 PM
Page 15
Shrimp Quesadillas
Wild Mushroom Quesadillas
1/2 cup (4 oz.) shredded Monterey Jack cheese
4 (10-inch) flour tortillas
1/4 pound small shrimp, cooked and coarsely chopped
1 cup shredded iceberg lettuce
1/4 cup guacamole or Thousand Island salad dressing
2 tablespoons olive oil
1 large onion minced
2 cloves garlic, peeled and minced
1 roasted, canned jalapeño pepper, chopped
1/2 pound crimini or white button mushrooms, including stems, coarsely
chopped
1/2 teaspoon salt
1/8 teaspoons black pepper
4 (10-inch) flour tortillas
1/2 cup (4 oz.) shredded Swiss or Gouda cheese
1. Evenly sprinkle two tortillas with half of the cheese, up to 1/2-inch
from the edge. Evenly scatter shrimp and lettuce over cheese. Top
with guacamole or salad dressing. Sprinkle cheese on top of each
and cover with the remaining two tortillas.
2. Place on preheated Quesadilla Maker, one at a time. Close
Lid and cook 3 to 4 minutes, or until tortilla is lightly browned. Cut into
triangles. Serve with additional guacamole or Thousand Island
dressing, if desired.
Makes 2 quesadillas, 12 pieces
1. Heat the olive oil in medium-sized skillet over medium-high heat. Add
the onion and garlic and sauté 4 to 6 minutes, or until soft. Add the
jalapeño pepper and mushrooms. Sauté 5 to 7 minutes, or until the
mushrooms are soft. Season with salt and black pepper. Drain to
remove any remaining cooking liquid.
2. Evenly sprinkle two tortillas with half of the cheese up to 1/2-inch from
the edge. Evenly spread mushroom filling over cheese. Sprinkle
cheese on top of each and cover with remaining two tortillas.
3. Place on preheated Quesadilla Maker, one at a time. Close
Lid and cook 3 to 4 minutes, or until tortilla is lightly browned. Cut into
triangles. Serve with sour cream, if desired.
Makes 2 quesadillas, 12 pieces
14
15
Sante Fe_QM2SFR_IB_30-6-04
6/30/04
6:36 PM
Page 17
SOUR Cream & Chive Quesadillas
2 medium russet potatoes, peeled and cut into 1-inch cubes
1/4 cup real dairy sour cream
2 tablespoons chopped fresh chives or two scallions, green part only,
sliced thin
salt
black pepper
4 (10-inch) flour tortillas
1/4 cup (2 oz.) Cheddar cheese
1. Boil potatoes in salted water until tender. Drain and mash with sour
cream and chives. Season with salt and black pepper, to taste.
2. Divide and evenly spread potato filling mixture on two of the tortillas,
up to 1/2-inch from the edge. Sprinkle evenly with the Cheddar
cheese. Cover with the remaining tortillas.
3. Place on preheated Quesadilla Maker, one at a time. Close
Lid and cook 3 to 4 minutes, or until tortilla is lightly browned. Cut into
triangles. Serve with additional sour cream, if desired.
Ham & Cheese on To r t i l l a
Quesadilla
4 (10-inch) flour tortillas
4 tablespoons prepared mustard
1/2 cup (4 oz.) shredded Swiss cheese
12 thin slices ripe tomato
4 thin slices Virginia ham
4 tablespoons pickle relish
1. Spread one side of each tortilla with 1 tablespoon mustard. Evenly
sprinkle half of the Swiss cheese on two of the tortillas, 1/2-inch from
the edge. Cover each with tomato slices, ham, and pickle relish.
Sprinkle cheese on top of each and cover with the remaining two
tortillas, mustard-side down.
2. Place on preheated Quesadilla Maker, one at a time. Close
Lid and cook 2 to 3 minutes, or until tortilla is lightly browned. Cut into
triangles.
Makes 2 quesadillas, 12 pieces
Makes 2 quesadillas, 12 pieces
Pepperoni Pizza Pockets
1/2 cup pizza sauce
1/4 cup (2 oz.) shredded mozzarella cheese
1 tablespoon grated Parmesan cheese
2 tablespoons minced pepperoni
4 (10-inch) flour tortillas
1. Combine the pizza sauce, mozzarella, Parmesan, and pepperoni in a
small mixing bowl.
2. Divide and evenly spread pizza filling mixture on two of the tortillas, up
to 1/2-inch from the edge. Cover with the remaining tortillas.
3. Place on preheated Quesadilla Maker, one at a time. Close
Lid and cook 3 to 4 minutes, or until tortilla is lightly browned. Cut into
triangles.
Makes 2 quesadillas, 12 pieces
Chunky Peanut Butter & Jelly
Quesadilla
1/2 cup smooth or chunky-style peanut butter
1/2 your favorite chunky fruit jelly
4 (10-inch) flour tortillas
powdered sugar, optional
1. Combine peanut butter and jelly in small mixing bowl.
2. Divide and evenly spread peanut butter filling mixture on two of the
tortillas, up to 1/2-inch from the edge. Cover with the remaining
tortillas.
3. Place on preheated Quesadilla Maker, one at a time. Close
Lid and cook 3 to 4 minutes, or until tortilla is lightly browned.
4. Cut into triangles. If desired, sprinkle with powdered sugar before
serving.
Makes 2 quesadillas, 12 pieces
16
17
Sante Fe_QM2SFR_IB_30-6-04
6/30/04
6:36 PM
Page 19
Apple Pie Quesadillas
Fresh Tom at o Salsa
1 cup canned apple pie filling
4 (10-inch) flour tortillas
powdered sugar
ground cinnamon
6 large vine-ripened plum tomatoes, coarsely chopped
4 scallions, white and green parts sliced thin
1 small jalapeño pepper, finely chopped
2 tablespoons finely chopped cilantro
juice of 1 lime
salt
black pepper
1. Remove apple slices from heavy syrup with a fork. Divide and evenly
spread apples on two of the tortillas, up to 1/2-inch from the edge.
Cover with the remaining tortillas.
2. Place on preheated Quesadilla Maker, one at a time. Close
Lid and cook 3 to 4 minutes, or until tortilla is lightly browned.
3. Cut into triangles. Sprinkle with powdered sugar and cinnamon, to
taste.
1. Combine first 5 ingredients together and season with salt and black
pepper to taste.
2. Let stand 15 to 30 minutes before serving.
Makes 1-1/2 to 2 cups
Makes 2 quesadillas, 12 pieces
18
19
Sante Fe_QM2SFR_IB_30-6-04
6/30/04
6:36 PM
Page 1
LIMITED ONE YEAR WARRANTY
Warranty: This product is warranted by Salton, Inc. to be free from defects in materials or workmanship for
a period of (1) year from the original purchase date. This product warranty covers only the original
consumer purchaser of the product.
Warranty Coverage: This warranty is void if the product has been damaged by accident in shipment,
unreasonable use, misuse, neglect, improper service, commercial use, repairs by unauthorized personnel,
normal wear and tear, improper assembly, installation or maintenance abuse or other causes not arising out
of defects in materials or workmanship. This warranty is effective only if the product is purchased and
operated in the USA, and does not extend to any units which have been used in violation of written
instructions furnished with the product or to units which have been altered or modified or to damage to
products or parts thereof which have had the serial number removed, altered, defaced or rendered illegible.
Implied Warranties: ANY IMPLIED WARRANTIES WHICH THE PURCHASER MAY HAVE ARE LIMITED IN
DURATION TO ONE (1) YEAR FROM THE DATE OF PURCHASE. Some states do not allow limitations on how
long an implied warranty lasts, so the above limitation may not apply to you.
Warranty Performance: During the above one-year warranty period, a product with a defect will be
either repaired or replaced with a reconditioned comparable model (at our option) when the product is
returned to the Repair Center, or the purchase price refunded. The repaired or replacement product will be
in warranty for the balance of the one-year warranty period and an additional one-month period. No charge
will be made for such repair or replacement.
Service and Repair: Should the appliance malfunction, you should first call toll-free 1 (800) 233-9054
between the hours of 9:00 am and 5:00 pm Central Standard Time and ask for CONSUMER SERVICE stating
that you are a consumer with a problem. Please refer to model number QM2SFR when you call.
In-Warranty Service (USA): For an appliance covered under the warranty period, no charge is made for
service or postage. Call for return authorization 1 (800) 233-9054.
Out-of Warranty Service: A flat rate charge by model is made for out-of-warranty service. Include $8.00
(U.S.) for return shipping and handling. We will notify you by mail of the amount of the charge for service
and require you to pay in advance for the repair or replacement.
For Products Purchased in the USA, but Used in Canada: You may return the product insured,
packaged with sufficient protection, and postage and insurance prepaid to the USA address listed below.
Please note that all customs duty / brokerage fees, if any, must be paid by you and we will require you to
pay the cost of customs duty / brokerage fees to us in advance of our performing any service.
Risk During Shipment: We cannot assume responsibility for loss or damage during incoming shipment.
For your protection, carefully package the product for shipment and insure it with the carrier. Be sure to
enclose the following items with your appliance: any accessories related to your problem, your full return
address and daytime phone number, a note describing the problem you experienced, a copy of your sales
receipt or other proof of purchase to determine warranty status. C.O.D. shipments cannot be accepted.
To return the appliance, ship to:
ATTN: Repair Center
Salton, Inc.
708 South Missouri Street
Macon, MO 63552
To contact us, please write to, call, or email:
Salton, Inc.
P.O. Box 7366
Columbia, MO 65205-7366
1-800-233-9054
E-mail: [email protected]
Limitation of Remedies: No representative or person is authorized to assume for Salton, Inc. any other
liability in connection with the sale of our products. There shall be no claims for defects or failure of
performance or product failure under any theory of tort, contract or commercial law including, but not
limited to negligence, gross negligence, strict liability, breach of warranty and breach of contract. Repair,
replacement or refund shall be the sole remedy of the purchaser under this warranty, and in no event
shall Salton be liable for any incidental or consequential damages, losses or expenses.
Some states do not allow the exclusion or limitation of incidental or consequential damages, so the above
limitation or exclusion may not apply to you.
Legal Rights: This warranty gives you specific legal rights, and you may also have other rights which vary
from state to state.
For more information on Salton products: visit our website: www.salton-maxim.com
©2004 Salton, Inc. All rights reserved.
P/N 60945
Made in China
Rev. 1
6/04
OW N E R S M A N U A L
& RECIPE BOOKLET
QM2sFR