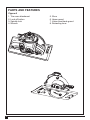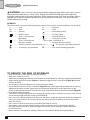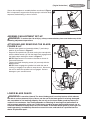
1
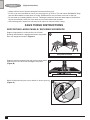
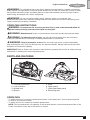
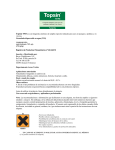
QUICK CONNECT SYSTEM
www.blackanddecker.com.au
3-3/8 INCh (86 mm)
TRImSAw ATTAChmENT
Australia
BDCMTTS-XE
New Zealand
PARTS AND FEATURES
Figure A
1. Trim saw attachment
2. Lock-off button
3. Spindle lock
4. Wrench
5. Shoe
6. Upper guard
7. Lower saw blade guard
8. Retracting lever
1
2
3
4
6
8
5
7
2
(Original instructions)
ENGLISH
Intended use
Your Black & Decker multi-purpose tool has been designed for a wide range of DIY applications.
Using the Trim saw head, this tool is intended for cutting wood and wood products.
This tool is intended for consumer use only.
Safety instructions
General power tool safety warnings
:
WARNING! To reduce the risk of injury, the user must read the instruction manual.
General power tool safety warnings
@
@
WARNING! Read all safety warnings and all instructions. Failure to follow the warnings and
instructions listed below may result in electric
WARNING! Read all safety warnings and all instructions provide with your power unit (BDCDMT108-XE,
BDCDMT180-XE) before using this accessory.
WARNING: Read all safety warnings and all instructions. Failure to follow the
warnings and instructions may result in electric shock, fire and/or serious injury.
Save all warnings and instructions for future reference.
WARNING: Read all safety warnings and all instructions provided with your
Power Unit (CMCDMT120FC or CMEDMT) before using this attachment. Failure to
follow the warnings and instructions may result in electric shock, fire and/or serious injury.
SPECIFIC SAFETy RUlES
a)
DANGER: Keep hands away from cutting area and the blade. Keep your second hand on
auxiliary handle or motor housing. If both hands are holding the saw, they cannot be cut by the blade.
b) Do not reach underneath the workpiece. The guard cannot protect you from the blade below
the workpiece.
c) Adjust the cutting depth to the thickness of the workpiece. Less than a full tooth of the blade
teeth should be visible below the workpiece.
d) Never hold piece being cut in your hands or across your leg. Secure the workpiece to a
stable platform. It is important to support the work properly to minimize body exposure, blade
binding, or loss of control.
e) Hold power tool by insulated gripping surfaces when performing an operation where the
cutting tool may contact hidden wiring or its own cord. Contact with a “live” wire will also
make exposed metal parts of the power tool “live” and shock the operator.
f) When ripping always use a rip fence or straight edge guide. This improves the accuracy of cut
and reduces the chance of blade binding.
g) Always use blades with correct size and shape (diamond versus round) of arbour holes. Blades
that do not match the mounting hardware of the saw will run eccentrically, causing loss of control.
h) Never use damaged or incorrect blade washers or bolt. The blade washers and bolt were
specially designed for your saw, for optimum performance and safety of operation.
3
ENGLISH
(Original instructions)
CAUSES AND OPERATOR PREVENTION OF KICKBACK
• Kickback is a sudden reaction to a pinched, bound or misaligned saw blade, causing an
uncontrolled saw to lift up and out of the workpiece toward the operator.
• When the blade is pinched or bound tightly by the kerf closing down, the blade stalls and the motor
reaction drives the unit rapidly back toward the operator.
• If the blade becomes twisted or misaligned in the cut, the teeth at the back edge of the blade
can dig into the top surface of the wood causing the blade to climb out of the kerf and jump back
toward the operator.
Kickback is the result of saw misuse and/or incorrect operating procedures or conditions and can be
avoided by taking proper precautions as given below:
a) Maintain a firm grip with both hands on the saw and position your arms to resist kickback
forces. Position your body to either side of the blade, but not in line with the blade.
Kickback could cause the saw to jump backwards, but kickback forces can be controlled by the
operator, if proper precautions are taken.
b) When blade is binding, or when interrupting a cut for any reason, release the trigger and
hold the saw motionless in the material until the blade comes to a complete stop. Never
attempt to remove the saw from the work or pull the saw backward while the blade is in
motion or kickback may occur. Investigate and take corrective actions to eliminate the cause of
blade binding.
c) When restarting a saw in the workpiece, center the saw blade in the kerf and check
that saw teeth are not engaged into the material. If saw blade is binding, it may walk up or
kickback from the workpiece as the saw is restarted.
d) Support large panels to minimize the risk of blade pinching and kickback. Large panels tend
to sag under their own weight. Supports must be placed under the panel on both sides, near the
line of cut and near the edge of the panel.
e) Do not use dull or damaged blades. Unsharpened or improperly set blades produce narrow
kerf causing excessive friction, blade binding and kickback.
f) Blade depth and bevel adjusting locking levers must be tight and secure before making cut.
If blade adjustment shifts while cutting, it may cause binding and kickback.
g) Use extra caution when making a “plunge cut” into existing walls or other blind areas. The
protruding blade may cut objects that can cause kickback.
lOWER GUARD SAFETy INSTRUCTIONS
a) Check lower guard for proper closing before each use. Do not operate the saw if lower
guard does not move freely and close instantly. Never clamp or tie the lower guard into the
open position. If saw is accidentally dropped, lower guard may be bent. Raise the lower guard
with the retracting handle and make sure it moves freely and does not touch the blade or any
other part, in all angles and depths of cut.
b) Check the operation of the lower guard spring. If the guard and the spring are not operating
properly, they must be serviced before use. Lower guard may operate sluggishly due to
damaged parts, gummy deposits, or a buildup of debris.
c) lower guard should be retracted manually only for special cuts such as “plunge cuts”
and “compound cuts.” Raise lower guard by retracting handle and as soon as blade enters
the material, the lower guard must be released. For all other sawing, the lower guard should
operate automatically.
d) Always observe that the lower guard is covering the blade before placing saw down on
bench or floor. An unprotected, coasting blade will cause the saw to walk backwards, cutting
whatever is in its path. Be aware of the time it takes for the blade to stop after switch is released.
ADDITIONAl SAFETy INSTRUCTIONS
• Use clamps or another practical way to secure and support the workpiece to a stable platform.
Holding the work by hand or against your body leaves it unstable and may lead to loss of control.
4
(Original instructions)
ENGLISH
• Keep your body positioned to either side of the blade, but not in line with the saw blade.
KICKBACK could cause the saw to jump backwards (see Causes and Operator Prevention of
Kickback and KICKBACK).
• Avoid cutting nails. Inspect for and remove all nails from lumber before cutting.
• Always make sure nothing interferes with the movement of the lower blade guard.
• Accessories must be rated for at least the speed recommended on the tool warning
label. Wheels and other accessories running over rated speed can fly apart and cause injury.
Accessory ratings must always be above tool speed as shown on tool nameplate.
• Always make sure the saw is clean before using.
• Stop using this saw and have it properly serviced if any unusual noise or abnormal operation occurs.
• Always be sure all components are mounted properly and securely before using tool.
• Always handle the saw blade with care when mounting or removing it or when removing the
diamond knockout.
• Always wait until the motor has reached full speed before starting a cut.
• Always keep handles dry, clean and free of oil and grease. Hold the tool firmly with both hands
when in use.
• Always be alert at all times, especially during repetitive, monotonous operations. Always be sure
of position of your hands relative to the blade.
• Stay clear of end pieces that may fall after cutting off. They may be hot, sharp and/or heavy.
Serious personal injury may result.
• Replace or repair damaged cords. Make sure your extension cord is in good condition. Use
only 3-wire extension cords that have 3-prong grounding-type plugs and 3-pole receptacles that
accept the tool’s plug.
• An extension cord must have adequate wire size (AWG or American Wire Gauge) for safety.
The smaller the gauge number of the wire, the greater the capacity of the cable, that is 16 gauge
has more capacity than 18 gauge. An undersized cord will cause a drop in line voltage resulting in
loss of power and overheating. When using more than one extension to make up the total length, be
sure each individual extension contains at least the minimum wire size. The following table shows the
correct size to use depending on cord length and nameplate ampere rating. If in doubt, use the next
heavier gauge. The smaller the gauge number, the heavier the cord.
CAUTION: Blades coast after turn off. Serious personal injury may result.
WARNING: AlWAyS wear proper personal hearing protection that conforms to ANSI
S12.6 (S3.19) during use. Under some conditions and duration of use, noise from this product may
contribute to hearing loss.
WARNING: AlWAyS use proper eye protection. All users and bystanders must wear proper
eye protection that conforms to ANSI Z87.1.
WARNING: AlWAyS USE SAFETy GlASSES. Everyday eyeglasses are NOT safety glasses.
Also use face or dust mask if cutting operation is dusty. ALWAYS wear certified safety equipment:
• ANSI Z87.1 eye protection (CAN/CPA Z94.3),
• ANSI S12.6 (S3.19) hearing protection,
• NOSH/OSHA respiratory protection.
WARNING: Some dust created by power sanding, sawing, grinding, drilling, and other
construction activities contains chemicals known to the state of California to cause cancer,
birth defects or other reproductive harm. Some examples of these chemicals are:
• lead from lead-based paints,
• crystalline silica from bricks and cement and other masonry products, and
• arsenic and chromium from chemically-treated lumber.
Your risk from these exposures varies, depending on how often you do this type of work. To reduce
your exposure to these chemicals: work in a well ventilated area, and work with approved safety
equipment, such as those dust masks that are specially designed to filter out microscopic particles.
• Avoid prolonged contact with dust from power sanding, sawing, grinding, drilling, and other
construction activities. Wear protective clothing and wash exposed areas with soap and water.
Allowing dust to get into your mouth, eyes, or lay on the skin may promote absorption of harmful chemicals.
5
ENGLISH
(Original instructions)
WARNING: Use of this tool can generate and/or disburse dust, which may cause serious
and permanent respiratory or other injury. Always use NIOSH/OSHA approved respiratory
protection appropriate for the dust exposure. Direct particles away from face and body. Always
operate tool in well-ventilated area and provide for proper dust removal. Use dust collection
system wherever possible.
SyMBOlS
The label on your tool may include the following symbols. The symbols and their definitions are as follows:
V .................. volts
A ...................amperes
Hz................ hertz
W ..................watts
min .............. minutes
................alternating current
no..................no load speed
............ direct current
................ Class I Construction
..................earthing terminal
(grounded)
................safety alert symbol
................ Class II Construction
.../min or rpm...revolutions or
(double insulated)
reciprocation per minute
............ Read instruction manual before use ...............
Use proper respiratory protection
................ Use proper eye protection
..................Use proper hearing protection
TO REDUCE THE RISK OF KICKBACK
•
•
•
•
•
•
•
•
•
•
•
•
6
Keep a firm grip on saw with both hands at all times.
Stay alert – exercise control.
Support long overhanging materials. As the material is cut and weakens, it will sag, causing a pinched blade.
Support large panels as shown (Figure C). Material supported only at the ends (Figure B) will lead
to blade pinching.
Avoid sawing overhead. Material can sag and will pinch blade.
Insure that the material to be cut is clamped (Figure E) and solidly supported and balanced on a strong,
stable and level work surface. Support the work so that the wide portion of the saw shoe is on the
portion of the material that doesn’t fall after the cut is made. Never hold cut off piece by hand (Figure D).
Keep blades sharp and clean.
Use fence or straight edge guide when ripping. Be careful as the cut off strip can sag or twist, closing
the cut and pinching the blade, leading to KICKBACK.
Don’t force tool. Wood variables such as knots, hardness, toughness, wetness, pressure treated and
freshly cut green lumber can heavily load the saw which can lead to stalling. Push the saw slower
when this occurs.
Don’t remove saw from work during a cut while the blade is moving.
Allow saw to reach full speed before blade contacts material to be cut. Starting the saw with
the blade against the work or pushed forward into cut can lead to stalling or sudden backward
movement of saw.
Never attempt to lift saw when making a bevel cut. This leads to blade binding and stalling.
ENGLISH
(Original instructions)
Secure the workpiece to a stable platform as shown in Figure
D. It is important to support the work properly to minimize body D
exposure, blade binding, or loss of control.
ASSEMBly/ADjUSTMENT SET-UP
WARNING: To reduce the risk of injury, always remove battery from saw before any of the
following adjustment operations.
ATTACHING AND REMOVING THE BlADE:
FIGURE E & F
• Retract lower guard and assemble blade (7) and clamp
washer (9) as shown in Figure E.
• Depress the spindle lock (3) while turning the saw spindle
with the blade wrench (4) until the blade lock engages and
the blade stops rotating as shown in Figure F.
NOTE: Blade wrench is stored on the saw as shown in
Parts and Features.
• Tighten the blade clamping screw (10) securely with the
blade wrench.
NOTE: Never engage the spindle lock while the saw is
running, or engage in an effort to stop the tool. Never turn
the tool on while the spindle lock is engaged. Serious
damage to your saw will result.
E
3
7
9
10
F
lOWER BlADE GUARD
WARNING: laceration Hazard. The lower blade guard is a safety feature which reduces
the risk of serious personal injury. Never use the saw if the lower guard is missing, damaged,
mis-assembled or not working properly. Do not rely on the lower blade guard to protect you
under all circumstances. your safety depends on following all warnings and precautions as
well as proper operation of the saw. Check lower guard for proper closing before each use as
outlined in Additional Safety Rules for Circular Saws. If the lower blade guard is missing or not
working properly, immediately discontinue use of the saw, and take it to a qualified service
dealer for possible repair.
7
ENGLISH
(Original instructions)
• Always secure work to prevent workpiece movement during cut.
• Do not try to force saw back on line if your cut begins to go off line. This can cause KICKBACK. Stop
saw and allow blade to coast down to a stop. Withdraw from cut and start a new cut on the line.
• Do not back up a rotating blade in the cut. Twisting the saw can cause the back edge of the blade to
dig into the material, climb out of the work and run back toward the operator.
• Avoid cutting nails. Inspect for and remove all nails from lumber before cutting.
SAVE THESE INSTRUCTIONS
SUPPORTING lARGE PANElS / SECURING WORKPIECE
Support large panels to minimize the risk of blade
pinching and kickback. Large panels tend to sag under
their own weight as shown in Figure A.
A
Wrong
Material bends on blade causing
heavy loads or kickback
Supports must be placed under the panel on both sides,
near the line of cut and near the edge of the panel
(Figure B).
B
Support work near cut
Never hold piece being cut in your hands or across your leg
(Figure C).
8
C
ENGLISH
(Original instructions)
WARNING: To minimize the risk of eye injury, always use eye protection. Carbide is a hard but
brittle material. Foreign objects in the work piece such as wire or nails can cause tips to crack or break.
Only operate saw when proper saw blade guard is in place. Mount blade securely in proper rotation
before using, and always use a clean, sharp blade.
WARNING: Do not cut ferrous metals (steel), masonry, glass or tile with this saw.
A dull blade will cause slow, inefficient cutting overload on the saw motor, excessive splintering, and
could increase the possibility of kickback.
OPERATING INSTRUCTIONS
WARNING: To reduce the risk of serious personal injury, read, understand and follow all
important safety warnings and instructions prior to using tool.
WARNING: Shock hazard. Under no circumstances should this product be used near water.
WARNING: To reduce the risk of injury, turn off and remove battery from the tool before
making any adjustments or removing or installing attachments or accessories.
WARNING: Risk of lacerations or burns. Do not touch work piece or blade immediately
after operating the tool. They can become very hot. Handle carefully. Always allow accessories and
workpiece to cool before handling.
IMPORTANT: Refer to Power Unit instruction manual before operating this tool for all safety warnings
and details on installing and removing attachments.
PARTS AND FEATURES
1
6
2
8
3
4
5
7
1. Trim saw attachment
2. Lock-off button
3. Spindle lock
4. Wrench
5. Shoe
6. Upper guard
7. Lower saw blade guard
8. Retracting lever
OPERATION
• To switch the tool on, press the variable speed switch on the power unit. The tool speed depends
on how far you press the switch.
• To switch the tool off, release the variable speed switch.
NOTE: This tool attachment only operates in the forward direction; the forward/reverse slider of the
Power Unit should not be able to be switch to reverse.
9
ENGLISH
(Original instructions)
BlADE SElECTION
your circular saw is designed for use with 3-3/8 inch (86 mm) diameter blades that have a
15 mm diameter bore. Blades must be rated for 3000 RPM operation (or higher).
NOTE: This saw is designed to cut wood and plastic. Do not use masonry or metal
cutting blades. DO NOT use any abrasive wheels.
GENERAl CUTS
WARNING: To reduce the risk of injury, remove the battery, and follow all assembly,
adjustment and set up instructions.
Make sure lower guard operates. Select the proper blade for the material to be cut.
• Measure and mark work for cutting.
• Support and secure work properly (See Safety Rules and Instructions).
• Use appropriate and required safety equipment (See Safety Rules).
• Secure and maintain work area (See Safety Rules).
• With battery inserted, make sure switch turns saw on and off.
SAWING
WARNING: To reduce the risk of serious personal injury, always hold the tool with both hands as
illustrated in Figure G below.
• Let the blade run freely for a few seconds before starting the cut.
• Apply only a gentle pressure to the tool while performing the cut.
• Work with the shoe (5) pressed against the workpiece.
HINTS FOR OPTIMUM USE
• For best results use a blade with 20-24 cutting teeth.
• As some splintering along the line of cut on the top side of the workpiece cannot be avoided,
cut on the side where splintering is acceptable.
• Where splintering is to be minimized, e.g. when cutting laminates, clamp a piece of plywood
onto the top of the workpiece.
POCKET CUTTING (FIGURE G)
G
WARNING: Never tie the blade guard in a raised
position. Never move the saw backwards when pocket
cutting. This may cause the unit to raise up off the work
surface which could cause injury.
WARNING: To reduce the risk of serious personal
injury, always hold the tool with both hands.
WARNING: laceration Hazard. As blade starts
cutting the material, release the retracting lever
immediately.
A pocket cut is one that is made in a floor, wall, or other
flat surface.
• Tilt the saw forward and rest front of the shoe on material to be cut.
• Using the retracting lever (8), retract lower blade guard (7) to an upward position. Lower rear of shoe
until blade teeth almost touch cutting line.
• Release the blade guard (its contact with the work will keep it in position to open freely as you start the
cut). Remove hand from retracting lever and firmly grip the top of the power unit, as shown in Figure G.
Position your body and arm to allow you to resist kickback if it occurs.
• Make sure blade is not in contact with cutting surface before starting saw.
• Start the motor and gradually lower the saw until its shoe rests flat on the material to be cut.
Advance saw along the cutting line until cut is completed.
• Release trigger and allow blade to stop completely before withdrawing the blade from the material.
• When starting each new cut, repeat as above.
10
(Original instructions)
ENGLISH
TROuBLEShOOTING
Problem
• Unit will not start.
Possible Cause
• Attachment is not secured.
Possible Solution
• Make certain the attachment is fully
pushed into the Power Unit.
MAINTENANCE
Useonlymildsoapanddampclothtocleanthetool.Neverletanyliquidgetinsidethetool;
neverimmerseanypartofthetoolintoaliquid.
IMPORTANT:ToassureproductSAFETYandRELIABILITY,repairs,maintenanceand
adjustment(otherthanthoselistedinthismanual)shouldbeperformedbyauthorizedservice
centersorotherqualifiedservicepersonnel,alwaysusingidenticalreplacementparts.
ACCESSORIES
wARNING: Theuseofanyaccessorynotrecommendedforusewiththistoolcouldbehazardous.
Recommendedaccessoriesforusewithyourtoolareavailablefromyourlocaldealerorauthorized
servicecenter.Ifyouneedassistanceregardingaccessories,pleasecall:1-800-444-224
Technical data
when operate with 18V MATRIX unit
TrimSaw
no-load speed
Weight
BDCMTTS-XE
0-3400/min RPM
729g
11
Australia & New Zealand
Stanley Black & Decker
82 Taryn Drive, Epping, VIC 3076 Australia
Tel.1800 444 224 (Aust) or Tel. 0800 339 258 (NZ)
90589521 REV-0
07/2012