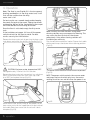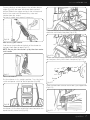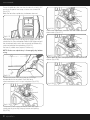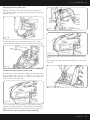
1
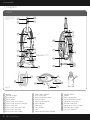
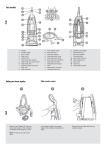
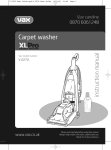
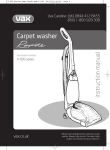
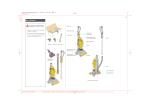
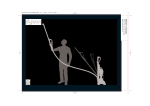
Vax careline
0870 6061248
instruction manual
Carpet washer
Vax model number:
V-027CC
AAA
SOLUTION
www.vax.co.uk
Please read carefully before using this cleaner.
Always fully extend the mains cable before use.
Retain for future reference.
www.vax.co.uk
1. Diagram
V-027CC
Solution trigger- There does
not appear to be anything here
in the photo’s
1
2
3
4
16
5
17
6
18
7
19
8
23
9
23
10
On image 1 you can see a dial here
which has not been picked up on in
the annotated image
11
20
12
13
21
14
15
3
22
22
24
25
26
28
1
2
3
4
5
6
7
8
9
Handle
Solution trigger
Brush on/off
Power on/off
Clean water tank release
Clean water tank carry handle
Clean water tank
Dirty water tank nozzle tab
Dirty water tank latch
10 Dirty water tank handle
2 parts overview
SOLUTION
27
Fig.1/1
11
12
13
14
15
16
17
18
19
20
Floor/ tools selector
Dirty water tank
Hose attachment cover
Dual brushbars
Front suction nozzle
Hose storage
Cord wrap
Carry handle
Cord
Lower cord and hose storage
AAA
4
29
21
22
23
24
25
26
27
28
29
Handle release
Wheels
Hose storage clips
Detachable tool storage
Uphostery/stair hose
Solution tube plug
Upholstery/stair wash tool
Solution spray trigger
Vax AAA Solution
Vax Careline 0870 606 1248
2. Safety Information
FOR HOUSEHOLD USE ONLY.
When using the vacuum cleaner, basic safety precautions
should always be observed, including the following:
21. Using improper voltage may result in damage to the
motor and possible injury to the user. The correct
voltage is listed on the rating label.
22. A hazard may occur if the carpet washer runs over
the power supply cord.
1.
Do not leave the carpet washer unattended when
plugged in. Unplug it from socket when not in use.
23. To prevent dirty water from running into motor, do
not hold the appliance upside-down or lay on its side.
Use appliance in normal vacuuming position.
2.
To prevent electric shock do not use outdoors.
24. Use extra care when cleaning on stairs.
3.
Not to be used as a toy. Children should be supervised to
ensure that they do not play with the appliance.
25. Do not carry appliance while motor is running.
4.
This appliance is not intended for use by persons
(including children) with reduced physical, sensory or
mental capabilities, or lack of experience and knowledge,
unless they have been given supervision or instruction
concerning the use of the appliance by a person
responsible for their safety.
NOTE: Carpets should be dry vacuumed thoroughly
before washing.
5.
Use only as described in this manual.
6.
Do not use with a damaged cord or plug. If the supply
cord and/or plug is damaged, they must be replaced
by the manufacturer, a Vax Service Agent or similarly
qualified persons in order to avoid hazard.
7.
Do not pull or carry by the cord, use the cord as a
handle, allow the cord to come into contact with hot
or sharp surfaces or close a door on the cord.
8.
Do not unplug by pulling on the cord.
9.
Do not handle the plug or carpet washer with wet
hands.
NOTE: The unit must be unplugged from the mains
socket outlet after use, and before cleaning or
maintaining the unit.
!
IMPORTANT: This unit is not intended for
commercial use.
PLEASE KEEP THESE INSTRUCTIONS
FOR FURTHER USE.
10. Do not put any objects into openings or operate with
openings blocked, keep them free of anything that
may reduce airflow.
11. Keep hair, loose clothing, fingers and all parts of the
body away from openings and moving parts.
12. Do not use the carpet washer on any glowing,
burning or smoking particles.
13. Do not use without the solution tank and dirty water
tank in place.
14. Do not use the vacuum without the dust bag in place.
15. Turn off all controls before unplugging.
16. Do not use to pick up flammable or combustible
liquids such as petrol, or use in areas where they may
be present.
17. Keep the unit on the floor.
18. Do not use an extension cord.
19. Do not attempt to remove blockages with sharp
objects as they may cause damage.
20. Store indoors put away after use to prevent tripping
accidents.
safety information
3
www.vax.co.uk
3. Assembly
Feed the cord through the slots on the back of the
handle and push into place (Fig.3/4).
Putting your cleaner together
Remove your Rapide XL from the carton with caution.
The handle is connected to the body by a cord (Fig.3/1).
NOTE: Do not tug or pull on the cord.
Fig.3/4
Fig.3/1
Line up the handle to the upper body of the machine and
slide into place (Fig.3/2).
Place a nut into the recess in the back of the upper
handle. While holding the nut in place insert one of the
large screws through the front of the upper handle and
tighten (Fig.3/5).
Repeat the process with the second screw.
NOTE: Phillips screwdriver required
Fig.3/5
Fig.3/2
Secure from the back with the two smaller screws
(Fig.3/3).
Remove the backing tape from the screw cover and press
into place (Fig.3/6).
Fig.3/6
Fig.3/3
4 assembly
Vax Careline 0870 606 1248
Clean water tank
NOTE: Make sure the grey wedge block is resting in
place (fig.3/7).
Slide the tool caddy downwards until it is secured in place
(Fig.3/10).
NOTE: The tool caddy can be removed for storage on
a wall
Fig.3/7
Line up the grooves of the clean water tank with the
support posts inside the handle. Tilt the top of clean
water tank inward and push until it locks into place
Fig.3/8
(Fig.3/8).
To install the tool caddy, line up the tabs of the tool
caddy storage with round tabs on the back of the handle
Fig.3/10
Connect upholstery attachment to end of hose by
pressing until it clicks into place (Fig3/11).
Fig.3/11
Push upholstery attachment into the left hose clip, wrap
the hose around the tool caddy starting on the back
groove of the storage caddy.
Secure into place by pushing the end of the hose into the
hose clip on the right. Press the solution/ hose clip onto
the hose to secure the solution tube in place (Fig 3/12).
Fig.3/9
(above quick cord clip) (Fig.3/9).
Fig.3/12
assembly
5
www.vax.co.uk
4. Operation
Note: The float in your Rapide XL is the transparent,
pivoting moulded part in the dirty water tank, it will
shut off the suction when the dirty
water tank is full.
For best results use a smooth steady motion keeping
the nozzle flat against the carpet. Tipping the cleaner
and breaking the seal of the nozzle against the carpet
will cause the float to rise cutting off suction.
Once the float is activated, empty the dirty water
tank.
If the tank does not appear full turn off the power
switch and wait for the float to settle. For best
results use only Vax AAA Solution.
Remove the clean water tank by pressing the clean water
tank release and pulling the tank by the handle (Fig.4/1).
Fig.4/3
Note: Use only Vax AAA Solution. using other
cleaning solution may cause excessive foaming. This
may cause the float to shut off the cleaner
prematurely. Using other cleaning solution will
invalidate your warranty.
Plug the cord into an electrical socket. Step on the handle
release pedal to put the cleaner into a cleaning position
(Fig.4/4).
Fig.4/1
!
CAUTION: Maximum water temperature 50°C.
Add approximately 140ml of Vax AAA solution.
Remove the clean water tank cap and put in a safe place.
Slowly fill the clean water tank with warm tap water
(max 50°C) and replace the cap (Fig.4/2).
Fig.4/2
Return clean water tank by lining up the grooves of the
clean water tank with the support posts on the inside of
the handle. Rock clean water tank inward until it locks
into place (Fig.4/3).
6 operation
Fig.4/4
Turn power switch and brush switch to the ON position
(Fig.4/5).
NOTE The power switch controls the vacuum motor
and pump, the bursh switch only turns the contrarotating brush bars on and off when the power is on.
Fig.4/5
Vax Careline 0870 606 1248
To spray cleaning solution, depress the solution release
trigger (Fig 4/6) and move the cleaner backward and
forward. Release the trigger and push the unit back and
forth in the same track to remove dirty water and
solution from the carpet.
For heavily soiled areas, repeat if necessary.
Fig.4/9
Insert the end of the hose into the tool opening and twist
clockwise until it locks into place (Fig.4/10).
Fig.4/6
How to carry your cleaner
Grab the carrying handle on the back of the cleaner to
transport from room to room (Fig.4/7).
NOTE: Do not pick the cleaner up by the clean water
tank handle.
Fig.4/10
Attach the water supply connector to the water supply
port and press firmly until it locks into place (Fig.4/11).
Fig.4/7
Hose attachments
Put the cleaner in its upright position. Turn the brush
switch and power switch to the off position (Fig.4/8).
Fig.4/11
Move the floor/tools selector to the tools (upward)position
(Fig.4/12).
Fig.4/8
Remove the hose from its stored position on the back of
the cleaner. Lift the hose attachment cover located on the
top of the dirty water tank (Fig.4/9).
Fig.4/12
operation
7
www.vax.co.uk
To wash upholstery, be sure that the brush switch is OFF
and that the power and soap switches are turned ON
(Fig.4/13).
Note: Do not allow upholstery to become too wet.
Fig.4/16
Move the tool/floor selector to the floor position
(downwards) (Fig.4/17).
Fig.4/13
While depressing the blue solution spray trigger, push the
attachment in a forward motion. Release the trigger and pull
the attachment backward in the same path to remove dirty
water and solution from upholstery (Fig.4/14).
For heavily soiled areas, repeat if necessary.
NOTE: Make sure upholstery is thoroughly dry before
using.
Fig.4/17
Return tools to their storage position on the back of the
cleaner (Fig.4/18).
Fig.4/14
Remove the hose from the fitting by twisting it
counterclockwise to unlock. Close the hose
attachmentcover until it snaps into place (Fig.4/15).
Fig.4/18
Fig.4/15
Disconnect water supply connector from the water
supply port by pressing the grey button and pulling
(Fig.4/16).
8 operation
Vax Careline 0870 606 1248
Emptying the dirty water tank
Depress the dirty water tank latch and simultaneously
pull the dirty water tank nozzle tab up and away from the
cleaner (Fig.4/8).
Fig.4/11
Return the dirty water tank cap (Fig.4/12).
Fig.4/8
Remove the dirty water tank by lifting the dirty water
tank handle and pulling the tank out of the base (Fig.4/9).
Fig.4/12
Lift the dirty water tank handle and pull out the filter to
clean.
Rinse under hot water and return to the dirty water tank
(Fig.4/13).
Fig.4/9
NOTE: The nozzle does not need to be completely
removed to empty the dirty water tank.
Place the dirty water tank over a large sink and remove the
dirty water tank cap by twisting it to the left
(counterclockwise) and out in a safe place. Empty the
water into the sink (Fig.4/10).
Fig.4/13
Fig.4/10
Dirty water tank can be rinsed out with hot tap water to
remove any remaining debris. Wipe and let dry thoroughly
before storing to prevent mildew from forming (Fig.4/11).
NOTE: Do not use any chemicals when cleaning.
operation
9
www.vax.co.uk
Emptying the dirty water tank
Return dirty water tank to the base of the cleaner by
tipping the nozzle down into the basin and dropping it
into place (Fig.4/14).
Fig.4/14
Lift the front of the cleaner base off the carpeting with
one hand. Line up the black tabs with the grooves of the
front nozzle.
5. Maintenance
Remove dirty water tank and front nozzle put them to
one side (Fig.5/1).
Fig.5/1
Use a Phillips screwdriver to remove two (2) screws
(Fig.5/2).
NOTE: Phillips screwdriver required
Lift the front nozzle upwards towards the cleaner and
press under the latch until it locks into place (Fig.4/15).
Fig.5/2
Remove the belt cover. Remove the broken belt (Fig.5/3).
Fig.4/15
Fig.5/3
Belt or brush removal and replacement (Fig.5/4)
1. Loop the belt around the rear shaft.
2. Loop the top of the belt above the small pulley and
the bottom of the belt around the lower small pulley.
3. Feed the entire belt over the first large pulley.
4. Loop the belt around the front large pulley and rotate
the front brushbar forward until the belt is in place.
10 operation/ maintenance
Vax Careline 0870 606 1248
NOTE: Make sure the entire belt stays on top of the
first large pulley by lightly placing a finder on top to
guide it.
Fig.5/7
Fig.5/4
Return the nozzle cover to the original position (Fig.5/5)
Secure by replacing the two (2) screws.
Fig.5/5
Remove the screw that holds the brushbar in place
(Fig.5/6).
To install a new brushbar. Feed the brushbar through the
opening until the screw plate and screw hole are lined up
(as above) (Fig.5/8).
NOTE: The black cap behind the silver screw plate will
be through the hole.
Fig.5/8
Replace the silver cap to right side of the brushbar.
Lift the brushbar up and align with the brushbar chamber.
Push the screw plate towards the screw hole until the
flush and replace the screw (Fig.5/9).
Fig.5/6
Tilt cleaner off the carpet. Grasp the brush bar and pull
the right side of its chamber.
Fig.5/9
Tilt the brushbar down to the ground and remove the
silver cap. Slide the worn brushbar out of the cleaner
(Fig.5/7).
maintanance
11
-
EEC STATEMENT OF COMPLIANCE
Manufacturer/EEC importer: Vax Limited, hereby on our own responsibility, declare that the
Vax V-027CC is manufactured in compliance with the following Directives:
Safety: 2006/95/EC Low Voltage Directive
EMC: 2004/108/EC Electromagnetic Compatibility Directive
Waste electrical products should not be disposed of with household waste. Please recycle where
facilities exist. Check with your Local Authority or retailer for recycling advice.
Vax Ltd., Kingswood Road, Hampton Lovett, Droitwich, Worcestershire, WR9 OQH, UK
email: [email protected] - website: www.vax.co.uk