1
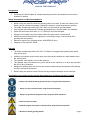
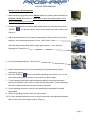
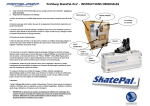
AS 1001- Portable ORIGINAL INSTRUCTIONS Read the installation and operating instructions carefully before using the machine. Usage that is not in accordance with the instruction manual and/or disregard safety instruction, may cause injury or death, and damage the machine. Page 1 Installation instructions 1. Unpacking and installation: Open the transportation box by unscrewing the locks on both sides of the transportation box. 2. Place the machine on a steady table on a height between 80-100 cm. 3. Cut all cable ties. 4. Plug the power cord of the machine and vacuum cleaner. Place the NDT3 diamond tool to the diamond holder. 5. Use the machine in a warm, dry and well lit room. 6. The AS 1001-Portable includes: 1 x transportation box, 1 x AS 1001-Portable skate sharpener, 1 x Grinding wheel MA70 (mounted), 1 x diamond tool NDT3 (mounted), 1 x instruction manual, 1 x power cord, 1 x 19mm wrench, 2 x key for emergency stop. 7. After usage of the machine clean the machine and the working space properly. Push down the emergency stop button. Before transportation make sure that the grinding wheel arm is steadily locked so it can’t move during transportation. Unplug the power cords. Place the machine into the transportation box and lock it. Operation instructions: 1. When starting the machine turn the key on the emergency stop switch. All lights on the “SHARP” button will start to blink. Test the grinding wheel by pushing once the “DRESS” button. Grinding wheel should now run steadily. Push the button again and the wheel will stop. Dress the grinding wheel for desired radius of hollow (see dressing of the grinding wheel on page 9.) Safety precautions: WARNING! When using electric tools basic safety precautions should always be followed to reduce the risk of fire, electric shock and personal injury. Read all these instructions before attempting to operate this product and save these instructions. The use of any accessory or attachment other than one recommended in this instruction manual may present a risk of personal injury. 1. Always use eye, ear and breathing protection. Always connect a vacuum cleaner to the machine to minimize dust occurring outside the machine. 2. Wear proper apparel. Do not wear loose clothing, gloves, neckties, rings, bracelets, or other jewelry which may get caught in moving parts. Nonslip footwear is recommended. Wear protective hair covering to contain long hair. 3. Do not expose the machine into rain. Do not use the machine in damp or wet locations. Keep work area well lit. Keep work area clear. Cluttered areas and benches invite injuries. Do not use the machine in the presence of flammable liquids or gases. 4. Guard against electric shock. Avoid body contact with earthed or grounded surfaces (e.g. pipes, radiators, ranges, refrigerators) Page 2 5. Keep other persons away. Do not let persons, especially children, not involved in the work touch the machine or the extension cord and keep them away from the work area. Make workshop kip proof with padlocks, master switches, or by removing starter keys. Do not overreach. Keep proper footing and balance at all times. Do not stand on the machine. 6. Never leave tool machine running unattended. Turn power off. Don’t leave tool until it comes to a complete stop. 7. Use right tool. Do not use the tool for purpose not intended. Don’t force the machine. It will do the job better and safer at the rate for which it was designed. 8. When not in use always disconnect the power cords. 9. Stay alert. Watch what you are doing, use common sense and do not operate the machine when you are tired. 10. Check damaged parts. Before further use of the machine, it should be carefully checked to determine that it will operate properly and perform its intended function. Check for alignment of moving parts, binding of moving parts, breakage of parts, mounting and any other conditions that may affect its operation. A guard or other part that is damaged should be properly repaired or replaced by an authorized service centre otherwise indicated in this instruction manual. Have defective switches replaced by an authorized service centre. Do not use the machine if the switch does not turn it on and off. 11. Store the machine properly in a dry locked-up place, out of reach of children. 12. Never yank the cord to disconnect it from the socket. Keep the cord away from heat, oil and sharp edges. Use proper extension cord. When tool is used outdoors, use only cords intended for outdoor use and so marked. Make sure your extension cord is in good condition. Be sure to use one heavy enough to carry the current your product will draw. An undersized cord will cause a drop in line voltage resulting in loss of power and overheating. 13. Avoid unintentional starting. Ensure switch is in “off” position when plugging in. 14. This electric machine should be repaired by qualified persons using original spare parts, otherwise this may result in considerable danger to the user. 15. Maintain the machine with care. Follow instruction for lubricating and changing accessories. Inspect machine cords periodically and if damaged have them repaired by an authorized service facility. Inspect extension cords periodically and replace if damaged. Keep handles dry, clean and free from oil and grease. 16. Disconnect machine before servicing; when changing accessories, such as grinding wheels and diamond tools. Detailed instructions how the change the grinding wheel are on page 11 in this operation instruction manual. Other parts than those recommended by the manufacturer may present a risk of personal injury. Page 3 Control Panel Manual Page 4 Designation ProSharp AS 1001-Portable is a skate sharpening machine and should be used only to sharpen ice skates. Safety Information and Recommendations Before using the machine check the grinding wheel for cracks. If there are cracks in the wheel (can be caused in transport), change the wheel to a new wheel before grinding. The skate sharpening machine AS 1001 may only be used for grinding skates. Only original special balanced ProSharp grinding wheels, may be used in the machine. When the wheel has worn down to ~5” (125mm) it must be changed. Change of the wheel may only be done when the main power is switched off. Please notice that the protective equipment, according to signs, must be used when grinding with the machine. Maximum speed of the grinding wheel: 4440 RPM (35 m/s) Capacity of the machine: 200W Hazards The skate sharpening machine AS 1001- Portable is equipped with grinding tools which may cause injury. Children and visitors must be kept away from the machine and be at a safe distance from the working area. The operator must stand in front of the machine. The operator may never bend over- put his hands on the machine or in other way increase the risk of injury moments. Dangerous grinding dust comes from the machine and therefore the operator must always use eye- and mouth protection. Before using the machine check if there are any transport damages on the machine. Explanation of symbols marked on the skate sharpener ProSharp AS 1001-Portable = Always use mouth/breathing protection when using the skate sharpener! = Always use ear protection when using the skate sharpener! = Always use protective eye glasses when using the skate sharpener! = Beware of electric shock! = Read the original instructions carefully before using the skate sharpener! = Beware of rotating grinding wheel! Page 5 Connection Adjust the right or left foot to make the machine stable. Connect tab single-phase A.C, 100-240 VAC 50-60 Hz. Release the emergency button. Lamps are walking 1 by 1, put in a skate and then machine is ready to sharp. Connect the dust-cleaners hose to the machine for automatic start of dust-cleaner when grinding. Connect dust-cleaners hose with the machines hose. Placement The machine must be placed on a flat, steady workbench with a height between 80-100 cm. The working area must be well lit. Keep work area clear. Cluttered areas and benches invite injuries. Issuing The noise level of the machine is less than 70 dB. During use of the machine, dust will occur and this dust must be taken away. Clean the machine between every grinding. Engagement For information regarding the grinding machine the responsible operator must inform other users about safety and maintenance instruction. For safety reasons, modifications of the machine or its design are not allowed. Maintenance The ProSharp AS 1001-Portable is manufactured for low maintenance demands. In your own interest and for your own safety, control and cleaning must be done before, during and after grinding. Remove the plug before carrying out any adjustment, servicing or maintenance. Important! All operators must read and understand original instructions regarding operation and maintenance contained in this manual, before using the machine. People under 18 years of age may NOT use the machine! Never move the skate-holder by hand. Only use the arrows to move the skate-holder. Only non-flammable vacuum cleaners should be connected to the AS 1001. Page 6 The ProSharp AS 1001- Portable delivery includes: 1 Skate sharpening machine ProSharp AS 1001- Portable 1 Grinding wheel MA70 1 Dressing-tool NDT3 1 Power cord 1 Key for grinding wheel change, 19mm 2 Keys for the use of the emergency button 1 Transportation-box 1 Operating instruction manual Technical Data Voltage 1 x 100-240 VAC Cycles 50-60 Hz Power Pmotors: 200 W, Poutlet 2000W, Ptotal 2200W Power outlet for the vacuum cleaner MAX 2000W Weight 25 kg (including the transportation box and detachable parts) Length 660 mm Width 200 mm Height 240 mm Noise level 98dB Business name and manufacturer Eriksson Teknik AB Hirsvägen 4 86241 Njurunda SWEDEN T. +46 60 15 85 80 F. +46 60 15 83 80 E. [email protected] Authorized service representative ProSharp Oy Kavallinmäki 15 A 02710 ESPOO FINLAND T. +358 40 5309 392 E. [email protected] Page 7 Maintenance Instructions Change of wheel and all service work may only be done when the main power is switched off. Before every grinding: Please check that: 1. You have read and understood the safety instructions and all functions 2. The grinding wheel is OK, dust cleaner is connected and that the motor is running without vibrations. After grinding: Lock the emergency button and take away the key. Clean the machine from dust with a dust-cleaner and use a dry rag to clean up. Never use oil or grease. After 1-10 pairs: Dress the grinding wheel. After 200-400 pairs: Time to change the grinding wheel. The number of pairs/wheel depends on how often you dress the wheel, type of steel etc. For best grinding result, use only balanced ProSharp- grinding wheels, MA70 or CA80. After 800-1000 pairs: Check the dressing-tool. The diamond must be pointed and even for best grinding result. Use only specialcentered dressing tool NDT1 or NDT3 for exact dressing and best grinding-result. After 1000-2000 pairs: (In some cases more often) The driving-belt should be perfectly stretched. Check the driving-belt by starting the motor. The belt must run even and smooth. In cause of belt-tension: Take off the belt-shroud and driving belt. Loosen the 2 screws for tensioning. Adjust in very small steps and put the belt back. Test run. Put the belt-shroud back. After 1000-3000 pairs: (or 1-2 seasons) Service should be made by an authorized service technician. Notice: This is a technical machine and the operator must take notice that everything can happen earlier or later, bid defiance to number of pairs or real time. Please contact us for support about the machine! [email protected] Page 8 Dressing of the grinding wheel 1. When dressing the grinding wheel always adjust the grinding wheel sideways to position 3.0 mm. See Picture 1. Never start to dress the grinding wheel if the skate is clamped into the machine. Picture 1. 2. Choose the hollow by moving the skate-holder device by using the arrows from “SPEED” so that the “pointer” points on the hollow you wish to have. See Picture 2. 3. Adjust the dressing-tool by screwing it downwards so that it comes out from the Picture 2. dressing –tool holder approximately 10 mm. See Picture 3. After that adjust the grinding wheel height approximately. 1 mm under the dressing-tool. See picture 3. Picture 3. 4. Lock the grinding wheel arm. See Picture 4. 5. Adjust the dressing-tool as close as possible to the grinding wheel without Picture 4. making any contact. 6. Push the “DRESS” button once and the grinding wheel starts to run. It will stop automatically after 2 minutes or by pushing the button again. 7. Turn the dressing-tool back-and forwards and adjust the dressing-tool screw carefully towards the wheel until it touches the grinding wheel. Turn the dressingtool back- and forwards until the entire surface is dressed. 8. Unlock grinding wheel-arm, screw up the dressing-tool and adjust the wheel downwards. 9. Ready for grinding with the hollow you have chosen. 10. For more detailed instructions how to use the electronics and adjustments please take a look at the control panel manual. (Page 4) Page 9 Grinding. 1. Adjust the grinding wheel sideways to the right blade thickness. See Picture 1. Always remember to measure both blades because there are sometimes differences even between the blades in same pair! HTC-tool is perfect for this! 2. Take the skate with your left hand and put the skate in to the skate-holder so that Picture 1. the heel is towards the wheel and make sure that the skate lies on both rolls at a distance of min 10 mm (half an inch) from the grinding wheel. 3. Use right hand to turn the handle to the left and make sure that the skate is in the correct position. Clamp the skate in place as showed in the picture 5. 4. Choose number of grinding cycles by using the “SHARP” button . Picture 5. 1 push is worth of 1 cycle, 2 pushes is worth of 2 cycles and so on. Machine will start after choosing the amount of cycles. Important! Never start the machine without a skate unless you are dressing the grinding wheel! Grinding is finished when the skate is in “home-position” and the motor stops. Check the result. 5. If you want to stop the grinding earlier (during cycles 2-5) just push the “SHARP” button again (reset). During 1 cycle push the button and the skate-holder will turn back. Push again and it will turn back again. That way you can sharpen a particular part of the blade. 11. For more detailed instructions how to use the electronics and adjustments please take a look at the control panel manual. (Page 4) Grinding of figure skates 1. Adjust the wheel sideways to the right blade thickness. See Picture 1. 2. Clamp the skate in place so that the heel is towards the wheel and the toe picks Picture 1. will leave outside the grinding area by using the points in the skate-holder device. See picture 5. Also use a special figure skate application (see the picture 6.) to make sure that heel of the blade will not be rounded. Attach the figure skate Picture 5. application to the skate-holder device. See Picture 6. Choose from “PROFILE” from which point the skate-holder will turn back. See pictures 6 & 7. Two pushes one light will go on and the skate-holder will turn back from the “1 point mark”. 3 pushes 2 lights and the skate-holder will turn back from the “2 points mark”. 4 pushes 3 lights and the skate-holder will Picture 6. turn back from the “3 points mark”. 3. Use right hand to turn the handle to the left and make sure that the skate is in the correct position. 4. Choose grinding cycles from “SHARP” Picture 7. Every push (light) is worth of one cycle. Page 10 5. Important! If you wish to reset the grinding push quickly twice the “SHARP” button when the skate-holder is going from left to right. When the skate-holder is moving from right to left only one push is needed for “reset”. Never start the machine without a skate unless you are dressing the grinding wheel! 6. Check the result and the skate is finished. For more detailed instructions how to use the electronics and adjustments please take a look at the control panel manual. (Page 4) 7. Notice! Figure skate application has to be ordered separately. Change of the grinding wheel Changing of the wheel and all service work may only be done when the main power is switched off. But before switching the power off please read these instructions. Drive the skate-holder to the left by using the arrows at “SPEED” . Now switch the power off. 1. Adjust the wheel towards you by turning the “blade-thickness” nut 5 full rounds clockwise. See Picture 1. Now the nut is getting more accessible. Picture 1. 2. Loosen the grinding wheels nut and remove the grinding wheel. 3. Put in a new wheel so that the text label is towards you and tighten it moderately. 4. Adjust the wheel sideways 5 full rounds anti-clockwise to 3.0 mm. 5. Now switch on the power. After changing the grinding wheel you have to reset the wheel size counter by pressing both arrows down for 3 seconds. You will hear “beeps” from the machine and the resetting is done. Now you can drive the skate-holder back to the starting position by using the arrows Picture 8. . and at the same time keeping the wheel-arm down by hand. See Picture 8. 6. Dress the wheel with desired hollow. See instructions for Dressing of the grinding wheel. Page 9. 7. For more detailed instructions how to use the electronics and adjustments please take a look at the control panel manual (Page 4.) Page 11