1
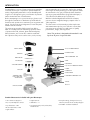
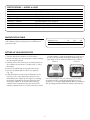
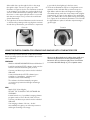
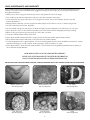
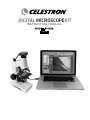
DIGITAL MICROSCOPE KIT
INSTRUCTION MANUAL
MODEL #44320
ENGLISH
Computer not included
INTRODUCTION
Congratulations on your Celestron microscope purchase.
Your new microscope is a precision optical instrument,
made of high quality materials to ensure durability and
long life. It is designed to give you a lifetime of pleasure
with a minimal amount of maintenance.
Before attempting to use your microscope, please read
through the instructions to familiarize yourself with the
functions and operations to maximize your enjoyment and
usage. See the microscope diagrams to locate the parts
discussed in this manual.
The microscope provides high powers from 40x to
600x. It is ideally suited for examining specimen slides
of yeasts and molds, cultures, plant and animal parts,
fibers, bacteria, etc. You can also examine small and
thin objects at low powers such as coins, rocks, insects,
various materials, etc. You can also explore the exciting
microscopic world by creating your own specimen slides.
An excellent book to get you started, which describes
various projects and activities along with techniques, is
“The World of the Microscope” by Usborne.
With the included digital camera and the software,
you can observe magnified images, capture video or
take snapshots.
The final section of this manual provides simple care
and maintenance tips for you to follow to ensure that
your microscope provides you with years of quality
performance, usage, and enjoyment.
Note: This product is designed and intended for use
by those 14 years of age and older.
1.10x to 20x ZOOM EYEPIECE
DIGITAL CAMERA
2. EYEPIECE TUBE
TWEEZERS
3. TOP ILLUMINATION - LED
NEEDLE PROBE
4. ARM
EYE DROPPER
5. NOSEPIECE
3 SPECIMEN SAMPLES
6. 4x, 15x and 30x OBJECTIVE LENSES
7. STAGE
DIFFUSER
8. STAGE CLIP
9. FOCUS KNOB
10. BOTTOM ILLUMINATION – LED
3 PREPARED SLIDES,
HOLE (CLEAR) SLIDE,
2 BLANK SLIDES
11. BASE
Figure 1
CD-ROM-SOFTWARE
Standard Accessories Included with your Microscope
• 10x—20x Zoom Eyepiece
• Digital Camera
• 4x, 15x, 30x Objective Lenses
• USB Cable – 1.1
• Top Illuminator - LED
• 3 Prepared Slides, Hole (Clear) Slide,
2 Blank Slides
• Bottom Illuminator - LED
• Honeybee Wing, Shrimp, Rock Pieces,
Tweezers, Needle Probe and Eyedropper
• Light Diffuser
1
• CD-ROM – Software Installation
SPECIFICATIONS — MODEL # 44320
Stage
Zoom Eyepiece
Focuser
Objectives
Illuminator — Top
Illuminator — Bottom
Nosepiece
Camera Resolution
Weight/Dimensions (with batteries) Plain Stage with metal clips — 74 mm x 70 mm (2.9” x 2.8”)
Glass optics. Power continuous from 10x to 20x
Coarse focus — dual knobs
All glass optics — see magnification chart for powers
Pen light style.
Uses 2AA batteries (user supplied)
Triple with click stop
VGA 640 x 480 pixels
17 oz. (482 g) — 5.25” x 3.13” x 9.75” (133 mm x 79 mm x 248 mm)
MAGNIFICATION TABLE
Use the following table to determine the magnification
of the different eyepiece/objective lens combination of
your microscope.
Objective Lens
10x on Zoom Eyepiece
20x on Zoom Eyepiece
4x
40x
80x
15x
150x
300x
30x
300x
600x
SETTING UP YOUR MICROSCOPE
1.Take the Styrofoam container out of the carton.
2.Remove the tape from the Styrofoam container holding
the various parts in place.
3.Carefully remove the microscope and other parts from
the container and set them on a table, desk, or other
flat surface.
4.Remove the plastic bag covering the microscope.
5.Remove the plastic cap from the zoom eyepiece
Fig. 1 (1).
6.Install the batteries for the bottom illuminator in the
base Fig. 1 (11) of the microscope which uses two
AA batteries (user supplied). See Figure 3a, showing
the battery compartment closed at the back of the
microscope. Figure 3b shows the batteries being
installed in the compartment (see the inside of the
battery compartment door to locate where the positive
(+) and negative (-) ends of the batteries go. Pull out on
the door to open it while holding the base firmly and
push firmly to close it after the batteries are installed.
Figure 3a
Figure 3b
You are now ready to use your microscope for looking
at specimen slides or small objects through the zoom
eyepiece! For using the digital (CMOS) camera, installation
and operating instructions will follow later in this manual.
2
MICROSCOPE OPERATION
and reversed but after some usage you will have an easy
time centering. Read the sections below on Focusing,
Changing Power, and Illumination before proceeding.
VIEWING A SPECIMEN
Carefully place a specimen slide under the stage clips Fig.
1 (8) and center the specimen directly over the hole in the
center of the stage Fig. 1 (11) – Figure 4a shows the stage
area with the hole in the center and Figure 4b shows a
specimen slide centered over the hole in the stage. It will
take some experimenting to place slides or objects in the
center of the stage as the image you see is upside down
Figure 4a
You are now ready to focus and view the specimen, but first
you must take some precautions so you do not damage a
specimen slide or valuable object. When using the higher
powers while you are focusing, make sure that the objective
lens does not hit the slide or object being viewed.
Figure 4b
Figure 5
FOCUSING & CHANGING POWER (MAGNIFICATION)
Now that the specimen slide (or object) is placed directly
under the objective lens, use the focus knob Fig. 1 (9) to
focus on the specimen. Note that for very small objects,
you should set them on the clear slide with a recessed hold
in the center.
hand and rotate the nosepiece with the other hand until it
clicks at the position. Be cautious not to let the objective
lens touch the specimen slide or object when changing
to higher powers – you should turn the focus knob first
to lower the stage to a low position. Note the power
range of the objective lens you are using is shown on the
nosepiece after it clicks into position.
4.At the highest powers, your views will be greatly
magnified but somewhat darker. The most enjoyable
views can be at the lower powers which have a wider
field of view and brighter illumination.
1.Always start with the lowest power (4x objective lens) and
have the zoom eyepiece at the 10x position, all the way
counterclockwise (when you are facing the microscope
from the front) until it stops, so that the total power is 40x
– this is the most useful power for solid objects.
2.For slightly higher power, you can rotate the knurled ring
on the zoom eyepiece (see Figure 5) clockwise to obtain
powers of 40x to 80x (or anywhere in between) as you
continue rotating to the 20x eyepiece position. Note
that you will have to refocus whenever you rotate the
eyepiece to obtain a sharp focus.
ILLUMINATION
To get the sharpest and best views, the illumination
(lighting) will have to be adjusted.
1.The top illuminator Fig. 1 (3) is used only for solid
objects (not specimen slides) so that light shines down
onto the object. Push the button on the top of the
illuminator to turn it on/off. After some usage, you can
determine the best way of adjusting the light to provide
the most pleasant views.
2.The bottom illuminator Fig. 1 (10) is used for specimen
3.For much higher powers, you will have to rotate the
nosepiece Fig. 1 (5) to change the objective lens to 15x
(provides total power of 150x to 300x depending on what
position you have the zoom eyepiece in or 30x provides
total power of 300x to 600x). You rotate the nosepiece by
holding the microscope above the nosepiece with one 3
slides which shine up through the hole in the stage
through the slide. You can see a close up of the
illuminator in Figure 6a below. The illuminator is turned
on by rotating it so the light goes up through the hole.
You turn off the illuminator by rotating it down so that
the mirror is on the upper part (the mirror is not useful
with this microscope since you have the much better
electric illuminator).
3.The light from the bottom illuminator can be increased
or decreased by rotating it with very slight movements.
As with the top illuminator, you will have to experiment
to provide the best lighting for the best views.
4.The bottom illumination may be too bright with some
specimen slides. Included with your microscope is a
light diffuser which reduces the brightness and glare
somewhat and can make the views sharper with a higher
contrast level. In Figure 6a the diffuser is the small black
piece. The diffuser fits over the bulb area by press fitting
it on. Figure 6b shows what the illuminator looks like with
the light diffuser in place. It will take experimenting to
get this right.
Figure 6a
Figure 6b
USING THE DIGITAL CAMERA FOR VIEWING AND IMAGING WITH YOUR MICROSCOPE
Your microscope camera will work on Windows and Mac
based operating systems, but the installation process for
each is different.
Please note: Many keyboards on Macs have a USB port.
The microscope will not work through this USB port
because it does not have enough power. You will have
to connect the USB directly to your computer tower.
WINDOWS:
· Windows 98/98SE/2000/ME/XP/Vista and Windows 7
· Install the included VP EYE software (make sure the camera is disconnected during this process)
· Connect your Microscope camera via the included USB cable
· Locate and launch the VP EYE software (upon completion of installation, a desktop icon should be created automatically)
· The software should automatically recognize your microscope camera and begin streaming a live image
MAC:
· Apple OS X 4.9 and higher
· DO NOT TRY TO INSTALL THE SOFTWARE ON YOUR MAC
· Instead launch one of your Mac’s imaging software programs such as: Photo Booth, iChat or iPhoto
· Connect your Microscope camera via the included USB cable
· Your imaging software of choice, should automatically recognize your microscope camera and begin streaming a live image
4
ATTACHING YOUR DIGITAL CAMERA TO YOUR MICROSCOPE
After installing the software confirming the microscope
camera is working with your software, you are ready to
attach the camera to the microscope. This step can be
done before the software install, if you prefer, just make
sure to follow the installation steps with the camera
disconnected.
When viewing or imaging a specimen slide or object, you
can change the orientation of the image on the computer
screen by rotating the camera to the position you desire –
generally do this counterclockwise so you don’t tighten the
camera in the eyepiece tube.
Left to right below – digital camera with USB cable- (Figure
7a), eyepiece tube (Figure 7b), camera attached to eyepiece
tube (Figure 7c), microscope with camera attached to a
computer with the USB cable (Figure 7d).
First, you need to remove the zoom eyepiece Fig. 1 (1)
from the eyepiece tube Fig. 1 (2) by turning it past the stop
at the 10x position. Put a little pressure on the eyepiece
(and one hand on the base for support) and continue
turning it counterclockwise to unthread it from the
eyepiece tube. Take the protective cap off of the camera.
Next, thread the camera into the eyepiece tube (clockwise)
without overtightening. Lastly, plug the USB cable into an
open USB port on your computer.
Figure 7a Figure 7b
Figure 7c Figure 7d
VP EYE SOFTWARE
The software package you installed is called VP-EYE.
The software allows you to observe specimen slides or
objects on your computer. When you view with the camera
installed, the magnification depends on the objective lens
you are using and also the size of your PC monitor.
Plug in the USB cable of the microscope camera to your
computer.
VP EYE contains basic image capture and organization for
your photos (snapshots) and videos. Click on the VP EYE
icon to begin (or from the programs in the Start menu of your
computer). The software is very intuitive and easy to use.
Note: The software package may not have some
of the programs listed due to the version of
this software package. You can print out a short
instruction sheet from the installed software. If you
need additional information about the software, visit
http://www.mmedia.com.tw.
MAGNIFICATION USING DIGITAL CAMERA — ESTIMATES
4x Objective 15x Objective 30x Objective using a 14” monitor — 340x
using a 14” monitor — 1200x
using a 14” monitor — 2000x
5
using a 17” monitor — 400x
using a 17” monitor — 1380x
using a 17” monitor — 2400x
CARE, MAINTENANCE, AND WARRANTY
Your Celestron microscope and digital camera are precision optical instruments and should be treated with care at
all times. Follow these care and maintenance suggestions and your microscope will need very little maintenance
throughout its lifetime.
• When you are done using your microscope, remove any specimens left on the stage.
• Turn off the top and bottom illuminators when you are done using the microscope.
• If you will not be using your microscope for a long period of time, remove the batteries from the top and
bottom illuminators.
• Always place the dust cap over the eyepiece and the camera sensor when not in use or when being stored.
• Store the microscope in a clean, dry place.
• Be very careful if using your microscope in direct sun light to prevent damage to the microscope or your eyes.
• Never point the sensor on the camera towards the sun or the camera can be damaged and cease working.
• When moving your microscope, carry it by the “arm” with one hand.
• Clean the outside surfaces with a moist cloth.
• Never clean optical surfaces with cloth or paper towels as they can scratch optical surfaces easily.
• Blow off dust with a camel’s hair brush or an air blower from optical surfaces.
• To clean fingerprints off of optical surfaces, use a lens cleaning agent and lens tissue available at most photo outlets
and when cleaning do not rub in circles as this may cause sleeks or scratches to occur.
• Never disassemble or clean internal optical surfaces. This should be done by qualified technicians at the factory or
other authorized repair facilities.
YOUR MICROSCOPE HAS A TWO YEAR LIMITED WARRANTY.
PLEASE VISIT CELESTRON WEBSITE FOR DETAILED INFORMATION
ON ALL CELESTRON MICROSCOPES AT WWW.CELESTRON.COM.
BELOW ARE A FEW SNAPSHOT IMAGES TAKEN BY A YOUNG TEENAGER ON HIS FIRST ATTEMPT USING THE VP EYE SOFTWARE.
Winter Jasmine Leaf with 4x Objective
Winter Jasmine Leaf
with 15x Objective
U.S. Penny
with 4x Objective
Year Tilia Stem with 4x Objective
Year Tilia Stem
with 15x Objective
Rock
with 4x Objective
6
www.celestron.com
FCC Statement
This equipment has been tested and found to comply with the limits for a Class B digital device, pursuant to part 15 of the FCC Rules. These limits are
designed to provide reasonable protection against harmful interference in a residential installation. This equipment generates, uses, and can radiate radio
frequency energy and, if not installed and used in accordance with the instructions, may cause harmful interference to radio communications. However,
there is no guarantee that interference will not occur in a particular installation. If this equipment does cause harmful interference to radio or television
reception, which can be determined by turning the equipment off and on, the user is encouraged to try to correct the interference by one or more of the
following measures:
• Reorient or relocate the receiving antenna.
• Increase the separation between the equipment and receiver.
• Connect the equipment into an outlet on a circuit different from that to which the receiver is connected.
• Consult the dealer or an experienced radio/TV technician for help.
2835 Columbia Street • Torrance, CA 90503 U.S.A.
Telephone: 310.328.9560 • Fax: 310.212.5835
Product design and specifications are subject to change without
prior notification.
©2012 Celestron
All rights reserved. • Printed in China • 06-12
This product is designed and intended for use by those 14 years
of age and older.