1
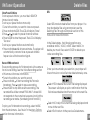
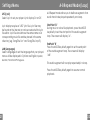
MP-C858
USER'S MANUAL
DIGITAL AUDIO PLAYER W/VOICE RECORDER
0 05/ 00 8 0 2:2 9/ 0 4: 1 6
The light of the w orld
Coby Ele ctronics Co rp.
56-65 Rust Street
Maspeth , NY 11378
www.co byusa.com
www.ec oby.com
Ple ase re ad m anua l befo re ope ratio n
Contents
Contents
O ther Functio ns
Getti ng Sta rted
Fea tures
3
Settings
19
Pa ckage Contents
4
A-B R epea t Mode
22
Safety In struct ions
5
Firmw are U pgrad e
23
Ba ttery Installa tion
6
C ustom er Support
Loc ation of Co ntrols
7
Troub lesho oting
25
LCD Scre en Di splay
8
Spec ificati ons
27
Conn ectin g to C ompu ter
USB Drive r Insta llatio n
9
Co nnecting/D iscon necting You r Play er
9
Tra nsferr ing Fil es
10
Basic Oper ation
1
Po wer O n/Off
11
Pla ying M usic
12
Me nu Ov ervie w
13
Vo ice Re cordi ng
15
FM Tuner Oper ation
16
De leting Files
18
2
Features
Package Contents
1 28 M B Integ rate d F lash Me mor y
M P3 and WM A Playb ack
0 05/ 00 8
02 :29 /0 4: 16
The l ig ht o f the w orld
Integ rat ed F M Tu ner
Integ rat ed M icrophone for Voic e Reco rding
M p3 play er
User's M anual
P orta ble Sto rage De vice (Music , Da ta, and Pic ture s)
Integ rat ed U SB P lug (no cab le r equ ired)
P lug and Pla y (n o dr iver installation req uire d fo r
W indows 2000/M E/X P or Ma c OS X 10.2. 6 or gre ater )
7 -co lor L CD Bac klight
D igit al P rese t Eq ualizer
Earp hones w /neck strap
USB Exte nsion C able
Song Titl e an d Sy nchronized Lyr ic Su ppo rt
M ult i-Language Sup por t
U pgr ade abl e Fir mware
Insta llation C D
(for Win dows 9 8 SE)
3
4
Safety Instructions
1 .Read these instruction s carefully. Keep these instructions for future
reference.
2 .Heed all warnings and follow all in structions.
3 .Do not exp ose to wate r or moistur e.
4 .Clean only with a dry c loth.
5 .Do not inst all near any apparatus that produc es heat suc h as stoves,
radiators, a mplifiers, e tc.
6 .Remove th e battery w hen the dev ice will be u nused for lo ng periods
of time.
7 .Do not use headphones/earphon es while cyc ling, driving , or
operating a motorized vehicle.
8 .Do not dro p or otherw ise subject t he device to impact. Physical
impact ma y result in lo ss of data. U sers are res ponsible for creating
backups o f their data. Coby Elect ronics cann ot be held l iable or be
otherwise r esponsible for loss of da ta.
9 .Do not disc onnect the USB cable o r turn off th e device w hile
transferring files to or fr om your de vice. Data l oss may occ ur as a resu lt.
1 0.Do not op en or attempt to repair this device . Refer all re pairs to
authorized service pe rsonnel.
P rotect your ears:
H earing experts advise a gainst the constant use of persona l stereo
e quipment p layed at high volumes. Constant h igh-volume use can
lead to hear ing loss. If yo u experien ce ringing in your ears o r hearing
loss, disconti nue use an d seek med ical advice.
F or recycling or disposa l informatio n about this product, pl ease
c ontact you r local authorities or the Electronic s Industries A lliance:
w ww.eiae.o rg
Battery Installation
1. Remove the U SB ca p.
2. Open the bat tery c over.
3. In sert th e AA A batt ery.
M ake su re to match the + and - ends of the batt ery wi th the
marking s insid e the batte ry compart ment.
WARNING: H andling the cord on the earphones will expose you to
lead, a chemical known to the State of Californ ia to cause
[ cancer, an d] birth defe cts or other reproducti ve harm.
Wash hands after handli ng.
5
6
Location o f Controls
M icrophone
LCD Sc reen Display
LCD Scree n
Play
Pause
Stop
Play mode indicator
005 /008
02: 29/0 4/1 6
File Type/
Bit rate
The light of the world
Current track
Play/P ause
N eck S trap H ook
Equalizer indicator
Battery level indicator
0 05/ 008 0 2:29/04: 16
The light of the world
Total time
Elapsed time
Number of tracks
Song Title/Filename
HOL D Swi tch
Volu me Co ntrol
PLAY MODE
Record
He adphone Jack
Pause
06:29:20 00: 00:40
Battery Cover
/VOICE/V007.WA
Recording Filename
Joysti ck Lef t
MODE (Pres s joystick)
Joysti ck Rig ht
7
USB Ca p
RECORD MODE
8
Connect to a Computer
USB Driver Installation (Windows 98 SE Only)
If you are using Windows 98 S E, you must install the USB driv er
and update utility.
1.Plac e the Installation CD in your c omputer's CD-ROM drive.
2.In My Computer, double-cl ick the disc drive (D:) icon
(where D: is your CD-ROM drive).
3.Find and d ouble-click "Win98Driver.exe " to start the
insta llatio n process. A setup dialo g window will ap pear o n
the screen .
4.Follo w the on-screen instructions. When setup is co mplete,
resta rt you r computer.
USB driver installation is not necessary if you are using
Windo ws Me/2K/XP or M ac O S X version 10.2.6 or ab ove.
Simply connect y our player to the computer; the op erating
system will then ta ke a moment to set up and a remo vable
disk icon will appear in "My Computer". (For Mac OS X users,
a removab le disk icon w ill appear on the "Desk top".)
Connecting/Disconnec ting Your Player
To connect your p layer to a compu ter:
1.Remove the USB cap to expose the inte grated USB plug.
2.Plug your player directly into the computer's USB port or use
the USB extension cab le (included).
To safely dis connect your player from a computer:
1.Double-click the gree n arrow in the tas kbar l ocated at the
bottom-rig ht of the co mputer's screen. A "Sa fely Remove
Hardware" window w ill appear.
2.In the list o f hard ware devices, double-click on "USB Mass
Storage Device ". A "S top a Hardw are D evice" window w ill
appear. Click the OK butto n.
You may now safely disconnect your player from the computer.
9
Transferring Files to Your Player
Transferring Files
To transfer files between yo ur player and a computer:
1.Conne ct your player to the c omp uter.
2.Open Windows Explo rer o n the compute r.
3.Select the file s yo u want to transfer fr om you r
comp uter and drag-a nd-dro p th em to the remo vab le
disk ic on (ie, your player). You can also transfer files
from your player t o a computer. Do not disconnect
your player while it is tran sferring files . Doing so may
corrupt or damage the firmw are and/or files on your
player. If your pla yer is accidentally disco nnecte d
while it is transferr ing files and do es n ot work pro perly,
re move and r epla ce the battery, and then turn your
player on again.
Deleting Files throu gh a Computer
With yo ur playe r conne cte d to a comp uter:
1.Open Windows Explo rer o n the compute r.
2.Do uble-click on the removable disk icon
(ie, yo ur player).
3.Use the m ouse to select the files you would like to
delete. Pr ess delete on your keyboar d and c lick Yes
to confirm.
You can also delete files di rectly from your pla yer. See
"DEL " in the Menu Options section of th is m anual for
more in formation.
10
Power On/Off
Ho ld F unc tion
The Hold s witc h lo cks/unlock s the joy stic k an d b utto ns
on yo ur playe r to prevent the m fr om bein g p ress ed
ac cidentally.
Ho ld Off:S lide the HOLD switc h in the opp osite di rection
o f the arr ow mar king on your pla yer to u nlock
the p laye r.
Ho ld On:S lide the HO LD switc h in the dire ctio n of the
a rrow to lock your playe r. Th e sc ree n wi ll
display the "l ock " symbo l sho wn belo w.
Turning Power On and Off:
to turn your playe r on.
Power On: Press and hold
The screen will display the CO BY logo first, and then
the remaining sto rage c apacity of your player.
. The screen will display
Power Off: P ress a nd ho ld
"Contin u e Holding on To Pow er Off". Do not
release the button until the screen displays
"GOOD BYE " .
Playing Music
Play a Mus ic Tr ack
1.Enter the Mus ic m ode (se e "Musi c" in the Me nu
O ptio ns section o f th is m anu al fo r more infor ma tion ).
2.P ress
t o st art p lay bac k.
Pau se/ Stop Playba ck
1.To pa use pla yba ck, pres s
re sum e p layb ack.
onc e. P ress
aga in to
005/008 0 2:29/0 4: 16
The light of the wor ld
2.To sto p p layb ack , press a nd hold
for 2 se con ds
(i e, until t he scree n d isplays " Con tinu e H olding o n To
Powe r Of f"). P ress a gain to resume pla yba ck.
005 /0 08 0 2:29 /0 4: 16
0 0 5/ 00 8 02 :2 9/ 04:16
The light of the world
The light of the w orld
Forwar d/Rever se
1.P ress
t o se lect the next track.
2.P ress
to se lect the pre viou s tra ck.
Fas t Fo rwa rd/R eve rse
1.P ress and hol d
to fast forw ard thro ugh a t rack
durin g playback.
2.P ress and hol d
to reverse thro ugh a trac k during
p layb ack .
Vol ume Co ntro l
1.P ress Volume to de cre ase the volume .
2.P ress Volume to inc rea se the v olume.
11
12
MENU Overview
P ress and ho ld M ODE to acc ess the Main me nu.
Pre ss
an d
t o ch ang e the se lec tion left and
righ t wi thin the menu.
Pre ss M ODE to con firm a se lec tion .
Pre ss Vo lum e + to c anc el o r return to a pre viou s m enu.
MU SIC
VO ICE
REC
FM
SET
PLAY MODE - Norm al, Re peat One,
Repe at All , Shuff le, Pre view
EQ - Norm al, Ro ck, Ja zz, Cl assic,
Pop, Bass
CONT RAST
BACK LIGHT
LIGHT COLOR
MENU
Main Menu Option
In the Ma in menu, the following options are ava ilab le:
MUSIC, VOIC E, REC, FM, SET, DEL , INF , and EX IT.
Music
Selec t MUSIC mo de to play y our digital a udio tr acks
(ie, Mp3 and WMA files). See the Playing Mu sic sect ion
of thi s ma nua l fo r mo re infor mation.
Voice
Selec t VO ICE mo de to play y our voice re cording file s.
Playb ack op erat ion is the sa me as in MU SIC mode.
See the R EC section of th is manual for inform ati on o n
how to re cor d fro m t he in tegrate d m icro phone.
POWE R (off) - D isable , 1 Mins, 2 M ins,
5 Mins, 10 Min s,
REC S ET - Normal, Middle, High
LYRIC
LANGUAGE S - Englis h, Spa nish, German,
French, Por tuguese
DEL
INF
EXIT
13
EXIT
Dele te Mu sic or Voice file
14
Voic e Rec ording
FM Tuner Operation
REC
FM
Select REC mo de to cr eate vo ice recordings with the
integrated microphone.
Select FM mode to liste n to FM radio station broadcasts.
To exit FM Tuner mode, press M ODE brie fly.
Start Recording
Select REC fr om the Main menu. The player will start
recording immediately. The screen will display a
Reco rding symbol
to indicate tha t recording is in
progr ess.
06:29:20 0 0:00:40
The re are 2 methods of tuning into stat ions : LISTEN
(preset stations) and SEARCH (manual sca n).
/VOICE/V007.WA
Pau se/Stop Recording
Press to pause reco rding. The screen will display a
Reco rding Pa used symb ol
to indicate that
recording has been paused. Press again to resume
recording.
Press the MODE key to sto p reco rding. The re corded
file will be named "VXXX.WAV" where XXX corresponds
to the numerical seq uence in which the recording
was made. (Numbering starts fro m 001.)
To p lay your recordings, select VO ICE from the Main
menu. See "Voice" in the Menu Options section for
more information.
Press
to c han ge between LISTEN and SEARC H.
LIST EN ( Pres et S tations)
LISTEN is the default method of tuning. Your pla yer can
stor e 30 station presets (CH01CH30). C H00 indicates
that the current sta tion has not been preset.
Press to select the next preset s tation.
Press to select the p revious pre set station.
SEARCH (Manual Scan)
SEA RCH allows you to manually scan and tune to a ll
radio frequenc ies.
Press or to de crea se o r in crea se the freq uency,
re spectively.
Press and hold
or to seek the previous or next
freque ncy with a broa dc ast signal, respectively.
To record FM broadcas ts, see the FM Tuner Operation section.
15
16
FM Tune r Operation
S tore Pre set S tati ons
To sto re p reset st atio ns, y ou mus t be in S EAR CH
(manual sca n) m ode .
To sto re y our pre set stations manual ly:
1 .Tun e to the station you wa nt to sto re a s a p res et.
2 .Pre ss an d hold MO DE. The LCD will disp lay "Sto re".
3 .Pre ss or to sele ct a pre set cha nne l num be r.
4 .Pre ss M ODE to store the pre set . The LC D w ill displa y
"Suc ce ss".
To sto re y our pre set stations auto ma tica lly:
Pre ss an d h old wh ile in M anu al mode . Th e playe r will
automa tica lly scan and store a s p rese ts a ll radio
freq uencie s with a bro adc ast sign al.
R eco rd F M Br oadcas ts
The re co rdin g pr oce ss fo r FM bro adcasts is the s ame as
fo r vo ice rec ording. See the Voi ce Reco rding se ctio n
o f thi s ma nua l fo r mo re infor mation.
Tun e to the station you want to rec ord .
Pre ss an d h old to sta rt re cord ing the FM rad io
bro adc ast. Pre ss aga in to pa use recording.
Pre ss M ODE to stop and sa ve th e re cording. The
rec orde d file w ill be na med "FX XX. WAV" w her e XX X
cor resp onds to the numerical sequ enc e in which the
rec ording w as made. ( Num be ring star ts fr om 001. )
17
To pla y y our FM b roa dca st re cordings, selec t M USIC
fr om the Main menu. See "M usic " in t he M en u O ptio ns
se cti on fo r m ore info rma tion .
Delete Files
DEL
Se lec t DE L mode to d elete files from your pla yer . Yo u
may a lso delete files usin g a com puter; see the
Delet ing Files Thr ough a C omput er s ecti on o f this
manual f or more info rma tion.
In the Delete Menu, the f ollowing op tion s ar e
availa ble : MU SIC, VO ICE , or EXIT . Sel ect MUSIC t o
delet e yo ur m usic file s; se lec t VO ICE to dele te your
voice rec ording files.
Once you have m ade yo ur selec tion , yo ur p laye r will
list ea ch m usic or voi ce f ile to be deleted on e-by-one.
Sele ct Y ES t o de lete the current file being d isplaye d.
The scre en will d isplay a quick confirmation that the
file has bee n de lete d a nd t hen mo ve t o the ne xt file.
Sele ct NO t o skip th e curren t fil e be ing disp lay ed a nd
move to the next file.
Sele ct Exit to return to t he p rev ious Del ete men u.
18
Settings Menu
S ET
Selec t SE T mo de to a cce ss th e Settin gs m en u of your
p laye r. In the Set ting s me nu, the foll owin g o ptio ns a re
a vailable : M ODE, EQ , CO N, BL, C OL , PWR, R EC, LRC ,
L AN, and EXI T.
MODE (Playm ode)
Selec t Pla ym ode to s et the P lay Mod e o ptio ns.
Normal: P lay trac ks in no rma l ord er.
Repe at O ne: Pla y the cu rren t tra ck r epe ate dly.
Repe at All: P lay a ll tr ack s rep eat edl y.
Sh uff le: P lay a ll tr ack s in random order.
P revi ew: Play the first few sec ond s o f ea ch track.
Note : Pla ymo de options ma y als o be se t by pressing
the M ODE ke y while play bac k has b een stop pe d.
E Q (E qualize r)
Selec t Eq ualizer to se t th e Eq ualizer opti ons. The op tion s
a re Normal, Rock, Ja zz, C lassic, Pop , or Bass .
Settings Menu
BL (Backlight)
Select Backlight to set the dura tion of time (in seco nds)
that the backlight will remain o n. The o ptions a re 5, 10,
30, Alwa ys, or Off.
COL (Lightcolor)
Select Lightcolo r to set the color of the backlight:
Color 1, Colo r 2, Color 3, Colo r 4, Color 5, Color 6,
Color 7 or Auto. The Auto setting will change the
ba cklight color e ach time a button is pressed.
PWR (Powe r)
Select Pow er to set the amoun t of time (in min utes)
you r player can be idle be fore it tu rns off auto mat ica lly.
The opt ions are 1, 2, 5, 10, o r Disab le.
REC (Rec Set)
Select Reco rd Set to se t the recording quality opt ion o f
you r player .
Normal: L owe r qualit y, small file size.
M iddle: M edium qua lity, medium file size .
High: High qu ality , larges t file size.
C ON (Co ntrast)
Selec t Co ntr ast t o se t the co ntra st le vel of the L CD
sc ree n. A set ting of 0 is lig hte st; a set ting of 1 0 is dar kest.
19
20
Settings Menu
A-B Repeat Mode (Loop)
LR C (L yric )
Se lec t Lyr ic to set you r pl aye r's ly ric displ ay O n o r Off.
A-B Repeat mode allows you to define a segment of an
audio tra ck to be played repeatedly on a loop.
Ly ric disp lay r equires a ".LRC" lyric file . Ly ric files may
be fo und on t he inter net or c an b e c reated with a Ly ric
fil e editor . Lyr ic files s hould have the sam e n ame as its
corre spo ndin g m usic file and be pla ced in the same
direc tory (eg , "So ngT itle1.lrc " an d "So ngTitle 1.m p3") .
Start Point "A"
During music or voice file playback, press the MODE
key b riefly to set the start po int of the audio segment
loop. The screen will display "A-".
LA N ( Languag es)
Se lec t La nguage s to set the lang uag e th at y our pla yer's
m enu s wi ll be disp lay ed i n. O ptio ns a re E nglish, S panis h,
Ge rman , Fren ch an d Port ugues e.
End Point "B"
Press the MODE key briefly again to set the end point
of the audio segment loop. The screen will display
"A-B ".
This a udio segment will now pla y repea tedly in a loop.
Press the MODE key briefly again to resume normal
playback.
21
22
Firmware Upgrade
Firmware Upgrade
IMPORTANT: Make sure your player has a new battery
insta lled before upgrading your firm ware. Do not
disconnect your pla yer from the computer or otherwise
interrupt the upgrade process-doin g so could damage
your player and render it inoperab le.
Firmwar e upda tes may be found a t www.cobyusa .com .
Check this site perio dically for new updates. Fi rmware
updates may add new func tion ality to your pla yer .
To upgrade your pla yer 's fir mware:
1.Do wnload the latest firmware for your pla yer from
www.cobyusa.co m . Save this file to the compute r.
2.Co nne ct y our player to the comp uter.
3.Do ubl e-cl ick t he downloa ded file *. In the window
that appears, double-click the file "stupdate rapp.exe".
This will launch the firmware update app lication.
4.A dialog b ox will a ppe ar. Click "OK".
6.C lick "Sta rt" t o be gin the firm wa re upda te.
D o NOT d isco nne ct y our pla yer whil e it is up dat ing.
7.T he upda te is co mpl ete whe n the green sta tus bar
has b een fille d. C lick "Close".
8.Disco nne ct your pla yer from the co mpu ter.
Yo ur p laye r wi ll tur n on au tom atic ally and up date its
firm wa re.
5. The updater w ill commence searching for yo ur
connected player. When it ha s detected your player,
you will see the screen below.
23
For mo re informat ion o n how t o sa fely conne ct to an d
disconnec t fro m a computer, refe r to the
Co nne ct t o a Com put er s ecti on o f th is manua l.
* Y ou m ust have a file com pre ssio n ut ility inst alle d on
your c omp ute r.
24
Troubl eshooting
This tro ub lesh ooti ng g uid e ai ms t o sa ve y ou time in
ca se y ou exp erie nce any inc onvenie nce with this
di gita l au dio play er. If yo u ar e still ha ving difficulty,
pl eas e co nta ct Technica l Su ppo rt.
M y player do es n ot work.
1.Ensure that the battery is charg ed.
2.Ensure that the battery has bee n p rope rly i nsta lled.
File transfer failur e.
1.Ensure that the USB driver has b een inst alle d
corr ectly on the PC .
2.Ensure that the USB cab le is attach ed s ecurely to
both the PC and yo ur p laye r.
3.Ensure that you r pla yer's me mo ry c apa city lim it ha s
not bee n re ach ed.
4.Ensure that the battery is charg ed.
Po or s oun d qu alit y or no s oun d.
1.Ensure that the volume leve l is n ot set to "0" .
2.Ensure that you r headp hones a re a ttac hed se cure ly
to th e head pho ne jack.
3.Poo r sou nd qua lity may result fr om corr upt or p oor ly
enc ode d m usic files. Try do wnlo ading the mus ic fil e
aga in o r encod ing the file a t a higher b itra te. T he
reco mm end ed minimum bit rat e fo r this pla yer is 128
kbps for Mp 3 file s and 64 kb ps for W MA files.
25
Troubleshooting
Poor FM reception
1. Ensure tha t yo ur e arp hones a re p lugged into the
he adp hone ja ck. (The co rd o f the ea rphones wo rk
as an FM a nte nna .)
2. Ad just the position of your ea rphone cor ds and
player. Turn off ne arb y electr onic devices.
Th ere's some thin g wr ong with the LC D sc ree n.
1.Rem ove , and then replace the battery .
2.Plea se c all Technic al Supp ort f or a Hot-key reb oot .
Technica l Su pport
Monday to Friday: 8: 30 AM - 8:30 PM EST
Satur day and Sunda y:9: 00 AM - 5:30 PM EST
Telep hone:800-681-2629 or 718- 416- 3197
You c an also reach u s online at w ww.co byu sa.c om or
by e- mail at t echsup por t@cobyusa. com .
26
Spec ifications
Power
Memo ry
Size
1 "AAA " Batt ery
512 MB Fl ash
3.7"x 1 .2"x0 .9"(WH D)
Interfa ce
US B Rev . 2.0 Full Spe ed
Displa y
12 8x32 d ot-m atrix L CD
Processor
65 MIPS D SP
Audio Playb ack
M p3 : 96-320 k bps V BR
Voice Recording
IM A-ADP CM e ncod ing
WM A: 32-192 kb ps
Signal-to-No ise Ra tio
90 dB
Frequency R espo nse
20-20,000 Hz
Output
Total H armonic Di stortio n:
2
50mW
0.01%-0.1%