1
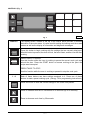
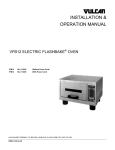
INSTALLATION &
OPERATION MANUAL
MODEL VFB2 ELECTRIC
FLASHBAKE OVEN
VFB2
VULCAN-HART
ML-126582
COMPANY,
FORM 31130 Rev. B (9-99)
P.O.
BOX
696,
LOUISVILLE,
KY
40201-0696,
TEL.
(502)
778-2791
© VULCAN-HART COMPANY, 1999
–2–
TABLE OF CONTENTS
GENERAL............................................................................................................................................. 4
INSTALLATION .................................................................................................................................... 4
Unpacking ................................................................................................................................. 4
Location .................................................................................................................................... 4
Installation Codes and Standards ........................................................................................... 5
Electrical Connections ............................................................................................................. 5
Cord Connected Ovens ........................................................................................................... 5
OPERATION ........................................................................................................................................ 6
Precautions ............................................................................................................................... 6
Utensils To Use ........................................................................................................................ 6
Controls .................................................................................................................................... 7
Modes ....................................................................................................................................... 8
Cooking ................................................................................................................................... 10
Settings ................................................................................................................................... 10
Cleaning .................................................................................................................................. 11
MAINTENANCE ................................................................................................................................. 13
Inspecting the Oven ............................................................................................................... 13
Lamp Replacement ................................................................................................................ 13
TROUBLESHOOTING ....................................................................................................................... 14
NOTES ............................................................................................................................................... 15
–3–
Installation, Operation and Care of
VULCAN MODEL VFB2 FLASHBAKE® OVEN
PLEASE KEEP THIS MANUAL FOR FUTURE REFERENCE
GENERAL
Your Vulcan FlashBake oven is a versatile oven that employs a revolutionary high quality, high-speed
cooking technology. The cooking process is so fast that food retains its natural juices. Bread products
brown and become crisp while vegetables retain their color and texture.
FlashBake ovens use visible and infrared light energy to cook by radiative heat transfer. The infrared
energy browns the surface of the food, while the visible light energy penetrates and heats it internally.
Using the proper combination of visible and infrared light energy, the FlashBake oven provides
efficient, high-speed baking and high quality food.
INSTALLATION
Before installing, verify that the electrical service agrees with the specifications on the rating plate
located on the rear of the oven. If the supply and specifications do not agree, do not proceed with the
installation. Contact the Vulcan Hart Company immediately.
UNPACKING
Immediately after unpacking, check for possible shipping damage. If the oven is found to be damaged,
save the packaging material and contact the carrier within 15 days of delivery.
Check to make sure you have the following items:
1. Oven (1)
2. Installation and Operation Manual (1)
3. Cooking guide (1)
LOCATION
When deciding oven placement, be sure to consider clearance and available air for oven cooling. If the
inlet air is obstructed or heated, the oven will not operate properly.
Install the oven on a level counter top.
–4–
There must be a 3" (76 mm) clearance on each side of the oven. There must be a 3" (76 mm) clearance
to the rear of the oven as well. The area behind the oven around the blower must be kept clear of
obstructions and allow for free air circulation.
Ensure that the cord can be plugged into the appropriate outlet.
INSTALLATION CODES AND STANDARDS
The VFB2 FlashBake oven must be installed in accordance with:
In the United States of America:
1. State and local codes.
2. National Electrical Code, ANSI/NFPA-70 (latest edition). Copies may be obtained from The
National Fire Protection Association, Batterymarch Park, Quincy, MA 02269.
ELECTRICAL CONNECTIONS
The VFB2 FlashBake oven has a 5 foot (1524 mm) power cord for receptacle installation.
WARNING: ELECTRICAL AND GROUNDING CONNECTIONS MUST COMPLY WITH THE
APPLICABLE PORTIONS OF THE NATIONAL ELECTRICAL CODE AND/OR OTHER LOCAL
ELECTRICAL CODES.
120
1
60
V oltage
P hase
C ycles
WARNING: DISCONNECT ELECTRICAL POWER SUPPLY AND PLACE A TAG AT THE DISCONNECT
SWITCH TO INDICATE YOU ARE WORKING ON THE CIRCUIT.
WARNING: APPLIANCES EQUIPPED WITH A FLEXIBLE ELECTRIC SUPPLY CORD ARE PROVIDED
WITH A THREE-PRONG GROUNDING PLUG. IT IS IMPERATIVE THAT THIS PLUG BE
CONNECTED INTO A PROPERLY GROUNDED THREE-PRONG RECEPTACLE. IF THE
RECEPTACLE IS NOT THE PROPER GROUNDING TYPE, CONTACT AN ELECTRICIAN. DO NOT
REMOVE THE GROUNDING PRONG FROM THIS PLUG.
CORD-CONNECTED OVENS
Plug the oven into a dedicated circuit outlet of the appropriate NEMA style and rating.
RECEPTACLE
ELECTRICAL DATA
PL-53370
15 Amp
NEMA 5-15R
Fig. 1
The outlet must be properly wired with the correct polarity and grounding or the oven will not operate
properly.
–5–
OPERATION
WARNING: THE OVEN AND ITS PARTS ARE HOT. USE CARE WHEN OPERATING, CLEANING,
OR SERVICING THE OVEN.
PRECAUTIONS
• Never attempt to open the oven door while a cook cycle is in progress.
• Never attempt to operate the oven with the door open.
• Never operate the oven without food inside.
• Before removing a pan from the oven, prepare a place to put the hot pan. Do not place the hot pan
on wood, plastic, Formica, or other burnable surfaces.
• When removing pans from the oven, use a pan grabber and hot pads designed to withstand high
temperatures.
• The inside surfaces of the oven are not intended for direct food contact. Always use approved
utensils and cookware.
UTENSILS TO USE
Approved
• FlashWare (Pyroceram)
• Silicone-treated parchment paper
• Steel
• Enameled aluminum
• Aluminum
• Corning Ware
• Aluminum Foil
• Grill Pan
• Silverstone coated aluminum
• Ovenproof glass
• Ceramics
Never Use
• Paper
• Plastic
• Roasting bags
• Boil-in bag pouches
–6–
CONTROLS (Fig. 1)
1
2
3
4
5
6
7
8
9
START
TIME
SAVE
PAUSE
STOP
Fig. 2
DISPLAY
PL-53346
The display screen, located at the top of the control panel provides a constant
indication of the oven status. It is also used for setting and saving cook times and
modes as well as the display of information and diagnostic messages.
START
Press this button to begin cooking with the settings that are currently displayed.
After this button is pressed, the door will lock, the fan will start, and the oven will start
cooking.
PAUSE
STOP
PRESS ONCE TO PAUSE.
Use this function while the oven is cooking to pause the current cook cycle and
unlock the door. Press the START button to resume cooking at the point the
recipe was interrupted.
PRESS TWICE TO STOP
Use this function while the oven is cooking or paused to stop the cook cycle.
1-9
Each of these buttons can have settings assigned to it. Press one of these
buttons to start a preset cooking cycle. (See pg. 10 for programming instructions.)
Press this button to save the current settings in one of the nine presets.
SAVE
Press to increase cook time in increments of 30 seconds (up to 90 minutes).
Press to decrease cook time by 30 seconds.
–7–
OK
O
PRESET BA
KE
OWN
BR
GRIL
L
C
CONTROLS CONT.
Fig. 3
OPERATING MODES
When using the VFB2, you will see information appear in the display window. Different information
appears when the dial is set on different modes.
Grill Mode
In the Grill mode, 2 of the 4 bottom lamps operate at the same time. Both lamps cycle in a circular
motion. It is normal to see top lamps operate in the Grill mode as well.
2:00 - Grill Time
SET TIME
PRESS START
Set the amount of time by pushing the
or
. Time is set in 30 second increments.
Cook Mode
In the Cook Mode, one of the four top lamps and one of the four bottom lamps operate at the same time.
Both lamps cycle in a circular motion.
5:00 - Cook Time
SET TIME
PUSH START
Push the
or
to set the time. Time can be set in 30 second increments.
–8–
Bake Mode
In the Bake Mode, one top lamp and one bottom lamp operate at a time. Lamps cycle in a circular
motion. When one minute remains, two lamps will operate on the top and the bottom lamp will shut off.
5:00 - Bake Time
SET TIME
PUSH START
Set the amount of time by pushing
or
. Time is set in 30 second increments.
Brown Mode
In the Brown Mode, two top lamps operate at a time and cycle in a circular motion.
3:00 - Brown Time
SET TIME
PUSH START
Set the amount of time by pushing
or
. Time is set in 30 second increments.
–9–
COOKING
USING THE FLASHBAKE
Food cooks faster in the FlashBake than in conventional ovens but basic cooking principles still apply.
For example, if you would normally cover the dish with a lid, or turn, stir or add water to the product
when cooking in a conventional oven, do the same in the VFB2.
See Utensils To Use (pg. 6) when deciding on what type of cookware to use in the oven. Use of the
items listed under the Never Use section of this manual will damage the VFB2 and void the warranty.
For best results, place the dishware in the center of the oven. Place multiple smaller dishes to the
middle as well.
Cooking Times
The VFB2 reduces cooking time by approximately 25-50%. To determine a cooking time, reduce the
cooking time for a conventional oven by about half.
• If the product has a time range, reduce the greater time by half to determine the cooking time.
Some products will require an extra minute or two in addition to halved time. (See the VFB2 Cook
Chart for additional instructions.)
The product should be checked through the viewing window to monitor the product's progress and
to determine if any adjustments should be made to the cooking time. Time can be increased or
decreased by pressing the appropriate arrow key. Once you have achieved the desired doneness and
appearance of the product, the COOK MODE and COOK TIME can be saved using one of the nine
available presets on the touchpad of the control panel (see page 7).
SETTINGS
Saving a Setting
1. Turn the knob to the desired mode.
2. Enter the time by pushing the
or
on the control panel.
• Time can only be set in 30 second increments.
3. Press
SAVE
.
4. Using the touchpad, select a number between 1 and 9 to store the setting.
The display screen will indicate SAVED! The time and mode screen will then be displayed.
Using Saved or Preset Settings
1. Turn the knob to PRESET on the dial.
• The display screen will read SELECT A RECIPE:
2. Push a number (1-9) from the keypad.
The selected cook cycle will begin immediately.
– 10 –
BLOWER
The oven blower is temperature controlled and will turn off automatically, adding to the oven's energy
efficiency.
CLEANING
WARNING: DISCONNECT ELECTRICAL SUPPLY BEFORE CLEANING THE OVEN.
The interior cleanliness of the FlashBake oven is essential to ensure maximum efficiency of your oven.
Keeping the oven clean and free of food debris will minimize the possibility of smoke and odors from
food stuck on the lamp shields and interior walls.
The interior of the oven cavity is lined with highly reflective materials that allow the oven to cook with
exceptional speed. These materials SHOULD NOT, under any circumstances, be cleaned with
abrasive materials or chemicals other than those recommended below. If non-recommended
chemicals are used, they can etch and scratch the cavity, causing a loss in efficiency and result in the
need for repairs.
IMPORTANT: The VFB2 is equipped with a pan sensor. This sensor automatically reads the reflected
light from the pan and adjusts the lamps accordingly. If the bottom of the oven surface is not kept clean,
the sensor will read the pan surface incorrectly and improper cooking results may occur.
APPROVED CLEANING MATERIALS AND PROCEDURES
CAUTION: NEVER USE OVEN CLEANERS TO CLEAN THE VFB2 OVEN. NEVER USE ABRASIVES
OR SHARP OBJECTS ON THE OVEN WALLS OR WINDOW.
Cleaners
• 3M white scouring pad.
• Mild dish soap - Use any mild food service type dish soap for the interior cleaning. Be sure that
the soap is non-caustic.
• Citrus 2000 Multi-Purpose Ready To Use.
• Pro Formula 409 - Use for interior walls.
• Windex Powerized Formula - Use for cleaning the door window interior and exterior.
• FDA food quality sanitizer for cooking surfaces.
• Vinegar and water solution.
• Baking soda and water solution.
Cleaning Tools
• Terry towel cloth - Food service quality.
• Nonabrasive pad - Institutional quality-certified nonabrasive. (Example: White 3-M).
Always rinse cleaned surfaces to ensure all the soap and chemicals have been removed, then wipe
dry with a soft clean cloth.
– 11 –
It is recommended that you clean the oven after each shift. If your operation is extremely busy, it may
be necessary to wipe out the oven during a shift until you are able to perform the detailed cleaning.
1. Allow oven to cool before starting the cleaning process.
2. Open the door.
3. To start the interior cleaning, use a cloth dampened with one of the recommended cleaners. Be
sure that the soap is non-caustic. Wipe the food debris out of the oven, working from the back
forward.
• Do not pour cleaning liquids into the oven. Always use a cloth dampened with the
cleaning fluids.
4. You can use a rubber or plastic scraper or a non-abrasive pad to loosen any residual food
remaining on the lower glass lamp shield. Repeat Step 3.
5. Dampen a clean cloth with one of the recommended cleaners and wipe out the interior wall
surfaces to remove any grease or spatters. Work from the back of the oven forward. Repeat this
step several times if necessary.
6. Clean the interior surface of the front door with a terry cloth towel and recommended cleaner.
Wipe the exterior edges of the door and frame, paying close attention to the gasket.
7. Clean the inside of the oven door window with a cloth dampened with window cleaner. If
necessary, use a 3M white scouring pad to remove baked on grease. Wipe the window clean with
a cloth or paper towel dampened with window cleaner. CAUTION: Do not use abrasives on the
reflective inside door surface.
8. With a clean cloth dampened with a food quality sanitizer, wipe the entire interior cavity of the
oven, working from the back forward.
9. Clean the exterior of the oven with a soft cloth dampened sparingly with a commercial stainless
steel cleaner. The outside of the oven door window may be cleaned with a cloth dampened with
window cleaner.
NEVER touch the cooking lamps. Skin oils on the lamps could lead to premature lamp failure. If contact
does occur, gently wipe the lamps with a clean, lint-free cloth dampened with rubbing alcohol.
– 12 –
MAINTENANCE
WARNING: THE OVEN AND ITS PARTS ARE HOT. USE CARE WHEN OPERATING, CLEANING
AND SERVICING THE OVEN.
WARNING: DISCONNECT THE ELECTRICAL SUPPLY BEFORE PERFORMING ANY MAINTENANCE
ON THE OVEN.
Do not remove the oven covers or attempt to open the control cabinet. Doing so will void the warranty.
There are no user serviceable parts inside.
INSPECTING THE OVEN
At least once each day, when the oven is cool, visually inspect the inside of the oven. Make sure there
are no obvious signs of damaged, worn, or broken parts.
Do not operate the oven if the glass bottom or ceiling of the cavity is cracked or broken. Contact your
local Vulcan service representative.
LAMP REPLACEMENT
All lamps MUST be replaced by your local Vulcan service representative.
– 13 –
TROUBLESHOOTING
PROBLEM
No power to the oven.
POSSIBLE CAUSES
1. Oven power cord is not plugged into the wall
outlet.
2. Main branch circuit breaker is blown.
Fan not operating.
1. Obstruction in the blower air flow path.
2. Ensure than blown inlet and louvered outlets
are clear and unobstructed.
Oven not cooking.
1. Check the oven setting. Make sure the setting
is valid. Be sure the time setting is not zero.
2. Ensure the oven is clean: Especially the bottom
cooking surface.
Door does not lock.
1. Check for obstructions. Close door again.
Display window reads
Oven Cannot Operate.
1. Ensure the door is closed and there is no damage
to the door or the closure.
2. Ensure the power outlet is wired with the correct
polarity.
3. Unplug the oven then insert the plug back into
the outlet.
4. The oven may have overheated. Allow the oven
to cool.
If these actions do not reset the oven and allow the cooking cycle to begin, contact your local Vulcan
Service Office.
– 14 –
– NOTES –
– 15 –
– NOTES –
FORM 31130 Rev. B (9-99)
– 16 –
PRINTED IN U.S.A.