1
3D Blaster Annihilator 2 MX Installation Guide
Contents
! !
"
# $!
$%
Introduction
$ &'()#*+&, &,-./&)(
0#*(
0#*-12% &3%
$45$647./&)!895.!87
-+
&')#*--#2
$:'#%;-#-%<
-
&-%:22
-:-=
&')#*-&-3
#;2%%9+
Serial and Model
Numbers
>%%%=
8
%%
$%
%-
&')#*
!.%
#.%
Before You Begin
$8;)&#;&28?#-%
8
%
Minimum System
Requirements
❑
❑
❑
❑
❑
❑
❑
❑
❑
'#@""A%
@@)#&(B1@11#C9
1D#'8)#
#'-%=5-7E
)
"5)-7
5-7
&28?#-
3F3#3.$D
"5!-=7"""
!/)2+/)
E.G)=%+=%
-
Updating Drivers
$- &')#*3-->%
Preliminary step for
Windows 95 users
!
3--%%
=!3!3=
3%2=!
$%%!%:-
%
.%-%%
0
=%:-
❑D
""
"58-7
❑D
""
")58-7
❑D
""
"'5?!8-
7
❑D
""
"5?!8-
7
Installing Your
Graphics Card
$ &')#*
To install the graphics
card
:
&'
)#*3
%-:
D
$-
&
$
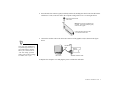
8--
)-G4)%
-G4:
$-:
1
8-5)7
B
H
)%
F
>%%3=
$3
!%
%/)?3
%
/)%-
2&.
2+
%
I$$4>I>
3I>
03
!&
!
!"
#$%&'
"
8-
Installing Software
)3
$ &')#*&G
❑ &-3F#57
❑ &-.$D
""""
(
❑ -;' 3F3#3
.$D
""""
❑ -4-J(
❑ #8$=(
❑ 0;:&
$G
❑ 58-7
❑ 5?!8-
"7
❑ F
❑ #
❑ .$D
"5!-=7
❑ """
Windows 95
(Retail version)
$
)%:3
%
%:
3=
3=
%
&')#*&
&28?#-
D
%:3!"#$% &"'#( &") *+$,5&G
&28?#-73=%
-3=#-../.-5)-7#-..0.
-5-7
$-
1
3=1%
H
)3
=&=$
F
$%:3!"#$% &"'#( &"&'23'+'=%
0
3
Windows 95
(OSR version 2.0
and later)
$
)%:3%
%:1
3=4%
3
)5%:3=
(
%
D
&')#*&
&28?#-
&
(
%:3
!"#$% &"'#( &") *+$,5&G
&28?#-73=
%
1
3
)5%:3=
%
H
%:3=%
F
6%:3!"#$% &"'#( &") *+$,3=
%
$-
3
)5%:3=%
"
3=1%
After the system has restarted, proceed to install the applications. Click Start, then click Run.
12. In the Run dialog box, type D:\GRAPHICS\ENGLISH\SETUP.EXE and click the OK button.
13. Follow the instructions on the screen to complete the setup.
If you do not install all the applications now, you can install them later.
!
Windows 98
1. Turn on your system.
Windows 98 automatically detects the graphics card.
An Add New Hardware Wizard dialog box appears,
informing you that a display adapter has been
detected.
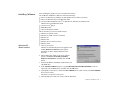
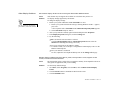
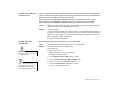
2. When a dialog box similar to the figure opposite
appears, click Display a list of all the drivers in a
specific location, so you can select the driver you
want, and then click the Next button.
3. Insert the 3D Blaster Annihilator 2 MX CD into your
CD-ROM drive.
4. In the Models list box, click the Have Disk button.
5. In the Install From Disk dialog box, type D:\GRAPHICS\ENGLISH\WIN9XDRV (where D:
represents your CD-ROM drive) and click the OK button.
If you are installing 3D Blaster Annihilator 2 MX as a second or subsequent card to make use of
Windows 98’s multi-monitor capability, you will see an Update Driver Warning message telling you
that the driver you selected may not work correctly. You must click the Yes button to confirm that you
want to use the selected driver. Otherwise, the system will install the wrong driver and will not
recognize the card as a 3D Blaster Annihilator 2 MX card (for details, see “Windows 98/Me MultiMonitor Display Problems” on page 15).
6. In the Models list box of the Select Device dialog box, make sure the Creative GB0030 (AGP
version) or Creative GB0050 (PCI version) entry is selected and click the OK button.
7. Click the Next button.
8. Click the Finish button.
The drivers are copied to your system.
9. When prompted to restart your system, click the Yes button.
10. After the system has restarted, proceed to install the applications. Click Start, click Run.
11. In the Run dialog box, type D:\GRAPHICS\ENGLISH\SETUP.EXE and click the OK button.
12. Follow the instructions on the screen to complete the setup.
If you do not install all the applications now, you can install them later.
3D Blaster Annihilator 2 MX 7
Windows Me
1. Turn on your system.
2. Windows Me automatically detects the graphics card.
An Add New Hardware Wizard dialog box appears, informing you that a display adapter has been
detected.
3. Windows will automatically install the drivers for a Standard PCI Graphics Adapter (VGA)
(Microsoft) (6-8-2000).
If you are installing 3D Blaster Annihilator 2 MX as a second or subsequent card to make use of
Windows Me’s multi-monitor capability, you will see an Update Driver Warning message telling
you that the driver selected may not work correctly. You must click the Yes button to confirm that you
want to use the selected driver. Otherwise, the system will install the wrong driver and will not
recognize the card as a 3D Blaster Annihilator 2 MX card (for details, see “Windows 98/Me MultiMonitor Display Problems” on page 15).
4. Click the Next button.
5. Click the Finish button.
6. When prompted to restart your system, click the Yes button.
7. After the system has restarted, proceed to install the applications. Click Start -> Run.
8. Insert the 3D Blaster Annihilator 2 MX CD into your CD-ROM drive.
9. In the Run dialog box, type D:\GRAPHICS\ENGLISH\SETUP.EXE (where D: represents your
CD-ROM drive) and click the OK button.
10. Follow the instructions on the screen to complete the setup.
If you do not install all the applications now, you can install them later.
Windows NT 4.0
(Service Pack 5)
1. Turn on your system.
2. Click Start, click Run.
3. In the Run dialog box, type D:\GRAPHICS\ENGLISH\SETUP.EXE (where D: represents your
CD-ROM drive) and click the OK button.
4. Follow the instructions on the screen to complete the setup.
If you do not install all the applications now, you can install them later.
5. If the Invalid Display Settings dialog box appears after your system has restarted, click the OK button
and change the display settings.
For details, see “To change the display settings in Windows NT 4.0 and Windows 2000” on page 10.
3D Blaster Annihilator 2 MX 8
Windows 2000
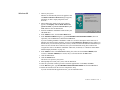
1. Turn on your computer. Windows 2000 automatically detects the graphics card. The “Found New
Hardware Wizard” dialog box appears, informing you that a display adapter has been detected.
2. Select the “Search for a suitable driver” option and click the Next button.
3. Insert the 3D Blaster Annihilator 2 Ultra CD into your CD-ROM drive.
4. In the Optimal serach locations list, check the CD-ROM drivers box and click the Next button.
5. The Driver file search results will identify the graphics card as Creative GB0030 (AGP version) or
Creative GB0050 (PCI version) and locate the driver files in
D:\GRAPHICS\ENGLISH\WIN2KDRV location (D: represents your CD-ROM drive). Click the
Next button.
6. When the “Digital Signature not Found” dialog box appears, click the Yes button to continue the
installation.
7. When the installation is complete, click the Finish button.
8. After the installation is complete, click Start on the Windows Taskbar and click Run.
9. In the Run dialog box, type D:\GRAPHICS\ENGLISH\SETUP.EXE and click on the Ok button.
10. Follow the instructions on the screen to complete the setup. If you do not install all the applications
now, you can install them later.
3D Blaster Annihilator 2 MX 9
Changing Settings
To change the
display settings in
Windows NT 4.0 and
Windows 2000
Right-click your desktop, and then click Properties on the shortcut menu.
In the Display Properties dialog box, click the Settings tab.
In the Desktop Area group box, drag the slider to set the desired resolution.
In the Color Palette group box, select the desired color. Certain colors may not be available for some
display resolutions.
5. In the Refresh Frequency group box, select the desired refresh rate.
6. To test the settings, click the Test button, and then click the OK button.
When the Testing Mode dialog box reappears:
• If the test bitmap is properly displayed, click the Yes button.
• If not, click the No button. A warning message will be displayed. Click the OK button and repeat
steps 3 to 6, changing one or more of the settings.
7. Click the OK button to close the Display Properties dialog box.
To change the
performance settings
You can customize the settings of your graphics card for optimal performance with applications, using
the instructions below. However, if your monitor displays abnormal behavior, revert to the factory
default settings (see “Troubleshooting” on page 15).
1.
2.
3.
4.
1. Click Start, select Programs, select Creative, select BlasterControl4, click on Display Center.
2. In Display Center, click the Tweak button to start BlasterControl Tweak Center.
3. Select the desired settings and click the OK button.
3D Blaster Annihilator 2 MX 10
Getting More
Information
3D Blaster Annihilator 2
MX
The Help file for 3D Blaster Annihilator 2 MX gives a brief introduction to the features supported by this
graphics card.
To open the Help file for 3D Blaster Annihilator 2 MX
Click Start, select Programs, select Creative, click on Help.
Creative BlasterControl
The Help file for Creative BlasterControl shows you how to use the BlasterControl utility to customize
your screen resolution, color depth, and refresh rate in Windows.
To open the Help file for BlasterControl
Click Start, select Programs, select Creative, select BlasterControl4, click on Help.
To open Help topics specific to a BlasterControl module
In the BlasterControl module, click the Show Help Window
LAVA! Player
button.
The Help file for LAVA! Player shows you how to use the multimedia player.
To open the Help file for LAVA! Player
Click Start, select Programs, select Creative, select Creative LAVA!, click on LAVA! Help.
3D Blaster Annihilator 2 MX 11
Technical
Specifications
Architecture Highlights
❑
❑
❑
❑
❑
❑
3D Features
❑
❑
❑
❑
❑
❑
❑
❑
❑
❑
Powered by the NVIDIA GeForce 2 MX™
Advanced 256-bit graphics architecture
32MB of Double Data Rate (DDR) memory
Intergrated high speed 350MHz RAMDAC
256-bit graphics architecture
AGP 4X, with Fast Writes support (AGP version - requires motherboard support)
Two independent pixel pipelines
Up to 4 texture-mapped, filtered, lit texels per clock cycle.
NVIDIA Shading Rasterizer per-pixel rendering engine
Delivers fill rates of up to 700 megatexels per second
2nd-generation transform and lighting (T&L) engines
Processes over 20 million sustained triangles per second
Optimized Direct3D® and OpenGL® acceleration
Hardware Full Scene Anti-Aliasing (FSAA)
Advanced per-pixel, perspective-correct texturing
• Shading and lighting
• Cube environment mapping
• Projective textures
• Bump mapping
• Texture modulation
• Light and reflection maps
• Procedural textures
Fog and Depth Cueing
• Radial or linear
• Per-vertex or per-pixel
3D Blaster Annihilator 2 MX 12
2D Features
❑
High performance 2D, GUI, DirectDraw®
Screen resolutions up to 2048 x 1536
❑ Optimized for 32, 16 and 8-bit per pixel color depths
❑ Flicker-free refresh rates up to 240Hz
❑
Video Features
❑
❑
❑
❑
❑
Drivers
❑
Utilities
❑
Video acceleration for DirectShow®, MPEG1, MPEG2
Enhanced motion compensation for full screen, full motion video playback
Multi-tap bilinear video scaling and filtering
Multiple video windows with hardware color space conversion
DVD sub-picture alpha blended compositing
Windows NT 4.0 and Windows 2000 display drivers
❑ Windows 95, Windows 98 and Windows Me display driver supporting DirectDraw,
Direct3D, DirectVideo, and ActiveX
❑ OpenGL ICD for Windows 95 and Windows 98, Windows NT 4.0, Windows 2000.
Creative BlasterControl 4.20
❑ MediaRing Talk
❑ Creative Lava! Player
❑ Online registration
3D Blaster Annihilator 2 MX 13
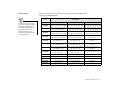
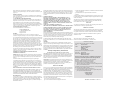
Refresh Rates
The refresh rates show in the table below are supported by different video modes
(based on 350 MHz RAMDAC).
Refresh
Rates
The refresh rates shown in the
table are the highest obtainable
and are monitor-dependent.
Resolutions, pixel depths, and
refresh rates are also driverdependent and may not be
available for some applications
or operating systems.
Color Depth
Resolution
256 (8-bit)
64k (16-bit)
16.7 million (32-bit)
640x480
60, 70, 72, 75, 85, 100, 120,
140, 144, 150, 170, 200, 240
60, 70, 72, 75, 85, 100, 120,
140, 144, 150, 170, 200, 240
60, 70, 72, 75, 85, 100, 120,
140, 144, 150, 170, 200, 240
800x600
60, 70, 72, 75, 85, 100, 120,
140, 144, 170, 200, 240
60, 70, 72, 75, 85, 100, 120,
140, 144, 170, 200, 240
60, 70, 72, 75, 85, 100, 120,
140, 144, 150, 170, 200, 240
1024x768
60, 70, 72, 75, 85, 100, 120,
140, 144, 150, 170, 200, 240
60, 70, 72, 75, 85, 100, 120,
140, 144, 150, 170, 200, 240
60, 70, 72, 75, 85, 100, 120,
140, 144, 150, 170, 200
1152x864
60, 70, 72, 75, 85, 100, 120,
140, 144, 150, 170, 200
60, 70, 72, 75, 85, 100, 120,
140, 144, 150, 170, 200
60, 70, 72, 75, 85, 100, 120,
140, 150, 170
1280x720
60, 70, 72, 75, 85, 100, 120,
140, 144, 150, 170
60, 70, 72, 75, 85, 100, 120,
140, 144, 150, 170
60, 70, 72, 75, 85, 100, 120,
140, 150
1280x960
60, 70, 72, 75, 85, 100, 120,
140, 144, 150, 170
60, 70, 72, 75, 85, 100, 120,
140, 144, 150, 170
60, 70, 72, 75, 85, 100, 120,
140, 150
1280x1024
60, 70, 72, 75, 85, 100, 120,
140, 144, 150, 170
60, 70, 72, 75, 85, 100, 120,
140, 144, 150, 170
60, 70, 72, 75, 85, 100, 120,
140, 150
1600x900
60, 70, 72, 75, 85, 100, 120,
140, 144, 150
60, 70, 72, 75, 85, 100, 120,
140, 144, 150
60, 70, 72, 75, 85, 100, 120
1600x1200
60, 70, 72, 75, 85, 100, 120
60, 70, 72, 75, 85, 100, 120
60, 70, 72, 75, 85, 100
1920x1080
60, 70, 72, 75, 85, 100
60, 70, 72, 75, 85, 100
60, 70, 72, 75, 85
1920x1200
60, 70, 72, 75, 85, 100
60, 70, 72, 75, 85, 100
60, 70, 72, 75, 85
1920x1440
60, 70, 72, 75, 85
60, 70, 72, 75, 85
60, 70, 75
2048x1536
60, 70, 72, 75
60, 70, 72, 75
60
3D Blaster Annihilator 2 MX 14
Troubleshooting
System Stops
Responding, Blank
Screen or Corrupted
Display
After installing 3D Blaster Annihilator 2 MX and starting your system, the monitor displays a
blank screen.
Windows 98/Me MultiMonitor Display Problems
In a multi-monitor setting, the monitor connected to the 3D Blaster Annihilator 2 MX card
remains blank even though the card and its drivers have been installed.
Solutions
Try the following:
❑ Turn off your system and wait a while before turning it on again.
❑ Verify that any built-in graphics card on your motherboard is disabled and that you have
removed any other video display card from your system.
❑ Be sure that your 3D Blaster Annihilator 2 MX card’s bus connector is fully inserted
into the expansion slot by pressing it firmly and evenly into the slot.
❑ Verify that the pins of your monitor’s VGA Input connector are not bent and that the
connector is properly connected to the VGA Out connector of 3D Blaster Annihilator 2
MX.
Cause
If 3D Blaster Annihilator 2 MX’s drivers are not specified during the software installation,
the system installs it as a standard graphics card that does not support Windows 98/Me’s
multi-monitor feature.
Solution
Update the device drivers to 3D Blaster Annihilator 2 MX’s drivers:
1. Right-click your desktop, and then click Properties on the shortcut menu.
2. In the Display Properties dialog box, click the Settings tab.
3. On the Settings tabbed page, click the Advanced Properties button.
4. In the Advanced Display Properties dialog box, click the Change button.
5. In the Select Device dialog box, click the Have Disk button.
6. Insert the 3D Blaster Annihilator 2 MX CD into your CD-ROM drive.
7. Follow steps 6 through 13 of the procedure in “Windows 98” on page 7 to complete the
update.
You can also try setting 3D Blaster Annihilator 2 MX as the primary boot up adapter in the
system BIOS.
3D Blaster Annihilator 2 MX 15
Other Display Problems
The monitor display flickers or the screen goes blank after Windows starts.
Cause
Your monitor may not support the resolution or refresh rate that you have set.
Solution
Use display settings supported by the monitor.
To change the display settings:
1. Restart your system in Windows 98/Me Safe Mode. To do so:
a. Restart your system and when the message “Starting Windows 98/Me...” appears,
press <F8>.
A list of options such as Safe Mode and Command Prompt Only Mode appears.
b. Select Safe Mode and press <Enter>.
2. After your system has restarted, right-click the desktop and click Properties.
3. In the Display Properties dialog box, click the Settings tab.
4. Try the following:
❑Make sure that the correct monitor is selected.
Click the Change Display Type or Advanced Properties button. Select the
Monitor tab and change the setting if necessary.
❑Use a lower refresh rate or the adapter’s default.
For details on this, refer to the topic “Using BlasterControl Display Center” in the
BlasterControl Help file.
❑Lower your monitor’s resolution.
To do so, adjust the color depth and desktop area on the Settings tabbed page.
For the resolutions supported by
your monitor, refer to its manual.
Monitor display exhibits pixel drop (that is, pixels, usually white in color, appear on the
screen) or other abnormal behavior.
Cause
The settings that you have selected for your graphics card may be incompatible with one or
more games or applications that you are running.
Solution
Use the factory default settings:
1. Click Start, select Programs, select Creative, click on BlasterControl Display
Center.
2. Click the Tweak button to start BlasterControl Tweak Center.
3. Click the Defaults button.
3D Blaster Annihilator 2 MX 16
Beeping Sounds During
System Startup
Problems Installing
Software
Problems Using Software
When the system is starting up, there is a series of prolonged beeps.
Cause
Your 3D Blaster Annihilator 2 MX card may not be firmly inserted into the expansion slot.
Solution
Be sure that the AGP bus connector of the graphics card is fully inserted into the expansion
slot by pressing the card firmly and evenly into the slot. You can also try removing the card
and re-inserting it.
In Windows 95 or Windows 98, the installation program for BlasterControl does not run
automatically after you have inserted the installation CD into your drive.
Cause
The AutoPlay feature in your Windows 95 or Windows 98 system is not enabled.
Solution
To install the software from the CD:
1. Double-click the My Computer icon on your Windows desktop.
2. In the My Computer window, double-click the Creative 3D Blaster Annihilator 2
MX icon.
If the installation program does not run, double-click on Graphics, double-click on
English and double-click the Setup icon.
3. Follow the instructions on the screen to complete the installation.
When you restart Windows, one of the following error messages appears:
❑ “BlasterControl will only work on Creative graphics product drivers.
Do you want BlasterControl to be loaded the next time you start Windows?”
❑ “BlasterControl will only work on Creative graphics product drivers.”
Cause
3D Blaster Annihilator 2 MX drivers, required by BlasterControl, may have been replaced
by other drivers when you installed DirectX applications.
Solution
Reinstall or revert to the 3D Blaster Annihilator 2 MX drivers.
To revert to the drivers:
1. Right-click your desktop, and then click Properties on the shortcut menu.
2. In the Display Properties dialog box, click the Settings tab, and then click the Change
Display Type button or the Advanced Properties button.
3. In the Adapter Type group box or on the Adapter tabbed page, click the Change
button.
4. In the Select Device dialog box, click Creative GB0030 (AGP version) or Creative
GB0050 (PCI version), and then click the OK button.
3D Blaster Annihilator 2 MX 17
5. In the Insert Disk dialog box, click the %&
1
&')#*--&*-
3=&%%2%:%
%%
H
=%%:
F
3=1%
)-3&*-=
&')#*-
Problem with OpenGL
Applications
When starting OpenGL Screen Saver or applications in Windows 98, the message “No local
buffer memory available” appears.
&
!G
82==3=
%:3=&6%
&
%%:378.489.
D
3=:7;
<6
=?4
=
OpenGL applications run too slowly in Windows 98.
?4F>2
+3
F%2%
&
&%2G
82==3=
%:3=&6%
'4)=%:
3D Blaster Annihilator 2 MX 18
Problem with PCI Bridge
(in Windows 95)
Problem with AGP
Aperture Size
'?!
! '?!
8
'?!
After installing Annihilator 2 MX (AGP version) onto a Pentium II LX system or any other AGP
system, the Resources tabbed page of the GeForce2 MX Properties dialog box in Windows
95 shows resource conflicts similar to the following:
Memory Range used FEDC0000 - FEDDFFFF used by PCI standard PCI-to-PCI bridge.
Memory Range used FD800000 - FDFFFFFF used by PCI standard PCI-to-PCI bridge.
Memory Range used FE000000 - FE7FFFFF used by PCI standard PCI-to-PCI bridge.
)%%
)K22L%
&
.+
)%)-K22%L
&-#)
$%) &
')#*>
%-F
DirectDraw/Direct3D fails to use hardware acceleration (HAL).
$'?!))9F#'
&
!))9F#'
&G
8
&=3M&N
$'?!
!&M;N
D
!%#%&5<>-=9>-
M;N'?!
1
!&?'4&3M;N
H
MNM;N
' ; 3 & ( %6 , @8 A B @. . .
('%&'$'%2 &3>'2%$'3((1-'$' &2%(( #2'&2)%$'-1 &2%(( #%3& #2'&2)%$'A13%#$''2-'-3-12'2'$>&2 &%#$''>'2 13
2%#$''22'2'$>&2'%#$''>'2A2 &2%(($3&'2'&2)%$'$>2(1$'23$A) 2 :0%1&A2'&2)%$'A%(($'(%2'3>'2%2 %%>%1 #
2'>&22'(%'%C3 & 2 $%3(($'3
$%2
6(
%5K-L7
$)
-==
3%
3:%3-3%
5-3K!L7
4;.!;
#(
$!33
)
=!
%+:O%3%-53
:%373-
!-:
3&6
$!%%
2%!
3-57!5
75%7
%!%
&;%-
!2%3!
-%
!
!%3
!=
D
6
$!%-,%P
!-
-
!
33!
%
=57-2%
!%=!
3-
!
1
>6 6
!3
!33:::
%<
)!
33%%<
)3
!
H
,
-K=L-!3)
!K-L
%
;KLK-L
-KL!3%
KL
F
2(
!3-57
!35%7
!357%
%%)
(36A6A>6&
;:::%)%
<+!33
!
.%2)
!3%
%-
"
6A6A$'66
=!
-
;:::
%)%<
33%-
!3-%
-%!
&-
$=&&'3
'=
5Q&&'Q7
$&&'5Q&&'Q7%
%23
33=5Q&&'&Q7
-5Q&&'!-Q7
&&'&3&&'&&'!-
2
33
&&'&&'&
?P
)8;;.?$$?P!;?8;*4?$&&'&)$)3$C;&&'4;.$3?8
&&'!;8/;8!3;*;$)!;*8;!!4;8#$$;&C;8;.
2:-&&'&3&&'
&&'!--
3&&'&3
&&'&&'!-
&&'-&&'&3
&&'&&'!-3
&&'3
)
$&&'&&'&Q)!!
Q
&&'=3:3
&&'&&&'!-
&&'-
&&'!-
&&'
.&&'
&&'!-2&&'&&'
!-%
&&'%-
&&'
-
&&'&!4)#!)44)88).$;!;*8;!!?8#4;&3
.4P&.3'P$.?$4#$;&$?3#4;&)88).$;!?0
#;8C).$)'4$30$.;!!0?8))8$P4)8P8?!;3$$4;
).&.?.2.08.;#;.$
&&'%
%%&&'&&'!-
..?)!;
44&&'';4)'4;0?8).?.!;RP;.$)4?8.&;.$)4
&)#);!?80?8).4?!$8?0$!3?84?!$8;/;.P;!
3!
!S%<=
!S%<
%-+
%!3
%!%3
+-
%
P-+3-
+3
3--%
%
-3---
-3
-%
!
2'$> %2 $-
%!57
-
$
-)
!5
7-
P3-
-%
$-)
-
( > 2')%$$%21
-33=!
%3
!
.%3
9:-
)
)3
)3%-
-!
+!%32
03KL
33333
33
3=3-3$<333
%%3=
'+'2%&&2%2'%-,' 2 &
%#$''>'2A2'&2)%$' &$, '%&; &) 232
)%$$%21%1 A' 2'$'+$'&&$ >( 'A
(3 #A-322( > 2'2A%1 >( ')%$$%2 '&
>'$%2%- ( 21% 2'&&$%%$2 3(%$3$&'
$'%2 ,' &2-( #%2'2$, '%13%2'&A
3#$%'&$2' %(&3$2$2'&2)%$'
03-%%-%
-33
3%=%
%!-
33%!
=+
!
!!--35-3
%7-3
$-3-
-,,
!,
:3%-:
-=!93
=%-
( > 2%2 $'>' '&%%>%#'&
2'(1$'>'1$-$'%)%$$%21) ((-'2%2
&'2$2 2')%$$%21%$$$ 2'>%3%(
(3') 22'&2)%$' ','2) (($'%2 ,'
$ 2&( '&$&-'( %-('$%1 $'2A '2%(A
&' %($&'C3'2 %(%>%#'&$$%1(&2
$ 2&A(&2&%, #&A(&2$','3'&$(&2%2%%$ & #
$>$$'(%2 #22'&2)%$'$2 &%#$''>'2A
',' $'%2 ,'$ 2&( '&$&%,'-''%, &'
2'&& - ( 21&3%>%#'& ','2) ((
$'%2 ,'D&( %- ( 21$%>%#'&213$%12'$
'$&','$'+''2'%>32% -11323&'2'
&2)%$'A$'#%$('&&2'$>2'(%
> "
!,:%
+3%-:
$32$'23$&
-9-%
3=
3&#,'$>'2$'&2$ 2'$ #2&
)!-
P3
%P
!
-%<
%-5%75 7578$&
!
H2H" %2!
P!3%
3P
!
:3;-)
2$%2$E>%3%23$'$
$,#!G
2
6(
3'=
-8
!1"
#''$%(
$)%33
3
.!
-%::
P
!
%-
$)-%
!5::-
=7
$)
%3
3%3-3!
-)-%%
--<3-%
:=--%3
-
0+)3-
%-
0+3-
ADDENDUM TO THE MICROSOFT SOFTWARE LICENSE
AGREEMENT (WINDOWS 95)
to obtain such information, and you agree to request such information from Creative
at the address listed earlier. Upon receiving such a request, Creative shall determine
whether you require such information for a legitimate purpose and, if so, Creative
will provide such information to you within a reasonable time and on reasonable
conditions.
LIMITED WARRANTY
EXCEPT AS STATED EARLIER IN THIS AGREEMENT, AND AS
PROVIDED UNDER THE HEADING “STATUTORY RIGHTS”, THE
SOFTWARE IS PROVIDED AS-IS WITHOUT WARRANTY OF ANY
KIND, EITHER EXPRESS OR IMPLIED, INCLUDING, BUT NOT
LIMITED TO, ANY IMPLIED WARRANTIES OR CONDITIONS OF
MERCHANTABILITY, QUALITY AND FITNESS FOR A PARTICULAR
PURPOSE.
LIMITATION OF REMEDY AND DAMAGES
THE LIMITATIONS OF REMEDIES AND DAMAGES IN THE SOFTWARE
LICENSE AGREEMENT SHALL NOT APPLY TO PERSONAL INJURY
(INCLUDING DEATH) TO ANY PERSON CAUSED BY CREATIVE’S
NEGLIGENCE AND ARE SUBJECT TO THE PROVISION SET OUT
UNDER THE HEADING “STATUTORY RIGHTS”.
STATUTORY RIGHTS
Irish law provides that certain conditions and warranties may be implied in contracts
for the sale of goods and in contracts for the supply of services. Such conditions and
warranties are hereby excluded, to the extent such exclusion, in the context of this
transaction, is lawful under Irish law. Conversely, such conditions and warranties,
insofar as they may not be lawfully excluded, shall apply.
Accordingly nothing in this Agreement shall prejudice any rights that you may
enjoy by virtue of Sections 12, 13, 14 or 15 of the Irish Sale of Goods Act 1893 (as
amended).
GENERAL
This Agreement is governed by the laws of the Republic of Ireland. The local
language version of this agreement shall apply to Software acquired in the EU. This
Agreement is the entire agreement between us, and you agree that Creative will not
have any liability for any untrue statement or representation made by it, its agents or
anyone else (whether innocently or negligently) upon which you relied upon
entering this Agreement, unless such untrue statement or representation was made
fraudulently.
Safety & Regulatory Information
❑ Connect the equipment to an outlet on a circuit different from that to which the
receiver is connected.
❑ Consult the dealer or an experienced radio/TV technician.
❑ Caution
To comply with the limits for the Class B digital device, pursuant to Part 15 of the
FCC Rules, this device must be installed in computer equipment certified to comply
with the Class B limits.
All cables used to connect the computer and peripherals must be shielded and
grounded. Operation with non-certified computers or non-shielded cables may
result in interference to radio or television reception.
Modifications
Any changes or modifications not expressly approved by the grantee of this device
could void the user’s authority to operate the device.
Notice for Canada
This apparatus complies with the Class “B” limits for radio interference as specified
in the Canadian Department of Communications Radio Interference Regulations.
Cet appareil est conforme aux normes de CLASSE “B” d’interférence radio tel que
spécifié par le Ministère Canadien des Communications dans les règlements
d’interférence radio.
Compliance
This product conforms to the following Council Directive:
Directive 89/336/EEC, 92/31/EEC (EMC), 73/23/EEC (LVD)
Declaration of Conformity
According to the FCC96 208 and ET95-19 documents,
Name:
Creative Labs Inc.
Address:
1901 McCarthy Boulevard
Milpitas, CA. 95035
United States
Tel: (408) 428-6600
declares under its sole responsibility that the product
The following sections contain notices for various countries:
CAUTION: This device is intended to be connected by the user to a CSA/TUV/UL
certified/listed IBM AT or compatible personal computers in the manufacturer’s
defined operator access area. Check the equipment operating/installation manual
and/or with the equipment manufacturer to verify/confirm if your equipment is
suitable for devices to be connected to it.
Trade Name:
The Microsoft Software is provided for the sole purpose of replacing the
corresponding files provided with a previously licensed copy of the Microsoft
software product identified above (“ORIGINAL PRODUCT”). Upon installation,
the Microsoft Software files become part of the ORIGINAL PRODUCT and are
subject to the same warranty and license terms and conditions as the ORIGINAL
PRODUCT. If you do not have a valid license to use the ORIGINAL PRODUCT,
you may not use the Microsoft Software. Any other use of the Microsoft Software
is prohibited.
ATTENTION: Ce périphérique est destiné à être connecté par l’utilisateur à un
ordinateur IBM AT certifié ou listé CSA/TUV/UL ou compatible, à l’intérieur de la
zone d'accès définie par le fabricant. Consulter le mode d’emploi/guide
d'installation et/ou le fabricant de l’appareil pour vérifier ou confirmer qu'il est
possible de connecter d'autres périphériques à votre sytème.
EMI/EMC:
ANSI C63.4 1992, FCC Part 15 Subpart B
This device complies with part 15 of the FCC Rules.
Operation is subject to the following two conditions:
1. This device may not cause harmful interference, and
2. This device must accept any interference received, including interference
that may cause undesirable operation.
SPECIAL PROVISIONS APPLICABLE TO THE EUROPEAN UNION
FCC Part 15: This equipment has been tested and found to comply with the limits
for a Class B digital device, pursuant to Part 15 of the FCC Rules. These limits are
designed to provide reasonable protection against harmful interference in a
residential installation. This equipment generates, uses, and can radiate radio
frequency energy and, if not installed and used in accordance with the instructions,
may cause harmful interference to radio communications. However, this notice is
not a guarantee that interference will not occur in a particular installation. If this
equipment does cause harmful interference to radio or television reception, which
can be determined by turning the equipment off and on, the user is encouraged to try
one or more of the following measures:
IMPORTANT: By using the Microsoft software files (the “Microsoft Software”)
provided with this Addendum, you are agreeing to be bound by the following terms.
If you do not agree to be bound by these terms, you may not use the Microsoft
Software.
IF YOU ACQUIRED THE SOFTWARE IN THE EUROPEAN UNION (EU), THE
FOLLOWING PROVISIONS ALSO APPLY TO YOU. IF THERE IS ANY
INCONSISTENCY BETWEEN THE TERMS OF THE SOFTWARE LICENSE
AGREEMENT SET OUT EARLIER AND IN THE FOLLOWING PROVISIONS,
THE FOLLOWING PROVISIONS SHALL TAKE PRECEDENCE.
DECOMPILATION
You agree not for any purpose to transmit the Software or display the Software’s
object code on any computer screen or to make any hard copy memory dumps of the
Software’s object code. If you believe you require information related to the
interoperability of the Software with other programs, you shall not decompile or
disassemble the Software
Notice for the USA
❑ Reorient or relocate the receiving antenna.
❑ Increase the distance between the equipment and receiver.
Creative Labs
Model Number: GB0030 (AGP version)
GB0050 (PCI version)
has been tested according to the FCC / CISPR22/85 requirements for
Class B devices and found compliant with the following standards:
Ce matériel est conforme à la section 15 des régles FCC. Son Fonctionnement
est soumis aux deux conditions suivantes:
1. Le matériel ne peut étre source D’interférences et
2. Doit accepter toutes les interférences reques, Y compris celles pouvant
provoquer un fonctionnement indésirable.
Compliance Manager
Creative Labs, Inc.
28 August, 2000
No part of this publication may be reproduced or transmitted in any form or by any means without the prior written consent of Creative Technology Ltd.
Copyright © 2000 Creative Technology Ltd. All rights reserved.
Version 1.0
October 2000
Annihilator, Annihilator 2 MX, Blaster and BlasterControl are trademarks of Creative Technology Ltd.
NVIDIA and GeForce2 MX are trademarks of NVIDIA Corporation.
Other company and product names are trademarks or registered trademarks of the respective companies with which they are associated.
3D Blaster Annihilator 2 MX 22