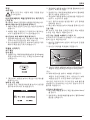
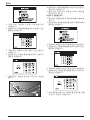
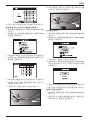
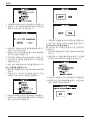
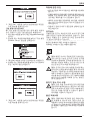
1
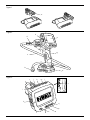
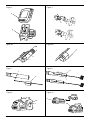
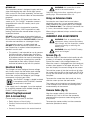
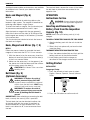
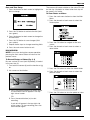
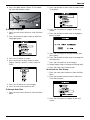
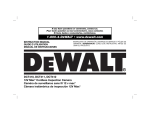
www. .com DCT410 DCT411 DCT412 English (original instructions)03 简 体 中 文17 31 Copyright DeWALT3 2 Figure 1 a Figure 2 h d e f g c b a Figure 3 r j k m l s i h q p n o 1 Figure 5 Figure 4 e c d g Figure 6A Figure 6B t v u Figure 8 Figure 7 w x w y Figure 10 Figure 9 a aa z 2 bb E ng l i s h Cordless inspection camera DCT410, DCT411, DCT412 Congratulations! You have chosen a DeWALT tool. Years of experience, thorough product development and innovation make DeWALT one of the most reliable partners for professional power tool users. Technical Data DCT410 DCT411DCT412 VoltageVDC10.8 10.8 10.8 Type 1 1 1 Li-Ion Li-Ion Li-Ion Battery Type Camera cable diameter mm17 9 5.8 Cable length m 0.9 0.9 0.9 dpi 320 x 480 320 x 480 320 x 480 Resolution Screen size mm 69 x 50 69 x 50 69 x 50 Weight (without battery pack) kg 0.77 0.69 0.60 Battery pack DCB121 DCB123 Li-Ion Li-Ion Battery type VoltageVDC 10.810.8 CapacityAh 1.31.5 Weightkg 0.2 0.2 Charger DCB100 DCB105 Mains voltageVAC 220 220 Battery type Li-Ion Li-Ion Approx. min 4040 3030 charging (1.3 Ah (1.5 Ah (1.3 Ah (1.5 Ah battery battery battery battery time packs)packs) packs)packs) Weight kg 0.30.49 WARNING: This is a Class A product. In a domestic environment this product may cause radio interference in which case the user may be required to take adequate measures. WARNING: Increased electrostatic voltage may cause display to fail and all unsaved data will be lost. Before reusing, ensure that the electrostatic voltage has stopped occuring and actuate the reset button using the appropriate pin. Afterwards the camera display will function. Definitions: Safety Guidelines The definitions below describe the level of severity for each signal word. Please read the manual and pay attention to these symbols. DANGER: Indicates an imminently hazardous situation which, if not avoided, will result in death or serious injury. WARNING: Indicates a potentially hazardous situation which, if not avoided, could result in death or serious injury. CAUTION: Indicates a potentially hazardous situation which, if not avoided, may result in minor or moderate injury. NOTICE: Indicates a practice not related to personal injury which, if not avoided, may result in property damage. Denotes risk of electric shock. Denotes risk of fire. WARNING: To reduce the risk of injury, read the instruction manual. Important Safety Instructions • Read these instructions. • Keep these instructions. • Heed all warnings. • Follow all instructions. nly use attachments/accessories specified by • O the manufacturer. • R efer all servicing to qualified service personnel. Servicing is required when the apparatus has been damaged in any way, the apparatus has been exposed to rain or moisture, does not operate normally, or has been dropped. Save all warnings and instructions for future reference Work Area Safety a) Keep work area clean and well lit. Cluttered or dark areas invite accidents. 3 E n gli sh connection from one terminal to another. Shorting the battery terminals together may cause burns or a fire. c) Under abusive conditions, liquid may be ejected from the battery; avoid contact. If contact accidentally occurs, flush with water. If liquid contacts eyes, additionally seek medical help. Liquid ejected from the battery may cause irritation or burns. b) Keep children and bystanders away while operating an inspection camera. Distractions can cause you to lose control. Personal Safety a) Stay alert, watch what you are doing and use common sense when operating an inspection camera. Do not use an inspection camera while you are tired or under the influence of drugs, alcohol or medication. A moment of inattention while operating the inspection camera may result in serious personal injury. b) Use personal protective equipment. Always wear eye protection. Protective equipment such as dust mask, non-skid safety shoes, hard hat, or hearing protection used for appropriate conditions will reduce personal injuries. c) Do not overreach. Keep proper footing and balance at all times. This enables better control of the inspection camera in unexpected situations. d) Dress properly. Do not wear loose clothing or jewellery. Keep your hair, clothing and gloves away from moving parts. Loose clothes, jewellery or long hair can be caught in moving parts. Use and Care a) Store an idle inspection camera out of the reach of children and do not allow persons unfamiliar with the inspection camera or these instructions to operate the inspection camera. Inspection cameras are dangerous in the hands of untrained users. b) Use the inspection camera, accessories, etc. in accordance with these instructions, taking into account the working conditions and the work to be performed. Use of the inspection camera for operations different from those intended could result in a hazardous situation. Battery Tool Use and Care a) Recharge only with the charger specified by DeWALT. A charger that is suitable for one type of battery pack may create a risk of fire when used with another battery pack. b) When battery pack is not in use, keep it away from other metal objects like paper clips, coins, keys, nails, screws, or other small metal objects that can make a 4 Safety Information for Inspection Cameras WARNING: Do not disassemble or modify the inspection camera. There are no serviceable parts inside. If you need assistance contact your local dealer. • Do not operate the inspection camera in explosive atmospheres, such as in the presence of flammable liquids, gases, or dust. Inspection cameras create sparks which may ignite the dust or fumes. • The inspection camera should only be used with specifically designated DeWALT batteries. Use of any other batteries may create a risk of fire. • Store the inspection camera out of reach of children and other untrained persons. Tools are dangerous in the hands of untrained users. • Do not disassemble the inspection camera. There are no user serviceable parts inside. • Do not use anywhere the unit may come into exposure with moving parts, hazardous chemicals, or electrical charges. Such situations may result in serious injury or death; such as walls, pipes, automobiles, and machinery. • Do not operate inspection camera near moving machinery. Can result in injury if the camera cable gets caught into moving parts and pulls the user in. • Ensure the work area is free of current-carrying parts during the work process. • Do not use the inspection camera around corrosive chemicals. Exposure to corrosive, oily environments can ruin the plastic covering on the camera head and ruin the picture quality. • Do not use the camera if condensation forms inside the lens. Let the water evaporate E ng l i s h before using again. • Do not remove or deface warning labels. • To avoid damaging the inspection camera or the equipment under test, protect them from the following: – E MF (electromagnetic fields) like from arc welders, induction heaters, etc. – ESD (electrostatic discharge). – T hermal shock (caused by abrupt ambient temperature changes for highest accuracy; allow 30 minutes for thermometer to stabilize before use). WARNING: Do not expose camera, monitor or battery to excessive heat such as sunshine, fire or the like. WARNING: Shock hazard. Do not allow the inspection camera cable to come into contact with live wires. Shut off circuit breakers to the entire area to avoid injury. Markings on Inspection Camera The following pictograms are shown on the inspection camera: Read instruction manual before use. Date Code Position The date code, which also includes the year of manufacture, is printed into the housing surface that forms the mounting joint between tool and battery. Example: 2011 XX XX Year of Manufacture Important Safety Instructions for All Battery Chargers SAVE THESE INSTRUCTIONS: This manual contains important safety and operating instructions for the DCB100 and DCB105 battery chargers. WARNING: Do not use on humans or animals. This is not for human or animal use and can cause injury if used. • Before using charger, read all instructions and cautionary markings on charger, battery pack, and product using battery pack. WARNING: ALWAYS use safety glasses. Everyday eyeglasses are NOT safety glasses. Also use face or dust mask if cutting operation is dusty. ALWAYS WEAR CERTIFIED SAFETY EQUIPMENT. WARNING: Shock hazard. Do not allow any liquid to get inside charger. Electric shock may result. Caution: Burn hazard. To reduce the risk of injury, charge only DeWALT rechargeable batteries. Other types of batteries may burst causing personal injury and damage. CAUTION: Children should be supervised to ensure that they do not play with the appliance. CAUTION: When not in use, place inspection camera on its side on a stable surface where it will not cause a tripping or falling hazard. Some tools with large battery packs will stand upright on the battery pack but may be easily knocked over. WARNING: Modifications not authorised by the manufacturer may void user’s authority to operate this device. Residual Risks In spite of the application of the relevant safety regulations and the implementation of safety devices, certain residual risks cannot be avoided. These are: – Risk of personal injury due to prolonged use. – Risk of personal injury due to unintentional contact with current-carrying parts during the work process. NOTICE: Under certain conditions, with the charger plugged in to the power supply, the charger can be shorted by foreign material. Foreign materials of a conductive nature such as, but not limited to, grinding dust, metal chips, steel wool, aluminum foil, or any buildup of metallic particles should be kept away from charger cavities. Always unplug the charger from the power supply when there is no battery pack in the cavity. Unplug charger before attempting to clean. • DO NOT attempt to charge the battery pack with any chargers other than the ones in this manual. The charger and battery pack are specifically designed to work together. • These chargers are not intended for 5 E n gli sh any uses other than charging DeWALT rechargeable batteries. Any other uses may result in risk of fire, electric shock or electrocution. • Do not expose charger to rain or snow. • Pull by plug rather than cord when disconnecting charger. This will reduce risk of damage to electric plug and cord. • Make sure that cord is located so that it will not be stepped on, tripped over, or otherwise subjected to damage or stress. • Do not use an extension cord unless it is absolutely necessary. Use of improper extension cord could result in risk of fire, electric shock, or electrocution. • Do not place any object on top of charger or place the charger on a soft surface that might block the ventilation slots and result in excessive internal heat. Place the charger in a position away from any heat source. The charger is ventilated through slots in the top and the bottom of the housing. • Do not operate charger with damaged cord or plug — have them replaced immediately. • Do not operate charger if it has received a sharp blow, been dropped, or otherwise damaged in any way. Take it to an authorised service centre. • Do not disassemble charger; take it to an authorised service centre when service or repair is required. Incorrect reassembly may result in a risk of electric shock, electrocution or fire. • In case of damaged power supply cord the supply cord must be replaced immediately by the manufacturer, its service agent or similar qualified person to prevent any hazard. • Disconnect the charger from the outlet before attempting any cleaning. This will reduce the risk of electric shock. Removing the battery pack will not reduce this risk. • NEVER attempt to connect 2 chargers together. • The charger is designed to operate on standard 230V household electrical power. Do not attempt to use it on any other voltage. This does not apply to the vehicular charger. SAVE THESE INSTRUCTIONS Chargers The DCB100 and DCB105 chargers accept 10.8 V Li-Ion batteries. 6 These chargers require no adjustment and are designed to be as easy as possible to operate. Charging Procedure (fig. 1) 1.Plug the charger into an appropriate outlet before inserting battery pack. 2.Insert the battery pack (a) into the charger. The red (charging) light will blink continuously indicating that the charging process has started. 3.The completion of charge will be indicated by the red light remaining ON continuously. The pack is fully charged and may be used at this time or left in the charger. Note: To ensure maximum performance and life of Li-Ion batteries, charge the battery pack fully before first use. Charging Process Refer to the table below for the state of charge of the battery pack. State of charge charging fully charged hot/cold pack delay replace battery pack – – –– ––––––––––– –– – –– – ••••••••••• Hot/Cold Pack Delay When the charger detects a battery that is too hot or too cold, it automatically starts a Hot/Cold Pack Delay, suspending charging until the battery has reached an appropriate temperature. The charger then automatically switches to the pack charging mode. This feature ensures maximum battery life. Li-Ion battery packs only Li-Ion batteries are designed with an Electronic Protection System that will protect the battery against overloading, overheating or deep discharge. The tool will automatically turn off if the Electronic Protection System engages. If this occurs, place the Li-Ion battery on the charger until it is fully charged. Important Safety Instructions for All Battery Packs When ordering replacement battery packs, be sure to include catalog number and voltage. The battery pack is not fully charged out of the carton. Before using the battery pack and charger, read the safety instructions below. Then follow charging procedures outlined. E ng l i s h Read all Instructions • Do not charge or use battery in explosive atmospheres, such as in the presence of flammable liquids, gases or dust. Inserting or removing the battery from the charger may ignite the dust or fumes. • Never force battery pack into charger. Do not modify battery pack in any way to fit into a non-compatible charger as battery pack may rupture causing serious personal injury. • Charge the battery packs only in DeWALT chargers. • DO NOT splash or immerse in water or other liquids. • Do not store or use the tool and battery pack in locations where the temperature may reach or exceed 40 ˚C (105 ˚F) (such as outside sheds or metal buildings in summer). warning: Never attempt to open the battery pack for any reason. If battery pack case is cracked or damaged, do not insert into charger. Do not crush, drop or damage battery pack. Do not use a battery pack or charger that has received a sharp blow, been dropped, run over or damaged in any way (i.e., pierced with a nail, hit with a hammer, stepped on). Electric shock or electrocution may result. Damaged battery packs should be returned to service centre for recycling. Caution: When not in use, place tool on its side on a stable surface where it will not cause a tripping or falling hazard. Some tools with large battery packs will stand upright on the battery pack but may be easily knocked over. Specific Safety instructions for Lithium Ion (Li-Ion) • Do not incinerate the battery pack even if it is severely damaged or is completely worn out. The battery pack can explode in a fire. Toxic fumes and materials are created when lithium ion battery packs are burned. • If battery contents come into contact with the skin, immediately wash area with mild soap and water. If battery liquid gets into the eye, rinse water over the open eye for 15 minutes or until irritation ceases. If medical attention is needed, the battery electrolyte is composed of a mixture of liquid organic carbonates and lithium salts. • Contents of opened battery cells may cause respiratory irritation. Provide fresh air. If symptoms persist, seek medical attention. WARNING: Burn hazard. Battery liquid may be flammable if exposed to spark or flame. Battery Pack Battery type The DCT410, DCT411 and DCT412 operate on 10.8 volt battery packs. Storage Recommendations 1.The best storage place is one that is cool and dry, away from direct sunlight and excess heat or cold. For optimum battery performance and life, store battery packs at room temperature when not in use. 2.For long storage, it is recommended to store a fully charged battery pack in a cool, dry place out of the charger for optimal results. Note: Battery packs should not be stored completely depleted of charge. The battery pack will need to be recharged before use. Labels on Charger and Battery Pack In addition to the pictographs used in this manual, the labels on the charger and the battery pack show the following pictographs: Read instruction manual before use. 100% 100% Battery charging. Battery charged. Battery defective. Hot/cold pack delay. Do not probe with conductive objects. Do not charge damaged battery packs. Use only with DeWALT battery packs, others may burst, causing personal injury and damage. 7 E n gli sh Do not expose to water. Have defective cords replaced immediately. Charge only between 4 ˚C and 40 ˚C. Discard the battery pack with due care for the environment. Do not incinerate the battery pack. See Technical data for charging time. b.Camera with LED’s c.0.9 m Camera cable d.Camera connector e.Screen f.Camera cable on/off switch / LED brightness control switch g.Handle set h.Micro SD slot for micro SD memory cards 16 GB or less i. j. Power button for the screen: Both the screen and the camera cable (f) need to be turned on. Zoom/Delete button: Only for indoor use. The button has 2 functions: Zoom:This is to be used when you need a closer look at the object (3x zoom). Delete:When in the folder menu, pictures can be deleted by using this button. Package Contents The package contains: 1 Inspection camera 1 Camera Cable 17 mm (DCT410) 1 Camera Cable 9 mm (DCT411) 1 Camera Cable 5.8 mm (DCT412) k. 1 Hook (DCT410, DCT411) Play: Press the button to go to the folder where photos and videos are saved. 1 Magnet (DCT410, DCT411) OR 1 Mirror (DCT411) Press the button to play videos. 1 Battery pack l. 1Charger 1 Kit box Camera: Press this button for taking a photo. m. Record: Press this button to start and stop recording a video. n. Main Menu: Press this button to show a list of options for operating the inspection camera or to exit a screen. o. Back Arrow: Press this button to navigate backward. • Take the time to thoroughly read and understand this manual prior to operation. p. OK: Press this button to save changes. Description (fig. 2, 3) q. Forward Arrow: Press this button to navigate forward. r. Power indicator for the handle set: When the green light is on it indicates that the handle set is on. 1 Instruction manual 1 Exploded drawing Note: Battery packs and chargers are not included with N-models. • Check for damage to the tool, parts or accessories which may have occurred during transport. WARNING: Never modify the inspection camera or any part of it. Damage or personal injury could result. a.10.8 V lithium ion battery s.Reset button 8 E ng l i s h Warning: No connection is to be made to the earth terminal. INTENDED USE The inspection camera is designed to play real-time video while looking into walls and/or tight spaces. With a micro SD card (sold separately), the tool can then take photos or record videos for documentation purposes. Follow the fitting instructions supplied with good quality plugs. Recommended fuse: 3 A. Photos are saved in JPG format and videos are saved as AVI. This DeWALT inspection camera is compatible with micro SD memory cards up to 16 gigabytes. Applications consist of automotive inspection, plumbing inspection, HVAC inspection or cable routing. Read the entire manual before using this inspection camera. Do not use in presence of flammable liquids or gases. The camera cable extension is waterproof up to the camera connector. DO NOT USE the handle set under wet conditions or submerge in liquid. The inspection camera is a professional tool. Do not let children come into contact with the tool. Supervision is required when inexperienced operators use this tool. • This product is not intended for use by persons (including children) suffering from diminished physical, sensory or mental abilities, or for lack of experience and/or for want of knowledge or skills unless they are supervised by a person responsible for their safety. Children should never be left alone to play with this product. Electrical Safety The charger has been designed for one voltage only. Always check that the battery pack voltage corresponds to the voltage on the rating plate. Also make sure that the voltage of your charger corresponds to that of your mains. Your DeWALT charger is double insulated in accordance with EN 60335; therefore no earth wire is required. If the supply cord is damaged, it must be replaced by a specially prepared cord available through the DeWALT service organisation. Mains Plug Replacement (U.K. & Ireland Only) If a new mains plug needs to be fitted: • Safely dispose of the old plug. • Connect the brown lead to the live terminal in the plug. Using an Extension Cable An extension cord should not be used unless absolutely necessary. Use an approved extension cable suitable for the power input of your charger (see Technical data). The minimum conductor size is 1 mm2; the maximum length is 30 m. When using a cable reel, always unwind the cable completely. Assembly and adjustments Warning: Prior to assembly and adjustment, always remove the battery pack. Always turn the inspection camera off before inserting or removing the battery pack. Warning: Use only DeWALT battery packs and chargers. Screen (fig. 4) When the screen is attached to the handle set with a battery, it will receive a charge from the battery. Ensure the screen is fully charged before use. When the screen is disengaged from the handle set, a battery icon appears in the upper left corner. This icon also displays the current charge of the screen. To install the screen (e) into the handle set (g), align the screen with the rails on the handle set and slide it firmly into the handle until you hear the lock snap into place. To remove the screen from the handle set, firmly slide the screen up from the tool handle. The screen can be turned on and viewed when it is not attached to the handle set, allowing easier maneuverability of the camera. Camera Cable (fig. 5) Align the camera cable (c) with the camera connector (d). Push in and turn the connector counterclockwise (camera screen facing you) to firmly attach. To remove the camera cable, turn the connector clockwise (direction of arrow). • Connect the blue lead to the neutral terminal. 9 E n gli sh Additional camera cable and extensions are available at additional cost. Consult your dealer for further information. To move belt hook, remove the screw (z) that holds the belt hook in place then reassemble on the opposite side. Hook and Magnet (fig. 6) Operation Instructions for Use DCT410 The hook is beneficial for retrieving cable or wire located in tight spaces. The magnet is beneficial for retrieving metal objects in tight spaces. To attach the hook or magnet, turn the knurled part of the camera counterclockwise until it stops. Align the hook or magnet with the gray groove (t) then slide it down until the tabs (u) at the top of the hook/magnet are securely in the notches (v) located in the camera lens. Turn the knurled part clockwise to lock the base of the hook and magnet. Hook, Magnet and Mirror (fig. 7, 8) DCT411 Follow the process below to assemble the hook, magnet or mirror onto the DCT411 9 mm camera. 1.With the sleeve (w) on the accessory, insert the bottom of accessory (bent wire) into the hole (x) in the 9 mm camera cable. 2.Make sure the accessory is in the groove (y) on the sleeve and slide the sleeve onto the camera until the sleeve covers the hole (x). Caution: Cut Hazard. Use care when handling hook. Belt Hook (fig. 9) (Optional Accessory) warning: To reduce the risk of serious personal injury, DO NOT suspend camera overhead or suspend objects from the belt hook. ONLY hang camera’s belt hook from a work belt. warning: To reduce the risk of serious personal injury, ensure the screw (z) holding the belt hook is secure. important: When attaching or removing the belt hook, use only the screw (z) that is provided. The belt hook (aa) can be attached to either side of the tool using only the screw (z) provided, to accommodate left- or right-handed users. If the hook is not desired at all, it can be removed from the tool. 10 Warning: Always observe the safety instructions and applicable regulations. Inserting and Removing the Battery Pack from the Inspection Camera (fig. 10) NOTE: Make sure your battery pack (a) is fully charged. To install the battery pack into the tool handlE 1.Align the battery pack with the rails inside the handle. 2.Slide it firmly into place until you hear the lock snap into place. To remove the battery pack from the tool 1.Press the release button (bb) and firmly pull the battery pack out of the camera handle. 2.Insert battery pack into the charger as described in the charger section of this manual. Getting Started Initial Setup Language Setup 1.Press the forward or back arrow to select English, German, Spanish, French, Italian or Dutch. 2.Press the OK button to confirm and exit. E ng l i s h Date and Time Setup 1.Press the forward or back arrow to highlight the field to change. The camera will create a folder on the micro SD card for that day. All photos or videos taken that day will be stored in this folder. To View Photos or Videos 1.Press the main menu button to show the Main Menu. 2.Press the forward or back arrow to select the Folder option. 2.Press the OK button to activate the field (field turns green). 3.Press the forward or back arrow to change the activated field. 4.Press the OK button to save changes (field turns yellow). 5.Repeat above steps to change remaining fields. 6.Press the main menu button to exit. Basic Operation 3.Press the OK button to navigate to the next screen. 4.Press the forward or back arrow to select a dated folder. Note: At any time during the camera operation, pressing the main menu button will return to the previous menu. To Record Photos or Videos (fig. 2, 3) Be sure a micro SD card (sold separately) is loaded in the card slot (h). 1.Turn both the camera (b) and the handle set (g) on. 2.Aim camera at destination. A.Press the camera button (l) to take a photo. A confirmation icon will appear in the top right side of screen. 5.Press the OK button to select the dated folder. 6.Press the forward or back arrow to select the photo or video. 7.Press the OK button to view the photo or video. OR B.Press the record button (m) to start recording. A red dot will appear in the top right side of the screen. To stop recording, press the record button again. 11 E n gli sh 8.Press the forward or back arrow to advance to the next photo or video. 7.Press the delete button. Select YES to delete the individual photo or video. 9.When finished, press the main menu button to exit. To Delete Individual Photos or Videos 1.Press the main menu button to show the Main Menu. 2.Press the forward or back arrow to select the Folder option. 8.Press the main menu button to exit. To Delete a Photo or Video While Viewing 1.Press the main menu button to show the Main Menu. 2.Press the forward or back arrow to select the Folder option. 3.Press the OK button to navigate to the next screen. 4.Press the forward or back arrow to select a dated folder. 3.Press the OK button to navigate to the next screen. 4.Press the forward or back arrow to select a dated folder. 5.Press the OK button to navigate to the next screen. 6.Press the forward or back arrow to select a photo or video. 5.Press the OK button to navigate to the next screen. 6.Press the forward or back arrow to select a photo or video. 7.Press the OK button to view. 12 E ng l i s h 8.Press the delete button. Select YES to delete the individual photo or video. 2.Press the forward or back arrow to select Date/ Time option. To Change Languages 3.Press the OK button to navigate to the next screen. 1.Press the main menu button to show the Main Menu. 2.Press the forward or back arrow to select the Language option. 4.Press the forward or back arrow to highlight a field to change. 5.Press the OK button to activate the field (field turns green). 3.Press the OK button to select. 4.Press the forward or back arrow to select English, German, Spanish, French, Italian or Dutch. 6.Press the forward or back arrow to change the activated field. 7.Press the OK button to save changes. 8.Repeat above steps to change remaining fields. 9.Press the main menu button to exit. To Activate the Time Stamp 1.Press the main menu button to show the Main Menu. 2.Press the forward or back arrow to select the Time Stamp option. 5.Press the OK button to save changes. 6.Press the main menu button to exit. To Change Date/Time 1.Press the main menu button to show the Main Menu. 3.Press the OK button to navigate to the next screen. 13 E n gli sh 4.Press the forward or back arrow to select OFF or ON. 5.Press the OK button to save changes and exit. To Change Default Setup NOTICE: Changing to default setup will erase current settings and restore factory settings. 1.Press the main menu button to show the Main Menu. 2.Press the forward or back arrow to select the Default Setup option. 5.Press the OK button to save changes. 6.Press the main menu button to exit. To Format Micro SD Card NOTICE: Formatting the micro SD card will erase all data. 1.Press the main menu button to show the Main Menu. 2.Press the forward or back arrow to select the Format Disk option. 3.Press the OK button to navigate to the next screen. 4.Press the forward or back arrow to select NO or YES. 3.Press the OK button to navigate to the next screen. 4.Press the forward or back arrow to select NO or YES. 5.Press the OK button to save changes and exit. Operating Tips • Use only DeWALT 10.8 V lithium ion battery. 14 E ng l i s h • E nsure the DeWALT battery is in good working condition. If the low battery indicator light on the screen is flashing, the battery needs to be recharged. • To extend battery life, make sure to turn both the screen and the handle set off when not in use. • Make sure the screen is fully charged before operation. Maintenance Your DeWALT inspection camera has been designed to operate over a long period of time with a minimum of maintenance. Continuous satisfactory operation depends upon proper tool care and regular cleaning. The charger and battery pack are not serviceable. There are no serviceable parts inside. accessories should be used with this product. Recommended Accessories • DCT4101 – 17 mm diameter camera cable • DCT4102 – 9 mm diameter camera cable • DCT4105 – 5.8 mm diameter camera cable • DCT4103 – 17 mm diameter, 0.9 m long cable extension • Hook and magnet DCT410 (available only as spare parts) • Hook, magnet and mirror DCT411 (available only as spare parts) Consult your dealer for further information on the appropriate accessories. Troubleshooting • Make sure the 10.8 V battery is charged. • Make sure the screen is fully charged. Cleaning Warning: Blow dirt and dust off with clean, dry air at least once a week. To minimize the risk of eye injury, always wear proper eye protection when performing this. Warning: Never use solvents or other harsh chemicals for cleaning the non-metallic parts of the tool. These chemicals may weaken the materials used in these parts. Use a cloth dampened only with water and mild soap. Never let any liquid get inside the tool; never immerse any part of the tool into a liquid. Charger Cleaning Instructions WARNING: Shock hazard. Disconnect the charger from the AC outlet before cleaning. Dirt and grease may be removed from the exterior of the charger using a cloth or soft non-metallic brush. Do not use water or any cleaning solutions. Optional Accessories Warning: Since accessories, other than those offered by DeWALT, have not been tested with this product, use of such accessories with this tool could be hazardous. To reduce the risk of injury, only DeWALT recommended • Make sure the screen is always attached to the handle set. The picture may freeze if you attempt to remove the screen from the handle set while taking a photo or video. • Make sure the battery is installed on the handle set when in use. • Make sure the camera cable is attached to the handle set properly. • Make sure the handle set is turned on as well as the screen. • Make sure the back of the handle set is not covered with debris so the screen slides on easily and no damage to the screen occurs. • If the screen freezes or won’t turn on, insert a small object (i.e., paper clip end) into the reset button (s) located on the back of the screen. • If the picture is dim, roll the brightness control switch to brighten the LED light. Protecting the Environment Separate collection. This product must not be disposed of with normal household waste. Should you find one day that your DeWALT product needs replacement, or if it is of no further use to you, do not dispose of it with household waste. Make this product available for separate collection. 15 E n gli sh S eparate collection of used products and packaging allows materials to be recycled and used again. Re-use of recycled materials helps prevent environmental pollution and reduces the demand for raw materials. Local regulations may provide for separate collection of electrical products from the household, at municipal waste sites or by the retailer when you purchase a new product. DeWALT provides a facility for the collection and recycling of DeWALT products once they have reached the end of their working life. To take advantage of this service please return your product to any authorised repair agent who will collect them on our behalf. You can check the location of your nearest authorised repair agent by contacting your local DeWALT office at the address indicated in this manual. Alternatively, a list of authorised DeWALT repair agents and full details of our after-sales service and contacts are available on the Internet at: www.2helpU.com. Rechargeable Battery Pack This long life battery pack must be recharged when it fails to produce sufficient power on jobs which were easily done before. At the end of its technical life, discard it with due care for our environment: • Run the battery pack down completely, then remove it from the tool. • Li-Ion cells are recyclable. Take them to your dealer or a local recycling station. The collected battery packs will be recycled or disposed of properly. 16 简体中文 10.8 V 锂电充电式检修摄像机 DCT410、DCT411、DCT412 恭喜! 并使用适当的针状物启动复位按钮。 恭喜您选择了得伟工具。凭借多年的产品开发和 随后摄像机显示屏将开始运行。 创新经验,得伟已经成为专业电动工具用户最可 靠的合作伙伴之一。 下列定义解释了各警示词的严重程度。请仔细阅 技术参数 电压 型号 电池类型 摄像机电缆 直径 电缆长度 分辨率 屏幕尺寸 重量 (不含电池组) 电池组 电池类型 电压 电容 重量 VDC Ah kg 定义:安全指引 读本手册,并注意这些警示符号。 VDC DCT410 10.8 1 锂离子 DCT411 10.8 1 锂离子 DCT412 10.8 1 锂离子 mm 17 9 5.8 m 0.9 0.9 0.9 dpi 320 x 480 320 x 480 320 x 480 mm 69 x 50 69 x 50 69 x 50 kg 0.77 DCB121 锂离子 10.8 1.3 0.2 0.69 0.60 DCB123 锂离子 10.8 1.5 0.2 充电器 DCB100 DCB105 电源电压 VAC 220 220 电池类型 锂离子 锂离子 大约 分钟 40 40 30 30 充电 (1.3 Ah (1.5 Ah (1.3 Ah (1.5 Ah 时间 电池 电池 电池 电池 组) 组) 组) 组) 重量 kg 0.3 0.49 警告:本产品属于 A 类产品。在家用环 境下,此产品可能会造成无线电干扰, 用户可能需要采取适当的措施。 危险:表示存在紧急危险情况,如果不 加以避免,将导致死亡或严重伤害。 警告:表示存在潜在危险情况,如果不 加以避免,可能导致死亡或严重伤害。 警示:表示存在潜在危险情况,如果不 加以避免,可能导致轻度或中度伤害。 注意:表示不涉及人身伤害的情况,如 果不加以避免,可能导致财产损失。 表示存在触电危险。 表示存在火灾危险。 警告:为降低伤害风险,请阅读使用 手册。 重要安全指示 • 请阅读这些指示。 • 请遵守这些指示。 • 注意所有警告。 • 遵守所有指示。 • 仅使用由制造商指定的配件 / 附件。 • 所有维修应由合格的服务人员执行。当仪器发 生任何形式的损坏,暴露于雨水或湿气中,未 正常运行或发生掉落时,需要进行维修。 警告:较高的静电电压可能会导致显 请保存好所有警告和守则, 示屏故障,所有未保存的数据将丢失。 以备将来查阅 重新使用前,确保静电电压已消失, 工作场所安全 a) 保持工作场所清洁和明亮。杂乱或阴暗的地 方容易引发事故。 17 简体中文 b) 让儿童和旁观者离开后才操作检修摄像机。 干扰可能会导致您控制不当。 人身安全 a) 保持警觉。操作检修摄像机时注意操作, 接触到电解液,请寻求医疗救护。从电池喷 出的电解液可能会刺激皮肤或造成灼伤。 检修摄像机安全信息 保持清醒。切勿在疲倦或治疗时或在药物 警告:切勿拆卸或改装检修摄像机。 或酒精的影响下使用检修摄像机。操作检修 这些组件内没有可以维修的部件。若 摄像机时注意力不集中可能会导致严重的人 您需要协助,请联系您当地的经销商。 身伤害。 b) 使用个人防护装备。始终佩戴护目镜。防 护装备,例如适当条件下使用的防尘罩、防 滑安全鞋、安全帽或听力保护设备等将减少 人身伤害。 c) 禁止手伸得太长。时刻注意脚下和身体平 衡。这样在意外情况下才能更好地控制检修 摄像机。 d) 穿着得当。切勿穿宽松的衣服或佩戴首饰。 让您的头发、衣服和手套远离运动部件。 宽松衣服、配饰或长发可能会卷入运动部 件中。 使用及注意事项 a) 将闲置的检修摄像机贮存在儿童所及范围 之外,并且不要让不熟悉检修摄像机或对 • 不要在易爆环境,如有易燃液体、气体或粉尘 的环境下操作检修摄像机。检修摄像机产生的 火花会点燃粉尘或气体。 • 本检修摄像机仅可使用专门指定的得伟电池。 使用其他类型的电池会造成火灾危险。 • 本检修摄像机应存放于儿童和其他未经培训人 员的所及范围以外。工具在未经培训的用户手 中会发生危险。 • 切勿拆卸检修摄像机。这些组件内没有可供用 户维修的部件。 • 切勿在可能暴露于活动部件、危险化学品或电 荷的地方使用本装置。此类情况(如墙壁、管 道、汽车和机械)可能导致严重的人身伤害或 死亡。 这些说明不了解的人员操作检修摄像机。 • 切勿在活动的机械附近操作检修摄像机。如果 检修摄像机在未经培训的用户手中会发生危 摄像机电缆被活动部件缠住并将用户拖入,可 险。 能会造成伤害。 b) 按照使用说明以及作业条件和具体进行的 工作使用检修摄像机、附件等。将检修摄 像机用于非预期操作用途可能会导致危险情 况。 电池工具的使用及注意事项 a) 仅使用由得伟指定的充电器为电池充电。 使用适用于其他类型电池组的充电器充电可 能会引发火灾。 b) 不使用电池组时,要将电池组存储在远离 回形针、硬币、钥匙、钉子、螺钉或其他 可能使电池短路的小型金属物体。电池短路 可能会导致灼伤或火灾。 c) 在恶劣环境条件下,电池可能会喷出电解 液,请避免接触该液体。如果不小心接触 18 到电解液,请立即用清水冲洗。如果眼睛 • 确保工作过程中工作场所无带电的部件。 • 切勿在腐蚀性化学品周围使用检修摄像机。暴 露于腐蚀性、油性的环境可损坏摄像镜头上的 塑料盖,并影响图像质量。 • 如果镜头内出现冷凝现象,切勿使用摄像机。 请在继续使用前等待水分蒸发。 • 切勿去除或污损警告标签。 • 若要避免损坏检修摄像机或受试设备,请保护 其免受以下伤害: – 电弧焊机、感应加热器等产生的 EMF(电 磁场)。 简体中文 – ESD(静电放电)。 日期代码位置 – 热冲击(由环境温度突然变化导致 – 如需 连接工具和电池之间的外壳表面印有日期代码, 获得最高的精度,请在使用前留出 30 分钟, 日期代码包括制造年份。 使温度计达到稳定)。 例如: 2011 XX XX 警告:切勿将摄像机、显示器或电池 暴露于过高温度,如阳光、火焰等。 警告:触电危险。切勿使检修摄像机 电缆与火线接触。关闭整个区域的电 路断路器,避免发生伤害。 警告:请勿在人体或动物上使用。此 装置不适用于在人体及动物上使用, 如此使用可能会造成伤害。 警告:请始终佩戴安全眼镜。日常佩 戴的眼镜不是安全眼镜。如果切割作 制造年份 针对所有电池充电器的重要安全 说明 请妥善保存这些说明:本说明书提供有关 DCB100 和 DCB105 充电器重要的安全和操作指示。 • 在使用充电器之前,请先阅读所有指示以及充 电器、电池组和使用电池组的产品上的警示 标记。 业粉尘较多,另请使用面罩或防尘罩。 警告:触电危险。禁止任何液体渗入 请始终配备获得认证的安全设备。 充电器,否则会引起触电。 警示:不使用时,请将检修摄像机侧 警示:灼伤危险。为减低人身伤害风 放在平稳的表面上,确保不会导致踢 险,只可以使用得伟充电式电池充电。 绊或掉落的风险。一些具有大型电池 使用其他类型的电池可能会引起爆裂, 组的工具将直立于电池组之上,但可 并导致人身伤害和损害。 能会轻易被撞倒。 警示:应看管好小孩,以确保他们不 警告:未经制造商授权的修改可能造 将此设备当做玩具来玩。 成用户无权操作此装置。 注意:在某些情况下,充电器连接到 剩余风险 电源后,充电器触头可能会被异物导 致短路。导电的异物,包括但不限于 尽管遵守了相关的安全法规并采用了安全装备, 研磨粉尘、金属屑、钢丝绒、铝箔纸 某些剩余风险仍然是无法避免的。这些风险包括: 或任何由金属粒子组成的物件,必须 – 长时间使用引起的人身伤害。 要远离充电器范围。充电器内没有电 – 在工作过程中无意间接触带电部件而产生的人 池组时,请断开充电器与电源的连接。 身伤害危险。 清洗前,务必拔掉充电器。 • 请勿使用本手册指定的充电器以外的其他任何 充电器为电池组充电。充电器和电池组都是专 检修摄像机上的标识 检修摄像机上有下列标志: 使用前请阅读使用手册。 门设计的,互相配合使用。 • 除了为得伟充电式电池充电以外,这些充电器 都不能用于其他任何用途。否则,可能会导致 火灾、电击或触电。 • 请勿将充电器暴露于雨中或雪中。 19 简体中文 • 断开充电器时应拔下插头,切勿拉拽电线。这 将减少电源插头和电源线损坏的风险。 • 确保电源线布置在不易踩踏、踢绊、拉扯或会 受到损害或压力的位置。 • 非绝对必要条件下禁止使用延长电缆。使用延 长电缆不当可能会导致火灾、触电或电击的 危险。 充电程序(图 1) 1. 安装电池组之前,将充电器插头插入适当的 插座。 2. 将电池组 (a) 放进充电器。红色(充电中)指 示灯将不断闪烁,表示充电过程已经开始。 3. 红色灯持续亮起表示充电完成。此时电池组已 完全充电,您可以使用电池组或将电池组留在 • 请勿将任何物件放在充电器上面,或是把充电 充电器上。 器放在可能会堵住通风槽的柔软表面,导致充 注意:为了确保锂离子电池的效能和使用寿命最大 电器的内部过热。充电器应远离所有热源。充 化,在首次使用电池组之前必须将它完全充电。 电器外壳顶端和底端具有通风槽。 • 禁止使用电源线或插头已损坏的充电器,请立 即更换已损坏的充电器。 • 如果充电器受到重击、掉下来或出现其他损坏 充电程序 关于电池组的充电状态,请参阅下表。 充电状态 情况,请勿使用充电器,请将已损坏的充电器 充电中 – 送到授权的服务维修中心。 已完全充电 ––––––––––– 热 / 冷电池组延迟 –– – –– – 更换电池组 ••••••••••• • 请勿自行拆卸充电器。请将需要检修或修理的 充电器送到授权服务维修中心。重装不正确可 能会引起触电、电击或火灾的危险。 • 已损坏的电源线必须立即交由制造商、服务 – – – 热 / 冷电池组延迟 当充电器检测到电池过热或过冷,它会自动启动“热 / 代理或类似的合格人员进行更换以防止安全 冷电池组延迟”,中止充电直到电池恢复适当的 隐患。 温度。然后,充电器会自动切换到电池组充电模式。 • 清洁前,请断开充电器和插座的连接,以减少 触电的危险。仅取出电池不会减少触电风险。 此功能可确保电池拥有最长的使用寿命。 仅限锂离子电池组 • 切勿将两个充电器连接在一起。 锂离子电池具有“电子保护系统”设计,可保护 • 充电器设计用于采用 230V 家用电源操作。禁 电池免受过载、过热或过度放电之害。 止在任何其他电压下使用充电器。这条规则不 如果电子保护系统处于运作状态,该工具将自动 适用于车载充电器。 停止操作。如果发生这种情况,请将锂离子电池 请妥善保存这些说明 放在充电器上直到完全充电。 充电器 针对所有电池组的重要安全说明 DCB100 和 DCB105 充电器接受 10.8 V 锂离子 在订购更换电池组时,请务必提供产品目录号和 电池。 电压。 这些充电器无需做出任何调整,专为简易操作而 包装箱内的电池组并未完全充电。使用电池组和 设计。 充电器之前,请阅读下列安全指示,然后遵循所 述的充电程序。 20 简体中文 请阅读所有说明 • 电池里的成分可能会导致呼吸道刺激。请转移 • 请勿在易爆环境,如有易燃液体、气体或尘埃 至新鲜空气处。如果症状持续存在,请就医。 的环境中进行充电或使用电池。在充电器中插 警告:灼伤危险。电池液如果接触到 入或取出电池时可能会点燃粉尘或气体。 火花或火焰可能会燃烧。 • 切勿将电池强行插入充电器。请勿以任何方式 改装电池组以在不相容的充电器中使用,否则 电池组可能会破裂,导致严重人身伤害。 • 只可使用得伟充电器为电池充电。 • 请勿喷溅电池组或将其浸泡在水或其他液 电池组 电池类型 DCT410、DCT411 和 DCT412 使用 10.8 V 电池组。 存储建议 1. 最好将电池存放在阴凉、干燥、远离阳光直射、 体中。 • 禁止在温度可能达到或超过 40 ˚C(105 ˚F)的 不会过热或过冷的地方。为了获得最佳的电池 地方(如夏天户外的棚子或金属建筑物中)存 性能和使用寿命,在不使用时请将电池组存储 储或使用工具和电池组。 在室温下。 警告:禁止以任何理由试图打开电池 2. 长期存储时,建议将完全充电的电池组从充电 组。如果电池组外壳破裂或受损,请 器取出,存储在阴凉、干燥的地方,以达到电 不要将它插入充电器。请勿挤压、掉 池组的最佳性能。 落或损坏电池组。若电池组或充电器 注意:电池组存储时不能处于电荷完全耗尽的状 遭受重击、掉落、被碾过或因任何方 态。在使用电池组之前,电池组必须重新充电。 式引起的损坏(例如,指甲刺破、锤 子打击、踩踏),请不要操作该电池 充电器和电池组上的标签 组或充电器,否则可能会引起触电或 除了在本手册中使用的标志,充电器和电池组的 电击。损坏的电池组应该送回维修中 标签还包括: 心进行回收。 使用前请阅读使用手册。 警示:不使用时,请将工具侧放在平 稳的表面上,确保不会导致踢绊或掉 落的风险。一些具有大型电池组的工 具将直立于电池组之上,但可能会轻 100% 电池充电中。 100% 电池完成充电。 易被撞倒。 锂离子电池 (Li-Ion) 的安全说明 • 即使电池组已经严重受损或已完全耗竭也不可 焚烧处理电池组。电池组会在火中爆炸。锂离 电池受损。 子电池组在燃烧时会释放有毒气体和物质。 • 如果电池液体接触到皮肤,请立即以中性肥皂 热 / 冷电池组延迟。 和清水冲洗接触范围。如果电池液体不慎进入 眼睛,应睁开眼睛并用清水冲洗至少 15 分钟 请勿使用导电物体碰触。 或直到刺激感消失。如果需要医疗救助,请告 知医护人员。电池电解质是由液状有机碳酸盐 禁止对损坏的电池组充电。 和锂盐的混合物组成。 21 简体中文 只能使用得伟电池组,使用其他电池组 说明(图 2、3) 可能会造成电池爆裂,导致人身伤害和 警告:禁止改装检修摄像机或其任何 损害。 部 分。 否 则 可 能 会 导 致 损 坏 或 人 身 伤害。 禁止暴露于水中。 a. 10.8 V 锂离子电池 电线若出现故障,请立即更换。 b. 带 LED 的摄像机 c. 0.9 m 摄像机电缆 只在温度介于 4 ˚C 至 40 ˚C 之间充电。 以环保的方式谨慎处理废弃电池组。 d. 摄像机连接器 e. 屏幕 f. 摄像机电缆开关 / LED 亮度控制开关 g. 握柄 禁止焚烧电池组。 h. 用于 16 GB 或以下 Micro SD 内存卡的 Micro SD 卡插槽 有关充电时间,请参阅技术参数 。 i. 屏幕电源按钮:屏幕和摄像机电缆 (f) 均需要启动。 j. 缩放 / 删除按钮: 只能在室内使用。 该按钮有 2 种功能: 包装内容 缩放: 本产品包装内含有: 体的距离时使用(3 1 检修摄像机 倍缩放)。 1 摄像机电缆 17 mm (DCT410) 删除: 1 摄像机电缆 9 mm (DCT411) 1 磁铁 (DCT410, DCT411) 在文件夹菜单中时, 可使用此按钮删除 1 摄像机电缆 5.8 mm (DCT412) 1 挂钩 (DCT410, DCT411) 在需要缩短观察物 图片。 k. 1 镜子 (DCT411) 播放:按下该按钮,进入保存照片和 视频的文件夹。 或 1 电池组 按下该按钮,播放视频。 1 充电器 1 工具箱 1 使用手册 l. m. n. 主菜单:按下此按钮,显示用于操作 检修摄像机的选项列表,或退出界面。 o. 向后箭头:按下此按钮,向后浏览。 • 检查工具、部件或附件是否在运输过程中损坏。 • 操作前,请抽空仔细阅读并掌握本手册。 22 录制:按下此按钮,开始和停止录制 视频。 1 剖视结构图 注意:N 型号不包括电池组和充电器。 摄像机:按下此按钮,拍摄照片。 简体中文 p. 确定:按下此按钮,保存更改。 q. 向前箭头:按下此按钮,向前浏览。 r. 握柄的电源指示灯:当绿灯亮起时, • 安全地处置旧插头。 • 将棕色导线连接至插头的火线端子。 • 将蓝色导线连接至零线端子。 警告:不需要连接地线端子。 表示握柄已启动。 s. 复位按钮 遵守优质插头附带的安装说明。推荐使用的保险 设计用途 丝:3 A。 检修摄像机可在查看墙壁和 / 或有限的空间的同时 使用延长电缆 播放实时视频。借助 Micro SD 卡(单独出售), 除 非 绝 对 必 要, 否 则 请 勿 使 用 延 长 电 缆。 使 用 该工具可拍摄照片或录制视频,以供存档。 适合您的充电器电源输入的合格延长电缆(见技 照片保存为 JPG 格式,视频保存为 AVI 格式。 术参数 )。导线的最小尺寸为 1 mm2,最大长度为 本得伟检修摄像机兼容最大 16 G 的 Micro SD 内 30 m。 存卡。 使用电缆卷筒时,请务必拉出所有的电缆。 用途包括汽车检测、水管检测、暖通空调检测或 电缆敷设。请在使用本检修摄像机前阅读手册全 组装和调整 警告:组装与调整之前,必须取出电池 部内容。 组。插入或取出电池组之前,请关闭检 不得在存在易燃液体或气体的环境中使用。摄像 修摄像机。 机延长电缆采用防水设计,直到摄像机连接器。 警告:只得使用得伟电池组和充电器。 切勿在潮湿的情况下使用握柄或将其浸入液体。 检修摄像机是专业的工具。请勿让儿童接触本工 具。缺乏经验的操作员需要在监督下使用本工具。 • 本产品不适合身体、感官或心智能力有缺陷以 及缺乏经验、知识或技能的人员(包括儿童) 屏幕(图 4) 当屏幕安装在带电池的握柄上时,将从电池充电。 确保屏幕在使用前已完全充电。 使用,除非有人负责他们的安全监督。请勿在 当屏幕从握柄拆下时,左上角将显示电池图标。 无人监管的情况下让儿童触及本产品。 此图标还显示屏幕的当前电量。 电器安全 本充电器只适用一种工作电压。请务必检查电池 组的电压是否和铭牌上的电压一致。另外,请确 保充电器电压和主电源的电压一致。 您的得伟充电器符合 EN60335 双重绝缘 要求,因此无需使用接地线。 若要将屏幕 (e) 安装到握柄 (g),将屏幕与握柄里 的轨道对齐,然后将屏幕紧紧地滑入握柄,直到 听到锁定到位的声音。 若要从握柄拆下屏幕,从工具握柄紧紧地将屏幕 滑动向上。 当屏幕未连接到握柄时,也可以启动和查看,便 于更轻松地操作摄像机。 电源线损坏时,必须由得伟服务部门采用专门制 备的电线进行更换。 摄像机电缆(图 5) 电源插头更换(仅英国和爱尔兰) 将摄像机电缆 (c) 与摄像机连接器 (d) 对齐。将其 如果需要安装新的电源插头: 推入并逆时针(摄像机屏幕面向您)转动连接器, 直至牢固连接。 23 简体中文 若要拆除摄像机电缆,顺时针(箭头方向)转动 可使用提供的螺钉 (z) 将皮带扣 (aa) 装到工具的任 连接器。 意一侧,以同时方便习惯左手操作的用户以及习 可付费购买额外的摄像机电缆和延长电缆。请向 惯右手操作的用户使用。无需皮带扣时,可以从 您的经销商咨询,了解更多信息。 工具上拆除。 挂钩和磁铁(图 6) DCT410 挂钩用于收回在有限空间内的电缆或电线。磁铁 用于收回在有限空间内的金属物体。 要拆除皮带扣时,卸下固定它们的螺钉 (z),然后在 另一边重新装上。 操作 使用说明 警告:请务必遵守安全指示和适用法规。 若要安装挂钩或磁铁,逆时针转动摄像机的凸边 部分,直至其停止。 滑动,直至挂钩 / 磁铁顶部的耳片 (u) 固定在摄像 在检修摄像机插入和拆除电池组 (图 10) 机镜头处的凹口 (v) 内。 注意:请确保您的电池组 (a) 已完全充电。 顺时针转动凸边部分,锁定挂钩和磁铁的基部。 将电池组安装到工具握柄中 将挂钩或磁铁与灰色凹槽 (t) 对齐,然后将其向下 挂钩、磁铁和镜子(图 7、8) DCT411 遵照以下流程,将挂钩、磁铁或镜子组装到 DCT411 9 mm 摄像机。 1. 使用附件上的套管 (w),将附件(弯曲线)底部 插入 9 mm 摄像机电缆的孔 (x) 中。 2. 确保附件位于套管上的凹槽 (y) 中,并将套管 向上滑动至摄像机,直至套管将孔 (x) 盖住。 警示:切割危险。使用挂钩时务必小心。 皮带扣(图 9) (可选附件) 警告:为了减少严重人身伤害的危险, 1. 将电池组和握柄里的轨道对齐。 2. 将电池组紧紧地滑入握柄,直到听到锁定到位 的声音。 从工具上移除电池组 1. 按下释放按钮 (bb),将电池组从摄像机握柄中 稳妥地取下。 2. 按本手册充电器部分所述将电池组插入充电 器中。 入门指南 初始设置 语言设置 1. 按下向前或向后箭头,选择英语、德语、西班 牙语、法语、意大利语或荷兰语。 请勿将摄像机悬挂在头顶上方或用皮 带扣悬挂物品。只使用工作皮带悬挂摄 像机的皮带扣。 警告:为了减少严重人身伤害的危险, 确保固定皮带扣的螺钉 (z) 是牢固的。 重要:安装或拆除皮带扣时,只使用提供的螺钉 (z)。 2. 按下确定按钮,确认并退出。 24 简体中文 日期和时间设置 摄像机将在 Micro SD 卡上创建文件夹,用于保存 1. 按下向前或向后箭头,突出显示要更改的字段。 当天的内容。当天拍摄的所有照片或视频将保存 在此文件夹中。 查看照片或视频 1. 按下主菜单按钮,显示主菜单。 2. 按下向前或向后箭头,选择文件夹选项。 2. 按下确定按钮,激活字段(字段变绿)。 3. 按下向前或向后箭头,更改激活的字段。 4. 按下确定按钮,保存更改(字段变黄)。 5. 重复以上步骤,更改剩余的字段。 6. 按下主菜单按钮以退出。 基本操作 3. 按下确定按钮,进入下一界面。 4. 按下向前或向后箭头,选择带日期的文件夹。 注意:在摄像机运行过程中,随时按下主菜单按钮, 将返回上一菜单。 拍摄照片或录制视频(图 2、3) 务必在内存卡插槽 (h) 中装入 Micro SD 卡(单独 出售)。 1. 启动摄像机 (b) 和握柄 (g)。 2. 将摄像机对准目标。 A. 按下照相按钮 (l),拍摄照片。屏幕右上角将 5. 按下确定按钮,选择带日期的文件夹。 6. 按下向前或向后箭头,选择照片或视频。 7. 按下确定按钮,查看照片或视频。 显示确认图标。 或 B. 按下录制按钮 (m),开始摄像。 屏幕右上角将显示红点。若要停止录制, 再按下录制按钮。 25 简体中文 8. 按下向前或向后箭头,前进至下一照片或视频。 在查看时删除照片或视频 9. 结束后,按下主菜单按钮以退出。 删除单个照片或视频 1. 按下主菜单按钮,显示主菜单。 2. 按下向前或向后箭头,选择文件夹选项。 1. 按下主菜单按钮,显示主菜单。 2. 按下向前或向后箭头,选择文件夹选项。 3. 按下确定按钮,进入下一界面。 4. 按下向前或向后箭头,选择带日期的文件夹。 3. 按下确定按钮,进入下一界面。 4. 按下向前或向后箭头,选择带日期的文件夹。 5. 按下确定按钮,进入下一界面。 6. 按下向前或向后箭头,选择照片或视频。 5. 按下确定按钮,进入下一界面。 7. 按下确定按钮以查看。 6. 按下向前或向后箭头,选择照片或视频。 8. 按下删除按钮。选择 YES,删除单个照片或视频。 7. 按下删除按钮。选择 YES,删除单个照片或 视频。 更改语言 8. 按下主菜单按钮以退出。 26 1. 按下主菜单按钮,显示主菜单。 简体中文 2. 按下向前或向后箭头,选择语言选项。 5. 按下确定按钮,激活字段(字段变绿)。 6. 按下向前或向后箭头,更改激活的字段。 7. 按下确定按钮,保存更改。 8. 重复以上步骤,更改剩余的字段。 9. 按下主菜单按钮以退出。 激活时间戳 3. 按下确定按钮以选择。 1. 按下主菜单按钮,显示主菜单。 4. 按下向前或向后箭头,选择英语、德语、西班 2. 按下向前或向后箭头,选择时间戳选项。 牙语、法语、意大利语或荷兰语。 3. 按下确定按钮,进入下一界面。 5. 按下确定按钮,保存更改。 4. 按下向前或向后箭头,选择 OFF 或 ON。 6. 按下主菜单按钮以退出。 更改日期 / 时间 1. 按下主菜单按钮,显示主菜单。 2. 按下向前或向后箭头,选择日期 / 时间选项。 3. 按下确定按钮,进入下一界面。 4. 按下向前或向后箭头,突出显示要更改的字段。 5. 按下确定按钮,保存更改。 6. 按下主菜单按钮以退出。 格式化 Micro SD 卡 注意:格式化 Micro SD 卡将清除所 有数据。 1. 按下主菜单按钮,显示主菜单。 27 简体中文 2. 按下向前或向后箭头,选择磁盘格式化选项。 3. 按下确定按钮,进入下一界面。 4. 按下向前或向后箭头,选择 NO 或 YES。 3. 按下确定按钮,进入下一界面。 4. 按下向前或向后箭头,选择 NO 或 YES。 5. 按下确定按钮,保存更改并退出。 操作提示 • 只使用得伟 10.8 V 锂离子电池。 • 确保得伟电池处于良好的工作状态。如果屏幕 上的低电量指示灯闪动,则需要重新对电池 充电。 5. 按下确定按钮,保存更改并退出。 更改默认设置 • 若要延长电池寿命,确保在不使用时关闭屏幕 和握柄。 • 确保屏幕在使用前已完全充电。 注意:更改默认设置将清除当前的设 置,并恢复出厂设置。 1. 按下主菜单按钮,显示主菜单。 2. 按下向前或向后箭头,选择默认设置选项。 维护 您的得伟检修摄像机设计精良,可以长期使用, 而且只需最少的维护。若要连续、有效的操作, 需要进行适当的工具维护和定期清洁。 充电器和电池组都不能被维修。这些组件内没有 可以维修的部件。 28 简体中文 • 确保屏幕已完全充电。 • 确保屏幕始终安装在握柄上。如果您在拍摄照 片或录制视频时尝试将屏幕从握柄拆下,图片 清洁 警告:每周用清洁干燥的空气将尘土 吹去至少一次。若要尽量降低损伤眼 可能会冻结。 • 确保正在使用的握柄已安装电池。 睛的危险,务必在此过程中佩戴适当 • 确保摄像机电缆已正确安装至握柄。 的眼部防护。 • 确保握柄和屏幕已开启。 警告:切勿使用溶剂或其他烈性化学 • 确保握柄背面未覆盖碎屑,以便屏幕顺畅滑 制品来清洁工具的非金属部件。这些 化学物质可能会削弱这些部位使用的 材料。请用布和蘸温的肥皂水擦拭。 切勿让任何液体渗入工具,切勿让工 具的任何部分浸在液体中。 动,并且不会对屏幕造成损坏。 • 如果屏幕冻结或无法开启,将较小的物体(如 回形针头)插入屏幕背面的复位按钮 (s)。 • 如果图片暗淡,转动亮度控制开关,将 LED 灯 光调亮。 充电器清洁说明 警告:触电危险。清洁前,请断开充 环境保护 电器与交流电源插座的连接。可用布 分类收集。本产品不得与普通家庭垃圾 或非金属软刷清除充电器外部的污垢 一起处理。 和油脂。禁止使用水或任何清洁剂。 可选附件 如果您发现您的得伟产品需要更换或您已经不再 警告:除了得伟提供的附件之外,其 需要使用这些产品,请不要将它们与家庭垃圾一 他附件都未经此产品兼容性测试,若 起处理。请将它们分类以进行收集。 将此类附件与本工具一起使用将存在 分类收集使用过的产品和包装能够让 安全隐患。为降低伤害风险,本产品 材料得以回收和再利用。再生材料的 只可使用得伟推荐的附件。 再利用有助于防止环境污染,并降低 对原材料的需求。 推荐使用的附件 • DCT4101 – 17 mm 直径摄像机电缆 当地法规可能要求由市政废物处理点或向您出售 新产品的零售商提供从家庭中分类收集电器产品 • DCT4102 – 9 mm 直径摄像机电缆 的服务。 • DCT4105 – 5.8 mm 直径摄像机电缆 得伟提供设施收集和回收使用寿命到期的得伟产 • DCT4103 – 17 mm 直径,0.9 m 长的延长电缆 品。若要享受这项服务,请将产品送回任一授权 • 挂钩和磁铁 DCT410(仅可作为备件提供) 维修代理,他们将代表我们收集您的产品。 • 挂钩、磁铁和镜子 DCT411(仅可作为备件 请根据本手册所提供的地址与当地得伟办事处联 提供) 请向您的经销商咨询更多关于合适附件的信息。 故障排除 系,查询离您最近的授权维修代理的位置。或者, 您也可以登陆以下网站查询得伟授权维修代理名 单,以及我们的售后服务和联系方式的详细信息, 网址是:www.2helpU.com。 • 确保 10.8 V 电池已充电。 29 简体中文 充电式电池组 本长寿命电池组不能提供顺利完成工作所需的电 力时必须进行充电。其电池技术寿命结束时,请 妥善处理以保护我们的环境。 • 耗尽电池组的电力,然后从工具上拆下。 • 锂离子电池是可回收的。将它们送往您的经销 商处或当地的回收站。收集的电池组将被妥善 回收或处理。 制造商:百得(苏州)科技有限公司 地 址:苏州工业园区苏虹中路200号出口加工区 产 地:江苏苏州 30 한글 한국어 산업용 내시경(탐지카메라) DCT410S1 위험:절박한 위험 상태를 나타내며, 방지하지 않으면 사망 또는 심각한 부상을 초래합니다. 축하드립니다! 당신은 디월트 전동공구를 선택하셨습니다. 수년간의 경험과 철저한 제품 개발 및 혁신정신으로 디월트는 전문 전동공구 사용자에게 가장 믿음직 한 동반자가 되었습니다. 경고:잠재적으로 위험한 상태를 나타내며, 방지하지 않으면 사망 또는 심각한 부상을 초래할 수도 있습니다. 기술자료 전압 유형 배터리 종류 내시경 카메라 케이블 직경 케이블 길이 해상도 모니터 크기 무게(배터리 팩이 포함되지 않음) 배터리 팩 배터리 종류 전압 용량 무게 충전기 전원 전압 배터리 종류 대략적 충전시간 무게 dpi mm kg DCT410S1 10.8 1 리튬 이온 17 0.9 320 x 480 69 x 50 0.760 VDC Ah kg DCB121 리튬 이온 10.8 1.3 0.2 VDC mm m m mm DCB100 220 리튬 이온 min 40 (1.3Ah 배터리 팩) kg 0.3 VAC 경고: 본 제품은 A등급입니다. 가정 환경에서 사용할 경우 본 제품은 무선주파수 장해를 일으킬 수 있으므로 적당한 조치가 필요합니다. 경고: 정전압이 높아지면 화면이 꺼지면서 미처 저장하지 못한 모든 데이터가 분실됩니다. 재사용하기 전에는 정전압이 발생하지 않음을 확인하고 적당한 핀으로 재설정 버튼을 작동시킵니다. 그러면, 내시경 화면은 다시 작동합니다. 정의:안전 지침 다음 정의는 각 경고 문구의 심각도를 설명합니다. 사용 설명서를 읽고 다음과 같은 기호들에 유의하십시오. 16 3 주의: 잠재적으로 위험한 상태를 나타내며, 방지하지 않으면 경미하거나 가벼운 부상을 . 초래할 수 있습니다. 주의: 제품사용 시 안전경고표시에 표기된 내용을 준수하지않는 경우 위험을 초래할 우려가 있습니다. 엄중한 경우 재물손실 을 초래할 가능성도 있습니다. 감전의 위험이 있음을 의미합니다 화재의 위험이 있음을 의미합니다. 경고: 부상 위험을 줄이려면 사용 설명서를 숙지하십시오. 중요 안전지침 • • • • • • • 안전지침을 잘 읽으십시오. 안전지침을 잘 보관하십시오. 모든 경고 사항에 유의하십시오. 모든 안전지침 사항을 따르십시오. 제조업체가 지정한 부착물/액세서리만 사용하십시오. 모든 수리는 전문 수리인원에게 맡기십시오. 내시경이 어떠한 형식으로든 파손되었거나, 빗물이나 습기를 접했거나, 정상적으로 작동하지 않거나 혹은 내시경을 떨어뜨린 경우에는 수리를 의뢰해야 합니다. 향후 참고할 수 있도록 모든 경고 및 지시 사항을 보관해두십시오. 작업 영역 안전 a) 작업 영역을 청결하고 밝게 유지하십시오. 혼잡하거나 어두운 작업 영역에서는 사고가 발생하기 쉽습니다. b) 전동 공구를 사용하는 동안에는 어린이와 주변 사람들이 작업 영역에 가까이 들어오지 못하도록 하십시오. 주변이 산만해져 통제력을 잃을 수 있습니다. 신체 안전 31 한국어 한글 a) 전동 공구로 작업할 때는 방심하지 말고 작업에 주의하면서 상식에 따르십시오. 피곤한 상태이거나 약물, 술, 치료제를 복용한 상태에서는 전동 공구를 사용하지 마십시오. 전동 공구를 사용하는 중에 주의력을 잃어 순간적으로 부상을 당할 수 있습니다. b) 신체 보호 장구를 착용하십시오. 항상 보안경을 착용하십시오. 전동 공구를 사용하는 중에 적합한 상황에서 방진 마스크, 미끄럼 방지 안전화, 안전모 또는 청력 보호 기구 등의 보호 장비를 사용하면 신체 부상 위험이 줄어듭니다. c) 적절한 의복을 착용합니다. 헐렁한 옷이나 장신구를 착용하지 마십시오. 머리카락, 옷 및 장갑이 움직이는 부품에 닿지 않도록 유의하십시오. 헐렁한 옷, 장신구 또는 긴 머리가 움직이는 부분에 낄 수 있습니다. d) 먼지 배출 및 집진 시설 연결을 위한 장치가 제공된 경우, 이들 장치가 연결되어 적절히 사용되고 있는지 반드시 확인하십시오. 집진 장치를 사용하면 먼지와 관련된 위험을 줄일 수 있습니다. 사용 및 보관방법 a) 사용하지 않는 내시경은 어린이들의 손이 닿지 않는 곳에 보관하고 내시경이나 본 사용설명서를 잘 숙지하지 못한 사람이 내시경을 작동하게 해서는 안됩니다. 전문교육을 받지 않은 사용자가 내시경을 사용할 경우 위험을 초래할 수 있습니다. b) 내 시 경 및 액 세 서 리 등 을 사 용 할 때 본 사용설명서의 절차를 잘 따르는 한편, 작업환경 및 진행할 작업 등 사항들도 꼼꼼히 점검합니다. 내시경을 용도범위를 벗어난 다른 용도로 사용할 경우 위험이 따를 수 있습니다. 배터리 공구 사용 및 주의 사항 a) 다시 충전할 때는 제조업체에서 지정한 충전기만 사용하십시오. 한 배터리 팩 유형에 적합한 충전기를 다른 배터리 팩과 함께 사용할 경우 화재의 위험이 있습니다. b) 배터리 팩을 사용하지 않을 때에는 클립, 동전, 키, 못, 나사 등의 금속 물체나, 단자 간에 연결할 수 있는 작은 금속 물체가 닿지 않도록 멀리 두십시오. 배터리 단자가 단락되면 화상을 입거나 화재의 위험이 있습니다. c) 배터리를 과다 사용하면 액체가 배터리에서 흘러 나올 수 있으므로 접촉을 피하십시오. 실수로 접촉한 경우에는 물로 씻으십시오. 액체가 눈에 들어가면 치료를 받으십시오. 배터리에서 나온 액체는 통증을 유발하거나 화상을 입힐 수 있습니다. 32 내시경에 관한 안전사항 경고: 내시경을 분해하거나 개조하지 마십시오. 수리가 가능한 부품들이 내장되어 있지 않습니다. 도움이 필요할 경우 해당 지역의 판매자에게 문의하십시오. • 인화성 액체, 가스나 가루가 있는 환경 등 폭발위험 구역에서 내시경을 사용하지 마십시오. 내시경에서 발생하는 불꽃이 가루나 연기를 점화시킬 가능성이 있습니다. • 내시경은 지정된 전용 디월트 배터리만 사용합니다. 다른 배터리를 사용할 경우 화재를 유발할 위험이 있습니다. • 내시경을 어린이나 전문교육을 받지 않은 사람들의 손이 닿지 않는 곳에 보관하십시오. 전문교육을 받지 않은 사용자가 내시경을 사용할 경우 위험을 초래할 수 있습니다. • 내시경을 분해하지 마십시오. 사용자가 수리할 수 있는 부품들이 내장되어 있지 않습니다. • 움직이는 부품, 위험한 화학물질이나 전하 등에 노출될 수 있는 장소에서 내시경을 사용하지 마십시오. 벽, 배관, 자동차 및 기계 등이 있는 곳에서 사용할 경우 심한 부상이나 심지어 죽음 까지 초래할 수 있습니다. • 작동하고 있는 기계 부근에서 내시경을 사용하지 마십시오. 내시경 케이블이 움직이고 있는 부품에 걸려서 사용자를 끌어당길 경우 사용자가 부상을 입을 수 있습니다. • 작업 중에 전류가 흐르는 부품들이 작업구역에 있어서는 절대 안됩니다. • 부식성 화학물질이 있는 환경에서 내시경을 사용하지 마십시오. 부식성이 있거나 기름기가 덮 인 환경 에 노 출 되 면 카 메 라 헤 드 에 있 는 플라스틱 커버가 더러워지면서 화질이 나빠질 수 있습니다. • 렌즈 내부에 물방울이 형성될 경우 내시경을 사용하지 마십시오. 물방울이 증발된 다음에 다시 사용하십시오. • 경고 라벨을 제거하거나 라벨 표면을 훼손하지 마십시오. • 내시경이나 테스트 중에 있는 설비의 손상을 막으려면 다음의 경우를 피해야 합니다. - 아크 용접기, 전자조리기 등 설비들에서 발생하는 EMF (전자기장). - ESD (정전기 방전). - 열충격 (최대정확도에서 주변온도의 급격한 변화로 인한 열충격으로, 온도계가 다시 안정될 때까지 30분을 기다린 다음 다시 사용함). 17 4 한글 한국어 경고: 카 메 라 , 모 니 터 또 는 배 터 리 를 태양광선이나 화염과 같은 너무 뜨거운 열을 받게 하지 마십시오. 경고: 감전 위험이 있습니다. 내시경 카메라 케이블이 전류가 흐르는 전선을 접하지 않도록 하십시오. 작업구역 전반으로 통하는 회로 차단기를 차단시켜 부상을 피하십시오. 경고: 사람이나 동물을 상대로 사용하지 마십시오. 사람이나 동물을 위한 용도로 만들어진 것이 아니므로 만약에 사용할 경우 부상을 초래할 수 있습니다. 경고: 보안경을 항상 착용하십시오. 일반 안경은 보안경에 속하지 않습니다. 또한, 절단 작업이 먼지를 유발할 경우에는 페이스 마스크나 방진 마스크를 착용해야 합니다. 품질이 보증된 안전복을 항상 착용하십시오. 주의: 내시경을 사용하지 않을 경우에는 고른 평면 위에 측면으로 잘 방치하여 내시경이 넘어가거나 떨어지는 일이 없도록 해야 합니다. 큰 배터리 팩이 장착된 일부 내시경들은 배터리 팩을 토대로 곧게 세워놓을 수 있지만 살짝만 건드려도 쉽게 넘어갈 수 있습니다. 경고: 제조업체의 동의없이 무단 개조할 경우 사용자는 본 기기를 작동할 권한을 상실하게 됩니다. 기타 잔류 위험 관련된 안전 규정을 준수하고 안전 장치를 사용한다고 해도 특정한 위험은 피할 수 없습니다. 이러한 위험은 다음과 같습니다. - 장시간 사용으로 인한 신체 부상의 위험. - 작업 중에 무의식적으로 전류가 흐르는 부품을 만짐으로 인한 작업자의 부상 위험. 기타 잔류 위험 관련된 안전 규정을 준수하고 안전 장치를 사용한다고 해도 특정한 위험은 피할 수 없습니다. 이러한 위험은 다음과 같습니다. 사용 전에 사용 설명서의 내용을 숙지하십시오. 날짜 코드 위치 날짜 코드에는 제조년도가 포함되며 이 제조년도는 공구와 배터리의 탑재 이음부가 되는 케이스에 인쇄되어 있습니다. 예: 2011 XX 2010XX XXXX 제조년도 5 18 모든 배터리 충전기에 대한 중요한 안전 지침 본 지침을 잘 보관해 보관해 두십시오. 두십시오. 본 사용 사용 설명서에는 설명서에는 본 지침을 DCB100 및 DCB105 배터리 대한 및 중요한 DCB100배터리 충전기에 대한충전기에 중요한 안전 작업 안전 및 포함되어 작업 지침이 포함되어 있습니다. 지침이 있습니다. • 충전기를 사용하기 전에 충전기, 배터리 팩, 그리고 배터리 팩 관련 제품에 대한 지침과 주의표시를 숙지하십시오. 경고: 감전 위험, 충전기 내부에 액체가 들어가지 않도록 하십시오. 감전의 위험이 있습니다. 주의: 화상 위험. 신체 부상의 위험을 줄이려면 디월트충전용 배터리로만 충전하십시오. 다른 유형의 배터리는 폭발로 인한 신체 부상과 손상을 초래할 수 있습니다. 경고: 아이들이 본 제품을 가지고 놀지 않게끔 감독하셔야 합니다. 주의: 특정 조건에서, 충전기가 전원 공급기에 연결되어 있으면 충전기 내부에 노출된 충전 접점이 이물질에 의해 단락될 수 있습니다. 스틸 울(steel wool), 알루미늄 호일, 금속 입자 축적물 등의 전도성 이물질은 충전기 충전구에 닿지 않게 두어야 합니다. 충전구 안에 배터리 팩이 없을 경우, 항상 배터리 전원 공급기에서 충전기의 플러그를 뽑으십시오. 충전기를 청소할 때는 플러그를 뽑아야 합니다. • 본 사용 설명서에 명시된 충전기 외의 다른 충전기로 배터리 팩을 충전하지 마십시오. 본 충전기와 배터리 팩은 함께 사용하도록 특수 설계되었습니다. • 이러한 충전기는 디월트충전용 배터리 충전 이외의 용도로는 사용할 수 없습니다. 다른 용도로 사용하면 화재, 감전 또는 감전사의 위험이 있습니다. • 충전기가 비나 눈을 맞지 않도록 하십시오. • 충전기를 분리할 경우 코드가 아니라 플러그를 뽑으십시오. 그래야만 전기 플러그 및 코드 손상의 위험이 줄어듭니다. • 코드가 밟히거나 걸리거나 기타 원인에 의해 손상되거나 압박을 받지 않도록 유의하십시오. • 불가피한 경우가 아니면 연장 코드를 사용하지 마십시오. 연장 코드를 잘못 사용하면 화재, 감전 또는 감전사의 위험이 있습니다. • 충전기 위에 물건을 올려놓거나 부드러운 표면에 충전기를 두면 환기 슬롯이 막혀 내부가 과열될 수 있습니다. 충전기는 열원에 가까이 두지 마십시오. 충전기는 하우징의 상단과 하단에 있는 슬롯을 통해 환기됩니다. • 코드나 플러그가 손상된 충전기를 작동시키지 마십시오. – 즉시 교체하십시오. • 심한 충격을 받았거나 떨어뜨렸거나 기타의 방식으로 손상된 경우에는 충전기를 작동시키지 마십시오. 공인 서비스 센터로 가져가십시오. 33 한국어 한글 • 충전기를 분해하지 마십시오. 서비스나 수리가 필요한 경우에는 공인 서비스 센터로 가져가십시오. 잘못 재조립하면 화재, 감전 또는 감전사의 위험이 있습니다. • 전원선이 파손된 경우에는 위험을 막기 위해 반드시 제조업체, 수리대행사 또는 유사한 자격이 있는 기술인원에게 요청하여 전원선을 교체해야 합니다. • 청소하려면 먼저 충전기를 콘센트에서 분리하십시오. 그래야 감전 위험이 줄어듭니다. 배터리 팩을 제거하는 것만으로 이러한 위험이 줄어들지는 않습니다. • 절대로 충전기 두 개를 함께 연결하지 마십시오. 가정용 표준 표준 전력(220v)에서 전력(230v)에서 작동하도록 작동하도록 • 충전기는 충전기는 가정용 설계되어 설계되어 있습니다. 있습니다. 다른 다른 전압에서는 전압에서는 사용하지 사용하지 마십시오. 공용충전기는 충전기는제외됩니다. 제외됩니다. 마십시오. 공용 본 지침을 잘 보관해 두십시오. 충전기 DCB100 10.8V의 리튬 10.8 배터리의 사용을 DCB100 충전기는 및 DCB105 충전기는 V 리튬이온 허용합니다. 배터리를 사용합니다. 이러한 충전기는 어떠한 조절 작업도 필요 없으며 최대한 작동하기 쉽게 설계되었습니다. 충전 절차(그림1) 1) 2) 3) 배터리 팩을 넣기 전에 충전기를 적절한 콘센트에 꽂습니다. 배터리 팩(F)을 충전기에 넣습니다. 빨간색(충전 중)불이 계속 깜박이면서 충전 프로세서가 시작되었음을 알립니다. 충전이 완료되면 빨간색 불이 계속 켜져 있습니다. 배터리 팩이 완전히 충전되면 바로 사용하거나 충전기에 그대로 둡니다. 주의: 수명과 참고: 리튬이온 리튬이온 배터리의 배터리의 최장 성능과 수명을최고의 성능을 얻으려면 처음처음 사용하기 전에전에 배터리를 극대화하려면 사용하기 배터리최소 팩을10시간 완전히 충전시키십시오. 동안 충전하십시오. 충전 프로세스 배터리 팩의 충전 상태는 아래 표를 참조하십시오. 충전상태 충전 중 완전 충전됨 냉/온 팩 지연 배터리 팩 교체 34 – – – – ––––––––––– –– – –– – ••••••••••• 냉/온 팩 지연 충전기에서 너무 뜨겁거나 차가운 배터리가 감지되면, 냉/온 팩 지연이 자동으로 시작되어 배터리가 적절한 온도가 될 때까지 충전이 중단됩니다. 이 과정이 끝나면 충전기가 자동으로 팩 충전 모드로 전환됩니다. 이 기능은 배터리 수명을 최대한으로 보장하기 위한 것입니다. 리튬이온 배터리 팩에만 해당 리튬이온 배터리는 배터리에 과부하가 걸리거나 과열 또는 완전 방전되는 것을 방지하는 전자 보호 시스템으로 설계되었습니다. 이 공구는 전자 보호 시스템이 작동하면 자동으로 꺼집니다. 그러면 리튬이온 배터리가 완전히 충전될 때까지 충전기에 놓으십시오. 모든 배터리 팩에 대한 중요한 안전 지침 배터리 팩 교체를 주문할 때는 카탈로그 번호와 전압을 반드시 포함시켜야 합니다. 배터리 팩은 제품을 처음 개봉할 때 완전히 충전된 상태가 아닙니다. 배터리 팩과 충전기를 사용하기 전에 아래 안전 지침을 숙독하십시오. 그런 다음 설명된 충전 절차를 따르십시오. 모든 지침을 숙지하십시오 • 가연성 액체, 가스 또는 먼지 등 폭발성 분위기에서 배터리를 충전하거나 사용하지 마십시오. 배터리를 삽입하거나 충전기에서 제거할 때 먼지나 가스에 불이 붙을 수 있습니다. • 배터리를 강제로 충전기에 끼워넣으시면 안됩니다. 그 어떤 방식의 배터리 변경은 절대 금지입니다. 배터리를 변경하여 호환 충전기가 아닌 충전기에 넣으려고 시도하시다가 배터리가 파열되면서 엄중한 신체 상해를 일으키는 경우가 있기때문입니다. • 디월트충전기에서만 배터리 팩을 충전하십시오. • 물이나 기타 액체가 튀어 묻거나 액체에 빠지지 않도록 하십시오. • 온도가 40°(105°F)초과될 수 있는 곳(여름철 허름한 창고 또는 금속 건물 등)에 공구와 배터리 팩을 보관하거나 사용하지 마십시오. 위험: 어떤 이유로든 배터리 팩을 절대 열려고 하지 마십시오. 배터리 팩 케이스가 깨지거나 손상되면 충전기에 넣지 마십시오. 배터리 팩을 뭉개거나 떨어뜨리거나 손상시키지 마십시오. 강한 충격을 받았거나, 떨어뜨렸거나, 차에 치였거나 기타의 원인으로 어떤 방식으로든 손상된(못이 박히거나 망치로 맞았거나 밟힘) 배터리 팩이나 충전기는 사용하지 마십시오. 감전 또는 감전사의 위험이 있습니다. 손상된 배터리 팩은 재활용을 위해 서비스 센터에 반환해야 합니다. 196 한국어 한글 주의: 사용하지 않는 공구는 걸려 넘어지거나 떨어질 위험이 없는 안정된 표면에 눕혀 두십시오. 배터리 팩이 큰 일부 공구들은 배터리 팩 위에 바로 서있지만 쉽게 넘어질 수 있습니다. Li-Ion(리튬이온)에 대한 추가 안전 지침 • 배터리 팩이 심하게 손상되거나 완전히 낡았더라도 절대 소각하지 마십시오. 배터리 팩이 불속에서 폭발할 수 있습니다. 리튬이온 배터리 팩은 연소되면서 독성 연기와 물질을 발생시킵니다. • 배터리 내용물이 피부에 닿으면 즉시 중성 세척제로 해당 부위를 씻으십시오. 배터리액이 눈에 들어갔을 경우, 15분 정도 또는 통증이 가실 때까지 눈을 뜨고 물로 씻어냅니다. 치료가 필요한 경우를 위해, 배터리 전해질은 액체 유기 탄산염과 리튬염의 혼합물로 구성되어 있음을 알아 두십시오. • 열린 배터리 셀의 내용물은 호흡기 질환을 일으킬 수 있습니다. 신선한 공기를 흡입하십시오. 증상이 계속되면 치료를 받으십시오. 경고: 화상 위험. 배터리액은 불꽃이나 화염에 노출되면 연소될 수 있습니다. 배터리 팩 배터리 유형 DCT410S1은 10.8V배터리 팩에서 작동합니다. 보관 권장 사항 1) 보관 장소로는 직사광선을 받지 않고 지나치게 덥거나 춥지 않은 시원하고 건조한 곳이 가장 좋습니다. 최적의 배터리 성능과 수명을 위해, 사용하지 않을 때에는 배터리 팩을 실온에서 보관하십시오. 참고:동안 리튬이온 배터리 팩을 보관할 2) 오랫 보관할 때는 최적의 결과를 위해때는 완전히 충전된 상태여야 합니다. 꺼내 완전 충전된 배터리 팩을 충전기에서 장기간장소에 보관해도 배터리 충전기가 2) 건냉한 보관하는 것이팩이나 좋습니다. 훼손되지 않습니다. 적합한 참고: 완전 방전 상태로 배터리 팩을 환경에서는 보관해서는 3년 이상 보관할 있습니다. 안됩니다. 사용 전에 수 배터리 팩을 재충전해야 합니다. 충전기 및 배터리 팩에 부착된 레이블 본 설명서에 사용된 그림 외에도 충전기 및 배터리 팩에 부착된 레이블에는 다음과 같은 그림이 표시됩니다. 사용 전에 사용 설명서의 내용을 숙지하십시오. 20 7 배터리 충전 중 배터리 충전 완료 배터리에 결함 있음 냉/온 팩 지연 전도성 있는 물체로 시험하지 마십시오. 손상된 배터리 팩을 충전하지 마십시오. 디월트배터리 팩만 사용하십시오. 다른 유형의 배터리 팩은 폭발로 인한 신체 부상과 손상을 초래할 수 있습니다. 물에 닿지 않도록 하십시오. 손상된 코드는 즉시 교체하십시오. 온도가 4℃-40℃사이일 때에만 충전하십시오. 환경 보호 차원에서 배터리 팩을 폐기하십시오. 배터리를 불사르시면 안됩니다. 충전 시간은 기술 데이터를 참조하십시오. 실외사용은 금지입니다. 포장물 내역 포장물속에 든 품목들은 아래와 같습니다. 1 내시경 카메라 1 내시경 카메라 케이블 17 mm (DCT410S1) 1 후크 1 자석 1 배터리 팩 1 충전기 1 키트 박스 1 사용설명서 1 분해 조립도 35 한글 한국어 주의: N-모델인 경우 위의 내역속의 배터리 및 충전기가 포함되지 않습니다. • 운수도중에 도구, 부품 혹은 액세서리등이 파손될 수도 있으니 물품을 받으신 후 자세히 체크바랍니다. • 본 설명서를 자세히 읽고 사용방법을 확실히 터득하기전에는 절대로 드라이버를 사용하지 말아주십시오. 설명 (그림 2, 3) 경고: 내시경 또는 그 부품을 절대 개조하지 마십시오. 내시경이 파손되거나 작업자 부상을 초래할 수 있습니다. a. 10.8 V 리튬 이온 배터리 l. 내시경 카메라: 이 버튼을 눌러서 사진을 찍습니다. m. 녹화: 이 버튼을 눌러서 동영상 녹화를 시작하거나 정지시킵니다. n. o. 역방향 화살표: 이 버튼을 누르면 뒤로 이동합니다. p. 확인(OK): 이 버튼을 누르면 변경내용이 저장됩니다. q. 앞방향 화살표: 이 버튼을 누르면 앞으로 이동합니다. r. 손잡이 세트 전원 지시등: 녹색등이 켜지면 손잡이 세트가 켜져 있음을 나타냅니다. b. LED가 장착된 내시경 카메라 c. 0.9 m 내시경 카메라 케이블 메인 메뉴: 이 버튼을 눌러서 내시경 작동 옵션 리스트를 열거나 혹은 메뉴를 종료시킵니다. d. 내시경 카메라 커넥터 e. 모니터 s. 재설정 버튼 f. 내시경 카메라 케이블 온/오프 스위치 / LED 밝기 조절 스위치 용도 g. 손잡이 세트 h. 용량이 16 GB 또는 그 이하인 마이크로 SD 메모리 카드용 마이크로 SD 슬롯 i. 모니터 전원 버튼: 모니터와 내시경 카메라 케이블(f)이 모두 켜져야 합니다. j. 줌/삭제(Zoom/Delete) 버튼: 이 버튼은 2가지 기능을 갖고 있습니다. 줌(Zoom): 물체를 더 가까이(3x 줌)에서 볼 필요가 있을 때 이 버튼을 사용합니다. 삭제(Delete): 폴더 메뉴에서 이 버튼을 누르면 사진이 삭제됩니다. k. 재생: 이 버튼을 눌러서 사진이나 동영상이 저장된 폴더를 엽니다. 또는, 이 버튼을 눌러서 동영상을 재생시킵니다. 36 내시경은 벽 내부 및/또는 비좁은 공간 내부를 검사할 때 실시간 영상을 재생할 수 있도록 설계되었습니다. 마이크로 SD 카드(별도로 판매함)가 있으면 내시경으로 사진을 찍거나 동영상을 녹화하여 자료용으로 보관할 수 있습니다. 사진은 JPG 포맷으로, 그리고 동영상은 AVI 포맷으로 저장됩니다. 본 디월트 내시경은 최대용량이 16기가 바이트인 마이크로 SD 메모리 카드와 호환이 됩니다. 내시경의 용도범위는 자동차 검사, 배관 검사, HVAC(난방, 환기, 공조 시스템) 검사 또는 케이블 라우팅 등이 포함됩니다. 본 내시경을 사용하기 전에 사용설명서를 완전히 숙지하십시오. 인화성 액체나 가스가 있는 환경에서 사용하지 마십시오. 내시경 카메라 케이블 연결선은 카메라 커넥터 까지 방수처리 되어 있습니다. 손잡이 세트를 습한 환경이나 물에 침수시켜 사용하지 마십시오. 내시경은 전문기술이 필요한 도구입니다. 어린이들이 내시경을 만지게 해서는 안됩니다. 전문교육을 받지 않은 작업자가 굳이 내시경을 사용할 경우에는 전문인원의 감시하에 사용해야 합니다. 8 한국어 한글 • 본 제품을, 안전 보장을 책임진 기술인원의 감시가 없는 한, 육체적/지각적/정신적으로 능력이 한정되어 있거나, 경험이 부족하거나 전문지식 또는 기술이 없는 사람(어린이를 포함)이 사용해서는 안됩니다. 절대 어린이가 혼자서 본 제품을 만지고 장난해서는 안됩니다. 전기 안전 충전기는 지정된 한가지 전압만 사용하도록 설계되었습니다. 배터리 팩 전압이 명판에 표시된 전압과 일치하는지 항상 점검하십시오. 충전기의 전압이 전원 전압과 일치하는지도 확인하십시오. 디월트충전기는 EN 60335에 따라 이중 절연되어 있습니다. 따라서 접지선이 필요하지 않습니다. 전원 코드가 손상된 경우에는 디월트서비스 센터를 통해 특수 제작된 코드로 교체해야만 합니다. 연장 케이블의 사용 절대 필요할 때만이 연장선의 사용을 허용합니다. 품질보증이 있고 충전기의 파워 수출에 적합한(기술자료 참고) 연장 케이블의 사용만 허용합니다. 도체의 최소 사이즈는 1mm2에 도달하여야 하고, 길이는 30m를 초과하지 말아야 합니다. 케이블 릴인 경우, 감긴 케이블을 릴에서 완전히 풀고 작업을 시작하셔야 합니다. 조립 및 조정 경고: 조립 및 조정 작업 전에는 항상 배터리 팩을 분리하십시오. 배터리 팩을 삽입하거나 분리하기 전에 항상 공구 스위치를 끄십시오. 경고: 디월트배터리 팩과 충전기만 사용하십시오. 모니터 (그림 4) 모니터는 배터리가 장착된 손잡이 세트와 연결되면 배터리로 부터 전하를 받게 됩니다. 사용하기 전에 모니터가 충전완료 상태에 있는지 확인합니다. 손잡이 세트로 부터 모니터를 분리시키면 화면의 좌상단에 배터리 아이콘이 나타납니다. 이 아이콘은 모니터의 현재 충전 상태도 나타냅니다. 모니터(e)를 손잡이 세트(g)에 설치할 때 모니터를 손잡이 세트에 있는 레일과 일치하게 맞춘 다음, 고정장치가 제위치에 고정되면서 딸깍하는 소리가 날 때까지 모니터를 손잡이에 지그시 밀어넣습니다. 손잡이 세트에서 모니터를 제거할 경우에는 내시경 손잡이로 부터 모니터를 위로 지그시 밀어올리면 됩니다. 모니터를 손잡이 세트에 부착하지 않은 상태에서도 모니터 화면을 켜고 내용을 볼 수 있으므로 내시경 조절이 더 수월해집니다. 22 9 내시경 카메라 케이블 (그림 5) 내시경 카메라 케이블(c)을 카메라 커넥터(d)와 일치하게 맞춥니다. 밀어넣은 다음 커넥터를 시계바늘 회전 반대방향으로(카메라 모니터가 사용자를 마주함) 돌려서 단단히 부착시킵니다. 내시경 카메라 케이블을 제거할 때는 커넥터를 시계바늘 회전방향으로(화살표의 방향) 돌리면 됩니다. 내시경 카메라 케이블과 연결선이 추가로 필요할 경우에는 비용을 추가로 내야 합니다. 상세한 내용은 판매자에게 문의하십시오. 후크 및 자석 (그림 6) 비좁은 공간에 있는 케이블이나 와이어를 거둬들일 때 후크를 유용하게 사용할 수 있습니다. 자석은 비좁은 공간에 있는 금속 물체를 거둬들일 때 유용합니다. 후크나 자석을 부착할 때 내시경의 깔쭉깔쭉한 부분을 시계바늘 회전 반대방향으로 끝까지 돌리면 됩니다. 후크나 자석을 회색 홈(t)과 일치하게 맞춘 다음 후크/자석의 맨 위에 있는 탭(u)이 내시경 렌즈에 위치한 노치(v)에 단단히 맞춰질 때까지 후크나 자석을 아래로 밀어줍니다. 내시경의 깔쭉깔쭉한 부분을 시계바늘 회전방향으로 돌러셔 후크/자석의 밑부분을 고정시킵니다. 벨트 후크 (그림 7) (옵션 액세서리) 경고: 작업자가 심한 부상을 입을 위험을 줄이기 위해 내시경을 머리위에 매달거나 물체를 벨트 후크에 걸지 마십시오. 내시경 벨트 후크만 작업 벨트에 걸수 있습니다. 경고: 작업자가 심한 부상을 입을 위험을 줄이기 위해 벨트 후크를 고정시킨 나사(w)가 단단히 조여져 있는지 확인해야 합니다. 중요: 벨트 후크를 부착하거나 제거할 때 제공된 나사(w)만 사용하십시오. 벨트 후크(x)는 내시경의 양측에 모두 부착이 가능하므로 (반드시 제공된 나사(w)를 사용해야 함) 왼손잡이나 오른손 잡이 사용자들이 모두 사용할 수 있습니다. 후크가 전혀 필요하지 않은 경우에는 내시경으로 부터 제거할 수 있습니다. 벨트 후크를 제거할 때 벨트 후크를 고정하는 나사(w)를 푼 다음 후크를 반대 측에 다시 부착하면 됩니다. 37 한글 한국어 작업 사용 지침 경고: 안전 지시 사항과 해당 규정을 항상 준수하십시오 내시경에 배터리 팩을 장착하거나 제거하기 (그림 8) 주: 배터리 팩(a)이 충전완료 상태임을 확인하십시오. 배터리 팩을 내시경 손잡이에 장착하기 1. 배터리 팩을 손잡이 안에 있는 레일과 일치하게 맞춥니다. 2. 배터리 팩을 고정장치가 고정되면서 딸깍하는 소리가 들릴 때까지 지그시 밀어넣습니다. 내시경으로 부터 배터리 팩을 제거하기 1. 잠금해제 버튼(y)을 누른 다음 배터리 팩을 지그시 당겨서 내시경 손잡이로 부터 꺼냅니다. 2. 본 사용설명서의 충전기 부분에서 설명한 대로 배터리 팩을 충전기에 끼워넣습니다. 작동을 시작하기 2. “확인(OK)” 버튼을 눌러서 필드를 활성화시킵니다 (필드가 녹색으로 변함). 3. 앞방향 또는 역방향 화살표를 눌러서 활성화된 필드의 내용을 변경합니다. 4. “확인(OK)” 버튼을 눌러서 변경내용을 저장합니다 (필드가 노란색으로 변함). 5. 남은 필드의 내용을 변경할 때도 상기 절차를 반복하면 됩니다. 6. 메인 메뉴 버튼을 눌러서 메뉴를 종료시킵니다. 기본 작동 주: 내시경 작동 중에 언제든지 메인 메뉴 버튼을 누르면 이전 메뉴로 되돌아갑니다. 사진 또는 영상을 녹화하기 (그림 2, 3) 마이크로 SD 카드(별도로 판매함)가 카드 슬롯(h)에 꽂혀 있는지 확인하십시오. 1. 내시경 카메라(b)와 손잡이 세트(g)의 전원을 모두 켭니다. 2. 내시경 카메라를 목표물에 조준합니다. 초기 설정 언어 설정 1. 앞방향 또는 역방향 화살표를 눌러서 영어(English), 프랑스어(French) 또는 스페인어(Spanish)를 선택합니다. 2. “확인(OK)” 버튼을 눌러서 확인한 다음 메뉴를 종료시킵니다. 날짜 및 시간 설정 1. 앞방향 또는 역방향 화살표를 눌러서 변경할 필드에 하이라이트 표시를 합니다. A. 내시경 카메라 버튼(l)을 눌러서 사진을 찍습니다. 화면의 우상단에 확인 아이콘이 나타납니다. 또는, B. 녹화 버튼(m)을 눌러서 녹화를 시작합니다. 화면의 우상단에 빨간 점이 나타납니다. 녹화 버튼을 한번 더 누르면 녹화가 정지됩니다. 내시경은 마이크로 SD 카드에 당일 녹화 폴더를 생성합니다. 당일에 찍은 사진이나 영상이 모두 이 폴더에 저장됩니다. 사진이나 영상을 보기 1. 메인 메뉴 버튼을 눌러서 “메인 메뉴(Main Menu)” 를 엽니다. 2. 앞방향 또는 역방향 화살표를 눌러서 “폴더(Folder)” 옵션을 선택합니다. 38 23 10 한글 한국어 3. “ 확 인 ( O K ) ” 버 튼 을 누 르 면 다 음 화 면 으 로 이동합니다. 4. 앞방향 또는 역방향 화살표를 눌러서 날짜가 있는 폴더를 선택합니다. 5. “확인(OK)” 버튼을 누르면 날짜가 있는 폴더가 선택됩니다. 6. 앞방향 또는 역방향 화살표를 눌러서 사진이나 영상을 선택합니다. 8. 앞방향 또는 역방향 화살표를 누르면 다음 사진이나 영상으로 이동합니다. 9. 끝내려면 메인 메뉴 버튼을 눌러서 메뉴를 종료시키면 됩니다. 사진이나 영상을 보기 1. 메인 메뉴 버튼을 눌러서 “메인 메뉴(Main Menu)”를 엽니다. 2. 앞방향 또는 역방향 화살표를 눌러서 “폴더(Folder)” 옵션을 선택합니다. 3. “확인(OK)” 버튼을 누르면 다음 화면으로 이동합니다. 4. 앞방향 또는 역방향 화살표를 눌러서 날짜가 있는 폴더를 선택합니다. 5. “확인(OK)” 버튼을 누르면 다음 화면으로 이동합니다. 6. 앞방향 또는 역방향 화살표를 눌러서 사진이나 영상을 선택합니다. 7. “확인(OK)” 버튼을 눌러서 사진이나 영상을 봅니다. 7. 삭제 버튼을 누릅니다. “예(YES)”를 선택하면 개별 사진이나 영상이 삭제됩니다. 11 24 39 한국어 한글 8. 삭제 버튼을 누릅니다. “예(YES)”를 선택하면 개별 사진이나 영상이 삭제됩니다. 8. 메인 메뉴 버튼을 눌러서 메뉴를 종료시킵니다. 재생 중에 있는 사진이나 영상을 삭제하기 1. 메인 메뉴 버튼을 눌러서 “메인 메뉴(Main Menu)”를 엽니다. 2. 앞방향 또는 역방향 화살표를 눌러서 “폴더(Folder)” 옵션을 선택합니다. 3. “확인(OK)” 버튼을 누르면 다음 화면으로 이동합니다. 4. 앞방향 또는 역방향 화살표를 눌러서 날짜가 있는 폴더를 선택합니다. 5. “확인(OK)” 버튼을 누르면 다음 화면으로 이동합니다. 6. 앞방향 또는 역방향 화살표를 눌러서 사진이나 영상을 선택합니다. 7. “확인(OK)” 버튼을 눌러서 재생시킵니다. 40 언어를 변경하기 1. 메인 메뉴 버튼을 눌러서 “메인 메뉴(Main Menu)”를 엽니다. 2. 앞방향 또는 역방향 화살표를 눌러서 “언어(Language)” 옵션을 선택합니다. 3. “확인(OK)” 버튼을 누르면 선택됩니다. 4. 앞방향 또는 역방향 화살표를 눌러서 영어(English), 프랑스어(French) 또는 스페인어(Spanish)를 선택합니다. 5. “확인(OK)” 버튼을 눌러서 변경내용을 저장합니다. 6. 메인 메뉴 버튼을 눌러서 메뉴를 종료시킵니다. 날짜/시간을 변경하기 1. 메인 메뉴 버튼을 눌러서 “메인 메뉴(Main Menu)”를 엽니다. 2. 앞방향 또는 역방향 화살표를 눌러서 “날짜/시간 (Date/Time)” 옵션을 선택합니다. 25 12 한국어 한글 3. “확인(OK)” 버튼을 누르면 다음 화면으로 이동합니다. 4. 앞방향 또는 역방향 화살표를 눌러서 변경할 필드에 하이라이트 표시를 합니다. 5. “확인(OK)” 버튼을 눌러서 변경내용을 저장합니다. 6. 메인 메뉴 버튼을 눌러서 메뉴를 종료시킵니다. 5. “확인(OK)” 버튼을 눌러서 필드를 활성화시킵니다 (필드가 녹색으로 변함). 6. 앞방향 또는 역방향 화살표를 눌러서 활성화된 필드의 내용을 변경합니다. 7. “확인(OK)” 버튼을 눌러서 변경내용을 저장합니다. 8. 남은 필드의 내용을 변경할 때도 상기 절차를 반복하면 됩니다. 9. 메인 메뉴 버튼을 눌러서 메뉴를 종료시킵니다. 마이크로 SD 카드를 포맷하기 주: 마이크로 SD 카드를 포맷할 경우 모든 데이터가 지워집니다. 1. 메인 메뉴 버튼을 눌러서 “메인 메뉴(Main Menu)”를 엽니다. 2. 앞방향 또는 역방향 화살표를 눌러서 “디스크를 포맷하기(Format Disk)” 옵션을 선택합니다. 타임 스팸프를 활성화시키기 1. 메인 메뉴 버튼을 눌러서 “메인 메뉴(Main Menu)”를 엽니다. 2. 앞방향 또는 역방향 화살표를 눌러서 “타임 스탬프(Time Stamp)” 옵션을 선택합니다. 3. “확인(OK)” 버튼을 누르면 다음 화면으로 이동합니다. 4. 앞방향 또는 역방향 화살표를 눌러서 "아니오(NO)” 또는 “예(YES)”를 선택합니다. 3. “확인(OK)” 버튼을 누르면 다음 화면으로 이동합니다. 4. 앞방향 또는 역방향 화살표를 눌러서 "오프(OFF)” 또는 “온(ON)”을 선택합니다. 26 13 41 한국어 한글 작동에 관한 조언 5. “확인(OK)” 버튼을 눌러서 변경내용을 저장한 다음 메뉴를 종료시킵니다. 기본 설정으로 변경하기 주: 기본 설정으로 변경할 경우 현재 설정 내용이 모두 지워지고 공장 기본 설정값이 복원됩니다. 1. 메인 메뉴 버튼을 눌러서 “메인 메뉴(Main Menu)”를 엽니다. 2. 앞방향 또는 역방향 화살표를 눌러서 “기본 설정 (Default Setup)” 옵션을 선택합니다. • 반드시 디월트 10.8 V 리튬 이온 배터리를 사용해야 합니다. • 디월트 배터리의 작동상태가 양호함을 확인하십시오. 화면에 있는 배터리 부족 경고 지시등이 깜박일 경우에는 배터리를 다시 충전해야 합니다. • 배터리 사용수명을 연장하려면 내시경을 사용하지 않는 동안 모니터와 손잡이 세트의 전원을 모두 꺼야 합니다. • 작동하기 전에 모니터가 충전완료 상태에 있는지 확인하십시오. 유지보수 디월트전동 공구는 최소한의 유지 보수로 장기간에 걸쳐 작업이 가능하도록 설계되어 있습니다. 연속 작동은 적절한 공구 관리와 정기적인 청소에 따라 그 성능이 달라질 수 있습니다. 충전기와 내시경은 권장하지 충전기 및 배터리 팩은 수리를 수리할 수 없습니다.않습니다. 충전기나수리할 내시경에는 수리가없습니다. 가능한 부품들이 내부에는 수 있는 부품이 내장되어 있지 않습니다. 청소 3. “확인(OK)” 버튼을 누르면 다음 화면으로 이동합니다. 4. 앞방향 또는 역방향 화살표를 눌러서 "아니오(NO)” 또는 “예(YES)”를 선택합니다. 경고: 통풍구 속이나 주변에 먼지가 쌓여있는 것이 보이면 가능한 한 자주 건조한 공기를 이용하여 몸체에서 먼지를 불어내십시오. 이 절차를 수행할 때에는 승인된 보안경 및 승인된 방진 마스크를 착용하십시오. 경고: 공구의 금속 이외 부품을 청소할 때는 용제 등의 강력한 화학약품을 절대 사용하지 마십시오. 그렇지 않으면 이러한 부분에 사용된 재료가 약해질 수 있습니다. 헝겊에 물과 연한 비누를 젹셔 닦아주십시오. 공구 내부에 액체를 넣거나 공구 부품을 액체에 담그는 행동은 절대 금물입니다. 충전기 청소 지시 사항 경고: 감전 위험. 청소하려면 먼저 충전기를 콘센트에서 분리하십시오. 헝겊이나 부드러운 금속 이외 브러시로 충전기 외관 부분에 묻은 먼지 및 기름을 제거할 수 있습니다. 물이나 세척제를 사용하지 마십시오. 옵션 액세서리 5. “확인(OK)” 버튼을 눌러서 변경내용을 저장한 다음 메뉴를 종료시킵니다. 42 경고: 디월트에서 제공하지 않은 액세서리는 본 제품에서 테스트되지 않았으므로 본 제품에서 이러한 액세서리를 사용하면 위험할 수 있습니다. 신체 부상의 위험을 줄이려면 본 제품에 디월트권장 액세서리만 사용해야 합니다. 27 14 한글 한국어 환경 보호 분리 수거. 본 제품을 일반 가정용 쓰레기로 처리하면 안됩니다. 디월트제품을 교체해야 하거나 더 이상 쓸모가 없어졌다고 판단되면 본 제품을 가정용 쓰레기로 처리하지 마십시오. 이 제품은 분리 수거하십시오. 사용하던 제품과 포장을 분리 수거하면 자원을 재활용 및 재사용할 수 있습니다. 재활용 자원을 이용하면 환경 오염이 방지되고 고철 자원에 대한 수요를 줄일 수 있습니다. 지역에 따라 가정용 가전제품을 분리 수거하는 규정이 마련되어 있거나 새로운 제품을 구입할 때 판매점에서 폐기 방법을 알려줄 수 있습니다. 디월트는 사용이 끝난 디월트제품을 수집하여 재활용하기 위한 시설을 운영하고 있습니다. 이 서비스를 활용하려면 당사가 폐제품 수거를 위임한 공인 수리 대리점에 제품을 반환해 주십시오. 본 사용 설명서에 기재된 연락처로 가까운 디월트영업소에 연락하면 가까운 공인 수리 대리점 위치를 확인할 수 있습니다. 또는 다음 웹 사이트를 방문하여 디월트공인 수리 대리점 목록과 애프터 서비스 및 연락처에 대한 자세한 정보를 찾아볼 수 있습니다. www.dewalt.co.kr 충전용 배터리 팩 이전에 쉽게 수행했던 작업에 대해 충분한 힘을 발휘하지 못하는 배터리 팩은 재충전해야 합니다. 배터리 수명이 다하면 환경 보호 차원에서 배터리 팩을 폐기하십시오. • 배터리 팩을 완전히 사용하고 난 후 공구에서 분리하십시오. • 리튬이온 배터리 팩은 재활용할 수 있습니다. 이 배터리 팩을 판매점이나 지역 재활용 센터로 가져가십시오. 수집된 배터리 팩은 재활용되거나 적절히 폐기됩니다. 28 43 한글 14 한글 14 한글 N220352 10/12 14