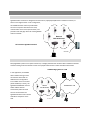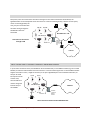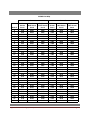
1
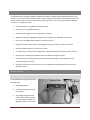
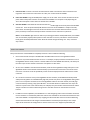
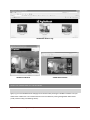
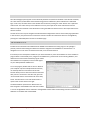
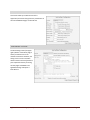
IMPORTANT SAFETY INSTRUCTIONS
When using this device, basic safety instructions should always be followed to reduce the risk of fire, electric shock and injury to persons, including the following: a. Do not use this product near water. b. Avoid using this product during an electrical storm. There may be a remote risk of electric shock from lightening. c. Do not use this product in the vicinity of a gas leak. AgileMesh™ Network Bridge
AV3000 Series
Additional Installation Requirements. When installing, the placement of this device must also satisfy the following requirements: User’s Guide
a. Connect the unit to a grounding type AC wall outlet (100‐240 V AC) using the standard power cord/adapter as supplied with the unit. b. Placement must allow for easily disconnecting the power cord/adapter of the device from the AC wall outlet. c. Do not cover the device, or block the airflow to the device with any other objects. Keep the device away from excessive heat and humidity, and keep the device free from vibration and dust. d. Installation at all times must conform to local regulations. e. When the device will be connected to other systems, consult the documentation that came with those systems for additional regulatory information, safety instructions and installation requirements. f. Always disconnect the cables before opening the equipment enclosure or touching an uninsulated cable, jack or internal component. SAVE THESE INSTRUCTIONS Rev. 3c (revised 3/24/08) Rev. 3.0a (3/12/08) TABLE OF CONTENTS Introduction ................................................................................................................................................................... 4 Getting Started .............................................................................................................................................................. 4 Included with the AV3000 ......................................................................................................................................... 4 Connecting and Starting the AV3000 ........................................................................................................................ 5 Using the AV3000 ...................................................................................................................................................... 6 Using the AV3000 from the Mesh Network .................................................................................................................. 7 Login from Mesh ....................................................................................................................................................... 7 Using the AV3000 from the LAN Network ..................................................................................................................... 8 Login from LAN .......................................................................................................................................................... 8 Using “View” from the LAN ....................................................................................................................................... 9 AVR Discover Utility ................................................................................................................................................... 9 Ports – How to Select .................................................................................................................................................. 10 What are ports? ...................................................................................................................................................... 10 How do they relate to the video sources? .............................................................................................................. 10 Which ports should you use? .................................................................................................................................. 10 From the Mesh ............................................................................................................................................................ 10 Using the Browser to View Video ............................................................................................................................ 10 Using a Viewing Package ......................................................................................................................................... 10 From the LAN or Internet ............................................................................................................................................ 11 Using the Browser to View Video ............................................................................................................................ 11 Using a Viewing Package ......................................................................................................................................... 11 Advanced Configuration Options................................................................................................................................. 11 “Amcampage” Admin section ................................................................................................................................. 12 “AmCamPing” Section ............................................................................................................................................. 12 AgileMesh Network Bridge (AV3000) Page 2 Interface Configuration Section .............................................................................................................................. 13 Miscellaneous Configurations ................................................................................................................................. 13 Connecting Other Network Devices to the Mesh ........................................................................................................ 13 Connecting an IP Camera to the Mesh .................................................................................................................... 14 Network Configurations Using the AV3000 ................................................................................................................. 15 Stand‐alone Network .............................................................................................................................................. 15 Connection of Mesh Network to a LAN ................................................................................................................... 15 Connection to Internet through a LAN .................................................................................................................... 16 Direct Connection to Internet through A Broadband Modem ................................................................................ 16 Appendix A – AV3000 Port Map .................................................................................................................................. 17 AGILEMESH SUPPORT .................................................................................................................................................. 18 AgileMesh Network Bridge (AV3000) Page 3 INTRODUCTION The AgileMesh Network Bridge (AV3000) is designed to facilitate the bridging between AgileMesh wireless mesh networks and customer local area networks (LAN’s). When configured and connected, the AV3000 scans the mesh network, identifies video sources, and then automatically maps those sources to the LAN to which the AV3000 is connected. Its capabilities include: •
Automated discovery of AgileMesh analog video ports •
DHCP server on the AgileMesh network •
Automated self‐configuration for routing between networks •
Algorithmic mapping of AgileMesh analog video port IP addresses to LAN/WAN network ports •
Can accept a LAN/WAN network address via the DHCP protocol •
Replication of video streams toward the LAN/WAN to minimize loading on the wireless network •
Automatic DDNS setup based on video source names •
User‐optional one‐to‐one manual remapping of IP addresses between the inside and outside networks •
Automatic port forwarding for AgileMesh network IP addresses assigned via DHCP •
Automatic dynamic web page generation with video thumbnail images to make identification and selection of video sources easy •
Automatic synchronization of the system times for all AgileMesh analog video ports connected to the AgileMesh network GETTING STARTED INCLUDED WITH THE AV3000 The AV3000 Network Bridge ships with the following items: •
An AV3000 appliance •
A DC power supply (110 Volts AC to 5 Volts DC) •
Two straight‐through Ethernet cables. One of these is intended for connecting the AV3000 to an AgileMesh node. The other cable AgileMesh Network Bridge (AV3000) Page 4 may be used to connect the LAN side of the AV3000 to an Ethernet switch attached to a LAN. •
Installation CD containing the AVR Discover utility installer and an electronic copy of this User’s Guide (in PDF format.) CONNECTING AND STARTING THE AV3000 The AV3000 default settings were chosen to make the most common type of setup entirely automatic. As a result, for most applications, there are only a few steps required to place the AV3000 into operation. Please refer to the front and back panel images below as you set up the AV3000. AV3000 Front Panel AV3000 Back Panel The steps required to place an AV3000 into service are: 1.
Unpack and Inventory – Unpack and locate the AV3000, the power supply and the two Ethernet cables. Make sure the rocker power switch on the AV3000 is in the OFF position (i.e. the side opposite the dot is depressed) 2.
Connect to AgileMesh network ‐ Connect one of the Ethernet cables to the Ethernet network port on an AgileMesh wireless node. Connect the other end of the cable to the “MESH” port on the back of the AV3000. AgileMesh Network Bridge (AV3000) Page 5 3.
Connect to LAN ‐ Connect one end of the other Ethernet cable to an Ethernet switch connected to the target LAN. Then connect the other end to the “LAN” port on the back of the AV3000. 4.
Power the AV3000 – Plug the AV3000 power supply into an AC outlet. Then connect the other end of the power cable to the power connector on the back of the AV3000. Turn the power on by depressing the “dot” side of the power rocker switch on the back of the AV3000. 5.
Start the AV3000 – Wait about 30 seconds and make sure the blue light on the front panel of the AV3000 remains off. Press the square START/STOP button on the front of the AV3000 for a couple of seconds, then release. The blue light on the front of the unit should come on within about 30 seconds. From this point, the startup is automatic and requires about 3 minutes for the networks to synchronize. Note: If the AV3000 blue light comes on without your having pressed the START/STOP button, the AV3000 was not shut down properly before power was last removed. To recover, wait about 3 minutes and then briefly press the START/STOP button. After about 30 seconds the light should go out. Then, re‐execute step 5 above. USING THE AV3000 Many of the features of the AV3000 are completely automatic. These include the following: •
Once connected and started, the AV3000 makes available DHCP services on the AgileMesh wireless network to any connected devices that can use it. For example, a laptop connected via Ethernet to one of the AgileMesh wireless nodes, receives a network address from the AV3000 automatically. This works just the same way that most network connections of computers to LAN’s work. •
As soon as the AV3000 is connected and initialized, it finds all of the AgileMesh analog video ports on the AgileMesh wireless mesh network and automatically synchronizes their times with its own internal real‐
time clock. It continues to do this periodically so that the times displayed with the video streams remain consistent. •
As a result of its automatic survey of the AgileMesh wireless network, the AV3000 automatically builds and dynamically updates an embedded web page that provides easy access to the AgileMesh analog video ports. From a computer connected to one of the AgileMesh nodes on the mesh network, this web page can be accessed by entering “http://192.168.224.1” into the web browser’s address bar. Not only is this useful for a quick access to the video streams, but it displays the port numbers associated with the videos. The port numbers are useful in determining access to the video streams on the LAN side or over the Internet. •
In addition to these capabilities, the AV3000 acts as a self‐configuring video router to facilitate connection to other networks. It automatically makes the video sources available on the network attached to the LAN side of the AV3000. It accomplishes this by mapping the discovered video sources into the IP addressing subnet associated with the LAN using the Network Address Translation (NAT) technique. One unique aspect of this automatic self configuration is that the video sources are mapped to predictable port AgileMesh Network Bridge (AV3000) Page 6 numbers. This means that you can access any of the AgileMesh video streams on the LAN if you know the AgileMesh node number that is providing the desired video source. Appendix A includes a table of default port number assignments associated with each of the node numbers. USING THE AV3000 FROM THE MESH NETWORK LOGIN FROM MESH One of the useful aspects of the AV3000 is the ability to easily view video via the dynamically built web page embedded in the AV3000. This web page does require the user to login. The default username/password pair is “guest”/”guest” (without the quotation marks). This web page is accessible from the AgileMesh wireless mesh network through a web browser by entering “http://192.168.224.1” into the browser’s address bar. The login screen appears as shown to the left. Once you are successfully logged into the AV3000, you will be presented with a web page that includes thumbnail images from each of the AgileMesh analog video ports located on the mesh network. Beneath each thumbnail image are two buttons, one labeled “Admin”, the other labeled “View”. Clicking on the “Admin” button takes you to the web page for the corresponding video source. Clicking on “View” brings up a new browser window that includes the video stream from that particular video source. Following are screen captures that show what to expect from each of these selections. AgileMesh Network Bridge (AV3000) Page 7 AV3000 Main Browser Page AV3000 View Window AV3000 Admin Window USING THE AV3000 FROM THE LAN NETWORK LOGIN FROM LAN Again, log on to the AV3000 internal web pages from the LAN side by entering the AV3000’s IP address into your web browser’s address bar. You can determine the correct IP address by running the AgileMesh Video Router (“AVR”) Discover utility (see following section). AgileMesh Network Bridge (AV3000) Page 8 USING “VIEW” FROM THE LAN All of the web page options appear to work identically whether accessed from the Mesh or the LAN side. However, the “View” button (located below the thumbnail image) functions differently when invoked from a LAN‐based login. In this case, the video shown in the window that results from pressing the “View” button uses a replicated video stream. This means that up to five different users may view copies of the same video stream from five different computers attached to the LAN without causing the additional video streams to be transported over the wireless network. The limit of five users may be changed in the Miscellaneous Configurations sections of the Admin page (described in later sections). The parameter that controls the maximum number of simultaneous viewers is changeable by pressing the “Video Multiplexer” button on the Admin page. AVR DISCOVER UTILITY Included on the installation CD included with the AV3000 is the AVR Discover utility program. This package is primarily useful for determining the address that has been assigned to the AV3000 for its LAN interface. It is designed to run on a PC that is connected to the LAN, not to the mesh network. If the utility has not already been installed on your LAN‐connected PC, insert the installation CD. If the installation program doesn’t automatically start, navigate to the AVRDiscover_install.exe file on the CD using Windows, and double‐click it to launch the installation program. When the installation has completed, a new icon will appear on your desktop labeled “AVRDiscover”. To run this program, double‐click on the icon. Because your computer may have multiple network interfaces, use the drop‐down list at the bottom of the AVR Discover Utility frame to select the interface associated with your PC’s connection to the LAN. Then, press the “Scan for AVRs” button at the bottom left of the utility frame. That will initiate a scan and should result in a report similar to that shown to the right. The AVR IP Address reported is the address that has been assigned to the AV3000 on the LAN. Also included is a list of the AgileMesh cameras attached to the AgileMesh wireless video network along with their network IP addresses on the Mesh side of the AV3000. AgileMesh Network Bridge (AV3000) Page 9 PORTS – HOW TO SELECT WHAT ARE PORTS? As we use the term here, ports can be viewed as an additional field in the IP addressing scheme. This additional field is necessary when a video stream crosses the boundary from one network to another. HOW DO THEY RELATE TO THE VIDEO SOURCES? At the interface between an AgileMesh network and another LAN, every AgileMesh video stream originating on the mesh network has three port numbers associated with it...7xxx, 8xxx and 9xxx. In the mesh network, all of the AgileMesh analog video ports are associated with IP addresses between 192.168.224.049 and 192.168.224.149. The “xxx” digits shown in the port numbers above always correspond to the last 3 digits of the associated video source. For example, if the video source has an IP address of 192.168.224.052 (the address for node 1, camera 1 as shown on the port map in Appendix A), the associated port numbers are 7052, 8052 and 9052. The mapping between AgileMesh node numbers and the associated ports is detailed in Appendix A. As described in the following sections, the 7000‐series port numbers are the video streaming ports, the 8000‐
series port numbers are the http access ports and the 9000‐series ports are the replicated video ports. WHICH PORTS SHOULD YOU USE? Choosing the port number depends on the network (i.e., the Mesh or the “LAN”) to which the computer is connected and the program being used to access the video. Following are some recommendations for various situations. FROM THE MESH USING THE BROWSER TO VIEW VIDEO To view video using a browser, it is not necessary to specify a port. For example, it is possible to just enter the mesh IP address as a URL and access the video source directly. Of course, with the AV3000, it is easier to just click on the “Admin” button underneath the appropriate thumbnail image on the AV3000 web page. USING A VIEWING PACKAGE Often, it is desirable to run a viewing package like i‐Pro Viewer to view and record the video on a computer connected inside the mesh. In this case, you should specify the 7000‐series port number for a given video source. AgileMesh Network Bridge (AV3000) Page 10 FROM THE LAN OR INTERNET USING THE BROWSER TO VIEW VIDEO Use of a browser to access one of the AgileMesh analog video ports is possible from the network connected to the LAN side of the AV3000. In this case, the port must be specified along with the LAN IP address of the AV3000. For browser‐based access from the LAN side, you should use the 8000‐series port number. For example, if the LAN address of the AV3000 is 192.168.1.57 (as determined by running the AVR Discover utility) and you wish to view video from node 1, camera 1, the address that would need to be entered into the browser would be http://192.168.1.57:8052. Once more, it would be easier to just click on the “Admin” button underneath the thumbnail image on the AV3000 web page to achieve the same results. USING A VIEWING PACKAGE There are several different viewing packages that support the AgileMesh analog video ports. If possible, you should use the 9000‐series port number when setting up a viewing package that is connected to the network on the LAN side of the AV3000. The 9000‐series ports supply replicas of the video stream and multiple viewing locations do not cause an additional load on the wireless mesh network where bandwidth availability is critical. This functions well with the i‐Pro Viewer software available from AgileMesh. Other viewing packages may use different aspects of the video interface for accessing not only the video stream but for passing controls (such as Pan‐Tilt‐Zoom) commands across the interface. Depending on the mechanism being used by the third party package, pan‐tilt‐zoom may not work using this port number. If the pan‐tilt‐zoom functions are needed, you can use the 7000‐series port numbers (at the potential expense of burdening the mesh network.) ADVANCED CONFIGURATION OPTIONS Included in the AV3000 embedded web server is an administration page that allows the user to set up some of the less commonly used options. Accessing this administration page requires knowing the IP address of the AV3000. The IP address of the AV3000 from the mesh side is 192.168.224.1. From the LAN side, the IP address may be determined by running the AVR Discover utility (described previously). If the AV3000 IP address from the LAN side is 192.168.1.114, for example, the following must be entered into the URL section of the Internet Explorer browser: http://192.168.1.114/admin You will be prompted for a username and password. The default username and password pair is “agilemesh”/”agilemesh” (without the quotation marks). There are four sections to the resulting administration page, as described in the following. AgileMesh Network Bridge (AV3000) Page 11 “AMCAMPAGE” ADMIN SECTION This section allows you to define some of the appearance parameters that govern the presentation of the main AV3000 web page. It looks like this: “AMCAMPING” SECTION The AmCamPing section (the upper right quadrant of the admin page) is where you define some of the network environment variables, the timing of the scans for new video devices and the username/password pairs required for directly accessing the web pages embedded in the AgileMesh analog video ports. It looks like this: AgileMesh Network Bridge (AV3000) Page 12 INTERFACE CONFIGURATION SECTION This section (the lower left quadrant of the admin page) allows you to define the addressing associated with the AV3000 itself. Here is where a static network address would be applied to the AV3000 LAN side if needed. It looks like this: MISCELLANEOUS CONFIGURATIONS This final section (the lower right quadrant of the admin page) is where various configuration parameters are entered, including definition of the username/password pair used for accessing the AV3000 embedded web pages. This is also where the date and time are set in the AV3000. When the AV3000 is active on a network, it keeps all of the AgileMesh analog video ports synchronized to the date and time used in the AV3000. CONNECTING OTHER NETWORK DEVICES TO THE MESH The mesh network that forms the communications core of the AgileMesh system can also provide transport for network traffic from any number of other types of network devices. These devices may include additional computers or IP network cameras. If the AV3000 Network Bridge is also attached to the wireless mesh network, it will automatically assign network addresses to these devices (when they are connected to an AgileMesh node via an Ethernet cable) using its built‐in DHCP (Dynamic Host Control Protocol) server. This is the same mechanism that is used on most LANs to assign IP addresses to computers when they’re connected to a network. Devices that have received a network address from the AV3000 on the AgileMesh network are also assigned automatically forwarded ports so that they can be accessed from the LAN network connected to the other side of the AV3000. As with the AgileMesh video ports, these default ports are 7xxx and 8xxx, where the “xxx” are the last three digits of the IP address that was assigned to the device. For example, if a network device capable of accepting a DHCP address is plugged into the Ethernet port of an AgileMesh node it will be assigned an IP address by the AV3000 (say, for example, 192.168.224.209), ports 7209 and 8209 will be assigned to it. The default uses of the ports are the same as for AgileMesh analog video ports (i.e. 7xxx for a video stream and 8xxx for http access). AgileMesh Network Bridge (AV3000) Page 13 CONNECTING AN IP CAMERA TO THE MESH If you connect an IP camera to the Ethernet port of one of the AgileMesh wireless nodes and the camera is set up to request a network address via DHCP, it will be assigned a network address as described above. Its embedded server will be accessible from the LAN side of the AV3000 through the ports that are automatically configured. So, if the LAN IP address of the AV3000 (probably also assigned by a DHCP server on the LAN) is, for example, 192.168.1.114, and the new IP camera is assigned address 192.168.224.210 by the AV3000, you should be able to access the embedded web server on the new IP camera from a location on the LAN by using http://192.168.1.114:8210 in the URL field of a web browser (e.g., Internet Explorer). Usually, the manufacturer of the IP camera provides a utility software package that can scan the network to determine what IP addresses have been assigned to cameras from that manufacturer. Just like the AgileMesh IP video servers (embedded in AgileMesh nodes) that provide the analog video ports for external cameras, most IP video cameras use separate ports for providing video streams. It will probably be necessary to log into the new IP camera and make sure its video port number matches the one that is mapped for forwarding in the AV3000. Its internal http port number (i.e. the port number associated with its embedded web server interface) is assumed to be 80, the standard http port. So, for the above example, the ports in the new IP camera will need to be set to 80 for the http server (almost certainly the default) and 7210 for the video stream. You will need to consult the manufacturer’s manual for that IP camera to determine the exact method for configuring the video port. In summary, the general steps to connecting with and viewing a non‐AgileMesh IP camera with a browser are as follows: 1.
Power the IP camera and connect it to the Ethernet port on an AgileMesh wireless node. 2.
Determine the IP address that has been assigned to the IP camera by running the appropriate manufacturer‐supplied utility from a computer also attached to the mesh network. 3.
From a computer on the LAN side of the AV3000, log into the embedded web server on the IP camera using the LAN address of the AV3000 (determined previously by having run the AVR Discover utility, described in an earlier section) and the port number 8xxx where xxx are the last 3 digits of the mesh IP address assigned to the IP camera. 4.
Once you have logged into the embedded web server in the IP camera, configure the video port number to be 7xxx, save the configuration and exit. 5.
Using the browser on the computer on the LAN, log back into the IP camera using the LAN IP address of the AV3000 and the appropriate 8xxx port number as the URL (e.g. http://192.168.1.114:8210). AgileMesh Network Bridge (AV3000) Page 14 NETWORK CONFIGURATIONS USING THE AV3000 STAND‐ALONE NETWORK AgileMesh video networks are designed to be stand‐alone, rapidly deployable video surveillance solutions, as shown in the diagram below. In this configuration, the AV3000 would be useful to provide DHCP services to computers attached to the mesh, maintain video server clock synchronization, and provide a local web page where all of the AgileMesh video is accessible. Wireless Mesh
Network
(192.168.224.xxx)
Self‐Contained AgileMesh Network 192.168.224.1
Viewing/Control Station
CONNECTION OF MESH NETWORK TO A LAN Many AgileMesh system users require connections, or bridges, between their wireless video surveillance networks and their existing local area networks so that more people could access the video surveillance information. In this application, the AV3000 with its default settings can be connected as shown with no additional user configuration. From a DHCP server on the LAN (often handled by a router), the AgileMesh AV3000 will receive a LAN IP address and will automatically make the video sources connected into the AgileMesh wireless mesh network available to computers on the LAN. AV3000 Bridging Video to a LAN Wireless Mesh
Network
(192.168.224.xxx)
Wired/Wireless LAN
IP Address
supplied by
LAN DHCP
server or IT
dept.
192.168.224.1
Laptop computer
Viewing/Control Station
AgileMesh Network Bridge (AV3000) Page 15 CONNECTION TO INTERNET THROUGH A LAN Many times, LAN’s are connected to the Internet through a router. When connected as shown below, the AgileMesh video can be transported across the Internet to a central monitoring facility, if desired. If a third party router is involved (generally the case), the ports associated with the video coming through the AV3000 will need to be forwarded. Wireless Mesh
Wired/Wireless LAN
Network
(192.168.224.xxx)
Connection to the Internet through a LAN IP Address
supplied by
LAN DHCP
server or IT
dept.
192.168.224.1
Viewing/Control Station
Router/Firewall
Laptop computer
Internet
DIRECT CONNECTION TO INTERNET THROUGH A BROADBAND MODEM In yet another connection variant, the AV3000 can be connected directly to a broadband modem (e.g. DSL or Cable Modem) to make the video available across the Internet to a remote monitoring location. If the broadband modem happens to include a router, it might be necessary to set up the AgileMesh ports to be forwarded. Otherwise, no setup at all would be required. In both of these cases, there should be no Wireless Mesh
need to change the Network
(192.168.224.xxx)
internal setup of Broadband Modem
Internet
the AV3000. 192.168.224.1
IP Address
supplied via
DHCP or
from ISP
Viewing/Control Station
Direct Internet Connection via Broadband Modem AgileMesh Network Bridge (AV3000) Page 16 APPENDIX A – AV3000 PORT MAP AV3000 Port Map
Node #
Video Stream Port #
0
1
2
3
4
5
6
7
8
9
10
11
12
13
14
15
16
17
18
19
20
21
22
23
24
25
26
27
28
29
30
31
32
7049
7052
7055
7058
7061
7064
7067
7070
7073
7076
7079
7082
7085
7088
7091
7094
7097
7100
7103
7106
7109
7112
7115
7118
7121
7124
7127
7130
7133
7136
7139
7142
7145
Camera 1
Video Server Replicated Web Access Video Stream Port #
Port #
8049
8052
8055
8058
8061
8064
8067
8070
8073
8076
8079
8082
8085
8088
8091
8094
8097
8100
8103
8106
8109
8112
8115
8118
8121
8124
8127
8130
8133
8136
8139
8142
8145
AgileMesh Network Bridge (AV3000) 9049
9052
9055
9058
9061
9064
9067
9070
9073
9076
9079
9082
9085
9088
9091
9094
9097
9100
9103
9106
9109
9112
9115
9118
9121
9124
9127
9130
9133
9136
9139
9142
9145
Video Stream Port #
7050
7053
7056
7059
7062
7065
7068
7071
7074
7077
7080
7083
7086
7089
7092
7095
7098
7101
7104
7107
7110
7113
7116
7119
7122
7125
7128
7131
7134
7137
7140
7143
7146
Camera 2
Video Server Replicated Web Access Video Stream Port #
Port #
8050
8053
8056
8059
8062
8065
8068
8071
8074
8077
8080
8083
8086
8089
8092
8095
8098
8101
8104
8107
8110
8113
8116
8119
8122
8125
8128
8131
8134
8137
8140
8143
8146
9050
9053
9056
9059
9062
9065
9068
9071
9074
9077
9080
9083
9086
9089
9092
9095
9098
9101
9104
9107
9110
9113
9116
9119
9122
9125
9128
9131
9134
9137
9140
9143
9146
Page 17 AGILEMESH SUPPORT Support Options AgileMesh Technical Support Software support is available free of charge for 90 days after the original date of purchase. For AgileMesh Technical Support, call 1‐972‐231‐2122 or find AgileMesh on the Web at http://www.agilemesh.com. Operating System Online Support AgileMesh applications support Microsoft® Windows® 2000, Microsoft® Windows® XP and Microsoft® Windows® Vista. For operating system support, you can access Microsoft® customer support at: http://support.microsoft.com/directory/. © 2008 AgileMesh, Inc. Reproduction in whole or in part without written permission is prohibited. All rights
reserved. AgileMesh and the AgileMesh logo are trademarks of AgileMesh. All other trademarks are trademarks
or registered trademarks of their respective owners.
The information in this document is for information only and subject to change without notice. While reasonable
efforts have been made in the preparation of this document to assure its accuracy, AgileMesh assumes no liability
resulting from errors or omissions in this document, or from the use of the information contained here. AgileMesh
reserves the right to make changes or revisions in the product design or the product manual without reservation
and without obligation to notify any person of such revisions and changes.
Printed in USA.
AgileMesh Network Bridge (AV3000) Page 18