1
Thank you for purchasing the Minolta RD-175 Digital Camera with
the RD-Grabber utility and the Photoshop Plug-In software.
With the RD-Grabber utility software you can:
• Copy images captured with RD-175 digital camera to the
Macintosh hard drive
• Display acquired images on the Macintosh in PICT format
• Save acquired images on the Macintosh in TIFF or PICT format
• Delete copied images from the Macintosh hard drive
• Delete images stored in the PC card
• Perform the following functions using the Macintosh computer:
Trigger the digital camera’s shutter remotely
Change the camera’s exposure compensation value
Initialize the PC card
Reset the clock in the RD-175 Digital Camera
This manual does not instruct in the use of Macintosh
computers or the Adobe Photoshop software. Before operating
the RD-Grabber or the Adobe Photoshop plug-In software, you
should have a working knowledge of the Macintosh and the
Adobe Photoshop software. Please refer to the Macintosh
users guide or the instruction manual included with Adobe
Photoshop.
IMPORTANT INFORMATION ABOUT THE INSTALLER
• Adobe® and Adobe® Photoshop® are registered trademarks of Adobe Systems Inc.
• Macintosh is a registered trademark of Apple Computer, Inc.
• Microsoft, Microsoft Windows®, Microsoft Windows® 95 are registered trademarks of
Microsoft corporation.
• Other corporate names and product names are also registered trademarks.
The install program “RD-175 Installer” will detect the CPU type
built-in your Macintosh and install different versions of the RD-175
software (RDGrabber, Adobe Photoshop Plug-In) as follows:
If you are using a Power Macintosh (Macintosh with a
PowerPC processor), the install program will install the latest
version (ver.1.5) of the software on your Macintosh.
If your computer is a 68K Macintosh (Macintosh with a 68030
or 68040 processor), ver.1.13 will be installed.
END-USER LICENSE AGREEMENT
CAREFULLY READ THE LICENSE AGREEMENT BELOW BEFORE OPENING THIS
PACKAGED SOFTWARE. OPENING THIS PACKAGE INDICATES YOUR
ACCEPTANCE OF THE TERMS AND CONDITIONS BELOW. IF YOU DO NOT
AGREE WITH THEM YOU SHOULD PROMPTLY RETURN THE PACKAGE
UNOPENED.
This is a license agreement and not an agreement for sale. Minolta owns, or has been
licensed from other owners, copyrights in the computer programs ("Software"). You
obtain no rights to the intellectual property in the Software other than the license granted
to you regarding the Software under this agreement. The title to the enclosed copy of the
copy the Software and any copy made from it is retained by Minolta or such other
owners.
1. LICENSE
You may:
(1) install and use the Software on only one computer at any one time.
(2) make a copy of the Software for backup or installation purposes only in support of the
normal and intended use of the Software.
(3) transfer possession of copies of the Software to another party by transferring a copy
of this Agreement and all other documentation along with at least one complete unaltered
copy of the Software, provided that (i) you must, at the same time, either transfer to such
other party or destroy all your other copies of the Software. (ii) Such transfer of
possession terminates your license from Minolta, and (iii) such other party shall accept
and be bound by these license terms by their initial use of the Software.
2. RESTRICTIONS
You shall not without the written consent of Minolta:
(1) use, copy, modify, merge or transfer copies of the Software except as provided
herein.
(2) reverse assemble or reverse compile the Software except as permitted by law; or
(3) sublicense, rent, lease or distribute the Software or any copy thereof.
SUCH WARRANTIES ARE IN LIEU OF ALL OTHER WARRANTIES, EXPRESSED OR
IMPLIED, INCLUDING, BUT NOT LIMITED TO, THE IMPLIED WARRANTIES OF
MERCHANTABILITY AND FITNESS FOR A PARTICULAR PURPOSE.
4. LIMITATION OF REMEDIES
In no event will Minolta be liable for any lost profits, lost saving, or any incidental
damages that result from the use or inability to use the Software, even if Minolta or its
Authorized remarketers have been advised of the possibility of such damages or for any
claim by you based on a third party claim.
5. TERMINATION
You may terminate your license at any time by destroying the Software and all your
copies of it or as otherwise described in these terms. Minolta may terminate your license
if you fail to comply with these terms. Upon such termination, you agree to destroy all
your copies of the Software.
6. GOVERNING LAW
This Agreement shall be governed by the laws of the country where the delivery is made
to the original customer.
7. GOVERNMENT END USERS
If you are acquiring the Software on behalf of any unit or agency of the United States
Government, the following provisions apply. The Government agrees: (i) if the Software
is supplied to the Department of Defense (DoD), the Software is classified as
"Commercial Computer Software" and the Government is acquiring only "restricted right"
in the Software as that term is defined in Clause 252.227.7013(c)(1) of the DFARS; and
(ii) if the Software is supplied to any unit or agency of the United States Government
other than DoD, the Government's rights in the Software will be as defined in Clause
52.227-19(c)(2) of the FAR or, in the case of NASA, in Clause 18-52.227-86(d) of the
NASA Supplement to FAR.
3. LIMITED WARRANTY
Minolta warrants the media on which the Software is recorded to be free from defects in
materials and workmanship under normal use. Warranty details and limitations for the
Software are described in the Statement of Limited Warranty which is supplied with the
hardware. With the exception of the foregoing express warranties applicable to hardware
and media only, the Software is not warranted and is provided "AS IS".
2
3
SYSTEM REQUIREMENTS
To use the software, you need:
• Power Macintosh
• 24MB free RAM or more is recommended.
A minimum of approx. 10MB free RAM (approx. 2 X the image size) is
necessary per image being acquired.
(Example: approx. 40MB free RAM is required for a multiple acquire of 4
images)
• At least 30 MB available hard disk space
• 3.5" Floppy disk drive
• Monitor with a display area of 640 X 400 pixels or wider
• Apple System software (MacOS) 7.5 or higher
• Adobe® Photoshop® version 3.0.5 or higher is required to use the
Photoshop® plug-In software
• Set 32-bit addressing to ON in the memory control panel.
• Set Virtual Memory, Modern Memory Manager, and File Sharing to OFF.
Modern Memory Manager settings can not be changed in MacOS 7.6
and higher.
TABLE OF CONTENTS
END USER-LICENSE AGREEMENT ..................................................................2
SYSTEM REQUIREMENTS .................................................................................4
TABLE OF CONTENTS ........................................................................................5
INSTALLING THE SOFTWARE ...........................................................................6
PREPARING THE RD-175 DIGITAL CAMERA
Setting the SCSI ID .....................................................................................10
Setting the Terminator Power Supply ........................................................12
Inserting the PC Card .................................................................................14
Connecting to the Macintosh......................................................................14
Setting the RD-175 to SCSI Mode .............................................................15
OPERATING THE SOFTWARE
Starting-Up the RDGrabber Utility Software ..............................................16
Displaying Images Stored on the PC Card................................................19
Saving Displayed Images to the Macintosh Hard Drive ...........................20
Copying Images to the Macintosh Hard Drive...........................................23
Saving Images Copied to the Macintosh Hard Drive ................................26
Deleting Copied Images From the Macintosh Hard Drive ........................28
Deleting Images Stored on the PC Card ...................................................31
Taking Pictures with the Macintosh............................................................34
Setting Digital Camera Functions with the Macintosh...............................36
Setting the Exposure Compensation Value......................................36
Setting the Clock in the RD-175........................................................38
Initializing the PC Card.......................................................................40
Quitting the Software...................................................................................43
Messages ....................................................................................................44
Operation of the RD-175 Software for Windows................................................48
4
5
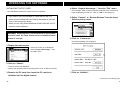
INSTALLING THE SOFTWARE
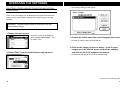
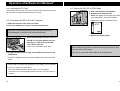
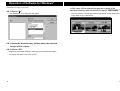
4. Double click on the floppy disk icon to open it.
WARNING - BEFORE INSTALLATION
• The “RD-175 Installer” icon will be displayed on the computer screen.
Some virus protection system-extensions conflict with the operation of
this installer. Please remove or disable them before loading the
RDGrabber installer. Replace or re-enable them when the installation is
finished. If applicable, remove all versions of the RDGrabber and the
RD-175 Photoshop Plug-In prior to installation of this software.
There are two files on the floppy disk:
• “RDGrabber” Utility Software
• “RD-175 Plug-In” Photoshop plug-in software
The Photoshop plug-In software, RD-175 Plug-In, adds the
RDGrabber utility to Adobe Photoshop.
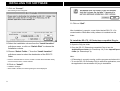
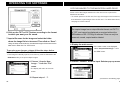
5. Double click on the “RD-175 Installer” icon.
• The splash screen shown below will be displayed.
Using the installer, both files will be copied to the system.
The operation of the utility RDGrabber software is explained in this
instruction manual. Differences in operation between the
RDGrabber utility software and the RD-175 Plug-In are only briefly
explained.
Installation Instructions
1. Start up the Macintosh.
2. Quit all other applications in use.
3. Insert the utility software disk into the disk drive.
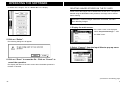
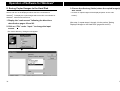
6. Click on “Continue...”.
• The “Software License Agreement” will appear. Read this agreement carefully
before continuing the installation.
• If you do not agree to the conditions stated in the “Software License Agreement”,
click on “Decline”. Installation will quit.
(Continued on the following page.)
6
7
INSTALLING THE SOFTWARE
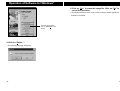
7. Click on “Accept”.
• The following screen will appear.
11. Click on “Quit”.
After installation is complet, a new folder labeled RD-175 1.5 is
created and the RDGrabber utility software is installed into this
folder.
To install the RD-175 1.5 Photoshop-compatible Plug-In:
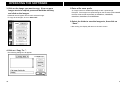
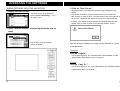
8. Select the installation volume from the “Install Location”
pull-down menu, or click on “Switch Disk” to choose the
installation volume.
9. Choose “Select Folder...” from the “Install Location”
pull-down menu to select the destination of the RD-175
folder.
• Unless a new destination is chosen, the RD-175 folder will be installed directly
onto the root level of the volume selected.
10.Click on “Install”.
1. Locate and open the Photoshop folder.
2. Open the Plug-ins folder.
3. Drag the RD-175 Photoshop compatible Plug-In into the
Acquire/Export folder (for Photoshop 3.X) or the Import/Export
folder (for Photoshop 4.X).
Note:
• If Photoshop is currently running, quit the program and relaunch it.
• To use the RD-175 Photoshop Plug-In with other applications, see
the application's documentation for plug-in installation.
• Installation will begin.
• When install is finished, the following dialog box will be displayed.
8
9
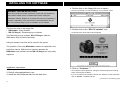
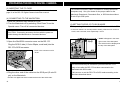
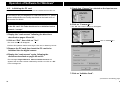
PREPARING THE RD-175 DIGITAL CAMERA
(1) SETTING THE SCSI ID
1. Press and hold the mode button.
2. Slide the main switch to ON.
SCSI (Small Computer System Interface) is the standard for data
transfer between the computer and peripheral devices. SCSI
devices can be linked to the Macintosh in a chain. The last device in
the chain has either an internal or external terminator to tell the
computer where the chain ends.
• If the main switch is in the ON position already, slide the main switch to
LOCK, wait 3 seconds, then repeat step 1 and 2.
• "SCSI" will appear in the lower
right corner of the data panel.
The SCSI ID will be displayed at
the top of the data panel.
To identify each peripheral device to the Macintosh, a unique ID is
set on each SCSI device. If an ID is used by more than one device,
data may be lost or the computer may not work correctly. The SCSI
ID range of the Macintosh is from 0 to 7. SCSI IDs 0, 3, and 7 are
reserved for internal devices in the computer and cannot be used by
the RD-175 digital camera or other peripheral devices.
The RD-175 Digital Camera is factory preset to SCSI ID 6, but can
be reset if necessary.
3. Turn the function dial to set the SCSI ID to a non-reserved
ID.
4. Release the mode button.
10
11
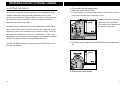
PREPARING THE RD-175 DIGITAL CAMERA
(2) SETTING THE TERMINATOR POWER SUPPLY
1. Press and hold the mode button.
2. Slide the main switch to ON.
The RD-175 digital camera has only one SCSI connector and must
be located at the end of the SCSI chain. A terminator is built into the
RD-175 digital camera. Power for the built-in terminator is supplied
by the computer when using a desktop Macintosh or a Macintosh
Powerbook Duo with a Duo Dock. When using a Macintosh Power
Book or a Macintosh Power Book Duo with a mini-Dock, the
following operation must be followed so power can be supplied by
the RD-175 battery. Aftermarket docking units for the Powerbook
Duo vary, please refer to your instruction manual.
• If the main switch is in the ON position already, slide the main
switch to LOCK, wait 3 seconds, then repeat step 1 and 2.
• "SCSI" will appear in the lower
right corner of the data panel.
The SCSI ID will be displayed at
the top of the data panel.
3. Press the program set button.
• The terminator power indicator
will appear in the lower left hand
corner of the data panel.
4. Release the mode button.
12
13
PREPARING THE RD-175 DIGITAL CAMERA
(3) INSERTING THE PC CARD
Insert the PC card into the card slot according to the instructions on
page 32 of the RD-175 Digital Camera instruction manual.
(4) CONNECTING TO THE MACINTOSH
1. Slide the camera’s main switch to LOCK.
2. Turn the Macintosh off by selecting “Shut Down” from the
Special menu. Turn off all connected devices.
CAUTION : Connecting accessory devices with the power on
could damage the Macintosh or connected devices.
3. Open the Slot/SCSI connector cover on the RD-175.
Plug the SCSI-2 side (1/2 size 50pins, small end) into the
RD-175’s SCSI connector.
The standard accessory cable is suitable for desktop Macintosh
computers only. See your dealer for the proper cable for the
Macintosh Powerbook, Powerbook Duo, or SCSI devices without
D-sub 25 pin SCSI ports.
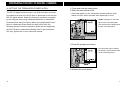
(5) SETTING THE RD-175 TO SCSI MODE
While pressing the mode button, slide the main switch to ON.
• If the main switch is in the ON position already, slide the main switch to
LOCK, wait 3 seconds, then repeat step 1 and 2.
• "SCSI" will appear in the lower
right corner of the data panel.
The SCSI ID will be displayed at
the top of the data panel.
• Push in the connector until it
clicks.
4. Plug the other end of the cable into the SCSI port (D-sub 25
pin) on the Macintosh.
The SCSI mode may be canceled if you touch the RD-175's
body or lens after the RD-175 has been connected to the
Macintosh with SCSI cable.
If this occurs, re-set the RD-175 to SCSI mode according to the
directions described above.
• The RD-175 digital camera is located at the end of the SCSI chain.
14
15
OPERATING THE SOFTWARE
Starting-Up the RDGrabber Utility Software
1. Set the RD-175 digital camera to SCSI mode.
2. Turn all other devices in the SCSI chain on.
When using the RD-175 Plug-In software for Adobe Photoshop, follow the
procedure below.
1. Set the RD-175 digital camera to SCSI mode.
2. Turn all other devices in the SCSI chain on.
• Turn on SCSI devices starting with the last device in the SCSI chain. If
SCSI devices are turned after the computer, the computer will not be able
Turn on SCSI devices starting with the last device in the SCSI
chain. If SCSI devices are turned on after the computer, the
computer will not recognize the devices.
3. Turn the Macintosh on.
4. Double click on the hard drive icon.
5. Open the RD-175 folder by double clicking on it. Double
click on the RDGrabber PPC icon.
16
to recognize the devices.
3. Turn the Macintosh on.
4. Launch Adobe Photoshop.
5. Choose “Import” from the “File” menu, then select
“RD-175 1.5” from the list.
17
OPERATING THE SOFTWARE
After the software starts up, the start-up display will appear, then the
main screen will be displayed.
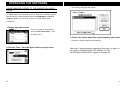
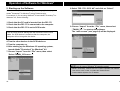
DISPLAYING THE IMAGES STORED ON THE PC CARD
After the software starts up, the main screen will be displayed. An
index of the images stored on the PC card will be displayed in the
order in which they were taken.
• If the SCSI connection to the Digital Camera RD-175 can not be
confirmed, the software will default into the “Select Folder” menu.
(1) Quit the software according to the directions described on page 43.
(2) Check the following:
• The RD-175's main switch is ON.
• The RD-175's battery power is sufficient for all operations. (Using the
AC Adapter AC-M515 is recommended.)
• There are no problems with the SCSI cable.
• The selected SCSI ID number on the camera does not conflict with
any other device in the SCSI chain.
(3) Repeat steps 1 through 5 on page 16.
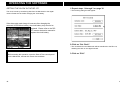
The number of images displayed depends on the screen size and
the number of recorded images.
DISPLAY SIZE
13 inch Monitor (or smaller)
17 inch Monitor
19 inch Monitor (or larger)
NUMBER OF INDEXED IMAGES
12 images (4 X 3)
20 images (5 X 4)
30 images (6 X 5)
If more images are stored on the PC card than available for display,
the scroll bar will change from white to grey. Other images can be
displayed by clicking on the scroll arrow or dragging the scroll box.
18
19
OPERATING THE SOFTWARE
SAVING DISPLAYED IMAGES TO THE MACINTOSH
HARD DRIVE
Images must be acquired into the Macintosh before they can be saved as a
TIFF or PICT file.
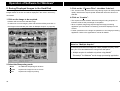
1. Click on the image to be acquired.
• A dashed line arround the image will indicate selected image(s).
• The aperture and shutter speed values will appear at the bottom of the
window.
3. Click on the “chroma filter” checkbox (so the ✕
appears) to turn the chroma filter on.
• The “chroma filter” optimizes the image during acquire for best possible
quality. Note that the acquire speed will diminish when this function is
selected.
4. Click on “Acquire”.
• The acquire function will start. While the image is being acquired, an
indicator will show the percentage of completion. When complete, the
acquired image will be displayed on the monitor.
• Double clicking on an image will perform the same function as clicking on
“Acquire”.
• When using the Adobe Photoshop Plug-In software, images are acquired
into the Photoshop. Further operations on the image are passed on to
the Photoshop. Please refer to the Adobe Photoshop manual for details.
• Scrolling the image window when another application window overlaps it
will cause the image to appear disjointed. To restore the normal image,
close the other application window, then change the size of the image
window.
5. Choose “Save As...” from the
“File” menu.
2. Select the Sharpening mode.
• None
• for Screen
• for Print
No additional sharpening will be done
Sharpening specification when screen is final output
Sharpening specification when printing is final output
• The following dialog box (shown on next
page) will appear.
(Continued on the following page.)
20
21
OPERATING THE SOFTWARE
COPYING IMAGES TO THE MACINTOSH HARD DRIVE
Some or all of the images stored on the PC card can be copied to the
Macintosh hard drive.
• To reclaim space on the PC card, first copy the images to the hard drive,
then delete the copied images from the PC card. For delete instructions,
see page 31 of this manual.
6. Click on the TIFF or PICT button according to the format
in which you want your file saved.
7. Input a file name for the image and select the folder
where the image file is to be saved. Then click on “Save”.
Using the steps outlined above, the selected images will be saved to the
hard drive in either PICT or TIFF format.
To acquire more images, please follow the steps below.
8. Choose “Close” from the “File” menu.
The copied image has a unique Minolta format, not PICT 2
or TIFF, and cannot be displayed or acquired without the
RDGrabber or RD-175 Plug-In software. Files can only be
renamed, moved, copied and/or deleted.
1. Display the main screen.
• If the main screen is not displayed,
select “Acquire New Image...” from
the “File” menu.
• If two image are already opened, more memory must be allocated to the
RDGrabber utility to acquire multiple images.
9. Choose “Acquire New
Image...” from the “File”
menu.
2. Choose “Camera” from the Input Selector pop-up menu.
• The display will return to the main
screen.
10. Repeat steps 1 - 7.
(Continued on the following page.)
22
23
OPERATING THE SOFTWARE
3. Click on the image you want to copy. If two or more
images are to be copied, press and hold the shift key
and click on the images.
• A dashed line will appear around each selected image.
• To copy all the images, click on “Select All”.
5. Enter a file name prefix.
An image number is added sequentially to each copied image.
Example: Five images are copied and given the file name prefix IMAGE,
the files will be saved sequentially as IMAGE001, IMAGE002,
IMAGE003, IMAGE004, and IMAGE005.
6. Select the folder to save the images to, then click on
“Save”.
• After saving, the display will return to the main screen.
4. Click on “Copy To...”.
• The following dialog box will appear.
24
25
OPERATING THE SOFTWARE
SAVING IMAGES COPIED TO THE MACINTOSH HARD
DRIVE
• The following dialog box will appear.
As stated earlier, files copied from the PC card are in a Minolta original
format and can not be displayed without the RDGrabber or RD-175
Plug-In software. To convert to the PICT 2 format, follow these
instructions:
1. Display the main screen.
• If the main screen is not displayed,
select “Acquire New Image...” from
the “File” menu.
3. Choose the folder where the copied image(s) was saved.
• An index of copied images will be displayed.
2. Choose “Files” from the Input Selector pop-up menu.
26
After step 3, repeat the same operations from step 1 to step 9 in
the section “SAVING DISPLAYED IMAGES TO THE
MACINTOSH HARD DRIVE” (pages 20 through 22).
27
OPERATING THE SOFTWARE
DELETING COPIED IMAGES FROM THE MACINTOSH
HARD DRIVE
• The following dialog box will appear.
Some or all of the images can be deleted from the Macintosh hard drive.
Images can be viewed before deleting when using the plug-in or utility
software.
WARNING : Deleted images cannot be recovered, use care
when deleting images.
1. Display the main screen.
• If the main screen is not displayed,
select “Acquire New Image...” from
the “File” menu.
2. Select “Files” from the Input Selector pop-up menu.
3. Choose the folder where the copied image(s) was saved.
• An index of copied images will be displayed.
4. Click on the image you want to delete. If two or more
images are to be deleted, press and hold the shift key
and click on all of the images to be deleted.
• A dashed line will appear around each selected image.
(Continued on the following page.)
28
29
OPERATING THE SOFTWARE
• To delete all the images, click on “Select All” in the display.
DELETING IMAGES STORED ON THE PC CARD
Some or all of the images can be deleted from the PC card. If images are
deleted using the RDGrabber utility software, the image can be viewed
before deleting.
WARNING : Deleted images cannot be recovered, use care
when deleting images.
1. Display the main screen.
• If the main screen is not displayed,
select “Acquire New Image...” from
the “File” menu.
5. Click on “Delete”.
• The following dialog box will appear.
2. Select “Camera” from the Input Selector pop-up menu.
6. Click on “Erase” to erase the file. Click on “Cancel” to
cancel the operation.
• The display will return to the main screen when the delete operation is
finished or canceled.
(Continued on the following page.)
30
31
OPERATING THE SOFTWARE
3. Click on the image you want to delete. If two or more
images are to be deleted, press and hold the shift key
and click on the images to be deleted.
• A dashed line will appear around each selected image.
• To delete all the images, click on “Select All” in the display.
5. Click on “Erase” to erase the file. Click on “Cancel” to
cancel the operation.
• The display will return to the main screen when the delete operation is
finished or canceled.
4. Click on “Delete”.
• The following dialog box will appear.
32
33
OPERATING THE SOFTWARE
TAKING PICTURES WITH THE MACINTOSH
3. Click on “Take Picture”.
1. Display the main screen.
• When the shutter is released, the captured image will appear in the
display.
• The shutter on the RD-175 will not release until focus is confirmed.
After clicking on “Take Picture”, a release signal is sent to the RD-175 for
20 seconds. The shutter will release only if focus is confirmed during
this time. If the shutter does not release, the following dialog box will
appear. Click on “OK” to return to the “Remote Release” screen.
• If the main screen is not displayed,
select “Acquire New Image...” from
the “File” menu.
2. Select “Remote Release” from the Input Selector pop-up
menu.
• The following “Remote Release”
screen will appear.
After the shutter is released, the image can be Acquired or Copied
to the Macintosh.
To Acquire
Click on “Acquire”.
For the following steps, see “SAVING DISPLAYED IMAGES TO THE
MACINTOSH HARD DRIVE” step 5 on page 21.
To Copy
Click on “Copy To...”.
For the following steps, see “COPYING IMAGES TO THE MACINTOSH
HARD DRIVE” step 5 on page 25.
34
35
OPERATING THE SOFTWARE
SETTING DIGITAL CAMERA FUNCTIONS WITH THE
MACINTOSH
• The following dialog box will appear.
SETTING THE EXPOSURE COMPENSATION VALUE
The exposure compensation value on the RD-175 can be set with the
Macintosh or on the camera itself.
1. Display the main screen.
• If the main screen is not displayed,
select “Acquire New Image...” from
the “File” menu.
2. Select “Camera” or “Remote Release” from the Input
Selector pop-up menu.
4. Choose the desired EV from the Over Ride pop-up
menu.
3. Click on “Camera etc...”.
5. Click on “Exit”.
36
37
OPERATING THE SOFTWARE
SETTING THE CLOCK IN THE RD-175
The clock is reset by transferring data from the Macintosh to the digital
camera. Reset the clock after changing the clock battery.
1. Repeat steps 1 through 3 on page 36.
• The following dialog box will appear.
If the date under each image is incorrect after changing the
camera's 2CR5 lithium battery, the clock battery may need to be
replaced. Please refer to the RD175 camera instruction manual to
replace the clock battery.
2. Click on “Set Clock”.
• The clock data from the Macintosh will be transferred to the RD-175,
resetting the clock on the digital camera.
Before starting this operation, open the Date & Time control panel
on the Macintosh, and set the correct time and date.
38
3. Click on “Exit”.
39
OPERATING THE SOFTWARE
INITIALIZING THE PC CARD
• Non-standard accessory PC cards need to be initialized.
• If you want to use non-standard PC cards with the RD-175,
please contact a Minolta Service Facility described on the back
cover of this manual for details.
• When you are using Power Macintosh 8100/7100/6100, the PC
card can not be initialized.
WARNING: Initializing the PC card will delete all current data
on the PC card! PC cards should not be re-initialized unless
format is “corrupt”.
4. Select “Acquire New Image...” from the “File” menu.
• The message “Card Format Corrupted” will appear if the card has not
been initialized by the RD-175. Click on “OK” in the dialog box.
5. Select “Camera” or “Remote Release” from the Input
Selector pop-up menu.
6. Click on “Camera etc...”.
• The following dialog box will appear.
1. Display the main screen.
• If the main screen is not displayed,
select “Acquire New Image...” from
the “File” menu.
2. Click on “Cancel”.
• The main screen will disappear.
• Perform this operation before removing the PC card, or data may be lost.
3. Remove the PC card, then insert the PC card to be
initialized into the digital camera.
7. Click on “Initialize”.
(Continued on the following page.)
40
41
OPERATING THE SOFTWARE
8. A dialog box will appear to confirm initialization.
9. Click on “Initialize” to initialize the PC card. Click on
“Cancel” to cancel the operation.
QUITTING THE SOFTWARE
To quit the RDGrabber software, select “Quit” from the
“File” menu.
• When the window is open and the image is not saved, the following
message will appear. Click on the desired function.
• When initialization is finished, the message box “Initialization Complete”
will appear.
When using the Adobe Photoshop
Plug-In software, select “Quit” from the
“File” menu to quit the application.
42
43
MESSAGES
This section lists the error message and the action to take
when they appear.
(E) Shutter didn’t release.
Click on “OK” to return to the “Remote Release” screen (see page 35).
(A) RD-175 isn’t connected. Change input from “File”.
1.Click on “OK”, then quit the software according to the directions
described on page 43.
2.Check the following.
• The RD-175's main switch is ON.
• The RD-175's battery power is sufficient for all operations.
• There are no problems with the SCSI cable.
• The selected SCSI ID number on the camera does not conflict with any
other device in the SCSi chain.
3.Repeat steps 1 through 5 on page 16.
(F) SCSI communication Error. Check main SW, cable & connector.
1.Click on “OK”, then quit the software according to the directions
described on page 43.
2.Check the following.
• The RD-175's main switch is ON.
• The RD-175's battery power is sufficient for all operations.
• There are no problems with the SCSI cable.
• The selected SCSI ID number on the camera does not conflict with any
other device in the SCSi chain.
3.Repeat steps 1 through 5 on page 16.
(B) Replace Existing Files ?
Click on “OK” to replace the old files with the new ones. Click on Cancel to
cancel the operation.
(G) No Card Found.
Insert the PC card into the card slot according to instructions on page 28 of
the RD-175 Digital Camera instruction manual.
(C) Card Initialization Failure.
Retry the initialization. If the same message appears again, please contact
a Minolta Service Facility.
(H) Incompatible Card Installed.
The installed PC card is incompatible with the RD-175. If you want to use
non-standard accessory PC cards with the RD-175, please contact a
Minolta Service Facility for details.
(D) RD-175 isn’t connected. Check main SW, cable & connector.
1.Click on “OK”, then quit the software according to the directions
described on page 43.
2.Check the following.
• The RD-175's main switch is ON.
• The RD-175's battery power is sufficient for all operations.
• There are no problems with the SCSI cable.
• The selected SCSI ID number on the camera does not conflict with any
other device in the SCSi chain.
3.Repeat steps 1 through 5 on page 16.
44
(I) Card Format Corrupted.
Remove the PC card and re-insert it. If the same message appears, reinitialize this card.
When a new PC card is inserted into the digital camera to initialize it, the
same message will appear. Click on “OK” in the dialog box to continue the
operation.
(J) Card Change Detected.
Replace the PC card in the card slot with the card that was inserted at the
time of software start-up.
45
MESSAGES
(K) File not found.
Input the correct file name.
(R) This program can’t run on the Macintosh using MC68000.
Please use another Macintosh.
(S) This program requires System 7 or later. Please use another Macintosh.
(L) Volume or folder not found.
Input the correct folder name.
(M) Misc. File Error.
1.Click on “OK”, then quit the software according to the directions
described on page 43.
2.Select “Restart” from the “Special” menu to restart the Macintosh.
3.Start-up the software again.(N) Insufficient Disk Space.
(N) Insufficient Disk Space.
Create more disk space by moving the files to other volumes or deleating
unnecessary files.
(O) Disk is locked or write protected.
Cancel the write protection. For example, slide the write-protect tab to the
write-enable position.
(T) Insufficient Memory
To use the software with the Macintosh, you need:
• Macintosh computer with a 68030 or 68040 processor (except Macintosh
II fx) and a minimum clock speed of 25 MHz, or a Power Macintosh
computer.
• 20 megabytes (MB) of random access memory (RAM), 24 MB RAM if
using a Power Macintosh, available to the applications.
(U) Apple event error occurred.
(V) Hardware Error.
(W) System Error. Plaease quit this application.
1.Click on “OK”, then quit the software according to the directions
described on page 43.
2.Select “Restart” from the “Special” menu to restart the Macintosh.
3.Start-up the software again.
(P) File is Locked. Can not delete or replace.
Unlock the file.
1.Find the file you want to unlock with the Macintosh Finder, then select the
file.
2.Choose “Information” from the “File” menu.
3.Click the checkbox to the left of “Lock” to remove the X in the box.
4.Close the “Information” dialog box.
(Q) Copying to the same folder is prohibited.
Copy to another folder.
46
47
Operation of Software for Windows®
CONTENTS
Operation of the
RD-175 Software
for Windows®
48
1. Summary....................................................................................50
2. System Requirements................................................................51
3. Installing the Software
For Windows®95 ...................................................................52
Uninstall Instructions for Windows®95 ..................................54
For Windows®3.1 ..................................................................55
4. Preparing the RD-175 Digital Camera
4-1. Setting the SCSI ID .......................................................56
4-2. Setting the SCSI Host Adapter ......................................57
4-3. Setting the Terminator Power Supply ............................58
4-4. Inserting the PC Card ....................................................60
4-5. Connecting the RD-175 to the Computer ......................60
4-6. Setting the RD-175 to SCSI Mode.................................61
5. Starting up the Software ............................................................62
6. Saving Displayed Images to the Hard Disk................................64
7. Copying Images to the Hard Disk ..............................................66
7-1. Copying One Image to the Hard Disk............................66
7-2. Copying Two or More Images to the Hard Disk.............68
8. Saving Copied Images to the Hard Disk ....................................72
9. Deleting Copied Images from the Hard Disk..............................74
10. Deleting Images from the PC Card ..........................................77
11. Setting the Digital Camera Functions
11-1. Setting the Exposure Compensation Value .................80
11-2. Setting the Clock in the RD-175 ..................................82
11-3. Initializing the PC Card ................................................84
12. Quitting the Software ...............................................................87
13. Messages.................................................................................88
49
Operation of Software for Windows®
1. Summary
2. System Requirements
With this software you can:
• Display images stored on the PC card
• Save displayed images to the hard drive
• Copy images to the hard drive
• Save images copied to the hard drive
• Delete copied images from the hard drive
• Delete images from the PC card
• Set the following digital camera functions with the computer:
Set the exposure compensation value
Reset the clock in the RD-175
Initialize the PC card
To use this software, you will need:
• PC/AT compatible computer with i486 or Pentium processor
• At least 16MB of free RAM (available to the application).
20MB or more is recommended.
• 30MB available hard disk space
• 3.5” Floppy disk drive
• 24-bit Color display for Windows® 95 or 3.1
• Microsoft® Windows® 95 or 3.1 operating system
• Adobe® Photoshop® for Windows® Ver.3.0.5 or later
or other TWAIN-compliant application (such as PhotoDeluxe
1.0, Pictoreit 1.0)
• SCSI host adapter (AHA-152x, AHA-154x, or AHA-294x
recommended)
• Appropriate SCSI cable
The SCSI cable will need to have a SCSI-2 (1/2 size 50pins) connection
on one end and the appropriate connection for your system on the other.
NOTE (only for users of Windows® 3.1 operating system)
Adaptec AHA-1540/1542 series SCSI boards can not support more than
16MB RAM. If you use an AHA-1540/1542 series SCSI board with the
RD-175, make sure you have 16MB of RAM.
Do not connect the RD-175 to an AHA-1540/1542 series SCSI board if
your have more than 16MB of RAM. Doing so may crash the system.
50
51
Operation of Software for Windows®
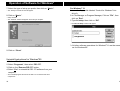
3. Installing the Software
4. Click on “Next >”.
Start the setup program as follows.
• The “Welcome” window will appear.
• It is assumed that the floppy disk drive is drive A.
For Windows® 95
1. Insert the floppy disk labeled “Control for Windows” into
drive A.
2. Click on “Start”, then click on “Run”.
3. Type a:\Setup, then click on “OK”.
• The “RD-175 Setup” window will appear.
5. Click on “Next >”.
• The “Software License Agreement” will appear. Read this agreement carefully
before continuing the Setup.
• If you do not agree to the conditions stated in the “Software License Agreement”,
click on “No”. Setup will quit.
6. Click on “Yes”.
• The “Setup Type” window will appear.
(Continued on the following page.)
52
53
Operation of Software for Windows®
7. Select the type of setup you prefer, then click on “Next >”.
• The “Ready To Install” window will appear.
8. Click on “Next >”.
• Setup will start.
• The “Finished” window will appear when setup is complete.
For Windows® 3.1
1. Insert the floppy disk labeled “Control for Windows” into
drive A.
2. In File Manager or Program Manager, Click on “File”, then
click on “Run”.
3. Type A:\setup, then click on “OK”.
• The “RD-175 Setup” window will appear.
✎ All other software operations for Windows®3.1 are the same
as for Windows®95.
9. Click on “Close”.
Uninstall Instructions for Windows®95
1. Click on “Start”.
2. Select “Programs”, then select “RD-175”.
3. Click on the “Remove RD-175” button.
4. Select “Yes” to uninstall all RD-175 software from your
computer.
• This uninstall program will remove the RD-175 1.5 software and all its
components.
54
55
Operation of Software for Windows®
4. Preparing the RD-175 Digital Camera
4-2. Setting the SCSI Host Adapter
4-1. Setting the SCSI ID
Before connecting the RD-175 to your computer, set the SCSI host adapter
as follows.
For the SCSI ID the RD-175 will use;
Set “Initial Sync Negotiation” to OFF
Set “Enable Disconnection” to OFF
The RD-175 digital camera is a SCSI device. SCSI is the standard for data
transfer between the computer and peripheral devices.
To identify each peripheral device to the computer, a unique ID is set on
each SCSI device. If an ID is used by more than one device, data may be
lost or the computer may not work correctly. The SCSI ID range of the
computer is from 0 to 7. ID 7 is reserved for the SCSI host adapter and
cannot be used by the RD-175 digital camera or other peripheral devices.
The RD-175's SCSI ID is preset to 6 at the factory, but can be changed if
necessary.
• Refer to the User's Guide for your SCSI host adapter.
1. Press and hold the mode button.
2. Slide the main switch to ON.
3. Turn the function dial to change
the SCSI ID to a non-reserved ID.
4. Release the mode button.
56
57
Operation of Software for Windows®
4-3. Setting the Terminator Power Supply
The RD-175 digital camera has only one SCSI connector and must be
located at the end of the SCSI chain. A terminator is built into the RD-175
digital camera.
Contact the manufacturer of your SCSI board to determine whether or not
your ASPI SCSI board can supply power to the built-in terminator.
If your SCSI board cannot supply power, or you use a note-book type
computer, set the RD-175's terminator power swith to ON. Power will be
supplied by the RD-175's battery.
1. Press and hold the mode button.
2. Slide the main switch to ON.
3. Press the program set button to
display the terminator power
indicator in the data panel.
4. Release the mode button.
58
59
Operation of Software for Windows®
4-4. Inserting the PC Card
Insert the PC card into the card slot, according to the instructions on page
32 of the RD-175 Digital Camera instruction manual.
4-5. Connecting the RD-175 to the Computer
4-6. Setting the RD-175 to SCSI Mode
1. Press and hold the mode button.
2. Slide the main switch to ON.
• "SCSI" will appear in the lower right corner
of the data panel. The SCSI ID will be
displayed at the top of the data panel.
1. Slide the camera’s main switch to LOCK.
2. Turn the computer off. Turn off all connected devices.
CAUTION : Connecting accessory devices with the power on
could damage the computer and connected devices.
3. Release the mode button.
3. Open the Slot/SCSI connector cover on
the RD-175. Plug the SCSI-2 side (1/2
size 50pins, small end) into the RD175’s SCSI connector.
• Push in the connector until it clicks.
4. Plug the other end of the cable into the SCSI connector on the
SCSI board.
• The RD-175 digital camera must be located at the end of the SCSI
chain.
After the RD-175 has been connected, touching the body or lens
may cancel the SCSI mode.
If this occurs, reset the SCSI mode as described above.
You will need to purchase the appropriate SCSI cable to connect the RD175 to your computer or SCSI chain.
• The SCSI cable will need to have a SCSI-2 (1/2 size 50pins)
connection on one end and appropriate connection for your system on
the other.
60
61
Operation of Software for Windows®
5. Starting-up the Software
8. Select "RD-175 1.50 32 bit" and click on “Select”.
This software is opened into the image processing application (e.g.,
Adobe® Photoshop® for Windows®) using TWAIN acquire.
For example, if you are using Windows® 95 and Adobe® Photoshop® for
Windows® 4.0, do the following:
1. Check that the PC card is inserted into the RD-175.
2. Check that the RD-175 is connected to the computer.
3. Check that the RD-175 is set to SCSI mode.
Turn on SCSI devices starting with the last device on the SCSI
chain. If a SCSI device is turned on after the computer, the
computer will not recognize the device.
9. Choose “Import” from the “File” menu, then select
“TWAIN_32...” to start-up the software.
The “main screen” (see page 64) will be displayed.
4. Turn the other devices in the SCSI chain on.
5. Turn the computer on.
6. After starting up the Windows® 95 operating system,
launch Adobe® Photoshop® for Windows® 4.0.
7. Choose “Import” from the “File” menu, then select
“Select TWAIN_32 Source…”.
NOTE (only for users of Windows® 95 operating system)
• Adobe® Photoshop® versions 3.0 to 3.0.4 have a problem with TWAIN.
Use version 3.0.5 or later, or update the TWAIN drivers.
Contact Adobe Systems Inc. for details.
62
63
Operation of Software for Windows®
6. Saving Displayed Images to the Hard Disk
3. Click on the “Chroma Filter” checkbox if desired.
After starting up, the “main screen” will be displayed. An index of the
images stored on the PC card will be displayed in the order in which they
were taken.
• The “Chroma Filter” optimizes the image during acquire for best possible
quality. Note that the acquire speed will diminish when this function is
selected.
4. Click on “Acquire”.
1. Click on the image to be acquired.
• A border will surround the selected image.
• To select two or more images, press and hold the shift key and click on
the images to be selected (see “Note for Multiple Acquire” on page 65).
• The acquire function will start. When the image is being acquired, an
indicator will show the percentage of completion.
• When complete, images are acquired into the image processing
application (such as Adobe® Photoshop®) and will be displayed on the
monitor.
• Further operations on the image are passed on to the image processing
application. Refer to the application's manual for details.
Note for “Multiple Acquire”
To acquire more than two images at a time (multiple acquire), check
that your PC's hard disk has an enough free disk space.
☞ Multiple acquire is available only when using Adobe®
Photoshop® for Windows® as the image processing application.
2. Select the Sharpening mode.
• None
• Screen
• Print
64
no additional sharpening will be done
acquires the image for use on screen
acquires the image for printing
65
Operation of Software for Windows®
7. Copying Images to the Hard Disk
Some or all of images stored on the PC card can be copied to the PC's
hard disk.
• To reclaim space on the PC card, first copy the images to the hard disk,
then delete the copied images from the PC card. For delete instructions,
see page 77 of this manual.
The copied image has a unique Minolta format and can not be
displayed or acquired without the RD-175 software for
Windows®. Files can only be renamed, moved, copied and/or
deleted.
4. Select the folder/directory where the image will be
copied.
5. Enter the desired file name in the box labeled “File
name:”.
6. Click on “Save”.
• While copying, do not activate other windows.
• After copying, the display will return to the “main screen”.
7-1. Copying one image to the hard disk
1. Display the “main screen” following the directions
described on pages 62 and 63.
2. Click on image you want to copy.
• A border will appear around selected image.
3. Click on “Copy To File...”.
• The “Save As” dialog box will appear.
66
67
Operation of Software for Windows®
7-2. Copying two or more images to the hard disk
1. Display the “main screen” (see pages 62 and 63).
• The “Save As” dialog box will appear.
2. Press and hold the shift key and click on the images to
be selected.
• A border will appear around each selected image.
• To select all the images, click on “Select All” in the display.
3. Click on “Copy To File...”.
• The following message will appear.
5-a. Select the folder/directory where the image will be
copied.
☞ When you want to name each file you selected individually, go
to step 4-a, shown below.
☞ If you do not want to name each file individually (you want to
copy the selected images with the default name), go to step
4-b, described on page 70.
4-a. Click on “Yes”.
68
6-a. Enter the desired file name in the box labeled “File
name:”.
7-a. Click on “Save”.
• While copying, do not activate other windows.
8-a. Repeat steps 5-a through 7-a until the last image is
copied.
• After the last image is copied, the display will return to the “main
screen”.
69
Operation of Software for Windows®
(Continued from step 3 on page 68.)
4-b. Click on “No”.
• The “Select Directory” dialog box will appear.
In this case, all the selected images are copied to the
selected directory with the default file name “MXXX.MDC”.
• XXX represents the sequential number of the image, shown above each
image index in the “main screen”.
5-b. Choose the drive/directory (folder) where the selected
images will be copied.
6-b. Click on “OK”.
• Copying of the images will begin. After copying all the selected images,
the display will return to the “main screen”.
70
71
Operation of Software for Windows®
8. Saving Copied Images to the Hard Disk
As stated earlier, files copied from the PC card are in a Minolta original
format, and can not be displayed without the RD-175 software for
Windows®. To display the copied images without the RD-175 software for
Windows®, follow these instructions:
1. Display the “main screen” following the directions
described on pages 62 and 63.
3. Choose the directory (folder) where the copied image(s)
was saved.
• An index of copied images will be displayed (same as the “main
screen”).
After step 3, repeat steps 1 through 4 in the section “Saving
Displayed Images to the Hard Disk” (pages 64 and 65).
2. Click on “File” under “Input:” to change the input
source.
• The “Select Directory” dialog box will appear.
72
73
Operation of Software for Windows®
9. Deleting Copied Images from the Hard Disk
Some or all of the images can be deleted from the hard disk. Images can
be viewed before deleting when using the RD-175 software for Windows®.
WARNING : Deleted images can not be recovered, use care when
deleting images.
1. Display the “main screen” following the directions
described on pages 62 and 63.
3. Choose the directory (folder) where the copied image(s)
was saved.
• An index of copied images will be displayed (same as the “main
screen”).
4. Click on the image you want to delete. If two or more
images are to be deleted, press and hold the shift key
and click on all of the images to be deleted.
• A border will appear around each selected image.
• To delete all the images, click on “Select All” in the display.
2. Click on “File” under “Input:” to change the input
source.
• The “Select Directory” dialog box will appear.
To delete all the images,
click on “Select All” in the
display.
(Continued on the following page.)
74
75
Operation of Software for Windows®
5. Click on “Delete...”.
10. Deleting Images from the PC Card
• The following message will appear.
Some or all of the images can be deleted from the PC card. Images can be
viewed before deleting when using the RD-175 software for Windows®.
WARNING : Deleted images can not be recovered, use care when
deleting images.
6. Click on “Yes” to erase the image file. Click on “No” to
cancel the operation.
1. Display the “main screen” following the directions
described on pages 62 and 63.
2. Check that “Camera” is selected as the input source.
• The display will return to the “main screen” when the delete operation is
finished or canceled.
• An index of the images stored on the PC card will be displayed.
3. Click on the image you want to delete. If two or more
images are to be deleted, press and hold the shift key
and click on all of the images to be deleted.
• A border will appear around each selected image.
• To delete all the images, click on “Select All” in the display.
(Continued on the following page.)
76
77
Operation of Software for Windows®
5. Click on “Yes” to erase the image file. Click on “No” to
cancel the operation.
• The display will return to the “main screen” when the delete operation is
finished or canceled.
To delete all the images,
click on “Select All” in the
display.
4. Click on “Delete...”.
• The following message will appear.
78
79
Operation of Software for Windows®
11. Setting the Digital Camera Functions
3. Click on the “Over ride:” checkbox to display a ✔ in it.
11-1. Setting the exposure compensation value
4. Choose the desired EV from the drop-down list.
The exposure compensation value on the RD-175 can be set with the PC
or on the camera itself.
1. Display the “main screen” following the directions
described on pages 62 and 63.
2. Click on “Camera etc...”.
• The “RD-175 Control” dialog box will appear.
Click on “Camera etc...”.
5. Click on “OK”.
• The selected exposure compensation value will be set in the RD-175.
• After setting the exposure compensation value, the “RD-175 Control”
dialog box will close and the display will return to the “main screen”.
80
81
Operation of Software for Windows®
11-2. Setting the clock in the RD-175
The clock is reset by transferring data from the computer to the digital
camera. Reset the clock after changing the clock battery.
Be sure the correct date and time are set on your computer
before transferring the data to the RD-175 Digital Camera.
3. Click on the “Set Camera Clock” checkbox to display a
✔ in it.
4. Click on “OK”.
• The clock data from the computer will be transferred to the RD-175,
resetting the clock in the digital camera.
• After transferring the clock data, the “RD-175 Control” dialog box will
close and the display will return to the “main screen”.
1. Display the “main screen” following the directions
described on the pages 62 and 63.
2. Click on “Camera etc...”.
• The “RD-175 Control” dialog box will appear.
Click on “Camera etc...”.
82
83
Operation of Software for Windows®
11-3. Initializing the PC card
5. Check that “Camera” is selected as the input source.
Non-standard accessory PC cards need to be initialized with the RD-175.
If you want to use non-standard PC cards with the RD-175, please
contact a Minolta Service Facility described on the back cover of
this manual for details.
WARNING: Initializing the PC card will delete all current data
on the PC card! PC cards should not be re-initialized unless
format is “corrupt”.
6. Click on “Camera etc...”.
• The “RD-175 Control” dialog box will appear.
1. Display the “main screen” following the directions
described on pages 62 and 63.
2. Click on “Exit”, then click on “Yes”.
Click on “Camera etc...”.
• The “main screen” will disappear.
• Perform this operation before removing the PC card, or data may be lost.
3. Remove the PC card, then insert the PC card to be
initialized into the digital camera.
4. Display the “main screen” again, following the
directions described on pages 62 and 63.
• The message “Illegal HDD Card. Please initialize the Card” will
appear if the card has not been initialized by the RD-175. Click on “OK”
in the message box.
7. Click on “Initialize Card”.
(Continued on the following page.)
84
85
Operation of Software for Windows®
8. A dialog box will appear to confirm Initialization.
12. Quitting The Software
1. Click on “Exit” in the “main screen”.
9. Click on “Yes” to initialize the PC card. Click on “No” to
cancel the operation.
• When initialization is finished, the “Initialization Complete” message box
will appear.
Click on “Exit” in the “main screen”.
• The following message will appear.
2. Click on “Yes”.
• The RD-175 software for Windows® will quit.
86
87
Operation of Software for Windows®
13. Messages
This section lists the error messages and the action to take
when they appear.
Message Are you sure you want to format?
Action
Click on "Yes" to initialize the PC card. Click on "No" to
cancel the operation.
<For users of Windows® 3.1>
Using Adaptec's utility software "showscsi.exe", check if
"Minolta RD-175" is displayed at the selected SCSI ID.
If the PC does not recognize the RD-175 as a SCSI
device, turn the PC and the RD-175 off, then restart the
PC and reinstall the software. See pages 52 - 55.
Message Are you sure you want to delete?
Action
Click on "Yes" to delete the images. Click on "No" to
cancel delete.
Message Device not selected
Action
Turn the PC and the RD-175 off, then repeat steps 1 - 9
on pages 62 and 63.
Message Device not ready
Action
Check the following:
Message Do you want to name the file?
Action
If you want to name the file, Click on "Yes" and type in
the desired file name. If you don't want to change from
the default file name, click on "No".
•
•
•
•
Did you turn on the RD-175 before the PC?
Is the RD-175 set to SCSI mode?
Is the SCSI cable connected securely?
Is the terminator power supply set correctly?
If nothing is wrong, check if the PC recognizes the RD175 as a SCSI device.
<For users of Windows® 95>
1. Click on "Start", then click on "Settings".
2. Double-click on "System" in the "Control Panel".
3. Click on the "Device Manager" tab, then click on the
"View devices by connection" checkbox.
4. Check if "Minolta RD-175" is listed in the "SCSI
Controllers" window.
88
Message Are you sure you want to exit?
Action
Click on "Yes" to exit.
Click on "No" to continue.
Message Error writing to file. Continue?
Action
Click on "Yes" to continue copying files to the hard drive.
Click on "No" to cancel the operation.
89
Operation of Software for Windows®
13. Messages
<For users of Windows® 3.1>
Message HDD Card not ready
Action
Turn the PC and the RD-175 off. Insert the PC card into
the camera’s card slot. Repeat "Starting-up the
Software" from step 1 on page 62.
Message Do you want to overwrite the existing file?
Action
Click on "Yes" to overwrite the existing file. Click on "No"
to select a different file name.
Message Illegal HDD Card. Please initialize the Card
Action
Use a standard accessory PC card. Before using
another type of PC card, contact a Minolta Service
Facility for details on incompatible cards.
Message No WINASPI.DLL present
(This message will appear only for users of Windows® 3.1)
Action
Install the "WINASPI.DLL" file into the Windows
directory. Refer to the user's guide for your SCSI host
adapter.
Message No host adapter
Action
Check if the ASPI driver is compatible with the SCSI
host adapter.
<For users of Windows® 95>
1. Click on "Start", then click on "Settings".
2. Double-click on "System" in the "Control Panel".
3. Click on the "Device Manager" tab, then check your
SCSI host adapter function.
90
Check the following:
• Do the resources (I/O address, DMA channel, IRQ, etc.)
conflict with each other?
• Has the ASPI device driver been installed correctly?
Message Insufficient memory for make index
Action
Increase the memory allocated to the software as
follows:
• Quit unnecessary applications.
• Turn on or increase Virtual Memory.
• Purchase additional memory.
Message Insufficient memory for make image
Action
Increase the memory allocated to the software as
follows:
• Quit unnecessary applications.
• Turn on or increase Virtual Memory.
• Purchase additional memory.
Message Can't get image information
Action
Back-up the necessary image data (copy the necessary
image data to the hard drive), then initialize the PC card.
Message Can't read image data
Action
Turn the PC and the RD-175 off. Check that the SCSI
board and SCSI cable are correctly attached. Repeat
"Starting-up the Software" from step 1 on page 62.
91
Operations of Software for Windows®
13. Messages
Message Can't make index
Action
Increase the memory allocated to the software as
follows:
• Quit unnecessary applications.
• Turn on or increase Virtual Memory.
• Purchase additional memory.
Message SCSI communication error
Action
Turn the PC and the RD-175 off. Repeat "Starting-up the
Software" from step 1 on page 62.
Message Can't make image
Action
Increase the memory allocated to the software as
follows:
• Quit unnecessary applications.
• Turn on or increase Virtual Memory.
• Purchase additional memory.
Message Device error!
Action
Turn the PC and the RD-175 off. Repeat "Starting-up the
Software" from step 1 on page 62.
Message Error writing to file
Action
Check the following:
• Is there enough disk space available?
• Has access to the drive you want to save to been
accepted?
92
93
Digital Camera RD-175
3CCD High Resolution
SOFTWARE INSTRUCTION MANUAL
Minolta Co. Ltd.
3-13, 2-Chome, Azuchi-Machi, Chuo-ku, Osaka 541, Japan
Minolta GmbH
Minolta (UK) Limited
Sachsehring 26, D-30855 Langenhagen, Germany
Rooksley Park, Precedent Drive, Rooksley, Milton Keynes, MK13 8HF, England
Minolta Corporation
Head Office
Los Angeles Branch
Minolta Canada Inc.
Head Office
Vancouver Branch
101 Williams Drive, Ramsey, New Jersey 07446, U.S.A.
11150 Hope Street Cypress, CA 90630, U.S.A.
369 Britannia Road East, Mississauga, Ontario L4Z 2H5, Canada
230-3771 Jacombs Road, Richmond, B.C. V6V 2L9, Canada
Minolta Hong Kong Limited
Room 208, 2/F, Eastern Center, 1065 King's road, Quarry Bay, Hong Kong,
China
Minolta Singapore (Pte) Ltd. 10, Teban Gardens Crescent, Singapore 608923
© 1995 Minolta Co., Ltd. under the Berne Convention
and Universal Copyright Convention
9222-2753-17(N9709-D709)
Printed in Japan
For Power Macintosh
For Windows®