1
LisaEm
The First Fully Functional Apple Lisa Emulator
Copyright (C) 2007, by Ray A. Arachelian
http://lisaem.sunder.net
DOCUMENTATION DRAFT
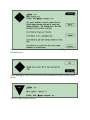
Note: This software is Beta quality, which means that there are many bugs that will
encounter. Your feedback and bug reports are important towards fixing these issues.
LisaEm emulates Apple's Lisa 2/5 computer. It currently runs on the win32, OS X, and
Linux platforms. It should run on any platform where wxWidgets will compile,
possibly requiring some modifications.
LisaEm is released under the terms of the GNU Public License 2.0.
This program is free software; you can redistribute it and/or modify it under the terms
of the GNU General Public License as published by the Free Software Foundation;
either version 2 of the License, or (at your option) any later version.
This program is distributed in the hope that it will be useful, but WITHOUT ANY
WARRANTY; without even the implied warranty of MERCHANTABILITY or FITNESS
FOR A PARTICULAR PURPOSE. See the GNU General Public License for more details.
You should have received a copy of the GNU General Public License along with this
program; if not, write to the Free Software Foundation, Inc., 59 Temple Place - Suite
330, Boston, MA 02111-1307, USA. or visit: http://www.gnu.org/licenses/gpl.html
LisaEm uses the libdc42 library, which is a part of this project. Libdc42 provides
support for Disk Copy 4.2 disk images as well as DART images. The routines for the
LZH compression that DART uses are subject to the following restrictions:
LZHUF.C (c)1989 by Haruyasu Yoshizaki, Haruhiko Okumura, and Kenji Rikitake.
All rights reserved. Permission granted for non-commercial use.
This project is not affiliated with Apple Inc. in any, and Apple Inc. retains all trade marks for
itself, all versions of the Disk Copy and DART programs, and their other products and services.
All other trademarks or servicemarks are property of their respective owners.
LisaEm Requirements
LisaEm needs a fairly fast machine. It has been tested for decent performance on
machines such as a PIII-750Mhz with ample memory. It may run on slower machines
with limited capabilities. Shutting off the skins option is recommended in this case.
LisaEm makes extensive use of memory as part of its operation. Its footprint has been
noted to rise above 64MB on some environments depending on the options used.
In particular, the skins and ImageWriter/ADMP printers tend to be memory hungry. It
is highly recommended to only configure a single printer. The virtual printer requires
at least 4MB as a frame buffer, however, once the page is ready to printed or save, its
requirements may rise upto 12MB.
To use the emulator you will need to extract a copy of the Lisa boot ROM from your
Lisa, preferably version H, and an operating system such as Lisa Office System or
MacWorks. (At this time the Xenix Operating System does not yet run.)
You will need to make disk images of the Lisa Operating System disks using the Disk
Copy 4.2 or DART programs as the emulator cannot read the original diskettes. This is
because only classic 68k and PPC machines with GCR capable drives are able to read
the 400K floppies used by the Lisa.
Software tools will be provided to allow ROM extraction. Please read and follow the
documentation that comes with them.
NOTE: If your ROM version is 3A, you will only be able to run MacWorks as your Lisa
has the screen modification kit for square pixels.
If you happen to have a copy of the ROM from the Dual Parallel Card, the emulator will
support upto three virtual dual parallel cards, providing six additional parallel ports to
which you can attach virtual profile hard drives or virtual Apple Dot Matrix Printers
(ADMPs).
If LisaEm is not provided for your platform, you may compile your own version,
provided you have proper development environments including wxWidgets 2.8 or 2.7.2
Introduction to LisaEm
If you are not familiar with the Apple Lisa computer, reading the LisaFAQ is highly
recommended http://lisafaq.sunder.net as it also contains pointers to other Lisa
information such as operation manuals and guides.
The following software has been reported to work under the emulator:
•
•
•
•
•
Lisa Office System 3.x
Lisa Pascal Workshop 3.x
MacWorks XL
MacWorks Plus
LisaTest (video timing test fails, the VIA tests pass internally, but lock up LisaTest.)
The following hardware is emulated by the emulator:
•
•
•
•
•
•
•
•
•
•
Display
Keyboard
Mouse
Sound
VIA
Parallel Ports
Serial Ports
Profile hard drives (5M, 10M under LOS/LPW, other sizes under MacWorks.)
ImageWriter I printer (serial port connection)
Apple Dot Matrix Printer (ImageWriter on a parallel port connection)
The following software does not work under the emulator:
•
Microsoft/SCO Xenix 3.x
The following hardware is not supported by the emulator:
•
•
•
•
Inkjet/Laser printers
SCSI/Priam hard drives
Quad port serial card
Priam hard drive
Using LisaEm
The screenshots in this documentation come from the wxX11 version running on Linux.
Your display may vary from these.
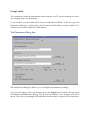
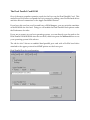
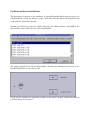
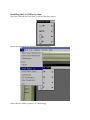
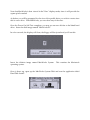
To use LisaEm, you must first tell it where to find the boot ROM. To do this, open the
Preferences dialog box which can be found under the File Menu, except on Mac OS X,
where it can be found under the LisaEm menu.
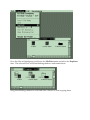
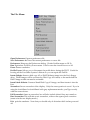
The Preferences Dialog box:
The Preferences dialog box allows you to configure the emulator's settings.
Once you are happy with your changes, press the Apply button which will save them
and dismiss the Preferences dialog. If you close the window, your changes will not be
saved. Note that your changes will take effect the next time you power on the emulator.
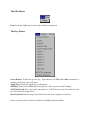
The Lisa ROM
The emulator can support several formats for the Lisa boot ROM. If you have extracted
the ROMs from your Lisa's CPU board and read them in with a ROM dumper, you
should save them as booth.lo and booth.hi. These are labeled 341-0175-H and 341-0176H for the H version of the ROM.
The Lisa's ROM are split into odd/even bytes which the emulator will stitch together
into a single file for you in the same location as the booth.hi or booth.lo files and change
its preferences to point to the merged ROM file.
The emulator will run the same checksum routine that the Power On Self Test (POST)
uses to check the ROM. Should it notice a problem with the checksum it will alert you
and offer the option to continue anyway. Note that a corrupted, or improperly merged
ROM will cause the emulator to crash.
The Lisa Boot ROM has a diagnostic mode called Service Mode which can be reached by
attempting to boot from a non-existant drive, and then sending Command-S. You can
use the Keyboard menu to send this command and enter this mode,
If you are an expert you can directly edit the path in the text field under the Lisa ROM
entry in the Preferences dialog box under the config tab, otherwise you should click on
the browse button and use the file picker to select the ROM file.
Note that both the ROMs and operating systems used on the Lisa are copyrighted and
subject to license restrictions. Please use only the ROMs and operating systems which
you own from your own Lisa.
Please do not ask me to provide copies of the ROMs or other Lisa software. I prefer not
to break Apple's copyright.
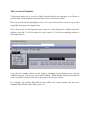
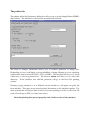
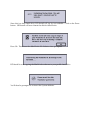
The Dual Parallel Card ROM
One of the more popular expansion cards for the Lisa was the Dual Parallel Card. This
card allowed Lisa users to expand the Lisa's storage by adding extra ProFile hard drives
and also allowed connections to the Apple Dot Matrix Printer.
If you have this card on your Lisa and have a ROM dumper, you can point the emulator
at the ROM file for this card. Doing so will enable the Dual Parallel card options under
the Preferences slot tabs.
If you are an expert at your host operating system, you can directly type the path to the
Dual Parallel Card ROM file into the text field, otherwise press the browse button to use
your operating system's file selector.
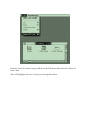
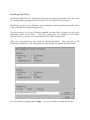
The tab for slot 2 shows an enabled dual parallel port card with a ProFile hard drive
attached to the upper port and an ADMP printer on the lower port.
Dual Parallel Port slot configuration:
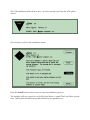
The Lisa Serial Number:
To properly make use of your Lisa Office System disks in the emulator, you'll have to
use the same serial number, otherwise the Lisa tools will fail to install.
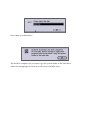
Enter Service Mode by attempting to boot off a non existent drive, such as a powered
off profile, then press the Apple-S key.
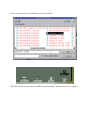
Next, click on the 1 in the Options menu, or press 1 on the keyboard. You'll be asked for
address, enter 240. You'll be asked for count, enter 20. You'll see something similar to
the display below:
Copy the hex numbers below in the display, ommiting every alternate zero starting
with the first one. This is your Lisa's serial number. Please double check this number as
your Lisa Office Software will not work properly if it doesn't match.
For example, the leading 0f0f 0002 becomes ff02 in the serial number, the next two
numbers 0803 0008 becomes 8308, and so on.
The I/O ROM version:
The Lisa emulator does not actually use the I/O ROM itself, all it needs is the ROM
version to report to the running operating system.
The I/O ROM version most commonly used in the Lisa 2/5 is A8. Version 88 is for the
Lisa 2/10. The emulator does not support Widget drives, so you should stick to A8.
The versions 88, 89, A9 are meant to be used with Xenix to fool it into using the right
sized drive.
Version 40 is used for the Lisa 1, however the emulator does not emulate enough for a
Lisa 1 for it to function.
The Keyboard Language:
The Lisa automatically detects the type of keyboard attached and switches its language
based on this selection. The emulator provides this as an option for US English, British
English, French of German. Other languages may have existed, if you happen to know
the keyboard IDs for them, please contact me and I'll add them to the emulator.
The Extra options:
Sound Effects: Enables playback of sound effects such as the power switch clicks,
floppy insertion, eject, motor, and the power off click.
Skins: Enables or disables the Lisa skin. This provides for animations of power on,
power off, floppies being inserted or ejected at the cost of a larger memory footprint. It
is intended for machines with lots of memory and large displays.
Boot ROM speedup hacks: this option enables patches (also known as cheats in
the emulator world) that speed up the boot ROM. Specifically they disable the long
memory test, checksum and other tests to provide a quicker startup.
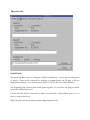
The ports tab:
Serial Ports:
The ports tab allows you to configure LisaEm's connections. At the top are serial ports
A, and B. These can be connected to nothing, a loopback plug, an OS pipe, a file, an
ImageWriter printer, or on some systems (linux, or OS X) can run a telnet daemon.
The loopback plug connects both serial ports together. If you select this plug on either
port, both will be connected.
For file, the file will be connected to either an actual file, which will be read, or to a
device, such as /dev/ttya.
Pipe is used to run an external program using the popen call.
If you select the telnetd, provide a port number to listen to. For example 9300. The Lisa
emulator will then listen on 127.0.0.1:9300. You can then telnet to this port from another
terminal window on the same machine and communicate with LisaTerm or ZTerm for
example.
The Imagewriter option allows you to connect a printer to one of the serial ports, using
the settings from the printer tab.
The Parallel Port:
The Parallel Port is mainly used to attach a ProFile hard drive. It can also be used to
attach an ADMP printer, however, it is preferable to attach an ImageWriter to a serial
port if you do not have a dual parallel card ROM, otherwise to one of the ports on the
dual parallel card.
You should select the Profile option, then click on the browse button to save the
location for a profile drive, or to select an existing profile drive image.
The first time you power on the emulator you will be asked for the size of the profile
drive to create. A 10M image is optimal.
Notes:
The hard drive format used by LisaEm is the same format as the Disk Copy 4.2, but with
an interleave of 5 to match what Lisa Office System uses. Note that you will not be able
to do anything with these images in the actual Disk Copy program.
I reused the floppy drive code because it was a convenient storage format for disk
images and it can also be used with lisafsh-tool.
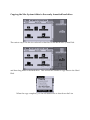
Profile hard drive initialization:
The first time you power on the emulator, if a specified profile drive does not exist, you
will be asked for what size drive to create. Note that only the 5M and 10M profiles will
work with the Lisa Office System.
Should you select any other size while using the Lisa Office System, only 5MB of the
drive will be used, while the rest will be inaccessible.
The newly created drive will not be bootable. Should you attempt to boot from it, the
Lisa ROM will throw error #84, or #85:
You'll need to install your operating system on the newly created virtual drive before
you'll be able to boot from it.
The printer tab:
The printer tab in the Preferences dialog box allows you to set the ImageWriter/ADMP's
dip switches. The defaults for the Lisa are automatically selected:
The Print to Images checkmark allows you to redirect printouts to image files.
Depending on how wxWidgets or the availability of image libraries in your operating
system these may be saved as PNG's, TIF's or BMP's. The text field allows you to chose
a directory to save the printouts in. The browse button will allow you to select this
directory. If the checkbox isn't selected, printouts will go to the host OS's printing
system.
Printing is page oriented, so it is difficult for the emulator to tell apart one print job
from another. This may cause several printed documents to be batched together. For
most systems this will be just fine, however if you are printing to a file on your host OS
such as PostScript or PDF, you may have issues.
Note that printing does not yet properly work in this version of the emulator.
Running the emulator for the first time
Once you have configured the emulator's preferences, you should press the Apply
button to save your preferences. The Preferences dialog box will then be dismissed. If
you forget this step and close the dialog box using the X button, you will lose your
changes.
When you are ready, you can power on the virtual Lisa. There are several ways to do
this.
You can use the File menu's run command, or the key menu's Power command.
If you are running with the skins enabled, you can press the power button located
underneath the floppy drive. If your display isn't large enough, you will have to scroll
around to see it.
The Lisa will then power on, and if your ROM file is good, it will go through the self
tests. If the ROM file is bad, it may cause the emulator to crash.
You may see a hard drive error 84 or 85 since you are running with a blank profile hard
drive. That is normal.
Inserting a micro-diskette:
If you wish to install the Lisa Office System, you should now insert the disk called "Lisa
Office System 1/5" into the virtual floppy drive. You can do this using the File menu's
Insert diskette command. Continue following the instructions in the Installing Lisa
Office System chapter.
If you are running with skins, you can simply click on the floppy drive.
A file selector dialog box will appear allowing you to browse to the Disk Copy 4.2 or
DART image file.
Note that DART images will take longer to open. This is because they will be converted
to Disk Copy 4.2 format since that is the emulator's preferred disk image format.
Consequently you shouldn't place disk images on read only media such as CDROM's
DVD-ROM's or file servers where you only have remote access.
DART image support is experimental and might not always work. It has worked with
the disk images we have tried, both the fast RLE and the higher LZH compressed
versions, but there are no guarantees that it will work with your images.
Always use Disk Copy 4.2 to image Lisa diskettes. Using newer versions will result in
non-functional disk images as vital data called tags will be stripped off.
Tags were not used very often by Macintosh software so their use is deprecated,
however the Lisa requires them in order to know that floppies are bootable.
Lisa Office System uses them to allow repairs to be made using a program called the
scavenger.
Installing the Lisa Office System:
Once the Lisa self tests are done, you'll see the boot menu:
Insert the microdiskette labeled Lisa Office System 1:
Select the Lisa Office System 1 of 5 disk image.
The LOS installation disk will now boot. In a few seconds you'll see the LOS splash
screen:
Once loaded, you'll see the installation menu:
Press the Install button at this screen to start the installation process.
The Installer will now search for a ProFile hard drive to install The Lisa Office System
onto. Ideally this should be the profile attached to the parallel port.
Press the OK button to allow the installer to use this Profile.
Click on the Don't Share button. If you would like to also use MacWorks, you can
create another Preferences file with its own profile drive. Sharing the drive results in
limited space.
The installer will now erase the profile. If you had used a Profile disk image which had
previous
data,
you
would
be
asked
to
confirm.
After a few minutes, the Lisa Installer will begin to copy itself to the ProFile hard drive.
Once the disk is copied, the installer will then eject Lisa Office System 1/5 and ask for
the next disk, disk 2. You do not have to press any buttons as the installer will
recognize that a floppy has been inserted and will be able to tell if it is the disk it
wanted.
You'll repeat this process until LOS is fully installed.
At the end of the installation process, it will ask for the first disk again. You must insert
the same disk image you first booted from in order to complete the install.
You'll soon be returned to the main menu. Since you're done installing, click on the
Finished button.
Select Start Up in order to boot from the freshly installed Lisa Office System on the
profile.
And Lisa Office System will boot.
Next, insert one of the tool disketters such as LisaCalc:
The disk will show up on the Lisa Office System desktop. Double click on it to open it.
With the Lisa Calc window open, pull down the Edit menu and select the "Select all
Icons" item.
This will highlight, the icons so that you can duplicate them.
Once the files are highlighted, pull down the File/Print menu and select the Duplicate
item. The selected icons will form blinking shadows underneath them.
Drag these blinking shadows to the hard drive window to start copying them.
The Lisa desktop will now copy the files.
Note that Lisa tools are serialized: the first time they are used, the Lisa's serial number is
written on them to prevent them from being installed on any other Lisa. You should
have backup disk images made if you are using original Lisa disks before continuing.
You'll be asked if this is what you want. Press Copy to allow the tool to be installed.
Once the copy completes, you can eject the LisaCalc disk by pulling down the
Housekeeping menu and selecting the Eject Micro Diskette option. Repeat the
installation process with the remaining Lisa tools (applications.)
Note that LisaWrite's dictionary file is actually split onto the second disk and lives on
both disks. Don't try to copy it along with the other files, instead once LisaWrite and the
examples are copied across, duplicate just the dictionary. You'll see this dialog box
during the duplication:
Congratulations, you've successfully installed the Lisa Office System.
Installing MacWorks
MacWorks, MacWorks XL, MacWorks Plus aren't emulators, but rather they are closer
to a virtualization program that allow the Lisa to run early Mac OS software.
MacWorks consists of two diskettes. A boot diskette containing MacWorks itself, and a
copy of the Macintosh Operating System.
The first thing to do if you've already installed the Lisa Office System is to save your
preferences with a new name. Save the current ones for example as "Lisa Office
System.lisaem" so that you can return back to Lisa Office System later.
Then save the preferences once more as "MacWorks.lisaem" Next, go back to the
Preferences dialog box, click on the ports tab and change the profile drive file name:
Once the name is changed, press Apply. You're now ready to install MacWorks.
Note that MacWorks is best viewed in the "Raw" display mode, since it will provide the
square pixels needed.
As before you will be prompted for the size of the profile drive you wish to create since
this is a new drive. With MacWorks, you can chose any of the sizes.
Once the Power On Self Test completes, you may see an error 84 due to the blank hard
drive. Insert the disk image named "MacWorks XL"
In a few seconds, the display will clear, the floppy will be ejected and you'll see this:
Insert the diskette image named MacWorks System.
operating system.
This contains the Macintosh
Once it boots up, open up the MacWorks System Disk and run the application titled
Hard Disk Install:
Since this is a fresh hard drive, HD Install will say its not readable. Click on the Erase
button. HD Install will now format the disk for MacWorks.
Press Ok. Then Insert the MacWorks XL diskette when prompted.
HD Install is now copying the MacWorks software to your profile hard drive.
You'll then be prompted to re-insert the System diskette.
Next, name your hard drive.
The install is complete, but you must copy the system folder to the hard drive,
otherwise attempting to boot from it will cause a Sad Mac error.
Copying the Mac System folder to the newly formatted hard drive:
The easiest way to do this is to select all of the files on the MacWorks System Disk
and then drag them to the hard drive. This will tell the Finder to copy them to the Hard
Disk.
When the copy completes, you can tell MacWorks to shut down the Lisa.
The next time you power on the Lisa, it will attempt to boot from the hard drive,
however, this may fail with some versions of MacWorks with error 75:
Should this happen, you should instead boot from the MacWorks XL Boot Disk, the
floppy will eject once it recognizes the MacWorks install on the profile drive.
MacWorks XL 3.0 booted up
Managing multiple preference files
The emulator allows you to manage multiple preference files, each one representing a
separate virtual Lisa. You can have a Lisa with the Lisa Office System, another with
MacWorks, another with the Lisa Pascal Workshop and so on.
In future versions, you will be able to double click on the preferences file to
automatically load them at start up. (If you're running on Linux, or windows you can
pass the preferences file name on the command line to LisaEm when launching, and it
will open them for you.)
The idea here is that you can store the LisaEm preferences in either a folder, or on your
desktop, then double click on whichever virtual Lisa you wish to work with.
If LisaEm is already running, you can use the File menu Open Preferences item to load
a new preferences file.
The currently loaded preferences take effect when you power on the virtual Lisa. If you
are switching between preference files, you should do so while the virtual Lisa is
powered off.
The File Menu:
Open Preferences: Opens a preferences file
Save Preferences As: Saves the current preferences to a new file.
Preferences: Brings up the Preferences dialog. (Under LisaEm menu on OS X)
Run: Equivalent to the Key Power menu. Used to turn the virtual Lisa on or off.
Pause: Pauses emulation
Profile Power: Allows you to disconnect the profile drive during the POST. Useful for
booting off the Lisa Office System 1 diskette so you can repair the ProFile.
Insert diskette: Inserts a disk copy 4.2 or DART diskette image into the Lisa's floppy
drive. DART images will be converted to Disk Copy 4.2 format, so the media that the
DART image resides on must be writeable.
Insert blank diskette: Creates a blank Disk Copy 4.2 image, and then inserts it into the
Lisa.
Screenshot: Save a screenshot of the display. Only the screen portion is saved. If you're
using the AntiAliased or AntiAliased with gray replacement modes, you'll get exactly
what the screen shows.
Full Screenshot: Same as screenshot, but will also include skins if they are turned on.
Raw Screenshot: This will take a raw screenshot, without the square pixel correction
(same as in the raw display mode.)
Exit: quits the emulator. Note that you should only do this after this Lisa has powered
off.
The Edit Menu:
Paste: Paste the clipboard text into the emulator's keyboard.
The Key Menu:
Power Button: Pushes the power key. Equivalent to the File Menu Run command, or
clicking on the skin's power button.
Apple {key}: Sends the Apple-key combination.
NMI Key: Sends a Non Maskable Interrupt key. This is used to enter LisaBug.
ASCII Keyboard: Does keystroke translation in ASCII between the host and the Lisa.
Use this for normal operations.
Raw Keyboard: Directly maps keystrokes from the host computer to the Lisa.
Future versions of the emulator will have a editable keyboard tables.
The Display Menu:
Anti Aliased: This is the normal mode you should use with the Lisa Office System.
This corrects the square pixel issues and uses anti-aliasing to fix most artifacts.
Anti Aliased with Grays: Same as above, however attempts to replace the 50% desktop
gray patterns with an actual gray color. The side effect is that some text will become
fuzzy.
Raw: Uncorrected square pixel display. Will show an incorrect aspect ratio. This is the
right mode to use with MacWorks.
Double Y: Same as Raw mode, only will double the vertical size.
Doube X, Tripple Y: This mode is for giant displays. It corrects the square pixel
problem by stretching the display.
Turn Skins On/Off: Turns on the Lisa Skins. Skins On is the default, however, it should
not be used with systems that are low on memory, nor with small displays.
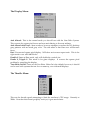
The Throttle Menu:
This sets the throttle speed attempting to limit the emulator's CPU usage. Normaly at
5Mhz. Note that this doesn't properly work yet, it goes much faster.
The Help Menu:
The help menu provides links to the LisaEm project webpage. Future versions will
include a help browser.
Contact and Support Information:
http://lisaem.sunder.net This is the project's official web site. Please visit this site every
week or two for updated versions of the emulator.
http://lisafaq.sunder.net
The Lisa Frequently Asked Questions site provides
information about the Lisa computer. It is not specific to the emulator.
mailto://[email protected] Please send bug reports to this address.
mailto://[email protected] Please send questions about the emulator here.
The Lisa List Google Group:
http://groups.google.com/group/lisalist
The LisaList mailing list is run on GoogleGroups. This is not affiliated with the
emulator project, however it is a forum for Lisa enthusiasts.