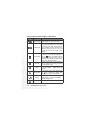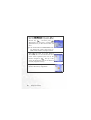
1
S660C Mobile Phone User’s Manual Copyright © 2004. BENQ Corporation. All rights reserved. No part of this publication may be reproduced, transmitted, transcribed, stored in a retrieval system or translated into any language or computer language, in any form or by any means, electronic, mechanical, magnetic, optical, chemical, manual or otherwise, without the prior written permission of BENQ Corporation. * This publication includes images from CorelDRAW® 9 which are protected by the copyright laws of the U.S., Canada and elsewhere. Used under license. Disclaimer BENQ Corporation makes no representations or warranties, either expressed or implied, with respect to the contents hereof and specifically disclaims any warranties, merchantability or fitness for any particular purpose. Further, BENQ Corporation reserves the right to revise this publication and to make changes from time to time in the contents hereof without obligation of BENQ Corporation to notify any person of such revision or changes. Safety Information For your safety, please read the guidelines below carefully before you use your phone: Exposure to Radio Frequency Signals Max. SAR measurement: GSM900: 1.34 mW/g; DCS1800: 0.725 mW/g. Your wireless handheld portable telephone is a low power transmitter and receiver. When it is ON, it receives and also sends out radio frequency (RF) signals. European and international agencies have set standards and recommendations for the protection of public exposure to RF electromagnetic energy. • International Commission on Non-Ionizing Radiation Protection (ICNIRP) 1996 • Verband Deutscher Elektringenieure (VDE) DIN- 0848 • Directives of the European Community, Directorate General V in Matters of Radio Frequency Electromagnetic Energy • National Radiological Protection Board of the United Kingdom, GS 11, 1988 • American National Standards Institute (ANSI) IEEE. C95.1- 1992 • National Council on Radiation Protection and Measurements (NCRP). Report 86 • Department of Health and Welfare Canada. Safety Code 6 These standards are based on extensive scientific review. For example, over 120 scientists, engineers and physicians from universities, government health agencies and industry reviewed the available body of research to develop the updated ANSI Standard. The design of your phone complies with these standards when used normally. Safety Information i Antenna Care Use only the supplied or approved replacement antenna. Unauthorized antennas, modifications or attachments may damage the phone and violate FCC regulations. Phone Operation Normal Position: Hold the phone as you would any other telephone with the antenna pointed up and over your shoulder. For your phone to operate most efficiently, do not touch the antenna unnecessarily when the phone is in use. Contact with the antenna affects call quality and may cause the phone to operate at higher power level than otherwise needed. Batteries All batteries can cause property damage, injury or burns if a conductive material such as jewelry, keys or beaded chains touches exposed terminals. The material may complete electrical circuit and become quite hot. To protect against such unwanted current drain, exercise care in handling any charged battery, particularly when placing it inside your pocket, purse or other container with metal objects. When battery is detached from the phone, your batteries are packed with a protective battery cover; please use this cover for storing your batteries when not in use. Driving Check the laws and regulations on the use of wireless telephones in the areas where you drive. Always obey them. Also, if using your phone while driving, please: • Give full attention to driving--driving safety is your first responsibility. • Use hands-free operation, if available. • Pull off the road and park before making or answering a call if driving conditions so require. ii Safety Information Electronic Devices Most modern electronic equipment is shielded from RF signals. However, certain electronic equipment may not be shielded against the RF signals from your wireless phone. Pacemakers The Health Industry Manufacturers Association recommends that a minimum separation of six (6") inches be maintained between a handheld wireless phone and a pacemaker to avoid potential interference with the pacemaker. These recommendations are consistent with the independent research by and recommendations of Wireless Technology Research. Persons with pacemakers: • Should ALWAYS keep the phone more than six inches from their pacemaker when the phone is turned ON. • Should not carry the phone in a breast pocket. • Should use the ear opposite the pacemaker to minimize the potential for interference. If you have any reason to suspect that the interference is taking place, turn your phone OFF immediately. Hearing Aids Some digital wireless phones may interfere with some hearing aids. In the event of such interference you may want to consult your hearing aid manufacturer to discuss alternatives. Other Medical Devices If you use any other personal medical device, consult the manufacturer of your device to determine if they are adequately shielded from external RF energy. Your physician may be able to assist you in obtaining this information. Turn your phone OFF in health care facilities when any regulations posted in these areas instruct you to do so. Hospitals or health care facilities may be using equipment that could be sensitive to external RF energy. Safety Information iii Vehicles RF signals may affect improperly installed or inadequately shielded electronic systems in motor vehicles. Check with the manufacturer or its representative regarding your vehicle. You should also consult the manufacturer of any equipment that has been added to your vehicle. Posted Facilities Turn your phone OFF in any facility where posted notice so requires. Aircraft FCC regulations prohibit using your phone while in the air. Switch OFF your phone before boarding an aircraft. Blasting Areas To avoid interfering with blasting operations, turn your phone OFF when in a “blasting area” or in area posted “TURN OFF TWO-WAY RADIO.” Obey all signs and instructions. Potentially Explosive Atmospheres Turn your phone OFF and do not remove the battery when in any area with a potentially explosive atmosphere and obey all signs and instructions. Sparks, from your battery, in such areas could cause an explosion or fire resulting in bodily injury or even death. Areas with a potentially explosive atmosphere are often, but not always clearly marked. They include fueling areas such as gasoline stations; below deck on boats; fuel or chemical transfer or storage facilities; vehicles using liquefied petroleum gas (such as propane or butane); areas where the air contains chemicals or particles, such as grain, dust, or metal powders; and any other area where you would normally be advised to turn off your vehicle engine. iv Safety Information For Vehicles Equipped with an Air Bag An air bag inflates with great force. DO NOT place objects, including both installed or portable wireless equipment, in the area over the air bag or in the air bag deployment area. If in-vehicle wireless equipment is improperly installed and the air bag inflates, serious injury could result. Safety Information v vi Safety Information Table of Contents Safety Information ............................................................. i 1. Preparing Your Phone For Use..................................... 1 Inserting a SIM Card ............................................................ 1 Installing a Battery and Charging the Phone ...................... 2 Turning the Phone On ......................................................... 5 2. Getting to Know Your Phone ....................................... 8 Your Phone at a Glance........................................................ 8 Active Flip Feature.............................................................. 10 Status Indicator Light......................................................... 10 Standby Screen.................................................................... 11 External Display .....................................................................11 Icons in the External Display's Status Bar.............................12 Main Screen ............................................................................14 Icons in the Main Display's Status Bar..................................16 Using the Keys in the Standby Mode ....................................18 Menu Navigation................................................................ 23 3. Using Your Phone ....................................................... 33 Making a Phone Call .......................................................... 33 Ending a Phone Call ........................................................... 33 Answering a Phone Call ..................................................... 34 Rejecting an Incoming Call................................................ 35 Turning Off the Ring Tone for an Incoming Call .......................................................... 35 Making an International Call............................................. 35 Table of Contents vii Making an Emergency Call ................................................ 36 Dialing an Extension Number ........................................... 36 Speed Dialing ...................................................................... 36 Voice Dialing ...................................................................... 37 Listening to Voicemails ...................................................... 38 Phone Book......................................................................... 39 Adding Contacts to the Phone Book.....................................39 Finding Contacts in the Phone Book ....................................44 Using a Location Number to Access a Contact's Data .........46 Last Missed, Dialed, and Received Calls............................ 47 Operations During a Call ................................................... 49 Call Menu ........................................................................... 51 Using the Silent Profile....................................................... 54 Shortcuts Menu .................................................................. 55 Setting Function Shortcuts ....................................................55 Setting Phone Number Shortcuts..........................................58 Using Function and Phone Number Shortcuts ....................59 Messages Menu................................................................... 60 Create ......................................................................................62 SIM Folder ..............................................................................65 Inbox .......................................................................................66 Template .................................................................................69 Outbox ....................................................................................69 Drafts.......................................................................................70 Voicemail ................................................................................70 Message Settings .....................................................................71 Cleanup Messages...................................................................74 viii Table of Contents Memory Status .......................................................................74 Voice Memo........................................................................ 75 Input Modes ....................................................................... 76 Changing the Text Input Mode.............................................76 Letter Input Mode (ABC) ......................................................77 Numeric Input Mode (123)...................................................77 Predictive Input Mode (iTap) ...............................................78 Symbol Input Mode ...............................................................79 Direct Connection to URLs ............................................... 80 4. Menus........................................................................... 82 Phone Book......................................................................... 82 Find .........................................................................................82 Add..........................................................................................82 Edit ..........................................................................................83 Copy ........................................................................................83 Delete ......................................................................................83 Caller Groups..........................................................................83 Privacy Manager .....................................................................84 Business Card .........................................................................86 Activate ...................................................................................87 My Number ............................................................................87 SIM Status...............................................................................87 Call Records ........................................................................ 88 Missed Calls ............................................................................88 Received Calls .........................................................................88 Dialed Calls.............................................................................88 Delete All.................................................................................88 Table of Contents ix Call Duration..........................................................................89 Call Cost..................................................................................90 Messages.............................................................................. 91 Organizer ............................................................................ 92 Calendar..................................................................................92 To Do List ...............................................................................94 Note.........................................................................................95 Tools.................................................................................... 96 Alarm Clock............................................................................96 Shortcuts .................................................................................97 Voice Memo ...........................................................................97 Calculator................................................................................98 Currency Converter ...............................................................98 Stopwatch .............................................................................100 Countdown Timer ...............................................................100 Memory Status .....................................................................101 Service Number ....................................................................101 SIM Toolkit Menu................................................................101 Games................................................................................ 102 Champion Soccer .................................................................102 Dragon Fight.........................................................................107 Internet.............................................................................. 108 WAP Service .........................................................................108 Start Browser ............................................................................. 109 WAP Message............................................................................ 117 Enter Address ............................................................................ 117 Resume ...................................................................................... 117 Clear Cache ............................................................................... 117 x Table of Contents WAP Settings............................................................................. 117 JAVA .....................................................................................121 Multimedia ....................................................................... 126 Picture ...................................................................................126 Animation.............................................................................127 Melody ..................................................................................127 My Melodies.............................................................................. 127 Composer .................................................................................. 129 Help ........................................................................................... 132 Settings .............................................................................. 133 Date & Time .........................................................................133 Time........................................................................................... 133 Format ....................................................................................... 133 Secondary Time........................................................................ 134 Power On/Off .......................................................................134 Profiles ..................................................................................135 Display ..................................................................................140 Theme........................................................................................ 140 Wallpaper .................................................................................. 140 Welcome Message ..................................................................... 141 Contrast ..................................................................................... 142 Brightness .................................................................................. 142 Backlight Setting ....................................................................... 142 OLED Duration......................................................................... 142 OLED Animation Setting ......................................................... 143 Audio.....................................................................................143 Power Saving Mode..............................................................143 Call Settings ..........................................................................144 Call Divert ................................................................................. 144 Call Barring ............................................................................... 145 Table of Contents xi Call Waiting............................................................................... 146 Auto Redial................................................................................ 146 Show Number ........................................................................... 146 Fixed Dial Number ................................................................... 147 Active Line................................................................................. 147 Connect Alert ............................................................................ 148 Minute Beep .............................................................................. 148 Network ................................................................................148 Mode Selection.......................................................................... 148 Available List ............................................................................. 149 Band Setting .............................................................................. 149 Connection Mode ..................................................................... 149 Security .................................................................................150 PIN Code ................................................................................... 150 Phone Lock................................................................................ 151 SIM Lock ................................................................................... 151 Screen Lock ............................................................................... 152 Language ...............................................................................153 Input Mode...........................................................................153 Flip Activate..........................................................................153 User Group ...........................................................................154 Restore ..................................................................................154 5. Care and Maintenance .............................................. 155 6. Troubleshooting ........................................................ 157 xii Table of Contents Preparing Your Phone For Use Inserting a SIM Card 1. Turn the phone over, and release the battery latch. Lift the battery off the phone. Battery latch Do not remove the battery when the phone is on. Doing so could cause you to lose personal settings or data stored either on your SIM card or in the phone's memory. 2. Slide the SIM card in under the metal plate in the SIM card slot, with the SIM card's metal contacts facing down and the cut corner at the top right. Metal plate SIM card A SIM card can be easily damaged if its metal contacts become scratched. Therefore, take special care when holding or inserting it. Preparing Your Phone For Use 1 you wish to remove the SIM card, you / Ifmust first press down the stay, then push the SIM card out of the slot. Stay SIM card Installing a Battery and Charging the Phone 1. With the battery's metal contacts facing down, align the protruding tabs on the end with the holes in the battery bay of the phone. Then push the battery toward the end of the bay to insert the battery's tabs into the holes. Press down to click the battery in place. 2 Preparing Your Phone For Use 2. Insert the charger connector into the charger socket on the bottom of the phone. Make sure that the connector is inserted in the correct orientation (with the arrow pointing up). Charger socket Charger connector 3. Insert the charger into a power outlet. 4. Once the phone is fully charged, remove the charger from both the power outlet and the phone. Preparing Your Phone For Use 3 requires approximately 4 hours. / •• Charging When charging the phone while it is turned off, the external and main displays will be activated, and the status indicator light will flash blue (during the charging process, the external display will show the time and cycle through 3 animations, then turn off temporarily. This is normal. • During charging, in the external display's battery indicator , the lines showing the battery power level will scroll until the battery is fully charged. • When charging while the phone is turned off, the main display shows the animation. If the charging is performed while the phone is on, the main display shows the icon. The lines showing the battery power level will scroll until the battery is fully charged. • After the battery is fully charged, the status indicator light will flash purple. • When the battery is out of power, the phone will play an alert sound to remind you to recharge it and then will automatically turn off. Do not remove the battery while the phone is charging. 4 Preparing Your Phone For Use Turning the Phone On 1. Open the phone's flip. 2. Press and hold to turn the phone on. The phone will display the welcome animation. can select and set a welcome animation, image, or message / • You that will display when you turn on your phone, as well as the music that will be played. Go to the menu: Settings → Display → Welcome Message. For details, please refer to page 141. • If the welcoming music goes on too long, once the standby screen comes up, you can press to stop playback. 3. Enter your PIN1 number. If you enter the PIN1 number incorrectly, press (Clear) to delete the incorrect numerals. Press and hold to delete all numerals that have been entered. After completing entry of your PIN1 number, press confirm. to Preparing Your Phone For Use 5 8 The PIN (Personal Identification Number) is a password provided by a network operator with a SIM card. You need this password in order to use the SIM card. If you enter the PIN incorrectly 3 times in a row, the SIM card will lock down and no longer be usable. If this happens, you must enter the PUK (Personal Unblocking Key) for that SIM card in order to unlock it. Please contact your network operator to obtain a PUK. cancel PIN password authentication, go to the menu Settings → / ToSecurity → PIN Code → PIN1 Code. Please see page 150. 4. When the PIN code entered has been accepted, the phone will automatically search for the designated network. This search process may take a few seconds. 5. The phone will then ask you whether you wish to activate the phone book stored in the phone's memory or on your SIM card. Press to highlight the desired phone book and then press have selected. to open the phone book you 6. After you open the phone book on the SIM card, any data you browse, store, or delete will be from the SIM card's phone book. If you open the phone book in the phone's memory, any data that you view, store, or delete will be from the phone's phone book. at some later point, you wish to switch phone books, go to the / Iffollowing menu Phone Book → Activate. 7. The standby screen will be displayed, as well as network signal 6 Preparing Your Phone For Use strength and the name of the network operator. You can now use the phone. 8 If the phone cannot detect the network, the on-screen signal strength meter will show no bars. 8 If the phone links to a network that you are not authorized to use, the signal strength meter will show a level of zero. You will only be able to make emergency calls. Preparing Your Phone For Use 7 Getting to Know Your Phone Your Phone at a Glance The figure below shows the main parts of your phone: Front view 1 Antenna Status indicator light External display External speaker 8 Getting to Know Your Phone Front view 2 Earpiece Main display OK key Left soft key Dial/Answer key Scroll key Right soft key Power on/off key Messages menu key Alphanumeric keys Microphone Getting to Know Your Phone 9 Bottom and top views Hands-free Neck strap socket headset/Data cable jack Volume key Charger socket Active Flip Feature Opening the flip allows you to answer an incoming call. Closing the flip ends a call, cancels dialing, or rejects an incoming call. can turn the active flip feature on or off. To do so, go to the menu: / You Settings → Flip Activate. Status Indicator Light The status indicator light has the following functions: • Flashes blue when the phone detects a network or is charging. • Flashes purple when the battery is fully charged. • Flashes blue rapidly when there is an incoming call. 8 To turn off the status indicator light, you must start up the power saving mode. Go to this menu: Settings → Power Saving Mode. 10 Getting to Know Your Phone Standby Screen External Display When the flip is closed, the external display's status bar will show icons for network signal strength, battery power, and alarm (if active). The current time and an animation will appear in sequence. The external display can also alert you to incoming calls, text messages, and missed calls. you wish to set the time shown on the external display, go to the / • Ifmenu Settings → Date & Time → Time. See page 133. • In the default setting, the external display will show the time and several animations in sequence for one cycle. The external display will then temporarily power off. After it has powered off, you can turn it back on by pressing either the up or down arrow on the volume key located on the left side of the phone. • You can set the external display's cycling mode by using the menu Settings → Display → OLED Duration. See page 142. • You can choose the animations to be shown on the external display by using the menu: Settings → Display → OLED Animation Setting. See page 143. • You can go to the menu Settings → Profiles → Personal to change the name of the profile to your own user name. When this profile is activated and the phone's flip is opened, your own name will appear on the external display. For details, see page 136. Getting to Know Your Phone 11 Icons in the External Display's Status Bar Icon Function Description Signal strength Signal strength of the network. The more bars indicated, the stronger the signal. Battery status Shows the current level of battery power. The more bars indicated, the more power that remains. Four bars: fully charged. No bars: immediate charging needed. When charging the phone, the icon will scroll through the bars until the battery is fully charged. Shows that a text message is being received or that there are unread text messages. If Text message the icon flashes, this indicates that the SIM card's text message memory is full. For information about the text message function, see page 60, "Messages Menu". Voicemail Indicates that there are voicemails (this icon will only appear if the function is supported by your network vendor). Alarm The alarm is turned on. To set the alarm, go to the menu Tools → Alarm Clock. See page 96. In the standby screen, press and hold down Vibrating alert 12 the key to activate the vibrating alert. See page 54, "Using the Silent Profile". Normal Shows that the Normal profile is in use. To set the profile, go to this menu: Settings → Profiles. See page 135. Meeting Shows that the Meeting profile is in use. Getting to Know Your Phone Icon Function Description Outdoors Shows that the Outdoors profile is in use. Personal Shows that the Personal profile is in use. Handsfree Shows that the Handsfree profile is in use. Divert Shows that the call divert function is active.To set the call divert function go to the menu Settings → Call Settings → Call Divert. See page 144. Roaming Roaming has been activated (not your regular network) Getting to Know Your Phone 13 Main Screen Status bar Name of network operator Time and date Wallpaper Soft key bar Press to enter the Phone Book 14 Press to enter the main menu. Getting to Know Your Phone Press to enter the function/number shortcuts menu can set the animation or image you wish to use as wallpaper / • You when the phone is in standby mode by going to the menu Multimedia → Picture or Animation. Alternatively, you can go to the menu Settings → Display → Wallpaper. See page 126 and page 140. • To set the current time and date, as well as the format in which they will be shown in the main display's standby screen, go to the menu Settings → Date & Time. See page 133. • You can go to the menu Settings → Profiles → Personal to change the name of the profile to your own user name. When this profile is activated, your own name will appear in the standby screen on the main display. For details, see page 136. • For enhanced security, you can use the screen lock function. Go to the menu Settings → Security → Screen Lock. If the screen lock is activated, and you have not performed any tasks with the phone for a set time, the phone will automatically bring up the screen lock image. The purpose is to protect any personal data on your phone from being read by other persons. To restore the original display screen, you must enter a password that you provide for this function. For details on settings, see page 152. • After the standby screen remains for 10 seconds, the soft key bar, time and date, as well as all the other words currently displayed will automatically disappear, showing the full-screen wallpaper. You can also press to display/hide the status bar and words normally shown on the standby screen. Getting to Know Your Phone 15 Icons in the Main Display's Status Bar Icon Function Description Signal strength Signal strength of the network. The more bars indicated, the stronger the signal. Battery status Shows the current level of battery power. The more bars indicated, the more power that remains. Four bars: fully charged. No bars: immediate charging needed. When charging the phone, the icon will scroll through the bars until the battery is fully charged. GPRS network GPRS services have been activated on your SIM card. • Shows that a text message is being received or that there are unread text Text message 16 messages. If the icon appears in red, this indicates that the SIM card's text message memory is full. For information about the text message function, see page 60, "Messages Menu". Voicemail Indicates that you have voicemail messages (this icon will only appear if the function is supported by your network operator). Alarm The alarm is turned on. To set the alarm, go to the menu Tools → Alarm Clock. See page 96. Line in use Shows the number of the line currently in use. To set the line, go to the menu Settings → Call Settings → Active Line. For details, see page 147. Getting to Know Your Phone Icon Function Description Vibrate In the standby screen, press and hold to activate the silent profile. See page 54, "Using the Silent Profile". Normal Shows that the Normal profile is in use. To set the operating mode, go to the menu Settings → Profiles. See page 135. Meeting Shows that the Meeting profile is in use. Outdoors Shows that the Outdoors profile is in use. Personal Shows that the Personal profile is in use. Handsfree Shows that the Handsfree profile is in use. Divert Shows that the call divert function is active. To make settings for this function, go to the menu Settings → Call Settings → Call Divert. See page 144. Roaming Roaming has been activated (not your regular network) Getting to Know Your Phone 17 Using the Keys in the Standby Mode 8 In this user manual, "long-press" means to press and hold down a key for about two seconds before release. "Press" means to press a key and release immediately. 8 The chart below is meant only to introduce the commands accessible with keys when the phone is in standby mode. For information on other key commands available in other operating modes, see the pertinent sections in this user manual. Function keys any key is pressed, the phone will provide aural feedback / • When through keypad tones. To activate or cancel this aural feedback, enter the menu Settings → Profiles. Scroll to the profile currently in use and press (Edit). Then select Keypad Tone. You can also go to Settings → Audio → Keypad Tone to turn the aural feedback on or off. See page 138 and page 143. • After turning the phone on, press any key to activate keypad and display backlighting. To turn the backlighting on or off, and to set the duration of backlighting, go to Settings → Display → Backlight Setting. See page 142. 18 Getting to Know Your Phone Key Commands and functions Power on/off key • Long-press to turn the phone on or off. • Press this key to reject incoming calls or cancel a call being dialed. Send/Answer key • Press to send or answer a call. • Long-press and your phone will automatically call the last number dialed. • Press to access the list of last missed/dialed/received calls. OK key • Press to open up the main menu and show its first item. Left soft key • Press to access the Phone Book (when PBook is shown). • Press to save the phone number keyed in from the standby screen to the Phone Book (when Save is shown). Right soft key • Press this key to enter the menu for function and phone number shortcuts (when GoTo is shown). For information about the shortcuts menu, see page 55. • Press this key to delete entered digits one by one; longpress to delete all digits entered (when Clear is shown). • Long-press to turn the silent profile on or off. Getting to Know Your Phone 19 Key Commands and functions Scroll key • Press to open the main menu and show its first item. • Long-press to activate voice dialing. • Long-press to activate the voice memo function. Messages menu key • Press this key to enter the Messages menu. For a description of the Messages menu, see page 60. Asterisk key • Press this key to enter an asterisk " * ". • To make an international call, long-press this key until the display shows "+" ,Then enter the recipient's country code, area code and phone number. Voicemail key • Long-press to dial your voicemail number. # key • Press to enter "#". • For extensions: After entering a phone number, longpress to enter a "P" and then enter the extension number. 20 Getting to Know Your Phone Key Commands and functions Alphanumeric keys ~ • Press to enter digits in a phone number. • Shortcut key: Long-press a key to immediately access the function, or dial the number, that it represents. See page 55, "Shortcuts Menu". Volume key • Long-press the upper or lower portion of this key, located on the left side of the phone, to adjust the ring tone volume. Press the upper portion of this key or to increase the volume. Press the lower portion of this key or 8 When to decrease the volume. there is an incoming call, long-press the upper portion of the volume key to reject the call; long-press the lower portion to turn off the ring tone. Getting to Know Your Phone 21 Alphanumeric keys Key Digit Key Digit/Symbol/Function 1 7 2 8 3 9 4 0 5 * + (long-press) 6 # P(long-press after entering a phone number) 8 Long-pressing an alphanumeric key will access the function it represents, or dial the number that has been assigned to it (shortcut function). 22 Getting to Know Your Phone Menu Navigation When the phone is in standby mode, press to bring up the main menu and highlight the first item in that menu: Phone Book. 8 For details on how to use the various functions listed in the menu, see page 82, "Menus". can choose a display color for the menus by going to the menu / You Settings → Display → Theme. See page 140. Main menu The main menu item to which you have scrolled will be displayed as an animation. The name of the main menu item you have scrolled to. Each icon represents a sub-menu. Indicates that pressing will return the display to the standby screen. Getting to Know Your Phone 23 Sub-menus The highlighted row is the currently selected item. Press to scroll up or down to an item. The name of the current menu. Press to bring up the previous screen. Press to enter the highlighted menu item for editing. Press to enter the sub-menu represented by highlighted item or to activate the highlighted function. Press to bring up the next screen. Press to return to the previous menu or screen. Pop-up menus Press to scroll up or down to an item. Press to open a pop-up menu. 24 Press to close a pop-up menu. Press to enter the highlighted item or activate the function represented by the item. Getting to Know Your Phone Turning a function on or off Press to turn the selected function on or off (the currently selected function will be highlighted). After the selected function is activated, the display will usually show further setting options. Press to scroll to the desired setting option. Press to cancel and return to the previous screen. Press or to edit the setting. Press to confirm the setting. Getting to Know Your Phone 25 Menu navigation example The example given below demonstrates how to use menus to change the language setting. Regular access 1.In the standby mode, press or to open the main menu. 2.In the main menu, press to scroll to the Settings menu icon. Press enter this menu. to 3.In the Settings menu, press to scroll to the Language item (press to bring up the next screen, or press to bring up the previous screen), then press to enter the Language menu. 26 Getting to Know Your Phone 4.Press to scroll to the language you wish to use. Then press to confirm your selection. If, for example, you wish to set English as the display language, scroll to highlight English, and then press . The display will automatically return to the Settings menu, displayed in English. 5.Press (Back) repeatedly or press once to return to the standby screen. Access through number shortcuts 1.In the standby mode, press or to bring up the main menu. Getting to Know Your Phone 27 2.The location of items in the main menu corresponds to the position of the to keys in the alphanumeric keypad. Thus, pressing will bring up the Settings menu. 3.In the Settings menu, the alphanumeric keys to represent menu items 1 to 10. Since Language is item number 10 in the Settings menu, pressing will bring up the Language sub-menu. 4.Press the alphanumeric key that corresponds to the language you wish to select, as it is listed in the Language sub-menu. For example, if you wish to set English as the display language, press 28 . Getting to Know Your Phone 5.Press (Back) repeatedly or press once to return to the standby screen. Getting to Know Your Phone 29 Main menu map Select To enter When using the phone book stored in your SIM card's memory, the seventh item is SIM Status. There is no Privacy Manager item. 30 Getting to Know Your Phone Select To enter If your network vendor provides SIM toolkit valueadded services, they will appear as item number 10. Getting to Know Your Phone 31 Select 32 Getting to Know Your Phone To enter Using Your Phone Making a Phone Call Open the flip and make sure that the standby screen is shown on the main display. Enter the desired number using the alphanumeric keys to . Press to dial your call. / During a call, you can use the options. See page 51, "Call Menu". To modify a phone number that you have entered, press (Clear) to delete individual digits. Long-press (Clear) or press to delete all digits entered and return to the standby screen. Ending a Phone Call Press or close the flip to end a call. The display will show the total call time, and then return to the standby screen. / To cancel a call that is being dialed, press or close the flip. 8 If the flip function has not been activated, you cannot end a call or cancel dialing by closing the flip. To activate or cancel the flip function, go to the menu Settings → Flip Activate. 8 If you also have a call waiting or on hold, after you press , the display will show a menu to allow you to choose the call you wish to end. Using Your Phone 33 Answering a Phone Call When a call is received, your phone rings or vibrates, with the display showing the caller's number (if supported by your network vendor). If the caller is a contact stored in the Phone Book, the phone will show the name recorded in the Phone Book. caller is a member of a caller group, the ring tone assigned to / • Ifthisthegroup will sound. The display will show the animation that is associated with this group as well, to help you identify the caller. • For information on how to set up caller groups in the Phone Book, see page 39, "Adding Contacts to the Phone Book". Depending on whether your phone's flip is open or closed, you can do one of the following to answer a call: • If the flip is closed, opening it will allow you to answer the call. 8 If the flip function has not been activated, you cannot answer a call by opening the flip. To activate or cancel the flip function, go to the menu Settings → Flip Activate. • If the flip is already open, press to answer the call. 8 If you wish to change the answering mode so that you can press any key to answer a call, go the menu Settings → Profiles. After selecting the currently active profile, press Answer Mode → Any Key. 34 Using Your Phone (Edit) and go to Rejecting an Incoming Call • Regardless of whether the flip is open or closed, you can reject an incoming call by long-pressing the upper portion of the volume key on the left side of the phone. • When the flip is open, you can reject an incoming call by closing the flip or pressing . 8 If the flip function has not been activated, you cannot close the flip to reject an incoming call. To activate or cancel the flip function, go to the menu Settings → Flip Activate. Turning Off the Ring Tone for an Incoming Call Regardless of whether the flip is open or closed, you can temporarily mute the ring tone for an incoming call to avoid disturbing others. To do this, long-press the lower portion of the volume key on the left side of the phone. After the ring tone has been turned off, you can still open the flip to answer the call. Making an International Call 1. Enter the outgoing international call code, or long-press until "+" appears on the display. 2. Enter the recipient's country code, area code and phone number. Dial the call by pressing . Using Your Phone 35 Making an Emergency Call To call emergency services, enter 112 (the international emergency number) and then press to dial the call. You can make an emergency call even if your phone is locked or cannot access your network, or there is no SIM card inserted, so long as you are within range of a network of the type supported by your phone. Dialing an Extension Number After you enter a telephone number, long-press , The phone display will show "P". At this point, you can enter the desired extension number, and then press to dial it. Speed Dialing 8 You must assign a number key as the shortcut for a particular phone number in order to use speed dialing for that phone number. For information on how to set up a shortcut, see page 55, "Shortcuts Menu". After you have assigned a number key to serve as the shortcut key for a particular phone number, you can long-press this key when the phone is in the standby mode to dial the corresponding phone number. For example, if you have selected as the shortcut key for a certain phone number, long-pressing will dial this number. 36 Using Your Phone Voice Dialing 1. In the standby mode, long-press . 2. After a beep, when the display shows the "Recording…" screen, you can speak the voice dialing prompt for the number you wish to dial. Once the phone has correctly identified the contact associated with this voice dialing prompt, two situations may occur: a. If there is only one phone number stored for the contact identified, your phone will automatically dial this number. b. If there are two or more phone numbers stored for the contact identified, the display will show the contact's Phone Book data. You can then scroll to the number you wish to dial, pressing or to make the call. 8 To use voice dialing to make a call, you must have stored a voice dialing prompt for the desired number in Phone Book. For details, see page 39, "Adding Contacts to the Phone Book". Using Your Phone 37 Listening to Voicemails When your voicemail inbox contains new messages, your network vendor will send a text message notifying you that you have new voicemail messages (if the network vendor supports it, the icons will be shown in the external and main display's and status bars, respectively. There are two ways to access and listen to voicemail: 1. When the phone is in standby mode, long-press to directly dial the voicemail phone number and listen to your voicemail messages. 2. Go to the menu Messages → Voicemail to dial the voicemail number. 8 If the voicemail number is not stored on your SIM card or in the phone itself, you will not be able to access your voicemail by longpressing ,Generally speaking, network operators will store the voicemail number on a SIM card before giving it to you. If so, you will be able to dial your voicemail number by long-pressing when the phone is in standby mode, without needing to first manually store this number. If however your network vendor did not store the number on your SIM card, you will need to do this yourself. To save or modify a voicemail phone number, go to the menu Messages → Message Settings → Voicemail No. 38 Using Your Phone Phone Book Adding Contacts to the Phone Book The Phone Book will have different formats and data headings depending on whether you have chosen to use a phone book stored on your SIM card or in your phone's memory. 8 The phone book in your phone's memory can store up to 500 contacts. The capacity of a phone book on your SIM card depends on the particular service provided by your network vendor. SIM card Phone Book 1. In the standby screen, enter the phone number that you wish to store, then press (Save). The screen will show the Phone Book data fields for a new contact. 2. Press to scroll to the contact data field that you wish to edit. Press (Edit), or simply begin keying in data to enter and edit the currently selected field. After completing data entry and settings, press contact. to store the data for this The data fields provided by a SIM card phone book are as follows: The contact's name. The contact's mobile phone number. Using Your Phone 39 Used to select a caller group for the contact. Press to select a group and then press . When there is an incoming call from this contact, the ring tone assigned to this group will sound and the display will show the animation/image associated with the group. 8 To set a ring tone and animation/image for each caller group, go to the menu Phone Book → Caller Group. See page 83. 8 You can also go the menu Phone Book → Caller Group to set a caller group for a contact. 40 Using Your Phone Phone Book in the phone's memory 1. In the standby screen, enter the phone number you wish to store, and then press (Save). The display will show the default data fields for a new contact. 2. In the contact data screen, scroll to the data field that you wish to edit, and then press (Options) to bring up a pop-up menu. You can then use the following options with the contact data: • Edit: Edit the information in the selected field. 8 In the contact data screen, press or begin entering data to directly edit the data in the currently selected field. • Change Type: Change the category of the phone number (for example, from Mobile Number to Home Number). This option can only be used in the phone number data field. • Add New Field: Adds other data fields for a contact. • Delete Field: Removes the selected data field. 3. After completing the data for the various fields, you must press in order for the contact's data to be stored in the Phone Using Your Phone 41 Book. 8 If you do not wish to save a modified Phone Book record, press or (Back) to abort. 8 You can also add a new contact by going to the menu Phone Book → Add. • The default data fields for a contact are as follows: The contact's name. The contact's mobile phone number. The contact's home phone number. The contact's e-mail address. Used to assign a contact to a caller group. Press group, and then press to select a . Used to assign a voice dialing prompt to a phone number. After the beep, speak the contact's name into the microphone. After it is successfully recorded, the phone will play back this voice dialing prompt. • In addition to the contact data fields described above, you can also add the data fields listed below by pressing (Option) when the Phone Book screen is visible and then selecting Add New Field. The contact's mobile phone number. The contact's home phone number. 42 Using Your Phone The contact's work phone number. Other phone number for the contact. The contact's home address. The contact's work address. The contact's company name. The contact's department name. The contact's job title. Used for notes about the contact. Used to mark dates of special significance associated with the contact. Used to set a ring tone for the contact. When there is an incoming call from the contact, the phone will play this ring tone. 8 A ring tone set in this field will replace the one associated with the contact's caller group, if any. Used to set the animation/image that will appear on the phone's display when there is an incoming call from the contact. 8 The animation/image set in this field will replace the animation/image associated with the contact's caller group, if any. Using Your Phone 43 Finding Contacts in the Phone Book In the standby mode, press (PBook) to display contacts stored in the Phone Book. There are two ways to locate a specific contact in the Phone Book: • Press to scroll through the names (listed in alphabetical order) until the one you want is highlighted. • Press the alphanumeric key that corresponds to the first letter of the name you wish to locate the appropriate number of times. For instance, if the name starts with "K", you would press twice for "K". The names starting with "K" will appear, with the first one highlighted. Press to scroll to the name you want. 8 You can also go to the menu Phone Book → Find, and then enter the full name or the first letter of the name to locate a contact. When the desired contact's name is highlighted, you can do one of the following: • Press to dial the first phone number saved in that contact. • Press (Option) to bring up a pop-up menu, which contains the following items: Edit: Edit the Phone Book data for this contact. When you are finished, press see page 39. . For more information on editing, 8 If you do not wish to save a modified Phone Book record, press (Back) or Copy 44 to abort. to SIM (Phone): If you are currently using a phone Using Your Phone book stored in the phone's memory, you can copy the contact's data to the phone book stored on your SIM card. Conversely, if you are currently using a phone book stored on your SIM card, you can copy the contact's data to the phone book stored in the phone's memory. 8 The only information that can be copied from a phone book stored in the phone's memory to the one on your SIM card is a contact's name, phone number, and caller group. If a contact has more than one phone number associated with it, when that contact's data is copied from the phone to the SIM card's phone book, each phone number will be stored as separate contact. Delete: Erases the contact's data from the Phone Book. • Press to show the information in all data fields for that contact. You can then perform the following tasks: Scroll to the number that you wish to dial, and then press or . Scroll to the desired data field. If the complete contents cannot be displayed on the screen, or there is no content to display (for example, Note ), press to display the complete contents (if the data field is for a voice dialing prompt , you can press voice dialing prompt. to play the sound of this Press (Option) to bring up a pop-up menu that contains the following items: Using Your Phone 45 • Edit: Used to edit the Phone Book data for this contact. For information on editing, see page 39. 8 If you do not wish to save a modified Phone Book record, press or (Back) to abort. • Copy to SIM (Phone): If you are currently using a phone book stored in the phone's memory, you can copy the contact's data to the phone book stored on your SIM card. Conversely, if you are currently using a phone book stored on your SIM card, you can copy the contact's data to the phone book stored in the phone's memory. • Delete: Erases the contact's data from the Phone Book. • Send: Dial the currently highlighted number. Using a Location Number to Access a Contact's Data A contact's location number represents the / position where this contact's data is stored in the phone book on your SIM card or in your phone's memory. Location number To access data for a contact while the phone is in standby mode, enter the location number for this contact, and then press . The display will show the data for the contact stored at this location. 46 Using Your Phone For example, to display the contact data stored in the fifth position in the Phone Book, you would press and then . When the contact's data appears, you can perform the following tasks: • Scroll to the number that you wish to dial, and then press or to dial this number. • Press (Option) to edit, copy, or delete the data for this contact, or dial the currently highlighted number (equivalent to the Send option). Last Missed, Dialed, and Received Calls There are two ways you can view the last missed, dialed, and received calls on your phone, as well as information on their date and time: 1. If there have been any missed calls, the display will show a missed call message along with the number of calls that were missed. Press (View), and then press desired phone number. to scroll to the 2. In the standby mode, press to view the list of the most recent missed, dialed, and received calls. Press desired phone number. to scroll to the Using Your Phone 47 8 The icon will appear beside missed calls; the icon appear beside dialed calls; the calls. will will appear beside received 8 If a phone number has already been stored in the information for a contact in the Phone Book, the display will show the name of this contact. 8 If a call for the same number has been missed, dialed, or received two or more times, a note such as "x02" will appear beside the record of the call to show the number of times it was missed, dialed, or received. 8 If your network operator is not able to display a certain call's number, the list will not show a number for the call. When the number for a missed, dialed, or received call is highlighted, you can perform the following tasks: • Press to re-dial the number. • Press (Option) to bring up a pop-up menu: Dial the phone number. Save (Edit): If the phone number for the call has not been stored in the Phone Book, select the Save option to create a contact for this number in the Phone Book. If this phone number is already stored under a contact in the Phone Book, select the Edit option to edit this information for this contact. For information about editing Phone Book data, see page 39, "Adding Contacts to the Phone Book". Delete: Erases the record of the call from the list. Call: 48 Using Your Phone Delete • Press All: Erases all the calls in the list. to display the details on this call. The date and time of the last time this call was made. This name of the contact for the call (if the phone number has not been stored in the Phone Book, "Unknown" will be displayed. The phone number for the call. Press (Option) to select whether to dial the number, store or edit it, or erase the record of the call. Operations During a Call 8 The following options marked with an asterisk (*) are dependent on network support on may require a subscription. Adjusting the Earpiece Volume During a call, you can press the volume key on the left side of the phone to adjust call volume. Mute Press (Mute) to turn off the microphone. The person on the other end of the line will not be able to hear your voice. To restore the microphone's function, press (Unmute). Using Your Phone 49 Putting a Call on Hold* 1. When the only call is active: a. Press (Hold) to hold this call. b. Press to end this call. 2. When the only call is on hold: a. Press (Unhold) to resume the call. b. Press to end this call. 3. When there is an active call and a call on hold. a. Press (Swap) to resume the call that is on hold, and put the active call on hold. b. Press to show on the display a list of calls that you can end. Making a Second Call* Enter a phone number, or select one from the phone number or call record, and then press to dial it. The currently active call will automatically be placed on hold. However, if there is already one active call and another on hold, this action will fail. 50 Using Your Phone Call Waiting* If there is an incoming call while you are on the phone, a tone will sound through the earpiece and the display will show that a second call is currently waiting. You can handle the waiting call and currently active call in the following ways: 1. Answer the waiting call: Press The currently active call will automatically be placed on hold. However, if there is already another call on hold, a menu will appear on the display allowing you to select a call to end and then answer the waiting call. 2. Reject the waiting call: Press or (End). Pressing (End) will immediately reject the waiting call; pressing will bring up a menu on the display that you can use to select a call to end. Call Menu If you press during a call, it will bring up the call menu. Press to scroll to the desired item (press menu page by page) and then press to scroll through the to enter that item; press (Back) to return to the pervious menu; press directly to the call menu. to return 8 Items marked with an asterisk (*) depend on network support and may require a subscription. Phone Book Accesses data in the Phone Book. For details, see page 39, "Phone Book". Using Your Phone 51 Call Records Allows you to view information on missed, received, and dialed calls. See page 47, "Last Missed, Dialed, and Received Calls". Conference* Conference calls allow you to converse with more than one party at a time. The conference menu contains the following options: 8 The maximum number of parties that can be accommodated during a conference call depends on the particular service provided by a network vendor. Hold/Unhold/Swap* Toggles the call status. Join/Private Adds a party that is on hold to the current conference call, or isolates a single party in a conference call and puts all other parties on hold. Forward Allows two parties to connect, while ending one's own call (one of the two parties may be involved in an active call while the other is either on hold or being dialed), so as to allow the two parties to have their own call. 52 Using Your Phone Send DTMF When the phone is connected with other devices or services, you can send DTMF (Dual Tone Modulation Frequency) strings. DTMF strings are keypad tones that can be sent via the microphone as you dial another number. Your phone will emit the tones in order to communicate with answering machines, pagers, computerized telephone services, and so forth. Enter the phone number and then press string. to send the DTMF End Call End All Ends all calls, whether active or on hold. End Active Ends only the active call. End Hold Ends only a call or calls on hold. End One Ends only a single call. Hold/Unhold/Swap Toggles the call status. Mute/Unmute Activates/cancels the silent mode. Using Your Phone 53 SMS Enters the SMS (Short Message Service — i.e. text message) menu. For details on the SMS menu, see page 60, "Messages Menu". Calculator Allows you to use the calculator. For information about the calculator, see page 98. STK Brings up the menu for the STK (SIM Toolkit) services provided by your network vendor. Using the Silent Profile From the standby screen, you can long-press to activate the Silent profile. Once it is activated, the phone will alert you to an incoming call by vibrating with no ring tone. • When you long-press to activate the Silent profile, the phone will vibrate for one second. The icon will appear in the main display's status bar (the external display will show ) to remind you that your phone is currently using the Silent profile. • To cancel the Silent profile and restore the previously active vibrant and ring tone settings, long-press . feature is very convenient for switching to the Silent profile / This during, say, a meeting to avoid the disruption caused by a ring tone. 8 To set and select a profile, please enter the main menu's Settings → Profiles. See page 135. 54 Using Your Phone Shortcuts Menu You can use the Shortcuts menu to assign 9 alphanumeric keys as shortcuts to commonly used functions or frequently dialed numbers. Entering the Shortcuts Menu From the standby screen, press (GoTo) to enter the Shortcuts menu. The numbers 1 to 9 displayed in the menu's default screen represent the corresponding 9 alphanumeric keys on the phone. Setting Function Shortcuts 1. In the Shortcuts menu, press to move the selection box to the number key you wish to use as a shortcut key ( is selected in the example on the right). You can also press the actual alphanumeric key 2. Press (Option) to bring up a pop-up menu, and use press to select it. to select Add Function. Then . Using Your Phone 55 3. From the Add Function menu, press to select the function to be represented by the shortcut key , and then press . Alternatively, you can press a corresponding alphanumeric key to select the function you want. 8 The functions listed in the Add Function menu are selected from various other menus. For details on these functions, see page 82, "Menus". 4. After has been set as the function shortcut key, the '1' icon in the shortcut menu screen will be replaced by the icon for the function assigned to . The top of the screen will display the name of the function currently assigned to this key. 5. Repeat the above step to add or modify function shortcut key assignments. 56 Using Your Phone 6. To cancel a shortcut key and restore the key's original function, use to move the selection box to the icon for the shortcut key that you wish to cancel, and then press (Option). Select Delete to cancel the shortcut. 8 If you select Delete All, all shortcut settings will be cancelled. Using Your Phone 57 Setting Phone Number Shortcuts 1. The method for setting a phone number shortcut key is largely the same as for a function shortcut key. After selecting the shortcut key, press (Option) to bring up a pop-up menu. After selecting Add Phone, press to confirm. 2. From the Phone Book, select a contact, and then press . 3. Next, from the list of phone numbers for this contact, select the one that you wish to access through the shortcut key, and then press . 4. After you have set the shortcut key, the number icon for the key will be replaced by an icon representing a phone number shortcut. The upper part of the screen will display the name of the contact to whom the phone number accessible by the shortcut key belongs. 58 Using Your Phone 5. Repeat the above step to add or modify a phone number shortcut. Different categories of phone numbers will be represented by different phone number shortcut icons. Using Function and Phone Number Shortcuts There are two ways to use shortcuts: 1. From the standby screen, long-press to to access the function represented by that key or dial the number it represents. 2. From the standby screen, press Shortcuts menu. You can then: a. Press (GoTo) to enter the to move the selection box to the icon corresponding to the desired key. Then press to access the assigned function or dial the assigned phone number. b. Press the corresponding key to to access the function represented by that key or dial the number it represents. Using Your Phone 59 Messages Menu Your phone supports SMS (Short Messaging Service) text messaging and EMS (Enhanced Messaging Service), which allows you to add graphics and ring tones to your messages. You can use this menu to view, edit, and send SMS and EMS messages. From the standby screen, press to enter the Messages menu. You can also press when in the standby screen and then enter from the main menu by selecting . Additional information about messaging • Memory for storing messages is divided between SIM card memory and the phone's own memory. In the first level of the Messages menu, except for the SIM Folder option, messages saved in Inbox, Outbox, and Drafts are all stored in the phone's memory. • When a new message is received, or when there are unread messages in the phone's or SIM card's memory, the icon will appear in the external display's status bar; the main display will show the to remind you that you have unread messages. icon in its status bar • When a message has arrived, it will be saved either to the the phone's memory or to your SIM card's memory, depending on the preferred memory you have selected in the menu: Messages → Message Settings → Short Message Settings → Save New Msg To (See page 71). Messages saved to the phone's memory will be stored in the menu: Messages → Inbox; messages saved to your SIM card's memory will be stored in the menu: Messages → SIM Folder → Inbox. • If the phone's memory is already full, any new messages will remain stored in the SIM card's memory (in the menu Messages → SIM Folder → Inbox) until the SIM card's memory is itself full. 60 Using Your Phone • If there is a flashing icon on the external display, and the main display shows a red icon , this means that the SIM card's message memory is full. When the SIM card's memory is full, your phone will not be able to receive any new messages. If this has occurred, when you go to the Messages menu, the display will show a "SIM Full!" message to remind you of the current situation. • If the number of messages stored in the phone's memory has reached 500, when you enter the Messages menu, the "Message Full!" screen will appear. If there is less than 1K remaining in the phone's memory, the "Memory Insufficient!" screen will appear. In either of these two situations, any messages received will be saved to the SIM card, and you will no longer be able to edit any messages. • In the Messages menu, the number (such as "(1)", "(3)") following the name of each message folder represents the number of messages saved in that folder. The items in the Messages menu are as follows: Using Your Phone 61 Create 1. Used to bring up the message editing screen so you can write a new message. Use the alphanumeric keys to enter text. 8 For information on how to use the input methods provided by the phone for writing messages, see page 76, "Input Modes". 8 If no text has been entered in the editing screen, press to return to the standby screen; if some text has been entered, pressing will bring up the prompt "Back to Idle?", to make sure you wish to abort the message being edited. If you press (Yes), you will return to the standby screen; if you press (No), you can continue writing the message. 2. When writing a message, press (Option) to perform the following tasks: • Insert: You can insert the following types of objects: Text: This is a list of templates that can be used instead of entering all the characters individually. You can use the factory default templates or templates of your own that you previously saved to the list. 8 To create your own quick message templates, go the menu Messages → Template. See page 69. 62 Using Your Phone Picture: You can select an EMS icon from the EMS icon library to insert into your message. Press to select the name of the icon you wish to insert, and then press (View) to view the icon. Press to insert the icon into your message. Animation: You can select an EMS animation from the EMS animation library to insert into your message. Press to select the name of the animation you wish to insert, and then press (View) to view the animation. Press to insert the animation into your message. Melody: You can select an EMS ring tone from the EMS ring tone library to insert into your message. When the recipient of the message reads it, the inserted ring tone will be played by the recipient's phone. Scroll to the name of the ring tone you wish to use, and then press to insert the ring tone into your message. The inserted ring tone will be displayed as musical note within the message's text. can insert an EMS icon or animation at any position within a / You message's content. • Text Alignment: Used to select the type of text alignment for the message's content. 3. After you have finished editing the message, press . A screen in which you can edit the recipient's number will appear. There are two ways you can enter the recipient's phone number: • Key in the recipient's phone number in the number editing screen. Using Your Phone 63 • Before entering any phone number, you can press (Select) and then select a recipient from the list of contacts in the Phone Book. Follow the steps below: a. Press to scroll to the name of contact, and then press (Select) to select that contact. b. The display will show all the phone numbers stored for the contact you selected. Press select the desired phone number. 8 If the number is too long, press (Select) to to display the complete number. c. After the number has been selected, you must press to return to the list of contacts in the Phone Book. A check mark will appear beside the contact whose number you selected as recipient for your message. You can use the same steps to select the numbers of other contacts. d. After you have selected all the numbers you wish to dial, press and the display will show all these numbers. 4. After the numbers to be dialed have appeared on the screen, press to use the following options with this message: • Send Message: Sends the message to the numbers selected previously. 8 When a message is to be sent, a copy of the message will be saved to the Outbox folder. If the save fails, the "Save to Outbox Failed!" screen will appear and the send operation will stop. • Preview: Allows you to view the contents of the message. 64 Using Your Phone • Save to Draft: Saves the message to the Drafts folder, for sending at a later time. • Edit Content: Allows you to edit the contents of the message. SIM Folder The messages in the SIM folder are the messages stored in your SIM card's memory. Inbox If your SIM card was previously used in another phone, any messages received on that phone are stored here. When the SIM card is used in your S660C, and the phone's memory is full, any further messages that you receive will also be stored in the SIM card's inbox. The procedure for using this option is largely identical with that described below for using the phone's Inbox. However, after selecting a message and pressing (Option), the menu displayed includes four additional options: • Move to Phone: Moves the selected message from your SIM card's memory to the phone's memory. • Move All to Phone: Moves all messages to the phone's memory. • Copy to Phone: Copies the selected message from your SIM card's memory to the phone's memory. Using Your Phone 65 • Copy All to Phone: Copies all messages to the phone's memory. 8 The messages moved to the phone will be erased from the SIM card's memory, and cannot be moved back. 8 When there is 1K or less of free space in the phone's memory, the screen will display the message "Memory Insufficient!" and you will not be able to move or copy messages from the SIM card to the phone. 8 Only complete messages can be copied to the phone's memory. Outbox If your SIM card was previously used in another phone, saved messages or backups of sent messages will be stored here. Inbox 1. When new messages are received, the icon will appear on the external display, along with a text indicator of the number of messages received. After you open the flip, the main display will show the number of messages that have been received. 2. You can press to read the messages in the inbox. You can also press (Back) to return to the standby screen (The icon will appear in the standby screen's status bar, indicating that there are unread messages) and then enter the menu Messages → Inbox to read messages. A list of all new messages will appear on the screen, with each message record showing the sender's phone number. (If the sender is a contact stored in the Phone Book, the display will show the name of the contact in the Phone Book, rather than the phone number.) 3. Press 66 to scroll to the message record you would like to view. Using Your Phone You can now: • Press (Option), which will present the following choices: Allows you to write and send a new message. Delete: Deletes the selected message. Call: You can use the phone number used to send the message to call the sender. Forward: Allows you to edit the content of this message and forward it to another person. Save to Phone Book: Saves the phone number of the message's sender to the Phone Book. For information on how to save, see page 39, "Adding Contacts to the Phone Book". Delete All: Deletes all the messages in the inbox. Create: • Press to read the message's content. Then press (Option) to display the following options: Reply: Allows you to write and send a reply message. Delete: Deletes the message being read. Call: Uses the number from which the message was sent to call the sender (listed in the "Sender" item on the display), or dial a phone number shown in the contents of the message (the displayed number option). Scroll to the desired number, and then press to dial the number. Lets you edit the message's contents, and then forward it to another person. Details: Allows you to view the date and time when the message was sent. Save: Allows you to save the following content: Forward: Using Your Phone 67 • Save the phone number from which the message was sent (the number shown on the display in the "Sender Info" item) to the Phone Book. • Save the phone number displayed in the message's contents. (the option for a directly displayed number). • If the message is an EMS message with an attached picture or ring tone, you can save these objects to your phone's memory (such as by selecting the option for "Picture/Animation" shown on the display). Depending on the type of the object, the phone will save it to the corresponding EMS object library in the Multimedia menu. For example, if the object is an EMS animation, it will be saved to an available position in the Multimedia → Animation menu where you can use it in composing future messages. 8 If you are saving a picture or animation, you can select the Save as Wallpaper option, setting it as the wallpaper for the standby screen. 8 If you are saving a melody, you can also select the Save as Ring Tone option, setting it as the ring tone that will play when there is an incoming call. 8 For details on the Multimedia menu, see page 126. Save 68 All: Saves all the objects attached to the message. Using Your Phone Template You can use the quick message templates in this menu to compose a message without having to enter the entire text character by character. You can use the factory default templates, or templates that you previously saved to the list. Scroll to the desired template and then press to enter its text into your message. You can then edit the text as you wish and then send the message. To create your own quick message templates, press (Option) and then select Add. You can then enter the text for the template, pressing to save it. 8 If a template is one of the factory defaults, you will not be able to use the editing function to modify it. Outbox This option preserves a backup copy of messages that you previously sent. Scroll to the desired message record, and then you can: • Press (Option) to access the following options: Allows you to edit and send the message to its original recipients. Forward: Allows you to edit and forward the message to other recipients. Delete: Deletes the message. Delete All: Deletes all the messages in the Outbox. Resend: • Press to read the message. After reading the message, you can press (Option) to execute the following options: Using Your Phone 69 Resend: Allows you to edit and send the message to its original recipients. Forward: Allows you to edit and forward the message to other recipients. Delete: Deletes the message. Drafts This option allows you to preserve message drafts that you have saved. Scroll to the desired message record, and then you can: • Press (Option) to access the following options: Allows you to edit and send the message. Forward: Allows you to edit and forward the message. Delete: Deletes the message. Delete All: Deletes all messages in the Drafts folder. Send: • Press to directly edit the contents of the message. Voicemail Used to dial the voicemail number provided by your network vendor to listen to your voicemails. 8 Your network vendor will provide you with your voicemail inbox number and a number for accessing any other voicemail services. For detailed information about voicemail services, contact your network operator to see if you need to save a specific phone number to your phone in order to access your voicemail inbox. 70 Using Your Phone Message Settings This menu item includes a number of options for adjusting message settings: Voicemail No. You can save your voicemail phone number here. Short Message Setting Save New Msg to Here you can determine whether a new message will be saved to the phone's memory or to your SIM card's memory. Service Center No. This feature allows you to save the message center's phone number for sending your messages. The messages that you send are sent to recipients through this message center. Enter the message number provided by the network vendor. After you are finished, press to confirm. Bearer Mode This can be set according to whether you are using a GPRS network system or a regular GSM dialup network. If you are using a GPRS network, you can use both the GPRS and dialup network to send and receive SMS messages. If however you are using a dialup network, you are restricted to using only the dialup network for sending and receiving SMS messages. Using Your Phone 71 • GPRS: Use only the GPRS network to send and receive SMS messages. • CSD: Use only the dialup network to send and receive SMS messages. • GPRS Preferred: Use the GPRS network preferentially. Only if there is no GPRS network present will the dialup network be used. • CSD Preferred: Use the dialup network preferentially. Only if there is no GPRS network will the GPRS network be used. Validity Period This sets the duration that an undeliverable SMS message that you send can be stored at the message center. During this period, the message center will continue to attempt to deliver the message to the designated number. Message Type You can request that your network operator convert your text messages to different types. Status Report After activating this function, the network vendor will report to you when a message has been delivered. Direct Reply You can request that your reply to an SMS be sent directly through the sender's message center. 72 Using Your Phone Broadcast Cell broadcast messages are general messages that your network operator broadcasts to all phones within a particular area. These messages are broadcast in numbered channels. For example, channel 030 might be for local weather, 060 for traffic reports, 080 for information about local hospitals, taxis, pharmacies, and so forth. You can receive cell broadcast messages that your network operator broadcasts, and select your preferred topics and languages. 8 For more information about available channels and a list of the information they provide, contact your network operator. 8 When you receive a cell broadcast, the content will be displayed twice in ticker-tape fashion. Receive Allows you to select whether or not to receive cell broadcast messages. Topics Allows you to decide what information you wish to receive from your network operator's cell broadcasts. The topics listed in the Topics list represent the broadcast information that you have selected to receive from your network operator. If you have not previously saved any topics, you can press (Option) and then select the Add option so that you can enter the desired range of topic numbers (that is, the channel numbers). The upper and lower limits of the range are the highest and lowest channel numbers, Using Your Phone 73 respectively. The largest possible range is 0 to 65534. You are no longer limited to selecting only single channels, but can specify a range. After the list has stored the topic range, you can select a specific topic and then press (Option) to add it to the list. You can also edit or delete selected topics. Language You can limit the cell broadcast information that you receive from your network operator to a specific language. Press (Select) to select your preferred language, and then press . Cleanup Messages Allows you to erase specific messages based on the message category that you select in this menu. Memory Status Displays the amount of remaining available memory, including pictures, animations and ring tones stored on the phone. 74 Using Your Phone Voice Memo 1. When the phone is in the standby mode, long-press 2. Press . (Option) to bring up a pop-up menu. Select Add and then press . The voice memo screen will appear. Use to navigate to the button icons on the screen and access Voice Memo functions: a. Press to record. b. Press to stop recording. c. Press to play the voice memo. 3. After you are finished recording, press (Save) to save the voice memo. Enter the name of the recording and then press . 4. After you save the voice memo, the display will show the name of the voice memo. You can now: a. Press (Option), and then select whether you wish to record a new voice memo, rename the current voice memo, or delete the current voice memo. Using Your Phone 75 b. Press to play the voice memo. In the voice memo screen, you can press to play the previous or next memo. Input Modes Changing the Text Input Mode When the display shows the editing screen, The text input mode you will be able to see the name of the currently in use current text input mode in the upper right corner of the screen. Press the input mode. to change The input mode icons (names) that may appear in the upper right corner of the screen represent the following input modes: Uppercase letters input mode. Lowercase letters input mode. iTap (predictive input mode) for uppercase letters. iTap (predictive input mode) for lowercase letters. Numeric input mode (123). can set the default input mode to the one you most frequently / You use. Go the menu Settings → Input Mode. See page 153. 76 Using Your Phone Letter Input Mode (ABC) In this mode, press the key containing the desired letter repeatedly to scroll through the available characters in order until it is reached. How to use the letter input mode • You must press the key corresponding to the desired letter the correct number of times in order to enter the letter you want. Display letters for entry according to the order shown on each key. Pressing a key once will display the first letter listed on the key, while pressing it twice will display the second letter, and so on. • When you have entered a letter and wish to enter the next letter, either wait for two seconds until the cursor moves to the next text entry position, or immediately press the key for the next letter. • Press to enter a space before beginning a new word. • While entering text, press press to move the cursor left or right; to move the cursor up or down. Press delete a character; long-press once to to delete all entered content. Numeric Input Mode (123) The numeric input mode allows you to use the alphanumeric keys to to enter numbers. Using Your Phone 77 Predictive Input Mode (iTap) iTap analyzes letters as they being inputted, making intelligent predictions about the words you are attempting to enter, and speeding up text entry. How to use iTap • Press once the alphanumeric key corresponding to the first letter of the word you wish to enter without considering where that letter falls in the sequence of characters available through that key. Then press the key corresponding to the second letter, and so forth. The phone will predict which word you wish to enter based on the set of keys you have pressed. The predicted word will be shown in the lower left portion of the screen. This word may change as you continue to press other keys; therefore, before you have entered a complete word, you do not need to worry if the displayed word does not yet match the word you intend to enter. • After pressing keys for a complete word, if the displayed word does not match the one you intended to enter, press other candidate words and locate the desired word. to view • Once the correct word is displayed on the screen, press to enter this word. A space will automatically be inserted after the word. • While entering text, press press to move the cursor up or down. Press delete a character; long-press 78 to move the cursor left or right; Using Your Phone once to to delete all entered text. Example of iTap in use To enter "COME HOME" in the message editing screen using iTap, use the following steps: 1. Press to switch to iTap for uppercase letters (ITAP). 2. Press to select C, O, M, E. 3. Press to enter "COME" as text. A space will automatically be inserted after "COME". to enter "HOME". 4. Press 5. Since "GOOD" is not the word that you wish to enter, press to display the next candidate word, "HOME". 6. Press to place "HOME" into the message. Symbol Input Mode When editing messages, press along the bottom of the screen. Use to open the symbols field to move the selection box to the symbol you wish to enter, and then press in the message text. to place it Using Your Phone 79 Direct Connection to URLs Your phone provides handy preset URL text hotkeys, enabling you to enter a complete URL more quickly and conveniently, and making Internet access more efficient and enjoyable. From the standby screen, you can rapidly key in numerical URLs. If, for example, you wish to enter "http://123.com" you need only key in "123" and then press . The full URL will appear on the screen. automatically adds the necessary "http://" prefix and the ".com" domain suffix. To actually connect to this website, simply press to confirm and the phone's browser will be started up so that you can get online. When entering a URL, you can also use functions: to access the following • After pressing once, further presses of URL suffixes shown in the chart: will switch to the Number of Output result times 0 . com 1 .com.tw 2 .net 3 .net.tw 4 .com.cn 5 .net.cn • You can convert (*) into the (.) that appears in URL addresses. For example, if you enter 123*456 in the standby screen, and then press appear on the screen. 80 Using Your Phone , the URL "http://123.456.com" will • After you press to enter "http://" press to enter "/" and "-". For example, if after you enter "123" and then press once-causing "http://123.com" to appear on the screen-you press Pressing again, the URL will change to "http://123.com/". again will switch between "/" and "-". • When the screen shows the desired URL, press to connect to the Internet and access this URL address. Using Your Phone 81 Menus The phone's menus provide various features. The main menu consists of 9 icons. Each icon represents a particular menu item, which is used to access related sub-menus. For information about navigating menus, see page 23, "Menu Navigation". Phone Book This menu provides various functions for managing the Phone Book, including the ability to add, locate, and copy contact data; add contacts to a caller group; and so forth. Find Used to locate a contact in the Phone Book. You can enter the full name of the desired contact, or if you are not sure about the spelling of the contact's name, simply enter the first letter, and then press . The phone will locate all contacts whose names begin with this letter, and you can scroll to the field containing the contact you want. For details on what to do after locating the desired contact, see page 44, "Finding Contacts in the Phone Book". Add Used to add a new contact to the Phone Book. You can follow the procedure described on page 39, "Adding Contacts to the Phone Book". 82 Menus Edit After selecting a particular contact, you can follow the procedure described on page 39 for editing the data for this contact. Copy If you are using the phone book stored in the phone's memory, you can copy contact data to the SIM card's phone book, and vice versa. You can select a contact to copy from one phone book to the other, and copy all contacts in one phone book to the other by choosing the option Copy All Phone Book to SIM (Copy All SIM Phone Book to Phone). Delete Deletes a contact from the Phone Book. You can delete one contact at a time, or delete all contacts at once. If you select the option to delete all contacts, you will be asked for your phone password (the default password is "1234"). Caller Groups Caller groups are combinations of phone settings used to identify a particular group of contacts, such as work colleagues, family members, or friends. For example, you can associate a ring tone and animation with one group, and when a member of that group calls, the phone will use the group's ring tone and display its animation. The phone provides 5 caller groups: Colleagues, Family, Friends, VIP, Others. After you scroll the caller group that you wish to configure, you can perform the following tasks: Menus 83 • Press (Option): Used to select the ring tone or animation/image that will help you identify the caller group to which a particular caller belongs, or to rename the caller group. • Press : Allows you to view a list of all contacts that belong to the caller group. Press contact, and then press options: Add: to highlight the desired (Option) to access the following Add a contact to the caller group. Press to select a contact to add, and when finished press . Deletes the selected contact from the contact group. Delete: Privacy Manager This option allows you to set your phone to reject certain calls, or alternatively, specify which calls to accept, rejecting all others. 1. First, create a list of calls that you wish to accept (Accept List) or a list of calls that you wish to reject (Reject List), by scrolling to the corresponding item. Then press (Edit) and the names of the contacts who are already on the selected list will be displayed. If the list is empty, press 84 Menus (Option) and then select Add to choose contacts to include in the list. 2. You can select all the members of a caller group to be added to a list, or you can select contacts from the Phone Book individually (the screen will first display the caller group option). Press to scroll to the caller group or contacts that you wish to add to the list, and then press (Select) to make your selections; press (Cancel) to clear the caller group or contacts that you have selected. 3. When you are finished, press . The screen will display the names of the contacts you have added to the list. If needed, you can press (Option) to add or remove contacts. When you have confirmed the list, press Privacy Manager menu. (Back) to return to the 4. Lastly, select whether to activate the Accept List or the Reject List. Press to scroll to the list that you wish to activate, and then press to confirm your choice. Menus 85 If you choose to activate the Accept List, from now on your phone will only be able to receive calls from contacts in the Accept List. If, on the other hand, you choose to activate the Reject List, your phone will not be able to receive calls from contacts in the Reject List. 8 The same contact cannot be included in both the Accept List and the Reject List. 8 If you are currently using the phone book on your SIM card, you will not have access to the Privacy Manager feature. Business Card You can use this option to enter your own business card information. The data fields are as follows: Your name. Your mobile phone number. Your e-mail address. Your company's address. Your job title. Press to scroll to the data field you wish to edit, and then press (Edit), press , or begin entering text to edit the data in this field. After you are finished entering the data you wish to, press 86 to save all the business card data. Menus Activate Used to activate the phone book stored in the phone's memory or on your SIM card. Press to highlight the desired phone book and then press . My Number This option allows you to save your SIM card number and name to your SIM card's memory. Press (Option) and select Add. Now select whether you want to enter your name or number and then press (Edit) or to begin entering the information. When you are finished, pres , and the screen will display the name you have stored in your SIM card's memory. You can press (Option) to add more data, edit the currently selected data, or delete the currently selected data. SIM Status Used to view how many additional entries can be stored in the SIM card's phone book and the maximum number of entries that it can store. Menus 87 Call Records 8 Your network operator must support this feature in order for you to be able to use it. This menu includes a list of your missed calls, dialed calls, and received calls. Call costs and time are also recorded. Missed Calls Shows your most recent missed calls. Press to scroll to the missed call that you wish to select. You can now choose to view, edit, or delete the number for the missed call. The procedure is the same as that described on page 47, "Last Missed, Dialed, and Received Calls". Received Calls Shows your most recent received calls. The procedure for using this feature is the same as that described on page 47, "Last Missed, Dialed, and Received Calls". Dialed Calls Shows your most recent dialed calls. The procedure for using this feature is the same as that described on page 47, "Last Missed, Dialed, and Received Calls". Delete All Deletes all call records. 88 Menus Call Duration 8 This feature is only accessible if supported by your network operator. Last Call Time Shows the duration of the last call. All Calls Time Shows the total time for all calls. Received Calls Time Shows the total time for all received calls. Dialed Calls Time Shows the total time for all dialed calls. Clear Clears all call time records. 8 You must enter your PIN2 code in order to zero call times. is a PIN2 code? / What • The PIN2 is the second PIN code. Its main use is in controlling restricted services-for example, call time limits and restricted phone numbers. • If the PIN2 code is incorrectly entered three times consecutively, the PIN2 code will be locked. To unlock the PIN2 code, you will need to enter the PUK2 code, which you obtain from your network operator. Menus 89 Call Cost Last Call Cost Shows the cost of your last call. 8 Requires the support of the network operator. All Calls Cost Shows the total cost of all calls. 8 Requires the support of the network operator. Clear Clears all call cost records. 8 Requires entry of the PIN2 code. Call Cost Limit Shows the current limit set for total call costs. Set Cost Limit Allows you to set a limit for total call costs. If call costs exceed this limit, the phone will no longer be able to dial pay calls. When this feature is activated, the remaining cost will be displayed in the information box on the screen each time you end a call. 8 Requires entry of the PIN2 code. Set Units Allows you to first enter the unit price and a currency for calculating call costs. 8 Requires entry of the PIN2 code. 90 Menus Messages For a description of the features available in the messages menu, see page 60, "Messages Menu". Menus 91 Organizer Calendar You can use the Calendar to set up memos for forthcoming events such as a meeting, an appointment, or a friend's birthday. The Calendar will also remind you about events you have previously scheduled. 1. When you open the Calendar, the phone will show the calendar for the current date. 8 If you have not set the current date on your phone, go the menu Settings → Date & Time. See page 133. In the Calendar screen, press to move the red box to the date where you wish create a memo. You can also press (Option) and select the Go to Date option, then enter the desired date, When the Calendar is opened, the current date will be highlighted by a red box. pressing to confirm your selection of that date. 2. When the red box is highlighting the desired date, press (Option) and select the Add option to open the memo editor. 3. In the memo editor screen, scroll to the data field you wish to edit, and then press 92 Menus (Edit) or , or press alphanumeric keys to begin entering data. You can enter data in these fields: Change the memo's assigned date. In the Calendar screen, press to scroll to the date where you wish to create the memo, and then press . Enter a time for the event associated with the memo by using the appropriate number keys. Enter a name for the event associated with the memo. Enter the scheduled location for the event associated with the memo. Enter the names of the participants in the event associated with the memo. Record any notes about the event associated with the memo. Scroll to this option to set up your phone to remind you about an event. On the appointed date, when the scheduled time arrives, the memo will appear on the screen and the Alarm Clock will ring. First press to activate this feature. The time field will appear beneath, and you can enter the time when you wish to be reminded about the event. 4. After completing entry of data in each of the fields, you must press to save the memo to that date. The phone will display this date's memo list, including the event name and time for the memo you just saved. If the Alarm Clock has been set to remind you about the event associated with the memo, the icon will Menus 93 appear beside the event name. 5. You can now perform the following tasks: a. Press (Option) to select whether to edit or delete the memo. b. Press press to view the information in the memo. Then (Option) to edit or delete the memo c. Press (Back) to return to the Calendar screen. You can move the red box to other dates to create additional memos (dates that already contain memos will be marked by a yellow box); you can also create a second memo for the same date. The procedure is identical to that described previously. 6. After creating all the event memos you wish, return to the Calendar screen. You can now press (Option) and select: • Delete All: Deletes all currently saved memos. • Auto Delete: If this feature is activated, all event memos for dates prior to the current date will be automatically deleted. To Do List You can use this feature to create a list of work tasks or personal projects. 1. Press (Option) and then select Add to bring up the editor window. After entering the name of the task, press to create this to do item. 2. In the list screen, scroll to the desired to do item, and then press (Option) to add a new to do item, or to edit or delete the selected to do item. If there are two or more items in the list, 94 Menus you can select Delete All to delete all of them. 3. In the list screen, if there are any to do items that have already been completed, you can scroll to the item and then press to mark it to remind yourself that the task has been done. If you press (Option), you can activate the Auto Delete, which will automatically clear any to do items that you have marked as completed. Note You can use this feature to create a list of notes. 1. Press (Option) and select Add to bring up the editor screen. Enter the desired text and press . 2. A message on the screen will ask whether you wish to add a password for this note. If you press (Yes), you will from then on need to enter the phone password in order to view the contents of the note. Press adding a password. (No) to save the note without 8 The default phone password is 1234. To change the password, go to the menu Settings → Security → Phone Lock. See page 151. Menus 95 Tools Alarm Clock activate the Alarm Clock feature, when the specified date and / Iftimeyouarrive, the phone will sound the alarm, even if your phone is turned off. Use the following steps to set an alarm: 1. Select an alarm you wish to set and activate. 2. Press to select the feature for activation. The configuration fields for the alarm will appear in the lower part of the screen. Day Used to set the alarm to go off on a particular day from Monday to Sunday. Press (Edit) to display the days of the week. Press (Select) to make your selection. When done, press to return to the Alarm Ring screen. The Day field will now indicate the days on which the alarm will go off. 96 Menus The days on which the alarm will go off. Time Allows you enter the time when an alarm will go off. Time Duration Allows you to set the length of the alarm. Press the desired alarm duration and then press (Edit) to select . 3. Lastly, you must press to save all your current Alarm Clock settings. After completing Alarm Clock settings, will appear in the external display's status bar; will appear in the main display's status bar. the alarm rings, there are two ways to turn it off: / When • Press (Snooze) to stop the alarm. The alarm will ring again five minutes later. • Press to turn off the alarm. The alarm will not ring until the next scheduled time. Shortcuts For a description of the features accessible through the Shortcuts menu, see page 55, "Shortcuts Menu". Voice Memo For a description of the features accessible through the Voice Memo menu, see page 75, "Voice Memo". Menus 97 Calculator Allows you to use the phone as a calculator. Use to perform the mathematical operations shown on the screen. 8 You can enter numbers up Entered numbers and calculation results will appear in this field. Press to enter a decimal point. to a maximum of 8 digits in length. Currency Converter Below is a description of the Currency Converter screen: Once you enter the Currency Converter screen, the default currencies will be displayed, as shown in this example: Currency 1: EUR (euros) Currency 2: USD (US dollars) For entering the amount for conversion The current exchange rate setting 1. To set the currencies for conversion, press (Option) and select either Currency 1 (to set the currency at the top of the screen) or Currency 2 (to set the currency at the bottom of the screen), then press to confirm. After selecting a currency from the list, press 98 Menus . 2. Used to set the exchange rate. Press (Option) and select Rate Setting, then enter the rate for converting from Currency 1 to Currency 2. The conversion calculation result will be displayed in the same line as the bottom currency on the screen. Use the to view the calculation result. The calculation can provide precision up to two decimal places. 8 The exchange rate field can accommodate a maximum of five digits (including decimal digits). 8 Press to enter a decimal point. 3. After returning to the Currency Converter screen, you can select one of the currencies and then enter an amount that you wish to convert into the other currency. 8 You can enter amounts up to six digits long. 4. After pressing the converted amount will appear in the field for the other currency. Menus 99 Stopwatch 1. Press to start the stopwatch. 2. While the stopwatch is running, you can press (Split) to save up four elapsed times (such as in a race). The display will show the saved times in the lower part of the screen. 8 Pressing (Back) while the stopwatch is running will bring up the "Quit?" warning message (the stopwatch will continue to run). Press stop the stopwatch or screen. 3. Press (Yes) to (No) to return to the timer to halt the stopwatch. 4. Once the stopwatch is halted, press stopwatch. (Reset) to zero the Countdown Timer 1. Enter the amount of time to count down. You can set any time up to 23 hours, 59 minutes and 59 seconds. 2. When you press , the countdown timer will begin counting down to zero. When the countdown is finished, the screen will display the "Time's Up" message and an alert sound will be played. Press (Exit) to leave the screen. 3. Press to stop the countdown timer. 4. After the countdown timer is stopped, you can press (Reset) and enter a new time to count down. 5. When the countdown timer is running, press 100 Menus (Back). The "Stop Timer?" message will appear. If you press (Yes), the countdown timer will stop and return to the timer screen. If you press (No), you will exit the countdown timer screen, but the countdown timer will continue the countdown. You can then perform other tasks, and when the countdown is finished, the "Time's Up" message will appear and an alert sound will be played. Press (Exit) to exit the screen. Memory Status Shows the amount of memory, including space for storing pictures, animations, and ring tones on the phone. The amount will be displayed as "Remaining Usable Memory / Total Usable Memory". Service Number This option can be used to display the service number that the network operator has stored on the SIM card. 8 Requires network operator support. SIM Toolkit Menu Your network operator provided you with the mobile services in this SIM Toolkit (STK, for short) menu. Depending on the particular services provided by the network operator, this menu may contain a number of extra options. However, if the network operator has not provided any STK services, this menu will not appear on the screen. For detailed information, contact your network operator. 8 Requires network operator support. Menus 101 Games Your phone provides a number of exciting games that you can use to entertain yourself when you have a spare moment. Champion Soccer This game lets you manage one of the world's top eight soccer teams in its quest to win the greatest prize in world soccer. 1. After choosing this option, select Start to enter the game's opening screen. Press and select START to begin a new round of play. 2. Select World Cup Mode or Arcade Mode. 102 Menus 3. In the World Cup Mode, you can select your own team with the opposing team selected at random by the phone. If your team wins, you face the next team as you make a challenge for the World Cup title. In the Arcade Mode, you can select your own team and the opposing team to play a single game. Press to select a flag representing a national team, and then press to confirm. 4. After the message announcing the first half appears, press to begin the game. Menus 103 Game Controls •Controls the direction of the player's movement •When attacking, use these three keys to select which player to pass the ball to. •When on defense, use these three keys to select players to move. •Controls the direction of the player's movement. •When on defense, •When attacking, to press take a shot on goal. press to tackle. During the game, you need to control your three players on the pitch, while your goalkeeper is controlled by the phone. • When attacking, use to , alphanumeric keys, excepting and (the ) to move the players. Use to to pass the ball (you will see the player's number on the screen), and when near the goal, press to take a shot on goal. • When on defense, use to , (the alphanumeric keys, excepting and ) to move a player. Use to to select a player to move (you will be able to see the player's number on the screen). When a player on the opposing team is near the goal, use to tackle. 104 Menus • If you want to stop a game during play, press and . Game screen The opposing team The opposing team's score Timer Your team Your score The number of the player you are controlling. Full pitch view White point: The position of the player you are controlling Black point: The ball's location Blue points: Your teammates Red points: Players on the opposing team. Game options • START: Begins a new game. • Continue: Resumes an interrupted game. Usable only in the World Cup Mode. • Controls: Brings up an explanation of how to use keys during a game. • Ranking: Records the rankings of the teams after a tournament in the World Cup Mode is completed. Menus 105 • Option: Sound: Press to adjust the volume, or to turn off background music. Mini Map: Shows/hides the full pitch view. Time: Sets the duration of a half. • Exit: Quits this game. 106 Menus Dragon Fight The flying dragon that you control must make incursions into hostile territory and destroy enemies. Select Start to enter the game's opening screen, and then press to begin play. The more enemies you destroy, the higher your score. If you collide into an enemy, you lose one flying dragon. Score Pick up objects like this to increase the power of your weapon Press Enemy to control the direction of the dragon's flight Super Bombs Shield Number of remaining dragons Press to launch a firestorm or bring up a protective shield Press to shoot the laser gun or fireballs Press to increase the power of your weapon. Menus 107 Internet Your phone includes a built-in WAP browser, allowing you to use the phone for mobile Internet connectivity. You can browse the online services offered by the network operator or ISP, such as information on financial news, sports, travel, and entertainment. To use the phone to get online, necessary WAP and GPRS settings must be made in this menu. 8 You must apply to a network operator for WAP services and complete WAP and GPRS settings in this menu before you will be able to take advantage of mobile Internet connectivity. In general, once the service you have applied for has been activated, the network operator will automatically transmit the needed settings to your phone. If this is not the case, you must perform this configuration yourself. For information about WAP and GPRS services and configuration details, contact a network operator providing these services. WAP Service Your phone provides the following methods for activating the browser / and getting online. 1. From the standby screen, activate the browser and get online by using the feature that allows you to connect directly to URLs. For details, see page 80, "Direct Connection to URLs". 2. Activate the browser from the three options in the menu Internet → WAP Service: • Start Browser: Starts up the browser and connects to the homepage. • WAP Message: Starts up the browser and accesses the WAP inbox for reading text messages. • Enter Address: Starts up the browser and connects to the URL that you enter. 108 Menus Start Browser Starts up the browser and connects to the homepage. Browsing a webpage Referring to the soft key commands at the bottom of the screen, press and to perform needed tasks while browsing a webpage. Press to scroll up or down a webpage. For details on browsing a webpage, inquire with the network operator providing WAP services. Your Internet connectivity service will determine the layout and content of the webpages you view. Depending on the specifics of your service, they way you browse the Internet on your phone will differ. How to close the browser and end the online session • While online, press or long-press . • If you are already viewing a WAP webpage, long-press or from the browser's menu select Exit. Menus 109 How to display the browser's menu While viewing a WAP webpage, press to display the browser's menu. Referring to the soft key commands at the bottom of the screen, press and to access the various options. Press the corresponding alphanumeric keys to directly select an option. The browser menu contains the following items: Back Selecting this option will take you to the page you viewed previously. Home Returns to the home page. To designate a particular page to be your home page, go to 9 Settings → 1 Homepage. Exit Closes the browser and returns you to the main menu screen. Inbox When your phone receives a message that can only be viewed using a WAP browser, you enter this WAP inbox to read the message. 110 Menus Bookmarks You can open the Bookmarks menu and select webpage bookmarks. View Allows you to see the current bookmarks and bookmarks folders. Scroll to the desired bookmark or bookmarks folder, and you can: • Press (Go) to link to the webpage that the bookmark represents. If you have selected a bookmarks folder, select the desired bookmark from within the folder, and then press • Press (Go). (Menu) to display the following options: Details: Displays the bookmark's title and the URL it represents. Delete: Deletes the bookmark or bookmarks folder. New Bookmark: Creates a new bookmark. New Folder: Creates a new bookmarks folder. Move to Folder: Moves a bookmark to the designated folder. Delete All: Deletes all bookmarks and bookmarks folders. Menus 111 Hotkeys: Allows you set a numerical key as a hotkey for a bookmark. After completing the setting, you can press this numerical key to directly link to the webpage represented by the bookmark. Mark Site Adds the current webpage to your bookmarks list. GoTo URL Press (Edit) and enter the URL of the webpage that you wish to browse, and then scroll to the Go option and press (Go) to link to that URL. Save Items When viewing a webpage, if you discover that it contains an image that can be downloaded, you can access this option to save the image to your phone. Subsequently, this image will be available for use when you are composing messages or choosing a standby screen wallpaper. Reload Reloads the current webpage. Settings You can enter this item to making the following settings: 8 For detailed information about the following settings, contact your ISP. 112 Menus Homepage Designates a homepage. When you start up the WAP browser or if you select Home from the browser's menu, the screen will display the homepage you designate. a. Press (Edit) and then enter the URL of the webpage that you wish to use as your homepage. (Some WAP service providers do not allow users to set a homepage.) b. Select the Save option to designate the URL you entered as your homepage. Select Use Default to use the homepage designated by your WAP service provider. Scroll Mode You can select two scrolling modes: Block or Smooth. In the Block mode, as many words as will fit in a line are shown for a few seconds, then the next line is shown, and so on. In the Smooth mode, the content scrolls smoothly on the screen. You can also adjust the scrolling speed: Fast, Medium, Slow. Send Referrer This option allows you to determine whether the browser will send an HTTP referrer header. Menus 113 Key Press Timeout This option sets the amount of time that the phone waits during text entry before automatically advancing the cursor to the next entry position. As long as the same key is re-pressed within the interval of time set here, it will continue to cycle through the characters available through that key. Set Proxy Your phone can save the settings for six WAP proxy servers. You can select one of these proxy settings for use as a default so that your phone will connect to that proxy server when you begin an Internet session. You can also go to the menu Internet → Wap Service → Wap Settings to select the server that you wish to activate. See page 117. Circuit Prompt The Circuit Prompt is a message displayed before each circuit data call is made. It reads, "Circuit is down. Start a data call?" You can choose to enable or disable this feature. Security Secure Prompt The Secure Prompt message is displayed before you leave a secure area. It reads, "Entering a nonsecure area. OK?" You can choose to enable or disable this feature. 114 Menus Current Certificate Displays information on the certificate currently in use. CA Certificates Displays information on the built-in certificate. A certificate is a digital ID issued by a trusted third party known as a certificate authority (CA). The phone uses CA certificates to authenticate websites that send information to the phone. Authentication You can decide whether your phone should store your user name and passwords for websites that require them. If you allow your phone to authenticate you automatically, you will not need to re-enter your user name and password each time you visit the same website. Advanced Restart Browser Restarts the browser, and automatically returns to the designated homepage. This feature is provided for your convenience if network errors occur, allowing you to restart the browser and reestablish your Internet connection. Downloads If this option is enabled, you will not be able to download images, background audio, and objects. Menus 115 View Title Region You can choose whether or not to have the browser display webpage titles. You can also set this option so that titles exceeding a certain length will be split into separate lines. (The first line of the browser displays a "G" and a globe image, while the second is the "title region". The actual webpage content begins on the third line.) About… From here, you can view information about the version of the browser that you are using. 116 Menus WAP Message Starts up the browser and displays the WAP inbox so you can read WAP messages. Enter Address Starts up the browser and connects to the URL you enter. Resume Returns to the last webpage you viewed. Clear Cache Clears webpage content that the browser temporarily stores in memory. WAP Settings In this menu, you can make settings for the WAP servers of six different network operators, and select the server that you would like to use when connecting to the Internet. The first time that you start your phone after inserting a SIM card, the ISP name of the network operator issuing the SIM card will appear in this menu's first group of settings. This indicates that your network operator's WAP server settings will be saved under the name shown. The phone will activate this group of settings for use in connecting to the Internet. To activate another set of WAP server settings, scroll to the group of settings you wish to use and then press . The phone will activate these settings for use in connecting to the Internet. Menus 117 By scrolling to a particular group of WAP server settings that you wish to modify, and then pressing (Option), you can create a new group of settings, edit the settings, or delete the settings. WAP server settings include the fields listed below. Press (Edit) to edit the setting in each field. When you are finished with the settings for all fields, you must press in order for this group of WAP server settings to be saved. • Profile Name: Gives the WAP server settings a name. • Homepage: Sets the webpage that the browser will link to when it is started up. After you enter this item, key in the URL for the webpage that you would like to use as the homepage — for example, http://wap.yahoo.com. • IP Address: Enter the IP address used for accessing the mobile Internet. • Port: Enter the connection port specified by the network operator — for example, 9201. • Bearer Mode: Before connecting to the Internet, you must set this item according to whether your Internet connection bearer mode is a GPRS network system or a GSM dialup network. Doing so will allow you to properly link to the data network to browse WAP pages, download Java programs, and so forth. If you are using a GPRS network, you can use both the GPRS and dialup network to connect to the Internet. If, however, you are using a dialup network, you are restricted to using only the dialup network to connect to the Internet. 118 Menus GPRS/CSD: Use the GPRS network preferentially. Only if there is no GPRS network present will the dialup network be used. GPRS: Use only the GPRS network. CSD/GPRS: Use the dialup network preferentially. Only if there is no dialup network will the GPRS network be used. CSD: Use only the dialup network. A dialup network is a GSM Circuit Switch Data Service (CSD / for short). Using a dialup network can be likened to using a home computer's modem, in that before connecting to the Internet a number must be dialed. As for GPRS, it like the LANs used at company, where users do not need to dial a number to access the network. Regular GSM users who are not using a GPRS network system can only have a dialup connection to the Internet. • GPRS: To modify settings for a GPRS account, press (Edit) to edit the settings in each field. GPRS settings include the following fields: APN: Enter the APN (Access Point Name) assigned by your network operator. User Name: If needed, enter the user name provided by your network operator. Password: If needed, enter the account password provided by your network operator. • CSD: If you are using a GSM network, you must configure and activate a CSD account. Press settings in the following fields: (Edit) to edit the Menus 119 Dial Number: When you start up the browser to connect to the Internet, you phone will dial this number. Your telecoms network operator or ISP will provide this number to you. User Name: This is your user account name, and is provided by your network operator. Password: The account password provided by the network provider. Line Type: This is the type of dialup connection. Press to select. Rate: The default value is 9600, which is the standard speed for data connections with a GSM mobile phone. Auth Type: This is information needed for telecommunications protocol authentication. Baud 120 Menus JAVA Your phone provides Java support, allowing you to download and install Java applications that you like, such as various Java games, from sites provided by your network operator. You can then run these Java applications directly on your phone. If you do not need an application, you can remove it from your phone at any time, replacing it with another downloaded application. The JAVA menu contains the following items: Application Browser All Java applications will be listed in this menu. The Application Browser menu serves as a file manager, and includes the option to place Java applications into groups, similar to folders, for convenient organization of and access to the Java applications you download. Environment Settings This sets a file size limit for downloads, allows you to complete necessary Java online settings, and displays memory usage within Java (space in use/space available). OTA Use this option to set the Java website URL that you wish to connect to, and start up the browser to get online and download Java applications. JAVA Settings Before you can begin downloading Java applications, you must go to the menu Internet → JAVA → Environment Settings → Internet Setting, and then press (Edit) to complete the settings below. When you are finished making all settings, you must press save them. • Profile Name: Provides a name for this Internet setting. to Menus 121 • Network Access: Some types of Java games are only playable online (for example, mahjong), and using the phone to go online entails an extra cost. However, it may not be possible to determine from a game's name alone whether or not it is an online game. Therefore, this setting allows you to be presented a prompt asking if you wish to go online to play a game before actually running the program. Always Ask: Each time you attempt to launch an online game, you will be asked if you want to connect to the Internet. Ask Once per AP: You will only be asked if you want to go online the first time you attempt to launch an online game. The next time you attempt to launch the game, the same choice that you made the first time will be applied. Never Ask: Each time you launch an online game, the phone will automatically connect to the Internet, and you will not be asked to confirm. • DNS: Here you can enter the IP address of the Domain Name Server that you wish to use. • Bearer Mode: Before you download a Java application from the Internet, you must set the network system that you are using to either GPRS or CSD (dialup). • Based on the bearer mode that you have set, you will need to make further settings for either the GPRS or dialup network. For details on configuring GPRS and dialup network access, see page 119. 122 Menus Downloading JAVA applications 1. To download Java applications from the Internet, go the menu Internet → JAVA → OTA, and enter the URL for the download site. Pressing will start up the Java download program and link to the specified site to begin downloading a Java application. 2. If you provide a confirm command, the Java application will be automatically installed into the MyApps group in the JAVA Application Browser and terminate the Internet connection. After installation is complete, you can enter a new URL to download a Java application from another site. 3. In addition, you can also use the WAP browser to download Java applications. The browser screen will first display information about the applications. After you have read this information, you can run the download command shown on the screen to begin downloading the desired application to the MyApps group on the phone. Menus 123 Managing and running JAVA applications To manage and run Java applications installed on the phone, go to the menu JAVA → Applications Browser. All Java applications will be listed in this menu. The Applications Browser menu serves as a file manager, and the groups listed within it can be thought of as folders used to organize different types of Java applications. When you enter the Applications Browser menu, you will see the default group MyApps, where all downloaded Java applications will initially be installed. The name of this group cannot be changed, and the group itself cannot be deleted. Press to enter MyApps, and then select the name of the desired Java application. You can now: • Press (Option) to access the following options: Displays information about the Java application. Delete: Deletes the Java application. Move: Removes the Java application from the MyApps group and places it in another group in the Applications Browser. Scroll to the group where you wish to move the Content: application and then press . 8 To move a Java application to a group other than MyApps when it is currently the only group, you must press (Option) in the JAVA → Applications Browser menu and select New to create a new group. 124 Menus • Press to show the names of the executable files of the applications. Scroll to the desired executable file and press to run the corresponding Java application. 8 After starting up a Java application, use the keys corresponding to the commands shown in the soft key bar in the lower part of the screen to control that application. • Use only BenQ-certified Java applications in order to ensure that they will run properly on your phone. • You must complete related settings in the menu JAVA → Environment Settings → Internet Setting in order to use a Java program to get online or to download Java games. default Java applications contained in MyApps may differ / The according to localized configurations. Once you begin running an application, simply follow the on-screen instructions. You can delete it in order to install other application software. Menus 125 Multimedia Picture This image library stores the phone's default pictures, as well as images received in EMS messages, or downloaded through WAP services or using multimedia communications tools. The file formats supported by the phone are BMP, PNG, GIF, JPEG (progressive or marithmetic-encoded saves not supported), and EMS picture. Scroll to the desired picture to access the following options: • Press to display this picture. Pressing next or previous picture; pressing picture. will display the will show the full-screen • Press (Option) to perform the following tasks with the picture: Rename: Allows you to provide the picture with a new name. 8 The phone's default picture cannot be renamed, so this option is not present for it. Delete: Deletes the picture. 8 The phone's default picture cannot be deleted, so this option is not present for it. Send: Sends the picture in a message. 8 Only pictures supporting EMS can be sent with a message, so non-EMS pictures do not offer this option. For information about messaging features, see page 60, "Messages Menu". 126 Menus Information: Displays the picture's name, file size, and whether the file is a default picture, a picture you have saved or one you downloaded yourself (noted as User Defined). Set Wallpaper: Use the picture as the wallpaper for the standby screen. Animation This animation library stores the phone's default animations, as well as animations received in EMS messages, or downloaded through WAP services or using multimedia communications tools. The procedure for using this menu is the same as that described above for the Picture menu. The phone supports the following animation file formats: GIF, EMS animation. 8 Only animations that support the EMS format can be sent with a message. Melody My Melodies This ring tone library includes the phone's default ring tones, as well as ring tones received in EMS messages, or downloaded through WAP services or using multimedia communications tools, or that you have created yourself with the Composer function. The phone supports the following music file formats: MIDI, SMAF. Menus 127 Scroll to the desired ring tone, and press (Option) to perform the following tasks with the ring tone: • Set Ringtone: Makes the ring tone the alert sound for incoming calls. 8 Ring tones that support the EMS format (such as Chimes High) cannot be set as the phone's alert sound for incoming calls, so they do not offer this menu option. • Rename: Allows you to give a new name to the ring tone. 8 The phone's default ring tones cannot be renamed, so they do not present this option. • Edit: Allows you to edit the ring tone. 8 The phone's default ring tone cannot be edited, and only Composer offers this option. For information on how to edit ring tones, see page 129, "Composer". • Delete: Deletes user-edited ring tones. 8 The phone's default ring tones cannot be deleted. Only usercreated or downloaded ring tones provide this option. • Send: Sends the ring tone in a message. 8 Only EMS format ring tones (such as ChimesHigh) can be sent with a message. Non-EMS ring tones (including default ring tones and user-created ring tones that can be set as the alert sound for incoming calls) do not provide this option. For information about messaging features, see page 60, "Messages Menu". • Information: Displays the name of the ring tone, its file size, and whether it is a default ring tone, or a file that you have saved or downloaded yourself (noted as User Defined). 128 Menus Composer You can edit your own polyphonic ring tone melodies, and use them as alert sounds for incoming calls. A polyphonic ring tone consists of musical tones in multiple channels. The Composer function allows you to create a maximum of 8 channels, mixing them to create the final polyphonic ring tone. Note format Length Pitch Octave Sharp Entering default notes Press to to enter the eight pitches in an octave as quarter notes: Do Re Mi Fa So La Ti. The screen will display: 4C5, 4D5, 4E5, 4F5, 4G5, 4A5 and 4B5. "4" on the left shows that the represented note is a / The quarter note; the "5" indicates that it is in the fifth octave. Entering a default rest Press to enter a quarter rest: 40. Menus 129 Adjusting the length of a note The default note length is a quarter note (the screen uses the number 4 to represent a quarter note). Press to increase the note's length (the number on the screen will increase); press to reduce the note's length (the number on the screen will decrease). Various note lengths are represented by the numbers shown in the chart: On-screen number 1 Note length 1/16 2 3 4 5 6 7 8 1/8 3/16 1/4 3/8 1/2 3/4 1 Adjusting a note's octave The default notes just entered are in the middle octave (represented on the screen by the number 5). Press to adjust a note's octave. The octave of a note is represented by the numbers shown in the chart: On-screen number Represented octave 4 Lower octave 5 Middle octave 6 Higher one octave 7 Higher two octaves Adding a sharp to a note Press to add a sharp '#', which raises the note a semitone. To remove a sharp from a note, press 8 A sharp cannot be added to an E or B note. 130 Menus . Steps for creating a polyphonic ring tone 1. The first time you enter the Composer menu, you will see 8 channels that you can select for editing. Each channel can be used to save one passage of music that you have created. Scroll to the channel that you wish to edit, and then press to enter the ring tone editing window to begin composing the music for this channel. 2. Edit notes according to the procedures described above. • To modify a note after you have entered several notes, press to move the cursor to the right of the note that you wish to change. You can then proceed with adjusting the length, octave, sharp/ unsharp, and so on. • Press to delete a highlighted note. 3. When editing the music in a channel, press (Option) to access the following options: • Play: Plays the notes in the channel. • Instrument: Allows you select the instrument that will play the notes in the channel. • Time Beat: Sets the tempo (tempo range: 40 to 200). 4. After you are finished editing the notes in the channel, press to return to the channel list. You can now repeat the above steps to create another channel of music. Menus 131 5. When you are finished with all the channels that you wish to fill with notes, press (Option) in the channel list screen to access the following options: • Play All: Plays the polyphonic ring tone that results from mixing all channels. • Play Channel: Plays the channel you have currently scrolled to (if this channel does not contain any music that you created, this option will not appear). • Save: Select this option and your phone will automatically mix the music you have created in the channels into a polyphonic ring tone, and save this ring tone to the menu Multimedia → Melody → My Melodies. Press and enter a name for the ring tone and it will be saved. Help Displays information on how to use the phone's keys in composing ring tones. 132 Menus Settings Date & Time Used to set the time and date, as well as the format in which the time and date will be displayed on the startup screen. Time 1. Press to select either the Auto or Set mode for this item: Auto: Automatic time zone adjustment. If during travel, you move between time zones, the phone will automatically adjust the time displayed on the screen based on the time zone prompts provided by the local network operator so that you always have access to accurate local time. Set: You phone will display the time you have set, and when you travel to other time zones, the phone will ignore time zone prompts issued by the local network operator. 2. After selecting the Set mode, you can complete the date and time fields. Format This option is used to decide the format in which the time and date will appear in the standby screen. Menus 133 Secondary Time Allows you to display the time in another designated time zone. If you choose to activate this option, the standby screen will display the time in that time zone along with your local time. Time in secondary time zone Power On/Off Allows you turn the phone on and off at specified times to conserve power. When riding in an airplane or in any other situation where you cannot a mobile phone, remember to deactivate the Power On/Off , use option. Power On Designates a time for the phone to be automatically turned on. If this option is activated, the phone will be automatically turned on at the designated time each day. Power Off Designates a time for the phone to be automatically turned off. If this option is activated, the phone will be automatically turned off at the designated time each day. 134 Menus Profiles A profile is a group of settings that determine whether the phone will alert you to incoming calls through a ring tone or a vibrating alert, and how ring tones in general are used on the phone. These settings allow the phone's operation to best suit the environment you are in. 1. Press to scroll to the desired profile and then press to activate this profile. You can choose from among the following profiles: Normal This is the default profile. Once this profile is activated, the main display's status bar will show the icon; the external display will show the . Meeting The options in this profile have been preset to suit a meeting environment (for example, only a vibrating alert is used, with no audible ring tone and no keypad tones). Once this profile is activated, the main display's status bar will show the icon; the external display will show the icon. Menus 135 Outdoors The options in this profile have been preset to suit an outdoor activity (for example, use of the highest ring tone volume, activation of both ring tone and vibrating alerts, and use of keypad tones). Once this profile is activated, the main display's status bar will show the external display will show the ; the icon. Handsfree This profile is only active when a hands-free kit is attached to the phone. Once this profile is activated, the main display's status bar will show the external display will show the icon; the icon. Airplane When you are on a plane, you can select this profile to turn off the phone. Once this profile is activated, the phone will automatically be powered off, and all alarms will be suspended. If the phone is turned off by longpressing , the alarms will still turn the phone at the appointed times. Personal You can use this profile as a group of custom settings, and rename the profile if desired. After activating this profile, besides the appearance of the icon in the main display's status bar and the icon on the external display, "Personal" will appear as well. If however you have renamed this profile, the name you chose will appear 136 Menus on the standby screens. 8 The default profile name "Personal" or the name you give to this profile will only appear on the external display when the phone's flip is opened. 2. Press to scroll to the desired profile, and then press (Edit) to modify the settings listed below and adjust the profile to suit a particular environment. 8 After entering the Edit menu, the setting for each option will be displayed, providing a overview of the profile. Vibrate Includes the following setting options: • Ring Only: When there is an incoming call, the phone will use a ring tone but no vibrating alert. • Vibrate Only: When there is an incoming call, the phone will use a vibrating alert but no ring tone. • Ring & Vibrate: When there is an incoming call, the phone will use both a vibrating alert and a ring tone. • Vibrate then Ring: When there is an incoming call, the phone will first use a vibrating alert and then a ring tone. Call Ring Your phone includes various types of ring tone melodies. Scroll to the desired ring tone, and after one second or so you will be able to hear that ring tone. Press confirm your selection. Menus to 137 Message Ring The ring tone that your phone uses when a message is received. Alarm Ring The ring tone used by the Alarm Clock. Calendar Ring The ring tone used for Calendar events for which you have set an alarm. Keypad Tone Determines whether keypad tones are played when keys are pressed. Ring Volume Press to adjust the ring tone volume or mute the ring tone. Answer Mode • Send Key: Allows incoming calls to be answered only by pressing . • Any Key: Allows any key except to be used to answer an incoming call. In this mode, is used to reject an incoming call, and not to answer. • Automatic: If the Automatic answer mode is activated, the phone will ring for five seconds, and then the incoming call will be automatically answered (only the Handsfree profile allows this setting). 138 Menus Rename Allows you to provide a new name for the profile (only available for the Personal profile). Restore Returns the above settings for the profile to their factory default values. 8 Requires entry of the phone password, whose default value is 1234. Menus 139 Display Theme A display theme consists of a combination of display color and the standby screen wallpaper. Different display colors are paired with different preset wallpapers, so when you change the display color, the standby screen wallpaper will also change. Scroll to the color that you wish to use and then press (View) to preview the color matched with the standby screen wallpaper. Press / After you press to confirm the setting. (View) to enter the preview mode, pressing will allow you to browse the wallpapers matched to the colors. Wallpaper Designates the wallpaper used for the main display's standby screen. Scroll to the name of the wallpaper that you wish to use, and then press you press (View) to view this wallpaper. After (View) to enter the preview mode, pressing will display the next or previous wallpaper; pressing display the wallpaper in full screen. Press selection of the standby screen wallpaper. will to confirm your can also use this feature to change the wallpaper matched / You with a color in the Theme option. 140 Menus Welcome Message Used to select and configure the animation/picture/text that is displayed when the phone is turned on, as well as the music that is played. • Animation: Only the animation selected in this option will be displayed when the phone is turned on. • Picture: Only the picture selected in this option will be displayed when the phone is turned on. Images that have been saved from messages can also be set for use in the welcome screen. • Text: Only the welcome message entered in this option will be displayed when the phone is turned on. 8 Limit on length of entered text: 15 letters or numbers. • Picture and Text: The picture and welcome message set in this option will be displayed when the phone is turned on. of the settings you have made for the animation/ / Regardless picture/text to be displayed when the phone is turned on, the phone will play the music set in this option. Therefore, after making settings for the animation/picture/text used for the startup screen, the startup music must also be set. • Off: Returns the settings for startup music and animation to their factory default values. Menus 141 Contrast Press to adjust the contrast of the screen's display. Press to confirm the setting. Brightness Press to adjust the brightness of the phone's display backlighting. Press to confirm the setting. Backlight Setting You can turn the phone's keypad backlighting and display backlighting on or off, as well as set the length of time that backlighting will remain activated after the flip is opened or a key is pressed. After turning backlighting on, you can scroll to the Time Duration option and then press length of time. When done, press (Edit) to set this . OLED Duration • Default: After the external display cycles through displays of the time and animations, it will power off, and will only power on again when you press the upper or lower part of the volume key on the left side of the phone, or open and then close the flip (if a new message is received or there is an incoming call, the external display will also power on and then, after cycling through the programmed items, power off once more). 142 Menus • Cycle: After the external display cycles through displays of the time and animations, it will power off. After 15 seconds, the external display will automatically power on and again cycle through the programmed items. • Always On: The external display will remain on, cycling continuously through displays of the time and animations. Because the S660C's external display drains power from the battery when it is on, selecting Cycle or Always On will reduce battery life. OLED Animation Setting You can set the animations to show on the external display. Press (Select) to make your selections; press (Cancel) to clear the animations that you have selected. When you are finished, press to confirm your selections. Audio This menu allows you to set various sounds that the phone uses. 8 Some of the options provided in this menu and the Profiles menu are identical (for example, Call Ring). Therefore the particular setting that the phone uses will depend on which menu you last used to make the setting. Power Saving Mode After you activate the power saving mode, keypad and display backlighting will be turned off, as will the status indicator lights on the flip, in order to conserve power. Menus 143 Call Settings Call Divert 8 Requires the support of the network operator. Forward All Forwards all incoming calls to a designated phone number or voicemail inbox. When you use this feature, you must enter a phone number to which to forward incoming calls. 8 After the Forward All mode is activated, the standby screen will display the icon. When Busy The phone will divert incoming calls to another number when you are in the middle of another call. No Reply Forwards incoming calls to another number when you do not answer. Not Reachable Diverts incoming calls when your phone is turned off or outside network coverage. Cancel All Cancels all call divert options. 144 Menus Call Barring You can request that your network operator block the dialing or receiving of certain calls. The call barring services below require the support of your network operator. To activate or cancel any of the options below, you must enter the network password provided by the network operator. All Outgoing Blocks dialing of any calls from the phone. Intl. Out If this option is activated, no international calls can be made with your phone. Intl. Except Home If this option is activated, your phone can only be used to dial local calls and calls to your home country from abroad. Other international calls will be barred. All Incoming Rejects all incoming calls. Incoming When Roaming If you are in another country (using roaming), activating this option will cause the phone to reject all incoming calls. Cancel All Cancels all call barring settings. You must enter the network password in order to cancel these settings. Menus 145 Change Password You can change the network password, which can be obtained from the network operator. Call Waiting If there is an incoming call when you are in the middle of another call, the screen will display the number of the incoming call and call waiting message to alert you. You can activate, cancel, or view the status of this feature from this menu. 8 You must apply to the network operator for the call waiting service in order to use this feature. Auto Redial If there is no answer at a number you have dialed, the phone will automatically redial. Show Number You can decide whether or not to display your phone number on the recipient's phone when you make a call. On: When you call someone, the recipient's phone will display your phone number. Off: Your phone number will not be shown on the recipient's phone. 8 If this feature is turned off, you may not be able to make phone calls in certain countries, such as Singapore and China. Preset: Whether your phone number will be displayed on a recipient's phone will be determined by the default set by the network operator. 146 Menus Fixed Dial Number After this feature is activated, the phone will only be able to dial numbers on the Fixed Dial Number list. If a number is not on the list, calls cannot be made to this number. 8 When you activate or cancel this feature, you must enter the PIN2 code. , If the PIN2 code is entered incorrectly three consecutive times, the PIN2 code will be locked down. You will need the PUK2 code to unlock the PIN2 code. Contact your network operator to obtain the PUK2 code. Before activating the Fixed Dial Number feature, you must press (View), then press (Option) and select Add to create a Fixed Dial Number list. You must enter the PIN2 code, and then add a new number to your Fixed Dial Number list. After creating the list, you can view, edit and delete numbers in the list. Active Line This feature allows you to use two different phone numbers on one phone. You can designate one number for dialing calls, while accepting incoming calls dialed to both numbers without needing to use two phones. Select either Line 1 or Line 2. The number you select ( standby screen. or ) will appear on the 8 This feature requires the support of the network operator. Menus 147 Connect Alert This feature allows the phone to provide a ring tone or vibrating alert, or flash the backlighting when the recipient of a call has answered. Minute Beep Once this option is activated, the phone will emit a beep once every minute during a call. Network Generally speaking, the choice of the network that your phone uses is configured automatically. When turned on, the phone will automatically connect to the network provided by your network operator, or will automatically connect to the roaming network when you are outside the coverage of your regular network. If you wish to change the connection network, this menu will allow you to select the network you want to use. When outside the coverage of your regular network in your home country or when abroad, you can manually select the local network system. 8 Your network operator must be able to support network selection in order for you to use this feature. Mode Selection You can choose whether the network selection mode that the phone will use when it is turned on is automatic or manual. Automatic: If this option is selected, when outside the coverage of your regular network, the phone will automatically search for usable networks. 148 Menus Manual: If this option is selected, when outside the coverage of your regular network, the phone will list all the networks of telecom vendors and allow you to choose. Available List Allows you to manually select a network. Your phone will list all the networks of telecoms vendors so you can choose. 8 Not all networks listed will necessarily be available for use. If you require further information, contact your network operator. Band Setting According to your requirements, you can set an appropriate band in the GSM network system. Connection Mode Used to set whether the phone will also search for a GPRS network when it is turned on. • GPRS & GSM: When it is turned on, the phone will search for available GPRS and GSM networks. • GSM Only: When it is turned on, the phone will search only for a GSM network. Menus 149 Security You can use a PIN code, phone password, and SIM card lock authentication to prevent unauthorized use of the phone. PIN Code A PIN (Personal Identification Number) code is a password provided by a network operator. When PIN code authentication is activated, it will prevent unauthorized use of the SIM card. Unless the correct PIN code is entered when the phone is turned on, the SIM card cannot be used, even if it is inserted in another phone. , If the PIN code is entered incorrectly three consecutive times, this will cause the SIM card to lock down, and a PUK1 code provided by the network operator will be required to unlock it. After unlocking, the PIN code will be automatically set to activate once the phone is turned on. PIN1 Code Used to activate/deactivate or change the PIN1 code. Before changing settings for the PIN1 code feature, the previously set PIN1 code must be entered. If you wish to change the PIN1 code, you must press in the Enable item to select On, so that you will be able to enter and confirm the new password. PIN2 Code Used to change the PIN2 code. The procedure is the same as for the PIN1 code. 150 Menus Phone Lock Activates/deactivates or changes the phone's startup password. The startup password prevents unauthorized persons from using your phone. Once the phone's password is activated, the phone will be locked down when it is turned on unless this password is correctly entered. If an incorrect password is entered, your phone will remain locked down, and cannot be unlocked even if the SIM card is replaced by another one. When the phone is locked, you will only be able to make emergency calls. Once the phone password is activated, you must enter the password each time the phone is turned on in order to unlock the phone (there is no limit on the number of attempts to enter the phone password). The procedure for setting the phone password is the same as for the PIN1 code (the default phone password is 1234). SIM Lock Using this feature, you can prevent unauthorized persons from using your phone with other SIM cards. After you activate the SIM Lock feature, only the SIM card present when the feature was activated will be accepted by the phone. If a new SIM card is inserted in the phone, when the phone is turned on and a PIN code is entered, the phone will request entry of a SIM Lock password (there is no limit on the number of attempts to enter the SIM Lock password. If the password is entered correctly, the phone will be able to recognize the new SIM card and use it normally. The next time the phone is turned on with this SIM card inserted, the phone will not ask again for you to enter the SIM Lock Menus 151 password. 8 Your phone can recognize a maximum of three different SIM cards. Before setting the SIM Lock feature, you must enter the previously set SIM Lock password (the default SIM Lock password is 1234). The password must be between 4 and 8 digits in length. Screen Lock Used to create a security screensaver. When you have not performed any tasks with the phone for a set period of time, the phone will automatically activate the screensaver shown on the left, the purpose being to prevent personal information on the phone from being viewed by others. To return to the original screen, after pressing any key, you must enter the password you set for this feature. The steps for setting the Screen Lock feature are as follows: 1. You must first enter the Screen Lock password that was previously set (the default password is 1234). 2. Press in the Enable option to select On, and then press to scroll to the Timeout item. 3. In the Timeout item, press (Edit) or press to set the period of inactivity before the phone will enter the Screen Lock mode. 152 Menus 4. After completing settings, press . The phone will prompt you to enter and confirm the Screen Lock password. You have two choices: a. If you do not wish to change the password, press to activate the Screen Lock feature using the previously set password. b. If you wish to change the password, enter the new password in the New Password and Confirm fields, then press to use the new password and activate the Screen Lock feature. Language You can select the language that the phone will use to display information. Input Mode You can set the default input mode that will be automatically activated whenever you open the editing window for entering information into a message, the Phone Book, and so forth. Flip Activate Activates/deactivates the active flip feature. Menus 153 User Group User Group Used to create a closed group of callers based on a service provided by the network operator. The members of a User Group can call each other, but cannot conduct calls with anyone outside the group unless special provisions are made. This option can be used to select whether or not to activate this service. Outside Access When the User Group service is activated, enabling Outside Access will allow users in the group to make calls to numbers outside the group. However, incoming calls will still be restricted to calls from within the group. Restore Restores all of the phone's settings to their factory defaults. 154 Menus Care and Maintenance Take note of the points noted below to ensure that you are using the phone properly and to extend the lifespan of the phone. • Store the phone and its accessories out of the reach of children. • Keep the phone and accessories dry, and use the phone in environments where the temperature is between –20°C and 55 °C. High or low temperatures outside this range may damage the phone. • If possible, do not use or store the phone in excessively dusty or dirty environments. • Do not remove the warranty seal on the phone yourself, nor allow an unauthorized dealer to do so. • Do not use strong detergents or organic solvents to wipe or clean the phone. • If your phone or its accessories are not operating normally, contact an authorized dealer immediately. • Use only genuine BenQ accessories such as batteries, battery charger and hands-free kit to ensure the phone's normal operation and preserve battery life, as well as protect the safety of your person and belongings. Use of non-BenQ accessories will not allow your phone to achieve optimal performance, and may cause the phone to malfunction. Any malfunctions or damage caused by the use of third-party accessories are not be covered by the terms of the product warranty, and will void the product warranty. Care and Maintenance 155 • Avoid allowing objects that may discharge electricity to contact the charging socket on the bottom of the phone or the metal contacts on the battery, as this may cause short circuits and put you in danger. 156 Care and Maintenance Troubleshooting If you encounter problems while using the phone, or if it performs erratically, you can consult the information in the chart below. If your particular problem cannot be resolved using the information in the chart, contact the dealer where you purchased the phone. Problem Possible cause Solution • The network signal is too Move to a location where the weak at your current network signal can location — for example, in properly received. a basement or near a tall building-because wireless transmissions can not effectively reach it. Poor reception be • The network is busy at Avoid using the phone at the current time (for such times, or try again after example, during peak waiting a short time. times, there may be too much network traffic to handle additional calls). • You are too far away from You can request a service a base station for your area map from your network operator. network operator. • Poor network trunk quality Hang up the phone and dial Echo or noise your again. You may be switched to a better-quality network trunk or phone line. • Poor local telephone line quality. on the part of network operator. Troubleshooting 157 Problem Possible cause • The standby time is related to your network operator's system configuration. The same phone used with different network operators' systems will not provide exactly the same length of standby time. Shortened standby time • The battery is depleted. In Use a new battery. high-temperature environments, battery life will be shortened. • If you are not able to connect to the network, the phone will continue to send out signals as it attempts to locate a base station. Doing so consumes battery power and will consequently shorten standby time. You cannot switch your phone on. Solution If you are located in an area where signaling is weak, temporarily shut off the phone. Change your location to one where the network is accessible, or temporarily turn off your phone. • Battery power has been Recharge the phone's depleted. battery. • SIM card malfunction or Take the SIM card to your damage. SIM card error • SIM card inserted network operator for testing. Insert the SIM card properly. improperly. • Debris on the SIM card Use a soft, dry cloth to clean contacts. 158 Troubleshooting the SIM card contacts. Problem Possible cause • SIM card invalid. Unable to connect to the network. You cannot answer incoming calls. Solution Contact your network operator. • You are not within the Check the service area with network's service area. your network operator. • Poor signal. Move to an open space, or if you are inside a building, move closer to a window. • You have activated Go to the menu Phone Book → Privacy Manager and then select Off in order to deactivate this option. Accept List or Reject List in the Privacy Manager option. • You have activated the Go to the menu Settings → Call Barring feature. Call Settings → Call Barring, and then select Cancel All. • You have activated the Go to the menu Settings → Call Barring feature. You cannot make outgoing calls. PIN Code is blocked. Call Settings → Call Barring, and then select Cancel All. • You have activated the Go to the menu Settings → Call Settings → Fixed Dial Number, and then select Off to turn off this feature. • You have entered an Contact your network operator. If the network operator provides the SIM card's PUK code, use the PUK code to unlock the SIM card. Fixed Dial Number feature. incorrect PIN code three consecutive times. Troubleshooting 159 Problem Possible cause • The battery or battery Solution Contact the dealer. charger is damaged. Battery will not charge. • The phone's temperature Adjust the battery charging is below 0 °C or higher environment to avoid extremes of temperature. than 45°C. • Poor contact between the Check all connectors to battery and charger. Unable to enter information into the Phone Book. Unable to select certain features. 160 • The Phone Book's memory is already full. make sure all connections have been properly made. Delete unnecessary data from the Phone Book. • Your network operator Contact your network does not support these operator. features, or you have not applied for services that provide these features. Troubleshooting