1
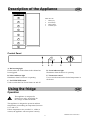
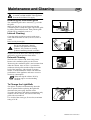
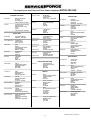
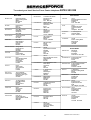
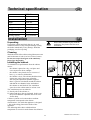
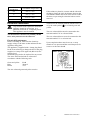
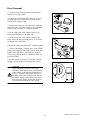
FREEZER
ZF711W
INSTRUCTION BOOKLET
818 15 02--03/3
Important Safety Instructions
GB
These warnings are provided in the interests of your safety. Ensure that you understand them all
before installing or using the appliance. Your safety is of paramount importance. If you are unsure
about any of the meanings or warnings contact the Customer Care Department.
Keep the instruction booklet. It will come in handy if you later sell the cabinet or give it to somebody
else.
Prior to Installation
·
in the refrigerator or freezer.
Check the appliance for transport damage. Under
no circumstances should a damaged appliance be
installed. In the event of damage please contact
your retailer.
Maintenance and Cleaning
· Before cleaning, always switch off the apppliance
·
Installation
·
·
·
·
·
This appliance is heavy. Care should be taken
when moving it.
It is dangerous to alter the specifications or
attempt to modify this product in any way.
Ensure that the appliance does not stand on the
electrical supply cable. If the supply cable is
damaged, it must be replaced by a cable
avaliable from your local Service Force Centre.
Any electrical work required to install this
appliance should be carried out by a qualified
electrician or competent person.
Parts which heat up should not be exposed.
Whenever possible, the back of the appliance
should be close to a wall, but leaving the
required distance for ventilation, as stated in the
installation instructions.
The appliance should be left for 2 hours after
installation before it is turned on, in order to
allow the refrigerant to settle.
Servicing
· This product should be serviced by an
·
authorised engineer and only genuine spare
parts should be used.
Under no circumstances should you attempt to
repair the appliance yourself. Repairs carried out
by inexperienced persons may cause injury or
serious malfunctioning. Contact your local
Service Force Centre.
At the end of the Appliance Life
· When disposing of your appliance use an
authorised disposal site.
· Remove the plug and ensure that any locks or
·
Child Safety
· Do not allow children to tamper with the controls
or play with the product.
· There is a risk of suffocation! Keep packaging
material away from children.
During Use
· This appliance is designed for domestic use only,
·
and disconnect from the electrical supply
When unplugging always pull the plug from the
mains socket, do not pull on the cable.
specifically for the storage of edible foodstuffs.
It is not intended for commercial or industrial
use.
Containers with flammable gases or liquids can
leak at low temperatures. Do not store any
containers with flammable materials, such as
spray cans, fire extinguisher refill cartridges etc.
·
2
catches are removed, to prevent young children
being trapped inside.
Do not let sharp objects come into contact with
the refrigerating system on the back of and inside
the cabinet. If the refrigerating system is
punctured, the cabinet will be damaged and
foodstuff inside may spoil.
If the refrigerant circuit should become
damaged:
avoid open flames and sources of ignition
thoroughly ventillate the room in which the
appliance is placed
The refrigerant isobutane (R600a) is contained
within the refrigerant circuit of the appliance, a
natural gas with a high level of environmental
compatibility, which is nevertheless flammable.
Do not place carbonated or fizzy drinks in the
freezer compartment. Bottles and cans must not
be placed in the frezeer compartment as they can
burst when the content freeze.
Zanussi 818 15 02--03/3
Contents
GB
Instructions for the User
Instructions for the Installer
Important Safety Instructions . . . . . . . 2
Contents . . . . . . . . . . . . . . . . . . . . . . . . . . 3
Description of the Appliance . . . . . . . . 4
Technical specification . . . . . . . . . . . . . 14
Installation . . . . . . . . . . . . . . . . . . . . . . . . 14
Unpacking . . . . . . . . . . . . . . . . . . . . . . . . . . . . . . . .
Cleaning . . . . . . . . . . . . . . . . . . . . . . . . . . . . . . . . . .
Installing the cabinet . . . . . . . . . . . . . . . . . . . . . . . .
Electrical connection . . . . . . . . . . . . . . . . . . . . . . . .
Door Reversal . . . . . . . . . . . . . . . . . . . . . . . . . . . . .
Control Panel . . . . . . . . . . . . . . . . . . . . . . . . . . . . . . 4
Use . . . . . . . . . . . . . . . . . . . . . . . . . . . . . . . 4
To start the freezer and thermostat control . . . . . . .
Switching off . . . . . . . . . . . . . . . . . . . . . . . . . . . . . .
Freezing . . . . . . . . . . . . . . . . . . . . . . . . . . . . . . . . . .
Alarms and other features . . . . . . . . . . . . . . . . . . . .
Suitable storage periods . . . . . . . . . . . . . . . . . . . . . .
Temperature inside the freezer . . . . . . . . . . . . . . . .
Thawing . . . . . . . . . . . . . . . . . . . . . . . . . . . . . . . . . .
Cabinet interior . . . . . . . . . . . . . . . . . . . . . . . . . . . .
5
5
5
6
6
6
6
7
Hints and Tips . . . . . . . . . . . . . . . . . . . . . 7
Energy Saving Advice . . . . . . . . . . . . . . . . . . . . . . . 7
Food Storage . . . . . . . . . . . . . . . . . . . . . . . . . . . . . . 7
Normal Operating Sounds . . . . . . . . . . . . . . . . . . . . 7
Maintenance and Cleaning . . . . . . . . . . 8
Removing the ventilation grille . . . . . . . . . . . . . . . .
Internal Cleaning . . . . . . . . . . . . . . . . . . . . . . . . . . .
External Cleaning . . . . . . . . . . . . . . . . . . . . . . . . . .
To Change the Light Bulb . . . . . . . . . . . . . . . . . . . .
Defrosting the freezer . . . . . . . . . . . . . . . . . . . . . . .
When the appliance is not in use . . . . . . . . . . . . . . .
8
8
8
8
9
9
Something Not Working . . . . . . . . . . . . 9
Service and Spare Parts . . . . . . . . . . . . 10
Customer Care Department . . . . . . . . . 10
Guarantee Conditions . . . . . . . . . . . . . . 13
Guide to use the instruction book
The following Symbols will be found in the text to guide you through the instructions
Safety instructions
1, 2, 3 ...
Step by step instructions for an operation
Hints and tips
3
Zanussi 818 15 02--03/3
14
14
14
15
16
Description of the Appliance
GB
1
2
Model ZF711W
2
3
1.
freezing tray
2.
shelf with flap
3.
freezer basket
4.
ventilation grille
3
3
3
3
4
Control Panel
s
A
B
A. Red warning light
Flashes when one of the alarms in the cabinet has
been triggered.
C
D
E
D. Green indicator light
Illuminates when the freezer is operating.
E. Thermostat control
Use to switch on and set the desired temperature in
the freezer.
B. Yellow indicator light
Illuminates when Fast Freeze is operating.
C. FAST FREEZE button
Used to switch the Fast Freeze feature on and off.
Using the fridge
GB
Operation
This appliance is designed for
domestic use only, specifically for
the storage of edible foodstuffs.
This appliance is designed to operate in ambient
temperatures (surrounding air temperature) between
10_C and 32_C.
If these temperatures are exceeded i.e., colder or
warmer, the appliance will not operate correctly.
4
Zanussi 818 15 02--03/3
Before use
·Remove all securing tapes.
·Wash the inside of the appliance with lukewarm
·Before inserting the power plug into the outlet and
switching on the cabinet for the first time, leave it
standing upright for about 30 minutes, or for 2 hours
if it was transported horizontally. Otherwise the compressor may sustain damage. This time will allow the
oil sufficient time to return to the compressor.
water with a little bicarbonate of soda added (5ml to
0,5 litre of water). Do not use soap or detergent as
the smell may linger. Dry the appliance thoroughly.
Do not use detergents, abrasive powders,
highly perfumed cleaning products, wax,
polishes or products containing alcohol.
To start the freezer and thermostat
control
Plug in the appliance.
Turn the thermostat control to the desired position.
1 : The lowest position of the thermostat control
results in the highest temperature inside the cabinet.
6 : The highest position of the thermostat control
results in the lowest temperature inside the cabinet.
0 : Off.
Allow the cabinet to run for a period of 24 hours
whenever the temperature setting is changed. This
will allow the temperature to stabilise inside the
cabinet.
Temperature inside the freezer
To ensure that foodstuff will keep for a long time, be
sure that the temperature inside the freezer is -18°C
or below. Please note, however, that the energy
consumption increases as the temperature decreases.
Switching off
Set the thermostat control to the "0" position.
Unplug the power supply plug from the wall socket.
Alarms and other features
Temperature alarm
The red warning light illuminates when the
temperature inside the cabinet rises above -12°C.
The light goes out again when the temperature falls
below -13°C.
Freezing
You need not press the fast-freezing button when
freezing smaller quantities of food during any
24-hour period.
In all other cases, press the fast-freezing button
approx. 24 hours prior to placing the food in the
freezer.
Press the fast-freezing button to switch off
fast-freezing again about 24 hours after placing the
food in the freezer.
The yellow fast-freezing lamp remains lit as long as
the fast-freezing button is engaged.
5
Zanussi 818 15 02--03/3
Practical advice on freezing
· When freezing products, use the top shelf, and if
necessary the shelf beneath as this is the coldest
part.
· Place the foods directly on the freezer shelves.
· Spread out the products as much as possible to
allow air to circulate between them.
· Do not place food products which are to be
frozen directly against other frozen food.
The heat from the unfrozen food may cause
the frozen food to thaw on the surface.
· Once frozen, re-arrange the products and put
them as close as possible to each other.
The food will then stay cold longer in the
event of a power failure.
· Do not freeze too much food at the same time.
The freezing capacity of the unit is indicated in
the specifications section.
Check that the cabinet is operating and
keeps the set temperature one day after
switching it on for the first time. Only
after then should the freezer be used to
freeze fresh foodstuff.
Suitable storage periods
Food purchased in frozen condition: Follow the
advice on the maximum storage period indicated on
the packaging.
Fresh food frozen at home:
Fatty and salty food should not be kept frozen for
more than three months. Cooked food and low-fat
food may be kept up to about six months. Lean food
and berries can be kept for approximately one year.
Thawing
It is best to use a fridge to thaw food. Place the
foodstuff on a plate with a raised edge to prevent
liquids from running out. To quickly thaw food, put
it in room temperature or in cold water. When using
a microwave oven to thaw foodstuffs, follow the
manufacturer's instructions.
Cabinet interior
Freezer drawers
The freezer drawers make it easy to quickly and
easily find the food package you want. To gain
space, the drawers can be removed and the products
can be put directly on the shelves. On all shelves,
except the top shelf, it is possible to place products
that protrude 20 mm from the front edge. This
allows maximum use of the available space.
Do not remove the bottom drawer. It is required to
assure proper air circulation.
6
Zanussi 818 15 02--03/3
Ice cubes
Fill the ice cupe tray 3/4 full with cold water, place it
in the freezer and leave it to freeze.
To loosen the frozen cubes, either twist the ice cube
tray or hold it under running water for a few
seconds. Important - Never try to free an ice tray
that is frozen to the freezer using pointed or sharp
objects.
Freezer tray
Use the freezer tray to freeze berries and vegetables.
After about 4 hours the food will be thoroughly
frozen and can then be packaged normally. Food
that is frozen in this way will not stick together,
enabling you to use only the amount required.
Hints and Tips
GB
Energy Saving Advice
Remove suspect food from you refrigerator and
clean, refer to cleaning and maintenance.
· In the event of a power failure causing the
temperature within your freezer to rise, do not
refreeze the food without checking its condition.
The following guidelines should assist you.
Ice-cream: once thawed should be discarded.
Fruits & Vegetables: if soft should be cooked and
used up.
Breads & Cakes: can be re-frozen without danger.
Shellfish: should be refrigerated and used up
quickly.
Cooked Dishes: i.e. casseroles should be
refrigerated and used up
Large Pieces of Meat: can be re-frozen providing
there are still ice crystals remaining within them.
Small Joints: should be cooked and can then be
refrozen as cooked dishes.
Chicken: should also be cooked and re-frozen as a
cooked dish.
· Do not install the cabinet close to sources of heat
such as a cooker, dishwasher or radiator.
· Locate the appliance in a cool well ventilated
·
·
·
·
·
·
·
·
·
room and make sure that the air openings of the
cabinet are not obstructed.
Always leave warm food to cool down to room
temperature before placing in the fridge.
Try to avoid keeping the door open for long
periods, or opening the door too frequently as
warm air will enter the cabinet, and cause the
compressor to switch on unnecessarily often.
Ensure there are no obstructions preventing the
door from closing properly.
It is advisable to periodically clean the
refrigeration system at the back of the appliance
with a duster or vacuum cleaner.
Avoid unnecessary frosting in the cabinet by
packing all foodstuffs into airtight packages
before placing them in the freezer.
Carefully follow the advice on freezing products
in the section "Use". This will prevent wasting
energy.
Do not set the temperature too low in the freezer.
A suitable temperature is in the range of -18°C
to -20°C .
Defrost the freezer when the frost layer reaches a
thickness of 3-5 mm. Regularly check the door
seal to ensure that it is clean and free from debris.
Make sure the door gasket is complete and
always clean.
Normal Operating Sounds
· You may hear faint gurgling or bubbling sounds
·
·
Food Storage
when the refrigerant is pumped through the coils
or tubing at the rear, to the cooling
plate/evaporator.
When the compressor is on, the refrigerant is
being pumped round, and you will hear a
whirring sound or pulsating noise from the
compressor.
A thermostat controls the compressor and you
will hear a faint " click" when the termostat cuts
in and out.
· Avoid buying frozen food if you can not store it
·
straight away. The use of an insulated container is
advisable. When you arrive home place the
frozen food in the freezer immerdiately.
Ensure that food placed in the freezer is dated
and labelled and used in date order to ensure that
food is consumed at its best.
7
Zanussi 818 15 02--03/3
Maintenance and Cleaning
GB
Before any maintenance or cleaning work
is carried out DISCONNECT the appliance
from the ELECTRICITY supply.
Removing the ventilation grille
The ventilation grille can be removed, e.g. to wash
the grille.
Make sure the door is open when removing the
ventilation grille. Unsnap the upper edge of the grille
by pulling outward/downward. Then pull the grille
straight out to completely remove it.
Internal Cleaning
Clean the inside and the accessories with warm
water and bicarbonate of soda (5 ml to 0,5 litre of
water).
Rinse and dry thoroughly.
Do not use detergents, abrasive
powders, high perfumed cleaning
products, wax polishes or cleaning
products containing bleach or alcohol .
Regulary check the door seals and wipe clean to
ensure they are clean and free from debris.
External Cleaning
Wash the outer cabinet with warm soapy water.
Remove the ventilation grille (see the section
"Removing the ventilation grille") and vacuum-clean
under the cabinet. Once or twice a year dust the
condenser (black grille) and the compressor at the
back of the appliance, with a brush or vacuum
cleaner, as an accumulation of dust will affect the
performance of the appliance and cause excessive
electricity consumption.
When moving the cabinet, lift it by
the front edge to avoid scratching
the floor.
To Change the Light Bulb
The light is switched on automatically when the
door is opened. Before replacing the light bulb,
disconnect the power plug from the outlet.
To replace the lamp in the chiller compartment (only
cabinets with two doors), first unscrew the lamp
grille with a screwdriver.
Use a bulb of the same type, E14 socket, maximum
rating of 25 W.
8
Zanussi 818 15 02--03/3
Defrosting the freezer
A certain amount of frost will always form on the
freezer shelves and around the top compartment.
Defrost the freezer when the frost layer reaches a
thickness of about 3-5 mm.
Remove the freezer drawers and place them on top
of each other by turning every other drawer one half
turn. Put insulating material around the drawers, e.g.
blankets or newspapers.
The frozen products can also be packed closely
together and be kept in a cold location, e.g. in the
fridge.
Defrosting can be accelerated by placing bowls with
hot water (not boiling) inside the freezer.
Take out the drain spout and place it in the bottom
freezer drawer where water can collect.
Loosen the ventilation grille to enable the bowl to fit
under the drain spout.
Carefully scrape off the ice when it starts to thaw.
Use a wood or plastic scraper. Do not use sharp
objects as these may damage the interior.
When all the ice has melted, clean and wipe the
cabinet dry, then push the drain spout back in place.
Switch on the cabinet and replace the frozen
foodstuff.
Never use a hair dryer or other heating
appliances to speed up defrosting. Excessive
heat may damage the plastic interior, and
humidity could enter the electric appliance
making it live.
When the appliance is not in use
Disconnect the appliance from electricity supply.
Empty all foods and clean the appliance, leaving the
doors ajar to prevent unpleasant smells.
If the cabinet will be kept on, ask somebody to
check it once in a while to prevent the food inside
from spoiling in case of a power failure.
Something Not Working
Before contacting your local Service Force Centre check the following points:
Symptom
The temperature is too high inside the
freezer.
The temperature is too low inside the
freezer.
Too much frost and ice are produced.
Solution
Set a lower temperature.
Make sure that the door is completely closed and that the
rubber door seal is complete and clean.
If warm food products have been put inside the freezer, wait for
a couple of hours and then check the temperature again.
Distribute the food products to allow cold air to circulate
around them.
Set a warmer temperature.
Fast Freeze could have been switched on.
Make sure that the door is completely closed and that the
rubber door seal is complete and clean.
Set a warmer temperature.
9
Zanussi 818 15 02--03/3
The compressor operates continuously.
Set a warmer temperature.
Make sure that the door is completely closed and that the
rubber door seal is complete and clean.
The temperature where the cabinet is placed is above normal
room temperature.
The cabinet does not operate at all.
Cooling or interior light does not
operate. No indicator lamps light.
The power plug is not properly connected.
The fuse has blown.
The cabinet is not switched on.
Power does not reach the cabinet. (Try connecting another
electrical device to the power outlet.)
Power failure
Do not unnecessarily open the cabinet, except when the power
cut seems to be long, in which case the food products should be
moved to another cabinet that works. See the chapter "Hints
and Tips".
Noise
See "Normal operating Sounds" in chapter
Hints and Tips.
The freezer door will not open
Has door just been opened? If so leave for few minutes to allow
the air pressure to equalise.
If after above checks there is still a fault call your local Service Force Centre.
In-guarantee customers should ensure that the above checks have been made as the engineer will make a charge
if the fault is not a mechanical or electrical breakdown.
Please note that proof of purchase is required for in-guarantee service calls.
Service and Spare Parts
GB
In the event of your appliance requiring service, or if you wish to purchase spare parts please contact your
local Zanussi Service Force Centre by telephoning:
0870 5 929929
Your tephone call be automatically routed the Service Force Centre covering your post code area. The address
are listed on the following pages.
Before calling out an engineer, please ensure you have read the details under the heading "Something Not
Working".
When you contact the Service Forse Centre you will need to give the following details:
1. Your name, address and post code
2. Your telephone number
3. Clear and concise details of the fault
4. The model and serial number of the appliance (found on the rating plate)
5. The purchase date.......................................................
Customer Care Department
GB
Fore general enquiries concerning your Zanussi appliance or futher information on Zanussi products, please
contact our Customer Care Department by letter or phone at the address below or visit our website at
www.zanussi.co.uk
Customer Care Department
Zanussi
55-77 High Street
Slough
Berkshire
SLI IDZ
08705 727727(*)
* calls to this number may be recorded for training purposes.
10
Zanussi 818 15 02--03/3
To contact your local Service Force Centre telephone 08705
CHANNEL ISLANDS
GUERNSEY
Guernsey Electricity
PO Box 4
Vale, Guernsey
Channel Islands GY1 3AD
JERSEY
Jersey Electricity Company
Haut De L’orme
Rue De Haut De L’orme
Trinity
Jersey
Channel Islands JE3 5FG
SCOTLAND
ABERDEEN
AUCHTERMUCHTY
BLANTYRE
54 Claremont Street
Aberdeen AB10 6RA
33a Burnside
Auchtermuchty
Fife KY14 7AJ
Unit 5
Block 2
Auchenraith Ind. Estate
Rosendale Way
Blantyre G72 0NJ
DUMFRIES
93 Irish Street
Dumfries
DG1 2 PQ
DUNOON
7 Hill Street
Dunoon
Argyll
PA23 7AL
EDINBURGH
GLASGOW
INVERNESS
ISLE OF ARRAN
ISLE OF BARRA
ISLES OF BUTE
Unit 12
Dumbryden Ind. Estate
2 Dumbryden Road
Edinburgh
EH14 2AB
Unit 4
Wellington Road
Bishopriggs
Glasgow G64 2SA
Unit 3BI
Smithton Ind. Estate
Smithton
Inverness IV2 7WL
ISLE OF LEWIS
KELSO
ORKNEY
PERTH
(OWN SALES)
SHETLAND
(OWN SALES)
SHETLAND
(OWN SALES)
WHALSAY
(OWN SALES)
Walker Engineering
Glenmhor
Upper Serpentine Road
Rothesay
Isle of Bute PA20 9EH
Unit 356a
Dukesway Court
Dukesway
Gateshead NE11 0BH
GRIMSBY
7 King Street
Kirkwall
Orkney
KW15 1JF
15 Hainton Avenue
Grimsby
N. E. Lincs
DN32 9AS
HULL
Scottish Hydro Electric
Central Warehouse
Inveralmond
Perth PH1 3AF
Unit 1
Boulevard Industrial Estate
Hull
HU3 4AY
LEEDS
64-66 Cross Gates Road
Cross Gates
Leeds
LS15 7YS
3-4 Carlton Place
Lerwick
Shetland
ZE1 0PW
Bolts Shetland
26 North Road
Lerwick
Shetland ZE1 0PE
Owenmore House
Kilwee Business Park
Dunmurry
Belfast
BT17 0HD
WALES
CARDIFF
CLYWD
DYFED
OSWESTRY
NEWTON AYCLIFFE Unit 23
Northfield Way
Aycliffe Industrial Park
Newton Aycliffe
DL5 6EJ
SHEFFIELD
Leask Electrical
Harisdale
Symbister, Whalsay
Shetland ZE2 9AA
NORTHERN IRELAND
BELFAST
NORTH EAST
GATESHEAD
2, 6 & 8 Woodmarket
Kelso
Borders
TD5 7AX
R Haggerty
Bruach
Blackwaterfoot
Isle of Arran
J Zerfah
244 Bruernish
Isle of Barra
Western Islands HS9 5QY
ND Macleod
16 James Street
Stornoway
Isle of Lewis PA87 2QW
929 929
Unit 4
Guardian Industrial Estate
Clydesmuir Road
Cardiff
CF2 2QS
Unit 6-7 Coed Parc
Abergele Road
Rhuddlan
Clwyd
LL18 5UG
Unit 9
St. Clears Business Park
Tenby Road
St. Clears
Carmarthen
SA33 4JW
Pennine House
Roman Ridge Road
Sheffield
S9 1GB
NORTH WEST
BIRKENHEAD
1 Kelvin Park
Dock Road
Birkenhead
CH41 1LT
CARLISLE
Unit 7
James Street Workshops
James Street
Carlisle
Cumbria
CA2 5AH
ISLE OF MAN
South Quay Ind. Estate
Douglas
Isle of Man
IM1 5AT
BOLTON
Unit B
Central Industrial Estate
St Marks Street
Bolton
BL3 6NR
PRESTON
Unit 250
Dawson Place
Bamber Bridge
Preston
Lancashire PR5 8AL
STOCKPORT
Unit 20 Haigh Park
Haigh Avenue
Stockport
SK4 1QR
Plas Ffynnon Warehouse
Middleton Road
Oswestry
SY11 2PP
11
Zanussi 818 15 02--03/3
To contact your local Service Force Centre telephone 08705
MIDLANDS
BIRMINGHAM
66 Birch Road East
Wyrley Trading Estate
Witton
Birmingham
B6 7DB
BOURNE
Pinfold Road
Bourne
PE10 9HT
BRIDGNORTH
68 St. Mary’s Street
Bridgnorth
Shropshire
WV16 4DR
GLOUCESTER
101 Rycroft Street
Gloucester
GL1 4NB
HEREFORD
Units 3 & 4
Bank Buildings
Cattle market
Hareford
HE4 9HX
HIGHAM FERRERS
30 High Street
Higham Ferrers
Northants
NN10 8PL
LONDON & EAST ANGLIA
BECKENHAM
CHELMSFORD
COLINDALE
ELTHAM
ASHFORD
Hanbury Road
Widford Ind. Estate
Chelmsford
Essex
CM12 3AE
Unit 2
Bridge Road Business Centre
Bridge Road
Ashford
Kent TN23 1BB
FLEET
Unit 1
Redfields Ind. Estate
Church Crookham
Fleet
Hampshire GU13 0RD
HAYWARDS
HEATH
21-25 Bridge Road
Haywards Heath
Sussex RH16 1UA
TONBRIDGE
Unit 30
Deacon Trading Estate
Morley Road
Tonbridge
TN9 1RA
Unit 14
Capitol Park
Capitol Way
Colindale
London NW9 0EQ
194 Court Road
Mottingham
Eltham
London SE9 4EW
ENFIELD
284 Alma Road
Enfield
London
EN3 7BB
GRAVESEND
Unit B4
Imperial Business Estate
West Mill
Gravesend
Kent
DA11 0DL
Unit 2
Furnace Road
Ilkeston DE7 5EP
LEICESTER
Unit 7
Oaks Industrial Estate
Coventry Road
Narborough
Leicestershire
LE9 5GF
LETCHWORTH
Unit 8
Clifton Street
Stone Field Park
Lincoln
LN5 8LQ
16-17 Woodside Ind. Park
Works Road
Letchworth
Herts
SG6 1LA
LONDON
18-21 Croft Road
Brampton Ind. Estate
Newcastle under Lyme
Staffordshire
ST5 0TW
2 - 4 Royal Lane
Yiewsley
West Drayton
Middlesex
UB7 8DL
MAIDENHEAD
Reform Road
Maidenhead
Berkshire
SL6 8BY
MOLESEY
10 Island Farm Avenue
West Molesey
Surrey
KT8 2UZ
NEWBURY
9 Pipers Court
Berkshire Drive
Thatcham
Berkshire
RG19 4ER
NORWICH
2b Trafalgar Street
Norwich
NR1 3HN
SUNBURY
Unit 1a
The Summit
Hanworth Road
Sunbury on Thames
TW16 5DB
NEWCASTLE
UNDER LYME
REDDITCH
13 Thornhill Road
North Moons Moat
Redditch
Worcestershire
B98 9ND
TAMWORTH
Unit 3
Sterling Park
Claymore
Tamworth
B77 5DQ
WORCESTER
Units 1 & 2
Northbrooks Close
Gregorys Mill Ind. Estate
Worcester
WR3 8BP
IPSWICH
SOUTH EAST
11a Gardner Ind. Estate
Kent House Lane
Beckenham
Kent BR3 1QZ
ILKESTON
LINCOLN
929 929
Unit 6C
Elton Park Business Centre
Hadleigh Road
Ipswich
IP2 0DD
12
SOUTH WEST
BARNSTAPLE
Main Road
Fremington
Barnstaple
North Devon EX31 2NT
BOURNEMOUTH
63-65 Curzon Road
Bournemouth
Dorset
BH1 4PW
BRIDGEWATER
6 Herswell Business Park
Salmon Parade
Bridgwater
Somerset TA6 5PY
BRISTOL
11 Eldon Way
Eldonwall Trading Estate
Bristol
BS4 3QQ
EMSWORTH
266 Main Road
Southbourne
Emsworth
PO10 8JL
ISLE OF WIGHT
Unit 8
Enterprise Court
Ryde Business Park
Ryde
Isle of Wight PO33 1DB
NEWTON ABBOT
Unit 2
Zealley Ind. Estate
Kingsteignton
Newton Abbot
TQ12 3TD
REDRUTH
Unit 7D
Pool Ind. Estate
Druids Road
Redruth
Cornwall TR15 3RH
Zanussi 818 15 02--03/3
Guarantee Conditions
GB
We, undertake that if within 12 months of the date of the purchase this appliance or any part thereof is proved
to be defective by reason only of faulty workmanship or materials, we will, at our option repair or replace the
same FREE OF CHARGE for labour, materials or carriage on condition that:
· The appliance has been correctly installed and used only on the electrical supply stated on the rating plate.
· The appliance has been used for normal domestic purposes only, and in accordance with the manufacturer's
instructions.
· The appliance has not been serviced, maintained, repaired, taken apart or tampered with by any person not
authorised by us.
· All service work under this guarantee must be undertaken by a ZANUSSI SERVICE FORCE CENTRE.
· Any appliance or defective part replaced shall become the company's property.
· This guarantee is in addition to your statutory and other legal rights.
Home visits are made between 8.30am and 5.30pm Monday to Friday. Visits may be available outside these
hours in which case a premium will be charged.
Exclusions
This guarantee does not cover:
· Damage or calls resulting from transportation, improper use or neglect, the replacement of any light bulbs or
removable parts of glass or plastic.
· Costs incurred for calls to put right an appliance which is improperly installed or calls to appliances outside
the United Kingdom.
·Appliances found to be in use within a commercial environment plus those those which are subject to rental
agreements.
· Products of Zanussi manufacture which are not marked by Zanussi.
European Guarantee
If you should move to another country within Europe then your guarantee moves with you to your new home
subject to the following qualifications:
· The guarantee starts from the date you first purchased your product.
·The guarantee is for the same period and the same extent for labour and parts as exists in the new country of
use for this brand or range of products.
·This guarantee relates to you and cannot be transferred to another user
·Your new home is within the European Community (EC) or European Free Trade Area.
· The product is installled and used in accordance with our instructions and is only used domestically, i.e. a
normal household.
· The product is installed and taking into account regulations in your new country.
Before you move please contact your nearest Customer Care Centre, listed below, to give them details of your
new home. They will then ensure that the local Service Organisation is aware of your move and able to look
after you and your appliances.
France
Germany
Italy
Sweden
UK
Senlis
Nürnberg
Prodenone
Stockholm
Slough
+33 (0)3 44 62 22 22
+49 (0)911 323 26 00
+39 (0)1678 47053
+46 (0) 20 78 77 55
+44(0) 1753 21 98 97
13
Zanussi 818 15 02--03/3
Technical specification
Model
ZF711W
Net volume
286 l
Width
595 mm
Height
1800 mm
Depth
600 mm
Energy consumption
431 kWh/year
Energy class
B
Rated power
120 W
Freezing capacity
28 kg/24 hours
GB
Installation
GB
Unpacking
Do not allow children to play with the
packaging. The plastic film can cause
suffocation.
Unpack the cabinet and check that it is in good
condition and free of any transport damage. Notify
the dealer immediately of any damage. Hand the
packaging over for recycling.
Cleaning
Wash the inside of the cabinet using lukewarm water
and bicarbonate of soda (5 ml to 0,5 litre of water).
Do not use soap or detergent as the smell may
linger. Dry thoroughly.
Installing the cabinet
To obtain the best performance from the cabinet,
ensure :
· the cabinet is placed in a dry, cool place and
is not exposed to direct sunlight.
· the cabinet is not placed close to a source of
heat, e.g. a cooker or dishwasher.
· the cabinet is level. The cabinet should not lean
against any wall. If necessary adjust the
feet using the adjustment spanner supplied.
· there is good air circulation around the cabinet
and that the air channels below and behind
the cabinet are not blocked. The ventilation
space above the cabinet must be at least 4 cm.
The ventilation space can either be
a) directly above the cabinet, or
b) behind and above the top cupboard. In this case,
the space behind the cupboard must be at least
50 mm deep.
Cabinet is placed at a location whose ambient
temperature corresponds to the climate
classification*, for which the appliance is designed.
* See on the rating plate on the inside of the
appliance.
The following table shows which ambient
temperature is correct for each climate classification.
a)
14
b)
50mm
Zanussi 818 15 02--03/3
Climate
classification
for an ambient temperature of
SN
+10°C to +32°C
N
+16°C to +32°C
ST
+18°C to +38°C
T
+18°C to +43°C
If the cabinet is placed in a corner and the side with
the hinges facing the wall, the distance between the
wall and the cabinet must be at least 10 mm to allow
the door to open enough so that the baskets can be
removed.
Electrical connection
connected to the terminal marked with the letter "E"
or by the earth symbol
yellow.
Any electrical work required to install this
appliance should be carried out by a
qualified electrician or competent person.
This appliance must be earthed.
The wire coloured blue must be connected to the
terminal marked "N" or coloured black
The manufacturer declines any liability should
these safety measures not be observed.
The wire coloured brown must be connected to the
terminal marked "L" or coloured red.
Electrical Requirements
Before switching on, make sure the electricity
supply voltage is the same as that indicated on the
appliance rating plate.
The appliance is supplied with a 13amp plug fitted.
In the event of having to change the fuse in the plug
supplied, a 13amp ASTA approved (BS1362) fuse
must be used.
Should the plug need to be replaced for any reason.
The wires in the mains lead are coloured in
accordance with the following code:
Green and yellow
Blue
Brown
or coloured green and
Upon completion there must be no cut, or stray
strands of wire present and the cord clamp must be
secure over the outer sheath.
-Earth
-Neutral
-Live
The wire coloured green and yellow must be
15
Zanussi 818 15 02--03/3
Door Reversal
1. Close the cabinet and disconnect the appliance
from the electricity socket.
1
2. Remove the ventilation grille. There is a part on
the grille that can be removed. Reposition it and
transfer to the opposite side.
2
3
3. Support the cabinet on a wooden block when it is
laid down. This will make it easier to grip under the
cabinet when returning to an upright position.
4. On the upper part of the cabinet. Remove the
hinge pin and replace on the other side.
5. On the lower part of the cabinet. Unscrew the
hinge. Move the hinge pin and plastic cover. Secure
the hinge on the other side.
4
6. Raise the cabinet and replace the ventilation grille.
7. Unscrew the handle. Carefully press in the plastic
plugs on the opposite side using a punch. Secure the
handle in the plug holes. Then press the supplied
plastic plugs into the holes to which the handle was
previously fitted.
5
8. Put the cabinet in position. Check that it stands
straight. See the section "Positioning the cabinet".
7
Attention
After completion of the door reversing
operation, check that the door gasket adheres
to the cabinet. If the ambient temperature is
cold (i.e. in Winter), the gasket may not fit
perfectly to the cabinet. In that case, wait for
the natural fitting of the gasket or accelerate
this process by heating up the part involved
with a normal hairdryer on a low setting.
16
Zanussi 818 15 02--03/3
qÜÉ=bäÉÅíêçäìñ=dêçìé=áë=íÜÉ=ïçêäÇDë=ä~êÖÉëí=éêçÇìÅÉê=çÑ=éçïÉêÉÇ=~ééäá~åÅÉë=Ñçê=âáíÅÜÉåI=ÅäÉ~åáåÖ=~åÇ=çìíÇççê=ìëÉK
jçêÉ=íÜ~å=RR=ãáääáçå=bäÉÅíêçäìñ=dêçìé=éêçÇìÅíë=EëìÅÜ=~ë=êÉÑêáÖÉê~íçêëI=ÅççâÉêëI=ï~ëÜáåÖ=ã~ÅÜáåÉëI=î~Åììã=ÅäÉ~åÉêëI
ÅÜ~áå=ë~ïë=~åÇ=ä~ïå=ãçïÉêëF=~êÉ=ëçäÇ=É~ÅÜ=óÉ~ê=íç=~=î~äìÉ=çÑ=~ééêçñK=rpa=NQ=Äáääáçå=áå=ãçêÉ=íÜ~å=NRM=ÅçìåíêáÉë
~êçìåÇ=íÜÉ=ïçêäÇK
Mariestad KTD--AV