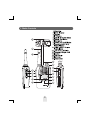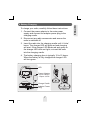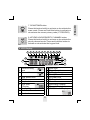
1
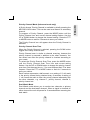
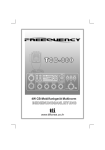
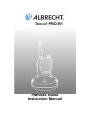
Tectalk PRO-R1
PMR446 Radio
Instruction Manual
Thank you for purchasing this radio.
All our products are built to offer excellent
value by combining advanced features,
great design and manufacturing quality.
To ensure you are familiar with the operation
and features of your radio, and in order to
obtain the best performance, please read
this manual carefully before operation.
1
2
3
4
5
6
7
8
9
10
11
12
13
14
15
Caution ...................................................... 4
Radio Controls ........................................... 5
Equipment and Accessories Supplied ....... 6
Fitting the Battery pack .............................. 6
Battery Charging ....................................... 7
Radio Controls ........................................... 8
LCD Display ............................................... 9
Basic Radio Operation ............................. 10
Radio ID ................................................... 10
Function Mode - User Mode .................... 11
Function Mode - Advanced Mode ............ 12
Radio Features Explained ....................... 13
Volume level ......................................13
Channels .......................................... 13
Transmit Power Hi / low....................13
Privacy Codes ................................... 14
Scan Pause Timer ............................. 14
Hands Free (VOX) Mode................... 15
Busy Channel Lock Out (BCLO) ....... 15
Priority Channel................................. 16
Priority Channel Scan Time............... 16
Dual Watch ........................................ 16
Roger Beep ....................................... 17
Key Beep........................................... 17
Time Out Timer.................................. 18
Call Alert ............................................ 18
Clone ................................................. 18
Squelch Level.................................... 19
Monitor............................................... 19
Display & Keypad Backlight .............. 19
Channel Scan.................................... 19
Privacy Code Scan/Decode .............. 20
Battery Level ..................................... 20
Power Save ....................................... 21
Keypad Lock...................................... 21
Troubleshooting........................................ 21
CE Declaration ......................................... 21
Safety Requirements................................ 22
Technical Specifications ........................... 22
ENGLISH
CONTENTS
IMPORTANT - READ ALL INSTRUCTIONS carefully and
completely before operating your radio and retain this
manual for future reference.
NEVER connect the radio to a power source other than the
supplied battery. This may damage your product.
ENGLISH
Caution
NEVER operate your radio with the antenna less than 5cm
from exposed parts of the body.
NEVER use the radio in or near a mining facility or other
area which uses remotely triggered explosives or an area
labelled "Blasting Area".
NEVER use or charge your radio in a potentially explosive
atmosphere.
DO NOT place your radio in front of a vehicle airbag.
DO NOT operate your radio on board an aircraft.
DO NOT use your radio with a damaged antenna.
DO NOT attempt to modify your radio in any way.
ALWAYS charge your radio at normal room temperature.
ALWAYS switch off your radio where notices restrict
the use of two-way radio or mobile telephones.
ALWAYS replace the accessory jack cover (if applicable)
when the jack is not in use.
ONLY use Albrecht or ALAN approved rechargeable batteries with the
supplied charger.
AVOID exposing your radio to water. It can widthstand spray water and
some rain,but has no higher waterproof class.
AVOID storing or charging your radio in direct sunlight.
AVOID storing or using your radio where temperatures are
below -20ºC or above +60ºC.
4
1. Radio Controls
1
2
3
9
10
11
4
12
5
13
6
14
7
15
8
16
5
1. TX-1446 radio (with fixed antenna)
1 unit
2. Li-Ion Battery pack (1000mAh)
1 unit
3. Charging Cradle
1 unit
4. Power Adaptor
1 unit
5. Instruction Manual
1 unit
3. Fitting the Battery pack
Fitting
1. Ensure that your radio is
switched off.
2. Align the bottom of the battery
pack with the securing slots at
the back of the radio.
3. Press the top of the battery into
the back of the radio until it
'clicks' home.
Removal
1. Ensure that your radio is
switched off.
2. Press down on the battery
release catch and separate the
battery pack from the radio.
6
ENGLISH
2. Equipment and Accessories Supplied
To charge your radio, carefully follow these instructions:
1. Connect the power adaptor to the main power
supply and connect the adaptor power plug to the
charging cradle.
2. Disconnect any radio accessories and ensure the
radio is switched off.
3. Insert the radio into the charging cradle until it 'clicks'
home. The charger LED will glow red and charging
will start. If the charger LED blinks red and green or
the charger LED does not light, re-insert the radio
into the charging cradle.
4. The battery charging time is typically 12 to 15 hours.
When the battery is fully charged the charger LED
will turn green.
LED
Power Adaptor
- Input: 230VAC
- Output: 9 VDC
Charge Cradle
Adaptor Power
Plug
7
ENGLISH
4. Battery Charging
1. Power On/Off/Volume control
Turn the knob clockwise to switch on and increase
the volume and counter-clockwise to decrease the
volume and switch off the radio. The radio will emit a
confirmation tone when it switches on.
2. Push-To-Talk (PTT) button
Press and hold this button to speak (transmit) and
release the button to hear (receive) messages. You
can only communicate with other PMR446 radios
when the channel and privacy code settings are the
same as yours.
3. UP button
Pressing this button will increase the channel
number. In some modes this button is used to adjust
the function setting.
4. DOWN button
Pressing this button will decrease the channel
number. In some modes this button is used to adjust
the function setting.
5. MODE/VOX button
Press this button briefly to activate the function
mode. Press the button again (repeatedly) to step
through the function menu. Press and hold this
button to activate or de-activate the VOX function.
6. SQUELCH/MONITOR button
Press this button briefly to activate and de-activate
the squelch level mode. Press and hold this button
to activate or de-activate the MONITOR function.
8
ENGLISH
5. Radio Controls
8. KEYPAD LOCK/PRIORITY CHANNEL button
Press this button briefly to activate or de-activate the
priority channel mode. Press and hold this button to
activate or de-activate the keypad lock.
6. LCD Display
1 2 3 4 5 6 7 8
9 10 11 12
13
19
18
15
17
1 Receiver Busy
2 Icon
3 Transmit Icon
10
11
12
13
14
15
16
17
18
19
4
5
6
7
Dual Watch Icon
VOX Icon
Key Lock Icon
DCS Icon
/ Display
8 Keytone Icon
9 Time Out Timer Icon
Monitor Icon
9
14
16
Scan Icon
Roger Beep Icon
Battery Icon
Priority Channel Icon
Hi Power Icon
BL Busy Lock Icon
Clone Icon
Information Display
Channel Display
CTCSS Icon / Display
ENGLISH
7. SCAN/TONE button
Press this button briefly to activate or de-activate the
scan mode. Press and hold this button to activate or
de-activate the current privacy code (CTCSS/DCS).
The PMR446 service which this radio uses shares channels on
a 'take turns' basis. This means that other users and groups
may be using any channel and privacy code combination.
To communicate with other PMR446 radios, all units must be
switched to the same channel (8 choices) and privacy code (50
CTCSS and 104 DCS choices). If the combination you have
chosen is already in use please make an alternative selection.
1. Switch on your radio.
2. Check and if necessary change the channel and privacy
code settings (see Function Mode).
3. To speak, hold the radio upright, about 10cm from your
mouth and press the PTT. Speak slowly and clearly towards
the radio. Release the PTT when you finish speaking.
You will hear messages from other radios that are within range
and have the same channel and privacy code setting.
The appropriate icon will appear in the radio display when you
receive or transmit a message.
8. Radio ID Editing
An up to 3 digit Radio ID can be displayed when the radio is
switched on. You can customise this Radio ID to identify your radio.
To enter the Radio ID edit mode, switch on the radio whilst
pressing the SCAN button and the MODE button.
1. Press the MODE button to select the first position.
2. Use the UP or DOWN button to change the character.
3. Press the MODE button to select the next letter.
4. Repeat steps 2 and 3 until the ID is complete.
5. Turn off the radio to finish editing.
10
ENGLISH
7. Basic Radio Operation
The user mode allows you to set-up and edit the basic functions
(see Radio Features Explained).
To access the consumer mode, press the MODE button briefly.
Each press of the MODE button steps the radio sequentially
through the different functions. The radio display indicates the
current function. The present setting and associated icon flash.
Use the UP or DOWN button to change the setting. Press the PTT
or MODE button or wait for 5 seconds to store your choice. If your
do not press any key for 5 seconds your radio will return to standby
mode automatically.
NB. Squelch level adjustment works via the SQUELCH button.
Display
Functions
Settings
Change Privacy Tone
Code (CTCSS)
1
to 50
Change Digital Privacy
Tone Code (DCS)
1
to 104
Select Hands Free Mode
(VOX)
1
to 5
, Off
Select Dual Watch Mode
1
to 8
, Off
Activate Roger Beep
On
, Off
Activate Key Beep
On
, Off
Change Call Alert Tone
1
Change Squelch Level
1
to 15
Off
11
to 5
, Off
, Off
, Off
, Auto
,
ENGLISH
9. Function Mode - User Mode
The advanced mode allows you to program user preferences,
activate features and use advanced functions (see Radio Features
Explained).
To access the advanced mode, turn on the radio whilst pressing
and holding the SQUELCH button and SCAN button.
Each press of the MODE button steps the radio sequentially though
the different functions. The radio display indicates the current
function. The present setting and associated icon flash.
Use the UP or DOWN button to change the setting. Press the PTT
or MODE button or wait for 5 seconds to store your choice. If you
do not press any key for 5 seconds your radio will return to standby
mode automatically. If the radio is turned off and turn on again
without pressing any buttons, the radio will return to the user mode.
Display
Functions
Settings
Change Privacy Tone
Code (CTCSS)
1
to 50
Change Digital Privacy
Tone Code (DCS)
1
to 104
Select Scan Stay Timer
1 ,2 ,3 ,5
15
, 20
, 30
60
, Off
Select Hands Free Mode
(VOX)
1
Select Busy Channel Lock
out Mode (Main Channel)
Carrier
, Correct tone,
Different tone
, Off
Select Priority Channel
1
to 8
Select Priority Scan Time
1
to 5
12
to 5
, Off
, Off
, 10
,45
, Off
, Off
,
,
ENGLISH
10. Function Mode - Advanced Mode
1
to 8
Activate Roger Beep
On
, Off
Activate Key Beep
On
, Off
Time-Out-Timer Settings
15
90
240
Change Call Alert Tone
1
Clone parameters
Send
Off
Change Squelch Level
1
to 15
Off
ENGLISH
Select Dual Watch Mode
, Off
, 30
, 45
, 60
, 120
, 180
,
, Off
to 5
,
, Off
, Receive
, Auto
,
,
11. Radio Features Explained
Volume Level
To adjust the volume level, use the POWER On/Off/VOLUME
control. To increase the volume turn this control clockwise, to
decrease the volume turn this control counter-clockwise.
Channels
This radio operates on any one of the 8 PMR446 licence free
channels. To communicate with other PMR446 radios, all units must
be switched to the same channel and privacy code. To change the
radio channel, press the UP or DOWN button when the radio is in
stand-by mode.
Transmit Power: To reduce TX power, keep PTT pressed and toggle
with UP or Down between Hi power mode and low power mode.
13
Only one type of Privacy code can be used on each channel.
Selecting a Digital Privacy code will override any Analogue Privacy
code settings. If the other unit(s) do not have privacy codes ensure
your units privacy codes (analogue and digital) are set to 'Off'.
Please note that privacy codes do not prevent other radio users
from hearing your conversation. They simply allow you to ignore
messages that are using a different privacy code.
Selecting an Analogue Privacy Code
To change the Analogue Privacy Code, press the MODE button
until the CTCSS icon and privacy code number flash. Use the UP
or DOWN button to select the desired code. Press the PTT or
MODE button or wait for 5 seconds to store your choice. The
CTCSS icon will appear when an Analogue Privacy Code is
selected.
Selecting a Digital Privacy Code
To change the Digital Privacy Code, press the MODE button until
the DCS icon and privacy code number flash. Use the UP or
DOWN button to select the desired code. Press the PTT or MODE
button or wait for 5 seconds to store your choice. The DCS icon will
appear when a Digital Privacy Code is selected.
Scan Pause Timer (Advanced mode only)
The Scan Pause Timer allows you to select the period of time that
your radio will dwell on an active channel when the scan mode is
activated.
Timer values from 1 second to 60 seconds and Off can be selected.
If the timer value is 'Off', the radio will remain on the scanned
channel until the signal disappears.
To change the Scan Pause Time, press the FUNCTION button until
SC is shown in the display. Use the UP or DOWN button to select
the desired setting. Press the PTT or MODE button or wait for 5
seconds to store your choice.
14
ENGLISH
Privacy Codes (CTCSS and DCS Tone Codes)
This radio is fitted with 50 Analogue Privacy codes (also known as
CTCSS, sub-codes or sub-channels) and 104 Digital Privacy codes
(also known as DCS codes).
15
ENGLISH
Hands Free (VOX) Mode
When Hands Free (VOX) Mode is selected the radio will
automatically transmit when the microphone detects your voice (or
other noise). It can be used with the internal microphone or a
suitable audio accessory (available separately). To avoid accidental
operation and reduce the effect of background noise, there are 5
microphone sensitivity settings.
To select the VOX sensitivity level, press the MODE button until the
VOX icon and current setting flashes. Use the UP or DOWN button
to change the sensitivity level (5 is the most sensitive). Press the
PTT or MODE button or wait for 5 seconds to store your choice.
To activate the VOX mode press and hold the MODE button until
the VOX icon appears. To de-activate VOX mode, press and hold
the MODE button until the VOX icon disappears. VOX mode can
only be activated if a sensitivity level has been selected.
Busy Channel Lock Out (BL) Mode (Advanced mode only)
Busy Channel Lock Out prevents you from transmitting when
another signal is present. Three modes are available:
a. Carrier only (CA)
This will prevent your radio from transmitting when a signal is
present on the same channel, regardless of the privacy code.
b. Correct Tone (CT)
This will prevent your radio from transmitting when a signal is
present on the same channel, using the same privacy code as your
current setting.
c. Different Tone (DT)
This will prevent your radio from transmitting when a signal is
present on the same channel, using a different privacy code setting.
To activate and select the BL mode, press the MODE button
until the BL icon and current setting flashes. Use the UP or
DOWN button to change the setting. Press the PTT or MODE
button or wait for 5 seconds to store your choice. A setting of 'Off'
will de-activate this mode.
The BL icon will appear when BL mode is active.
A 'Quick Access' Priority Channel is available by briefly pressing the
KEYPAD LOCK button. This can be used as a reserve or secondary
channel.
To program a Priority Channel, press the MODE button until the
Priority Channel icon and current channel setting flashes. Use the
UP or DOWN button to change the channel setting. Press the PTT
or MODE button or wait for 5 seconds to store your choice.
The Priority Channel icon will appear when the Priority Channel is
selected.
Priority Channel Scan Time
When the Priority Channel is selected, pressing the SCAN button
toggles the Priority Channel scan.
Priority Channel scan is similar to channel scanning, however the
priority channel is scanned in addition to the other channels. You
can select how often the priority channel is checked according to
your needs.
To select the Priority Channel Scan Time, press the MODE button
until the Priority Channel Scan Time icon and current setting
flashes. Use the UP or DOWN button to change the priority channel
scan time. Set the scan time to '1' for most frequent and '5' for least
frequent. Press the PTT or MODE button or wait for 5 seconds to
store your choice.
Each number represents a half second, so a setting of '4' will result
in the priority channel being checked every 2 seconds. A setting of
'1' will cause the radio to scan the priority channel alternately with
the other channels, e.g. channel 1, priority channel, channel 2,
priority channel etc.
Dual Watch Mode
Dual Watch mode allows you to monitor two channels; a primary
channel and the dual watch channel. When a signal is received on
either channel the unit will pause for 5 seconds before resuming the
dual watch.
16
ENGLISH
Priority Channel Mode (Advanced mode only)
The radio display will alternate between the primary and dual watch
channels and the dual watch icon will appear.
To deactivate the dual watch press the SCAN button.
If you press the PTT button whilst receiving a signal in Dual Watch
Mode the radio will transmit on the currently displayed channel. If
you press the PTT button when no signal is present the radio will
transmit on the primary channel.
Roger Beep
The Roger Beep is a short tone that is automatically added to the
end of your transmissions to tell other users that you have finished
speaking. You can activate or deactivate the Roger Beep as
required.
To change the Roger Beep setting, press the MODE button until the
Roger Beep icon and current setting flashes. Use the UP or DOWN
button to change the setting. Press the PTT or FUNCTION button or
wait for 5 seconds to store your choice.
The Roger Beep icon will appear when Roger Beep is active.
Key Beep
If the Key Beep is activated, your radio will emit a confirmation tone
whenever you use the keypad. You can activate or deactivate the
Key Beep as required.
To change the Key Beep setting, press the MODE button until the
Key Beep icon appears. Use the UP or DOWN button to change the
setting. Press the PTT or FUNCTION button or wait for 5 seconds
to store your choice.
The Key Beep icon will appear when Key Beep is active.
17
ENGLISH
To activate the dual watch mode, first select a radio channel (see
Channels) as the primary channel. To select the dual watch channel
press the MODE button until the Dual Watch Icon and current
setting flashes. Use the UP or DOWN button to select the desired
dual watch channel. Press the PTT or MODE button or wait for 5
seconds to store your choice and activate the dual watch.
This timer is used to limit the transmit time of your radio. By
selecting a timer setting, your radio will automatically release the
PTT when the selected time limit is reached.
To change or select the TOT time, press the MODE button until the
TOT icon appears. Use the UP or DOWN button to change the
setting. Press the PTT or FUNCTION button or wait for 5 seconds
to store your choice.
The TOT icon will appear when Key Beep is active.
Call Alert
To alert other users to your message and gain their attention you
can send a Call Alert melody by pressing the PTT button twice in
quick succession.
There are five different call alert tones and off.
To change the Call Alert melody, press the FUNCTION button until
'CA' appears. Use the UP or DOWN button to change the setting.
Press the PTT or FUNCTION button or wait for 5 seconds to store
your choice.
Clone (Advanced mode only)
Th of your radio (except the Radio ID) can be transferred
to or from another Tectalk PRO. To perform this function you will require
a TCC-1000 Cloning cable (available separately).
1. Place the two radios side by side and connect the Cloning cable.
2. Switch on the unit whose settings are to be copied (the master
unit). Press the MODE button until 'CL' appears. Use the UP or
DOWN buttons and select 'OUT'. Press the PTT or FUNCTION
button or wait for 5 seconds to store your choice.
3. Switch on the unit whose settings are to be changed (the slave
unit). Press the MODE button until 'CL' appears. Use the UP or
DOWN buttons and select 'IN'. Press the PTT or FUNCTION
button or wait for 5 seconds to store your choice. The radios LED
will turn green to indicate that it is ready to receive data.
18
ENGLISH
Time Out Timer (TOT) setting (Advanced mode only)
5. If the clone fails the slave radio sends an error beep and the LED
remains green. Repeat step 4 until a confirmation beep is heard.
If repeated clone attempts fail, repeat the whole procedure
from step 1.
If the clone procedure was successful switch off both radios and
disconnect the cloning cable. Switch on the slave radio to use the
copied data.
Squelch Level Adjustment
This function allows you to adjust the squelch level of your radio.
To change the squelch level, press the Squelch/Mon button briefly.
The current squelch setting will flash. Use the UP or DOWN button
to change the setting. Press the PTT button or wait for 5 seconds to
store your choice.
There are 15 squelch levels. Level 1 is the most sensitive (open)
and level 15 is the least sensitive (closed). Auto is the optimum
factory setting and 'Off' is fully open, with constant static noise.
Monitor
The Monitor function is used to briefly check for activity on the
current channel, regardless of privacy code settings. It is the same
as setting the squelch level to 'Off'.
19
ENGLISH
4. Press the PTT button of the master radio while the slave radio
LED is green. The LED of the slave radio will go off. The master
radio and slave radio will emit a confirmation beep.
Display & Keypad Backlight
The display and keypad backlight will illuminate for 5 seconds
whenever any buttons (except for the PTT button) are pressed.
Channel Scan
The Channel Scan can be used to find or detect users on other
radio channels.
To activate/deactivate the channel scan, press the SCAN button
briefly. The Scan icon will appear when the channel scan is active.
Scanning will only stop when you deactivate the scan function.
The radio will scan through the 8 channels. If your radio detects a
valid signal the scan will pause according to your Scan Pause Timer
settings.
If you press the PTT button when your radio detects a signal, the
radio will transmit on the same channel. Scanning will resume after
approximately 15 seconds. Press the UP or DOWN button to
resume scanning immediately.
If you press the PTT button during scanning, the radio will return to
your original channel. Scanning will resume after approximately 15
seconds.
Privacy Code (CTCSS/DCS) Scan and Decode
Privacy Code Scan is used to determine which Privacy Code is in
use on the current channel.
To activate the privacy code scan press the MODE button until the
privacy code number flashes, then press the SCAN button briefly.
The Scan icon will blink when the privacy code scan is active.
The radio will scan through the 50 CTCSS and 104 DCS codes. If
your radio detects a valid signal the scan will pause for 5 seconds.
If you press the PTT button when your radio detects a signal, the
radio will transmit on the same privacy code and the privacy code
will be automatically selected.
20
ENGLISH
To activate or deactivate the Monitor press the SQUELCH button for
about 2 seconds. The Monitor icon will appear when the Monitor is
active. It is normal to hear background static noise.
Power Save
To conserve battery power the radio will automatically enter Power
Save mode after a short period of inactivity. There is no user setting
for Power Save.
Key Lock
To toggle the key lock, press and hold the KEYPAD LOCK button.
The key lock icon appears when the lock is activated.
21
ENGLISH
If you press the PTT button during scanning, the radio will return to
your original privacy code. Scanning will resume when the PTT
button is released.
To stop scanning, press the SCAN button again or press the MODE
button to step to the next menu setting.
To increase battery life use the scan modes sparingly.
Battery Level
The Battery icon indicates when the battery level is low and the
battery needs recharging. If necessary, refer to the instructions to
recharge the battery.
If you experience problems with your TX-1446 first check the
battery power level as low batteries can cause problems such as
poor transmission, weak reception and reduced sound quality.
Then check the manual and radio display to ensure that a function
(such as VOX or Lock) has not been activated by accident.
If these steps do not solve the problem reset your unit as follows:
1. Switch off the radio.
2. Press and hold the MODE button and PTT button together.
3. Switch on the radio.
This will reset the radio to the factory settings and should resolve
most problems.
In case of further difficulty please consult your dealer or visit our
websites at www.ttikorea.co.kr or www.tti.uk.com.
13. CE Declaration
This PMR 446 radio Tectalk Pro-R1, marked with the CE symbol,
is declared to comply with the essential requirements of the
European Radio and Telecommunication Terminal Directive R&TTE,
the EMC Directive and the Low Voltage-Directive (LVD).
It corresponds to the relevant technical standards EN 300 296-2
EN 301 489-1, EN 301 489-05 and EN 60 950.
Please note that different versions of this radio may be available
to cover other national requirements for countries outside of European
regulations. Such radios may not be for use in Europe.
This radio can be used without license and charges in all EU countries +
non EU countries Iceland, Liechenstein, Norway, Switzerland, San Marino.
Italian users must pay a one-time-fee after purchasing the radio.
Please see our latest Conformity Declaration updates in the internet under
www.hobbyradio.de This product is only for sale in other countries under
the condition that the distributor can supply a user manual in the official country
language.
22
ENGLISH
12. Troubleshooting
For charging the rechargeable batteries, only a CE approved AC
adaptor complying with the following specifications must be used :
INPUT : 230VAC 50Hz
OUTPUT : 9VDC
300mA
15. Technical Specifications
1) Operating Frequencies (frequency shown in MHz):
Channel
1
2
3
4
Frequency
446.00625
446.01875
446.03125
446.04375
Channel
5
6
7
8
Frequency
446.05625
446.06875
446.08125
446.09375
2) Channel Spacing: 12.5kHz
3) Power Source: 1 x Li-Ion battery
4) Privacy Codes (CTCSS Tone Codes) Table (in Hz):
Ch
1
2
3
4
5
6
7
8
9
10
Freq.
67.0
71.9
74.4
77.0
79.7
82.5
85.4
88.5
91.5
94.8
Ch
11
12
13
14
15
16
17
18
19
20
Freq.
97.4
100.0
103.5
107.2
110.9
114.8
118.8
123.0
127.3
131.8
Ch
21
22
23
24
25
26
27
28
29
30
Freq.
136.5
141.3
146.2
151.4
156.7
162.2
167.9
173.8
179.9
186.2
23
Ch
31
32
33
34
35
36
37
38
39
40
Freq.
192.8
203.5
210.7
218.1
225.7
233.6
241.8
250.3
69.4
159.8
Ch
41
42
43
44
45
46
47
48
49
50
Freq.
165.5
171.3
177.3
183.5
189.9
196.6
199.5
206.5
229.1
254.1
ENGLISH
14. Safety Requirements
No
1
2
3
4
5
6
7
8
9
10
11
12
13
14
15
16
17
18
19
20
21
Code
023
025
026
031
032
036
043
047
051
053
054
065
071
072
073
074
114
115
116
122
125
No
22
23
24
25
26
27
28
29
30
31
32
33
34
35
36
37
38
39
40
41
42
Code
131
132
134
143
145
152
155
156
162
165
172
174
205
212
223
225
226
243
244
245
246
No
43
44
45
46
47
48
49
50
51
52
53
54
55
56
57
58
59
60
61
62
63
Code
251
252
255
261
263
265
266
271
274
306
311
315
325
331
332
343
346
351
356
364
365
No
64
65
66
67
68
69
70
71
72
73
74
75
76
77
78
79
80
81
82
83
84
Code
371
411
412
413
423
431
432
445
446
452
454
455
462
464
465
466
503
506
516
523
526
No
85
86
87
88
89
90
91
92
93
94
95
96
97
98
99
100
101
102
103
104
Code
532
546
565
606
612
624
627
631
632
654
662
664
703
712
723
731
732
734
743
754
ENGLISH
5) Digital Privacy Codes Table (DCS Tone Codes):
Alan Electronics GmbH -- Daimlerstr. 1 k -- D-63303 Dreieich / Germany
Repair enquiries & spare parts service: Tel: (+49) 6103 9481 22,
Fax: (+49) 6103 9481 60 or e-mail via [email protected]
Service-Download : www.hobbyradio.de Website: www.albrecht-online.de
24