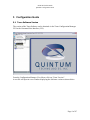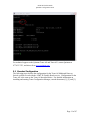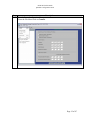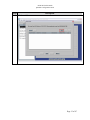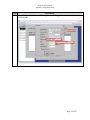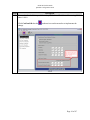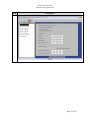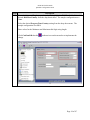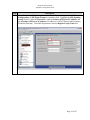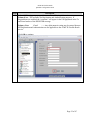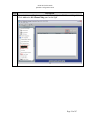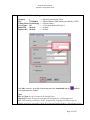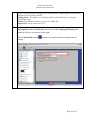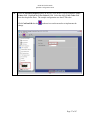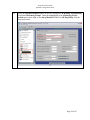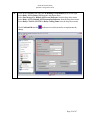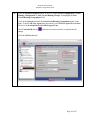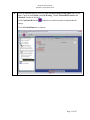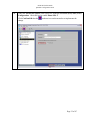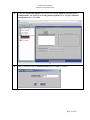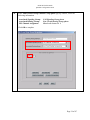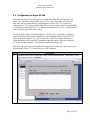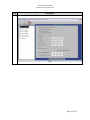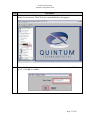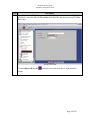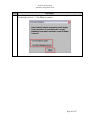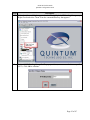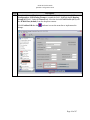
1
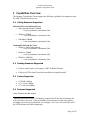
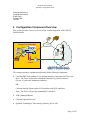
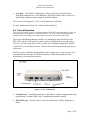
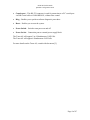
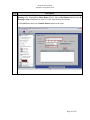
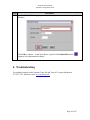
AT&T IP Flexible Reach
Quintum Configuration Guide
Quintum Technologies Tenor
Configuration Guide
For Use with AT&T’s
IP Flexible Reach Service
Version 1/ Issue 2
Date: 10/6/06
Page 1 of 47
AT&T IP Flexible Reach
Quintum Configuration Guide
TABLE OF CONTENTS
1
2
3
4
5
6
7
Introduction................................................................................................................. 3
Special Notes .............................................................................................................. 3
Capabilities Overview................................................................................................. 4
3.1
Calling Scenarios Supported............................................................................... 4
3.2
Routing Scenarios Supported.............................................................................. 4
3.3
Codecs Supported ............................................................................................... 4
3.4
Features Supported.............................................................................................. 4
Configuration Component Overview.......................................................................... 5
4.1
Tenor AX Overview ........................................................................................... 6
4.2
Tenor AS Overview ............................................................................................ 7
Configuration Guide ................................................................................................... 9
5.1
Tenor Software Version...................................................................................... 9
5.2
Standard Configuration..................................................................................... 11
5.3
Configuration for Super G3 FAX ..................................................................... 35
Troubleshooting ........................................................................................................ 46
Additional References............................................................................................... 47
Page 2 of 47
AT&T IP Flexible Reach
Quintum Configuration Guide
1 Introduction
This Guide describes the steps for configuring Quintum Tenor AS or Tenor AX to work
with AT&T’s Flexible Reach Service. The Quintum Tenor AS/AX Multipath Gateway
Switch provides Analog telephone access with VoIP capability and multipath switching
for redundancy. Tenor Software release P104.12.02 was tested with the AT&T IP
Flexible Reach Service.
The Tenor AS/AX is a multipath switch capable of supporting Analog telephones. The
Tenor AS/AX uses SIP signaling to complete telephone calls over the AT&T IP network
using the Flexible Reach service. Under normal conditions, calls from Analog telephones
are converted into VoIP packets by the Tenor AS/AX and sent through the AT&T IP
network. The Tenor AS/AX can also use a PSTN connection to bypass the data network
(AT&T and Customer) if there is an outage.
References in this Service Guide to “Tenor” refer to either or both of the Tenor AS and
Tenor AX.
2 Special Notes
Emergency 911/E911 Services Limitations
While AT&T IP Flexible Reach services support E911/911 calling capabilities in certain
circumstances, there are significant limitations on how these capabilities are delivered.
Please review the AT&T IP Flexible Reach Service Guide in detail to understand these
limitations and restrictions.
Tenor Transfer Feature Must be Turned Off
The Tenor IP transfer feature must be turned off. Quintum and AT&T do not currently
have a compatible mechanism for handling IP transfers.
Session Description Protocol in Session Progress and Ringing Messages
Must be Turned Off
Session description protocol in the session progress and ringing messages must be turned
off in the Tenor.
Page 3 of 47
AT&T IP Flexible Reach
Quintum Configuration Guide
3 Capabilities Overview
The Quintum Technologies Tenor supports the following capabilities in conjunction with
the AT&T Flexible Reach service.
3.1 Calling Scenarios Supported
Inbound Calls to the Quintum Tenor
•
Offnet gateway inbound to TENOR
o Local, Long Distance, International, FAX
•
TENOR to TENOR
o Local, Long Distance, International, FAX
•
TDM PBX to TENOR
o Local, Long Distance, International, FAX
Outbound Calls from the Tenor
•
TENOR to PSTN Offnet gateway
o Local, Long Distance, International, FAX
•
TENOR to TENOR
o Local, Long Distance, International, FAX
•
TENOR to TDM PBX
o Local, Long Distance, International, FAX
3.2 Routing Scenarios Supported
•
Failover from Primary to Secondary AT&T IP Border Element
•
Failover to PSTN when IP network unavailable or degraded quality1
3.3 Codecs Supported
•
•
•
G.729AB 8.0 Kbps
G.711 A-law 64Kbps
G.711 Mu-law 64Kbps
3.4 Features Supported
Virtual Telephone Number Support
1
Quintum patented SelectNet™ Technology monitors the IP network performance for
VoIP calls between Tenors. If the performance characteristics become unacceptable—
according to packet loss specifications you configure—the Tenor will switch the call to
the PSTN automatically and transparently.
Page 4 of 47
AT&T IP Flexible Reach
Quintum Configuration Guide
Calling Name Delivery
Call Hold and Resume
DTMF Relay
In Band DTMF
T38 FAX
4 Configuration Component Overview
This section provides a service overview of the Vendor integration with AT&T IP
Flexible Reach.
Enterprise w/ Analog PBX
PSTN
Application
Server
Network
Gateway
Border
Element
PBX
Call Control
Element
IP Border
Element
Firewall
The customer premises equipment shall consist of the following components.
•
Customer PBX with standard 2-wire Analog interface connections for FXO ports.
Note: The Tenor AS provides a standard Centronics 50 pin male interface
(50 pin / 25 pair male Amphenol connector).
OR
Customer Analog Phones and/or FAX machines with RJ11 interfaces.
Note: The Tenor AX provides standard RJ11 interfaces.
•
AT&T Managed Router
•
Customer optional Firewall
•
Quintum Technologies Tenor Analog Gateway (AS or AX).
Page 5 of 47
AT&T IP Flexible Reach
Quintum Configuration Guide
Tenor Software release P104.12.02 was used when conducting interoperability testing
with the AT&T IP Flexible Reach Service.
4.1 Tenor AX Overview
The Tenor AX is a high-density VoiP (Voice over Internet Protocol) SIP/H.323 switch
that compresses and packetizes voice, fax, and modem data and transmits it over the IP
network. The Tenor AX gives larger businesses with analog voice infrastructure a means to use
Voice over IP (VoIP).
The Tenor’s MultiPath architecture enables it to intelligently route calls between the
FXS, FXO, and the VoIP network. The Tenor AX also routes calls over IP to reduce
costs, and then transparently “hop off” to the PSTN, to reach offnet locations. Calls can
be routed in any direction between any of the ports.
The unit’s plug and play embedded system architecture brings VoIP technology to your
network without changing your existing telephony infrastructure. The Customer’s
network stays as is, and the call type is transparent to the user.
Figure 1 - Tenor AX Back Panel
•
Phone/FXS port - Provides a 50 Pin Telco connector which supports up to 24
Phone/FXS connections for connecting to the PBX, Keyphone or phones.
•
Line/FXO port - Provides a 50 Pin Telco connector which supports up to 24
Line/FXO connections for connection to the Central Office (connection to the PSTN).
Page 6 of 47
AT&T IP Flexible Reach
Quintum Configuration Guide
•
LAN port - 10/100 Base-T Ethernet port. This port provides an RJ-45 jack for
individual connection to a 10/100 Ethernet LAN switch or hub via RJ-45 cable; it is
individually configured with a unique IP and MAC address.
The Tenor AX will support 8, 16, 24 or 48 Simultaneous VoIP Calls.
For more details on the Tenor AX, consult with document [1].
4.2 Tenor AS Overview
The Tenor AS is a VoIP (Voice over Internet Protocol) H.323/SIP switch that digitizes voice, fax,
and modem data and transmits it over the IP network. The Tenor AS gives small to medium
sized businesses with analog voice infrastructure a means to use Voice over IP (VoIP).
The Tenor’s MultiPath architecture enables it to intelligently route calls between the
FXS, FXO, and the VoIP network to achieve the best combination of cost and quality.
The Tenor AX also routes calls over IP to reduce costs, and then transparently “hop off”
to the PSTN, to reach offnet locations. Calls can be routed in any direction between any
of the ports.
The Tenor can be installed without upgrades to the existing voice or data network. You
can install the unit in a home or office environment, without affecting the network
infrastructure you already have in place.
Figure 2 - Tenor AS Back Panel
•
Ground Screw - An earth ground screw is provided to connect to supplemental earth
ground using a Ground Safety Cable, if supplemental ground is needed.
•
Phone/FXS port - Provides an RJ-11 jack for connection to a PBX, Keyphone or
phone.
Page 7 of 47
AT&T IP Flexible Reach
Quintum Configuration Guide
•
Console port - This RS-232 connector is used for connection to a PC’s serial port
via DB-9 serial cable at 38400 BPS 8N1, without flow control.
•
Diag - Enables you to perform software diagnostic procedures.
•
Reset - Enables you to reset the system.
•
Power Switch - Switch to turn power on and off.
•
Power Socket - Connection port to external power supply block.
The Tenor AS will support 2 or 4 Simultaneous VoIP Calls.
The Tenor AF will support 8 Simultaneous VoIP Calls.
For more details on the Tenor AS, consult with document [2].
Page 8 of 47
AT&T IP Flexible Reach
Quintum Configuration Guide
5 Configuration Guide
5.1 Tenor Software Version
The version of the Tenor Software can be obtained via the Tenor Configuration Manager
GUI or the Command Line Interface (CLI).
From the Configuration Manager View Menu, click on “Tenor Version”.
A text file will open in a new window displaying the Software version as shown below.
Page 9 of 47
AT&T IP Flexible Reach
Quintum Configuration Guide
As shown below, the CLI Command to display the Tenor Software version information is
“show –v”.
Page 10 of 47
AT&T IP Flexible Reach
Quintum Configuration Guide
For technical support on the Quintum Tenor AS and Tenor AX, contact Quintum at
877-435-7553, and also refer to www.quintum.com
5.2 Standard Configuration
The following steps describe the configuration for the Tenor AS Multipath Gateway
Switch verified to work with the AT&T IP Flexible Reach service. Configuration for the
Tenor AX is the same as the Tenor AS described below. For detailed information on
installing and running Tenor Configuration Manager, consult documents [1], [2] and [3].
Page 11 of 47
AT&T IP Flexible Reach
Quintum Configuration Guide
Step
Description
Run the Tenor Configuration Manager.
1.
From the File Menu click on Connect.
Page 12 of 47
AT&T IP Flexible Reach
Quintum Configuration Guide
Step
Click on Add.
2.
Description
Page 13 of 47
AT&T IP Flexible Reach
Quintum Configuration Guide
Step
Description
Enter the Tenor IP Address, a Description, and the Login ID and Password.
3.
Click on OK.
Page 14 of 47
AT&T IP Flexible Reach
Quintum Configuration Guide
Step
Description
Connect to the Tenor AS from the Tenor Configuration Manager. Highlight the Tenor
4.
AS switch and click on Connect.
Page 15 of 47
AT&T IP Flexible Reach
Quintum Configuration Guide
Step
Description
Enter values for the Primary and Secondary DNS Server IP Address. If not using DNS
5.
enter: 0.0.0.0
Click Confirm/OK then the
change.
sunburst icon on the menu bar to implements the
Page 16 of 47
AT&T IP Flexible Reach
Quintum Configuration Guide
Step
Description
Click on the Advanced Explorer icon on the menu bar.
6.
Page 17 of 47
AT&T IP Flexible Reach
Quintum Configuration Guide
Step
Description
From the Advanced Explorer panel on the left, highlight the Dial Plan field. Select the
7.
desired Dial Plan Country from the drop down menu. The sample configuration uses
None.
Select the desired Progress Tone Country setting from the drop down menu. The
sample configuration uses USA.
Enter values for the Minimum and Maximum dial digit string length.
Click Confirm/OK then the
change.
sunburst icon on the menu bar to implements the
Page 18 of 47
AT&T IP Flexible Reach
Quintum Configuration Guide
Step
Description
From the Advanced Explorer panel on the left, click on the + sign next to VoIP
8.
Configuration Æ SIP Signal Groups to expand the field. Highlight the SIP Signaling
Group-1 field. Under the General tab, enter the Primary SIP Server IP Address and
the Secondary SIP Server IP Address (IP Addresses of AT&T Primary and Secondary
IP Border Elements). To disable Registration, enter the Register Expiry Time of 0.
Page 19 of 47
AT&T IP Flexible Reach
Quintum Configuration Guide
Step
Description
Click on the Advanced tab. Un-check the boxes for:
9.
• “SDP in 180 Ringing”
• “SDP in 183 Progress”
• “Proxy Address in From Header”
Page 20 of 47
AT&T IP Flexible Reach
Quintum Configuration Guide
Step
Description
10. Click on the User Agent tab. Click the Add button to add display the Add User Agent
pop-up window.
Page 21 of 47
AT&T IP Flexible Reach
Quintum Configuration Guide
Step
Description
11. In the Add User Agent pop-up window, enter the following information:
PrimaryUser - The username for Registration and Authentication purposes. If
Registration were enabled, the “username” will appear in the URI populated in the To
and From headers of the REGISTER message.
Primary User:
User1
< --- Any alpha-numeric string may be entered because
SIP Registration and Authentication are not applicable to the AT&T IP Flexible Reach
service.
Click OK to continue.
Page 22 of 47
AT&T IP Flexible Reach
Quintum Configuration Guide
Step
12.
Description
At the SIP Signal Group-1 panel click Confirm/OK to complete and the
icon to implement the change in the Tenor AS.
sunburst
Page 23 of 47
AT&T IP Flexible Reach
Quintum Configuration Guide
Step
Description
13. From the Advanced Explorer panel on the left, highlight the DN Channel Map field.
Click Add on the DN Channel Map panel on the right.
Page 24 of 47
AT&T IP Flexible Reach
Quintum Configuration Guide
14.
At the Add DN Channel Map pop-up window, enter the following information.
Channel:
1
DN:
7323680414
Calling Name: Kevin Honig
User Agent: 101
Public DN
checked
Register DN checked
< --- Physical port used on Tenor
< --- Phone Number (DID number provided by AT&T)
< --- Display Name
< --- User Agent defined in Step 11.
< --- default
< --- default
Click OK to continue. At the DN Channel Map panel click Confirm/OK and the
sunburst
icon implements the change.
Note:
Slot and Span are not relevant to the Analog Tenor.
Channel: Denotes the physical port that the analog device will be connected.
DN: DID number provided by AT&T. Populated in outgoing INVITE message (to
AT&T) as the user part of the URI in the From and Contact headers. On inbound calls to
Page 25 of 47
AT&T IP Flexible Reach
Quintum Configuration Guide
Tenor, used to determine routing of calls to physical line. Should appear as user part of
Request URI of incoming INVITE.
Calling Name: Will appear as the Display Name in the From header in outgoing
INVITE messages.
Public DN: Indicates whether or not this is a Public DN
Register DN: Only relevant to H.323
15.
From the Advanced Explorer panel on the left, highlight the Gateway. Enter a
Description and check the SIP only radio button for the Outgoing IP Routing field
under the Gateway screen panel on the right.
Click Confirm/OK then the
change.
sunburst icon on the menu bar to implements the
Page 26 of 47
AT&T IP Flexible Reach
Quintum Configuration Guide
16.
From the Advanced Explorer panel on the left, click on the + sign to expand the Voice
Codecs field. Highlight the Voice Codec-1 field. Select the desire Voice Codec field
from the drop down menu. The sample configuration uses the G.729 codec.
Click Confirm/OK then the
change.
sunburst icon on the menu bar to implements the
Page 27 of 47
AT&T IP Flexible Reach
Quintum Configuration Guide
17.
From the Advanced Explorer panel on the left, highlight the IP Routing Group-default
field under IP Routing Groups. Under the General tab in the IP Routing Groupdefault panel on the right, select Out-of-Band RFC 2833 for SIP Digit Relay from the
drop down menu.
Page 28 of 47
AT&T IP Flexible Reach
Quintum Configuration Guide
18.
Click on the ANI/FAX tab under the IP Routing Group-default panel on the right.
Select Relay ANI for Relay ANI from the drop down menu.
Select Pass-through for Default ANI Screen Indicator from the drop down menu.
Select Relay ANI for Default ANI Presentation Indicator from the drop down menu.
Select Relay CNAM in INVITE for Relay Calling Name from the drop down menu.
Click Confirm/OK then the
change.
sunburst icon on the menu bar to implements the
Page 29 of 47
AT&T IP Flexible Reach
Quintum Configuration Guide
19.
From the Advanced Explorer panel on the left, expand Circuit Configuration Æ Line
Routing Configuration Æ Line Circuit Routing Groups, and highlight the Line
Circuit Routing Group-phone field.
Click on the General tab under the Line Circuit Routing Group-phone panel on the
right. From the SIP User Agent drop down menu, select SIPUserAgent-101 and check
the boxes for Overlap Dial and Provide Progress Tone.
Click Confirm/OK then the
change.
sunburst icon on the menu bar to implements the
Click the Call Services tab.
Page 30 of 47
AT&T IP Flexible Reach
Quintum Configuration Guide
20.
From the Call Services tab under the Line Circuit Routing Group-phone panel on the
right. Check to enable Hold, and Call Waiting. Disable Unattended Transfer and
Attended Transfer if checked.
Click Confirm/OK then the
change.
sunburst icon on the menu bar to implements the
Click on ByPass/Hunt tab to continue.
Page 31 of 47
AT&T IP Flexible Reach
Quintum Configuration Guide
21.
Under the Advanced Explorer panel on the left, highlight the Phone (FXS)/Line (FXO)
Configuration. Check the box to enable Phone-Line 1.
Click Confirm/OK then the
change.
sunburst icon on the menu bar to implements the
Page 32 of 47
AT&T IP Flexible Reach
Quintum Configuration Guide
22.
Under the Advanced Explorer panel on the left, expand Phone (FXS)/Line (FXO)
Configuration, and highlight the Analog interface-phone field. Highlight Channel
Group-phone then click Add.
23.
Enter a description for the Channel Group and click OK to continue.
Page 33 of 47
AT&T IP Flexible Reach
Quintum Configuration Guide
24.
In the Add Channel Group-Channel Group phone pop-up window, select the
following information.
Associated Signaling Group:
Associated Routing Group:
FXS Channel Assignment
CAS Signaling Group-phone
Line Circuit Routing Group-phone
Check radio button for 1
Click OK to complete.
Page 34 of 47
AT&T IP Flexible Reach
Quintum Configuration Guide
5.3 Configuration for Super G3 FAX
When there are Super G3 FAX machines on both ends of the call, the Tenor does not
detect "fax" and never switches from voice to T.38. This causes the FAX call to fail.
This issue can be circumvented by configuring the Tenor to use G.711 exclusively.
Unfortunately G.729 is the preferred codec for voice calls. On the Tenor it is not possible
to configure one analog line for G.711 and the remaining lines for G.729. All lines on the
Tenor use the same default codec values.
To help avoid the failure of outbound Super G3 FAX calls, it is possible to configure a
static route for specific telephone numbers or number patterns and associate the G.711
Codec with those numbers. So, if the customer has a SG3 fax machine attached to a
Tenor and makes calls to other SG3 machines at specific numbers, they can configure
G.711 for just those numbers. This does not work for incoming calls.
The following steps describe the additional configuration necessary for the Tenor to use a
Default Route with a G.711 Codec for known SG3 machines.
Step
Description
Connect to the Tenor AS from the Tenor Configuration Manager. Highlight the Tenor
1.
AS switch and click on Connect.
Page 35 of 47
AT&T IP Flexible Reach
Quintum Configuration Guide
Step
Description
Click on the Advanced Explorer icon on the menu bar.
2.
Page 36 of 47
AT&T IP Flexible Reach
Quintum Configuration Guide
Step
Description
Under the Advanced Explorer panel on the left, highlight the Voice Codecs entry.
3.
Right Check and select “New” from the command directory that appears.
4.
At the Add Voice Codec pop-up window, enter a name for the new codec (SG3-FAXg711). Click OK to continue.
Page 37 of 47
AT&T IP Flexible Reach
Quintum Configuration Guide
Step
Description
From the Advanced Explorer panel on the left, highlight the Voice Codec-SG3-FAX5.
g711 field. Select the desired Voice Codec field from the drop down menu (G.711 Mulaw codec).
Click Confirm/OK then the
change.
sunburst icon on the menu bar to implements the
Page 38 of 47
AT&T IP Flexible Reach
Quintum Configuration Guide
Step
Description
Under the Advanced Explorer panel on the left, highlight the Codec Profiles entry.
6.
Right Check and select “New” from the command directory that appears.
7.
At the Add Codec Profile pop-up window, enter a name for the new profile (SG3).
Click OK to continue.
Page 39 of 47
AT&T IP Flexible Reach
Quintum Configuration Guide
Step
Description
If an “Association Reminder” appears, check “Do not remind me again!” and “Turn Off
8.
the Reminder forever!”. Click Close to continue.
Page 40 of 47
AT&T IP Flexible Reach
Quintum Configuration Guide
Step
Description
In the Defined Voice Codecs window, highlight the Voice Codec defined as g711.
9.
Click the “<<” button to move the g711 Voice Codec to the Selected Voice Codec
window.
Page 41 of 47
AT&T IP Flexible Reach
Quintum Configuration Guide
Step
10.
Description
Click Confirm/OK then the
change.
sunburst icon on the menu bar to implements the
Page 42 of 47
AT&T IP Flexible Reach
Quintum Configuration Guide
Step
Description
11. Under the Advanced Explorer panel on the left, highlight the IP Routing Group entry.
Right Check and select “New” from the command directory that appears.
12.
At the Add IP Routing Group Profile pop-up window, enter a name for the new profile
(SG3). Click OK to continue.
Page 43 of 47
AT&T IP Flexible Reach
Quintum Configuration Guide
Step
Description
13. From the Advanced Explorer panel on the left, click on the + sign next to VoIP
Configuration Æ IP Routing Groups to expand the field. Highlight the IP Routing
Group SG3 field. Under the General tab, select the desired Codec Profile (SG3) and
the IP Dial Plan (default) from the drop down menus
Click Confirm/OK then the
change.
sunburst icon on the menu bar to implements the
Page 44 of 47
AT&T IP Flexible Reach
Quintum Configuration Guide
Step
Description
14. From the Advanced Explorer panel on the left, click on the + sign to expand the VoIP
Routing field. Highlight the Static Route-1 field. Enter a Description and Select the IP
Routing Group configured for Super G3 FAX from the drop down menu.
Click Add button above the Number Pattern panel on the right.
Page 45 of 47
AT&T IP Flexible Reach
Quintum Configuration Guide
Step
Description
15. At the Add Static Route pop-up window, enter the phone number for the Super G3 Fax
Machine.
Click OK to continue. At the Static Route-1 panel click Confirm/OK and the
sunburst icon implements the change.
6 Troubleshooting
For technical support on the Quintum Tenor AS and Tenor AX, contact Quintum at
877-435-7553, and also refer to www.quintum.com
Page 46 of 47
AT&T IP Flexible Reach
Quintum Configuration Guide
7 Additional References
[1] Tenor AX VoIP Multipath/Gateway Switch Product Guide, P/N 480-0062-00-12
http://www.quintum.com/support/products/2G/tenor_2G/sysdoc/Tenoraxuserguide.pdf
[2] Tenor AS VoIP Multipath/Gateway Switch Product Guide, P/N 480-0059-00-13
http://www.quintum.com/support/products/2G/tenor_2G/sysdoc/TenorASuserguide.pdf
[3] Tenor Configuration Manager/Tenor Monitor Product Guide. P/N 480-0028-00-05
http://www.quintum.com/support/mgmt/TenorConfigManagerUsersGuide.pdf
Appendix 1
Dump of Tenor Database Configuration
The following Word document contains a complete printout of the Tenor database
configuration used for testing with the AT&T IP Flexible Reach Service. Click here to
download.
Page 47 of 47