1
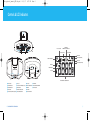
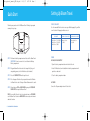
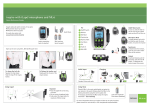
iboom_travel_manual_GM3:Layout 1
4/9/07
4:37 PM
DLO | iBoom Travel
USER MANUAL
Page 1
™
iboom_travel_manual_GM3:Layout 1
4/9/07
4:37 PM
Page 2
Contents
Controls & LCD Indicators
6
Setting Up iBoom Travel
7
iPod Dock Inserts
7
Setting Clock Time
8
Setting Alarm Time
8
Wake to iPod
8
Wake to Radio
9
Wake to Alarm
9
Setting Sleep Mode
10
Bass Boost Setting
11
Tuning in Radio Mode
11
Setting Preset Stations
Tips and Troubleshooting
© 2007 Digital Lifestyle Outfitters
DLO logo, Digital Lifestyle Outfitters and iBoom Travel are trademarks
of Digital Lifestyle Outfitters. iPod is a registered trademark of Apple
Inc. in U.S. and/or other countries. All Rights Reserved
Printed in China
M77080-061017-C
2 | DLO IBOOM TRAVEL USER MANUAL
4
Quick Start
11
12
Tech Specs
14
Important Safety Instructions
15
FCC Statement
16
Warranty
17
Service and Support
18
| 3
iboom_travel_manual_GM3:Layout 1
4/9/07
4:37 PM
Page 4
Controls & LCD Indicators
12
4
1
2
5
3
7
8
6
9
10
BASS BOOST STATUS
11
ALARM ARMED
WAKE INDICATOR: BUZZ,RADIO,IPOD
PLAY / PAUSE STATUS
STEREO INDICATOR
MEMORY MODE
POWER STATUS (BATTERY)
VOLUME LEVEL INDICATOR
SLEEP STATUS
POWER STATUS (DC ADAPTOR)
RADIO MODE
AM/PM INDICATORS
17
16
18
13
14
IPOD MODE
13
15
TIME / ALARM / RADIO FREQUENCY DISPLAY
1
POWER ON / OFF
2
6
IPOD DOCK
11
BASS BOOST
16
RESET BUTTON
VOLUME MIN BUTTON
7
12
BATTERY COMPARTMENT
17
BACKUP BATTERY COMPARTMENT
3
VOLUME MAX BUTTON
8
MEMORY BUTTON
13
SPEAKERS
18
DC ADAPTOR JACK
4
SLEEP BUTTON
9
TUNE DOWN / HOURS BUTTON
14
LCD DISPLAY
5
SLIDE SWITCH FOR (RADIO / IPOD) MODE
10
TUNE UP / MINUTES BUTTON
15
SNOOZE / LIGHT BUTTON
SLIDE SWITCH FOR ALARM (ON / SET / OFF)
4 | DLO IBOOM TRAVEL USER MANUAL
| 5
iboom_travel_manual_GM3:Layout 1
4/9/07
4:37 PM
Page 6
Quick Start
Thanks for your purchase of the DLO iBoom Travel. We will get you up and
running in 5 easy steps:
Setting Up iBoom Travel
IPOD DOCK INSERTS
Use the removable Dock Inserts to ensure your iPod fits properly. If your iPod
is not listed it will fit properly without an insert.
IPOD INSERT
iPod 3rd Gen. (10,15 20GB)
iPod 4th Gen. (20, 30GB)
iPod 5th Gen. (30GB)
IPOD NANO 1ST GEN. INSERT
IPOD NANO 2ND GEN. INSERT
iPod nano 1st Gen.
(1, 2, 4GB)
iPod nano 2nd Gen.
(2, 4, 8GB)
STEP 1 Pull down the battery compartment on the back of the iBoom Travel.
IMPORTANT: Be sure to remove the clear tab from the Backup
Battery compartment.
POWER
STEP 2 Plug your iBoom Travel into a wall outlet using the AC plug, or if
using battery power, install 4 x AA batteries (not included).
2. Install 4 X AA batteries (not included) into the battery compartment with
polarities as indicated.
STEP 3 Press the POWER BUTTON on the top of the unit.
3. Close the battery compartment door.
STEP 4 Place the proper Dock Insert for your particular model of iPod into
the iBoom Travel cradle. Slide your iPod or iPod nano into the cradle.
AC POWER
STEP 5 Choose between IPOD or RADIO MODES by using the IPOD/RADIO
MODE SWITCH on top of the iBoom Travel.
INSTALL/REPLACE BATTERY
1. Open the battery compartment door on the back of the unit.
Connect the AC power adapter into an AC wall outlet.
NOTE: Use your iPod click wheel to select and control music in IPOD MODE;
use the iBoom Travel Controls in RADIO MODE to tune radio, control volume
and other functions.
6 | DLO IBOOM TRAVEL USER MANUAL
| 7
iboom_travel_manual_GM3:Layout 1
4/9/07
4:37 PM
Page 8
SETTING CLOCK TIME
1. With power OFF, set the ALARM ON/SET/OFF SWITCH to the OFF position.
2. Press HOUR and MINUTE BUTTON to adjust the hour and minute.
3. Press the MEMORY to select 12 or 24 hour (military time) mode.
5. When you want to turn off the Alarm, press the POWER BUTTON to turn off the
alarm and stop the snooze function.
NOTE: If you wish, you may set the ALARM ON/SET/OFF SWITCH to ON, and this
will be your iBoom Travel’s wake up time every day.
SETTING ALARM TIME
WAKE TO RADIO
1. Beginning with the power OFF, slide the ALARM ON/SET/OFF SWITCH to the
SET position.
1. With the power OFF, slide the ALARM ON/SET/OFF switch to the ON position.
2. Set the IPOD/RADIO MODE SWITCH to RADIO.
2. ALARM will flash on the LCD display.
3. The ALARM and
3. Press the HOUR and MINUTE BUTTONS until the desired alarm time is displayed.
4. When the alarm plays your radio, press the SNOOZE BUTTON to stop the alarm
one time. The
ICON will then flash on the LCD display.
WAKE TO IPOD
1. With the power OFF, slide the ALARM ON/SET/OFF SWITCH to the
ON position.
2. Place the iPod in the cradle and slide the IPOD/RADIO MODE SWITCH to
IPOD.
3. The ALARM and
ICON will be displayed on the iBoom Travel LCD screen.
4. When alarm plays your iPod, press the SNOOZE BUTTON to stop the alarm
one time. Then the
ICON will then flash on the LCD display.
NOTE: After 5-6 minutes, the iBoom Travel Alarm will play your iPod a second time. Press the SNOOZE BUTTON to stop your iPod. You may only use
the Snooze function 3 times.
8 | DLO IBOOM TRAVEL USER MANUAL
ICON will be displayed on the iBoom Travel LCD screen.
NOTE: After 5-6 minutes, the iBoom Travel Alarm will play your radio a second
time. Press the SNOOZE BUTTON to stop the radio. You may only use the Snooze
function 3 times.
5. To turn off the Alarm, press the POWER BUTTON. This will turn off the alarm
and stop the snooze function.
NOTE: If you wish, you may set the ALARM ON/SET/OFF SWITCH to ON, and this
will be your iBoom Travel’s wake up time every day.
WAKE TO ALARM
1. With the power OFF, slide the ALARM ON/SET/OFF SWITCH to the ON position.
2. The ALARM and
ICON will be displayed on the LCD screen.
| 9
iboom_travel_manual_GM3:Layout 1
4/9/07
4:37 PM
Page 10
3. When the alarm goes off, press the SNOOZE BUTTON to stop the alarm one
time.
NOTE: After 5-6 minutes, the iBoom Travel Alarm will sound a second time.
Press the SNOOZE BUTTON to stop the alarm. You may only use the Snooze
function 3 times.
BASS BOOST SETTING
The Bass Boost feature on your iBoom Travel greatly enhances sound quality,
especially in iPod Mode. To engage the Bass Boost feature:
1. Turn power ON.
2. Press BASS BOOST BUTTON to enhance the bass.
4. When alarm sounds, Press the POWER BUTTON to turn off the alarm and
stop the snooze function in any status.
3. The BASS ICON will shown on LCD display.
5. Remember to slide the ALARM ON/SET/OFF SWITCH to OFF to turn off the
alarm function.
TUNING IN RADIO MODE
1. Turn Power ON.
NOTE: If you slide the ALARM ON/SET/OFF SWITCH to ON, this will be the
time at which the alarm will sound every day.
SETTING SLEEP MODE
1. With the power ON, press the SLEEP BUTTON to select 15/30/60/90/120
minute intervals for the sleep timer.
2. SLEEP will be displayed on the LCD screen.
3. To turn off SLEEP MODE, press the SLEEP BUTTON several times until
‘00’ appears on the display.
2. Slide the IPOD/RADIO MODE SWITCH to RADIO.
3. To manually tune, press the TUNE < or TUNE > BUTTON to select the FM
radio station.
4. To auto search for the next available station, press and hold TUNE < or
TUNE > BUTTON.
SETTING PRESET RADIO STATIONS
You can also set up to 4 preset stations on your iBoom Travel by pressing and
holding the MEMORY BUTTON on top of the unit. When the MEM ICON appears
above the preset number on the LCD screen, the present station frequency has
been set as a preset.
1. After you’ve tuned to the desired radio station, hold the MEMORY BUTTON
for 2 seconds to set the preset.
2. When the 1 and the MEM ICON appear on the LCD display, the station is
saved as Preset Station 1.
3. Repeat steps 1 & 2 to set up to four total preset stations.
10 | DLO IBOOM TRAVEL USER MANUAL
| 11
iboom_travel_manual_GM3:Layout 1
4/9/07
4:37 PM
Page 12
Tips and Troubleshooting
I would like to add a little more bass to my audio.
My iPod did not charge while docked in the iBoom Travel.
Be sure to check that you have selected the “Bass Boost” feature on your iBoom Travel.
This greatly enhances sound quality, especially in iPod Mode. For more information see
Bass Boost Setting on page 11.
The iPod may not be installed properly. Remove your iPod from the dock and
check for any obstruction to the connector in the cradle and on your iPod.
Then re-dock your iPod. You must plug iBoom Travel into AC power in order to
charge your iPod.
The LCD keeps dimming and unit powers down after a moment.
The universal power supply may not be connected properly, either at the back of the iBoom
Travel or the wall outlet. If you are running your iBoom Travel on battery power, be sure to
check that your batteries are connected properly and that they still have power.
My iPod does not dock properly.
Make sure that you are using the correct iPod Insert. The iBoom Travel has one insert for
iPods 30GB and under, and two separate inserts for each type of iPod nano. iPods that are
over 30GB, no matter which generation they are, do not require an insert for the iBoom
Travel. For more information reference the iPod Dock Inserts chart on page 7.
My iPod does not respond to the iBoom Travel when I plug it in.
My sound is distorted.
1. The volume may be set too high. Decrease the volume on your iBoom
Travel.
2. The sound source may be distorted. If the iPod original sound source (MP3)
is of poor quality, distortion and noise are easily noticed with high volume.
NOTE: Because the volume output on your iPod is static when docked, you
can only control volume using the iBoom Travel VOLUME BUTTONS.
My iBoom Travel is not responding.
Your iBoom Travel’s hardware may need resetting. To reset your iBoom Travel
open the battery compartment and with a paper clip, or a similar object, press
and hold the RESET BUTTON for a moment.
1. Your iPod may not be installed properly. Remove your iPod from the dock and check for
any obstruction to the connector in the cradle and on your iPod. Then re-dock your iPod.
2. iPod software may need to be updated. To upgrade software on your iPod, visit:
http://www.apple.com/iPod/download
3. The iPod is frozen and will not respond. Please make sure your iPod is working properly
before docking into the unit. You may need to reset your iPod, to do this press and hold
the Menu and Center Button on your iPod for 10-12 sec until your iPod resets. Please
refer to your iPod manual for details.
12 | DLO IBOOM TRAVEL USER MANUAL
When I unplug my iBoom Travel, the presets and clock settings are not
recalled when it powers back up.
You may need to replace your backup battery. To replace your backup battery,
unscrew the backup battery compartment cover and replace the battery. Then
screw the cover back on and press the RESET BUTTON.
| 13
iboom_travel_manual_GM3:Layout 1
4/9/07
Tech Specs
OUTPUT POWER 2 watts + 2 watts / 8ohm
SPEAKER UNIT 2
POWER CONSUMPTION <10.8 W
FREQUENCY RESPONSE 20Hz ~ 20kHz
4:37 PM
Page 14
Important Safety Instructions
This symbol indicates that three
are important operating and maintenance instructions in the literatue
accompanying this unit
This symbol indicates that dangerous
voltage constituting a risk of electric
shock is present within this unit.
CAUTION: TO AVOID THE HAZARDS OF FIRE OR ELECTRICAL SHOCK, DO NOT EXPOSE THIS APPLIANCE TO
RAIN OR OTHER MOISTURE
CAUTION: TO PREVENT ELECTRIC SHOCK, MATCH WIDE BLADE OF PLUG TO WIDE SLOT
SIGNAL TO NOISE RATIO >60dB
PRODUCT DIMENSION 220(W) x 120 (H) x 60 (D) mm
NET WEIGHT 470g
COMPATIBILITY
• 5G iPod with Video (30GB, 60GB, 80GB)
• iPod nano (1GB, 2GB, 4GB, 8GB)
• iPod mini (4GB, 6GB)
• 4G iPod with Click Wheel (20GB, 30GB, 40GB, 60GB, U2)
• 4G iPod with Color Display (20GB, 30GB, 40GB, 60GB, U2)
POWER SUPPLY
• BATTERY: 6V (4 x AA size, Alkaline)
• ADAPTER:
- AC Input: 100-240V AC, 50/60Hz, 0.3A
- DC Output: 9V, 1.2A
• BACKUP BATTERY: CR2032 (or equivalent)
CAUTION: TO REDUCE OF ELECTRIC SHOCK, DO NOT REMOVE COVER (OR BACK). NO USER-SERVICEABLE
PARTS INSIDE. REFER SERVICING TO QUALIFIED SERVICE
Please read all safety and operating instructions
carefully before use and keep these for future
reference
Water and Moisture - Keep the set free from moisture, water and dust
Ventilation - The unit should be situated so that its
location or position does not interfere with its proper
heat ventilation. For example, it should not be situated on a bed, sofa, rug or similar surface that may
block ventilation openings. Also, it should not be
placed in a built-in installation, such as bookcase or
cabinet, which may impede the flow of air through
the ventilation openings.
Heat - The unit should be situated away from heat
sources such as radiators,heat ducts,stoves or appliances(including amplifiers)that generate heat.
Power Sources - The unit should be connected to a
power supply only of the type described in the operating instructions or as marked on the unit.
Powercord Protection - Power supply cords should
be routed so that they are subject to wear or abuse.It
is always best to have a clear area from where the
14 | DLO IBOOM TRAVEL USER MANUAL
cord exists the unit to where it is plugged into an AC
outlet.
Cleaning - Clean only with a dry cloth. Do not use
aerosol or liquid cleansers. Unplug the product
before cleaning.
Objects and Liquid Entry - Care should be taken so
that objects do not fall and liquids are not spilled
into any openings or vents located on the product
Attachments - only use attachments specified by the
manufacturer
Lighting & power surge protection - Unplug the unit
from the wall outlet and disconnect the antenna or
cable system during a lightning storm.
This will prevent any damage to the unit
Overloading - Do not overload wall outlets, extension cords, or integral convenience receptacles as
this can result in a risk of fire or electric shock.
Servicing - Never attempt to repair this product
yourself. This unit does not contain any userserviceable parts.
| 15
iboom_travel_manual_GM3:Layout 1
4/9/07
4:37 PM
Page 16
FCC Statement
Warranty
Federal Communications Commission Interference Statement
Digital Lifestyle Outfitters Limited Manufacturer’s Warranty
This device complies with Part 15b of the FCC rules. Operation is subject to the following two conditions:
(1) This device may not cause harmful interference, and (2) this device must accept any interference
received, including interference that may cause undesired operation.
What This Warranty Covers. DLO (Digital Lifestyle Outfitters) warrants this product against defects in materials and workmanship. This limited warranty applies only to products manufactured by or for DLO.
What This Warranty Does Not Cover. This warranty does not apply to damage caused by: (a) accident, abuse, misuse, misapplication, ordinary wear, improper maintenance, failure to follow instructions, or products not manufactured by or for DLO; and
(b) aftermarket services (including upgrades and expansions).
How Long This Warranty Lasts. This warranty lasts for a period of ninety (90) days from the date of original retail purchase.
What DLO Will Do. If a defect exists, DLO will exchange the product, at its option, with a product that is new or has been manufactured from new or serviceable used parts and that is at least functionally equivalent to the original product. DLO will warrant a replacement product against defects in materials and workmanship for a period of ninety (90) days from the date of
replacement.
How To Get Service. In order to be eligible for this warranty, you MUST register your purchase at www.DLO.com/register within thirty (30) days of purchasing this product. If you believe that this product is defective in materials or workmanship, please
e-mail [email protected] with a brief description of the problem, for further instructions.
No Change To Warranty. No DLO reseller, agent or employee is authorized to make any modification, extension, or addition to
this warranty.
How State Law Applies. This warranty gives you specific legal rights, and you also may have other rights that vary from state
to state, or country.
Restrictions On Implied Warranties. All implied warranties, including, without limitation, warranties of merchantability and
fitness for a particular purpose, are limited in duration to the duration of this warranty. Some states do not allow limitations
on how long an implied warranty lasts, so the above limitation may not apply to you.
Restrictions On Damages. DLO is not responsible for direct, special, incidental or consequential damages resulting from any
breach of warranty or condition or under any other legal theory (including, without limitation, lost profits; downtime; goodwill;
damage to or replacement of equipment and property; failure to maintain the confidentiality of data stored on the product; and
any costs of recovering, reprogramming or reproducing any program or data stored in or used with products manufactured by
or for DLO). Some states and countries do not allow the exclusion or limitation of incidental or consequential damages, so the
above limitation or exclusion may not apply to you.
W1000-050803-B
16 | DLO IBOOM TRAVEL USER MANUAL
| 17
iboom_travel_manual_GM3:Layout 1
4/9/07
4:37 PM
Page 18
Service and Support
For more information and tips, please visit our website at www.dlo.com
18 | DLO IBOOM TRAVEL USER MANUAL
| 19
iboom_travel_manual_GM3:Layout 1
4/9/07
4:37 PM
Page 20
Thanks again for your
purchase of the DLO iBoom Travel
®
DIGITAL LIFESTYLE OUTFITTERS • VISIT US AT DLO.COM • ©2006 DIGITAL LIFESTYLE OUTFITTERS