1
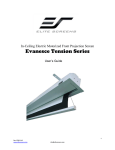
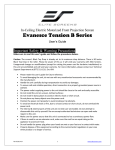
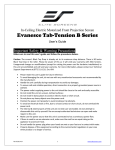
In-Ceiling Electric Motorized Front Projection Screen Evanesce Tension Series User’s Guide 1 Rev.122411-AS www.elitescreens.com [email protected] Important Safety & Warning Precautions Make sure to read this user’s guide and follow the procedure below. Caution: The screen’s Black Top Drop is already set to its maximum drop distance. There is NO extra Black Top Drop in the roller. Please be aware of this as it will void your warranty with Elite Screens. Unapproved changes or modifications (except for cutting the power cord for hardwire installations) to this unit are prohibited and will void your warranty. For more information, please contact our Technical Support Department at (877) 511-1211 Ext. 604. Please retain this user’s guide for future reference. To avoid damaging the unit, do not use with any unauthorized accessories not recommended by the manufacturer. Handle the unit carefully during transportation to avoid any damages. To ensure safe and reliable operation, direct connection to a properly grounded power source is advised. The power outlet supplying power to the unit should be close to the unit and easily accessible. Do not install the unit on uneven or inclined surfaces. Do not place any heavy objects over the power cord. Position the power cord properly to avoid creating a trip obstacle. To avoid an electrical shock or fire, due to a loose contact or short circuit, do not overload the power cord. The internal & external parts of this unit are not end user serviceable. Do not attempt to disassemble this unit by yourself. No one except authorized technicians can open and make repairs to this unit. Make sure the power source that this unit is connected to has a continuous power flow. If there is need to use an extension cord, make sure the cord has an equal rating as the appliance to avoid over heat. Do not handle the power plug when your hands are wet or your feet are in contact with water. Do not use this unit under the following circumstances. Disconnect the power cord under the conditions of heavy rain, wind thunder or lightning. Avoid direct sun light, rain shower and moisture. Keep away from fire sources and high temperature to prevent this device from overheating. Cut off the power supply first before transportation or maintenance. To avoid possible injury and/or an electric shock, do not attempt to use this screen if there is obvious damage or if there are any evident broken parts. 2 Rev.122411-AS www.elitescreens.com [email protected] Installation Warning Due to various installation environments, the instructions provided in this user’s guide are for reference only. Please consult a professional installation company for further installation and safety advice. The installer must insure that proper mounting hardware is used to provide adequate strength suitable for the installation. Elite Screens is not liable for any faulty installations. For limit adjustment instructions, please contact our Technical Support Department at (877) 511-1211 Ext. 604 The Screen’s Top Black Drop is already set to its maximum drop distance. There is NO extra top black drop in the roller. Please be aware of this as it will void the limitation of your warranty. Individual modifications to this product are prohibited and will void the warranty with the manufacturer. Please contact Elite Screens Customer Service for any questions. NOTE: This equipment has been tested and found to comply with the limits for a Class B digital device, pursuant to Part 15 of the FCC Rules. These limits are designed to provide reasonable protection against harmful interference in a residential installation. This equipment generates and can radiate radio frequency energy and, if not installed and used in accordance with the instructions, may cause harmful interference to radio communications. However, there is no guarantee that the interference will not occur on a particular installation. If this equipment causes harmful interference to radio or television reception, which can be determined by turning the equipment off and on, the user is encouraged to try to correct the interference by one or more of the following measures. Reorient or relocate the receiving antenna of the device which may be casing the interference. Increase the separation between the screen and the device’s receiver. Connect the equipment into a different power outlet other than the device. Pre-Installation 1. Carefully unpack the screen. 2. Always handle the screen in a leveled position on a clean surface. 3. In order to protect the screen from exposure to stains, keep the screen out of contact with foreign particles such as dust, sawdust, and/or liquids. NOTE Regardless of the mounting method, the screen should be securely supported so that the vibration or pulling on the viewing surface will not cause the casing to become loose or fall. The installer must insure that the fasteners used are of adequate strength and suitable for the installation location. 3 Rev.122411-AS www.elitescreens.com [email protected] Accessories for Evanesce Tension Series Please make sure all accessories listed below are included before proceeding. A. IR Remote B. RF Remote C. 3 Way Wall Switch D. IR Eye Receiver G. AAA Batteries Red+ E. 12V Trigger GreenF. In-Wall RJ-45 Module H. Bubble Level 4 Rev.122411-AS www.elitescreens.com [email protected] Control System for Evanesce Tension Series RJ-45 INPUT FOR 5-12V TRIGGER 1. 5-12V Trigger: The built-in 5-12V trigger input allows your screen to synchronize its drop & rise with the projector’s power cycle. The screen deploys when the projector powers up and will retract when the projector powers down. The 512 volt adaptor connects to your projector’s trigger output via a separate cable that may or may not be provided by the manufacturer of the projector. The trigger feature will not work without an output cable from the projector, but it can be tested by connecting the Red (+) and Green (-) cable to a 9-volt battery. 5-12 VOLT TRIGGER CABLE 2. 3-Way Wall Switch: The 3-way wall switch is a wall mount control box with an up/stop/down button and plugs directly into the screen’s RJ-45 input. 3. IR “Eye” Receiver: plugs directly into the screen’s RJ-45 input to present a low profile line-of-sight control option for your IR remote control even in a recessed ceiling installation. 4. IR Remote Control: The Infrared functions by direct line of sight contact with a beam range of 30 feet. 5. RF Remote Control: The radio waves eliminate the need for a direct line of sight with a range of 150 feet. UP Stop Down 5 Rev.122411-AS www.elitescreens.com [email protected] 6. In-Wall RJ-45 Module: The RJ-45 Module connects to a local wall switch for UP/Down control of your screen. Please follow the picture diagram below for instructions on how to connect the accessory. Elite Screens In-Wall Switch Module ( ZIW-Module ) Ethernet (RJ45) network cable (not included) Local Wall Switch In-Wall UP/DOWN Switch Module (ZIW-Module) Elite Electric Motorized Screen Steps to attach Elite Screens Motorized Screen to your local wall switch 1. Attach Elite Screens ZIW-Module (in-wall switch module) to your local wall switch as shown in diagram above. 2. Attach an RJ-45 Ethernet cable (not included) to the ZIW-Module and the other end to the RJ-45 input on your Elite electric screen. 3. After testing the connection, place the in-wall switch module in or on the wall and wire the Ethernet cable to complete the set up. NOTE: Please be aware that Ethernet cables have length limitations so please make test before concealing the cable into the wall. 6 Rev.122411-AS www.elitescreens.com [email protected] Hardware Parts List for Evanesce Series Please make sure all parts listed below are included before proceeding with the installation. G Hardware Parts List A. Case Rail Nut B. Hex Screw C. Hanging Bracket D. Suspension Bar E. Washer F. Hex Nut QTY 4-6 4-6 2-3 4 8-10 4-6 G. Suspension Bar J- Hook 4 Installation Instructions Please consult a professional installer. Elite Screens is not liable for faulty installations. Power 1. The Evanesce Series includes a 3-Prong Power Cord for use in a non-concealed power outlet. If your installation will be entirely concealed (including power outlet), Elite Screens strongly recommends a hardwire connection. Please refer to the image below for both 110v & 220v wiring information. 7 Rev.122411-AS www.elitescreens.com [email protected] Assembly 2. Insert the Hex Screw (B) through the Hanging Bracket’s (C) screw hole and secure with the Case Rail Nut (A). Slide the Hanging Bracket (C) through the railing on top of the case. 3. Place the Suspension Bar (D) on the Hanging Bracket (C) and align with the hole as shown below. Secure the Suspension Bar (D) with the Hex Screw (B), Washer (E) and the Hex Nut (F). Install the Suspension Bars (D) to your ceiling according to their distance. B D E E F 8 Rev.122411-AS www.elitescreens.com [email protected] Optional Suspension Bar J-Hook (G) 1. Attach the Suspension Bar J- Hook (G) to the bottom of the Suspension Bar (D) and secure with the Hex Screw (B), Washer (E) and Hex Nut (F). F E E B 2. Attach the Suspension Bar J-Hook (G) to the Hanging Bracket (C) as shown in figure below. Install the Suspension Bars (D) to your ceiling according to their distance. G C 9 Rev.122411-AS www.elitescreens.com [email protected] Optional Installation (parts & hardware not included) 1. Place the Hanging Bracket (C) in the desired location on the screen’s housing and measure the distance as shown below. (L = Distance) 2. Mark the location of where the screen will be installed according to the distance (L) and then secure the bolt to the ceiling. 3. Install the screen to the screw bolt as shown in the figure below. 10 Rev.122411-AS www.elitescreens.com [email protected] Evanesce Tension Series Dimensions Table Unit: mm Model Nominal Diagonal View Width (A) Case (A1) Length (A2) (A3) (A4) (A5) View Top Height Border (B) (B1) (B2) Case H (B3) Overall Height (B4) Case (B5) Width (C) C1 C2 C3 C4 C5 C6 ITE100VW2-E8 100"(4:3) 2032 95 2347 2407 1947 2342 1524 203 1827 118 1945 100 98 50 925 145 180 1145-1205 148 ITE120VW2-E8 120"(4:3) 2438 95 2770 2830 2370 2765 1828 203 2131 118 2249 100 98 50 925 145 180 1145-1205 148 ITE100HW2-E8 100"(16:9) 2214 95 2530 2590 2130 2525 1245 203 1548 118 1666 100 98 50 925 145 180 1145-1205 148 ITE106HW2-E8 106"(16:9) 2347 95 2660 2720 2260 2655 1320 203 1623 118 1741 100 98 50 925 145 180 1145-1205 148 ITE120HW2-E8 120"(16:9) 2657 95 2972 3032 2572 2967 1494 203 1797 118 1915 100 98 50 925 145 180 1145-1205 148 ITE135HW2-E8 135"(16:9) 2989 95 3310 3370 2910 3305 1681 203 1984 118 2102 100 98 50 925 145 180 1145-1205 148 ITE114XW2-E8 114"(16:10) 2455 95 2770 2830 2370 2765 1534 203 1837 118 1955 100 98 50 925 145 180 1145-1205 148 ITE126XW2-E8 126"(16:10) 2714 95 3030 3090 2630 3025 1696 203 1999 118 2117 100 98 50 925 145 180 1145-1205 148 (A4) (A5) Case H (B3) Overall Height (B4) Unit: inch Model Nominal Diagonal View Width (A) Case (A1) Length (A2) 92.4 (A3) ITE100VW2-E8 100"(4:3) 80.0 3.7 ITE120VW2-E8 120"(4:3) 96.0 3.7 109.1 111.4 94.8 ITE100HW2-E8 100"(16:9) 87.2 3.7 99.6 102.0 ITE106HW2-E8 106"(16:9) 92.4 3.7 104.7 107.1 ITE120HW2-E8 120"(16:9) 104.6 3.7 ITE135HW2-E8 135"(16:9) 117.7 3.7 ITE114XW2-E8 114"(16:10) 96.7 3.7 76.7 View Top Height Border (B) (B1) (B2) Case (B5) Width (C) C1 C2 C3 C4 C5 C6 92.2 60.0 8.0 71.9 4.6 76.6 3.9 3.9 2.0 36.4 5.7 7.1 45.1-47.4 5.8 93.3 108.9 72.0 8.0 83.9 4.6 88.5 3.9 3.9 2.0 36.4 5.7 7.1 45.1-47.4 5.8 83.9 99.4 49.0 8.0 60.9 4.6 65.6 3.9 3.9 2.0 36.4 5.7 7.1 45.1-47.4 5.8 89.0 104.5 52.0 8.0 63.9 4.6 68.5 3.9 3.9 2.0 36.4 5.7 7.1 45.1-47.4 5.8 117.0 119.4 101.3 116.8 58.8 8.0 70.7 4.6 75.4 3.9 3.9 2.0 36.4 5.7 7.1 45.1-47.4 5.8 130.3 132.7 114.6 130.1 66.2 8.0 78.1 4.6 82.8 3.9 3.9 2.0 36.4 5.7 7.1 45.1-47.4 5.8 109.1 111.4 60.4 8.0 72.3 4.6 77.0 3.9 3.9 2.0 36.4 5.7 7.1 45.1-47.4 5.8 93.3 108.9 The listed measurements are for general reference only. Please contact Elite Screens to verify product design and dimensions before attempting to integrate its products with any structural or furniture modification. Although a manufacturer may offer product advice, it may be taken or disregarded at the integrator’s discretion. Elite Screens will not be held responsible or be otherwise liable for faulty installations. Note Data error +/- 1” 11 Rev.122411-AS www.elitescreens.com [email protected] Limited Warranty Policy What is Covered: Elite Screens, Inc. (“Elite Screens”) warrants its products to the first retail purchaser, if purchased new and operated in the United States or Canada, to be free from defects in workmanship and materials (except as provided below) for a period of (2) years from the date of original purchase, and (3) years for products purchased directly by educational, non-profit, religious or government organizations. Refurbished products purchased directly from Elite Screens are warranted for a period of (90) days from the date of original purchase. For warranty service, you must provide proof of purchase and the serial number of your product. How to Get Service: Should this product prove defective during the warranty period, please visit www.elitescreens.com/rmaform and submit a warranty claim form. You must provide your proof of purchase, the serial number of your product, and describe the problem you are experiencing with your screen. An Elite Screens representative will determine whether the product requires service, and provide you with further instructions on how to proceed with your warranty claim. Missing Parts: If your product is missing parts, Elite Screens will, at its option, replace the part without any charge, including shipping and handling, provided that that you report your claim within (7) days of receipt. If you report your claim after (7) days of receipt, but within (30) days of receipt, Elite Screens will, at its option, replace the part without charge, but you will bear the cost of shipping and handling. If you report your claim after (30) days of receipt, you will bear all costs to replace the part. Returns and Exchanges: If a return is needed, Elite Screens will issue you a Return Merchandise Authorization (“RMA”) Number. This number is valid for (45) days from the date of issue, and is required to process any returns. A returned item sent to Elite Screens without a visible or valid RMA Number is subject to refusal by Elite Screens. You are responsible for the cost of returning the item and ensuring the product is properly packaged to prevent damage in transit. Once a returned product is received, Elite Screens will, at its option, replace the product or part without charge, including ground service freight. The replacement product or part may be new or refurbished to the Elite Screens standard of quality, and is subject to stock availability. Elite Screens’ liability for replacement of the covered product will not exceed the original retail selling price of the covered product. Exchange products and parts assume the remaining warranty period of the original product covered by this limited warranty. What is Not Covered: This warranty is not transferable and does not cover product purchased by another end user. This warranty does not cover incidental damages, such as loss of time, loss of use, or installation costs of defective, repaired or replaced product. This warranty does not cover product that has been damaged or rendered defective as a result of (a) neglect, abuse or misuse; (b) modification of the original product; (c) improper use or installation of products not manufactured by Elite Screens; (d) service provided by anybody other than Elite Screens; (e) abnormal mechanical or environmental conditions; (f) unusual physical or electrical stress -including failure or fluctuation of electrical power, lighting, static electricity, fire, tornadoes, or other natural disasters. Elite Screens does not warrant against freight damage, concealed or otherwise, unless product is shipped directly from an Elite Screens facility. You must contact the vendor and the delivering carrier to report freight damage within (7) days of receipt. Failure to report freight damages within the carrier’s guidelines may result in you bearing all costs. THIS LIMITED WARRANTY AND REMEDY PROVIDED ABOVE ARE EXCLUSIVE AND IN LIEU OF ALL OTHER WARRANTIES. ELITE SCREENS, INC. DISCLAIMS ALL OTHER WARRANTIES, WHETHER EXPRESS, IMPLIED OR STATUTORY, INCLUDING ANY WARRANTY OF MERCHANTABILITY, ANY WARRANTY OF FITNESS FOR A PARTICULAR PURPOSE AND ANY IMPLIED WARRANTIES ARISING FROM A COURSE OF DEALING OR USAGE OF TRADE. THIS LIMITED WARRANTY GIVES THE END USER SPECIFIC LEGAL RIGHTS, AND THE END USER MAY HAVE OTHER RIGHTS WHICH VARY FROM STATE TO STATE. EXCEPT AS PROVIDED IN THIS WRITTEN WARRANTY, ELITE SCREENS, INC. SHALL NOT BE LIABLE FOR ANY LOSS, INCONVENIENCE, OR DAMAGE, INCLUDING DIRECT, SPECIAL, INCIDENTAL OR CONSEQUENTIAL DAMAGES, RESULTING FROM THE USE OR INABILITY TO USE THE ELITE SCREENS PRODUCT, OR FOR LOST DATA OR LOST SOFTWARE WHETHER RESULTING FROM BREACH OF WARRANTY OR ANY OTHER LEGAL THEORY. SOME STATES DO NOT ALLOW THE EXCLUSION OR LIMITATION OF INCIDENTAL AND CONSEQUENTIAL DAMAGES, SO THE ABOVE LIMITATION MAY NOT APPLY. In Canada, warranties include both warranties and conditions. Some jurisdictions do not allow limitations on how long an implied warranty lasts and some jurisdictions do not allow the exclusion or limitation of incidental or consequential damages, so the above limitations and exclusions may not apply to you. This warranty gives you specific legal rights, and you may also have other rights which vary from jurisdiction to jurisdiction. International Warranty: Elite Screens, Inc. does not provide warranty coverage outside of the United States or Canada. For more information on the warranty coverage, terms and conditions in your region, contact your Elite Screens International Distributor directly. 12 Rev.122411-AS www.elitescreens.com [email protected]