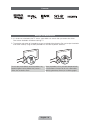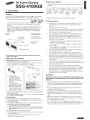
1
Plasma TV
user manual
SUPPORT
Thank you for purchasing this Samsung product.
To receive more complete service, please register
your product at
www.samsung.com/register
Model _____________ Serial No. _____________
✎ If you have any questions, please call us at 1-800-SAMSUNG (1-800-726-7864) for assistance.
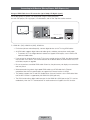
A detailed User’s Manual is built into your TV. For more information about how to view this e-Manual see page 27.
Figures and illustrations in this User Manual are provided for reference only and may differ from actual product appearances. Product design and
specifications may be changed without notice.
Important Warranty Information Regarding
Wide screen format PDP Displays (with 16:9 aspect ratios, the ratio of the screen width to height) are primarily designed to view wide screen format fullmotion video. The images displayed on them should primarily be in the wide screen, 16:9 ratio format, or expanded to fill the screen, if your model offers
this feature, with the images constantly in motion. Displaying stationary graphics and images on the screen, such as the dark sidebars on non-expanded
standard format television video and programming, should be limited to no more than 5% of the total television viewing per week.
Additionally, viewing other stationary images and text such as stock market reports, video game displays, station logos, web sites or computer graphics
and patterns, should be limited as described above for all televisions. Displaying stationary images that exceed the above guidelines can cause uneven
aging of PDP Displays that leave subtle, but permanent burned-in ghost images in the PDP picture. To avoid this, vary the programming and images, and
primarily display full screen moving images, not stationary patterns or dark bars. On PDP models that offer picture sizing features, use these controls to
view different formats as a full screen picture.
Be careful about the television formats you select and the length of time you view them. Uneven PDP aging as a result of format selection and use, as
well as burned in images, are not covered by your Samsung limited warranty.
Ř SAMSUNG ELECTRONICS NORTH AMERICAN LIMITED WARRANTY STATEMENT
Subject to the requirements, conditions, exclusions and limitations of the original Limited Warranty supplied with Samsung Electronics (SAMSUNG)
products, and the requirements, conditions, exclusions and limitations contained herein, SAMSUNG will additionally provide Warranty Repair Service
in the United States on SAMSUNG products purchased in Canada, and in Canada on SAMSUNG products purchased in the United States, for the
warranty period originally specified, and to the Original Purchaser only.
The above described warranty repairs must be performed by a SAMSUNG Authorized Service Center. Along with this Statement, the Original Limited
Warranty Statement and a dated Bill of Sale as Proof of Purchase must be presented to the Service Center. Transportation to and from the Service
Center is the responsibility of the purchaser. Conditions covered are limited only to manufacturing defects in material or workmanship, and only those
encountered in normal use of the product.
Excluded, but not limited to, are any originally specified provisions for, in-home or on-site services, minimum or maximum repair times, exchanges or
replacements, accessories, options, upgrades, or consumables.
For the location of a SAMSUNG Authorized Service Center, please call toll-free:
– In the United States : 1-800-SAMSUNG (1-800-726-7864)
– In Canada : 1-800-SAMSUNG
User Instructions
Ř Screen Image retention
Do not display a still image (such as on a video game) on the plasma display panel for more than several minutes as it can cause screen image
retention. This image retention is also known as ‘screen burn’. To avoid such image retention, refer to e-Manual to reduce the degree of brightness
and contrast of the screen when displaying a still image.
Ř Heat on the top of the Plasma TV
The top side of the product may be hot after long periods of use as heat dissipates from the panel through the vent hole in the upper part of the
product. This is normal and does not indicate any defect or operation failure of the product. However, children should be prevented from touching
the upper part of the TV.
Ř The product is making a ‘cracking’ noise.
A ‘cracking’ noise may occur when the product contracts or expands due to a change in the surrounding environment such as temperature or
humidity. This is normal and not a defect of the unit.
Ř Cell Defects
Your plasma TV has a panel containing 2,360,000 (HD-level) to 6,221,000 (FHD-level) pixels which require sophisticated technology to produce.
However, there may be a few bright or dark pixels on the screen. These pixels will have no impact on the performance of the product.
Ř Avoid operating the TV at temperatures below 41°F (5°C)
Ř A still image displayed too long may cause permanent damage to the PDP Panel.
Watching the Plasma TV in 4:3 format for a long period of time may leave traces of borders displayed on the left, right and center
of the screen caused by the difference of light emission on the screen. Playing a DVD or a game console may cause similar effects
to the screen. Damages caused by the above effect are not covered by the Warranty.
Ř After-images on the Screen.
Displaying still images from Video games or a PC for longer than a certain period of time may produce partial after-images.
To prevent this effect, reduce the ‘brightness’ and ‘contrast’ when displaying still images for a long time.
Ř Warranty
Warranty does not cover any damage caused by image retention. Burn-in is not covered by the warranty.
Ř Caution
The glass screen of your PDP TV can break if you accidently drop the TV. Handle the TV with care.
When moving the TV, always have two or more people pick it up and carry it as a safety precaution. Do not lay the TV flat on its
face or back.
Your Samsung Plasma TV is a high quality television that has been carefully packaged to protect the integrity of its glass panel and component parts
during shipment. It is, nonetheless, a fragile piece of electronics that requires careful handling. Refrain from putting undue stress on any part of the
packaging when shipping or unpacking the TV. Use care when installing the TV. Avoid placing the TV in a location where it may be struck, exposed to
sharp impacts, or fall. Panel breakage caused by a fall or impact strike is not covered under the manufacturer's warranty.
English - 2
List of Features
Ř 3D: This exciting new feature enables you to view 3D content.
Ř SMART HUB: Your gateway to all your content, integrated in one place.
− Provides diverse entertainment choices.
− Lets you control your entertainment life with an easy-to-use, user friendly user interface.
− Gives you easy access to diverse apps, with more being added every day.
− Lets you customize your TV by grouping and sorting apps to your taste.
Ř AllShare Play: Lets you access, view, or play photos, videos, or music located on USB devices,
digital cameras, cell phones, and PCs. PCs and cell phones can be accessed wirelessly, through your
wireless network.
Ř Anynet+ (HDMI-CEC): Allows you to control all connected Samsung devices that support Anynet+
with your Samsung TV’s remote.
Ř e-Manual: Provides a detailed, on-screen user's manual that's built into your TV. (page 27)
Accessories and Cables
✎ Please make sure the following items are included with your TV. If any items are missing, contact your
dealer.
✎ The items’ colors and shapes may vary depending on the model.
✎ Make sure that there are no accessories hidden behind or under packing materials after you open the
box.
Ř Remote Control (AA59-00579A) & Batteries (AAA x 2)
Ř Cleaning Cloth (BN63-01798B)
Ř Warranty Card / Safety Guide
Ř 3D Active Glasses
Ř User Manual
Ř Power Cord
Input Cables (Sold Separately)
You will need one or more of these cables to connect your TV to your antenna or cable outlet and your
peripheral devices (Blu-ray players, DVD players, etc.)
To purchase the RS232 cable, contact www.SamsungParts.com.
RS232 (AA39-00311A)
HDMI
HDMI-DVI
Component
Composite (AV)
Coaxial (RF)
English - 3
Audio
✎ Make sure you have the correct cable before plugging it in. Illustrations of common plugs and jacks
are below.
Cable Plugs
Ports / Jacks
HDMI
USB
Optical
Do not plug cables in upside down.
Be sure to check the orientation of the plug before plugging it in.
Warning
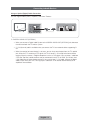
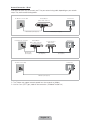
Providing Proper Ventilation for Your TV
When you install your TV, maintain a distance of at least 4 inches between the TV and other objects (walls,
cabinet sides, etc.) to ensure proper ventilation. Failing to maintain proper ventilation may result in a fire or a
problem with the product caused by an increase in its internal temperature.
✎ Whether you install your TV using a stand or a wall-mount, we strongly recommend you use parts
provided by Samsung Electronics only.
Ř If you use parts provided by another manufacturer, it may cause difficulties with the product or result
in injury caused by the product falling.
Installation with a stand.
Installation with a wall-mount.
4 inches
4 inches
4 inches
4 inches
4 inches
4 inches
4 inches
Other Warnings
✎ The actual appearance of the TV may differ from the images in this manual, depending on the model.
✎ Be careful when you touch the TV. Some parts can be somewhat hot.
English - 4
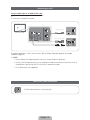
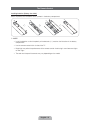
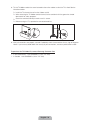
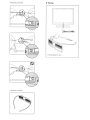
Installing the Stand
Stand Parts:
B
A
C
Stand x 1
Guide Stand x 1
(M4 X L12)
Screws x 8
Follow the steps below to connect the TV to the stand. For more detailed instructions, see the separate
stand installation guide.
3
1
2
Top View
x4 (M4 X L12)
C
Front
B
ATTENTION
✎ Place a soft cloth over a table to protect the TV, and then
A
place the TV on the cloth screen side down.
Rear
DO NOT USE DO NOT USE
CHEMICALS
GREASE
DO NOT
USE OIL
✎ Insert the Stand Guide into the slot on the TV's bottom.
4 Side View
(Correct assembly)
5
(Incorrect assembly)
C
English - 5
x4 (M4 X L12)
✎ NOTE
Ř Make sure to distinguish between the front and back of each component when assembling them.
Ř Make sure that at least two people lift and move the TV.
Ř Stand the product up before you tighten the screws. If you tighten the screws with the TV lying
down, it may lean to one side when you stand it up.
[ Do not insert your fingers into the stand base slot of the TV when installing the stand base.
Installing the Wall Mount (Optional)
Wall or Ceiling Mounting
If you mount this product on a wall, it should be mounted only as recommended by the
manufacturer. Unless it is correctly mounted, the product may slide or fall, causing serious
injury to a child or adult, and serious damage to the product.
Installing the Wall Mount Kit
The wall mount kit (sold separately) lets you mount the TV on the wall.
For detailed information about installing the wall mount, see the instructions provided with the wall mount.
We recommend you contact a technician for assistance when installing the wall mount bracket. We do not
advise you to do it yourself. Samsung Electronics is not responsible for any damage to the product or injury
to yourself or others if you elect to install the wall mount on your own.
To order the wall mount kit, contact Samsung Customer Care at 1-800-SAMSUNG (1-800-726-7864).
English - 6
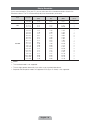
VESA Wall Mount Kit Notes and Specifications
✎ Install your wall mount on a solid wall perpendicular to the floor. Before attaching the wall mount to
surfaces other than plaster board, please contact your nearest dealer for additional information. If you
install the TV on a ceiling or slanted wall, it may fall and result in severe personal injury.
✎ NOTE
Ř Standard dimensions for wall mount kits are shown in the table below.
Ř Samsung wall mount kits contain a detailed installation manual and all parts necessary for assembly
are provided.
Ř Do not use screws that do not comply with the VESA standard screw specifications.
Ř Do not use screws that are longer than the standard length or do not comply with the VESA
standard screw specifications. Screws that are too long may cause damage to the inside of the TV
set.
Ř For wall mounts that do not comply with the VESA standard screw specifications, the length of the
screws may differ depending on the wall mount specifications.
Ř Do not fasten the screws too firmly. This may damage the product or cause the product to fall,
leading to personal injury. Samsung is not liable for these kinds of accidents.
Ř Samsung is not liable for product damage or personal injury when a non-VESA or non-specified
wall mount is used or the consumer fails to follow the product installation instructions.
Ř Do not mount the TV at more than a 15 degree tilt.
Ř Always have two people mount the TV on a wall.
Product Family
TV size in
inches
VESA screw hole specs
(A * B) in millimeters
43 – 51
400 X 400
Standard
Screw
Quantity
M8
4
PDP TV
60 – 64
600 X 400
✎ Remove the screws in the mounting holes before you install the wall mount.
Do not install your Wall Mount Kit while your TV is turned on. It may result in personal
injury due to electric shock.
Installing a Wall Mount from Another Manufacturer
To install a wall-mount from another manufacturer, use the HolderRing.
English - 7
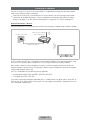
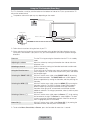
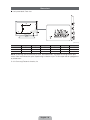
Connecting the Power Cord and the Antenna or Cable Connection
VHF/UHF Antenna
Antenna Cable (Not Supplied)
Cable
or
ANT OUT
Power Input
✎ Plug the power cord into a wall outlet only after you have made all other connections.
✎ If you are connecting your TV to a cable or satellite box using HDMI, Component, or Composite
connections, you do not need to connect the ANT IN jack to an antenna or a cable connection.
✎ The Plasma TV may interfere with an amateur radio or AM radio.
✎ Using two-way radio mobile and portable units or amateur radio or AM radio near your TV may cause
the TV to malfunction.
✎ Use caution when you move or swivel the TV if the antenna cable is tightly connected. You could
break the antenna jack off the TV.
English - 8
Connecting to AV Devices (Blu-ray Players, DVD Players, etc.)
Using an HDMI Cable for an HD connection (up to 1080p, HD digital signals)
For the best quality HD picture, we recommend using an HDMI connection.
Use with DVD players, Blu-ray players, HD cable boxes, and HD Set-Top-Box satellite receivers.
Device
HDMI Cable (Not Supplied)
HDMI OUT
✎ HDMI IN 1 (DVI), HDMI IN 2 (ARC), HDMI IN 3
Ř For the best picture and audio quality, connect digital devices to the TV using HDMI cables.
Ř An HDMI cable supports digital video and audio signals, and does not require an audio cable.
− To connect the TV to a digital device that does not support HDMI output, use an HDMI to DVI
cable and audio cables.
Ř If you connect an external device to the TV that uses an older version of HDMI, the video and audio
may not work. If this occurs, ask the manufacturer of the device about the HDMI version and, if it is
out of date, request an upgrade.
Ř Be sure to purchase a certified HDMI cable. Otherwise, the picture may not display or a connection
error may occur.
Ř We recommend using a basic high-speed HDMI cable or an HDMI cable that is Ethernet
compatible. Note that this product does not support the Ethernet function via HDMI.
Ř This product supports the 3D and ARC (Audio Return Channel) functions via an HDMI cable. Note
that the ARC function is supported by the HDMI IN 2 (ARC) port only.
Ř The ARC function allows digital audio to output via the HDMI IN 2 (ARC) port on the TV. It can be
enabled only when the TV is connected with an audio receiver that supports the ARC function.
English - 9
Using a Component Cable (up to 1080p HD signals) or an Audio/Video Cable (480i analog signals
only)
Use with DVD players, Blu-ray players, cable boxes, STB satellite receivers, VCRs.
Red Blue Green
Red White Yellow
Red
Component Cable
(Not Supplied)
Audio Cable
(Not Supplied)
Audio Cable
(Not Supplied)
Device
White
Video Cable (Not Supplied)
Device
✎ For better picture quality, we recommend the Component connection over the A/V connection.
✎ When you connect a Video cable to COMPONENT / AV IN, the color of the COMPONENT / AV IN
[VIDEO] jack (green) will not match the video cable (yellow).
English - 10
Connecting to Audio Devices
Using an Optical (Digital) Cable Connection
Use with Digital Audio Systems, Amplifiers, and Home Theaters.
Digital Audio System
OPTICAL
Optical Cable (Not Supplied)
✎ DIGITAL AUDIO OUT (OPTICAL)
Ř When you connect a Digital Audio System to the DIGITAL AUDIO OUT (OPTICAL) jack, decrease
the volume of both the TV and the system.
Ř 5.1 CH (channel) audio is available when you connect the TV to an external device supporting 5.1
CH.
Ř When the receiver (or home theater) is set to on, you can hear sound output from the TV’s optical
jack. When the TV is receiving a DTV signal, the TV will send 5.1 CH sound to the home theater
receiver. When the source is a digital component such as a DVD player / Blu-ray player / cable box
/ STB (Set-Top-Box) satellite receiver and you connected it to the TV via HDMI, you will only hear
2 CH audio from the home theater receiver. If you want to hear 5.1 CH audio, connect the digital
audio out jack from your DVD / Blu-ray player / cable box / STB satellite receiver directly to an
amplifier or home theater.
English - 11
Connecting to a PC
Using an HDMI cable or an HDMI to DVI cable
✎ Your PC may not support an HDMI connection.
✎ Use your PC speakers for audio.
HDMI Cable (Not Supplied)
HDMI OUT
HDMI to DVI Cable (Not Supplied)
DVI OUT
AUDIO OUT
Audio Cable (Not Supplied)
The optimal resolution is 1920 X 1080 @ 60 Hz. See the Display Resolution page for all available
resolutions (page 36).
✎ NOTE
Ř For an HDMI to DVI cable connection, you must use the HDMI IN 1 (DVI) jack.
Ř For PCs with DVI video out jacks, use an HDMI to DVI cable to connect the DVI out on the PC to
the HDMI IN 1 (DVI) jack on the TV. Use the PC's speakers for audio.
Ř PC (D-Sub) input is not supported.
The EX-Link Cable Connection
The EX-LINK connection is for service only.
English - 12
Connecting to a Network
You can set up your TV so that it can access SMART TV applications through your local area network
(LAN) using a wired or wireless connection.
✎ After you have “physically” connected your TV to your network, you must configure the network
connection to complete the process. You can configure the connection during the Initial Setup
process (see page 17) or after the Initial Setup process, through the TV’s menu (see page 25).
Network Connection - Wireless
You can connect your TV to your local area network (LAN) through a standard wireless router or modem.
The LAN Port on the Wall
Wireless IP Router or Modem
that has a DHCP Server
LAN Cable (Not Supplied)
This TV supports the IEEE 802.11a/b/g and n communication protocols. Samsung recommends using
IEEE 802.11n. If you play video using IEEE 802.11a, b, or g, the video may not play smoothly.
Most wireless network systems incorporate a security system that requires devices that access the
network through an access point or AP (typically a wireless router or modem) to transmit an encrypted
security code called an access key.
Your TV is compatible with the following security protocols:
Ř Authentication Mode: OPEN, SHARED, WPAPSK, WPA2PSK
Ř Encryption Type: WEP, TKIP, AES
If you select Pure High-throughput (Greenfield) 802.11n mode and the Encryption type is set to WEP or
TKIP on your AP or wireless router, Samsung TVs will not support a connection in compliance with new
Wi-Fi certification specifications.
English - 13
Network Connection - Wired
There are three main ways to connect your TV to your network using cable, depending on your network
setup. They are illustrated starting below:
The Modem Port on the Wall
Modem Cable (Not Supplied)
The Modem Port on the Wall
TV Rear Panel
External Modem
(ADSL / VDSL / Cable TV)
LAN Cable (Not Supplied)
External Modem
(ADSL / VDSL / Cable TV)
Modem Cable
(Not Supplied)
TV Rear Panel
IP Router that has a
DHCP Server
LAN Cable
(Not Supplied)
LAN Cable
(Not Supplied)
The LAN Port on the Wall
TV Rear Panel
LAN Cable (Not Supplied)
✎ The TV does not support network speeds less than or equal to 10Mbps.
✎ Use Cat 5 or 6 (STP Type*) cable for the connection. (*Shielded Twisted Pair)
English - 14
The Remote Control
Installing batteries (Battery size: AAA)
Match the polarity of the batteries to the symbols in the battery compartment.
✎ NOTE
Ř Install the batteries so that the polarity of the batteries (+/-) matches the illustration in the battery
compartment.
Ř Use the remote control within 23 feet of the TV.
Ř Bright light may affect the performance of the remote control. Avoid using it near fluorescent lights
or neon signs.
Ř The color and shape of the remote may vary depending on the model.
English - 15
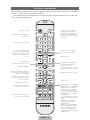
The Remote Control Buttons
Learn where the function buttons are on your remote. Especially note SOURCE, MUTE, VOL, CH, MENU,
TOOLS, E, INFO, CH LIST, RETURN, and EXIT.
✎ This remote control has Braille points on the Power, Channel, and Volume buttons and can be used
by visually impaired persons.
Turns the TV on and off.
Turns the remote control light on or
off. When on, the buttons become
illuminated for a moment when pressed.
(Using the remote control with this
button set to On will reduce the battery
usage time.)
SOURCE
Displays and selects the available video
sources. (page 21)
Gives direct access to channels.
PRE-CH
Press to select additional digital
channels being broadcast by the same
digital station. For example, to select
channel ‘54-3’, press ‘54’, then press
‘-’ and ‘3’.
Cuts off the sound temporarily.
MUTE
M
Changes channels.
CH
LIST
Adjusts the volume.
Displays channel lists on the screen.
MENU
SEARCH
Opens the OSD (Menu).
Quickly select frequently used functions.
Use this button in a specific feature. For
details, refer to the e-Manual.
Returns to the previous channel.
Brings up the Smart Hub applications.
See e-Manual chapter Advanced
Features ĺ Smart Hub.
Starts search function. See e-Manual
chapter Advanced Features ĺ Search.
INFO
TOOLS
Displays information on the TV screen.
Moves the cursor, selects the on-screen
menu items, and changes the values
seen on the TV's menu.
EXIT
RETURN
Exits the menu.
Returns to the previous menu.
Use these buttons in a specific feature.
For details, refer to the e-Manual.
C
Family Story
MTS
SUPPORT
P.SIZE
ll
D
CC
ll
B
Use these buttons according to the
directions on the TV's screen.
English - 16
Family Story: Connect to the Family
Story application. See e-Manual chapter
Advanced Features ĺ Family Story.
MTS: Press to select a sound track
you want to listen from among the
ones being broadcasted. See e-Manual
chapter Basic Features ĺ Adjusting
Sound Settings.
X: Turns the 3D image on or off. See
e-Manual chapter Advanced Features
ĺ 3D.
SUPPORT: Lets you use various
support functions including the
e-Manual. (page 27)
P.SIZE: Lets you select the Picture
Size. See e-Manual chapter Basic
Feature ĺ Changing the Picture Size.
CC: Displays digital subtitles. See
e-Manual chapter Preference Features
ĺ Other Features.
Configuring the Basic Settings in Initial Setup
When you turn the TV on for the first time, a sequence of screens and on-screen prompts will assist you in
configuring the TV’s basic settings. Plug the power cord into a wall outlet, and then press the P button to
turn on the TV.
✎ Setup is available only when the input source is set to TV. See "Changing the Input Source" (page 21).
✎ To return to the previous step in the Setup sequence, select Previous.
✎ If you are not using a cable box or satellite box, make sure you have connected the TV to an antenna
or cable connection before you turn on the TV. See page 8 for instructions.
✎ If you want to configure a wired network connection during Setup, make sure you've connected
a LAN cable to your TV. See pages 14 for instructions. If you want to configure a wireless network
connection during Setup, make sure your wireless modem or router is on and working.
1
Menu Language:
Select a Language.
After you press the P button, the Start screen appears. Select Next
to continue. The Menu Language screen appears. Select the menu
language you want using your remote, and then select Next. The TV will
display on-screen menus using the language you select beginning with
the next step in the Setup process.
2
Use Mode: Select
the Home Use
Mode.
On the Use Mode screen, select the Home Use using your remote, and
then select Next. The Network Settings screen appears.
✎ Store Demo is for retail environments only. If you select Store
Demo, some functions will not work, and the TV will reset all
functions to their factory default every 15 minutes. For more
information about Store Demo, go to the end of this section.
3
Network Settings:
Configure the
network settings
To configuring your network settings, select Start using your remote, and
then go to 3A - Wireless Network or 3B - Wired Network on the next
page.
✎ To configure
If you do not know your network configuration information or want to
configure the settings later, or do not have a network, select Skip, and
then go to 6 - Auto Program (1) on page 19.
later, select Skip.
You can set up
the network
connection later
using the onscreen Network
menu.
To configure network settings later, refer to “Setting up the Wired or
Wireless Network” in the e-Manual or see the Network Connection
sections in this manual (pages 13 and 25).
English - 17
3a
Wireless Network
1. The TV searches for and then displays all the wireless networks
within range. When done, it displays a list of the networks. In the list
of networks, move the Highlight to select a network, and then select
Next. If the selected network requires a Security Key, the Security
Key screen appears.
✎ If you have a WPS(PBC) compatible router, select WPS(PBC)
instead, and then follow the directions on the screen. When
done, go to Step 4.
2. Enter your network security key or WPS PIN using your remote.
✎ Enter numbers and letters using your remote.
Ř You can enter numbers by pressing the number buttons on
the remote.
Ř To enter a letter, move the Highlight to the letter, and then
select it. You can enter numbers in the same fashion if you
choose.
✎ To display capital letters (or redisplay small letters if capital letters
are displayed), select Caps or Shift.
✎ To display symbols and punctuation, select F. To redisplay
letters, select F again.
3. When done, select Next if you have entered a security key or WPS
PIN if you have entered a WPS PIN.
4. The TV checks the wireless connection. If the connection is
successful, the You are connected to the Internet. If you have any
problems using online services, please contact your Internet
Service Provider. message appears. Select Next, and then go to 4
Software Upgrade Step.
✎ If the connection fails, select Previous, repeat Step 1 and 2,
carefully re-enter your security key or WPS PIN, then repeat
Steps 3 and 4. If it fails again, select Next on the “Connection
Failed” screen, and then go to 6 - Auto Program (1) on the next
page. Configure your network later through Network Settings
in the TV’s Menu. For more information, refer to “Setting up the
Wired or Wireless Network” in the e-Manual or see the Network
Connection sections in this manual (pages 13 and 25).
3b
Wired Network
The TV checks the network connection, then displays the You are
connected to the Internet. If you have any problems using online
services, please contact your Internet Service Provider. message
appears. Select Next. The Software Upgrade screen appears.
English - 18
4
Software Upgrade:
Update the software
to the latest version
✎ To update later,
select Skip.
When Network Settings is complete, your TV will check for a new
software version automatically. If new software is available, the TV
downloads and installs the new software. When the download is
complete, select Next.
✎ If you want to upgrade later, select Skip. For more information, refer
to Software Update (Preference Features ĺ Support Menu) in the
e-Manual.
✎ This may take some time, depending on your network status.
✎ You can only upgrade software if your TV has an active network
connection.
✎ If no new update software is available, a no new updates message
appears on the screen. Select OK.
5
Terms of Service
Agreement
The Terms of Service Agreement screen appears.
✎ The screen can take a few seconds to display.
The General Disclaimer screen appears. Select Agree. The Privacy
Policy screen appears. Select Agree.
✎ To use Smart Hub, you must select Agree for the Terms of Service
Agreement.
6
Auto Program (1):
Select where your
TV signal comes
from.
Select the appropriate option for your TV using your remote, and then
select Next.
Ř I use an aerial cable to connect to TV.: Select if you have an
antenna or a cable connection without a set-top box. If you select this
option, go to 7 - Auto Program (2) Step.
Ř I use a set-top box.: Select if you have a satellite or cable set-top
box. You do not need to run Auto Program. If you select this option,
go to 9 - Clock on the next page.
7
Auto Program (2):
Select the search
options.
1. Select Air or Cable using your remote. A check appears on your
selection. When done, select Next. You can check both if you have
both connected.
2. If you selected Air, go to 8 - Auto Program (3).
3. If you selected Cable, you’ll go to the cable system screen. Select
Digital Cable System. The option window appears. Select the
correct cable signal format; STD, HRC, or IRC. Most cable systems
use STD (Standard). Repeat the same process with Analog Cable
System.
4. When done, select Next.
English - 19
8
Auto Program (3):
Channel
memorization
Channel memorization stars. Channel memorization can take up to 45
minutes, depending on your cable system.
For more information, refer to Auto Program (Channel Menu ĺ
Memorizing Channels) in the e-Manual.
✎ Select Stop at any time to halt the memorization process.
9
Clock: Set the Clock Select Auto or Manual, and then select Next.
✎ If you selected I have a set-top box. in 6 - Auto Program (1), you
can only set the current time and date manually, using your remote.
Auto
If you selected Auto, the TV will automatically download the correct time
from a digital channel. The Time Zone screen will appear. Select your
Time Zone, and then select Next. The DST (Daylight Savings Time)
screen will appear. The DST function sets the time ahead one hour to
adjust the clock for Daylight Savings Time. Select On if you want to turn
the DST adjustment on. Select Off to turn off the DST adjustment. You
can also turn the DST function on through the TV's on screen menu
(Menu ĺ System ĺ Time ĺ Clock ĺ DST).
Manual
If you selected Manual, you’ll go to the Clock screen. Select Date or
Time. You can set the current date and time using your remote. When
done setting the Date and Time, select Next.
10
Setup Complete
Review the Setup data, and then select Close to finish.
✎ The completed settings are displayed.
If You Want to Rerun Setup...
Menu ĺ System ĺ Setup
If You Want to Turn the Store Demo Mode On or Off.
To set or unset Store Demo mode outside of Setup, press and release the Controller when the power is
on. The Function menu screen appears. Push the Controller to the left (to MENU (m)) and hold for more
than 5 seconds. The Store Demo mode is set. To cancel Store Demo, bring up the Function menu using
the Controller, push the Controller to the right (to Source (s)) and hold for more than 5 seconds. See
page 23 for information about the Controller.
English - 20
Changing the Input Source
Source
™ ĺSource
When you are watching TV and you want to watch a movie on your DVD player or Blu-ray
player or switch to your cable box or STB satellite receiver, you need to change the Source.
SOURCE
■ TV / HDMI1/DVI / HDMI2 / HDMI3 / AV / Component
1. Press the ™ button on your remote. The Smart Hub screen appears.
2. Select Source. The Source screen appears.
3. Select a desired external input source.
✎ Alternatively, you can access the Source screen by pressing the SOURCEs button on your remote.
✎ You can only choose external devices that are connected to the TV. In the displayed Source list,
connected inputs are highlighted.
How to Use Edit Name
Edit Name lets you associate a device name to an input source. To access Edit Name, press the
TOOLST button on your remote when the Source list is displayed. The following selections appear under
Edit Name:
■ VCR / DVD / Cable STB / Satellite STB / PVR STB / AV Receiver / Game / Camcorder / PC / DVI
PC / DVI Devices / TV / IPTV / Blu-ray / HD DVD / DMA: Select an input jack, and then select the
name of the device connected to that jack from the list that appears. For example, if you have your Bluray player attached to HDMI IN 2, select Blu-ray for that input.
✎ If you connect a PC to the HDMI IN 1 (DVI) port with an HDMI cable, assign PC to HDMI1/DVI in
Edit Name.
✎ If you connect a PC to the HDMI IN 1 (DVI) port with an HDMI to DVI cable, assign DVI PC to
HDMI1/DVI in Edit Name.
✎ If you connect an AV device to the HDMI IN 1 (DVI) port with an HDMI to DVI cable, assign DVI
Devices to HDMI1/DVI in Edit Name.
Information
You can see detailed information about the selected external device.
Refresh
If the external devices are not displayed in the Source list, open the Tools menu, select Refresh, and then
search for the connected devices.
✎ Alternatively, you can refresh the Source list by pressing the a button on your remote.
English - 21
How to Navigate Menus
Your TV’s Main and Tools menus contains functions that let you control the TV’s features. For example, in
the Main menu you can change the size and configuration of the picture, its brightness, its contrast and so
on. There are also functions that let you control the TV’s sound, channel configuration, energy use, and a
host of other features. To access the main, on-screen menu, press the MENUm button on your remote.
To access Tools menus, press the TOOLST button. Tools menus are available when the TOOLST menu
Icon is displayed on the bottom right of the screen
The illustration below displays the buttons on the remote you use to navigate the menus and select and
adjust different functions.
1
MENU
2
TOOLS
INFO
RETURN
EXIT
SEARCH
3
4
5
1 MENUm button: Displays the main on-screen menu.
2 TOOLST button: Displays the Tools menus when available.
3 E and Direction buttons: Use the Direction buttons to move the cursor and highight an item. Use the
Enter button to select an item or confirm the setting.
4 RETURNR button: Returns to the previous menu.
5 EXITe button: Exits the on-screen menu.
How to Operate the Main Menu (OSD - On Screen Display) Using the Remote
The access steps may differ depending on the menu option you select.
1
2
3
4
5
6
7
MENUm
The main menu options appear on the screen:
E
Picture, Sound, Channel, Network, System, Support.
Select a main menu option on the left side of the screen with the u or d
button.
Press E to access the sub-menus.
u/d
Select the desired submenu with the u or d button.
u/d/l/r
E
Adjust the value of an item with the l, r, u, or d button. The
adjustment in the OSD may differ depending on the selected menu.
Press E to confirm the selection.
EXITe
Press EXITe.
u/d
English - 22
Using the TV's Controller (Panel Key)
The TV's Controller, a small joy stick like button on the bottom left side of the TV, lets you control the TV
without the remote control.
✎ The product color and shape may vary depending on the model.
Function menu
m
R
P
Down (Front)
Remote control sensor
Left
Right
TV Controller
Up (Rear)
✎ Follow these instructions facing the front of your TV.
✎ When selecting the function by moving the controller to the up/down/left/right directions, be sure
not to press the controller. If you press it first, you cannot operate it to move the up/down/left/right
directions.
Power on
Adjusting the volume
Selecting a channel
Using the Function menu
Selecting the SMART HUB (™)
Selecting the MENU (m)
Selecting a Source (s)
Power Off (P)
Turn the TV on by pressing the Controller when the TV is in standby
mode.
Adjust the volume by moving the Controller from side to side when
the power is on.
Select a channel by moving the Controller backwards and forwards
when the power is on.
To view and use the Function menu, press and release the Controller
when the power is on. To close the Function menu, press and release
the Controller again.
With the Function menu visible, select SMART HUB (™) by moving
the Controller backwards. The SMART HUB main screen appears.
Select an application by moving the Controller, and then pressing the
Controller.
With the Function menu visible, select the MENU (m) by moving the
Controller to the left. The OSD (On Screen Display) Menu appears.
Select an option by moving the Controller to the right. Move the
Controller to the right or left, or backwards and forwards to make
additional selections. To change a parameter, select it, and then press
the Controller.
With the Function menu visible, open the Source (s) list by moving
the Controller to the right. The Source list screen appears. To select
a source, move the Controller back and forth. When the source you
want is highlighted, press the Controller.
With the Function menu visible, select Power Off (P) by moving the
Controller forwards, and then press the Controller.
✎ To close the Menu, Smart Hub, or Source, press the Controller for more than 1 second.
English - 23
Standby mode
Your TV enters Standby mode when you turn it off and continues to consume a small amount of electric
power. To be safe and to decrease power consumption, do not leave your TV in standby mode for long
periods of time (when you are away on vacation, for example). It is best to unplug the power cord.
Using Smart Hub
Smart Hub provides easy, on-screen access to five functions that let you manage and access channels,
set favorite channels, access photos, videos, or music on USB devices, cameras, and PCs, select video
sources, and set the TV to turn on automatically when a show you want to watch is on. The five functions
are listed below:
Ř Channel: Lets you manage channels, select favorite channels, add channels to and delete channels
from the Added Ch. list (the channels that appear when you press the z button.)
Ř Web Browser: Lets you browse the Internet.
Ř Schedule Manager: Lets you schedule shows and channels for viewing.
Ř Source: Lets you select a connected external video source to view.
Ř AllShare Play: Lets you access, view, or play photos, videos, or music located on USB devices,
digital cameras, cell phones, and PCs. PCs and cell phones can be accessed wirelessly, through your
wireless network.
Smart Hub also provides an easy-to-use gateway to a host of on-line media and entertainment including
apps from the Samsung Apps store, streaming videos and movies, kids sites, and more.
✎ To access Smart Hub, press the ™ button on your remote.
✎ For more information about Smart Hub, see the e-Manual.
English - 24
Configuring Network Connections
After you have run the initial setup, you can configure or reconfigure the network connections through the
TV's menu.
Configuring a Wireless Network Connection
The instructions below are for networks that use the Dynamic Host Configuration Protocol (DHCP) to
configure network connections automatically. Most wireless networks use DHCP. If you have a Static IP
network, see the e-Manual for configuration instructions.
To configure the network connection for a network that uses DHCP, follow these steps:
1. Connect your TV to your network as shown in the illustration on page 13.
2. Turn on your TV, and then go to the Network Settings screen. (Menu ĺ Network ĺ Network
Settings)
3. Select Start. The Network function searches for available wireless networks. When done, it displays a
list of the available networks.
4. In the list of networks, move the highlight to select a network, and then select Next.
✎ If you have a WPS(PBC) compatible router, select WPS(PBC) instead, and then follow the
directions on the screen.
5. Enter your network security key or WPS PIN using your remote.
✎ Enter numbers and letters using your remote.
Ř Enter numbers by pressing the number buttons on your remote.
Ř To enter a letter, move the Highlight to the letter, and then select it. You can enter numbers in
the same fashion if you choose.
✎ To display capital letters (or redisplay small letters if capital letters are displayed), select Caps or
Shift.
✎ To display symbols and punctuation, select F. To redisplay letters, select F again.
6. When done, select Next if you have entered a security key or WPS PIN if you have entered a WPS PIN.
7. The TV checks the wireless connection. If the connection is successful, the “You are connected to the
Internet. If you have any problems using online services, please contact your Internet Service
Provider.” message appears. Select Next using your remote.
✎ For more detailed information, see “Setting up the Wireless Network” in the e-Manual.
✎ If you want to configure the connection manually, select IP Settings on the Network Connection
screen. Set IP Mode to Manual, and then enter the IP Address, Subnet Mask, Gateway, and
DNS Server manually.
English - 25
Configuring a Wired Network Connection
Most home networks use the Dynamic Host Configuration Protocol (DHCP) to configure network
connections. Home networks that support DHCP automatically provide the IP address, subnet mask,
gateway, and DNS values your TV needs to access the Internet so you don’t have to enter them manually.
If you have a Static IP network, see your user’s manual for configuration instructions.
To configure the network connection for a wired network that uses DHCP, follow these steps:
1. Connect your TV to your network as shown in one of the illustrations on page 14.
2. Turn on your TV, and then go to the Network Settings screen. (Menu ĺ Network ĺ Network
Settings)
3. Select Start.
4. The Network Connection screen appears, and verifies the network connection. When the connection
has been verified, the “You are connected to the Internet. If you have any problems using online
services, please contact your Internet Service Provider.” message appears. Network set up is
completed.
✎ If your TV cannot acquire network the connection values automatically or if you want to set the
connection manually, select IP Settings on the network connection screen. Set IP Mode to Manual,
and then enter the IP Address, Subnet Mask, Gateway, and DNS Server manually.
✎ For more detailed information, refer to “Setting up the Wired Network” in the e-Manual.
English - 26
How to view the e-Manual
SUPPORT
You can find instructions for your TV’s features in the e-Manual. To open the e-Manual,
press the SUPPORT button on your remote.
You can also access it through the menu:
Menu ĺ Support ĺ e-Manual
Access the e-Manual
To use the e-Manual, follow these steps:
1. When you need to help, press the SUPPORT button on your remote. The Support screen appears.
2. Select e-Manual using your remote. The e-Manual screen appears.
3. Select a desired category.
4. Select a desired topic. The e-Manual displays the page you want to see.
✎ Blue words in e-Manual signify menu options or selections on TV screen.
✎ Green icons in the e-Manual signify a button on your remote.
✎ Arrow steps (e.g. Menu ĺ Support ĺ e-Manual) in the e-Manual signify the sequence of steps
required to access an option or activate a function.
How to toggle between an e-Manual topic and the corresponding OSD menu(s).
Changing the Preset Picture Mode
Picture
Changing the Preset Picture Mode
Picture Mode
Picture
Picture Mode
Menu ĺ Picture ĺ Picture Mode
Picture Mode
Menu ĺ Picture ĺ Picture Mode
Picture Mode
Picture modes apply preset adjustments to the picture.
N When your TV is connected to a PC via the HDMI to DVI cable,
you can only select Entertain and Standard.
Cell Light
Picture modes apply preset adjustments to the picture.
N When your TV is connected to a PC via the HDMI to DVI cable,
you can only select Entertain and Standard.
Cell Light
Ř Dynamic
Contrast
Ř Dynamic
Contrast
Brightens the screen. Suitable for a bright room.
Brightens the screen. Suitable for a bright room.
Ř Standard
Brightness
Ř Standard
Brightness
Suitable for a normal environment.
Ř Natural for LED TV / Relax for PDP TV
Sharpness
Suitable for a normal environment.
Sharpness
Ř Natural for LED TV / Relax for PDP TV
Color
Ř Movie
Suitable for reducing eye strain.
Color
Tint (G/R)
Suitable for reducing eye strain.
Ř Movie
G50
Darkens the screen, making it less glary. Suitable for watching
movies in a darkened room.
Tint (G/R)
G50
✎ This function is not enabled in some menus.
✎ You can’t use the Try Now function if the menu is not available.
1. To go to the topic's corresponding menu option, press the a button on your remote.
2. To return to the e-Manual screen, press the SUPPORT button on your remote.
English - 27
Darkens the screen, making it less glary. Suitable for watching
movies in a darkened room.
Using the colored and function buttons with the e-Manual
Ř Scroll bar: Scroll the e-Manual screen up or down.
Ř l / r: Moves to the previous or next chapter.
Ř a Try Now: Move to the OSD menu that corresponds to the topic. To return to the e-Manual screen,
press the SUPPORT button on your remote.
Ř b Home: Moves to the e-Manual home screen.
Ř { Position: Each time you select {, you change the position of the e-Manual screen.
Ř } Index: Displays the Index screen.
Ř R Return: Return to the previous screen.
How to search for a topic on the index page
1. Select } using your remote. The Index screen appears.
2. To search for a topic, select a letter. The Index displays a list of topics and keywords that begin with the
letter you selected.
3. Select a topic or keyword you want.
4. The e-Manual page with the topic appears.
✎ To close the Index screen, press the RETURNR button.
To Change the screen position of the e-Manual
If the e-Manual screen is not invisible well because the OSD Menus screen, you can change the e-Manual
screen's position.
1. Move the Highlight to the e-Manual screen by pressing the SUPPORT button on your remote.
2. Press the { button on your remote. Each time you select {, the position of the e-Manual will change.
English - 28
Troubleshooting
If the TV seems to have a problem, first review this list of possible problems and solution. Also review the
Troubleshooting Section in the e-Manual. If none of the troubleshooting tips apply, visit www.samsung.
com/support or call Samsung Customer Service at 1-800-SAMSUNG (1-800-726-7864).
Issues
Solutions and Explanations
Flickering and Dimming
If your Samsung Television is flickering or dimming sporadically, you may
need to disable some of its energy efficient features such as the Eco
Sensor or the Energy Saving feature. Follow the steps below with your
remote to turn these features off or on.
Ř Energy Saving: User Menu ĺ System ĺ Eco Solution ĺ Energy
Saving
Ř Eco Sensor: User Menu ĺ System ĺ Eco Solution ĺ Eco Sensor
Component Connections /
Screen Color
If you find that the color on your Samsung television’s screen is not
correct or black and white, first run a Self Diagnosis on the TV to make
sure there are no device issues.
Ř Self Diagnosis: User Menu ĺ Support ĺ Self Diagnosis ĺ
Picture Test
If the problem does not appear in the Picture test, make sure:
Ř Your connections are all consistent. For example, if you’ve used the
AV In jack on your TV, make sure you have used the AV Out jack on
your video source.
Ř You have connected your devices to the correct jacks. For example, if
you use the Component jacks, labeled Pb, Pr, and Y, to connect your
TV and video source, make sure you have connected the blue Pb jack
on the video source to the blue Pb jack on the TV, and the yellow Y
jack on the source to the yellow Y jack on the TV.
Screen Brightness
If you find that the colors on your Samsung TV are correct but just a little
too dark or bright, try adjusting the following settings in the Picture menu
option of the Main menu:
Ř Cell Light, Contrast, Brightness, Sharpness, Color, Tint (G/R) and
so on.
English - 29
Issues
Solutions and Explanations
Unwanted Powering Off
If your Samsung TV appears to turn off by itself, there may be an issue
with either your Timer settings or your Eco friendly No Signal Power Off
feature.
First make sure Sleep Timer is not accidentally set. The Sleep Timer
turns off the TV automatically after a certain period of time has passed.
Ř Sleep Timer: User Menu ĺ System ĺ Time ĺ Sleep Timer
If the Sleep Timer is not activated, you may have engaged the No Signal
Power Off or Auto Power Off feature.
Ř No Signal Power Off : User Menu ĺ System ĺ Eco Solution ĺ
No Signal Power Off
Ř Auto Power Off: User Menu ĺ System ĺ Eco Solution ĺ Auto
Power Off
Trouble Powering On
Before you turn the TV on, find the red light on the right or left
bottom of your TV. Press the Power on button on the TV or remote.
The light should blink about 5 times before the TV turns on.
If you find that you are having trouble powering on your Samsung
television, there are a number of things to check before making a call to
the service department.
Ř If you happen to be using the TV as a monitor and the stand-by light
only blinks for a few seconds when you press the power button, your
PC is in sleep mode. To take your PC out of sleep mode, press a key
on your keyboard or move the mouse. Then try turning your TV on.
If you’re sure your power cord, remote control, and PC are functioning
properly, you may be having a cable issue. If you have a cable or satellite
box, your TV may appear to be off because the cable or satellite box is
not outputting a signal. To test the signal output of your cable or satellite
box, press the guide or info button on the cable or satellite box remote
control. If the screen displays the guide or info data, the problem is
caused by the box.
Stand Assembly
If you have any trouble assembling the stand, visit www.samsung.
com/spsn and watch “2012 Stand Assembly” on the “Top 7 TV
Troubleshooting Tips”.
Cannot Find a Channel
Re-run Setup (Go to User Menu ĺ System ĺ Setup) or run Auto
Program. (Go to User Menu ĺ Channel ĺ Auto Program).
✎ For detailed troubleshooting information, watch the troubleshooting videos at www.samsung.com/
spsn.
English - 30
Issues
The TV won’t turn on.
Solutions and Explanations
Ř Make sure the AC power cord is securely plugged in to the wall outlet
and the TV.
Ř Make sure the wall outlet is working.
Ř Try pressing the P button on the TV to make sure the problem is not
the remote. If the TV turns on, refer to “Remote control does not work”
below.
There is no picture/video.
Ř Check the cable connections. Remove and reconnect all cables
connected to the TV and external devices.
Ř Set the video outputs of your external devices (Cable/Sat Box, DVD,
Blu-ray etc) to match the TV's input connections. For example, if an
external device’s output is HDMI, it should be connected to an HDMI
input on the TV.
Ř Make sure your connected devices are powered on.
Ř Be sure to select the correct input source
Ř Reboot the connected device by unplugging it, and then reconnecting
the device’s power cable.
The remote control does not
work.
Ř Replace the remote control batteries. Make sure the batteries are
installed with their poles (+/–) in the correct direction.
Ř Clean the sensor’s transmission window on the remote.
Ř Try pointing the remote directly at the TV from 5~6 feet away.
The cable/set top box remote Ř Program the Cable/Set remote control to operate the TV. Refer to the
control doesn’t turn the TV on
Cable/Set-Top-Box user manual for the SAMSUNG TV code.
or off, or adjust the volume.
✎ Some functions and pictures shown in this manual are available on specific models only.
✎ To keep your TV in optimum condition, upgrade to the latest firmware on the Samsung web site by
USB (samsung.com ĺ Support ĺ Downloads).
English - 31
Licenses
Storage and Maintenance
✎ If a sticker was attached to the TV screen, some debris can remain after you remove the sticker.
Please clean the debris off before watching TV.
✎ The exterior and screen of the product can get scratched during cleaning. Be sure to wipe the exterior
and screen carefully using the cloth provided or a soft cloth to prevent scratches.
Do not spray water directly onto the product. Any
liquid that goes into the product may cause a
failure, fire, or electric shock.
Clean the product with a soft cloth dampened with
a small amount of water. Do not use a flammable
liquid (e.g. benzene, thinners) or a cleaning agent.
English - 32
Securing the TV to the Wall
Caution: Pulling, pushing, or climbing
on the TV may cause the TV to fall. In
particular, ensure your children do not
hang over or destabilize the TV. Doing
so may cause the TV to tip over, causing
serious injuries or death. Follow all safety
precautions provided in the Safety Flyer
included with your TV. For added stability
and safety, you can purchase and install
the anti-fall device as described below.
The TV-Holder Kit (Sold Separately):
The parts below are included in the TV Holder kit. In addition, you need to provide a wood screw, screw
and molly, or other screw appropriate for the wall or cabinet you intend to secure the TV-Holder string to.
We recommend a size M4xL20 wood screw.
TV-Holder (BN96-15753A)
Screw (M8 X L19)
Installing the TV-Holder
1. Remove the screw attached to the back of your TV, and then connect the TV-Holder to the TV with the
screw included in the TV-Holder Kit that is designated for your TV.
✎ Make sure to use only the appropriate supplied screw. If you use a different screw, you can
damage your TV.
2. Firmly fasten the screw you provided (size M4xL20 or similar) to the wall or cabinet where the TV is to
be installed.
✎ If you fasten the screw to the wall, we recommend you drive the screw into a stud. If that is not
possible, use a molly to anchor the screw.
English - 33
3. Tie the TV-Holder cord to the screw fastened to the wall or cabinet so that the TV is fixed. See the
illustrations below.
✎ Install the TV close to the wall so that it does not fall.
✎ When attaching the TV-Holder cord to the wall, tie the cord level with the ground or slanted
downwards for safety purposes.
✎ Check the cord occasionally to make sure it is secure.
✎ Before moving the TV, separate the connected cord first.
4. Verify all connections are properly secured. Periodically check the connections for any sign of fatigue or
failure. If you have any doubt about the security of your connections, contact a professional installer.
To purchase the TV-Holder Kit, contact Samsung Customer Care
Ř In the United States: 1-800-SAMSUNG (1-800-726-7864)
Ř In Canada: 1-800-SAMSUNG (1-800-726-7864)
English - 34
Specifications
Display Resolution
1920 x 1080
Environmental Considerations
Operating Temperature
Operating Humidity
Storage Temperature
Storage Humidity
50°F to 104°F (10°C to 40°C)
10% to 80%, non-condensing
-4°F to 113°F (-20°C to 45°C)
5% to 95%, non-condensing
Stand Swivel (Left / Right)
-20˚ ~ 20˚
Model Name
PN51E550
PN60E550
Screen Size
(Diagonal)
51˝ Class
(50.7˝ measured diagonally)
60˝ Class
(60.0˝ measured diagonally)
Sound
(Output)
Dimensions (W x H x D)
Body
With stand
Weight
Without Stand
With Stand
10 W X 2
47.1 x 28.1 x 2.2 inches
(1196.8 x 715.6 x 57.0 mm)
47.1 x 31.0 x 12.0 inches
(1196.8 x 787.4 x 305.0 mm)
55.0 x 32.9 x 2.2 inches
(1398.3 x 836.2 x 57.0 mm)
55.0 x 35.9 x 13.1 inches
(1398.3 x 913.0 x 335.0 mm)
46.5 lbs (21.1 kg)
55.3 lbs (25.1 kg)
66.1 lbs (30.0 kg)
77.3 lbs (35.1 kg)
Model Name
Screen Size
(Diagonal)
PN64E550
64˝ Class
(64.0˝ measured diagonally)
Sound
(Output)
10 W X 2
Dimensions (W x H x D)
Body
With stand
58.6 x 34.8 x 2.2 inches
(1488.8 x 885.8 x 57.0 mm)
58.6 x 37.8 x 13.1 inches
(1488.8 x 960.2 x 335.0 mm)
Weight
Without Stand
With Stand
✎
✎
✎
✎
79.8 lbs (36.2 kg)
91.0 lbs (41.3 kg)
Design and specifications are subject to change without prior notice.
The actual appearance of the TV may differ from the images in this manual, depending on the model.
This device is a Class B digital apparatus.
For information about the power supply, and more about power consumption, refer to the label
attached to the product.
✎ Typical power consumption is measured according to Energy Star Program requirements for
Televisions.
Dispose unwanted electronics through an approved recycler.
To find the nearest recycling location, go to our website:
www.samsung.com/recyclingdirect or call, (877) 278 - 0799
English - 35
Display Resolution
If you have attached the TV to your PC, you can select one of the standard resolutions listed in the
Resolution column. The TV will automatically adjust to the resolution you choose.
Mode
Resolution
Horizontal Frequency
(KHz)
Vertical Frequency
(Hz)
Pixel Clock Frequency
(MHz)
Sync Polarity
(H / V)
IBM
640 x 350
720 x 400
31.469
31.469
70.086
70.087
25.175
28.322
+/-/+
MAC
640 x 480
832 x 624
1152 x 870
35.000
49.726
68.681
66.667
74.551
75.062
VESA DMT
640 x 480
640 x 480
640 x 480
800 x 600
800 x 600
800 x 600
1024 x 768
1024 x 768
1024 x 768
1152 x 864
1280 x 720
1280 x 800
1280 x 1024
1280 x 1024
1366 x 768
1440 x 900
1600 x 900RB
1680 x 1050
1920 x 1080
31.469
37.861
37.500
37.879
48.077
46.875
48.363
56.476
60.023
67.500
45.000
49.702
63.981
79.976
47.712
55.935
60.000
65.290
67.500
59.940
72.809
75.000
60.317
72.188
75.000
60.004
70.069
75.029
75.000
60.000
59.810
60.020
75.025
59.790
59.887
60.000
59.954
60.000
30.240
57.284
100.000
25.175
31.500
31.500
40.000
50.000
49.500
65.000
75.000
78.750
108.000
74.250
83.500
108.000
135.000
85.500
106.500
108.000
146.250
148.500
-/-/-/-/-/-/+/+
+/+
+/+
-/-/+/+
+/+
+/+
-/+
+/+
+/+
+/+
-/+
+/+
-/+
+/+
✎ NOTE
Ř The interlaced mode is not supported.
Ř The set might operate abnormally if you select a non-standard video format.
Ř Separate and Composite modes are supported. SOG (Sync On Green) is not supported.
English - 36
Video Codec
File Extension
*.avi
*.mkv
*.asf
*.wmv
*.mp4
*.3gp
*.vro
*.mpg
*.mpeg
*.ts
*.tp
*.trp
*.m2ts
*.mts
*.webm
*.divx
Container
Video Codec
Resolution
Frame rate (fps)
Bit rate (Mbps)
Audio Codec
DIVX 3.11/4.x/5.x/6.1
MPEG4 SP/ASP
AVI
MKV
ASF
MP4
3GP
VRO
VOB
PS
TS
WebM
1920 x 1080
30
640 x 480
8
H.264 BP/MP/HP
Motion JPEG
Window Media Video v9
6 – 30
MPEG2
1920 x 1080
30
640 x 480
4
MPEG1
VP8
VP6
AC3
LPCM
ADMPCM(IMA,
MS)
AAC
HE-AAC
WMA
DD+
MPEG(MP3)
DTS Core
Voris
Other Restriction
✎ Video content will not play, or not play correctly, if there is an error in the content or the container.
✎ Sound or video may not work if the contents have a standard bit rate/frame rate above the compatible
Frame/sec listed in the table above.
✎
✎
✎
✎
If the Index Table is in error, the Seek (Jump) function is not supported.
When you play video over a network connection, the video may not be played smoothly.
The menu may take longer to appear if the video’s bit rate exceeds 10Mbps.
Some USB/digital camera devices may not be compatible with the player.
Video decoder
Ř Supports up to H.264, Level 4.1.
Ř H.264 FMO / ASO / RS, VC1 SP / MP / AP L4 and AVCHD are not supported.
Ř For all Video codecs except MVC, VP8, VP6:
− Below 1280 x 720: 60 frame max
− Above 1280 x 720: 30 frame max
− GMC is not supported.
Ř Supports only SVAF Top/Bottom and Side by Side.
Ř Supports only BD MVC Spec.
Audio decoder
Ř WMA 9, 10 Pro supports up to 5.1 channel and M2 profile (except LBR mode of M0).
Ř WMA lossless audio is not supported.
Ř If Vorbis is only in Webm container, supports up to 2 channel.
English - 37
Dimensions
■ Jack panel detail / Rear view
2
6
1
3
4
5
(Unit: inches)
Model name
1
2
3
4
5
6
PN51E550
15.7
15.7
36.3
3.9
4.8
18.8
PN60E550
15.7
23.6
40.7
7.5
7.9
20.5
PN64E550
15.7
23.6
42.4
9.2
8.9
21.4
NOTE: All drawings are not necessarily to scale. Some dimensions are subject to change without prior
notice. Refer to the dimensions prior to performing installation of your TV. Not responsible for typographical
or printed errors.
© 2012 Samsung Electronics America, Inc
English - 38
Contact SAMSUNG WORLDWIDE
If you have any questions or comments about your Samsung TV, please contact the SAMSUNG customer care center.
Country
Customer Care Center
1-800-SAMSUNG (726-7864)
Web Site
Address
CANADA
www.samsung.com
U.S.A
1-800-SAMSUNG (726-7864)
www.samsung.com
Samsung Electronics Canada Inc., Customer Service 55
Standish Court Mississauga, Ontario L5R 4B2 Canada
Samsung Electronics America, Inc. 85 Challenger Road
Ridgefield Park, NJ 07660
© 2012 Samsung Electronics Co., Ltd. All rights reserved.
BN68-04071A-00
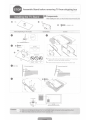
ENSAMBLE DE CLAM PER BAG (cintur6n para sostener, amarrar y enganchar cables y accesorios)
Clamper Bag assembly I Serre Ensemble de sac
S: Este material se encuentra dentro de Ia balsa de accesorios.
E: This material can be found in Assy. Accessory bag.
F: Ce materiau peut etre trouve dans Assy. sac a accessoires.
S: Antes de colocar el Clamper Bag verifique Ia condici6n fisica del Clamper Bag.
E: Please verify Clamper Bag condition before placing.
F: S'il vous plait verifier l'etat de Sac Serre avant de placer.
Clam per Bag
(BN6s-oooo3A)
S: Coloque el Clamper Bag en el orificio del Back Cover* presionando el gancho en forma de V que se introducira en el orificio.
E: Put Clam per Bag into the Back Cover hole, press the little hook into the hole. Hole for this clam per is located in the middle of Back
Cover, close to Assy Stand Base connection area.
F: Mettez Sac Serre dans le trou couvercle arriere, appuyez sur le petit crochet dans le trou. Trou pour ce dispositif de serrage est situe
dans le milieu du dos de couverture, a proximite d'Assy Stand zone de connexion de base .
...........................·t·····IL..__G_an_c_h_o_I_H_o_o_k_l_c_r_oc_h_e_t_
__,
I
~·-·-·-·-·-·-·-·-·-·-·-·-·-·-·-·-·-·-·i
Back Cover
,........,..
Orificio I Clamper
Bag hole location I
·········
Serre emplacement
du trou Sac
Clamper Bag
········......
Posicion final del Clamper I Final
position
I
La position finale
S: Clamper Bag puede ser ajustado dependiendo el usa.
*Back Cover (parte trasera de Ia television) puede variar en su diserio, pero Ia posicion del Clamper es Ia misma en cada modelo de TV.
E: Clamper Bag can be adjusted.
*Back Cover design may vary; it depends on PDP TV model and size. The location of Clam per Bag in each Back Cover is the same for
all PDP TV models.
F: Sac serrage peut etre ajustee.
* Retour Conception de Ia couverture peut varier, elle depend de Ia television PDP modele et Ia taille. L'emplacement de sac Serre dans
chaque capot arriere est Ia meme pour taus les modeles de televiseurs PDP.
BN68-04360A-OO
,.._be
1~----------------- -
A
aA
~.;;ol
-- ------- - ------ - -----------------·------------------------------------------------------------,
!! Jll!l !I!-----!@
2i .liV2I iDI f11tY ltiAI ......._ :
This product Is ltigh....,
c:a'8ful of surf1lce scratch :
~ ~ ~i8 ~.21 '!JAr. :raJtot ~Ata. ~~ ;lft:l~ ~£AI : A
while tnstaa.tlon.
:
~ {.~ t-1011~7~ ol§~tof H 4~ ~At!!-""· !! ~~ : aA tGi:l!suretDbtushdfth@<finonthepmvideddo!hbefol!doningtnecabinetFordeanmgthe:
front cabinet make 5IJT'e y!lU USfonly the piOVided doth lln which fD 5prayWi1tl!f 410 6times b ~
~~iii~} ~ ~JM W717• ~0 ~ ~I ~* ~ct. : English forewioingitoutsoftlyinonedirKtion.Aft!rdeaning.w!prthecabinettDremcM!anylnOIStiJre. :
Alltlll~e
!t ~tll.f.AI2.
:
Only ... water .. a ci....Ung solutioL
:
a
I
I
·----------------------------------------------------------·------------------------------------------------------------·
Ce produtt est NCOU¥et1 cr.. COliClie de llrlllant..........
DieMs Produlrt Mt eine hochgllnDftde Ollertl idle, die uhr
8IDC ...,..,. ;
A
II coavtent. par conMctuentt de rester vigilant
!A
I
Ieicht Ufkratzl ....... "-t, wesMib wllnnd .... Montage
bnonde.. Yonlcllt . - - ...
Vei!lez aenlever Iasaw al'aide du chlffon foumi avant de nett¥f 1e cMs.sis. Pour
Vefgewissem Sie sich. dass das mitgelef!rteTuch sauherlsl. bewr Sif es zurn Reinigen
nenoyer le meuble avant. assurez·vous de n'utiliser que le chiffon foumi. Aspergez-le •
des Gehauses ~ Zum Reinlgen del' VordeneiteYSWenden Sie bit1e nur das
Fran~IS deau 4a6 fois poisnettoyeZ en frottant dans une seule direction. Apr!s le ~ :1 Deutsch mrtgei"N!fene Tuch. auf das sie 4 bis 6 Spritzer Wasser aufuagen.Wische\ Sie dam l1l me :
essuyez 1echassis pour enlevef l'humadite.
Rid!tung VOBichtig uber die FJ:iche.Wischen Sie das Gehiuse nach c1em Retntgen uocken. :
N'utillluque de ruu conune produit de nettoyag1.
SJe ..... . . . . , a1s Rlllltl............
:
clwant
..
•
y.,....,.
·----------------------------------------------------------·------------------------------------------------------------·
II prodotto • IIIOHo Iucido IUIIa superfi de, che II pu0 .,.,. .,. :
Este prHIIctD tiiMun Ntf.am.Dto 11111J brtllante en la..,.rfl c1e
1
A
Italiano
•
:
fadlmente; occorrafareatt8nztone dwantel'lllllallaloee.
:
Primadi eff emwela pl.lf!Zladell!laio. assicu!lrSiche I pn.oappositarnenttfomilosia :
~to. Per pufire Ia pane anterior! del cabinet assicwrsi di utilizzare solo I panna fomito, :
valnerable a aralazol; lellga ..ao caladoMallte lalftltllaci6&
A Elimine" suciedad del pano Sll'ninistradoantesd! Tmpiar Ia caja. Para &mpiarel la
aA caJa frontal, asegurese de que utiliza iJnicamentl' til pano yde que lo rocia entre 4
che dowhssetesprumtod'aa!ua4o6vokepnma distroli narlodelicatamente in
•
~·ulliU direzic:lne.Dopo Ia pulizia,asciugardtelaio per riTuM!r! ognitraccia eli urnidita. : Espal'\ol
Come sostanza pulettte, uti~ solo acqua.
:
y6 ~ antesdepasaoo suavementeen una direcci6n. Despues de limpiar Ia caja.
sequela cuidadosamente para eliminar Ia humedad.
•
!
Umpie uniCMIIIIIt. con agull.
·----------------------------------------------------------·------------------------------------------------------------·
:
Este prodato pouuJ um acalt.....to lwtlhante na IUI*'fic:Je :
Ten procklkt INl powtenclullf lalderowan~t o wysoldm polylloa,
particulannent8sujelto a rlscos; ~.., tOIIIIIdas •
kt6rajest laat-&ko pOIIMI• • ..,..,...., dlatlgo •leZy
uwaiaC pod·ns montaiu.
Sacuda 0 p6 do pano fomeodo antes de limpar a caixa. Para procederafimpeza da
Pr2ed ~eniem do czyszaenia obudowy naleiy strzepaC brud zdoqaone)
1
parte frontal. certifi que-sede que utiliza apenas o panofomecido.ligelramente
szmatkl. Ooczyszoenia przedniej ~ nalezy uiywai. ~~ezalii!,CZonej szmatiU.
; Portugu6s humedKido.limpandosuavement!m.maunicad~. Depoisdalimpeza,passe
Polski ktDr.tnaleiyspryslcaC4-flrazy~a~iepmoerae~wjednym
•
um pano seco sobrt'a Cii.IXil do aparelho para rmKM!r a humidadek~erunku. Po zatonaeniu czys20I!flia wyrrr::K obud~ na sucho.
1
:
Utilize apenas llgua como sol~ de Dtnpeza.
:
Jedynym ~ Sroclldeal czys&Za~~CJIII jell wad&.
:
- ---------------------------------------------------·
:~----------------------------------------------------------·-------n0111pXIfOCTI. 8TOf'O rcTPOicTia c ............. IIOIIpltlmeM,.,.. :
Oriinilt cUIIMtiDif oa.n ,m,t ~~~~....,. DrJ1 haaatrr:
::
noqapanan;~oc:Topom~Kn>IO.,...JCtatiOIU.
:
d~lcurulum.......UdlldcatlloluRmaiNI•.
,
1
'
l,
A
aa
A
1
: PyCCIG1A
•
Midas~- duraatlt a instal~.
l'lePtA~~cmpnecHerOnWIItc~~TUHILllpM'IIICTif
:
A
aa
:
:
A
~cropoti~UOPI1)'Q~Tilllb&OI1J'~mtlb.~
yan4!Dne@e4-6pa3paaiiUIIITeMMBIW1l3aTe~6elliiiiiMX)'O'J:JM~AJM*MIIIMII: TOrtt
&Oil!!OM ~ flocneiMCilQI ~ r.opnyci!QilOAIIOfO)'P1ellllli&Banl
•
,: A
tp'Jt
:
v~~;ttrz:ci. :it&~~·ji'J''L:IUit~tJ~fii.
·
;titm~111. iiH1!R1!1ftU~*~· ~h~_tti41!J6~ . ~
:
ye
olun.Onkabini ~i9flyalnllabirliktegelen~c~Jrnaiikullanm\'tlw~4 ila6
kezsupUskrut!Ukten~tekyonliiolarak~ silin.Temizledikten sorn,nemden
a"ndvmak ~ dolabt silin.
:
:
:
,
:
Temizleme ~ olarall yalnaca 1U kull--.
·----------------------------------------------------------·------------------------------------------------------------~
:
Mcnon~e NIIIIIIICfiUII TOIIWCO IOAJ•
OolaoltemlzlemedenCince, Urilnleblrbsag!ananbezinfu~iletemizlendigindenemin
~~~.~---*·~~~~L~~.
1tfal-niolft$f.tt. ;t;E;tJit~. iiWJCW!f~e<J*ift·
R~fiifi*tF;t};J~~ll.
'
~llllln lll~lllt~~~~~~~~~~~~~n
BN63-02368B-OO
This symbol indicates that high voltage is present
inside. It is dangerous to make any kind of contact
with any internal part of this product.
CAUTION: TO REDUCE THE RISK OF ELECTRIC SHOCK, DO NOT
REMOVE COVER (OR BACK). THERE ARE NO USER SERVICEABLE
PARTS INSIDE. REFER ALL SERVICING TO QUALIFIED PERSONNEL.
This symbol alerts you that important literature
concerning operation and maintenance has been
included with this product.
• The slots and openings in the cabinet and in the back or bottom are provided for necessary ventilation. To ensure reliable operation of this
apparatus, and to protect it from overheating, these slots and openings must never be blocked or covered.
- Do not cover the slots and openings with a cloth or other materials.
- Do not block the slots and openings by placing this apparatus on a bed, sofa, rug or other similar surface.
- Do not place this apparatus in a confmed space, such as a bookcase, or built-in cabinet, unless proper ventilation is provided.
• Do not place this apparatus near or over a radiator or heat resistor, or where it is exposed to direct sunlight.
• Do not place a water containing vessel(vases etc.) on this apparatus, as this can result in a risk of fire or electric shock.
• Do not expose this apparatus to rain or place it near water(near a bathtub, washbowl, kitchen sink, or laundry tub, in a wet basement, or
near a swimming. pool etc.). If this appratus accidentally gets wet, unplug it and contact an authorized dealer immediately.
Make sure to pull out the power cord from the outlet before cleaning.
• This appratus uses batteries. In your community there might be regulations that require you to dispose of these batteries properly under
environmental considerations. Please contact your local authorities for disposal or recycling information.
• Do not overload wall outlets, extension cords or adaptors beyond their capacity, since this can result in fire or electric shock.
• Power-supply cords should be routed so that they are not likely to be walked on or pinched by items placed upon or against them, paying
particular attention to cords at plug end, adaptors and the point where they exit from the appliance.
• To protect this apparatus from a lightning storm, or when it is left unattended and unused for long periods of time, unplug it from the wall
outlet and disconnect the antenna or cable system. This will prevent damage to the set due to lightning and power line surges.
• Before connecting the AC power cord to the DC adaptor outlet, make sure the voltage designation of the DC adaptor corresponds to the
local electrical supply.
• Never insert anything metallic into the open parts of this apparatus. Doing so many create a danger of electric shock.
• To avoid electric shock, never touch the inside of this apparatus. Only a qualified technician should open this apparatus.
• Make sure to plug the power cord in until it is fmnly inserted. When removing the power cord, make sure to hold the power plug when
pulling the plug from the outlet. Do not touch the power cord with wet hands.
• If this appratus does not operate normally - in particular, if there are any unusual sounds or smells coming from it
- unplug it immediately and contact an authorized dealer or service center.
• Be sure to pull the power plug out of the outlet if the TV is to remain unused or if you are to leave the house for an extended period of
time (especially when children, elderly or disabled people will be left alone in the house).
- Accumulated dust can cause an electric shock, an electric leakage or a fire by causing the power cord to generate sparks and heat or the
insulation to deteriorate.
• Be sure to contact an authorized service center, when installing your set in a location with heavy dust, high or low temperatures, high
humidity, chemical substances and where it operates for 24 hours such as the airport, the train station etc.
Failure to do so may cause serious damage to your set.
• Use only a properly grounded plug and receptacle.
- An improper ground may cause electric shock or equipment damage. (Class I Equipment only.)
• To disconnect the apparatus from the mains, the plug must be pulled out from the mains socket, therefore the mains plug shall be readily
operable.
• Do not allow children to hang onto the product.
• Store the accessories (battery, etc.) in a location safely out of the reach of children.
• Do not install the product in an unstable location such as a shaky self, a slanted floor or a location exposed to vibration.
• Do not drop or impart any shock to the product. If the product is damaged, disconnect the power cord and contact a service center.
• Unplug the power cord from the power outlet and wipe the product using a soft, dry cloth. Do not use any chemicals such as wax, benzene,
alcohol, thinners, insecticide, air freshener, lubricant or detergent. This may damage the appearance or erase the printing on the product.
• Apparatus shall not be exposed to dripping or splashing.
• Do not dispose of batteries in a fire.
• Do not short circuit, disassemble or overheat the batteries.
• Danger of explosion if battery is incorrectly replaced. Replace only with the same or equivalent type.
• W ARNlNG- TO PREVENT THE SPREAD OF FIRE, KEEP CANDLES OR OTHER OPEN FLAMES AWAY
FROM THIS PRODUCT AT ALL TIMES.
-English-
Regulatory Compliance Statements
- Federal Communications Commission (FCC)- USA
-Industry Canada Equipment Standard for Digital Equipment (ICES-003)- Canada
- Voluntary Control Council for Interference (VCCI) - Japan
- Bureau of Standards Metrology and Inspection (BSMI) - Taiwan
- Korea Communications Commission(KCC) - Republic of Korea
-Italian Post Ministry (Homologation)- Italy
FCC Class A Notice
This device complies with part 15 of the FCC Rules. Operation is subject to the following two conditions:
1. This device may not cause harmful interference, and
2. This device must accept any interference received, including interference that may cause undesired operation.
NOTE:
This equipment has been tested and found to comply with the limits for a Class A digital device, pursuant to Part 15 of the FCC
Rules. These limits are designed to provide reasonable protection against harmful interference when the equipment is operated
in a commercial environment. This equipment generates, uses, and can radiate radio frequency energy and, if not installed and
used in accordance with the instruction manual, may cause harmful interference to radio communications.
Operation of this equipment in a residential area is likely to cause harmful interference in which case the user will be required to
correct the interference at his own expense.
FCC Class B Notice
This device complies with part 15 of the FCC Rules. Operation is subject to the following two conditions:
1. This device may not cause harmful interference, and
2. This device must accept any interference received, including interference that may cause undesired operation.
NOTE:
This equipment has been tested and found to comply with the limits for a Class B digital device, pursuant to Part 15 of the FCC
Rules. These limits are designed to provide reasonable protection against harmful interference in a residential installation. This
equipment generates, uses and can radiate radio frequency energy and, if not installed and used in accordance with the
instructions, may cause harmful interference to radio communications. However, there is no guarantee that interference will not
occur in a particular installation. If this equipment does cause harmful interference to radio or television reception, which can be
determined by turning the equipment off and on, the user is encouraged to try to correct the interference by one or more of the
following measures:
-- Reorient or relocate the receiving antenna.
-- Increase the separation between the equipment and receiver.
--Connect the equipment into an outlet on a circuit different from that to which the receiver is connected.
-- Consult the dealer or an experienced radio/TV technician for help.
User Information
Changes or modifications not expressly approved by the party responsible for compliance could void the user's authority to
operate the equipment. If necessary, consult with your dealer or an experienced radio/television technician for additiona
suggestions. You may find the booklet called How to Identify and Resolve Radio/TV Interference Problems helpful.
This booklet was prepared by the Federal Communications Commission. It is available from the U.S. Government Printing Office.
Washington, DC 20402, Stock Number 004-000-00345-4.
The party responsible for product compliance:
SAMSUNG ELECTRONICS CO., LTD.
America QA Lab of Samsung
3351 Michelson Drive
Suite #290, Irvine, CA92612 USA
Warning
User must use shielded signal interface cables to maintain FCC compliance for the product.
Provided with this monitor is a detachable power supply cord with IEC320 style terminations.
It may be suitable for connection to any UL Listed personal computer with similar configuration.
Before making the connection, make sure the voltage rating of the computer convenience outlet is the same as the monitor and
that the ampere rating of the computer convenience outlet is equal or exceeds the monitor voltage rating.
For 120 Volt applications, use only UL Listed detachable power cord with NEMA configuration 5-15P type(parallel blades) plug
cap. For 240 Volt applications use only UL Listed detachable power supply cord with NEMA configuration 6-15P type
(tandem blades) plug cap.
This television receiver provides display of television closed captioning in accordance with Section 15.119 of the FCC rules.
(TV broadcast receivers with picture screens 13 inches or larger in diameter models only)
/CES-003 Class A Notice- Avis NMB-003, Classe A
This Class A digital apparatus complies with Canadian ICES-003.
Cet appareil numerique de Ia classe A est conforme a Ia norme NMB-003 du Canada.
/CES-003 Class B Notice - Avis NMB-003, C/asse B
This Class B digital apparatus complies with Canadian ICES-003.
Cet appareil numerique de Ia classe B est conforme a Ia norme NMB-003 du Canada.
VCCI Class A Notice
.:: (])~-f;t, ? 7 7-.A
~lllttf*i~tl:~9 o
.:: (])~fl ~~Jillltt~ilm9 ~ t: -~~w ~ s 1~~.:: 9.:: t: tl· ~ L.J *9 o
.:: (])fl~l::f;tilm:ftt.J<iitJ.Jt~~• ~~9 ~ J:? ~* 2: n~.:: t: t.J<~ L.J *9 0
VCCI Class B Notice
.:: (])~ffl;i:, ? 7 A. B 11lllttf*i~TI~9 o
.:: (])~11f;t, ~JilJI±l~ilJf.l9 ~.:: l:: ~ El tf.J l:: L -c L' *9"/J<, .:: (])~flt.J<7 ://j-~7" L..tt::' :/ 3 ~:i:i~t~f::ilitl L -c
ilm 2:n~ t: .. :W:mlllW~sl ~~.:: 9.:: t: t.J<~ L.J *9 o nm~a..ij•f=Ut? -cl£ L "'liX L.J t&L '~ L -c""F 2: "'o
CCC Class A notice - China
!lt79A~tz:~. t£:£m;;ffir:p. ~tz:~ PJ~~~~J£7C~~~m o
B: ~#M&~. PJ~~~ffl~~~~m*~W ~ PJfr~m~ o
SSM/ Class A Notice
The following statement is applicable to products shipped to Taiwan and marked as Class A on the product
compliance label.
~-a~mt3:
~~~••mm~£·tr@tt$~~~m~·~~-~~Mm~•·tr~&m~~·
~m~•~•*~~~®~~~fim o
European Notice(Europe Only)
-
(E
Products with the CE marking comply with the EMC Directive(2004/1 08/EC) and the Low Voltage
Directive(2006/95/EC) issued by the Commission of the European Community.
Compliance with these directives implies conformity to the following European Norms:
EN55022: Radio Frequency Interference
EN55024: Electromagnetic Immunity of Information Technology Equipment
EN61 000-3-2: Power Line Harmonics
EN61 000-3-3: Voltage Fluctuations
EN55013: Radio disturbance characteristics of broadcast receivers and associated equipments
EN55020: Electromagnetic immunity of broadcast receivers and associated equipments
European Class A Warning
(If the user manual declares the product as Class A, following statement applies.)
This is a class A product. In a domestic environment this product may cause radio interference in which case the
user may be required to take adequate measures.
As 7/7/(gj.Ep.~ ~~gt.f7/XfXH)
017171~ ~¥~A~) ~:A~n~~~717I~Ai ~DH:A~ EE.~ A~:A~~
7~£12.1 :AI~OiiAi A~oi-E ~~ ~~.2.£ gtqc~.
Ol
~~ 2?-2.1o~AI7II::j~2.~~.
BE- 7/7/(7~~ ~~gt}7/XfXH)
017171~ 7~~~8~) ~:A~~~gj-717I~Ai 2?-~ 7~0i1Ai A~o~ ~~ ~~.2.£ o~~. 2~ :AI~OiiAi A~~* <U~LICL
Italian Homologation Notice
Questa apparecchio e fabbricato in conformita al D.M.28.08.95 n.548
ed in particolare a quanta specificato nell Art.2, comma 1.
Questa apparecchio e fabbricato nella U.E. in conformita al D.M.28.08.95 n.548
Art.2, comma 1 ed al D.M.26.03.92 Art.1
-. For products produced in countries except European Community
Questa apparecchio e fabbricato in conformita al D.M.28.08.95 n.548
ed in particolare a quanta specificato nell Art.2, comma 1.
-. For products produced in European Community
Questa apparecchio e fabbricato nella U.E. in conformita al D.M.28.08.95 n.548
Art.2, comma 1 ed al D.M.26.03.92 Art.1
Important Safety lnstructions(UL Only)
1)
2)
3)
4)
5)
6)
7)
8)
9)
10)
11)
12)
13)
14)
Read these instructions.
Keep these instructions.
Heed all warnings.
Follow all instructions.
Do not use this apparatus near water.
Clean only with dry cloth.
Do not block any ventilation openings, Install in accordance with the
manufacturer's instructions.
Do not install near any heat sources such as radiators, heat registers, stoves,
or other apparatus (including amplifiers) that produce heat.
Do not defeat the safety purpose of the polarized or grounding-type plug. A polarized plug has two
blades with one \vider than the other. A grounding type plug has two blades and a third grounding prong.
The wide blade or the third prong are provided for your safety. If the provided plug does not fit into your outlet,
consult an electrician for replacement of the obsolete outlet.
Protect the power cord from being walked on or pinched particularly at plugs, convenience receptacles. and the
point where they exit from the apparatus.
Only use attachments/accessories specified by the manufacturer.
Use only with cart, stand, tripod, bracket, or table specified by the manufacturer. or sold with the apparatus.
When a cart is used, use caution when moving the cart/apparatus combination to avoid injury from tip-over.
Unplug this apparatus during lightning storms or when unused for long periods of time.
Refer all servicing to qualified service personnel. Servicing is required when the apparatus has been damaged in
any \\'ay. such as power-supply cord or plug is damaged, liquid has been spilled or objects have fallen into the
apparatus, the apparatus has been exposed to rain or moisture, does not operate normally, or has been dropped.
• Ventilation
Do not place the apparatus in a rack or bookcase. Ensure that there is adequate ventilation and that you've
followed that manufacturer's instructions for mounting and installation.
This monitor complies with SWEDAC(MPR II) recommendations for reduced electric and magnetic fields.
Contains Mercury, Dispose According to Local, State or Federal Laws
I 1111111111111111111111111
AA68-03242L-08
5 GREAT REASO S
SWITCHING
DIRECTV:
DIRECTV delivers more full-time HD channels
than any other cable or satellite providerover 170-includinglocal channels plus the most
sportsPYou'll also get access to the most mov1es
10 1080p' w1lh Dolby- Dig1talS.l Surround Sound.'
for a viewing experience that redefines
home entertainment!
Plus, get up to 47 FREE premium channels for
3 months with the CHOICE~ package or higher!
•
f)t:iifu·''dii"''i·M«#i-·
X
X
Sharpest picture available with the most movies in 1080p,'
many with Dolby- Digital5.1 Surround Sound'
X
X
Exclusive sports packages: NFL SUNDAY TICKET,~ NASCAR HotPass•>
X
X
X
X
X
X
X
X
··--·...
Get bundled Internet and phone services coast-to-coast
with top names like AT&T!" Centurylintt- and Verizon•u
s.e
l Offer. : 205
5
When you use the new DIRECTV HI-DEF GUIDE.
you'll spend less time searching and more time
watching! With faster scrolling, smarter
searching, and a sleeker design, our new HD
on-screen guide makes controllmg your TV
an intuitive and enjoyable experience!•
-·-;>-
Bring home the ultimate television experience.
__ css
n Sports
., HD C ~an nels
From your favonte teams
to your fantasy teams,
DIRECTV sports coverage
is undefeated.>
No equ1pment to buy.
FREE professional Installation.
More of the
channels you really
want to watch in
full-time HD!
SAVE $120 WHEN YOU CALL THIS DEDICATED NUMBER: 1-888-778-8797
-JOIOiloll>tl~ri·IIH(Nl_o
~ •
. -
#- ~ li3S
lilllltiiAMERICA
ffi'w
-
EriiO!'.;,!i
Nclt
BEr*
-lrl!.~~
12.
.-m
tH,
M
~
C·SPAN
•
liE
/Jft·_.
current
.... 2' _ _ .........
iiiJ
l$J
=
¥II
~ e::::::::l1
IOIETIIIIIIIS
t=rui!
10150
llllil'J::\t
SAMSUNG BRAND PRODUCTS
LIMITED WARRANTY TO ORIGINAL PURCHASER
This SAMSUNG brand product, as supplied and distributed by SAMSUNG and delivered new, in the original carton to the original
consumer purchaser, is warranted by SAMSUNG against manufacturing defects in materials and workmanship for a limited warranty
period of: (90 Days Parts and Labor for Commercial Use)
Categories
Parts
Labor
LCD/LED TV
1 Year
1 Year
Plasma Display
Projector (Excluding Lamp**)
1 Year
2Year
1 Year
2Year
PICO & LED Pocket Projector
1 Year
1 Year
Size
40" and Larger
37" and Smaller
All
Service
All
Carry-In or In Home
Carry-In
Carry-In or In Home
Carry-In or Pick up
All
Carry-In or Pick up
** 180 Days after Purchasing and 600 Hours of Use Lamp on Projector
This limited warranty begins on the original date of purchase, and is valid only on products purchased and used in the United States. To
receive warranty service, the purchaser must contact SAMSUNG for problem determination and service procedures. Warranty service can
only be performed by a SAMSUNG authorized service center. The original dated bill of sale must be presented upon request as proof of
purchase to SAMSUNG or SAMSUNG's authorized service center.
SAMSUNG will repair or replace this product, at our option and at no charge as stipulated herein, with new or reconditioned parts or
products if found to be defective during the limited warranty period specified above. All replaced parts and products become the property
of SAMSUNG and must be returned to SAMSUNG. Replacement parts and products assume the remaining original warranty, or ninety (90)
days, whichever is longer.
Certain products are eligible for In-home service at Samsung's discretion. To receive in-home service, the product must be unobstructed
and accessible to service personnel. If during in-home service repair can not be completed, it may be necessary to remove, repair and
return the product. If in-home service is unavailable, SAMSUNG may elect, at our option, to provide for transportation of our choice
to and from a SAMSUNG authorized service center. Otherwise, and for 37" and smaller LCD/LED TV, transportation to and from the
SAM SUNG authorized service center is the responsibility of the purchaser.
This limited warranty covers manufacturing defects in materials and workmanship encountered in normal, and except to the extent
otherwise expressly provided for in this statement, noncommercial use of this product, and shall not apply to the following, including, but
not limited to: damage which occurs in shipment; delivery and installation; applications and uses for which this product was not intended;
altered product or serial numbers; cosmetic damage or exterior finish; accidents, abuse, neglect, fire, water, lightning or other acts of
nature; use of products, equipment, systems, utilities, services, parts, supplies, accessories, applications, installations, repairs, external
wiring or connectors not supplied or authorized by SAMSUNG which damage this product or result in service problems; incorrect
electrical line voltage, fluctuations and surges; customer adjustments and failure to follow operating instructions, cleaning, maintenance
and environmental instructions that are covered and prescribed in the instruction book; reception problems and distortion related to
noise, echo, interference or other signal transmission and delivery problems; brightness related to normal aging, or burned-in images.
SAMSUNG does not warrant uninterrupted or error-free operation of the product.
THERE ARE NO EXPRESS WARRANTIES OTHER THAN THOSE LISTED AND DESCRIBED ABOVE, AND
NO WARRANTIES WHETHER EXPRESS OR IMPLIED, INCLUDING, BUT NOT LIMITED TO, ANY IMPLIED
WARRANTIES OF MERCHANTABILITY OR FITNESS FOR A PARTICULAR PURPOSE, SHALL APPLY AFTER
THE EXPRESS WARRANTY PERIODS STATED ABOVE, AND NO OTHER EXPRESS WARRANTY OR GUARANTY
GIVEN BY ANY PERSON, FIRM OR CORPORATION WITH RESPECT TO THIS PRODUCT SHALL BE BINDING ON
SAMSUNG. SAMSUNG SHALL NOT BE LIABLE FOR LOSS OF REVENUE OR PROFITS, FAILURE TO REALIZE
SAVINGS OR OTHER BENEFITS, OR ANY OTHER SPECIAL, INCIDENTAL OR CONSEQUENTIAL DAMAGES.
CAUSED BY THE USE, MISUSE OR INABILITY TO USE THIS PRODUCT, REGARDLESS OF THE LEGAL THEORY
ON WHICH THE CLAIM IS BASED, AND EVEN IF SAMSUNG HAS BEEN ADVISED OF THE POSSIBILITY OF
SUCH DAMAGES. NOR SHALL RECOVERY OF ANY KIND AGAINST SAMSUNG BE GREATER IN AMOUNT
THAN THE PURCHASE PRICE OF THE PRODUCT SOLD BY SAMSUNG AND CAUSING THE ALLEGED DAMAGE.
WITHOUT LIMITING THE FOREGOING, PURCHASER ASSUMES ALL RISK AND LIABILITY FOR LOSS,
DAMAGE OR INJURY TO PURCHASER AND PURCHASER'S PROPERTY AND TO OTHERS AND THEIR PROPERTY
ARISING OUT OF THE USE, MISUSE OR INABILITY TO USE THIS PRODUCT SOLD BY SAMSUNG NOT CAUSED
DIRECTLY BY THE NEGLIGENCE OF SAMSUNG. THIS LIMITED WARRANTY SHALL NOT EXTEND TO ANYONE OTHER
THAN THE ORIGINAL PURCHASER OF THIS PRODUCT, IS NONTRANSFERABLE AND STATES YOUR EXCLUSIVE
REMEDY.
Some states do not allow limitations on how long an implied warranty lasts, or the exclusion or limitation of incidental or consequential
damages, so the above limitations or exclusions may not apply to you. This warranty gives you specific legal rights, and you may also
have other rights which vary from state to state.
To obtain warranty service, please contact SAMSUNG at:
Samsung Electronics America, Inc.
85 Challenger Road
Ridgefield Park, NJ 07660-2112
1-800-SAMSUNG (7267864)- www.samsung.com
1-800-749-0260: Only Projector
IMPORTANT WARRANTY INFORMATION REGARDING TELEVISION FORMAT VIEWING
Standard screen format televisions (4:3, the aspect ratio of the screen width to height) are primarily designed to view standard fonnat full-motion video.
The images displayed on them should primarily be in the standard 4:3 ratio fonnat and constantly moving. Displaying stationacy graphics and images on screen, such
as the dark tql and bottom letterbox bars (wide screen pictures), should be limited to no more than 15% ofthe total television viewing per week
Wide screen fonnat televSons (16:9, the aspect ratio of the screen width to height) are primarily designed to view wide screen format full-motion video.
The images displayed on them should primarily be in the wide screen 16:9 ratio fonnat, or expanded to fill the screen ifyour model offas this feature, and constantly
moving. Displaying stationary graphics and images on screen, such as the dark side-bars on 11011-expanded standard fonnat television video and progrnmming, should
be limited to no more than 15% ofthe total television viewing per week
Additionally, viewing other stationary images and text such as stock marlret reports, video game displays, station logos, web sites or computer graphics and patterns,
should be limited as descnbed above for all televisions. Displaying any stationary images that excero the above guidelines can cause uneven aging of Plasma Display
Panels that leave subtle, but pennanent burned-in ghost images in the television picture. To avoid this, vazy the progrnnnning and images, and primarily display full
screen moving images, not stationary patterns or dark bars. On television models that offer picture sizing features, use these controls to view the different fonnats as a
full screen picture.
Be careful in the selection and duration of televRon fonnats used for viewing. Uneven Plasma Display Paneh aging as a result of fonnat selection and use,
as well as other burned-in images, is not coverro by your Samsung limited warranty.
I 1111111111111111111111111
BP68-00263 E-03